AWS TAMS Sample Scripts
The AWS TAMS sample scripts are a set of Python scripts designed to walk through the process of connecting to a store, listing the content present, and then creating a simple piece of content. An initial set of media chunks have been provided for the test content.
To use the scripts, you will need a suitable environment with Python installed.
Adding Credentials
The first stage is to obtain the credentials for the store that you are working with. If this is the AWS Open Source implementation, the default authentication provider is Amazon Cognito.
There are two methods of creating credentials in the AWS Open Source store:
Create a new App Client in Amazon Cognito in the appropriate user pool.
Use the AWS CloudFormation template supplied in the repo, which simplifies the credential creation process.
Locate and open the credentials.py file. This will be used to store key variables relating to the location and authentication with the TAMS store.
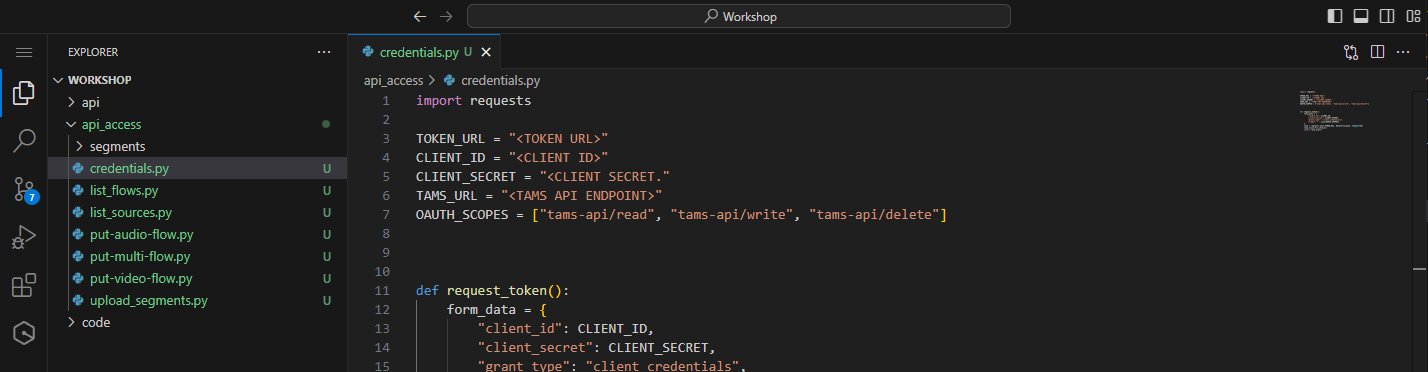
Figure 30: Credentials file awaiting details
Replace the following:
<TOKEN URL>with theTokenUrlfrom the CloudFormation output<CLIENT ID>with theClient IDfrom Amazon Cognito<CLIENT SECRET>with theClient Secretfrom Amazon Cognito<TAMS URL>with theApiEndpointfrom the CloudFormation output
In the your choice of terminal, run the following command to show you can connect to the store:
python get-service.py
This will run a script to access the /service endpoint on the deployed TAMS instance and return the output.
You should see a response similar to:

Figure 31: Response from the API service endpoint
This means that you have successfully connected to the store.
Create the Video Flow
Locate and open the put-video-flow.py file. This contains the code and JSON request to create a new video flow within the TAMS store. The code will automatically create the UUID’s required for both the video flow and corresponding source as well as call the TAMS API directly.
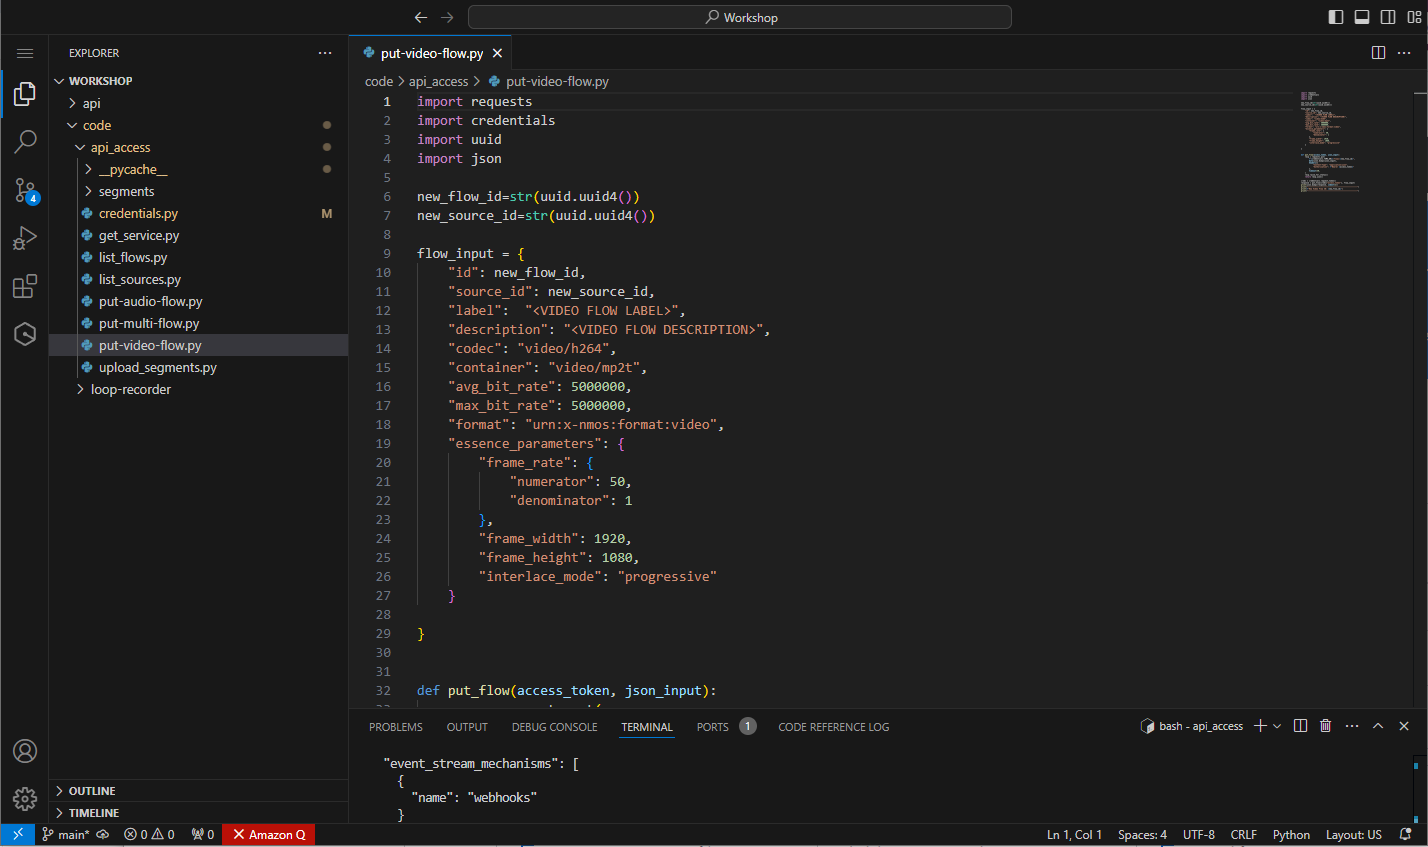
Figure 32: Supplied put video flow file
Update the following entries:
- Replace
<VIDEO FLOW LABEL>with an appropriate name, for example,My First Video Flow - Replace
<VIDEO FLOW DESCRIPTION>with a suitable description, for example,Manually created item
To run the file, first ensure the terminal session is in the correct folder. Then, type the following command:
python put-video-flow.py
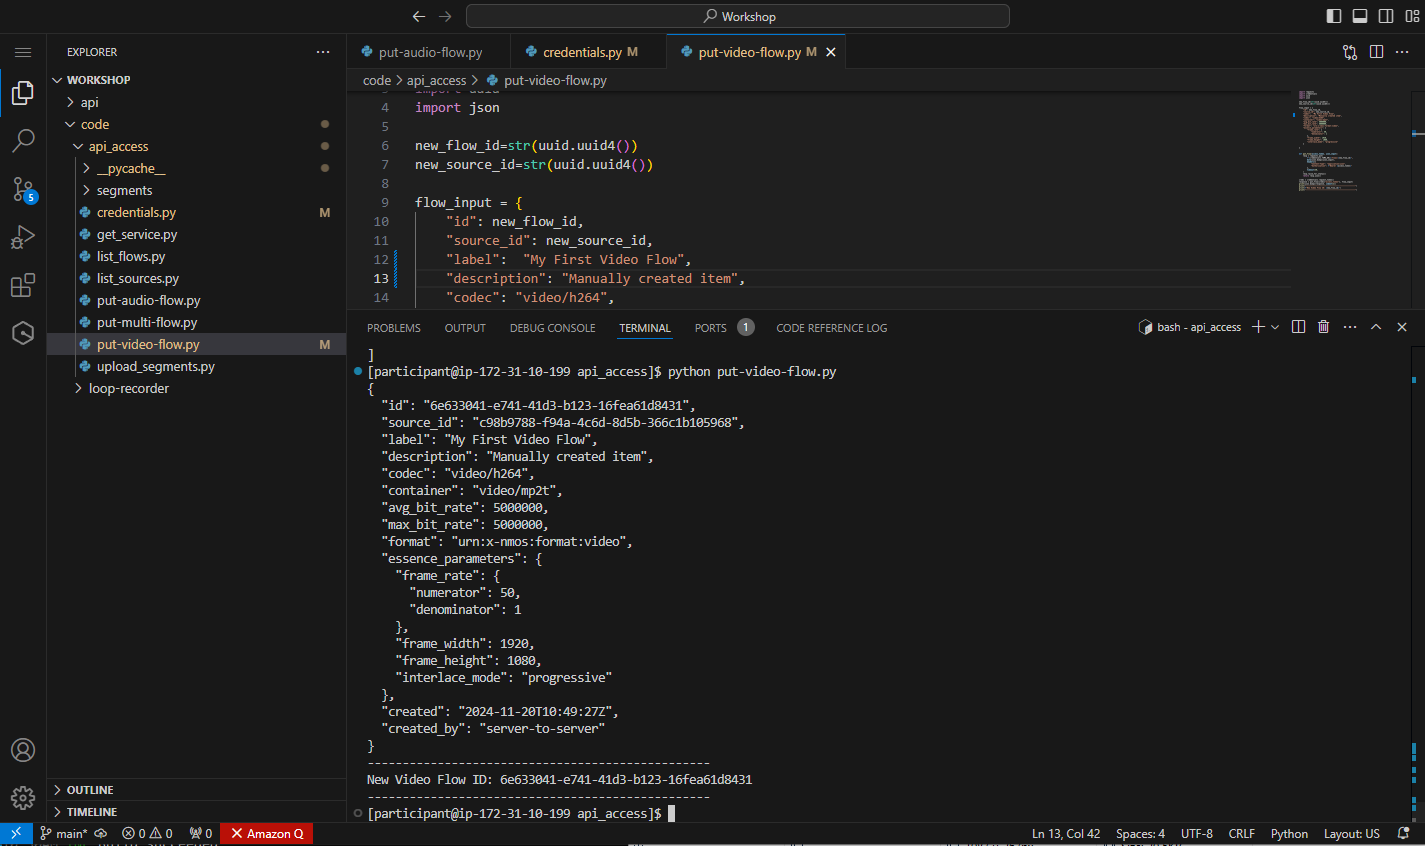
Figure 33: Response from creating the video flow
In the terminal window, you will see the JSON response back from the TAMS API, which should match the input plus additional files including created and created_by, which are managed by the API directly.
The output of the script will also include the ID for the new video flow. Copy this value to somewhere secure, as you will require it to create the multi-flow at a later stage.
At any point, you can list the flows in the TAMS store by running the following:
python list-flows.py
At this stage, you should only be returned the one video flow that you have created in the system. You can also list the sources within the TAMS store by running:
python list-sources.py
In this case, you should see one video source which was created automatically by the TAMS store as a result of creating the new video flow.
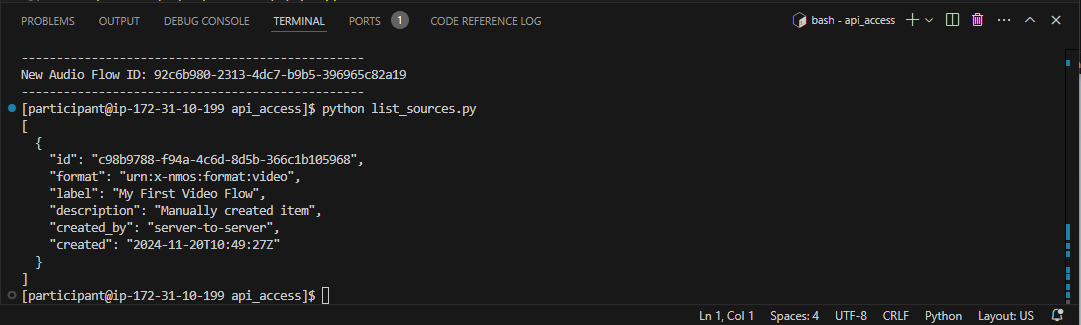
Figure 33: Response from listing sources
Create Audio Flow
The same process needs to be carried out to create the audio flow.
Open put-audio-flow.py. In this file, the JSON for creating the flow is sent to the same endpoint, but the fields required have been updated to reflect the audio essence. So the type is audio, and the details now include the sample rate and the number of audio channels present.
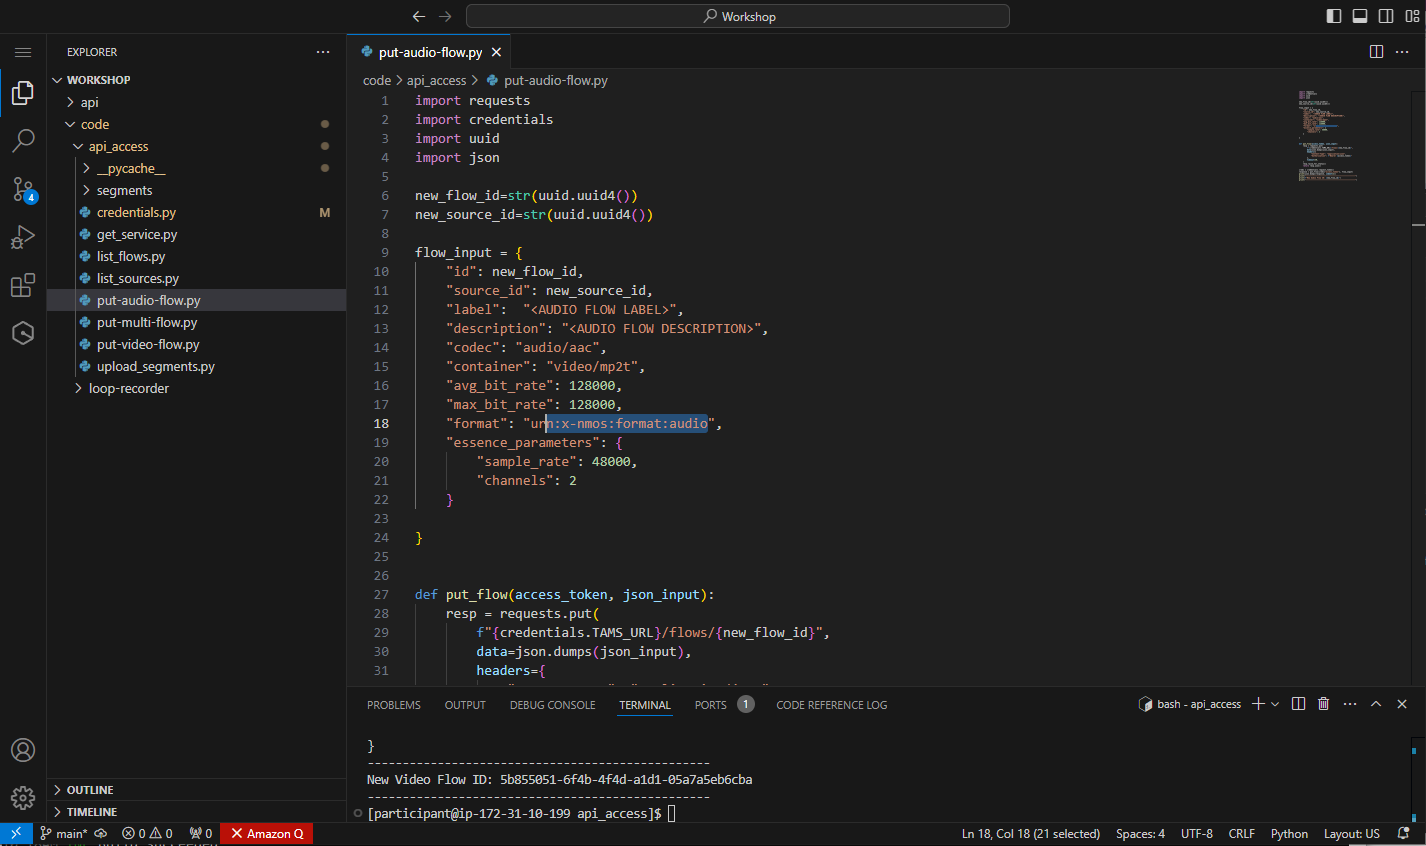
Figure 34: Supplied put audio flow file
Update the following entries:
- Replace
<AUDIO FLOW LABEL>with an appropriate name, for example,My First audio Flow - Replace
<AUDIO FLOW DESCRIPTION>with a suitable description, for example,Another manually created item
To run the file, first ensure the terminal session is in the correct folder. Then, type the following command:
python put-audio-flow.py
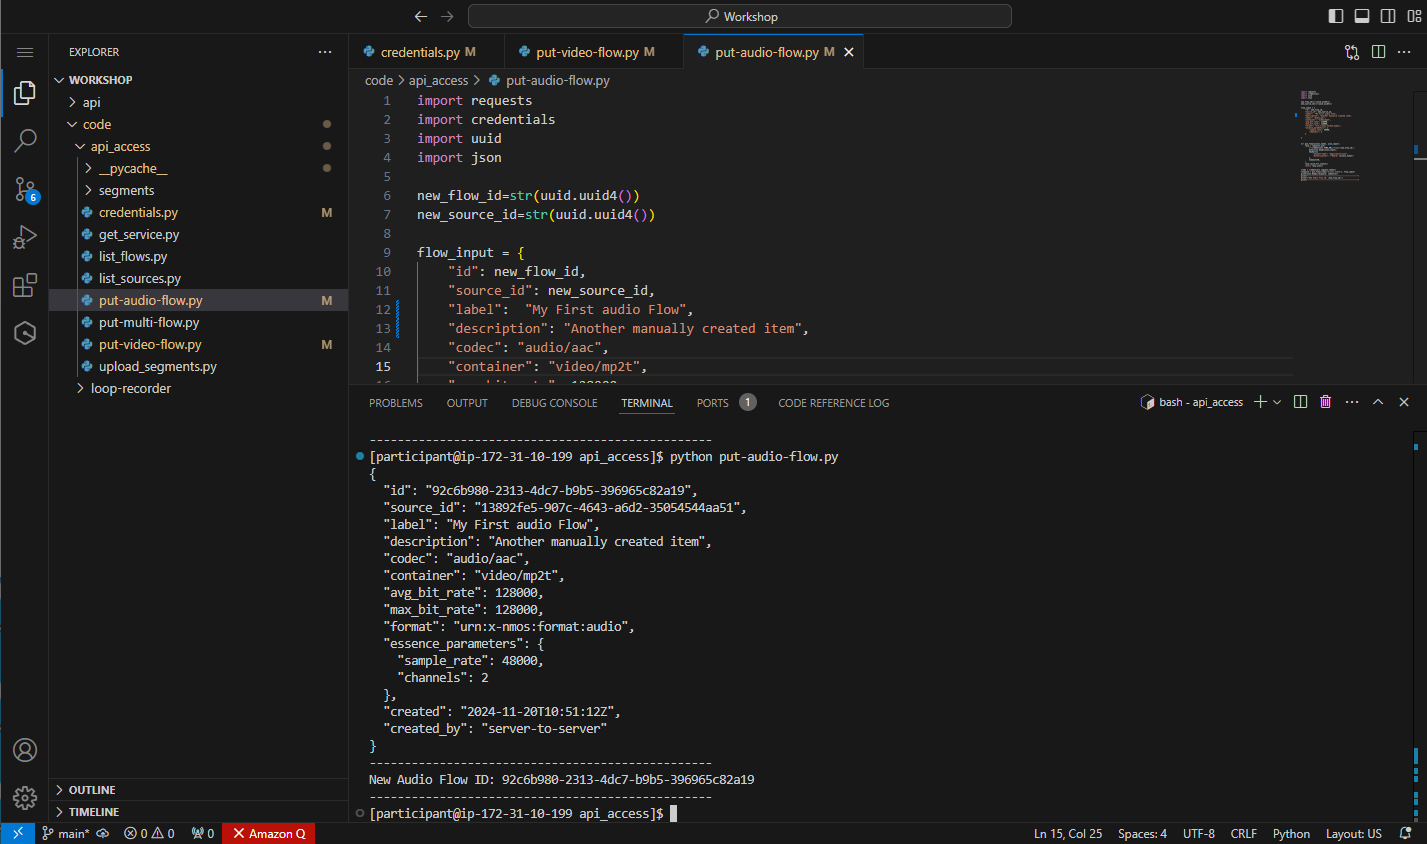
Figure 34: Response from creating the audio flow
The output of the script will also include the ID for the new audio flow. Copy this value to somewhere safe as you will require it along with the video flow ID to create the multi-flow in the next step.
At any point, you can list the flows in the TAMS store by running the following:
python list-flows.py
You should now see two flows returned: the video flow from the previous step and the audio flow you just created.
You can also list the sources within the TAMS store by running:
python list-sources.py
In this case, you should see two sources: the previous video source and the new audio source created from the audio flow.
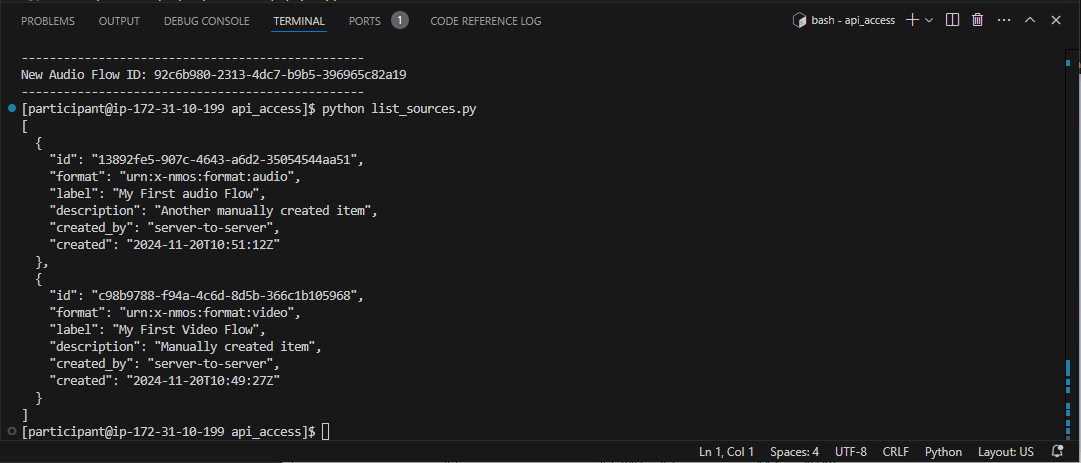
Figure 35: Response from listing sources
Create the Multi-Flow
To link together the audio and video from the separate flows, it is necessary to create a multi-essence flow and then declare that it collects the video and audio flows we created previously.
Open put-multi-flow.py
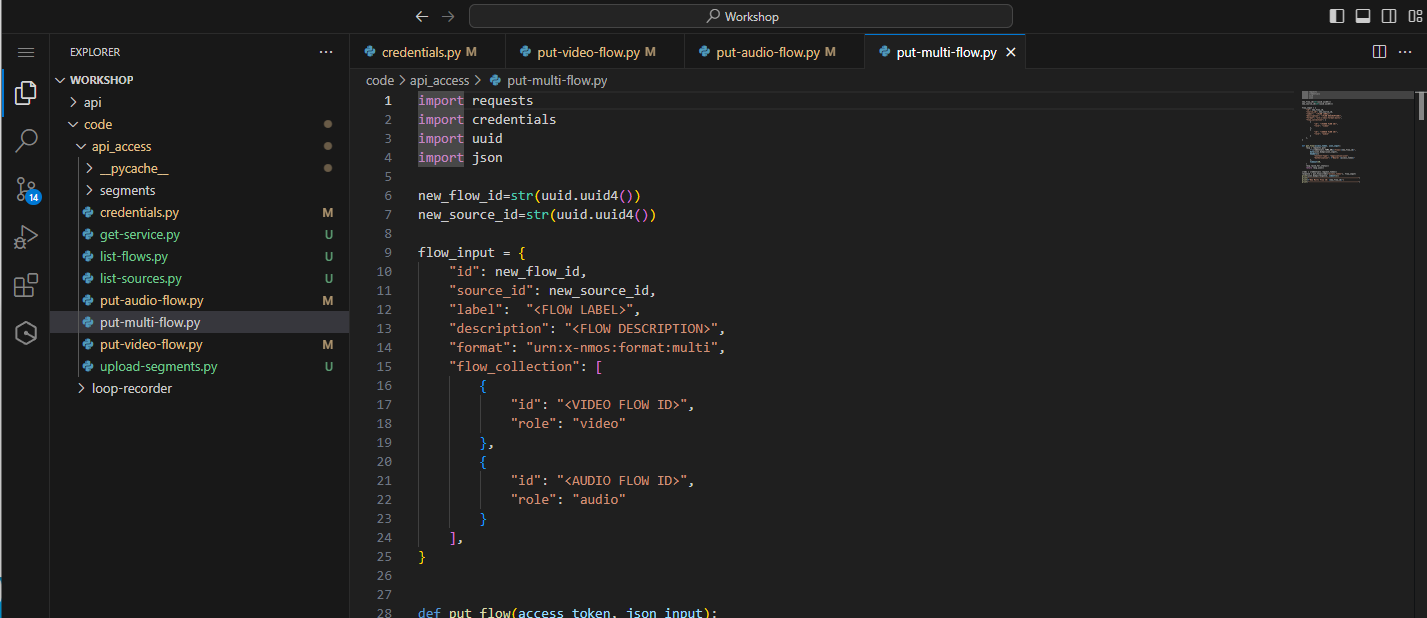
Figure 36: Supplied put multi flow file
Update the following entries:
- Replace
<FLOW LABEL>with an appropriate name, for example,My First multi essence flow - Replace
<FLOW DESCRIPTION>with a suitable description, for example,Manually created multi item - Replace
<VIDEO FLOW ID>with the ID of the video flow that you created earlier - Replace
<AUDIO FLOW ID>with the ID of the audio flow that you created in the previous step
If you have lost the flow IDs that you created, you can find them again by running the list-flows.py script to list the content in the store.
Create the multi-essence flow by typing the following command in the terminal:
python put-multi-flow.py
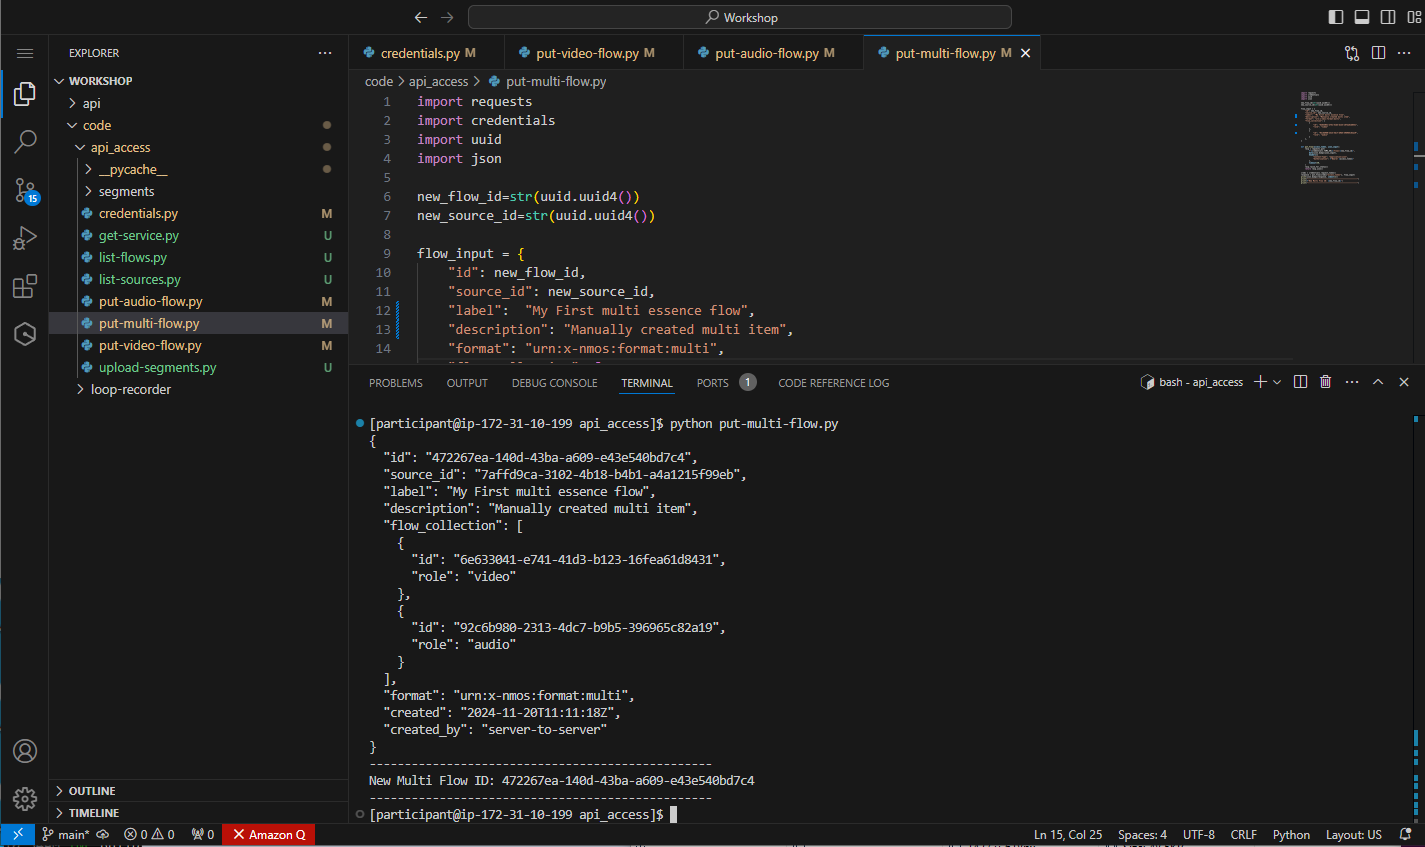
Figure 37: Response from creating the multi flow
The output will show the response from the API, including the references to the audio and video flows.
List the flows within the store by running:
python list-flows.py
You should see an output similar to the following. It should include all three flows that were created. You will also notice that while the collection information was only created against the multi-flow, this relationship has been replicated to the audio and video flow items.
[
  {
    "id": "472267ea-140d-43ba-a609-e43e540bd7c4",
    "source_id": "7affd9ca-3102-4b18-b4b1-a4a1215f99eb",
    "label": "My First multi essence flow",
    "description": "Manually created multi item",
    "created_by": "server-to-server",
    "created": "2024-11-20T11:11:18Z",
    "flow_collection": [
      {
        "id": "6e633041-e741-41d3-b123-16fea61d8431",
        "role": "video"
      },
      {
        "id": "92c6b980-2313-4dc7-b9b5-396965c82a19",
        "role": "audio"
      }
    ],
    "format": "urn:x-nmos:format:multi"
  },
  {
    "id": "6e633041-e741-41d3-b123-16fea61d8431",
    "source_id": "c98b9788-f94a-4c6d-8d5b-366c1b105968",
    "label": "My First Video Flow",
    "description": "Manually created item",
    "created_by": "server-to-server",
    "created": "2024-11-20T10:49:27Z",
    "codec": "video/h264",
    "container": "video/mp2t",
    "avg_bit_rate": 5000000,
    "max_bit_rate": 5000000,
    "collected_by": [
      "472267ea-140d-43ba-a609-e43e540bd7c4"
    ],
    "format": "urn:x-nmos:format:video",
    "essence_parameters": {
      "frame_rate": {
        "numerator": 50,
        "denominator": 1
      },
      "frame_width": 1920,
      "frame_height": 1080,
      "interlace_mode": "progressive"
    }
  },
  {
    "id": "92c6b980-2313-4dc7-b9b5-396965c82a19",
    "source_id": "13892fe5-907c-4643-a6d2-35054544aa51",
    "label": "My First audio Flow",
    "description": "Another manually created item",
    "created_by": "server-to-server",
    "created": "2024-11-20T10:51:12Z",
    "codec": "audio/aac",
    "container": "video/mp2t",
    "avg_bit_rate": 128000,
    "max_bit_rate": 128000,
    "collected_by": [
      "472267ea-140d-43ba-a609-e43e540bd7c4"
    ],
    "format": "urn:x-nmos:format:audio",
    "essence_parameters": {
      "sample_rate": 48000,
      "channels": 2
    }
  }
]
List the sources within the store by typing:
python list-sources.py
Similar to previous stages, the creation of the multi-flow has resulted in the creation of a multi-source, so three sources should be listed in the response. The store has replicated the collection information from the flow level up to the source level, so there should be collection information in the API response to link the three sources together.
[
  {
    "id": "13892fe5-907c-4643-a6d2-35054544aa51",
    "format": "urn:x-nmos:format:audio",
    "label": "My First audio Flow",
    "description": "Another manually created item",
    "created_by": "server-to-server",
    "created": "2024-11-20T10:51:12Z",
    "collected_by": [
      "7affd9ca-3102-4b18-b4b1-a4a1215f99eb"
    ]
  },
  {
    "id": "7affd9ca-3102-4b18-b4b1-a4a1215f99eb",
    "format": "urn:x-nmos:format:multi",
    "label": "My First multi essence flow",
    "description": "Manually created multi item",
    "created_by": "server-to-server",
    "created": "2024-11-20T11:11:18Z",
    "source_collection": [
      {
        "id": "13892fe5-907c-4643-a6d2-35054544aa51",
        "role": "audio"
      },
      {
        "id": "c98b9788-f94a-4c6d-8d5b-366c1b105968",
        "role": "video"
      }
    ]
  },
  {
    "id": "c98b9788-f94a-4c6d-8d5b-366c1b105968",
    "format": "urn:x-nmos:format:video",
    "label": "My First Video Flow",
    "description": "Manually created item",
    "created_by": "server-to-server",
    "created": "2024-11-20T10:49:27Z",
    "collected_by": [
      "7affd9ca-3102-4b18-b4b1-a4a1215f99eb"
    ]
  }
]
Upload Segments
Now that we have created the data structures required to describe content within the TAMS store, the final stage is to upload a set of segments. Since the segments for this example are separate audio and video, they will be registered against the audio and video flows.
In the sample-scripts/segments folder, you will find a set of pre-encoded segments to upload to the TAMS store. These match the same technical characteristics of the flows created in the previous steps.
To upload segments to a TAMS store, there are three steps which need to be taken:
Request one or more media segment storage locations from the TAMS store for a given flow. This will provide back an object ID and a pre-signed URL to upload the content to, removing the need for separate authentication to the object storage layer.
Upload the actual media segment to the object storage using the pre-signed URL.
Register the segment against the API using the object ID provided by the store and specifying the timerange of the segment.
The supplied segments will have a time reference starting from 0. Each segment is 10 seconds long, so the timeranges for the initial chunks are shown in the following diagram:

Figure 38: First four segments of the flow timeline
To simplify the process of uploading and registering multiple segments against each of the audio and video flows, we have provided a script that will do this for you.
Open upload-segments.py
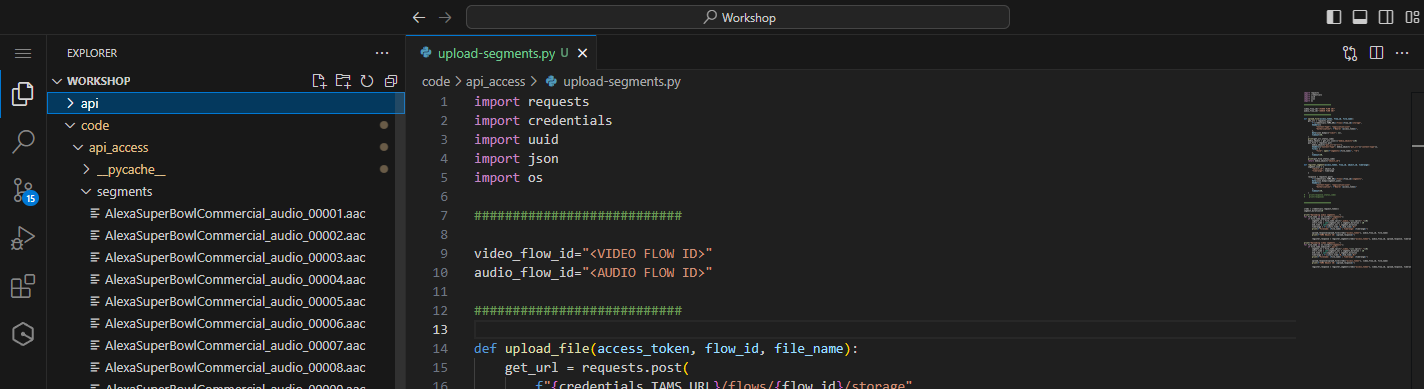
Figure 39: Supplied segment upload script
Update the following entries:
- Replace
<VIDEO FLOW ID>with the ID of the video flow that you created earlier. - Replace
<AUDIO FLOW ID>with the ID of the audio flow that you created in the previous step.
If you have lost the flow IDs that you created, you can find them again by running the list-flows.py script to list the content in the store.
Run the upload process by typing the following command:
python upload-segments.py
As the upload progresses, the status will be visible in the terminal window:

Figure 40: Output of the segment upload script
To list the segments back from the store against a single flow, open list-segments.py.
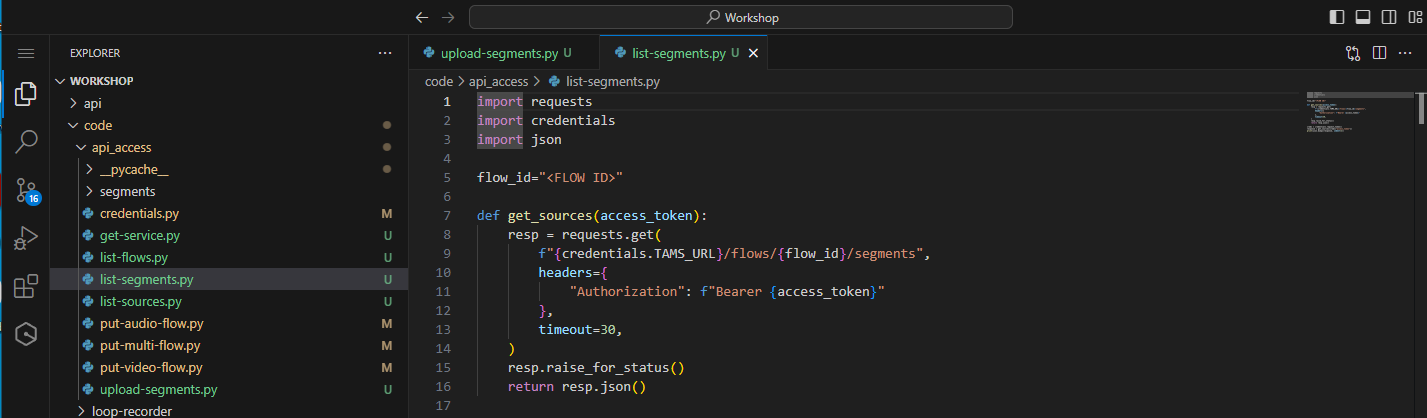
Figure 41: Supplied list segments file
Replace <FLOW ID> with either the video or audio flow IDs of the content in the store.
Run the list segments by typing the following command:
python list-segments.py
The terminal should show the response from the TAMS store in the format of a list of segments, each of which has the object_id, timerange, and a pre-signed URL to be able to get the content from the store. For long times, it is possible to restrict the segment get by a given timerange.
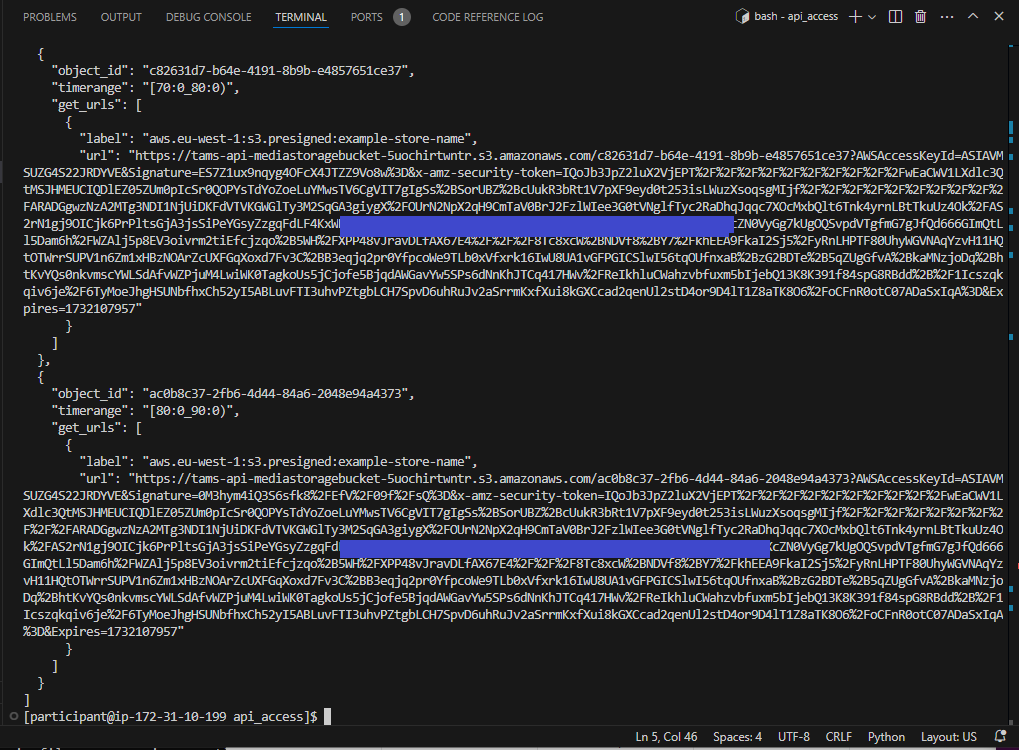
Figure 42: Response from listing the segments
You have now successfully created an item in the TAMS store and registered content against it. If you have a TAMS-capable player or the TAMS Tools UI available, then you should be able to play this content back.