Guidance for AI-enhanced Amazon Connect Customer Experience
Summary: This implementation guide provides an overview of the Guidance for AI-enhanced Amazon Connect Customer Experience , its reference architecture and components, considerations for planning the deployment, and configuration steps for deploying the Guidance to Amazon Web Services (AWS).
Introduction
This Guidance demonstrates how Amazon Connect can revolutionize your customer experience using Amazon Connect AI-powered automation and agent assistance. By implementing this solution, businesses can deliver 24/7 omnichannel support while significantly improving operational efficiency and customer experience. The integration enables natural, conversational customer interactions through generative AI, seamless escalation to human agents when needed, and empowers customer service representatives with real-time AI assistance. This AI-powered approach to customer service helps organizations reduce improve customer satisfaction, increase business growth, while optimizing operational costs and enabling support teams to focus on high-value interactions.
Deploy intelligent, ai-conversational support that services customer inquiries without human-agent intervention. Amazon Q in Connect leverages large language models to provide contextual responses from your knowledge base, improving customer self-service success rates.
Enable seamless transitions from AI-powered self-service to human agents when needed. Customers maintain context as they move between chat, voice, video, or in-app channels, creating a cohesive support experience that improves customer experience.
Automate and self-serve routine inquiries while directing complex issues to human agents. This approach, improves customer experience, reduces wait times, allows agents to focus on high-value interactions, and captures complete interaction history for continuous improvement of both AI and human-assisted support.
Cost
This bundle uses the following resources:
Amazon Connect
Amazon Connect provides unlimited use of AI capabilities that power end-customer self-service, agent assistance, and supervisor experiences. It allows you to optimize every step of your customer journey without cost-driven compromises. Learn more here. Alternatively, you can continue buying Amazon Connect features individually.
You are responsible for the cost of the AWS services used while running this Guidance. The cost for running this Guidance with the default settings in the US East (N. Virginia) with unlimited AI is approximately $5,300 per month for 100,000 minutes of in-app calls and 50,000 chat messages per month with all calls analyzed to provide Conversational analytics & post contact summaries. This guidance scenario also includes automated performance evaluations for 75 contact center agents.
The following table provides a sample cost breakdown for deploying this Guidance with the default parameters in the US East (N. Virginia) Region for one month.
Channels
Conversational analytics & post-contact summaries
Screen Recording
Real-time agent assistance
End-customer self-service
Automated performance evaluations
Agent forecasting & scheduling
Pricing
Voice (telephony, in-app and web, video)
X
X
X
X
$0.048 per min (see note 1)
Chat
X
X
X
X
$0.010 per message
Notes:
For Amazon Connect Voice, there are two charges associated with usage: voice service AI charges and a charge for the communication service i.e. in-app and web calling. In this chart, the voice service AI charge is $0.038, and you are separately charged for the in-app and web calling audio communication at a rate of $0.010 per minute, resulting in a charge of $0.048 per minute. Pricing example:
Omnichannel Customer Service: Let’s assume your 75-agent contact center receives 100,000 voice minutes, and 50,000 chat messages per month. You want to enable conversational analytics, real-time agent-assist, and end-customer self-service chatbots:
There is an Amazon Connect voice usage charge, based on end-customer call duration. At $0.038 per minute * 100,000 minutes = $3,800.
The per minute in-app voice usage charge at $0.010 per minute * 100,000 minutes = $1,000.
There is an Amazon Connect chat usage charge, based on the total messages sent during the chat (including initial message when chat was started). At $0.01 per message * 50,000 chat messages = $500 per month.
You are responsible for the cost of the AWS services used while running this Guidance. The cost for running this Guidance with the default settings in the US East (N. Virginia) with unlimited AI is approximately $5,300 per month for 100,000 minutes of in-app calls and 50,000 chat messages per month with all calls analyzed to provide Conversational analytics & post contact summaries. This guidance scenario also includes automated performance evaluations for 75 contact center agents. The following table provides a sample cost breakdown for deploying this Guidance with the default parameters in the US East (N. Virginia) Region for one month.
Setup
Prerequisites
You have an active Amazon Web Services (AWS) account with the necessary permissions to provision the required resources. Account with “AdministratorAccess” AWS managed.
You have a basic understanding of AWS services.
You have the ability to create and manage Identity and Access Management (IAM) Identity Centre users and assign the necessary permissions.
You have prepared Knowledge Base Content - FAQ documentation in supported formats (PDF, DOC, DOCX) for upload to Amazon Q
Login to your AWS account, select your preferred region. Note: Amazon Connect is available in select regions. Refer to documentation for the latest available regions.
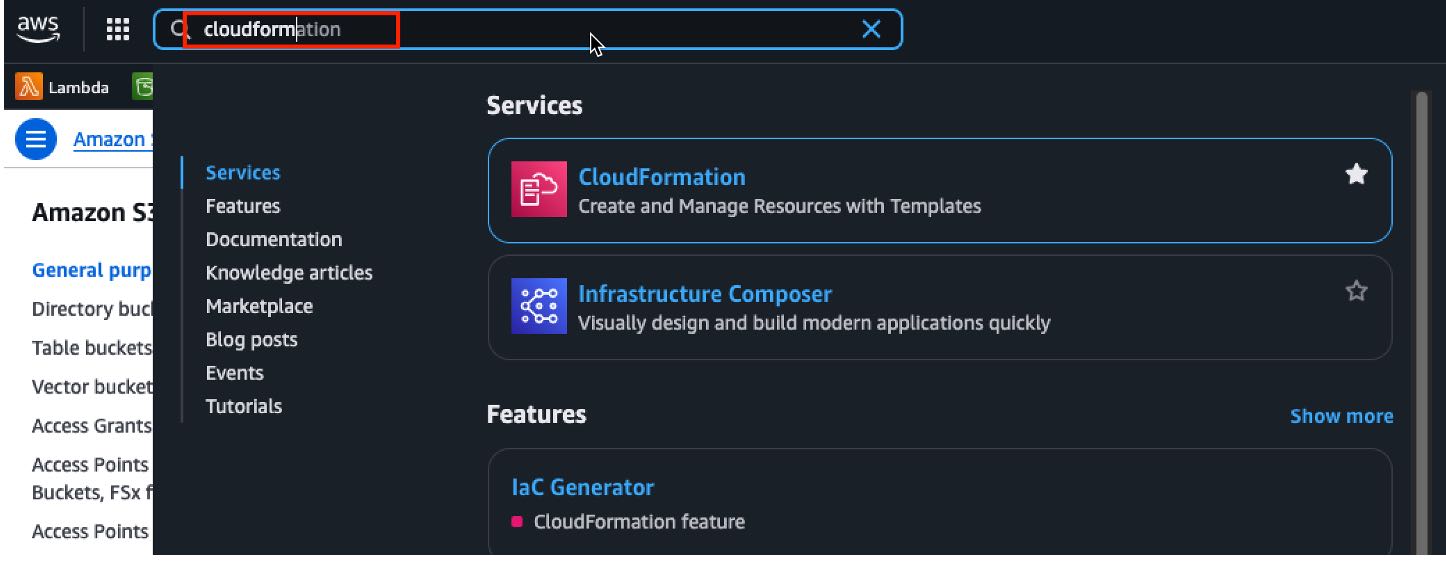
Navigate to CloudFormation.
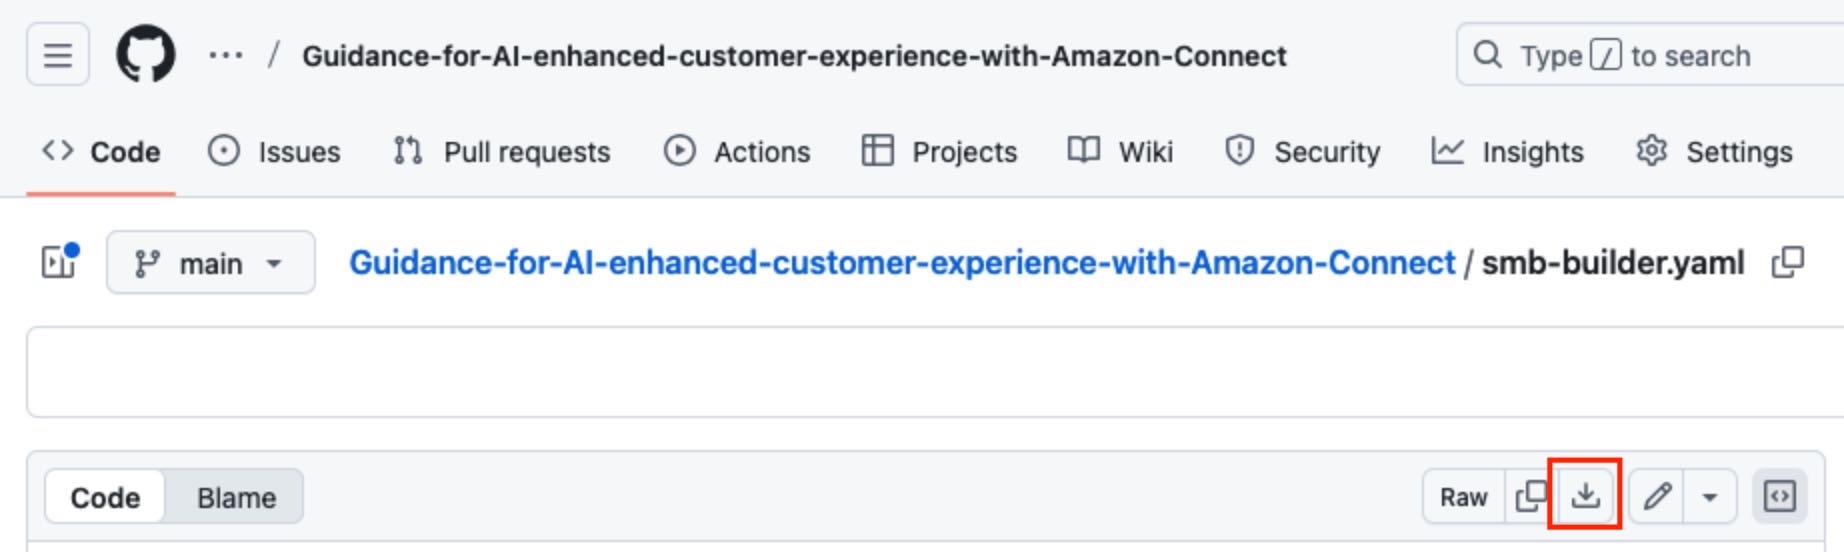
Select Create Stack > With new resources (standard) > Choose an existing template > Upload a template file > Choose file.
Select the downloaded .yaml file > Next.
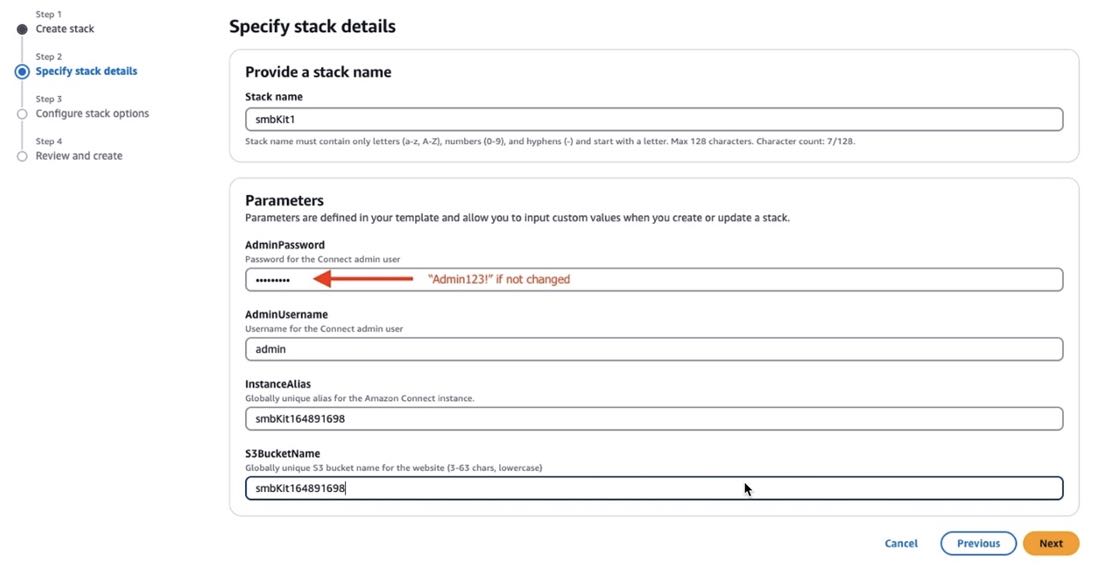
Complete Stack details:
Enter a stack name of your choice.
AdminPassword (you can change this to a password of your choice, if you leave it as is, the password will be Admin123!. Passwords must contain at least 8 characters with an uppercase letter, a lowercase letter, and a number).
AdminUsername (Username for the Connect admin user).
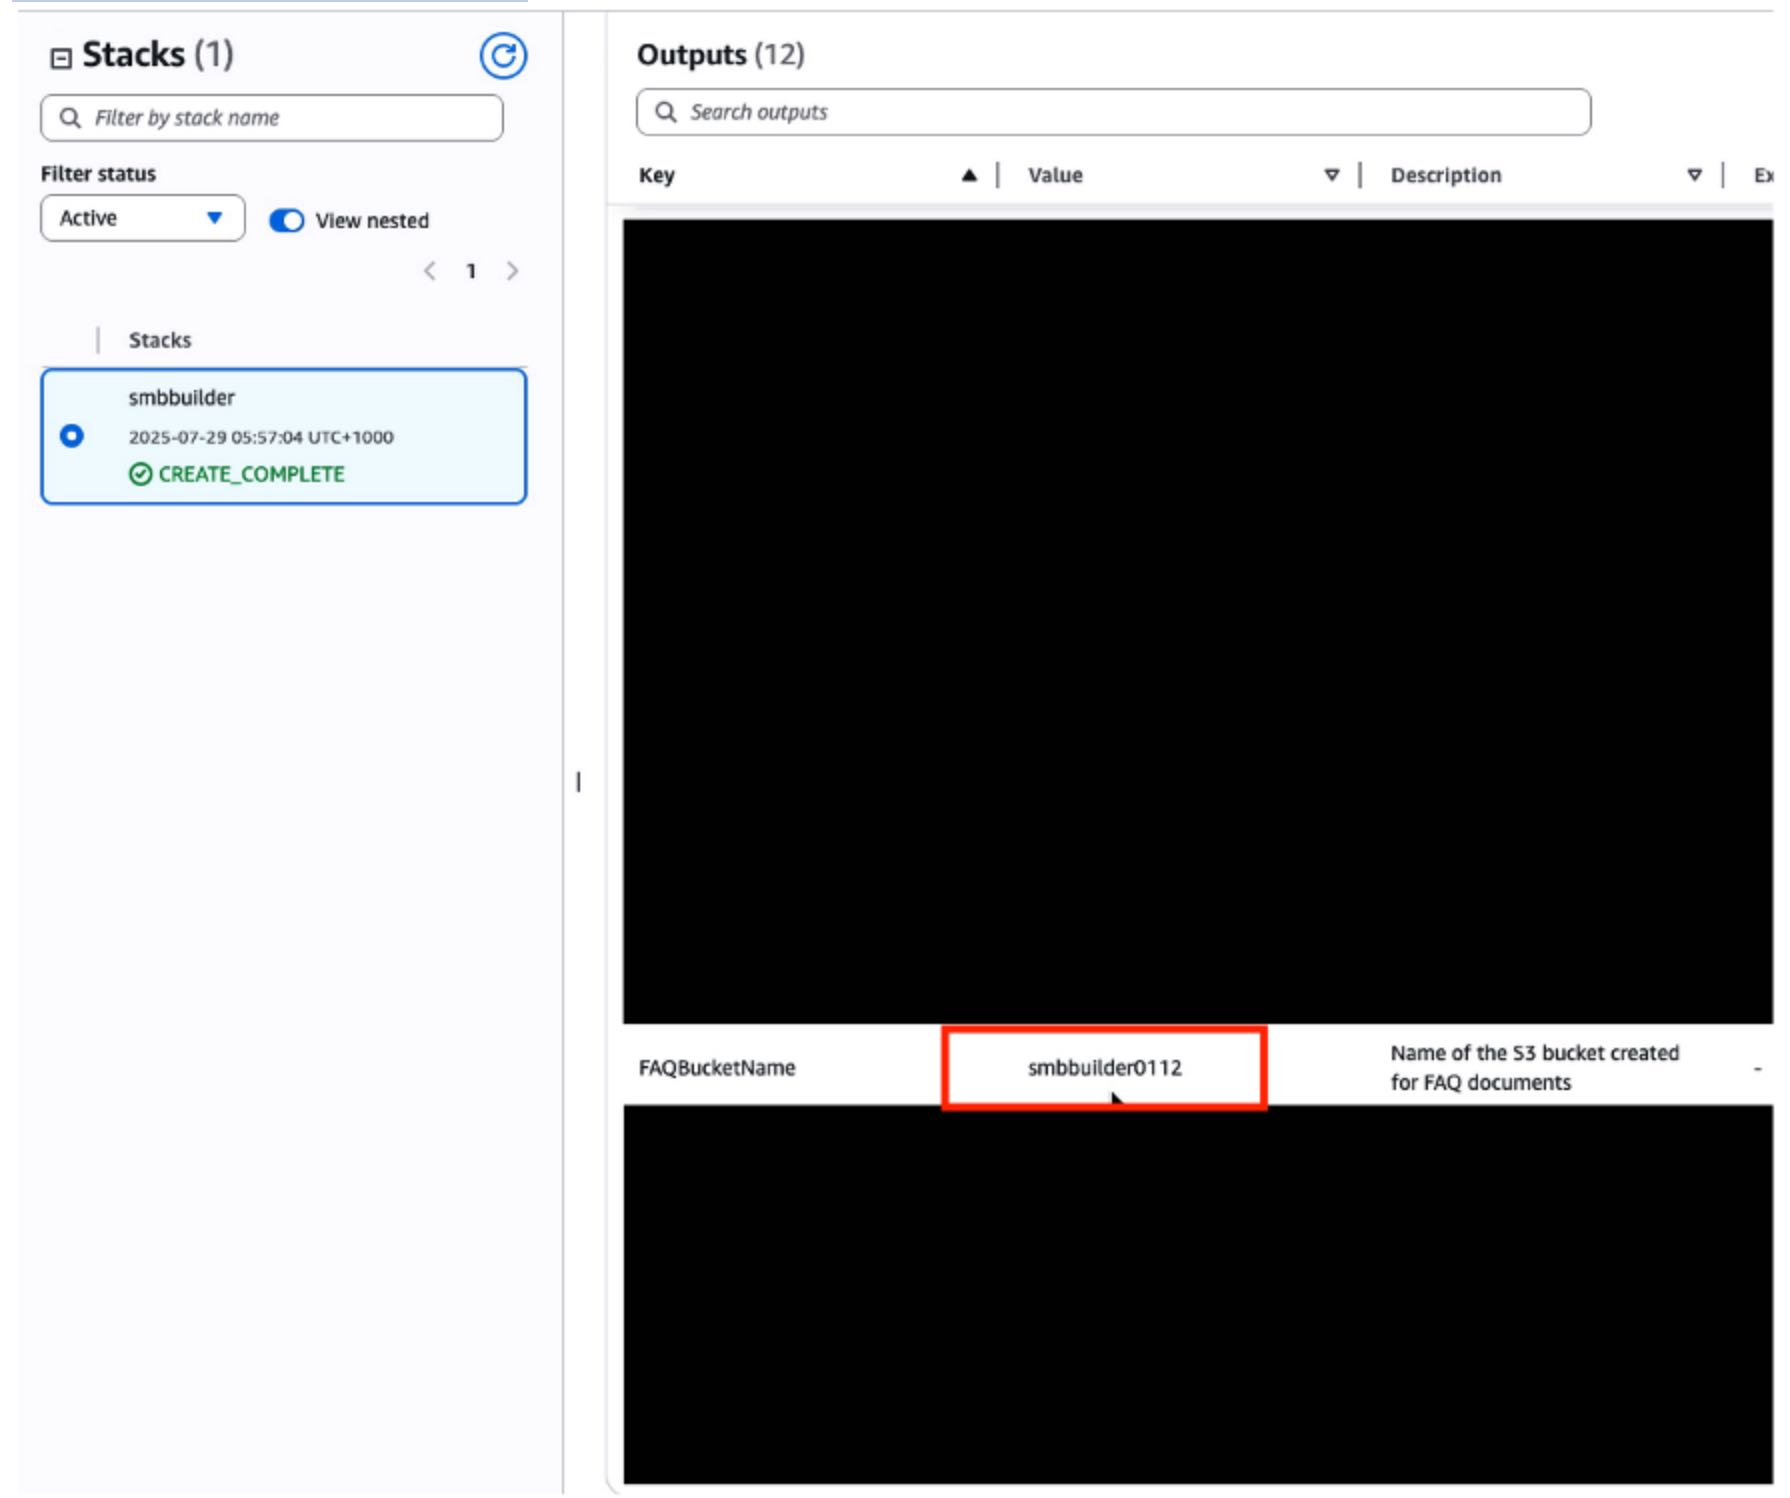
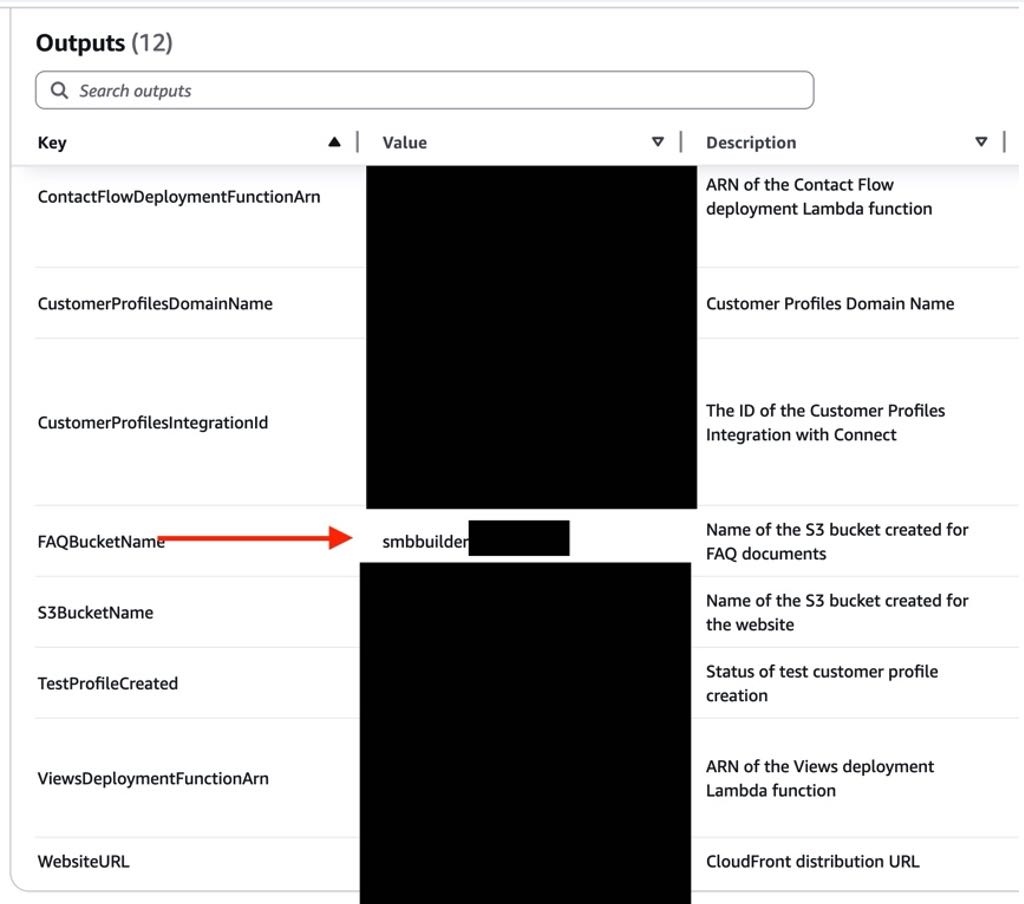
FAQBucketName – Enter a name of your choice. This is the S3 bucket where your FAQ documents will be stored.
InstanceAlias – Enter a name of your choice. This will be the Amazon Connect Instance Name
S3BucketName – Enter a name of your choice. This will be the bucket used to store the static website
Click Next.
Leave all selections as default and scroll down to Capabilities and select ‘I acknowledge that AWS CloudFormation might create IAM resources.’ > Next.
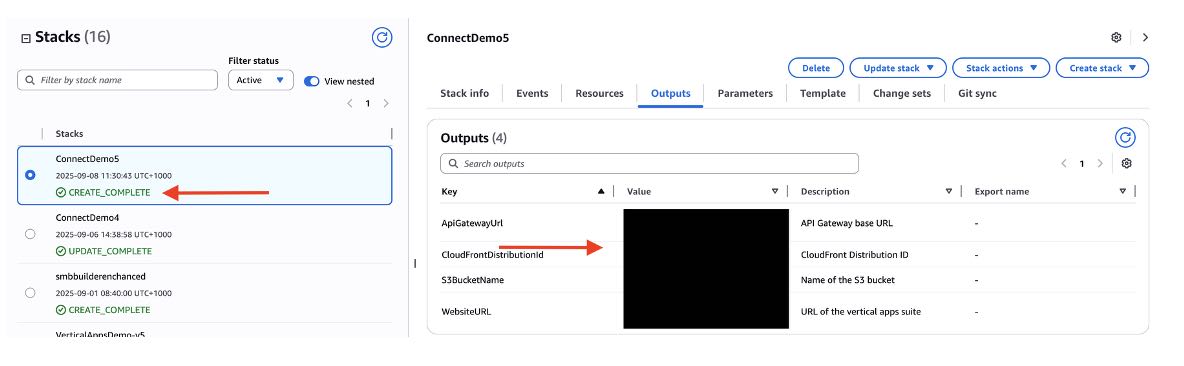
Leave all sections as is, scroll down to bottom of page and select Submit. Your CloudFormation template will start deploying with status ‘CREATE_IN_PROGRESS. Note: This build process will take 10-15 minutes to deploy.
When the CloudFormation is ‘CREATE_COMPLETE’ navigate to the Outputs tab and note down the FAQBucket, and S3Bucket names and the WebsiteURL.
Set up Amazon Q Knowledge Base
In the menu bar of the console, type in Amazon Connect and click Amazon Connect from the Services menu to navigate to the Amazon Connect AWS console.
In the Amazon Connect console, click on the Instance alias name that was created during the deployment.
In the left-hand menu, select Amazon Q.
Select Add Domain > Create a new domain. Enter a preferred domain name like “my-q-in-connect”.
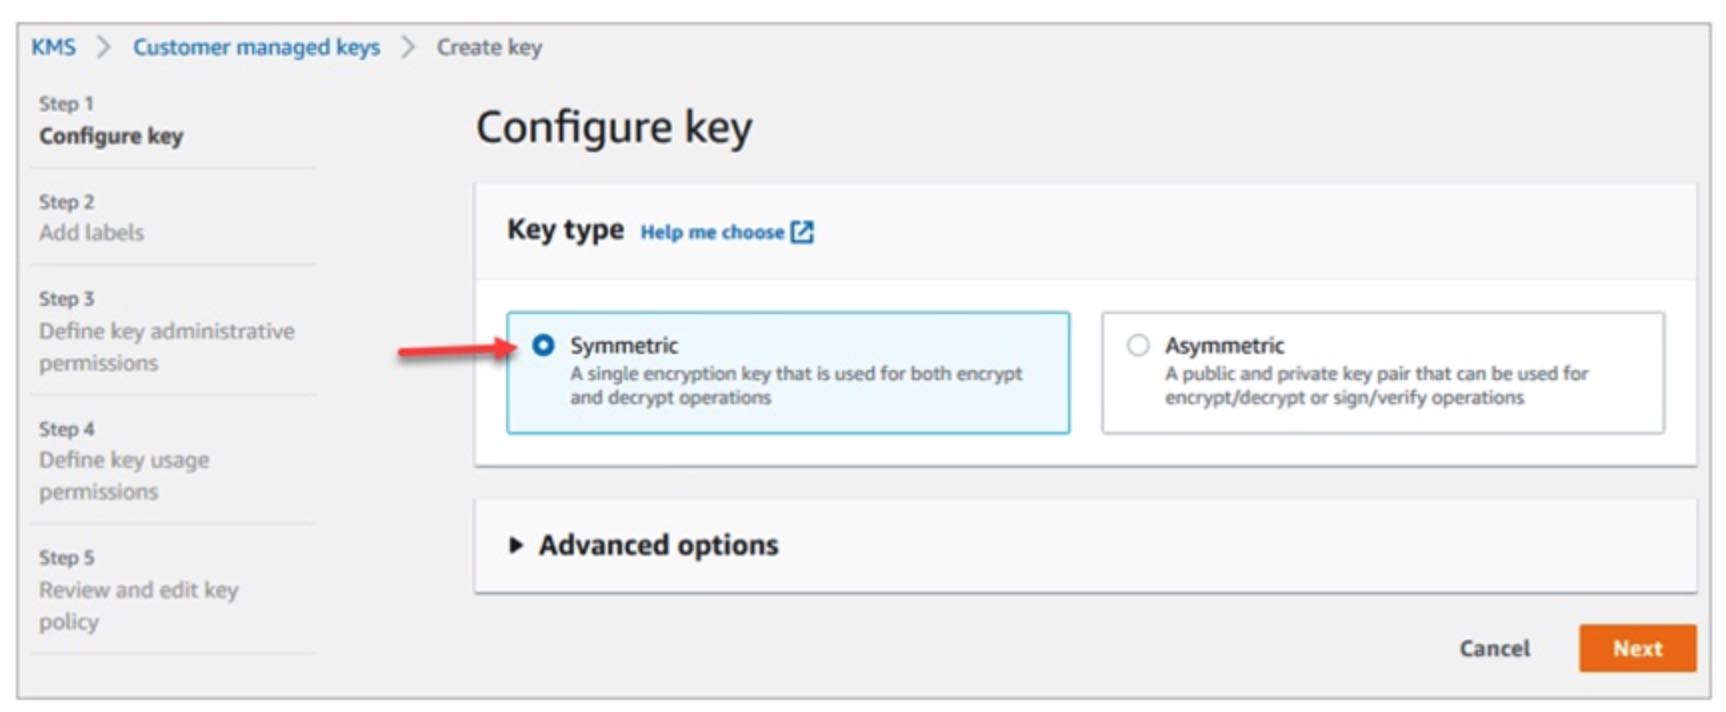
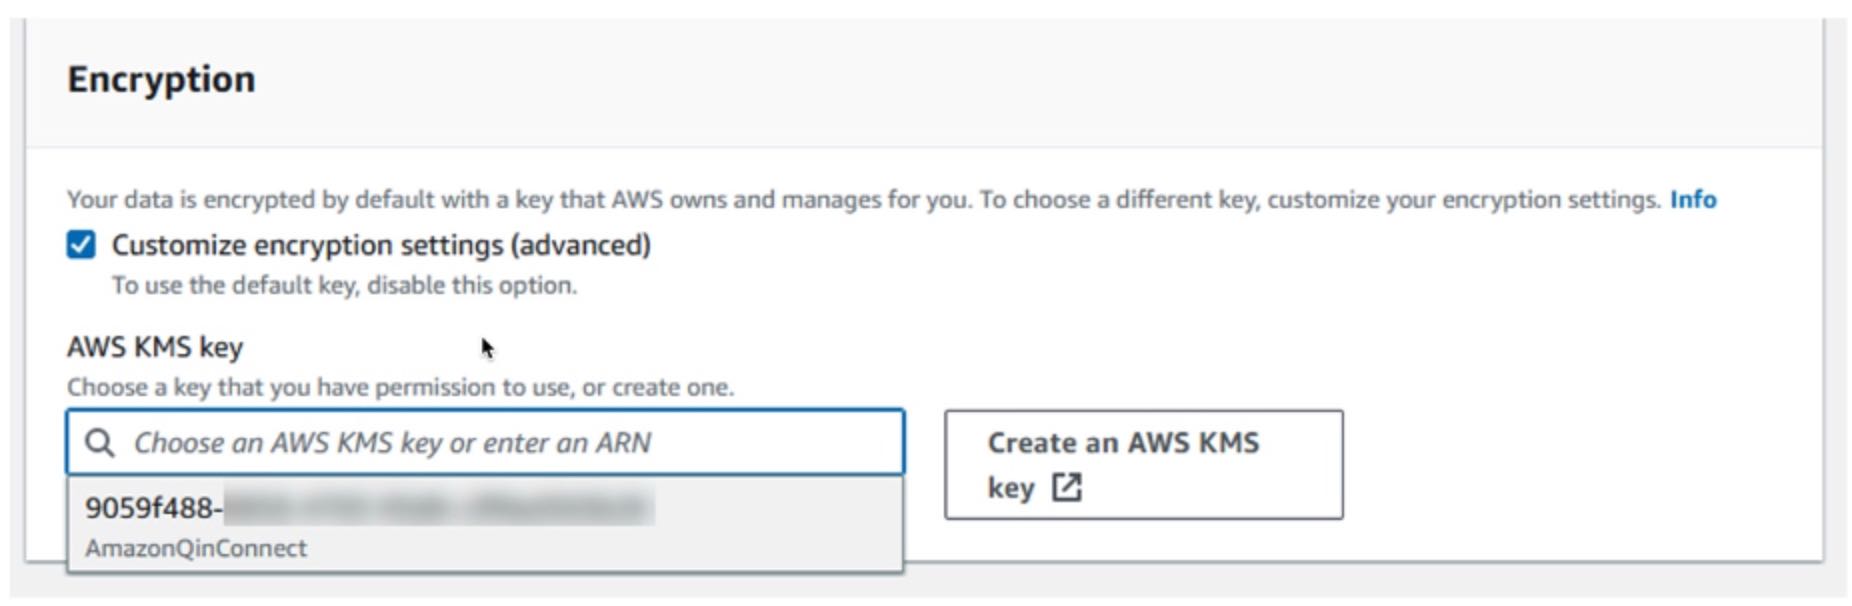
Select Create an AWS KMS Key. This will navigate to the Customer-managed keys page of the Key Management Service (KMS) console.
In the KMS console, on the Configure key page:
Choose Key Type - Symmetric
Key Usage – Encrypt and decrypt
Click Next
On the Add labels page, enter a display name for your key in the Alias field and click Next.
On the Define key administrative permissions page, leave everything default and click Next.
On the Define key usage permissions page, leave everything default and click Next.
On the Edit key policy page. Use the toggle button on the right-hand corner and move to ‘Edit’.
Copy and paste the updated key policy configuration below into the key policy. Note: make sure you include your account number and replace 111122223333 from the configuration before pasting into the Key policy.
In the Review page scroll to the bottom of the page then click Finish
Return to the AWS Amazon Connect console and the Amazon Q Add domain page. Select the new KMS Key.
Click Add domain.
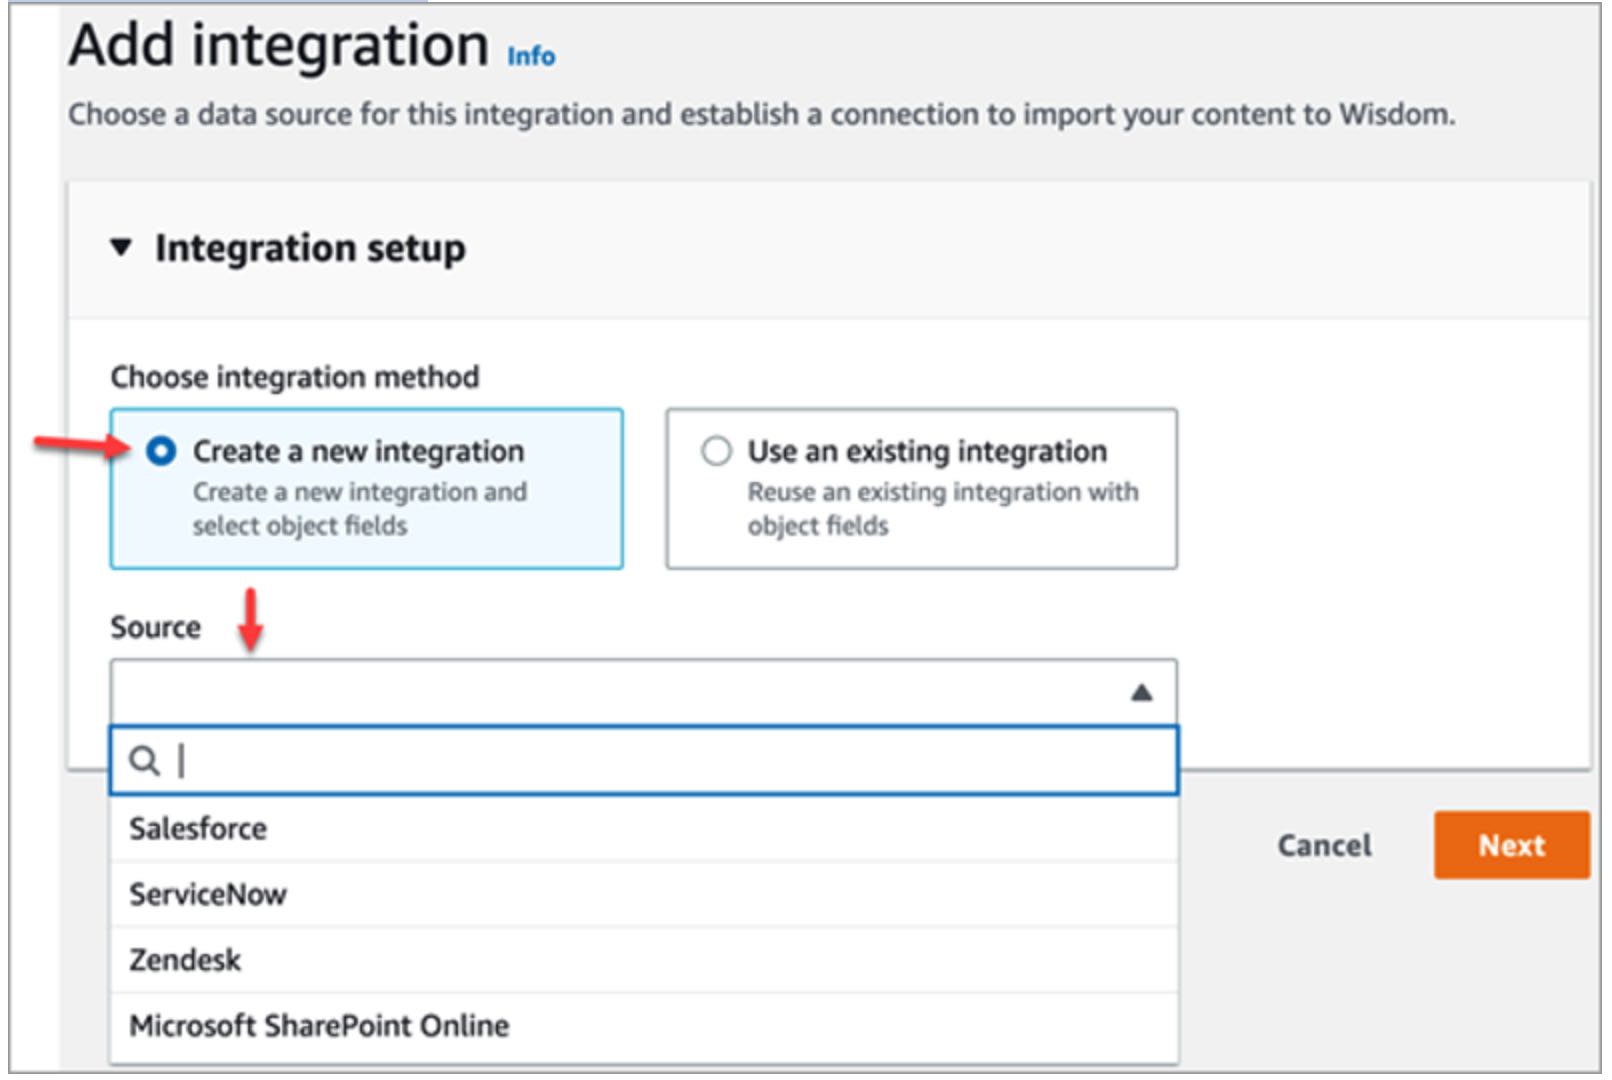
On the Add Integration page, choose Create a new integration, and under Source select S3.Add an integration name of your choice.
Under Connection with S3, click the Browse S3 button and search the bucket name created in previous CloudFormation step 6. (FAQBucket). Select bucket and click choose.
In the Encryption section, select the KMS Key you created previously
Click: Next > Add integration
Browse to the CloudFormation Outputs tab and locate the S3 bucket create for FAQBucketName
Browse to the S3 bucket and inside should be a file called FAQ.docx
Download the file and re-upload it to the bucket. Don’t change anything, this is to trigger a sync to QiC integration just created.
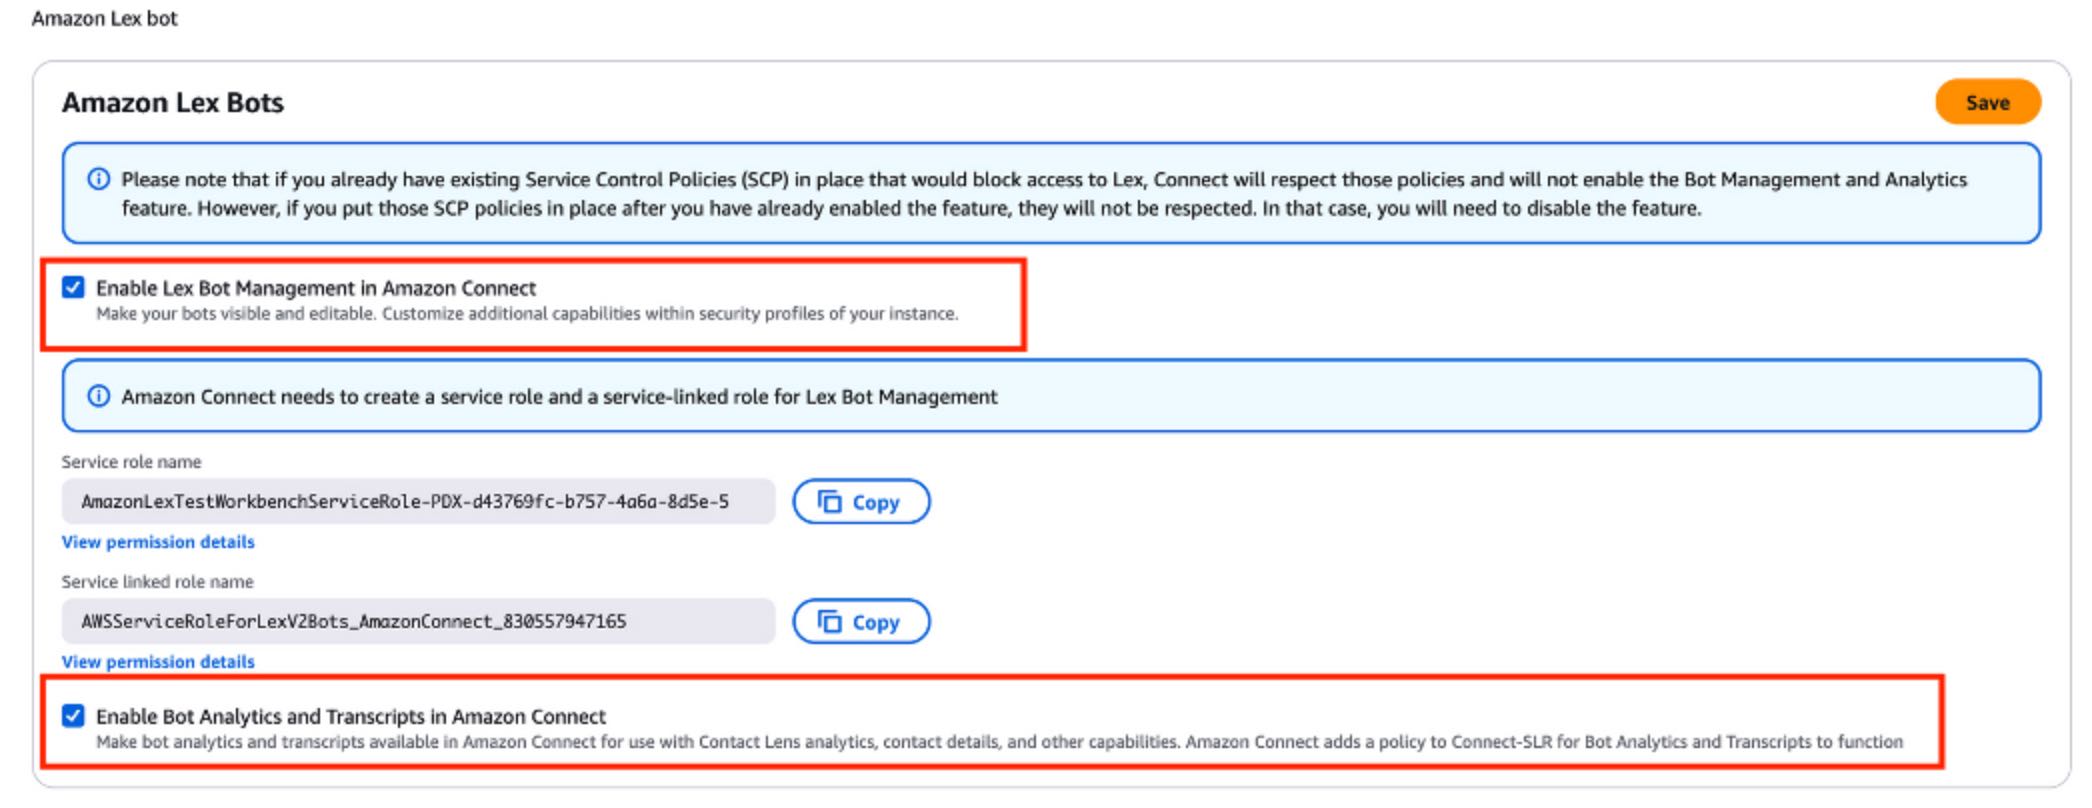
Enable Lex Bot
Navigate back to the Amazon Connect console and the new instance name
On the left-hand menu, at the bottom, click Flows
Check both boxes under Amazon Lext Bots and click Save. This provides the ability for the Lex bot to be created in the Amazon Connect Admin Console
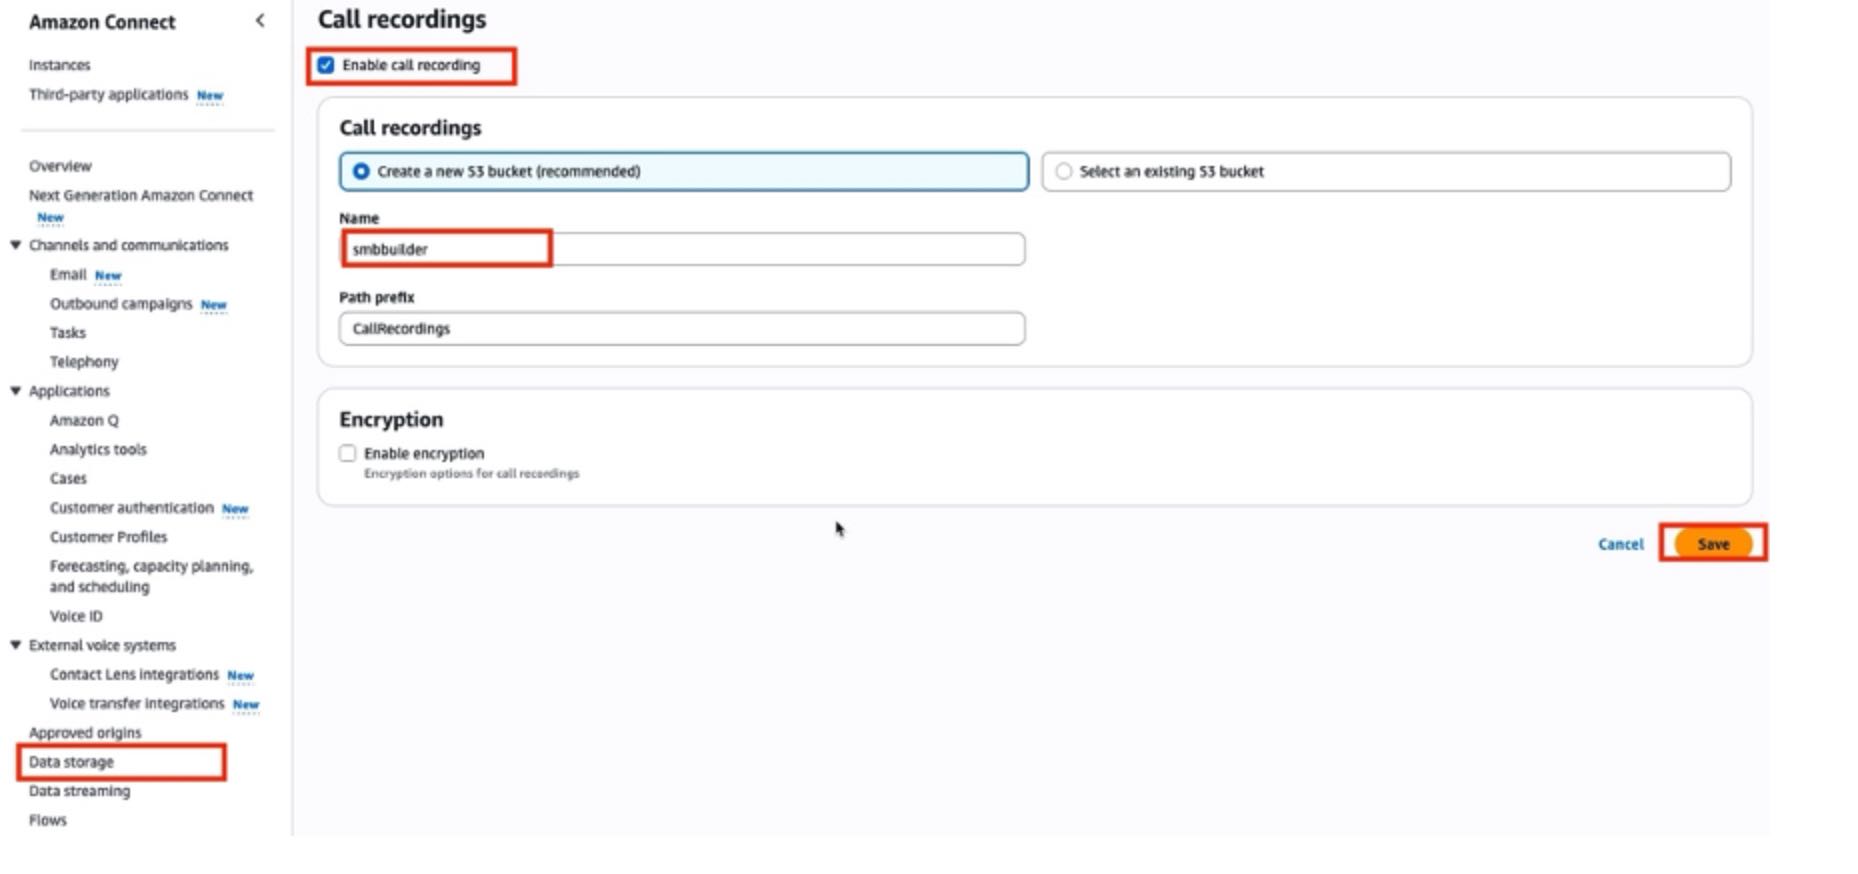
Enable Recording
Navigate back to the Amazon Connect console and the new instance name.
On the left-hand menu, at the bottom, click Data Storage
Select Edit on Call recordings
Select Enable call recording > Create a new S3 bucket (recommended)> name > Save.
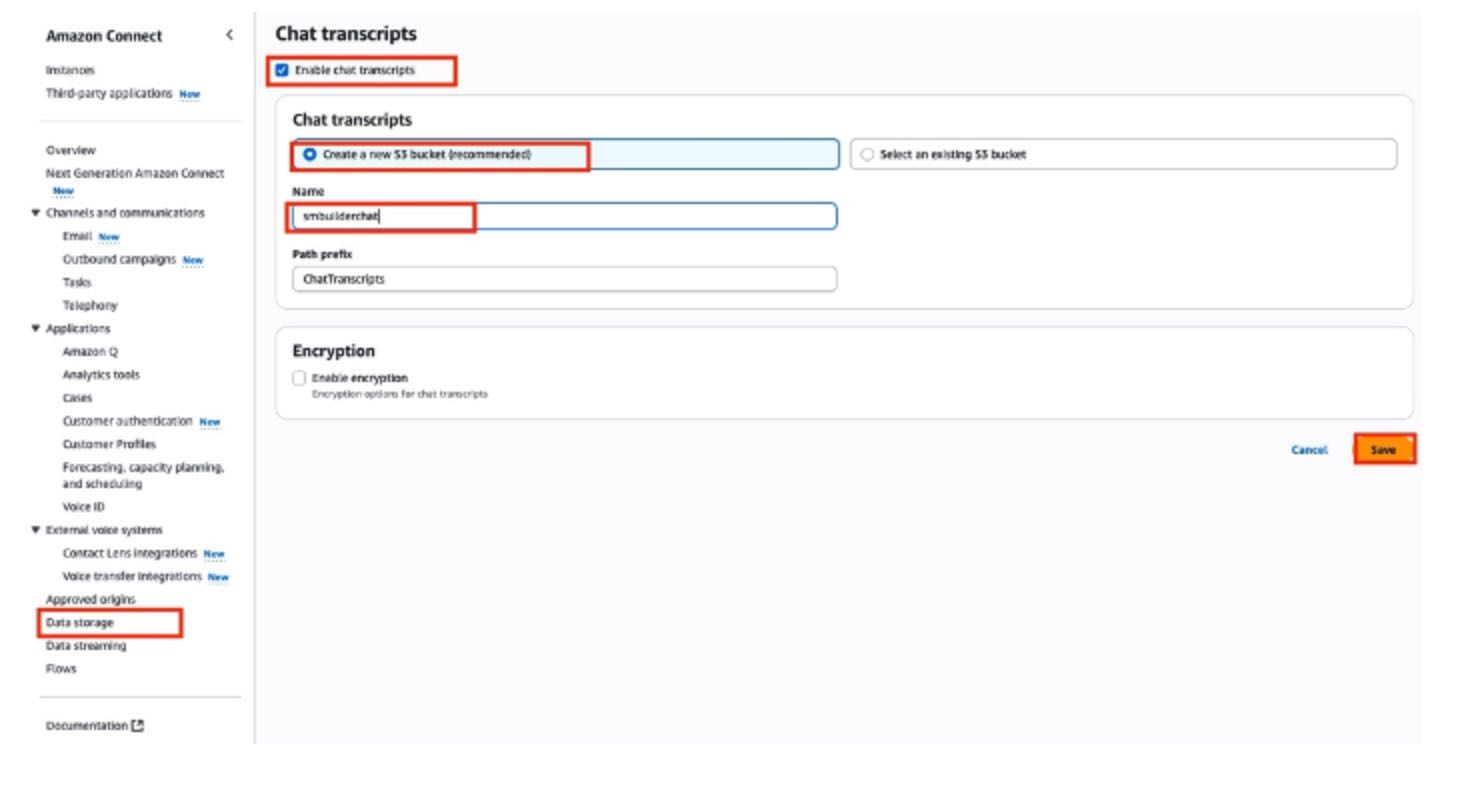
Chat transcripts
Navigate back to the Amazon Connect console and the new instance name.
On the left-hand menu, at the bottom click Data Storage.
Select Edit on Chat transcripts
Select Enable chat transcripts > Create a new S3 bucket (recommended) > name > Save.
Configure Lex Bot
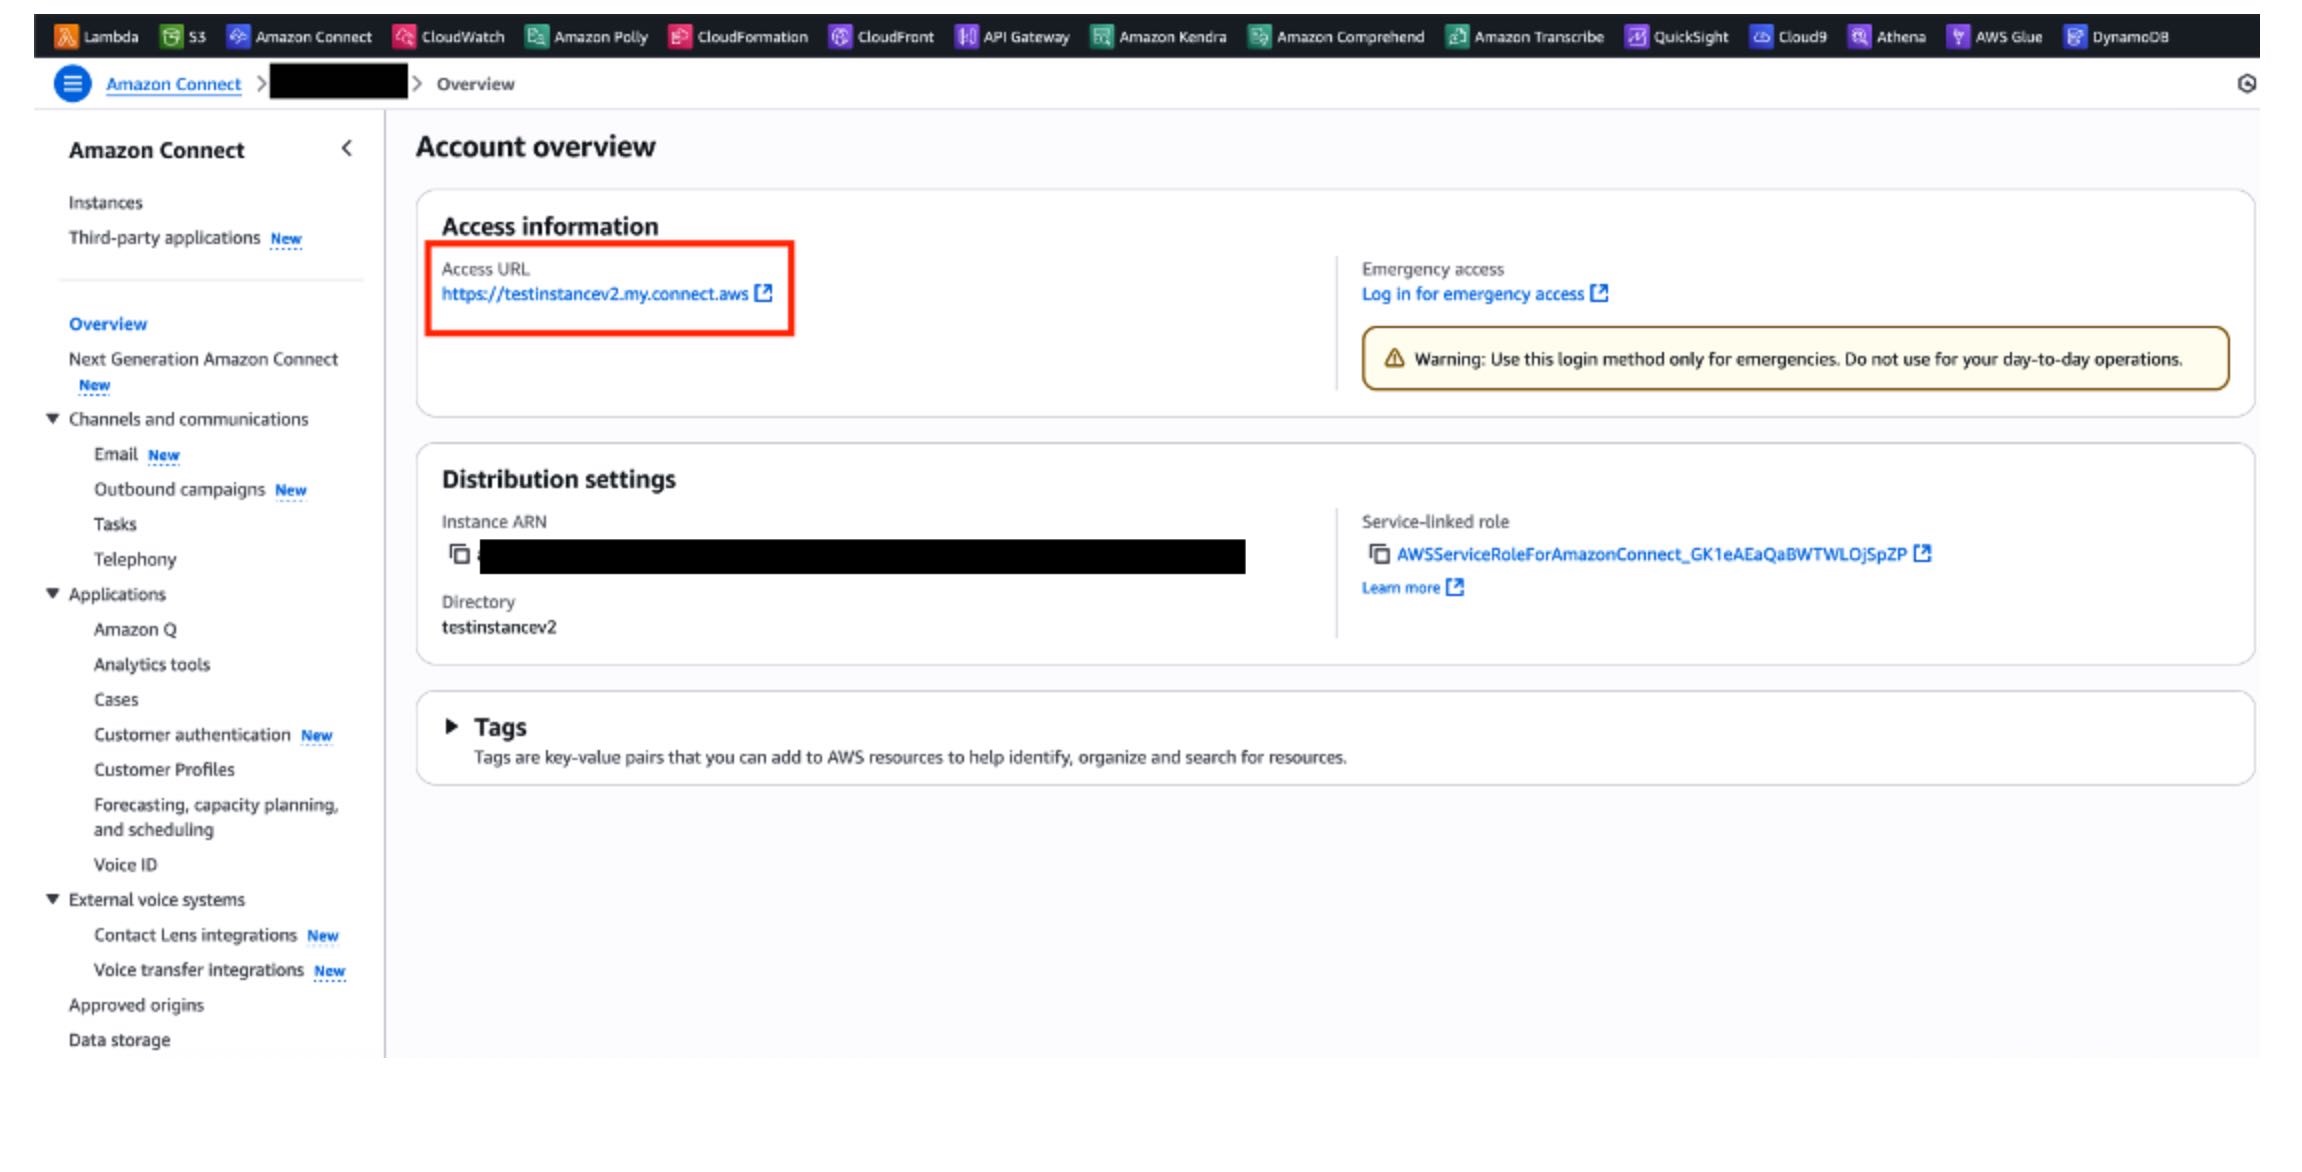
Navigate back to the Overview section of your Amazon Connect Instance by clicking the Instance Name in the top left corner.
In the Access Information of the Account Overview, click on the Access URL link.
This will take you to the Amazon Connect Admin console, use your username and password you entered when deploying your stack. Note: default details were username: Admin & Password: Admin123!
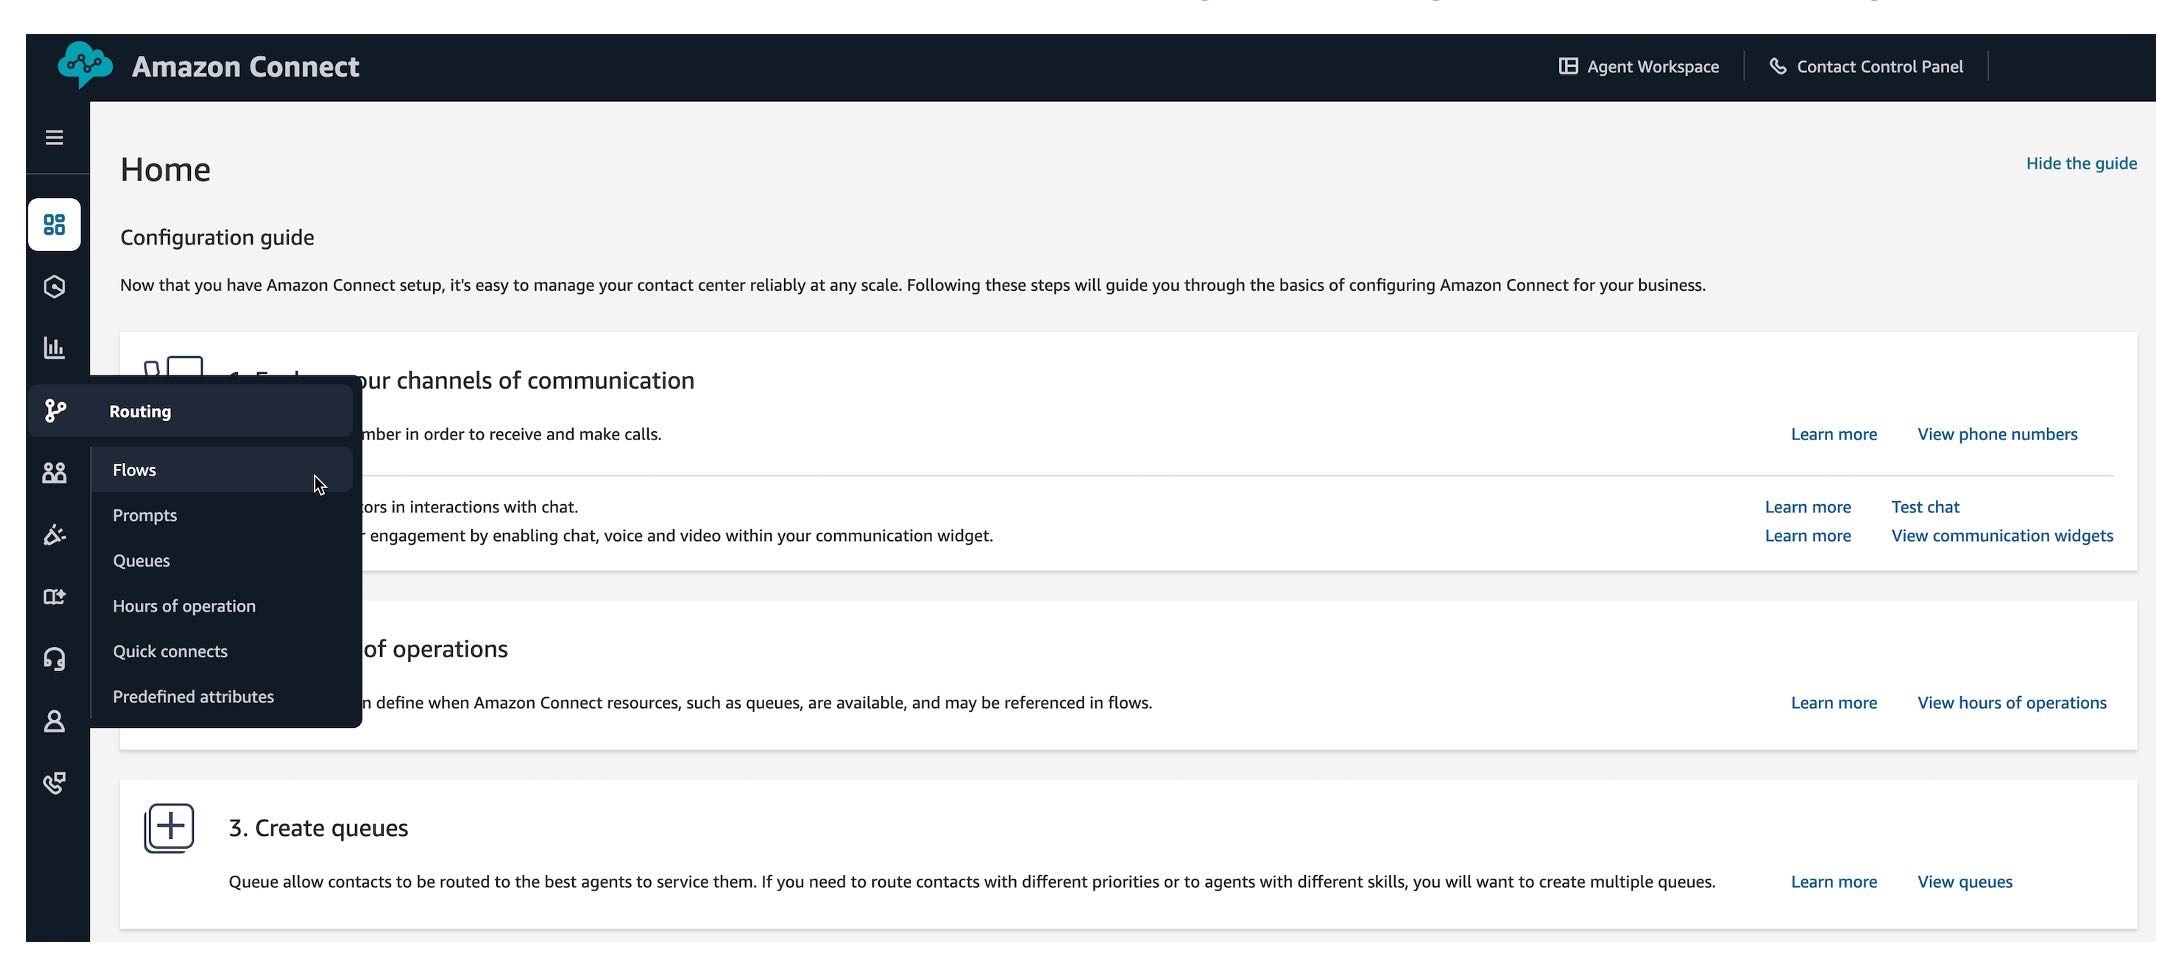
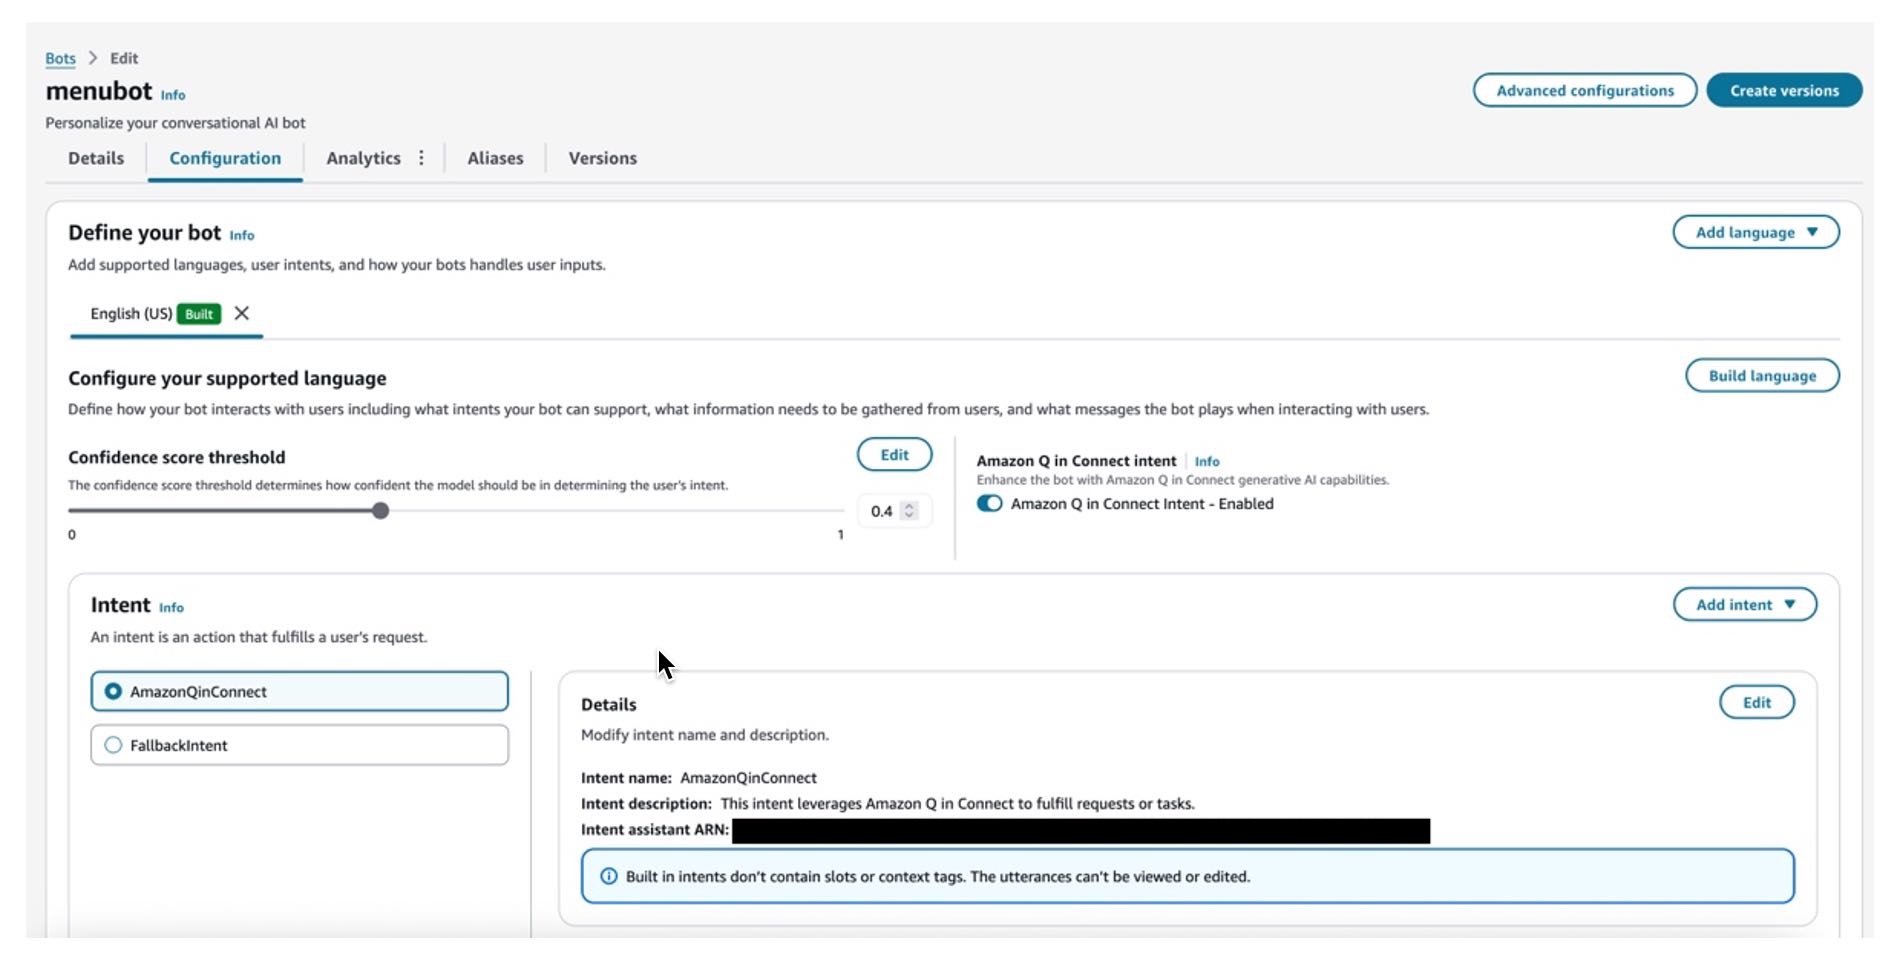
On the left-hand menu of the admin page, navigate to Routing > Flows > bots
Select Create Bot > call the bot “MenuBot”, leave the Children’s Online Privacy Protection Act (COPPA) as default setting > Click Create
Select Add language > English (US)
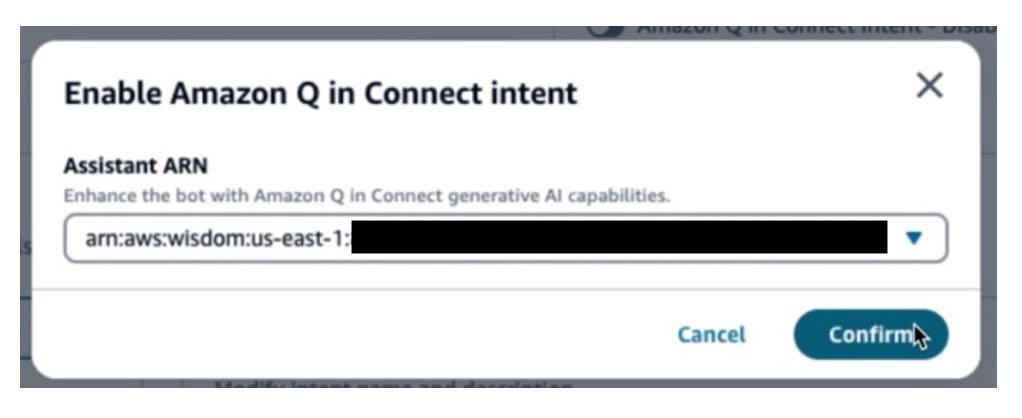
In the Amazon Q in Connect intent section, Enable Amazon Q in Connect Intent
In the Enable Amazon Q in Connect intent pop-up window, select your bot from the drop down. The bot’s name will start with arn:aws:wisdom Click Confirm.
Click Build language
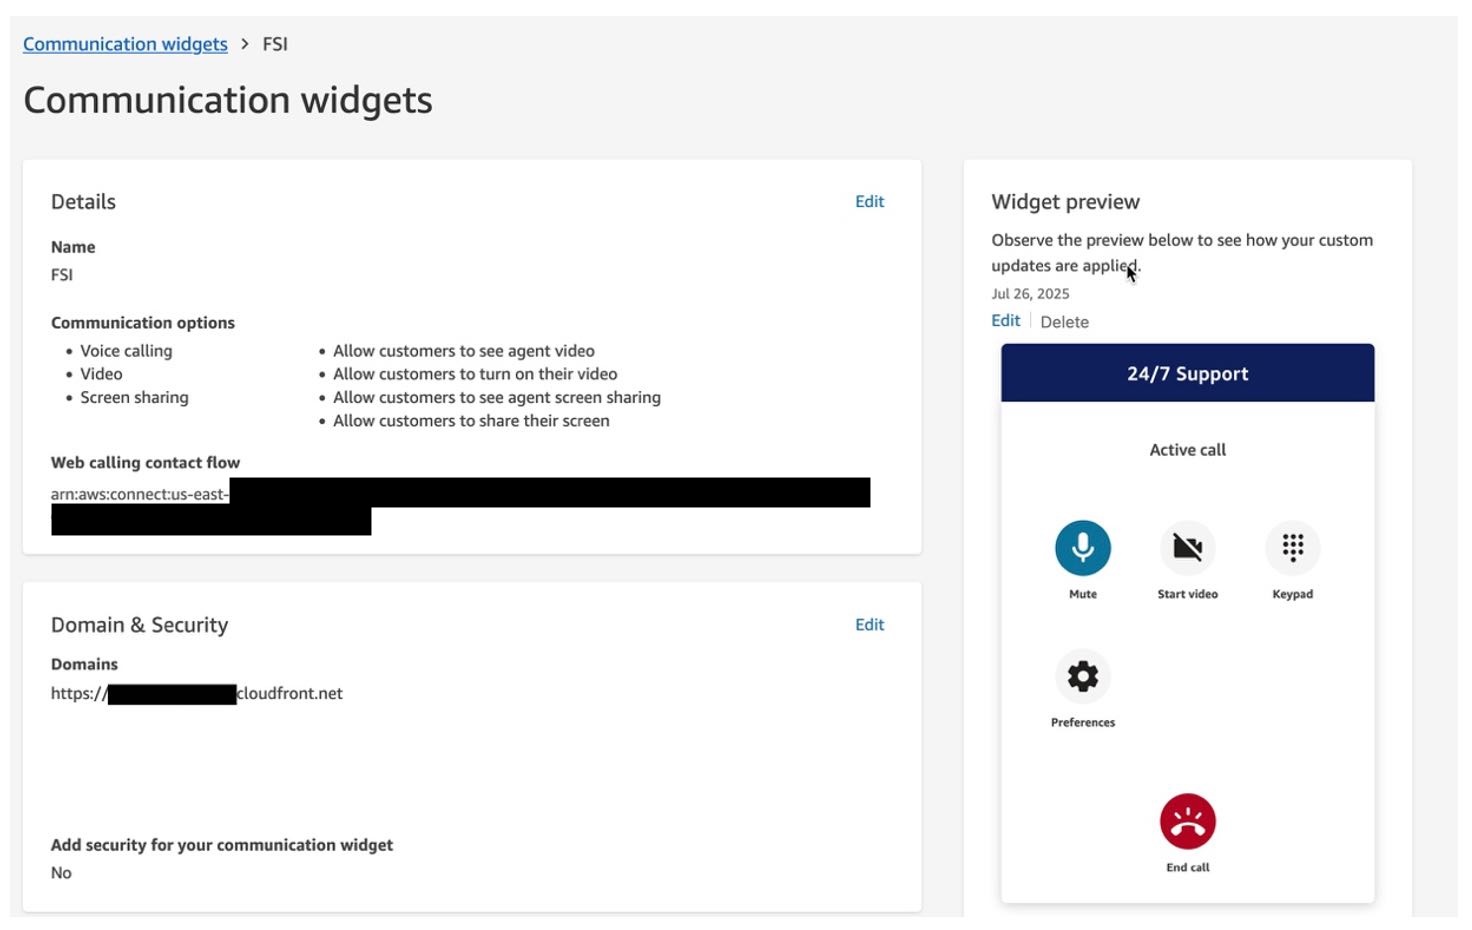
Configure Chat Widget
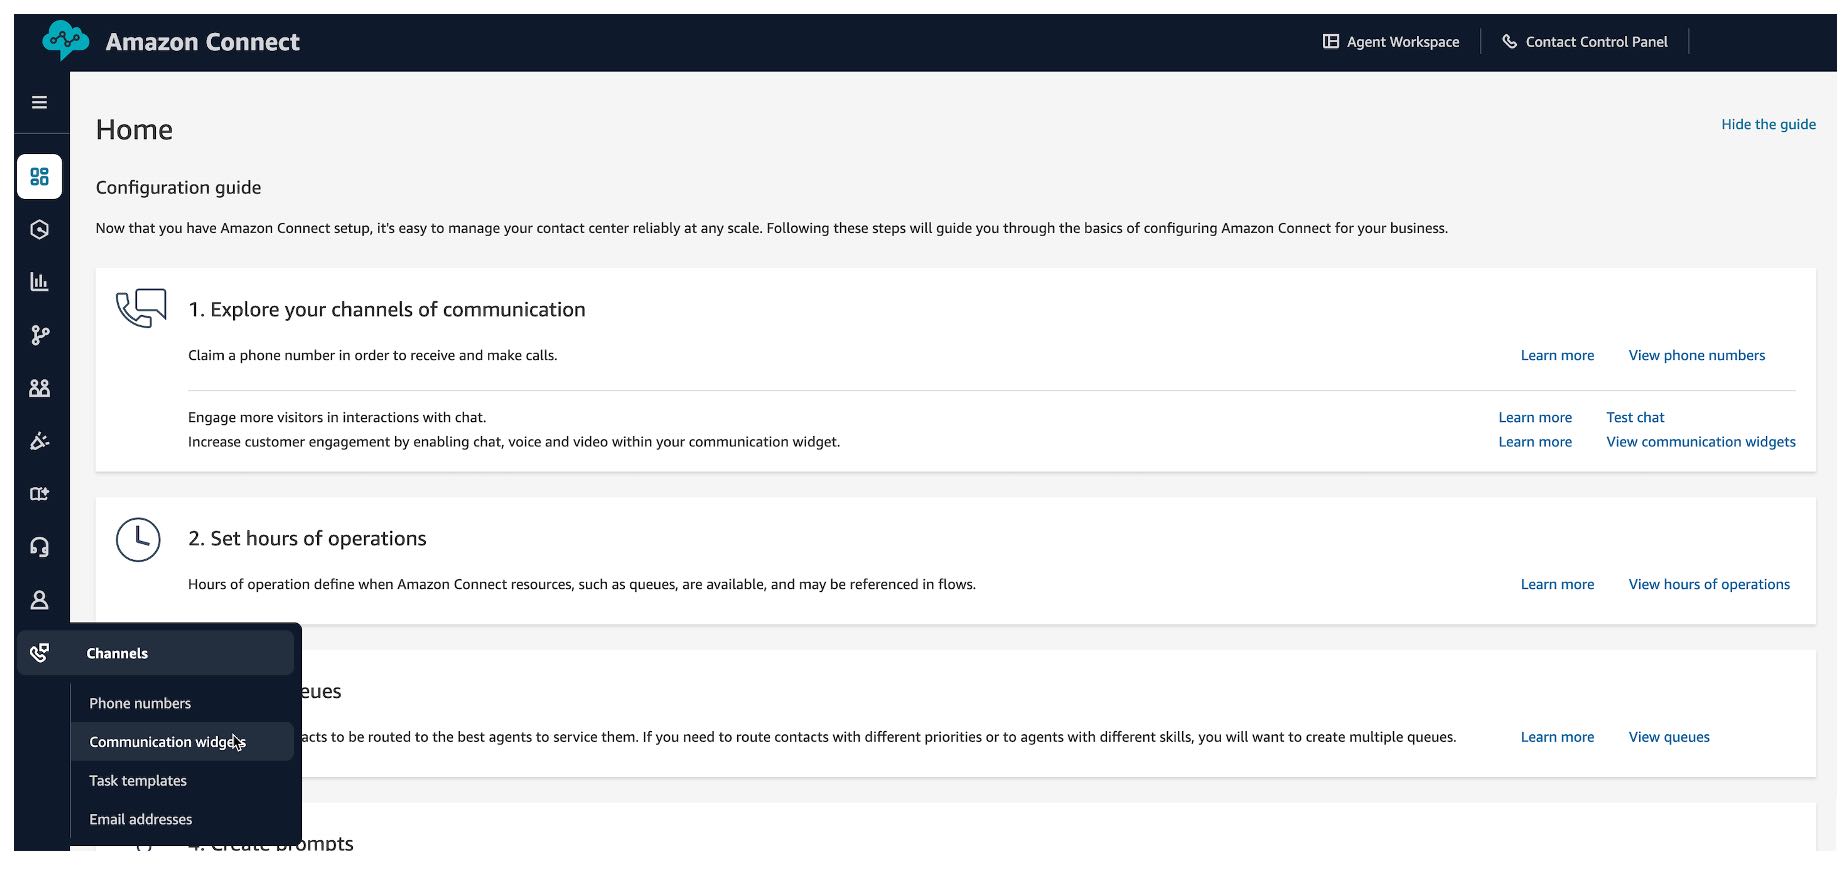
From Amazon Connect UI navigate to Channels > Communication widgets > Add widget
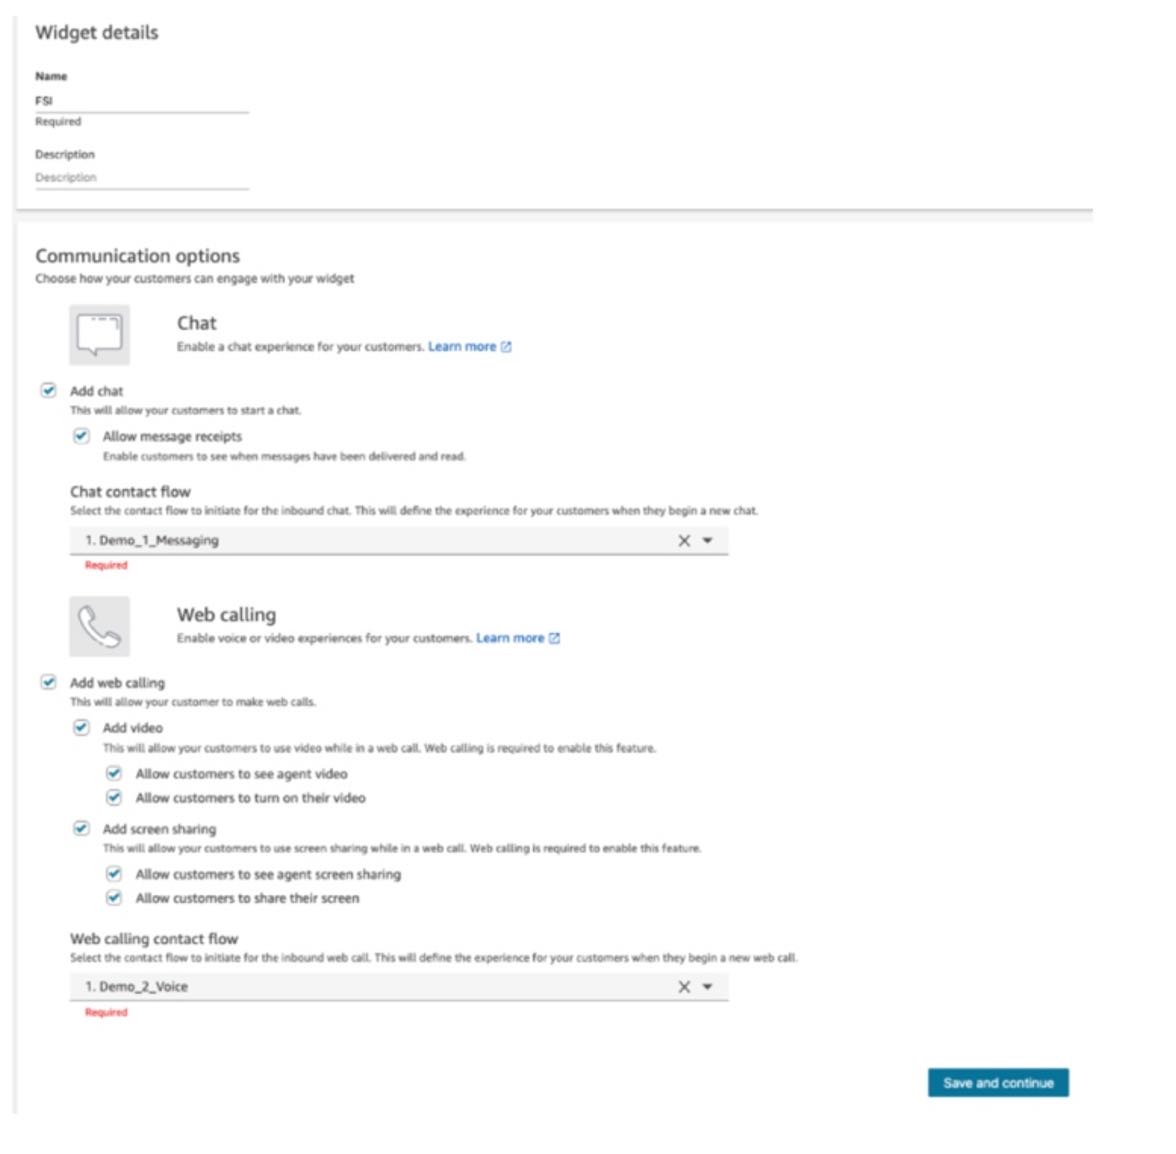
Add the following details:
Name: Enter a name of your choice
In the Chat contact flow, select the -inboindFlow-_20250508_222550 flow from the drop down.
Select the same flow for the Web calling contact flow
Click Save and continue
On the Customise widget page, update the Define widget access button styles as follows:
Start chat icon background color: 0f1e5a
Icon Color – Leave White
Minimize chat icon background color: 0f1e5a
Icon Color - White
Update the Widget Header with the following changes:
Header message, change to: 24/7 Support
Change Header color to: 0f1e5a
Leave widget background color as default: ffffff
Leave the Logo URL blank
In the Chat view section, make the following changes:
Change the Typeface to Tahoma
In the System Message Display Name, hit the space bar (this removes the System Message)
In the Bot Message Display Name, hit the space bar (this removes the System Message)
IN the Text Input Placeholder, hit the space bar (this removes the System Message)
Change the Agent chat bubble color, to 6fa3d9
Change the Customer chat bubble color to bd9a62
Click Save and </b>continue</b>
In the Domain & Security section make the following changes:
In the Add the required domains for the communication widget. Paste the URL copied from the WebsiteURL CloudFormation stack
On the final review page, select Copy Script
Configure Webpage
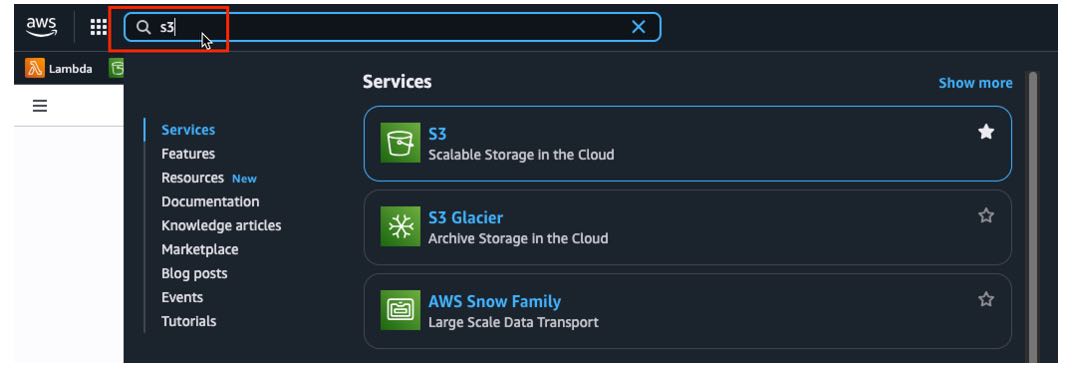
Login to your AWS account and navigate to S3.
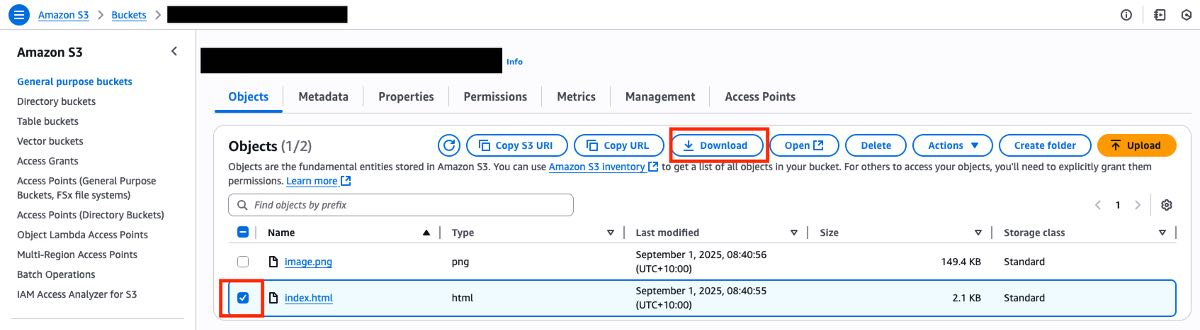
Search for the S3Bucket name noted down in step 10 Section CloudFormation Deployment.
From the root folder, select the index.html file and click download.
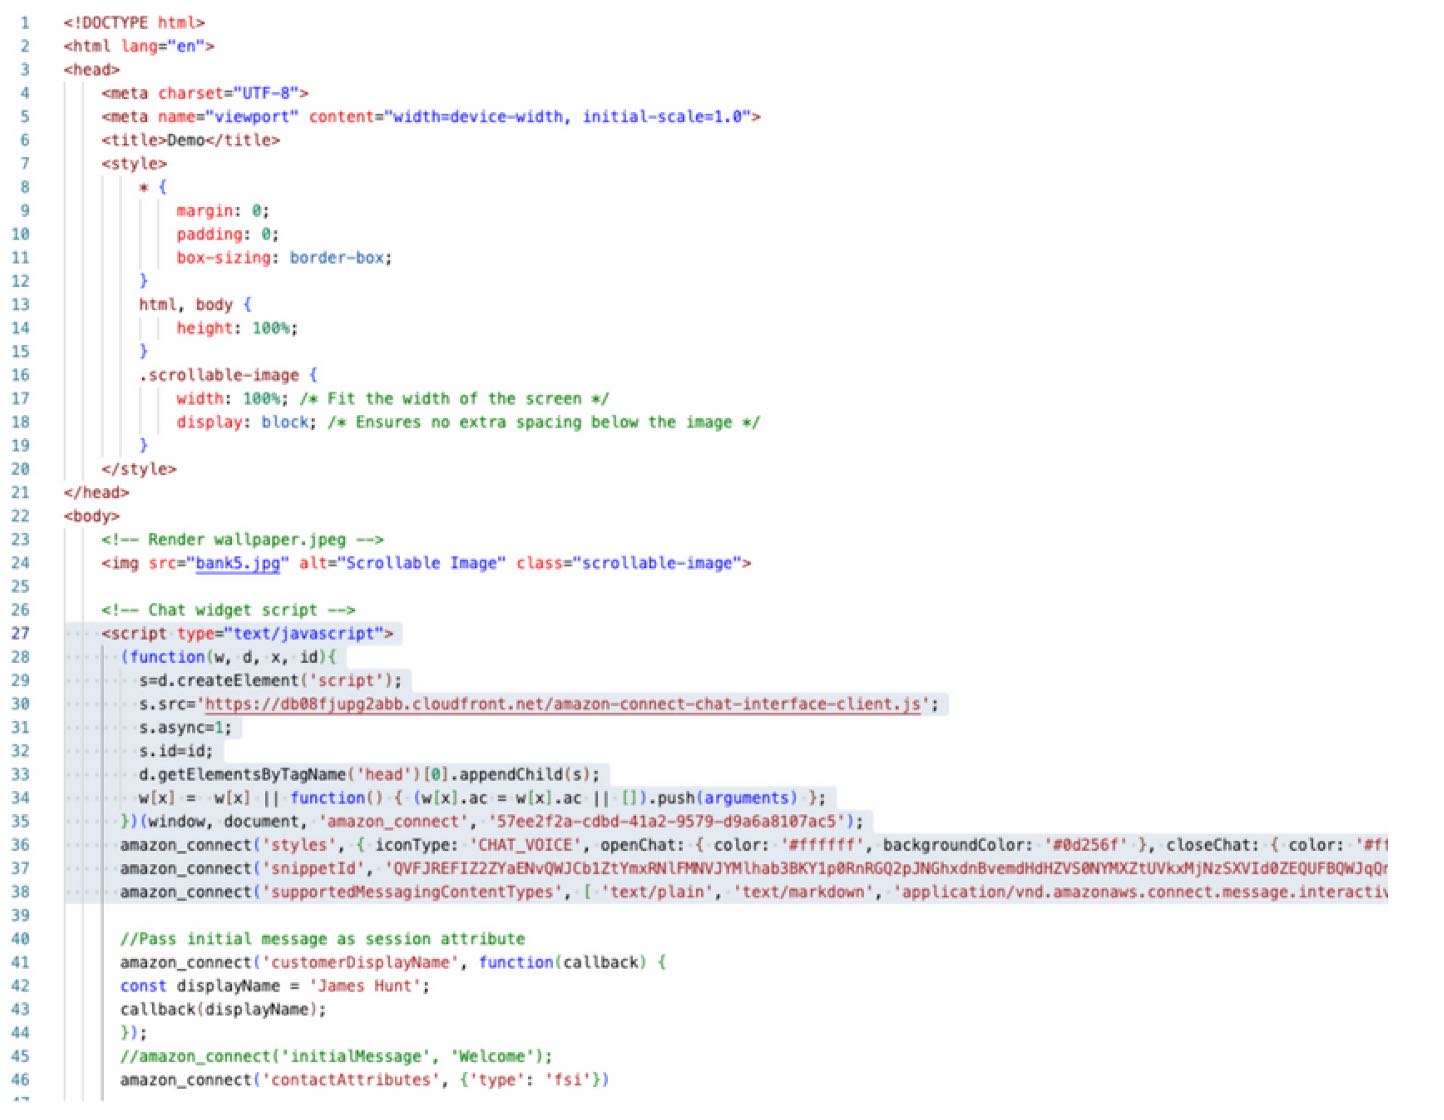
Open the file using a text editor, delete lines 27 – 39.
Paste the Widget script into the same file starting at line 27Note: the above is used for updating the test webpage included in the deployment package. To display this on your own webpage, you will need to update the script within your website.
Save the file as index.html to your local machine
Navigate back to the S3 bucket and add to new file updated file to the bucket.
Click Upload. This will overwrite the existing .html file
Test
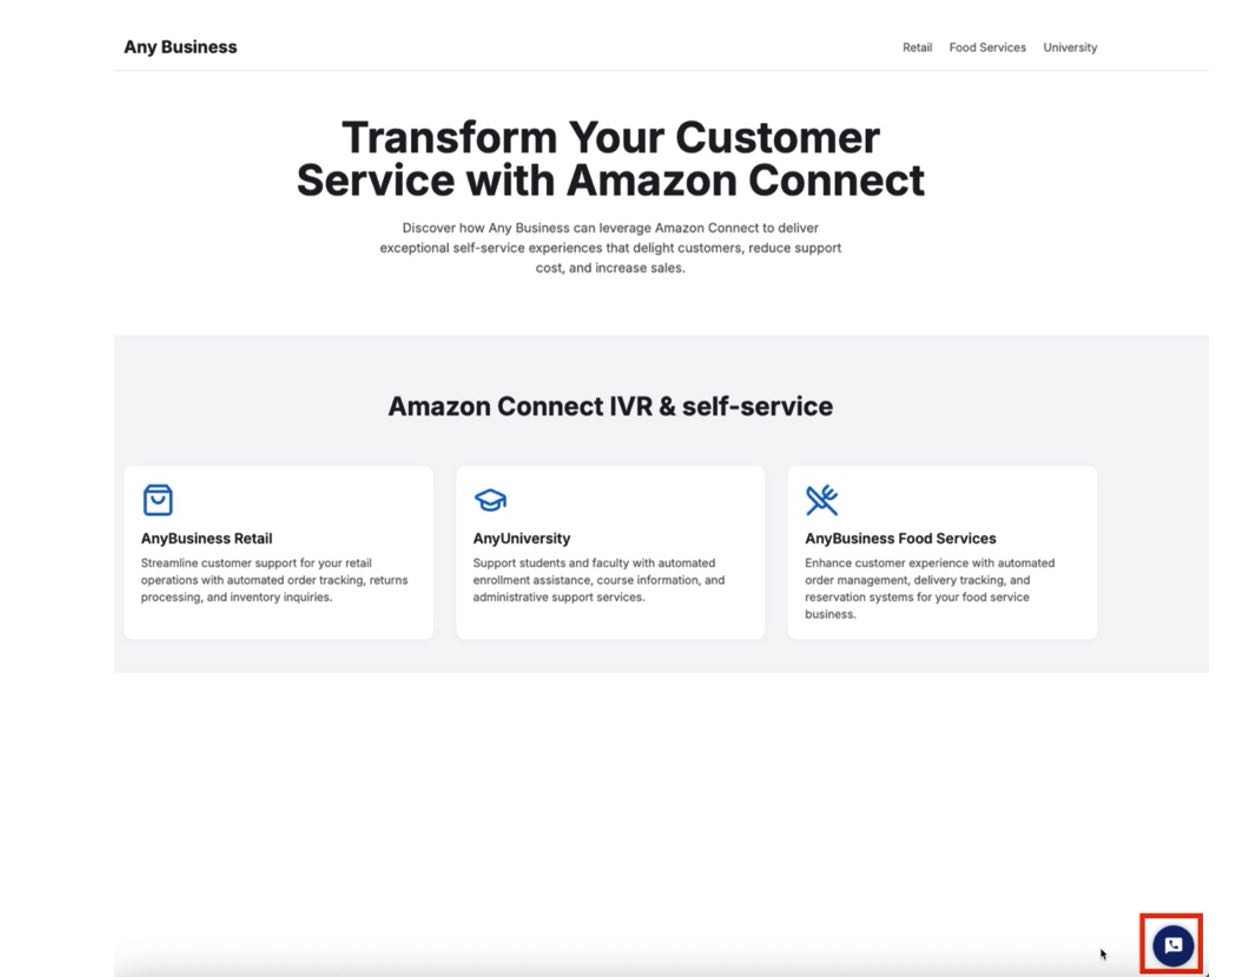
You can access the deployed solution through the static webpage.
Navigate to CloudFormation in the AWS Console
Select the stack name you created in step 3 of the Deployment Guide, CloudFormation section.
Click on the Outputs tab, click on the WebsiteURL Key in the value column.
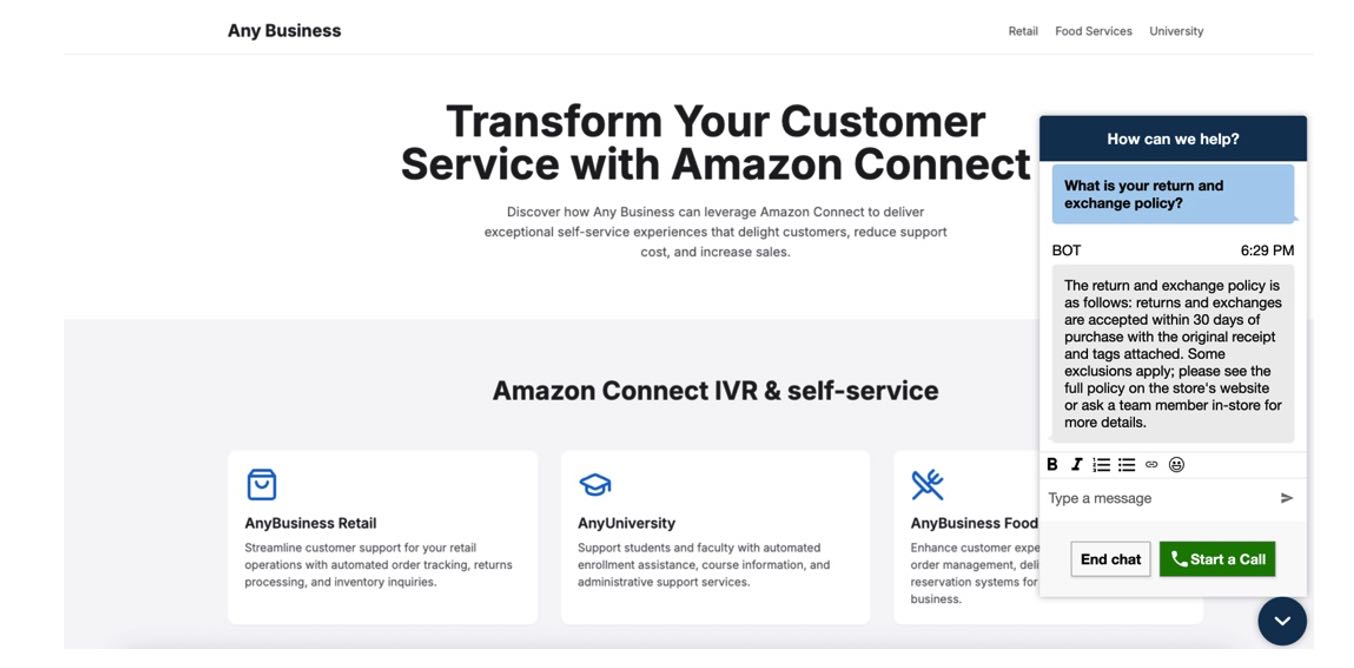
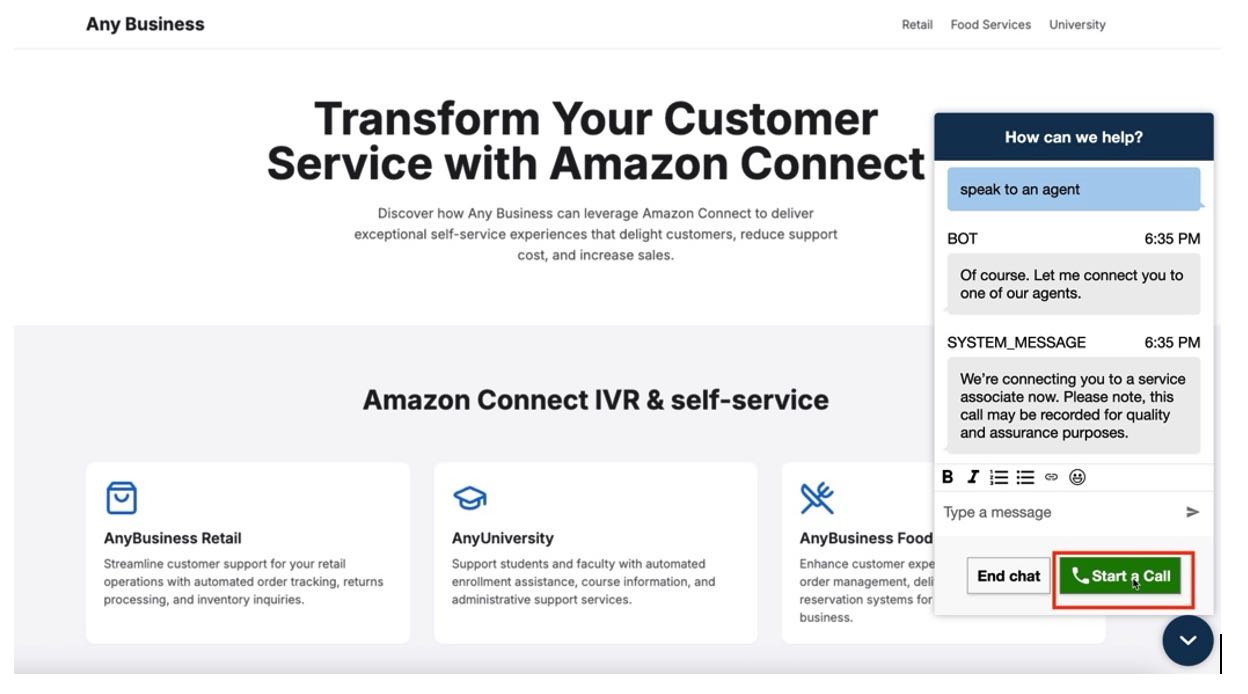
This is a test webpage of Any Business, select the test chat widget on the bottom right to start a chat.
Customers can submit questions for self-service support. The FAQBucket includes a Word document containing frequently asked questions, which will be used as a reference for providing answers. For instructions on how to upload your own FAQ document, please see the next section, “Change FAQ document.” Example questions
What is your return policy?
How do I return an item?
How can I contact support?
Do you have a loyalty program?Note: Amazon Q is an AI assistant that lets you ask questions in plain language. If the answer exists in the connected data sources, Amazon Q will understand what you mean, find the right information, and give you a helpful response—even if you ask the question in a different way. For example, if the document says “What is your return and exchange policy?” and a customer asks “I want to return my package,” Amazon Q will recognize they are the same topic and provide the return policy. If the question is not covered in the data, Amazon Q will let you know it doesn’t have an answer.
At any stage the agent can say “speak to an agent” to be transferred to an agent via chat.
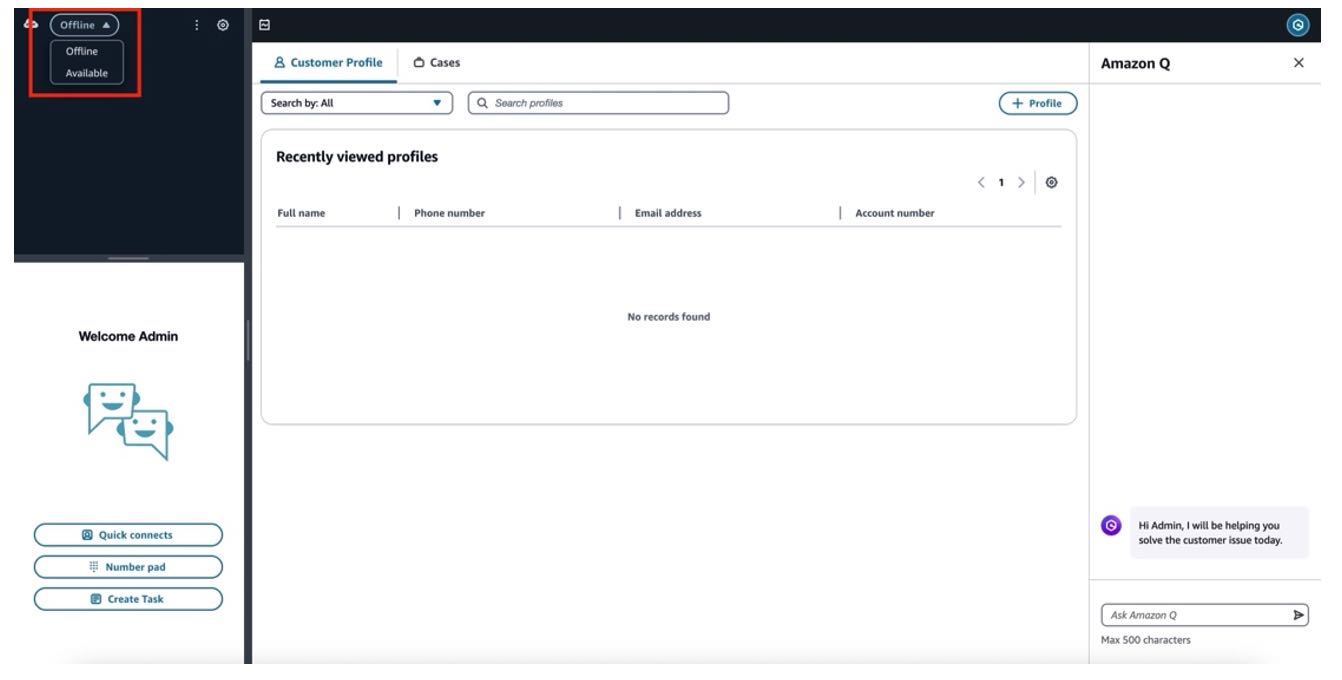
Log the agent into Amazon Connect and set status to ready to accept the chat.
Customers can move to voice, video and screenshare by select start call and enabling their camera
Agents will receive guidance throughout an interaction and a post-call summary following each interaction to automate their after-call work.
How to update the FAQ document with your own data
Login to your AWS account where you deployed the CloudFormation template.
Navigate to CloudFormation>
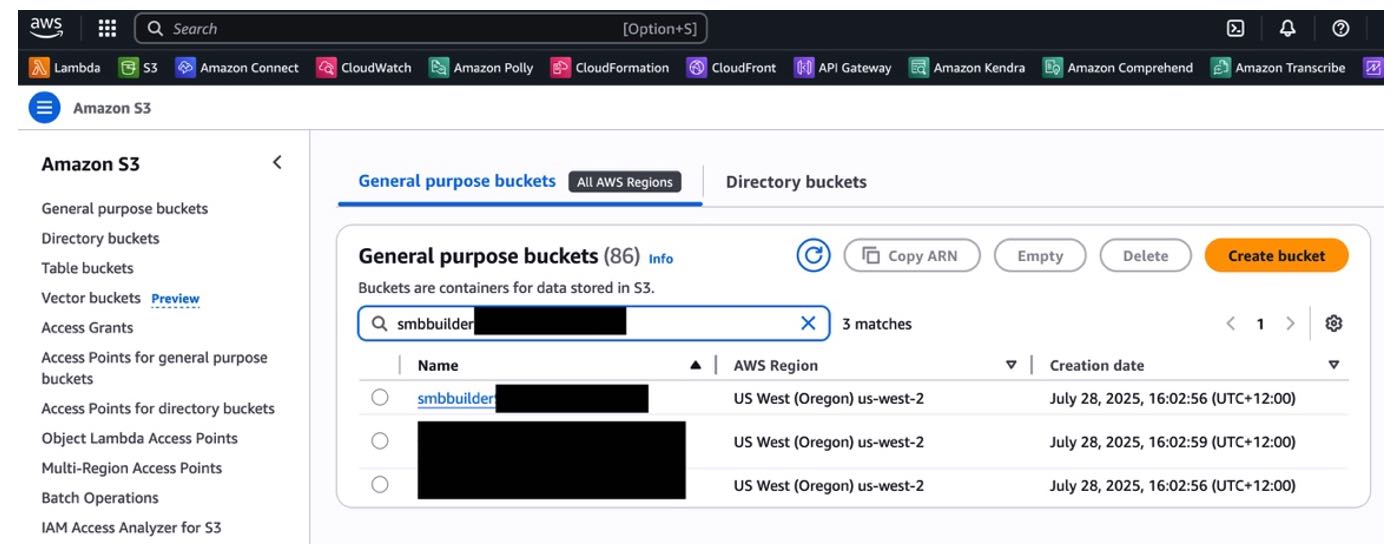
Select the stack name > Outputs and copy the FAQBucketName
Navigate to S3 and search for the bucket name.
The bucket will contain a single file. Please delete this file and upload your own document containing FAQ questions and answers. Note: Your document must meet the following requirements: Accepted formats: plain text (.txt), Word document (.docx), or PDF (.pdf) File size must be less than 1 MB Only include text-remove any images, as Generative AI only processes text
Clean up
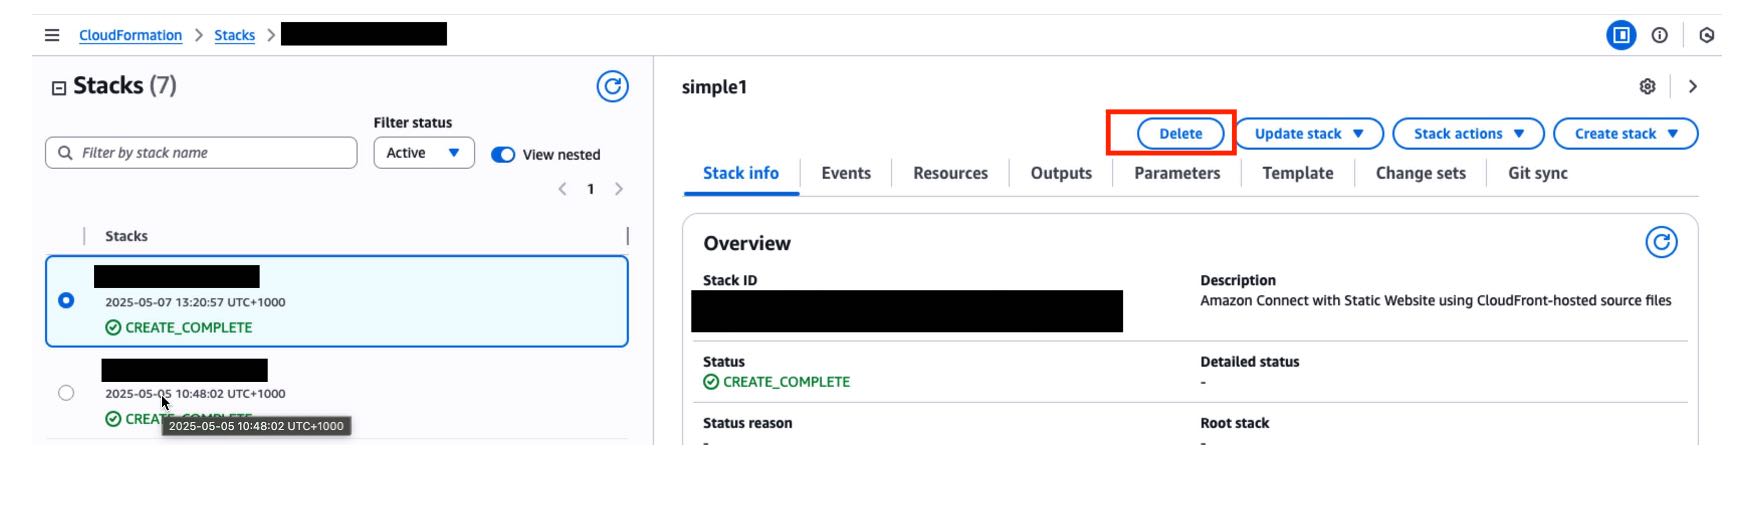
To delete the solution login to your AWS account where you deployed the CloudFormation template.
Navigate to CloudFormation
Select the stack name > Delete > Delete
Summary
This guide provides step-by-step instructions to deploy an Amazon Connect self-service customer experience solution. Upon completion you will have a GenAI chat bot with web calling capability, and an OMNI Channel contact centre.
Customers are responsible for making their own independent assessment of the information in this document. This document: (a) is for informational purposes only, (b) represents AWS current product offerings and practices, which are subject to change without notice, and (c) does not create any commitments or assurances from AWS and its affiliates, suppliers or licensors. AWS products or services are provided “as is” without warranties, representations, or conditions of any kind, whether express or implied. AWS responsibilities and liabilities to its customers are controlled by AWS agreements, and this document is not part of, nor does it modify, any agreement between AWS and its customers.