Microsoft Windows Server End-of-Support
Overview
AWS provides a detailed overview about AWS options for EOS products from a business perspective in the blog, Know your AWS options for Microsoft Windows Server 2012 End of Support. In this implementation guide, we supplement this overview by examining the technical perspective and exploring technical ramifications of EOS for your operating systems.
The main issue from a technical perspective is that that after an EOS date, identified products will no longer receive security updates, non-security updates, bug fixes, technical support, or online technical content updates.
Other technical issues include:
Inability to Upgrade the OS: Customers are unable to upgrade the OS due to application incompatibilities with newer versions of Microsoft Windows Server.
Application Incompatibility: Similar to the bullet above, some applications running on the EOS operating systems can’t be upgraded.
Lack of Knowledge or Options: Many IT professionals may not know what tools are available to tackle the EOS problem.
Security and Compliance Concerns: Many regulated environments have requirements to keep applications and operating systems up to date. Older operating systems that cannot be patched remain vulnerable to malware, ransomware attacks, and security breaches.
Lack of Staffing or Funding to Handle the EOS Issues: The EOS issue is often not top of mind and can be pushed to the bottom of the priority list given other more high-profile tasks or priorities.
Cost Prohibitive Solutions: Some extended support products, solutions, and offers look good on paper to an IT department but may end up being cost-prohibitive and simply delay tasks to be dealt with later.
Lack of New Features and Innovation to Leverage: Older operating systems do not have new features and capabilities that can help further improve business operations.
To address these technical issues, AWS offers technical solutions and offerings to help customers avoid EOS issues that may pose a risk to their operating systems.
AWS Technical Solutions and Offerings
AWS and AWS Partners are focused on helping you migrate, upgrade, and modernize your Windows Servers workloads with dedicated programs, tools, and technical assistance. AWS offers several pathways to solve EOS-related concerns. As you assess your environment and review your Microsoft licensing options, you can consider AWS offerings to make the process as seamless as possible.
In the following section, we will review some of the available options to help with Windows 2012 and 2012 R2 EOS. These approaches also apply to older EOS operating systems, such as Windows 2008 and 2008 R2.
A common practice for customers currently running EOS products in the AWS Cloud is to opt for a server migration or select the automated upgrade option available in AWS.
When you have EOS Windows servers on-premises, performing an in-place upgrade or side-by-side upgrade requires additional resources, including storage and compute that are not often readily available. AWS provides a prescriptive cloud service, AWS Application Migration Service to migrate these servers in addition to upgrading them in a streamlined verifiable manner. This service provides an immediate cost benefit, elasticity, and improved security posture for your workloads. Application Migration Service helps you move and improve your Windows workloads and uses the same automation options discussed in this implementation guide to upgrade your migrated servers.
For the AWS options described in this implementation guide, extensive testing is required to help ensure that the applications running on the upgraded OS are still functional.
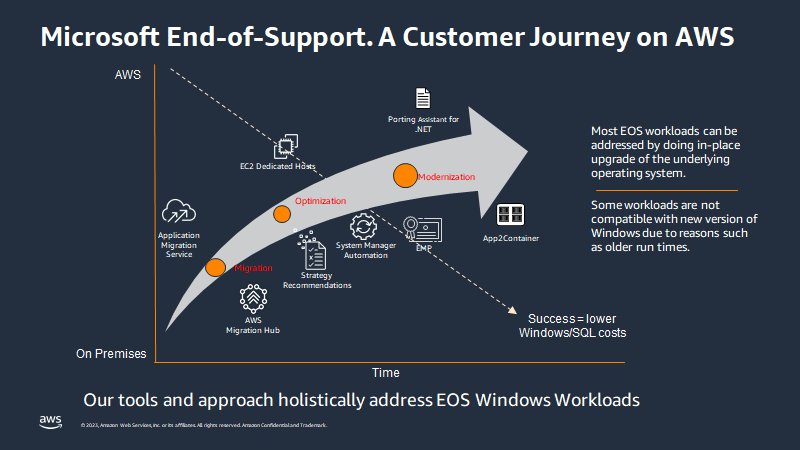
Figure 1. AWS offerings for EOS Windows workloads.
In the sections below, we present three options for upgrades:
- Option 1 (Recommended - used by the majority of AWS customers): Automated Upgrade using Amazon Systems Manager (SSM) Runbooks
- Option 2: Manual Upgrade of your Windows EC2 Instance
- Option 3: Other Considerations When Trying Addressing EOS
[RECOMMENDED] Automated Upgrade using Amazon Systems Manager (SSM) Runbooks
You can upgrade your existing instances to the latest version of Windows Server through AWS Systems Manager. In March 2023, AWS published a video titled “Navigate the Windows Server end of support challenge with AWS”. If you’d like to see this approach in action, fast forward to time stamp 34:36.
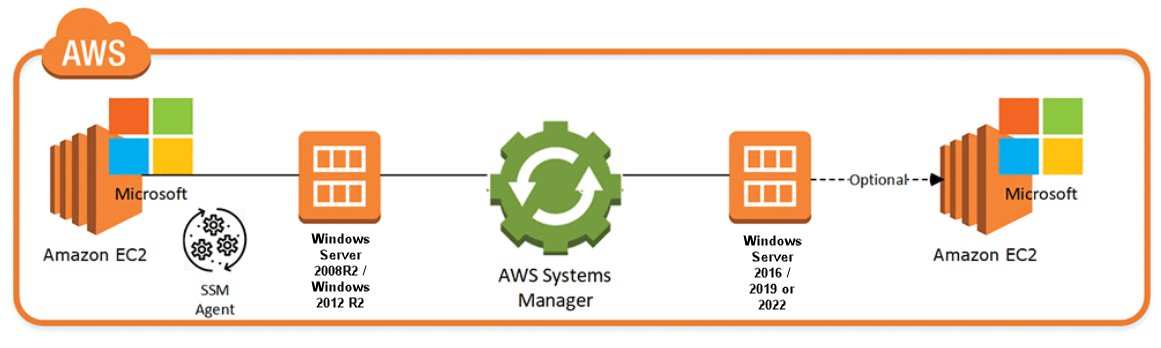
Figure 2. Flow depicting how to navigate Windows Server EOS with AWS.
Prerequisites
To complete this upgrade, you must meet the following prerequisites:
You will need an existing Amazon EC2 instance that needs to be upgraded.
You should have the SSM Agent installed and working on the instance you intend to upgrade.
TLS 1.2 should be enabled for this automation to work on the instance.
At least 20 GB of free space is needed on the root for the upgrade to succeed.
If the instance is joined to an existing Active Directory domain, it is recommended that you specify a SubnetID that does not have connectivity to Active Directory to avoid hostname conflicts.
You will need a public subnet with auto-assign public IPv4 addresses set to TRUE. If needed, consider upgrading using the method described in the previous section.
This automation works only on 2008 R2, 2012 R2, 2016 and 2019 Servers.
For Windows 2008R2, the Amazon EC2 instance will be upgraded to 2012 first, and then to 2016 or 2019.
You will also need an AWS Identity and Access Management (IAM) role to allow the Amazon EC2 instance to communicate with AWS Systems Manager and to have it perform the upgrade process on your behalf. For instructions on how to create the necessary role, see Step 1: Configure instance permissions for Systems Manager in the AWS Systems Manager User Guide.
This automation will allow you to upgrade an instance that does not use an AWS provided Windows License, however, there are some additional steps that you can find in our documentation.
For more details, review the AWS Systems Manager Automation runbook reference documentation.
Limitations
This automation doesn’t support upgrading Windows domain controllers, clusters, or Windows desktop operating systems. This automation also doesn’t support Amazon EC2 instances for Windows Server with the following roles installed:
Remote Desktop Session Host (RDSH)
Remote Desktop Connection Broker (RDCB)
Remote Desktop Virtualization Host (RDVH)
Remote Desktop Web Access (RDWA)
Supported Upgrade Paths
The Systems Manager Automation runbook AWSEC2-CloneInstanceAndUpgradeWindows supports the following upgrade paths:
Windows Server 2008 R2 to Windows Server 2012 R2, to Windows Server 2019 or 2022
Windows Server 2012 & Windows 2012 R2 to Windows Server 2016
Windows Server 2012 & Windows 2012 R2 to Windows Server 2019
Windows Server 2012 & Windows 2012 R2 to Windows Server 2022
Windows Server 2016 to Windows Server 2019
Windows Server 2016 to Windows Server 2022
Windows Server 2019 to Windows Server 2022
Upgrading your Windows Server Instance
In this section, we detail the steps for completing this upgrade using the automation. Throughout these steps, you will need to make note of specific pieces of information that you will need for the automation. We recommend having a notepad or other writing tool to keep track of this information.
Select one of the instances from your EC2 console, and make note of the following information:
a. The Instance ID

Figure 3. Screenshot showing where to find the Instance ID.
b. IAM role that you created that has access to Systems Manager. The figure below shows the Policy name, that you need to attach to the role, which is associated to the instance.
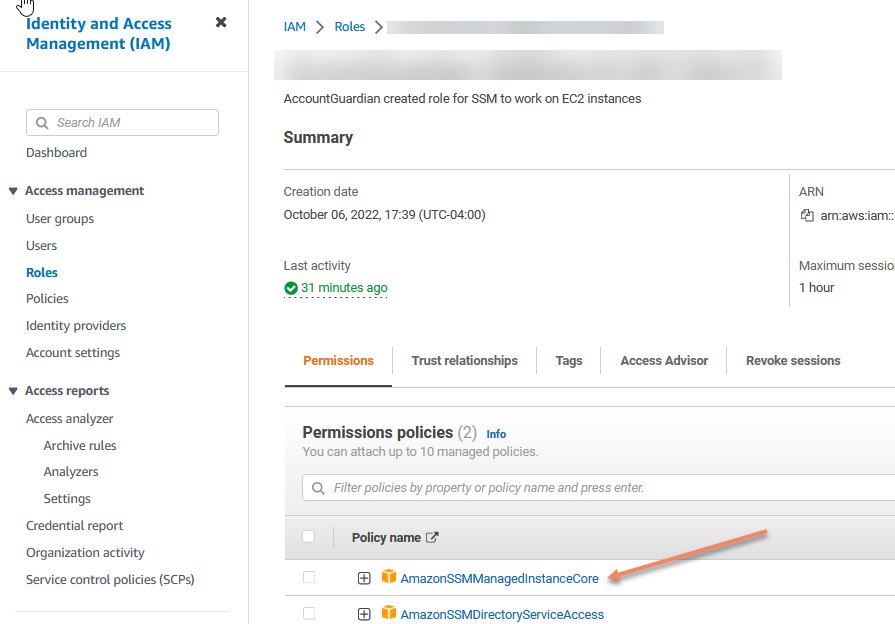
Figure 4. Screenshot showing the Policy name.
c. Find the public SubnetID with auto-assign public IPv4 addresses, which is set to TRUE. You can find this information by reviewing the EC2 instance Networking properties.
d. Make note of the Instance password, which you will need for later steps.
e. The figure below shows an example of a Windows 2012R2 machine that has several apps loaded on the desktop and installed on the system. We will use this as a reference once the process is completed.
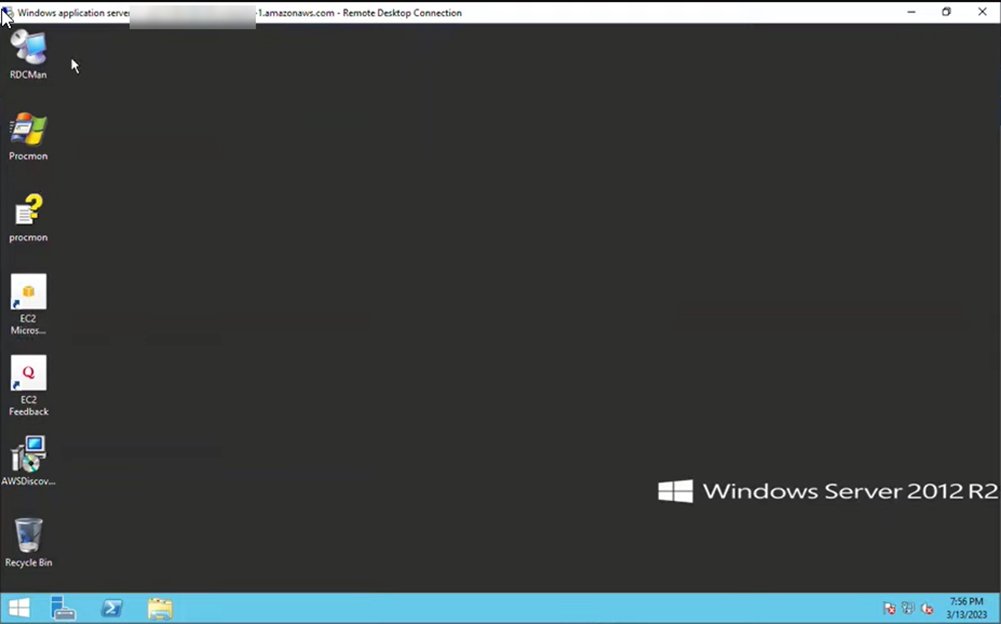
Figure 5. Screenshot showing installed applications.
- Go to the Amazon Systems Manager console, and navigate to the Automation tab under the Change Management section.
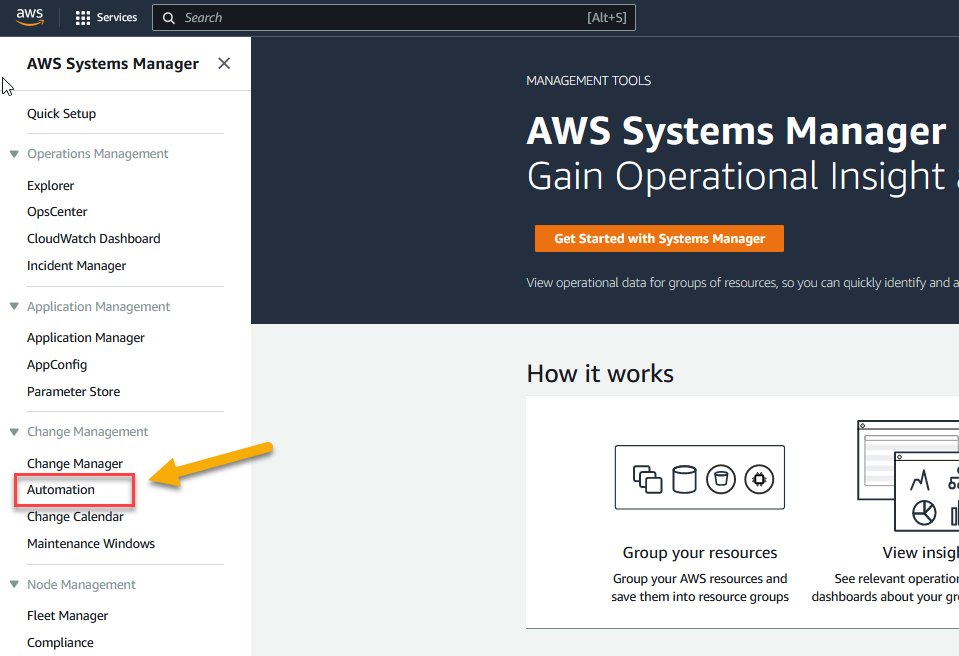
Figure 6. Screenshot showing where to find the Automations tab.
- Select Execute automation.
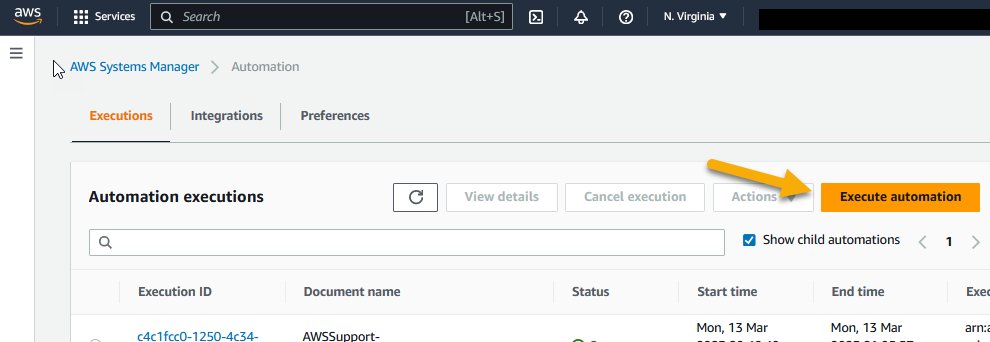
Figure 7. Screenshot showing where to find the Execute automation button.
- In the Search area, write clone to create a filter, and a set of automation documents will appear. Select the document named AWSEC2-CloneInstanceAndUpgradeWindows.
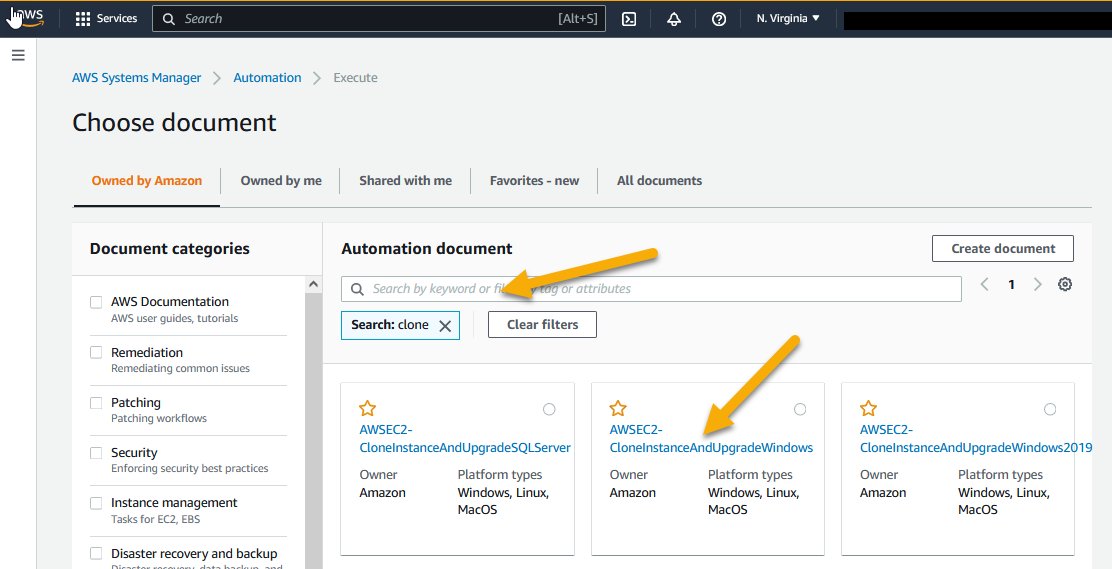
Figure 8. Screenshot showing how to find the right document.
- Once the document has loaded, select Execute automation.

Figure 9. Screenshot showing how to execute the automation for the document.
- On the next screen, you will pick your instance to upgrade. If you already have a name for the instance in mind, you may use that. If not, use the InstanceID you made note of previously.
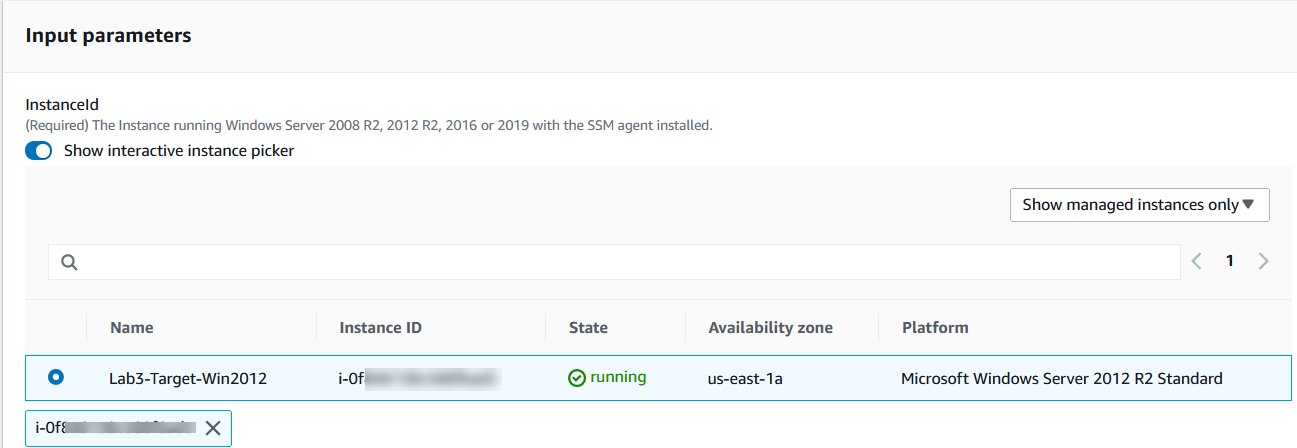
Figure 10. Screenshot showing where to select the instance you want to upgrade.
- Using the information you made note of previously, input the IamInstanceProfile, SubnetID, and finally, the TargetWindowVersion, using the dropdown option. Note the BYOLWindowsMediaSnapshotid field, which needs to be filled out with the Snapshot ID of your EBS volume of the Windows Server 2012R2 installation media, if the instance you are trying to upgrade uses the Microsoft Bring Your Own License (BYOL) option. Once you complete this section, select Execute at the bottom of the page.
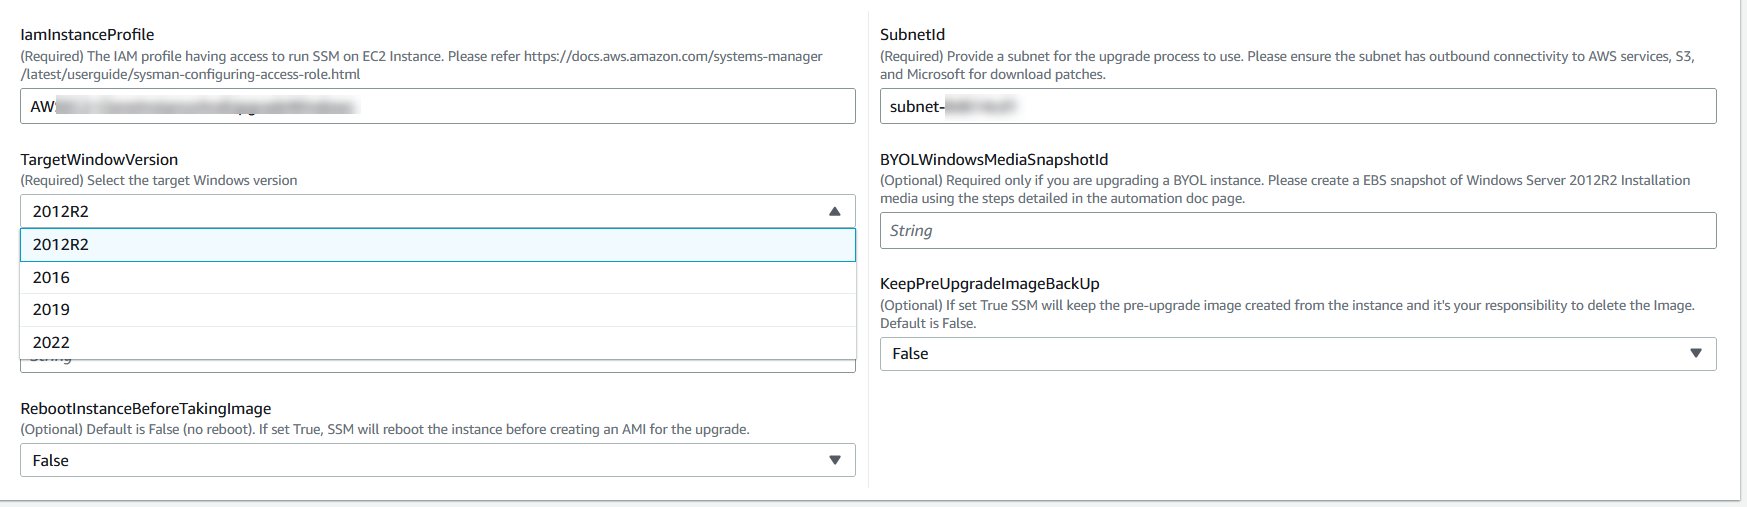
Figure 11. Screenshot showing the fields that must be completed.
- At this point, if you have selected all the correct options, an Execution detail page will appear, as shown in the figure below. The entire process may take over 2 hours to complete. For Windows 2008R2, note that the automation will first upgrade the instance to 2012R2 and then will automatically upgrade to the version of Windows you selected.
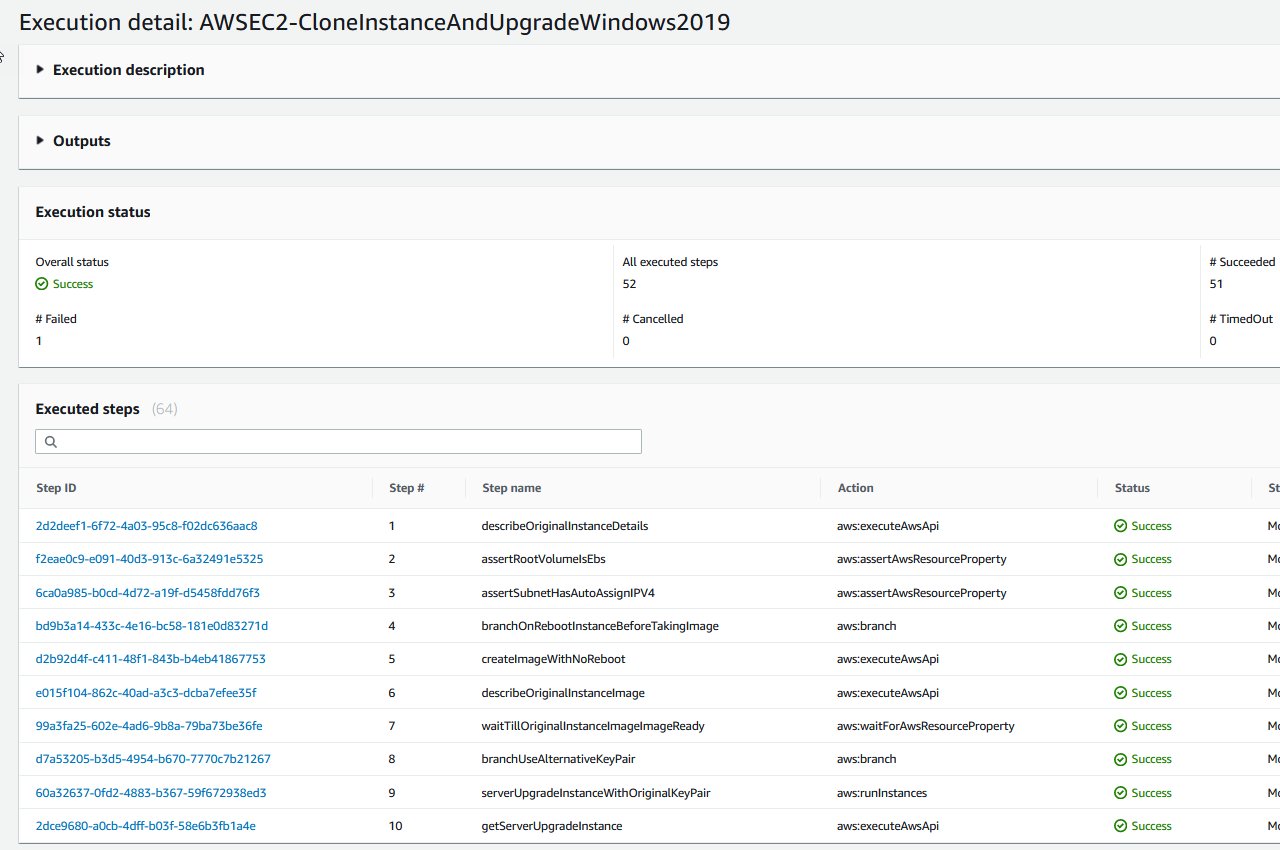
Figure 12. Screenshot showing execution details.
- Once completed, visit the EC2 console. On the left pane, navigate to Images and select AMI. Confirm that you are selecting the AMIs that are listed as Owned by me. You might have a few AMIs in the list. Find one that has a Creation date of when you launched the automation upgrade. You can also search using the attribute AMI name : upgraded. Once you have found your AMI, select Launch instance from AMI.
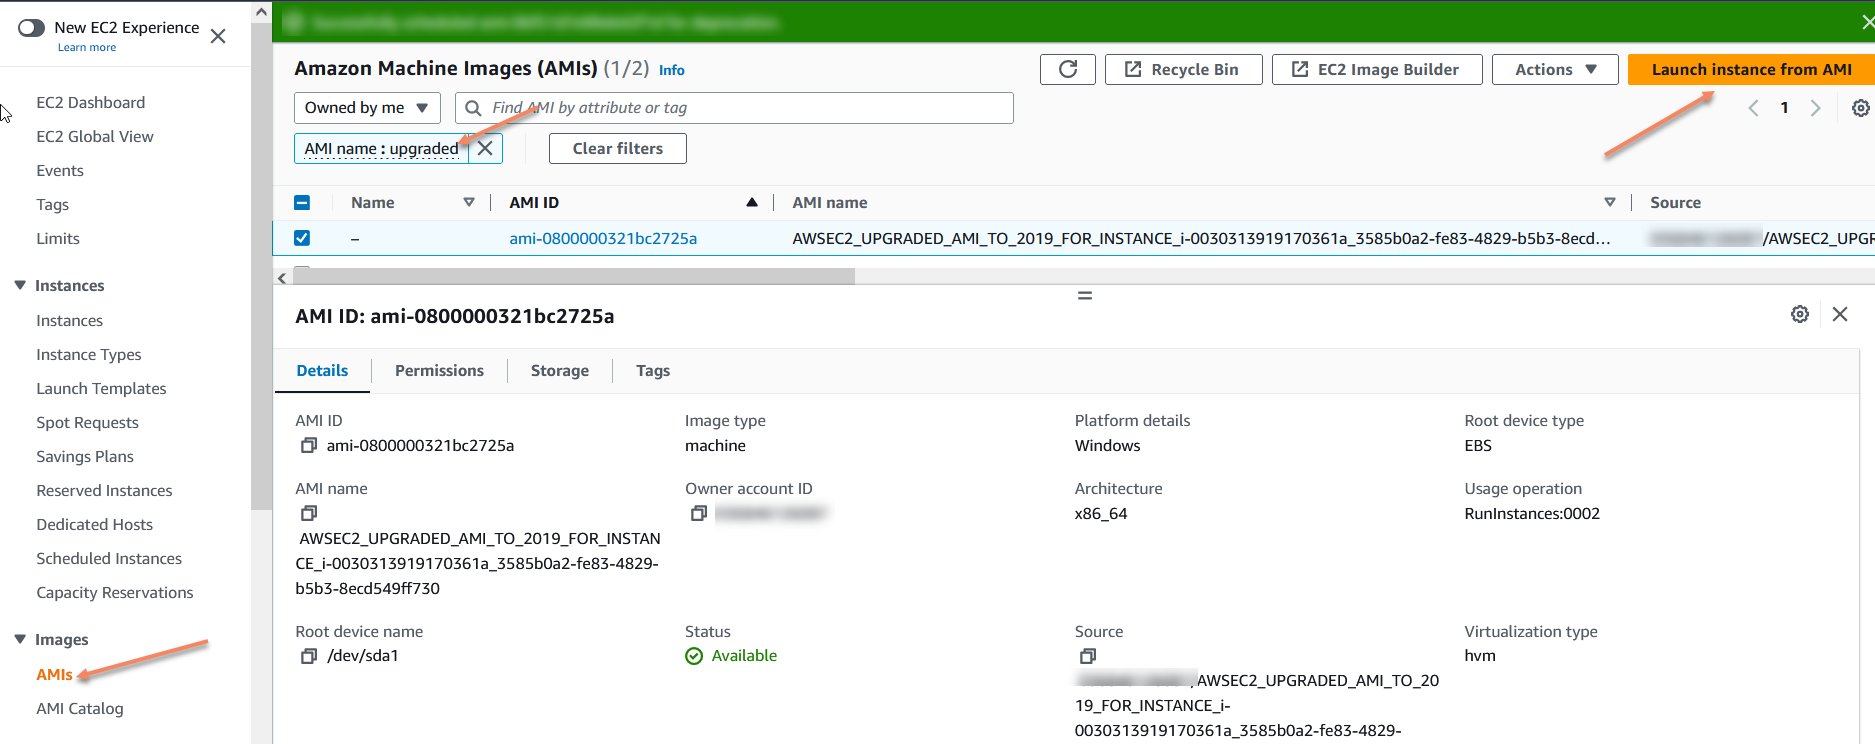
Figure 13. Screenshot showing how to launch an instance from the AMI.
- In the Launch an Instance user interface (UI), you have the option to select the instance type you would like to launch. This is an opportunity for you to right size your instance based on usage metrics. Verify that you have selected the correct VPC that you want the instance to be deployed to and its subnet. Remember that you will need to use the password captured originally from the Windows 2012R2 system, as we cloned this system. You can add the keypair later on, if desired on the new instance. After you have completed this step, select Launch Instance, which should prompt a loading screen for the instance launch, as shown in the two figures below.
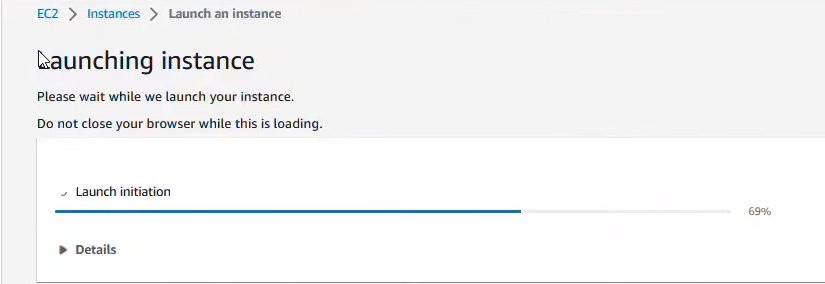
Figure 14. Screenshot showing the loading page for launching the instance.
Figure 15. Screenshot showing a successfully launched instance.
- Validate that the new upgraded instance is accessible, and connect to it through RDP by using the original password you noted earlier in the process.
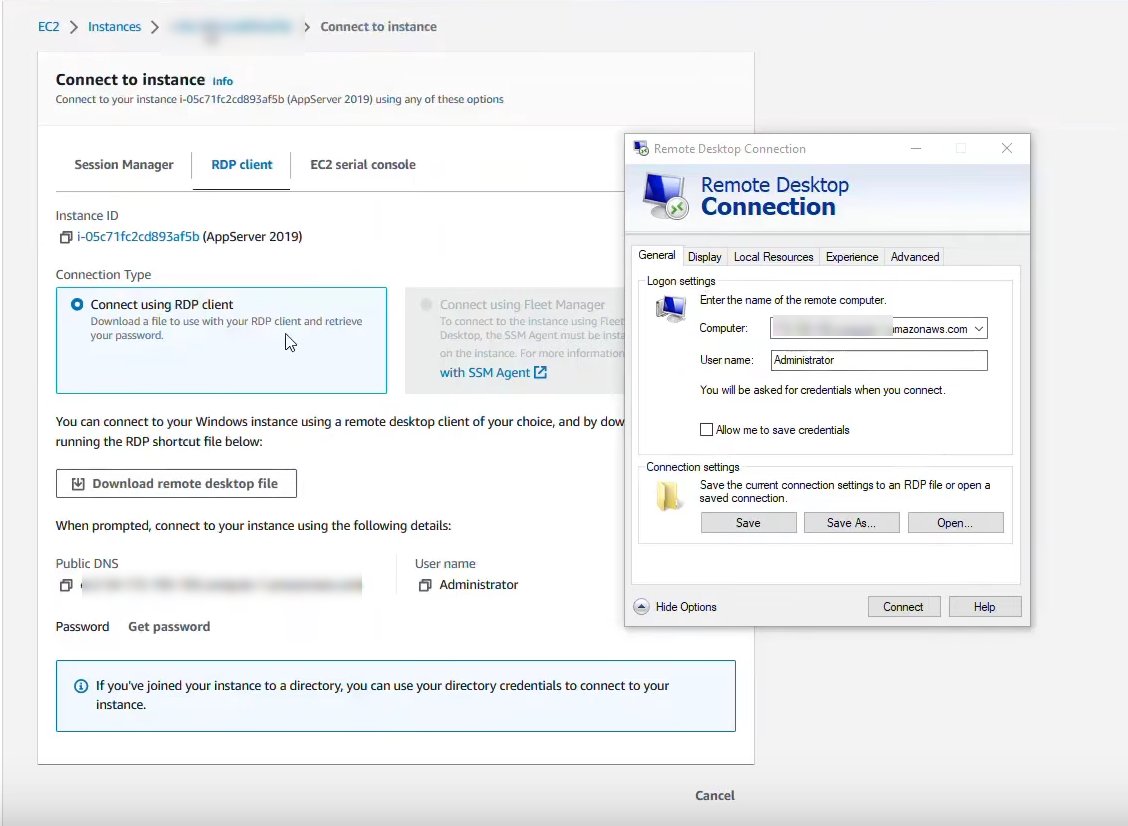
Figure 16. Screenshot showing the RDP connection.
- Once you log in, you should see the applications on the server, or in this example, the same applications displayed on the Windows 2012R2 system. This means that you have automatically upgraded from Windows 2012R2.
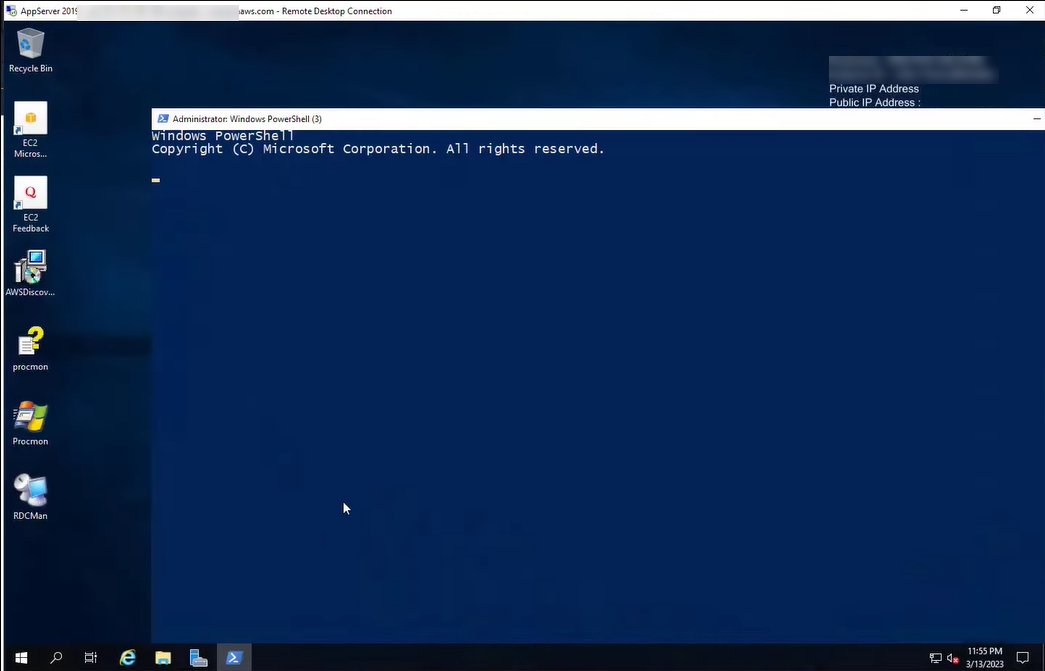
Figure 17. Screenshot showing the upgraded Windows 2012R2 system.
Manual Upgrade of your Windows EC2 Instance
We published a post in Knowledge Center titled “How can I upgrade my EC2 Windows Server instance OS to a newer version?” In this post, we shared recommendations on how to execute a server migration for an Amazon Elastic Compute Cloud (Amazon EC2) instance. We recommend that you have a backup solution in place prior to testing any of the options. For example, before initiating the upgrade, consider creating an Amazon Machine Image (AMI) or creating a snapshot of the Amazon Elastic Block Storage (EBS) volumes. This step provides an additional layer of protection in case of an issue during the upgrade process.
In “User Guide for Windows”, we direct customers to do an in-place upgrade by using our public installation media. AWS published a video in March 2020 titled How can I upgrade my EC2 Windows Server 2012R2 instance OS to Windows Server 2016?, demonstrating how to upgrade an Amazon EC2 instance, specifically a a t2.large instance running on Windows 2012R2. Based on when the instance was deployed, there are additional steps that you will need to take prior to initiating the upgrade:
From the console, collect the instance ID of the Windows Server that you want to upgrade, which you will need in later steps. Confirm that you have at least 10 GB of free disk space.
Confirm that you have the latest paravirtual (PV) drivers on the instance, by comparing it to the list in our user guide.
If the system is an older generation, you might have EC2ConfigService installed. If so, remove EC2ConfigService and replace it with the more recent EC2Lauch v2 service.
Confirm that the AWS Systems Manager Agent (SSM Agent) is installed on the instance as well. This will allow you to run any additional automation and help manage the instance going forward by using AWS Systems Manager.
Go to your AWS EC2 Console and select Snapshots under the Elastic Block Store tab.
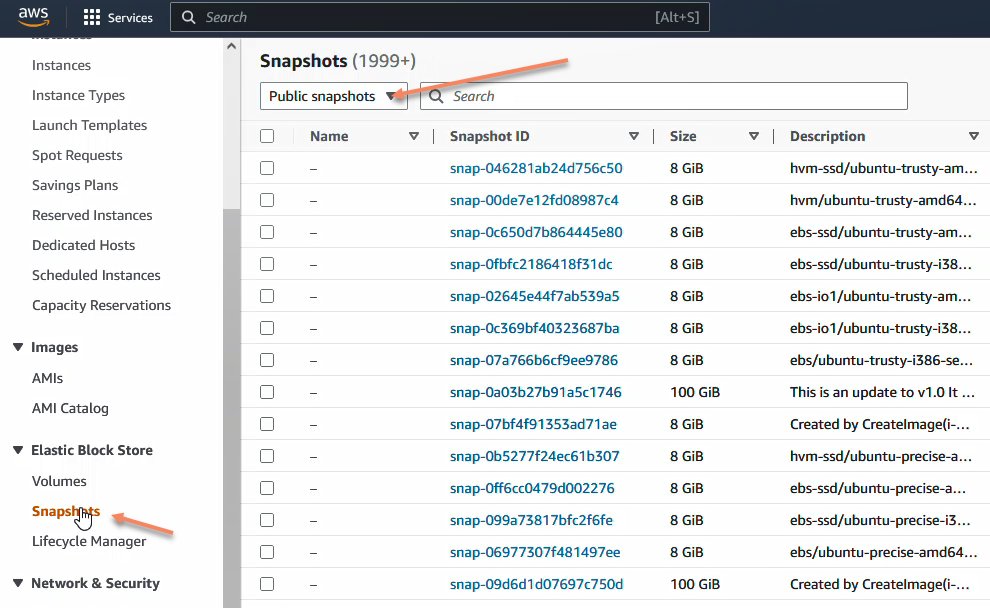
Figure 18. Screenshot showing where to find Snapshots.
- In the Search bar, include filters, such as “Owner Alias=amazon” and “Description:Windows 2019 English Installation Media”.
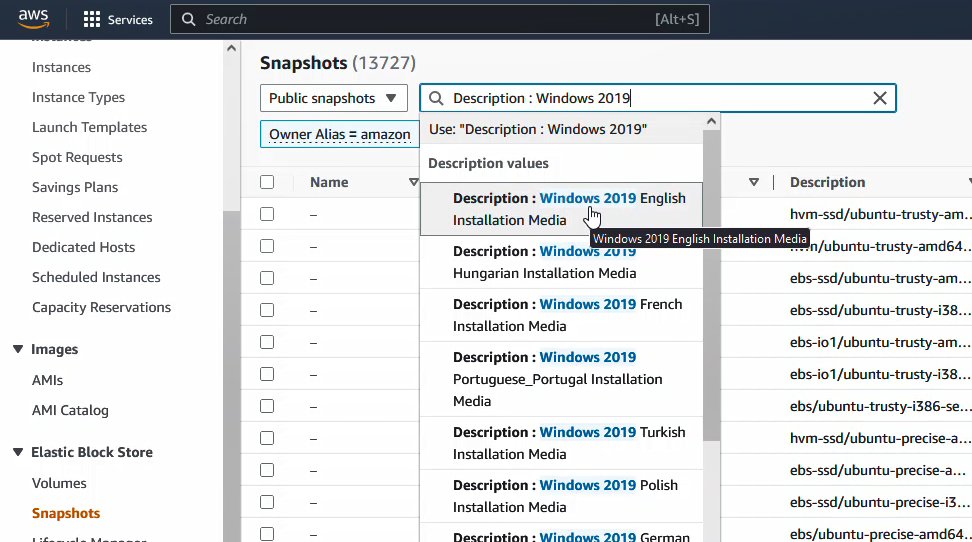
Figure 19. Screenshot showing how to add filters.
- Select the Snapshot, then go to Action and Create volume from snapshot.

Figure 20. Screenshot showing the Actions menu.
- When you create the EBS volume, make sure to select the right Availability Zone in which your instance is located, and select Create volume at the end of the page.
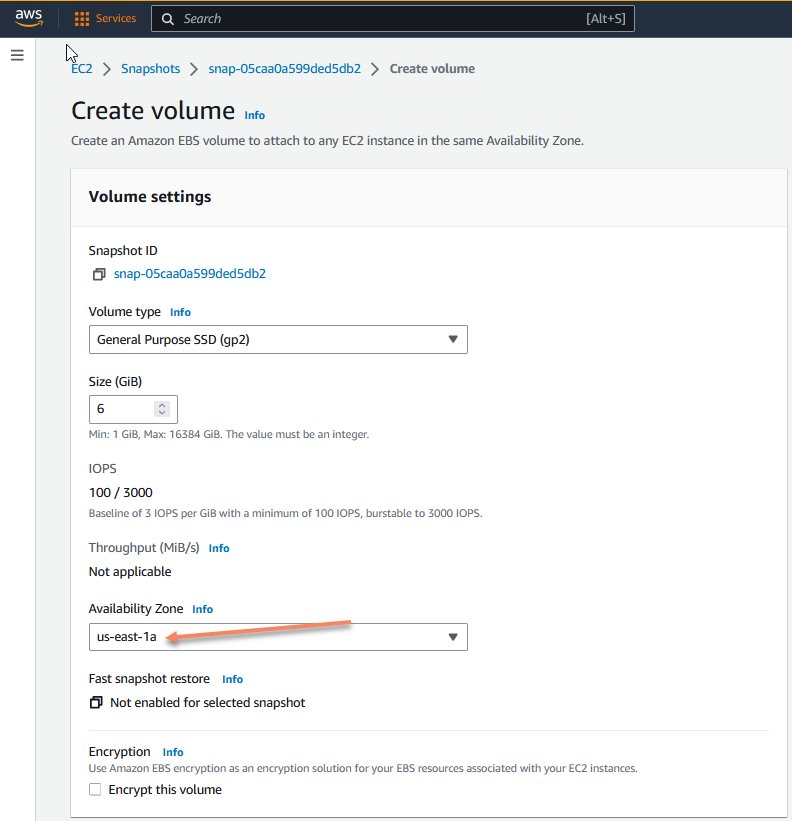
Figure 21. Screenshot showing how to check the Availability Zone.
- Once the EBS volume is created, you can select it to view details and attach it to the instance.
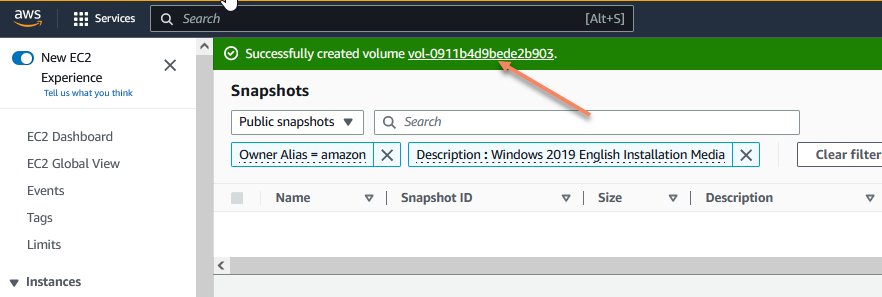
Figure 22. Screenshot showing confirmation of a successfully created volume.
- To attach the volume, select Actions and Attach volume.
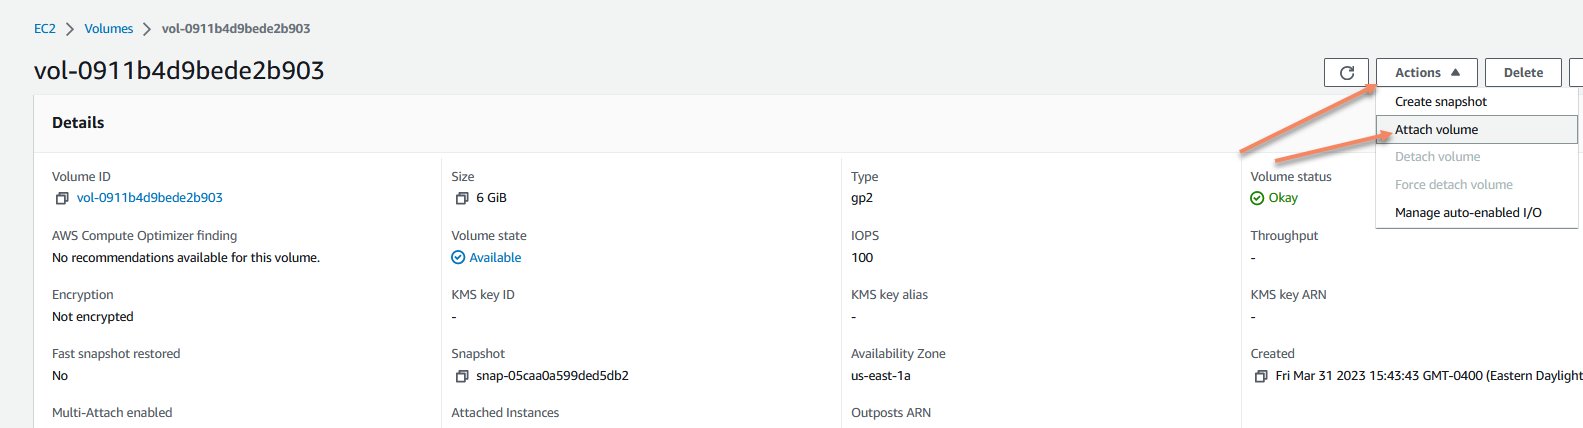
Figure 23. Screenshot showing the Actions menu for attaching the volume.
- Pick the instance that you want to upgrade from the list, and select Attach volume.
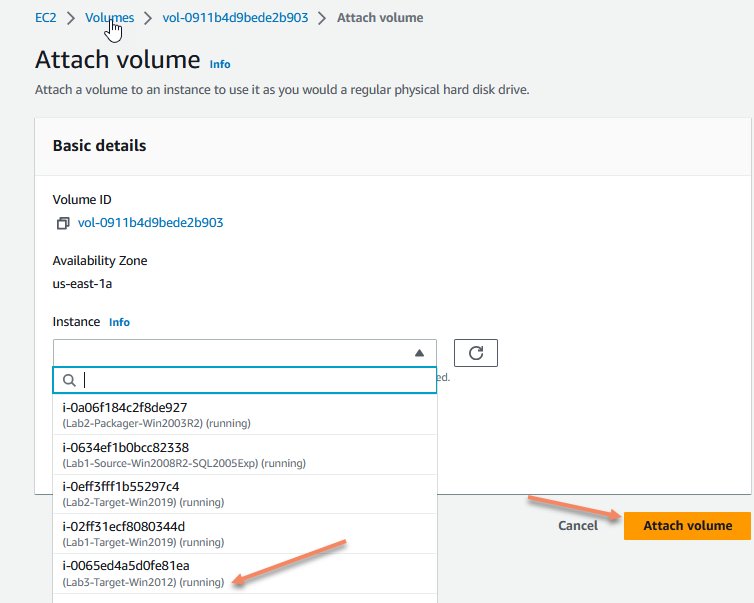
Figure 24. Screenshot showing how to select the right instance for attaching the volume.
- Use Remote Desktop Protocol (RDP) to access the instance, or use Amazon Fleet Manager to connect it. Attach the volume to the Windows 2012R2 machine using Disk Management. You can use the GUI or run diskmgmt.msc from a PowerShell console. Right-click or select Shift + F10 on the volume, and set it Online.
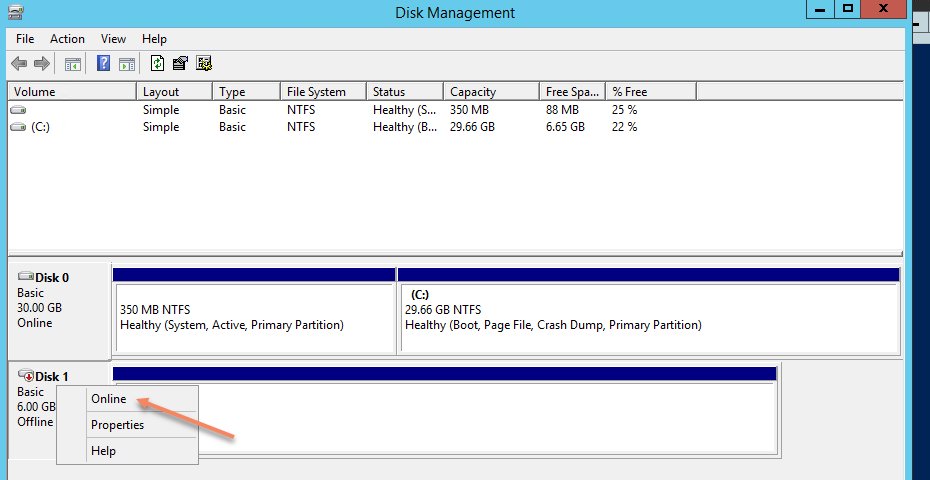
Figure 25. Screenshot showing how to set the disk online.
- This will mount the drive. In this example, the drive is now attached to the system as the d:\.
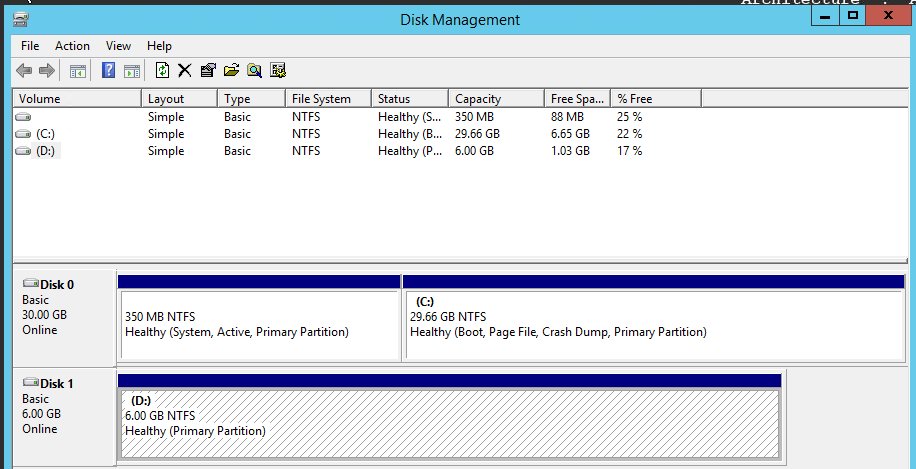
Figure 26. Screenshot showing the mounted drive.
- At this point, you will initiate the upgrade. Open a PowerShell console, change directory to the drive that you have just mounted, and submit the command ./setup.exe /auto /upgrade. If you have done everything correctly, a Windows Server 2019 Setup window will appear. You must select Windows Server 2019 Datacenter edition.
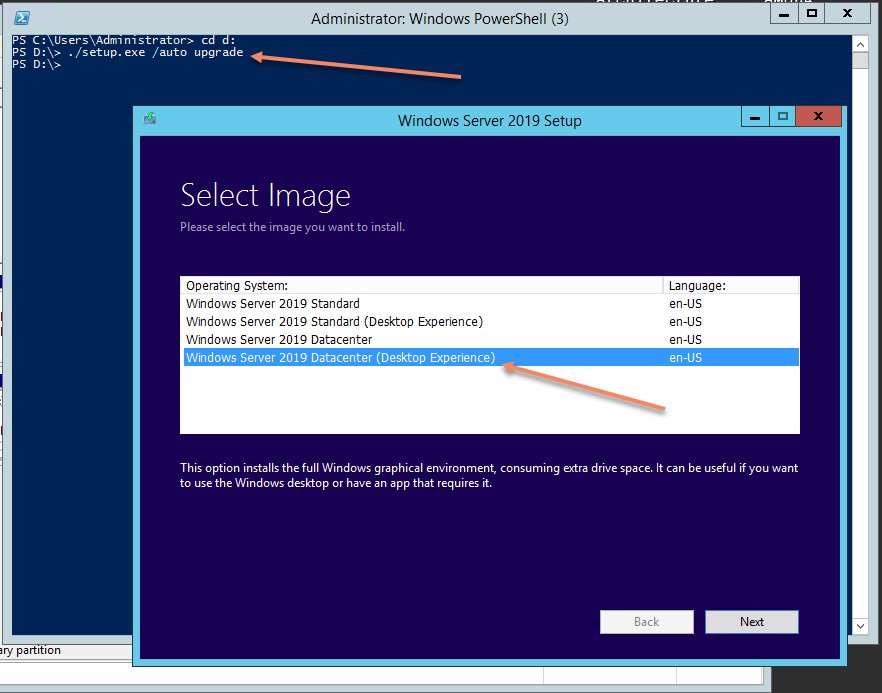
Figure 27. Screenshot showing the correct operating system to select.
- Follow the prompts until the upgrade is complete.
Other Considerations When Trying to Address EOS
Replatform Legacy .NET Framework Applications to Windows Containers
Based on past experience with AWS customers, we are seeing more opportunities to use Windows Containers to address the complexity of managing monolithic applications. For legacy applications still using .NET Framework, Windows Containers offer a helpful alternative to package your application into a portable unit and run on newer Windows operating systems without requiring you to refactor your code. In addition to addressing EOS Windows Operating systems, replatforming to Windows Containers can help you modernize your applications.
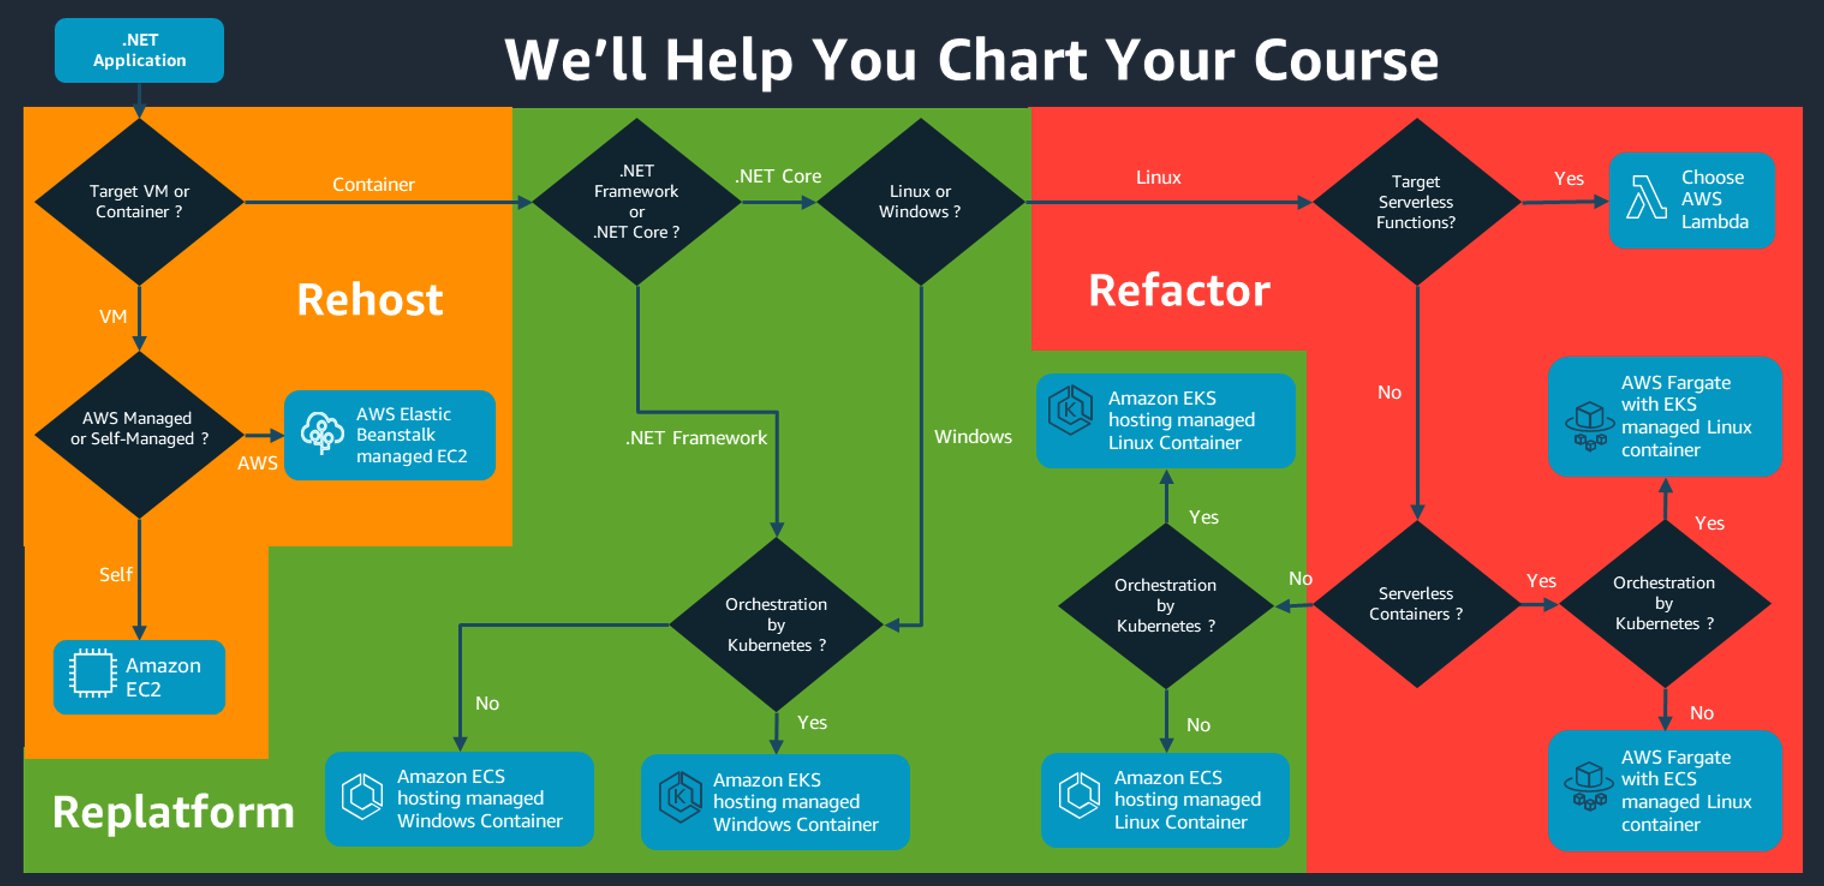
Figure 28. Options for rehosting, replatforming, or refactoring applications.
High-Level Workflow for Replatforming to Windows Containers
The following steps detail how to replatform your legacy systems to Windows Containers.
Determine if the application has any underlying operating system dependencies or Windows APIs that would halt it from moving to a new operating system.
Set a target Windows operating system based on your organizational requirements.
Amazon Elastic Container Service (Amazon ECS) and Amazon Elastic Kubernetes Service (Amazon EKS) are the two supported orchestration platforms for running Windows Containers. We recommend upgrading to Windows Server 2022, but for most compute options, Windows Server 2019 and 2022 are also supported. 2016 is only supported on the Amazon ECS or Amazon EC2 launch type.
Confirm that your application is supported by App2Container.
Determine the orchestration platform you would like to use. Amazon ECS and Amazon EKS are the supported platforms for Windows Containers and App2Container artifact creation.
Set up an Amazon Simple Storage Service (Amazon S3) bucket and test environment where your application is fully functional and you are able to target the application with the App2Container CLI tools.
Run the App2Container analysis and adjust the Container Base image to be the desired destination OS (for example, mcr.microsoft.com/dotnet/framework/runtime:4.8-windowsservercore-ltsc2022 - Dotnet Framework 4.8 Windows Server core 2022 image)
Run your containerization to create your DockerFile. This will extract all the necessary application binaries for the application to be packaged into the container image.
Adjust your deployment settings to include Amazon ECS or Amazon EKS artifacts. Run your application deployment to push your container image to Amazon Elastic Container Registry (ECR) and deploy your application to Amazon ECS or Amazon EKS.
Once your application is successfully containerized and secured for public accessibility, you are ready to plan your production deployment. App2Container supports creating continuous integration, continuous delivery (CI/CD) pipelines for ease of application deployment. If your deployment plans differ from what is produced by A2C out-of-the-box, use the A2C CloudFormation templates as a reverse engineering method to build your deployment approach.
Plan your public URL (cut over from your legacy application on Windows Server 2012) to your new load balancer that serves as the frontend for your container deployment.
If your application has no operating system dependencies, upgrades to future OS versions will be as straightforward as changing the FROM line in a DockerFile.
Appropriate testing is required to help ensure that there are no dramatic changes to the underlying OS before implementing in production.

Figure 29. FROM line for the old operating system.

Figure 30. FROM line for the new operating system.
If your organization is ready to refactor its .NET Framework code to a modern version of .NET, you can use the .NET Porting Assistant. By moving to .NET 6+, you unlock the ability to run your .NET code in Linux containers.
End-of-Support Migration Program
For edge cases where customers are unable to upgrade the operating system from an EOS to a supported operating system due to issues with their application dependencies or lack of application support, AWS has developed the End-of-Support Migration Program (EMP).
EMP for Windows Server is a combined offering of tools and select experts from the AWS Partner Network.
Customers have the option to self-package legacy applications by downloading the tool directly from the EMP webpage for free, as long as you are migrating the EMP packaged application to AWS.
The EMP technology identifies the dependencies that a legacy application has on an outdated operating system and creates a package that includes all the resources required by the application. This package then can be deployed on newer versions of Windows Server without making any code changes to the application. The package helps decouple the legacy application from the underlying operating system.
As seen in the figure below, you will have a host system running an older version of an application, and after going through the packaging exercise using the EMP tool, you will have the ability to move that EMP package to a new target system running a supported operating system and easily install the application with its dependencies without any code changes.
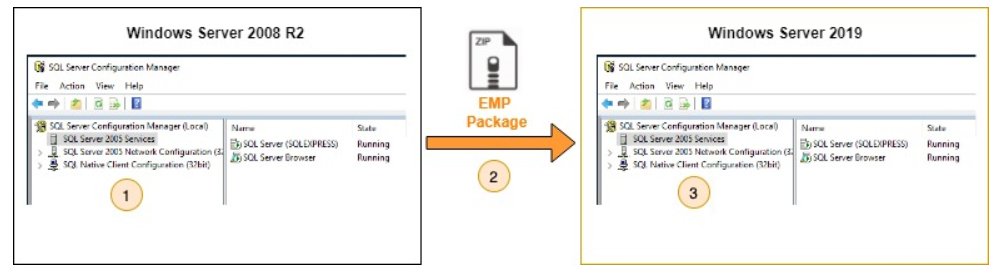
Figure 31. Outdated Windows server using the EMP package to move to an updated Windows server.
The following steps detail the process you would take for the example shown in Figure 31:
The SQL Server Express 2005 is running on Windows 2008R2.
After going through the EMP packaging process, copy the files to the new target OS.
The SQL Express 2005 will then run on the EMP packaged application on Windows 2019.
Figure 32 below shows a decision tree to help you consider if your applications are a good candidate for using EMP.
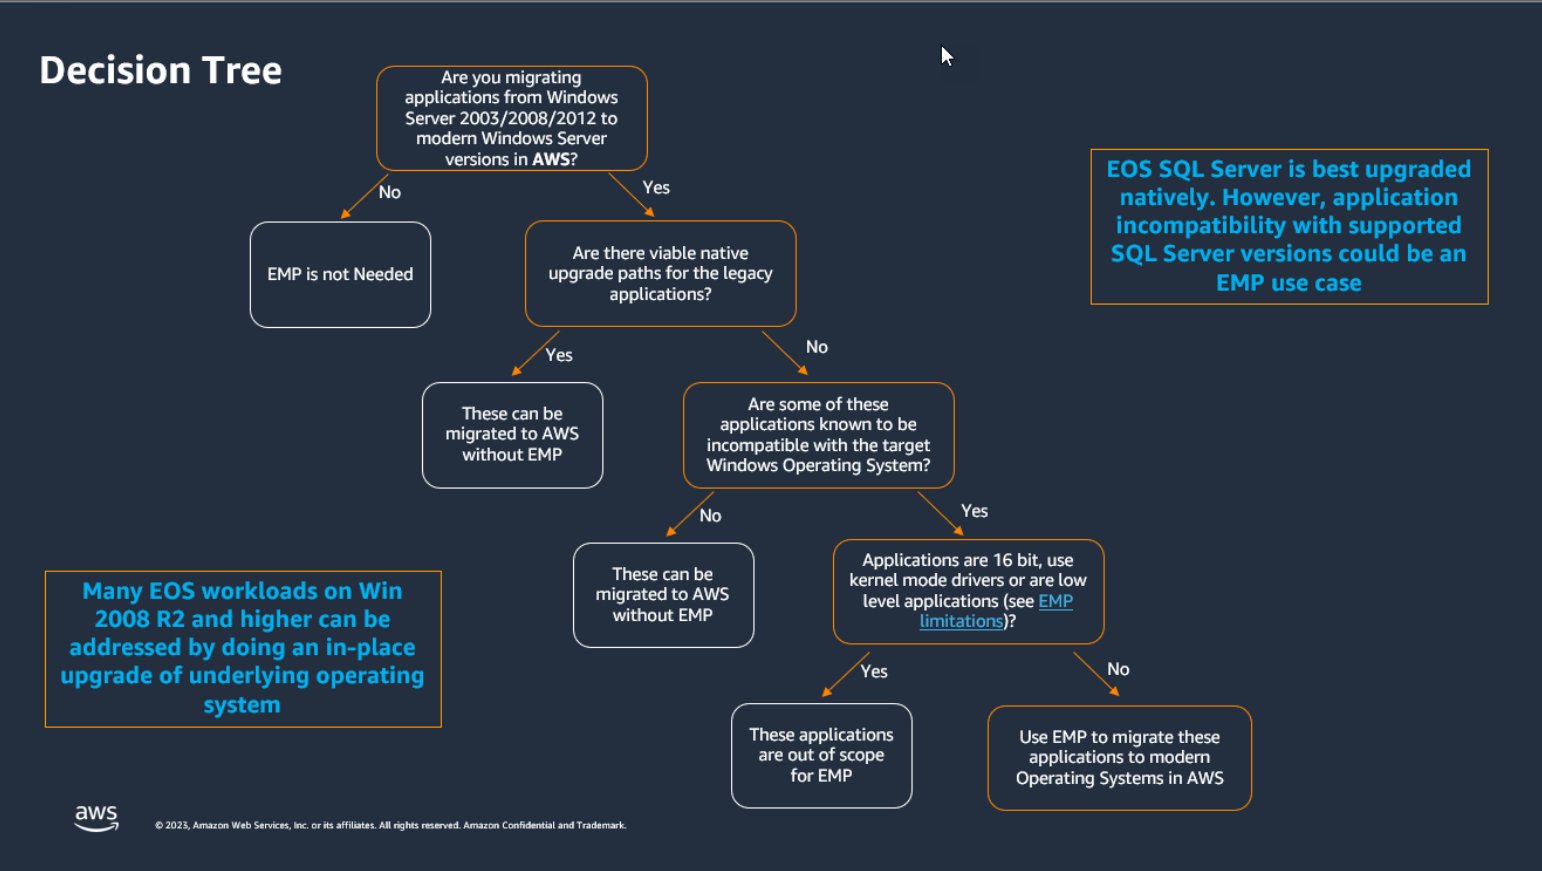
Figure 32. Decision tree to help you decide when to use EMP for your application.
Packaging Options
EMP provides the following options to help with the packaging process:
Standard packaging: This option is ideal when you have the install media and instructions to configure the application during and post install.
Guided Reverse Packaging: Use this option when you don’t have the install media or knowledge t to do a fresh install. This option captures application activity as it is running, requiring a subject matter expert (SME) to exercise the the application functionality.
Detached Packaging: This option is similar to guided reverse packaging; however, an AWS Partner or AWS Professional Services will complete but the packaging on your behalf. This option is best for those who do not have SME support or who have a complex application.
Conclusion
In this implementation guide, we have described only a few of the many options available for dealing with EOS and how AWS can help you address these issues through the right technology, tooling, and experts.
Recommendations and Related Resources
The following lists include recommendations and tips for your EOS needs in addition to resources for learning more about the topics in this implementation guide.
Recommendations
Related Resources
“Know your AWS options for Microsoft Windows Server 2012 End of Support” blog
“Migrate, optimize, and modernize Windows Server with AWS” eBook
YouTube video (Navigate the Windows Server end of support challenge with AWS)
Containerizing a Legacy ASP.NET application using App2Container A2C