Guidance for Credit Card Fraud Detection Using Mainframe Data Replication on AWS
Summary: This implementation guide provides an overview of how to build a card payment fraud insights and analytics solution using replicated data from mainframe on Amazon Web Services (AWS). The implementation guide includes the Guidance reference architecture and components, configuration steps to setup replication agents on mainframe, and instructions/code snippets for deploying the solution on AWS.
Overview
This Guidance demonstrates how to replicate card payment transaction data in near real-time from a mainframe system to AWS and build the surrounding architecture to use scores generated from an AI/ML models running on AWS services such as Amazon SageMaker to predict fraudulent transactions. The solution also describes how purpose-built analytics database such as Amazon Redshift and visualization tools from Amazon QuickSight may be used to uncover valuable business insights and build dashboards. You will be able to query the data in Amazon Redshift or QuickSight using natural language.
The payment transaction records are inserted into the mainframe database such as DB2, VSAM, or IMS. AWS Mainframe Modernization Data Replication with Precisely can read the changes in the databases and replicate the changed records in near real-time to AWS. The records are streamed to different event handling services such as Amazon Managed Streaming for Apache Kafka (Amazon MSK), Amazon Data Firehose, or Amazon EventBridge, or inserted into the different data sources such as an Amazon Relational Database Service (Amazon RDS) database or Amazon Simple Storage Service (Amazon S3) for further processing.
The instructions and screenshots provided in this implementation guide are for reference and applicable to a specific version of the software used. Some of the instructions may change, or screens may look different when using the latest version.
A demonstration of the Guidance is available on YouTube.
Features and benefits
This Guidance provides the following features:
Real-time mainframe data replication: Captures and replicates transaction data from the mainframe database logs as it happens using change data capture (CDC).
Card payment fraud insights: Infrastructure setup to replicate and utilize an AI/ML score that identifies potentially fraudulent card payments using AI/ML models running on SageMaker.
Mainframe data event streaming: Streams the replicated mainframe records to build event-driven solutions and new functions.
Analytics and visualization: Stores data in a cloud data warehouse (Redshift), creates interactive dashboards with QuickSight, and queries the data and builds visualizations in natural language.
Alerting and notification: Uses the events to identify a specific type of business action, then sends alerts and notifications.
Use cases
Most banks are still running their card payment authorization process on mainframe system. Traditionally, banks have long relied on a set of predefined static business rules to identify potentially fraudulent transactions. These rules are based on patterns and thresholds derived from historical data and expert knowledge. While static business rules have been effective in detecting many types of fraudulent activities, they have limitations. Fraudsters continuously adapt their tactics, and rule-based systems may struggle to keep up with evolving fraud patterns and sophisticated attack vectors.
AI/ML-powered fraud prediction addresses the limitations of static rules and enhances fraud insight and detection capabilities. As such, banks are increasingly turning to AI/ML technologies. These advanced techniques can analyze vast amounts of data, including transaction details, customer behavior patterns, and external data sources to generate dynamic fraud scores. By leveraging AI-generated fraud scores, banks can benefit from improved accuracy, adaptability, and real-time scoring.
AI-generated fraud scores should be used in conjunction with traditional rule-based systems and human expertise. The hybrid approach that combines static rules, ML-generated fraud scores, and human oversight can provide a robust and comprehensive fraud detection strategy.
Other use cases
The replicated data from mainframe are also fit for other use cases, such as:
- Customer segmentation and spending pattern analytics
- Rewards and chargeback management
- Data democratization by providing self-service analytics on payment data
Architecture overview
This section provides a reference implementation architecture diagram for the components deployed with this Guidance.
Architecture diagram
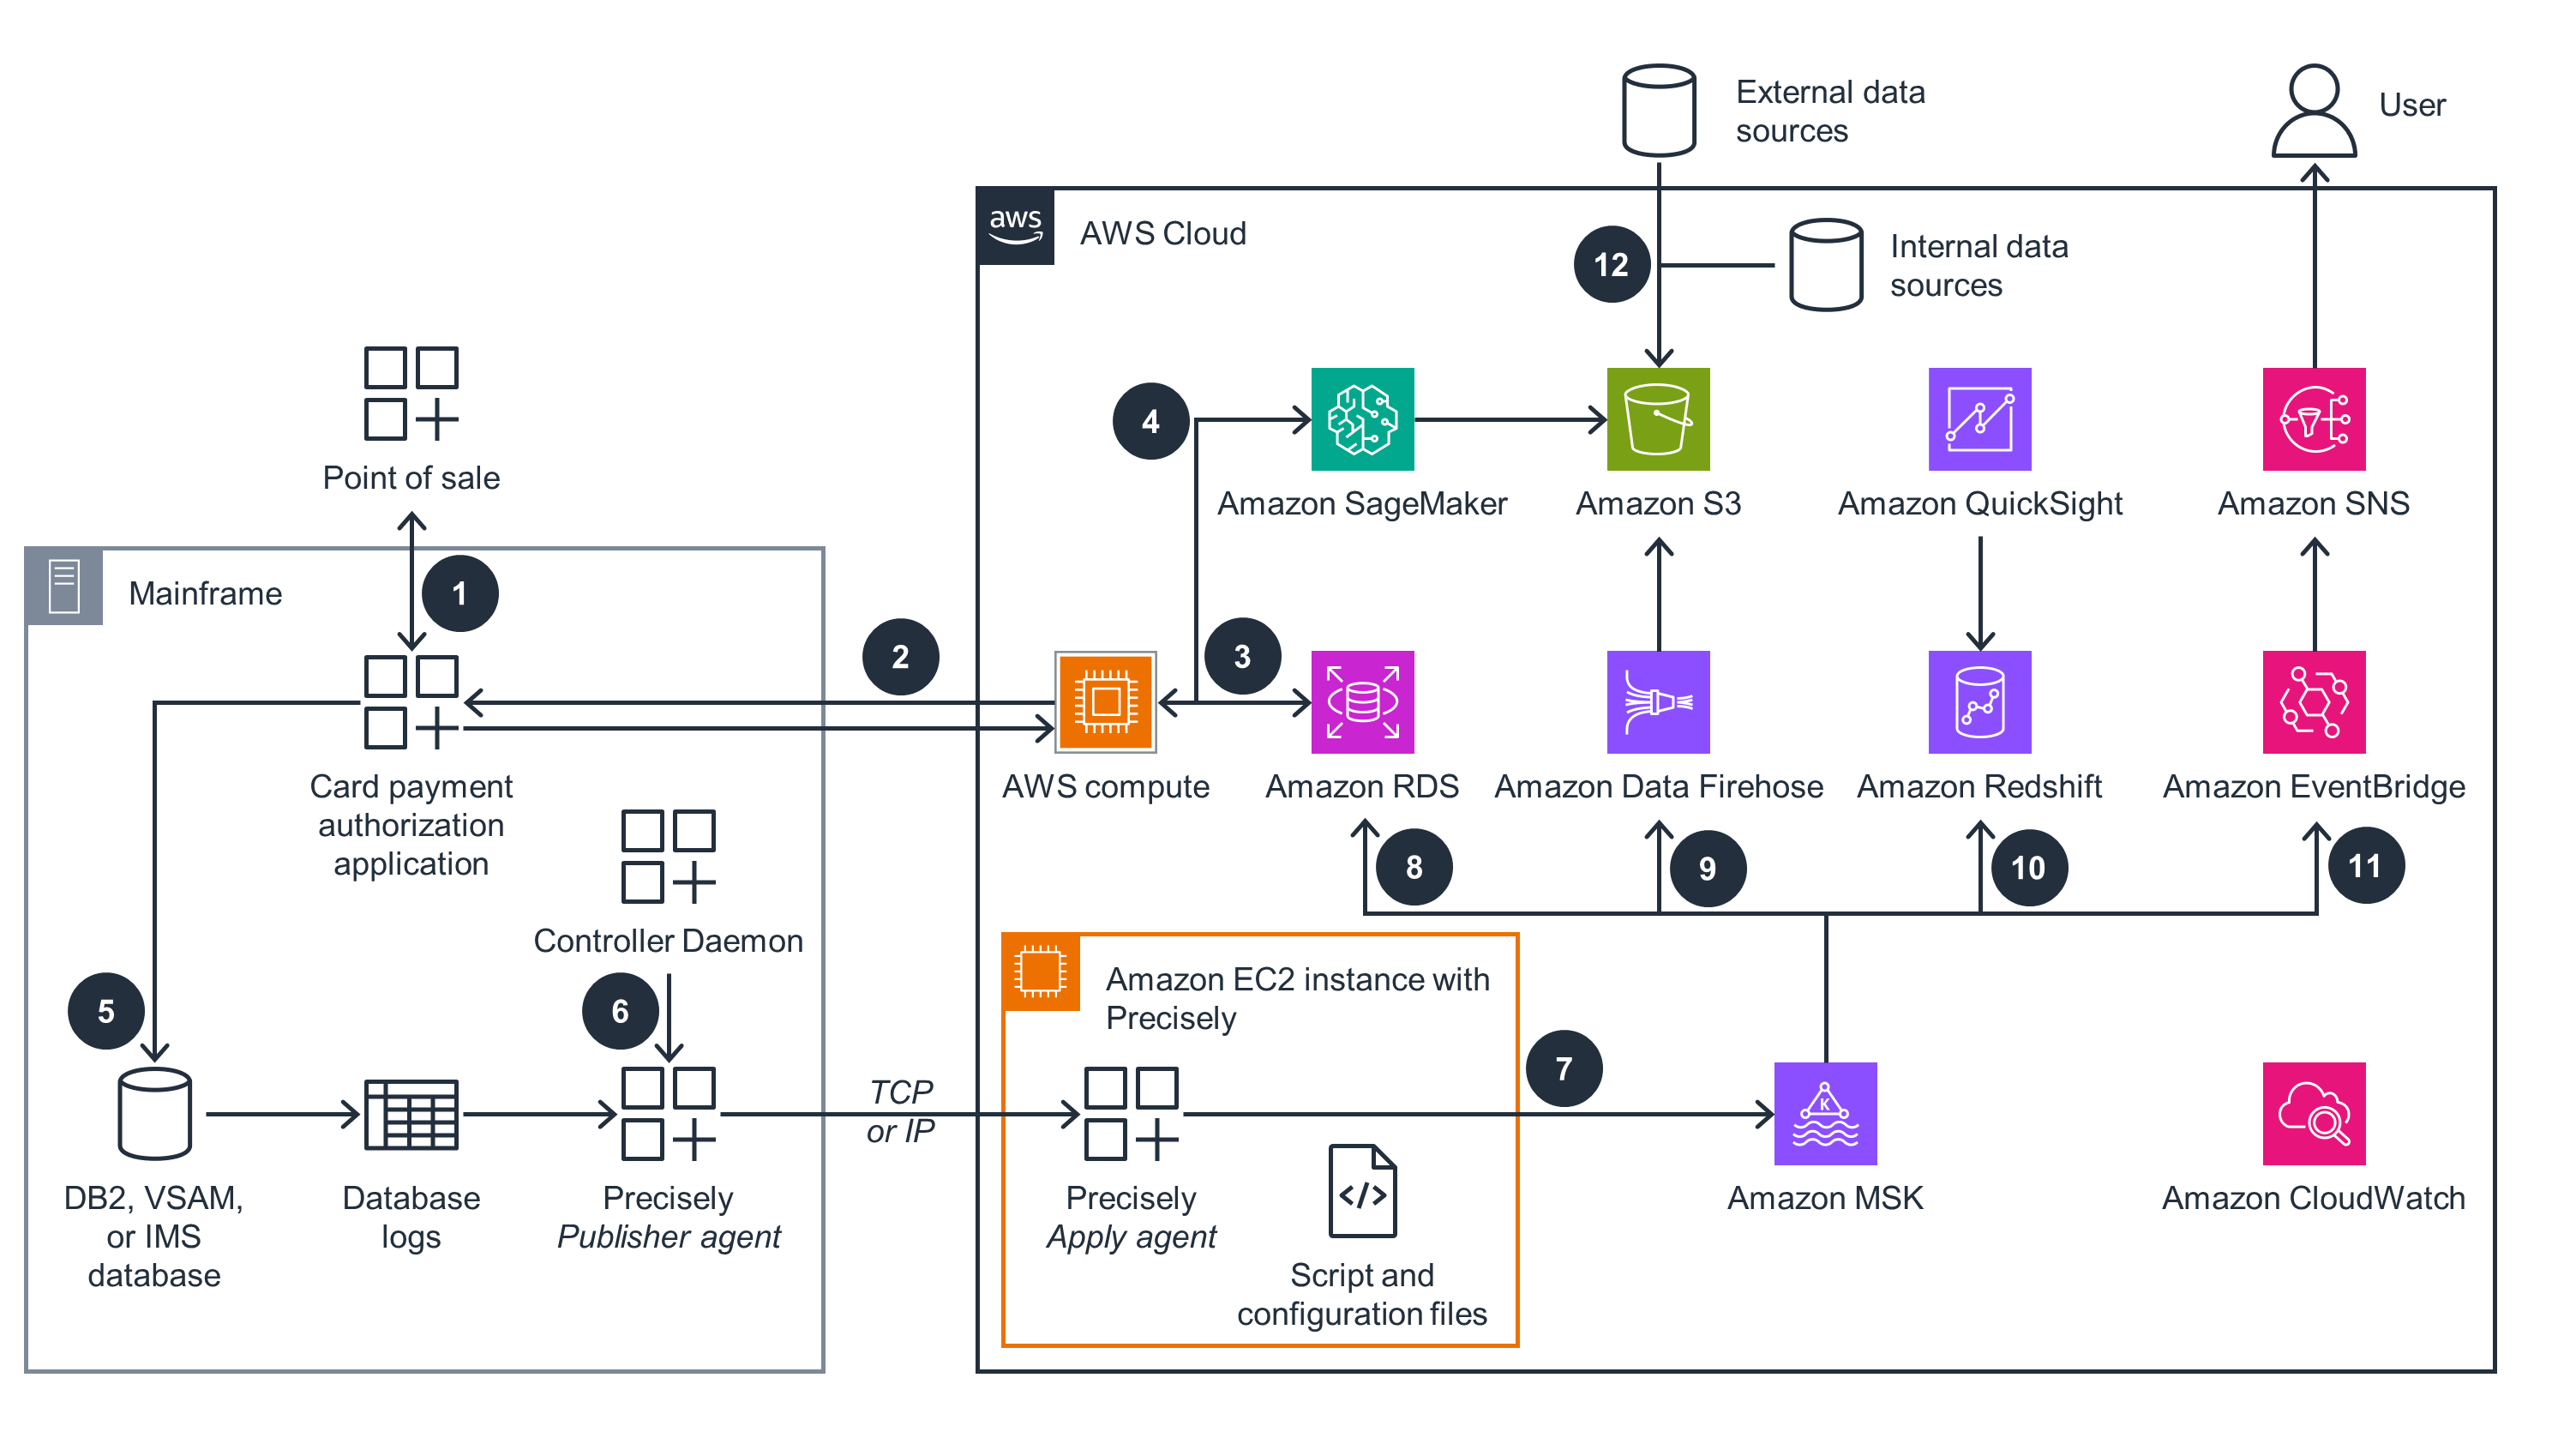
Figure 1: Reference architecture for card payment fraud insights and analytics on AWS
Architecture steps
Your bank receives the card payment authorization requests on your mainframe.
The authorization process makes a real-time call to AWS to get the fraud score using AWS compute.
The integration application on AWS enriches the request with customer and merchant historical data stored on Amazon Relational Database Service (Amazon RDS).
Artificial intelligence and machine learning (AI/ML) models running on Amazon SageMaker generate the fraud score and return it to the mainframe so that it can approve or decline the transaction.
The authorization history message is inserted into an IBM Db2, virtual storage access method (VSAM), or IBM information management system (IMS) database.
The Precisely publisher agent captures the database change records and publishes them to the apply agent running on an Amazon Elastic Compute Cloud (Amazon EC2) instance.
The Precisely apply agent publishes the change records to Amazon Managed Streaming for Apache Kafka (Amazon MSK).
An Amazon MSK connector process reads the messages from Amazon MSK and inserts them into the Amazon RDS history database. The same data is read during scoring.
Amazon Data Firehose (successor to Amazon Kinesis Data Firehose) streams the data from Amazon MSK to Amazon Simple Storage Service (Amazon S3).
Amazon Redshift consumes data from Amazon MSK. Business dashboards are created using Amazon QuickSight, which also provides the capability to query data using natural language.
Amazon Simple Notification Service (Amazon SNS) and Amazon EventBridge send alerts and notifications.
SageMaker trains the AI/ML model offline using the transaction data stored in Amazon S3 along with other internal and external data.
AWS services in this Guidance
The following AWS services are included in this Guidance:
| AWS service | Description |
|---|---|
| AWS CloudFormation | Core. Used to deploy all components of the solution and as a means to deploy products in the complimentary toolkit. |
| Amazon Virtual Private Cloud (Amazon VPC) | Core. Network security layer. |
| AWS Identity and Access Management (IAM) | Core. Provides required scoped permissions to all components on the solution. |
| AWS Key Management Service (AWS KMS) | Core. Stores accounts’ encryption keys that will be used to secure secrets with access credentials to the RDS database. |
| AWS Secrets Manager | Core. Used to store database credentials as secrets. |
| AWS Mainframe Modernization | Core. Supports data replication with Precisely. |
| Amazon Elastic Compute Cloud (Amazon EC2) | Core. Compute instance for running the Precisely Apply Engine from AWS Mainframe Modernization. |
| Amazon Managed Streaming for Apache Kafka (Amazon MSK) | Core. Precisely Apply Engine that publishes the replicated records to Amazon MSK. |
| Amazon Relational Database (Amazon RDS) | Core. Relational database to store the historical transactional records. |
| AWS Lambda | Core. Consumes messages from Amazon MSK and inserts them into the RDS database. |
| Amazon Data Firehose | Core. Streams the data from Amazon MSK to Amazon S3 with no code integration. |
| Amazon Simple Storage Service (Amazon S3) | Core. Object storage for historical transaction data for AI/ML model training. |
| Amazon Redshift | Core. Data lake for replicated card payment transaction data to run analytics and business insights. |
| Amazon QuickSight | Optional. Creates visualization and dashboards from the replicated card payment transaction data. |
| Amazon EventBridge | Optional. Used as a mechanism to capture replicated records, identify actionable events, and send alerts and notification. |
| Amazon Simple Notification Service (Amazon SNS) | Optional. Sends notification to business users or customers. |
| Amazon CloudWatch | Auxiliary. Provides observability for core services. |
Plan your deployment
This section describes the prerequisites, cost, security, AWS Regions, and other considerations prior to deploying the solution.
Prerequisites
- Network connection between your z/OS mainframe system and your AWS account where you want to deploy the Guidance. In this Guidance, database change records will be replicated from mainframe to AWS in near real-time, so connectivity between the mainframe and AWS account is a prerequisite.
- Mainframe administrator access to install and set up Precisely on the z/OS mainframe system. The mainframe software components are provided within a pre-defined AMI. The software package has to be transferred to your mainframe system and installed.
Cost
You are responsible for the cost of the AWS services used while running this Guidance and the data transfer cost between your mainframe and AWS. As of August 2024, the cost for running this Guidance with the default settings in the US East (N. Virginia) is approximately $830 per month.
We recommend creating a budget through AWS Cost Explorer to help manage costs. Prices are subject to change. For full details, refer to the pricing webpage for each AWS service used in this guidance.
Sample cost table
The following table provides a sample cost breakdown for deploying this Guidance with the default parameters in the US East (N. Virginia) Region for one month. The calculation also assumes a total of 100,000 database change records of size 1 KB each are replicated using Precisely.
| AWS service | Dimensions | Cost [USD] per month |
|---|---|---|
| Amazon EC2 | 1 c5.large instances x 0.085 USD On Demand hourly cost x 730 hours in a month | $ 62.05 |
| Amazon Elastic Block Store (Amazon EBS) | 30 GB x 1.00 instance months x 0.08 USD | $ 2.40 |
| Outbound Data Transfer | Internet: 1 GB x 0.09 USD per GB | $ 0.09 |
| Precisely usage | 1GB x 60 USD per GB | $ 60.00 |
| Amazon MSK instances | 3 m5.large instance x 0.21 USD hourly x 730 hours in a month | $ 459.90 |
| Amazon MSK storage | 3 broker nodes x 100 GB x 0.10 USD | $ 30.00 |
| Amazon RDS Postgres | 1 db.t3.micro instance x 0.018 USD hourly x (100 / 100 Utilized/Month) x 730 hours in a month | $ 13.14 |
| AWS Lambda | Free Tier - 1M free requestsand 400,000 GB-seconds of compute time per month | $ 0.00 |
| Amazon Data Firehose | 1GB x 0.055 USD per month | $ 0.14 |
| Amazon S3 | 2GB X 0.023 USD per month | $ 0.05 |
| Amazon Redshift | 8 RPUs x 1 hours x 0.375 USD x 30.5 days in a month | $ 91.50 |
| Amazon EventBridge | 100,000 Pipes requests (monthly) x 0.0000004 USD | $ 0.04 |
| Amazon SNS | 99,000 EMAIL calls x 0.00002 USD | $ 1.98 |
| AWS Secrets Manager | 1 secrets per month x 0.40 USD per secret per month | $ 0.40 |
| VPC Public IPv4 Address feature | 1 In-use public IPv4 addresses | $ 3.65 |
| VPC AWS PrivateLink feature | 4 VPC endpoints x 3 ENIs per VPC endpoint x 730 hours in a month x 0.01 USD | $ 87.60 |
These are estimated costs for reference only. The actual costs may vary depending on the AWS resource parameters you use, amount of data you replicate, and other factors.
Security
When you build systems on AWS infrastructure, security responsibilities are shared between you and AWS. This shared responsibility model reduces your operational burden because AWS operates, manages, and controls the components including the host operating system, the virtualization layer, and the physical security of the facilities in which the services operate. For more information about AWS security, visit AWS Cloud Security.
IAM roles
AWS Identity and Access Management (IAM) roles allow customers to assign granular access policies and permissions to services and users on the AWS Cloud. This solution creates IAM roles for communication between services. For more information, refer to Providing Access to an AWS Service in the IAM User Guide.
AWS KMS keys
This Guidance will deploy AWS KMS customer managed keys (one per account) to encrypt secrets used to share credentials. We recommend reviewing Security best practices for AWS KMS to enhance the protection of your encryption keys.
AWS Secrets Manager
Secrets are the core means by which this Guidance enables data access to the RDS databases. Access to secrets are protected by resource policies, and contents are encrypted in AWS KMS. Secrets are deleted when not needed by the Guidance.
Security groups
This Guidance creates a security group for the Amazon MSK cluster and Amazon RDS database so that it can communicate with the other solution components. We recommend that you review the security groups and further restrict access as needed using inbound rules once your deployment is up and running. For example, the VPC endpoint security group restricts inbound traffic to SSH port 22 only.
Networking considerations
The Guidance requires communication between your mainframe system and process running on Amazon EC2 on your AWS account. You might have communication already setup between your mainframe data center and AWS Region where you are planning to run this Guidance. If not, consult with your network team on how to set up the communication using AWS Direct Connect or other mechanism supported by our organization.
Supported AWS Regions
This Guidance uses several AWS services, and some of them are optional. All the referred AWS services from this Guidance might not be available in all AWS Regions.
This Guidance is fully supported in the following AWS Regions. Please refer to the AWS Regional Services List to check for the availability of the services if you plan to run any other AWS Region.
| Region Name |
|---|
| US East (Ohio) |
| US East (N. Virginia) |
| US West (Northern California) |
| US West (Oregon) |
Quotas
Service quotas, also referred to as limits, are the maximum number of service resources or operations for your AWS account.
Quotas for AWS services in this Guidance
Make sure you have sufficient quota for each of the services implemented in this solution. For more information, review AWS service quotas.
To view the service quotas for all AWS services in the documentation without switching pages, review the information in the Service endpoints and quotas page in the PDF instead.
AWS CloudFormation quotas
Your AWS account has CloudFormation quotas that you should be aware of when launching the stack in this Guidance. By understanding these quotas, you can avoid limitation errors that would prevent you from deploying this solution successfully. For more information, review CloudFormation quotas in the CloudFormation User Guide.
Deploy the Guidance
This section provides instructions on deploying the Guidance.
Deployment process overview
This Guidance uses CloudFormation to automate part of the deployment. Before you launch the Guidance, review the cost, architecture, security, and other considerations discussed in this guide. Follow the step-by-step instructions in this section to configure and deploy the Guidance into your account.
Time to deploy: Approximately 120 minutes to deploy the resources on AWS. Installation of Precisely on the mainframe will take additional time that depends on your organization’s installation procedure.
1. Provision AWS resources
- Use the CloudFormation template to pre-provision some of the AWS resources used in this Guidance.
The next few sections provide you the CloudFormation code snippets with an explanation. You may merge them as one and submit as one template, or run the first snippet and subsequently append the snippets in the CloudFormation template and update the stack.
This section of the snippet contains the parameters and mapping. You must provide a password for RDSAdminUserPassword, RSAdminUserPassword and make sure to update SSHLocation with the IP address of the machines from where you want to SSH to the EC2 instance. You may leave the rest of the parameters as default.
AWSTemplateFormatVersion: 2010-09-09
Parameters:

  ApplicationName:
    Description: Provide a unique name to identify the resources
    Type: String
    Default: CardPaymentFraud
  S3BucketName:
    Description: Provide a name for s3 bucket to store replicated messages
    Type: String
    Default: card-payment-fraud
  SSHLocation:
    Description: The IP address range that can be used to SSH to the EC2 instances
    Type: String
    MinLength: '9'
    MaxLength: '18'
    AllowedPattern: '(\d{1,3})\.(\d{1,3})\.(\d{1,3})\.(\d{1,3})/(\d{1,2})'
    ConstraintDescription: Must be a valid IP CIDR range of the form x.x.x.x/x
  RDSDatabaseName:
    Description: The name of the RDS database.
    Type: String
    Default: cardpaymentfraud
    MaxLength: 127
    AllowedPattern: '[a-zA-Z_0-9]*'
  RSDatabaseName:
    Description: The name of the database in the Amazon Redshift Serverless environment.
    Type: String
    Default: card-payment-fraud
    MaxLength: 127
    AllowedPattern: '[a-zA-Z][a-zA-Z_0-9+.@-]*'
  RDSAdminUsername:
    Description: The administrator's user name for RDS Posgres being created.
    Type: String
    Default: postgres
    AllowedPattern: '[a-zA-Z][a-zA-Z_0-9+.@-]*'
  RDSAdminUserPassword:
    Description: The password associated with RDS Postgres user.
    Type: String
    NoEcho: 'true'
    MinLength: 8
    MaxLength: 64
    AllowedPattern: '^(?=.*[a-z])(?=.*[A-Z])(?=.*\d)[^\x00-\x20\x22\x27\x2f\x40\x5c\x7f-\uffff]+'
  RSAdminUsername:
    Description: The administrator's user name for Redshift Serverless Namespace being created.
    Type: String
    Default: admin
    AllowedPattern: '[a-zA-Z][a-zA-Z_0-9+.@-]*'
  RSAdminUserPassword:
    Description: The password associated with Redshift user.
    Type: String
    NoEcho: 'true'
    MinLength: 8
    MaxLength: 64
    AllowedPattern: '^(?=.*[a-z])(?=.*[A-Z])(?=.*\d)[^\x00-\x20\x22\x27\x2f\x40\x5c\x7f-\uffff]+'
  NamespaceName:
    Description: A unique identifier that defines the Redshift Namespace.
    Type: String
    Default: card-payment-fraud-redshift-ns
    MinLength: 3
    MaxLength: 64
    AllowedPattern: '^[a-z0-9-]+$'
  WorkgroupName:
    Description: A unique identifier that defines the Redshift Workspace.
    Type: String
    Default: card-payment-fraud-redshift-wg
    MinLength: 3
    MaxLength: 64
    AllowedPattern: '^[a-z0-9-]*$'

Mappings:
  SubnetConfig:
    VPC:
      CIDR: 10.0.0.0/16
    SubnetCidrOne:
      CIDR: 10.0.0.0/24
    SubnetCidrTwo:
      CIDR: 10.0.1.0/24
    SubnetCidrThree:
      CIDR: 10.0.2.0/24

Metadata:
  'AWS::CloudFormation::Interface':
    ParameterGroups:
      - Label:
          default: General parameters
        Parameters:
          - ApplicationName
          - SSHLocation
          - S3BucketName
      - Label:
          default: RDS database parameters
        Parameters:
          - RDSDatabaseName
          - RDSAdminUsername
          - RDSAdminUserPassword
      - Label:
          default: Redshift parameters
        Parameters:
          - NamespaceName
          - WorkgroupName
          - RSDatabaseName
          - RSAdminUsername
          - RSAdminUserPassword

    ParameterLabels:
      ApplicationName:
        default: Application Name
      RSDatabaseName:
        default: Redshift Database Name
      RSAdminUsername:
        default: Redshift Admin User Name
      RSAdminUserPassword:
        default: Redshift Database User Password
      NamespaceName:
        default: Redshift Namespace
      WorkgroupName:
        default: Redshift Workgroup
      SSHLocation:
        default: SSH IP Range
      S3BucketName:
        default: S3 Bucket Name
      RDSDatabaseName:
        default: RDS Postgres Database Name
      RDSAdminUsername:
        default: RDS Postgres Admin User Name
      RDSAdminUserPassword:
        default: RDS Postgres User Password

Resources:

  UniqueSuffix:
    Type: AWS::SSM::Parameter
    DeletionPolicy: Delete
    Properties:
      Type: 'String'
      Value: !Select [0, !Split ['-', !Select [2, !Split [/, !Ref AWS::StackId ]]]]
This section defines the VPC, three subnets, and the security group.
  VPC:
    Type: AWS::EC2::VPC
    Properties:
      EnableDnsSupport: true
      EnableDnsHostnames: true
      CidrBlock:
        Fn::FindInMap:
          - SubnetConfig
          - VPC
          - CIDR
      Tags:
        - Key: Name
          Value: !Join
          - '_'
          - - !Ref ApplicationName
            - VPC
  SubnetOne:
    Type: AWS::EC2::Subnet
    Properties:
      AvailabilityZone:
        Fn::Select:
          - 0
          - Fn::GetAZs:
              Ref: AWS::Region
      VpcId:
        Ref: VPC
      CidrBlock:
        Fn::FindInMap:
          - SubnetConfig
          - SubnetCidrOne
          - CIDR
      MapPublicIpOnLaunch: true
      Tags:
        - Key: Name
          Value: !Join
            - '_'
            - - !Ref ApplicationName
              - SubnetOne
  SubnetTwo:
    Type: AWS::EC2::Subnet
    Properties:
      AvailabilityZone:
        Fn::Select:
          - 1
          - Fn::GetAZs:
              Ref: AWS::Region
      VpcId:
        Ref: VPC
      CidrBlock:
        Fn::FindInMap:
          - SubnetConfig
          - SubnetCidrTwo
          - CIDR
      MapPublicIpOnLaunch: true
      Tags:
        - Key: Name
          Value: !Join
            - '_'
            - - !Ref ApplicationName
              - SubnetTwo
  SubnetThree:
    Type: AWS::EC2::Subnet
    Properties:
      AvailabilityZone:
        Fn::Select:
          - 2
          - Fn::GetAZs:
              Ref: AWS::Region
      VpcId:
        Ref: VPC
      CidrBlock:
        Fn::FindInMap:
          - SubnetConfig
          - SubnetCidrThree
          - CIDR
      MapPublicIpOnLaunch: true
      Tags:
        - Key: Name
          Value: !Join
            - '_'
            - - !Ref ApplicationName
              - SubnetThree
  InternetGateway:
    Type: AWS::EC2::InternetGateway

  GatewayAttachement:
    Type: AWS::EC2::VPCGatewayAttachment
    Properties:
      VpcId:
        Ref: VPC
      InternetGatewayId:
        Ref: InternetGateway

  PublicRouteTable:
    Type: AWS::EC2::RouteTable
    Properties:
      VpcId:
        Ref: VPC

  PublicRoute:
    Type: AWS::EC2::Route
    DependsOn: GatewayAttachement
    Properties:
      RouteTableId:
        Ref: PublicRouteTable
      DestinationCidrBlock: 0.0.0.0/0
      GatewayId:
        Ref: InternetGateway

  SubnetOneRouteTableAssociation:
    Type: AWS::EC2::SubnetRouteTableAssociation
    Properties:
      SubnetId:
        Ref: SubnetOne
      RouteTableId:
        Ref: PublicRouteTable

  SubnetTwoRouteTableAssociation:
    Type: AWS::EC2::SubnetRouteTableAssociation
    Properties:
      SubnetId:
        Ref: SubnetTwo
      RouteTableId:
        Ref: PublicRouteTable

  SubnetThreeRouteTableAssociation:
    Type: AWS::EC2::SubnetRouteTableAssociation
    Properties:
      SubnetId:
        Ref: SubnetThree
      RouteTableId:
        Ref: PublicRouteTable

  CardPaymentFraudSecurityGroup:
    Type: 'AWS::EC2::SecurityGroup'
    Properties:
      GroupDescription: Enable SSH access via port 22
      GroupName: !Join
        - '_'
        - - !Ref ApplicationName
          - !GetAtt UniqueSuffix.Value
      VpcId:
        Ref: VPC
      SecurityGroupIngress:
        - IpProtocol: tcp
          FromPort: 22
          ToPort: 22
          CidrIp:
            Ref: SSHLocation
        - IpProtocol: tcp
          CidrIp: !GetAtt VPC.CidrBlock
          FromPort: 0
          ToPort: 65535
          Description: Allow on-vpc inbound access
      SecurityGroupEgress:
        - IpProtocol: tcp
          CidrIp: 0.0.0.0/0
          FromPort: 0
          ToPort: 65535
          Description: Allow outbound access
This section defines the IAM roles and profile to be used by the EC2 instance and the Lambda function. The EC2 instance will be running the Precisely Apply Engine. The Lambda function will pull the messages from Amazon MSK and write into an RDS database. The IAM role provides the EC2 instance and Lambda function access to the MSK cluster.
  CardPaymentFraudEC2Role:
    Type: AWS::IAM::Role
    Properties:
      AssumeRolePolicyDocument:
        Version: '2012-10-17'
        Statement:
          - Sid: ''
            Effect: Allow
            Principal:
              Service: ec2.amazonaws.com
            Action: sts:AssumeRole
      Policies:
        -
          PolicyName: !Join
            - '_'
            - - CardPaymentFraudEC2RolePolicy
              - !GetAtt UniqueSuffix.Value
          PolicyDocument:
            Version: "2012-10-17"
            Statement:
              -
                Effect: Allow
                Action:
                  - kafka-cluster:*
                Resource:
                  - !Sub 'arn:aws:kafka:${AWS::Region}:${AWS::AccountId}:cluster/*'
                  - !Sub 'arn:aws:kafka:${AWS::Region}:${AWS::AccountId}:topic/*'
                  - !Sub 'arn:aws:kafka:${AWS::Region}:${AWS::AccountId}:group/*'
              -
                Effect: Allow
                Action:
                  - lambda:PublishLayerVersion
                  - lambda:GetLayerVersion
                  - lambda:ListLayers
                Resource:
                  - !Sub 'arn:aws:lambda:${AWS::Region}:${AWS::AccountId}:layer:*'
  CardPaymentFraudEC2InstanceProfile:
    Type: AWS::IAM::InstanceProfile
    Properties:
      InstanceProfileName: !Join
        - '_'
        - - CardPaymentFraudEc2InstanceProfile
          - !GetAtt UniqueSuffix.Value
      Roles:
        - Ref: CardPaymentFraudEC2Role

  CardPaymentFraudLambdaRole:
    Type: AWS::IAM::Role
    Properties:
      AssumeRolePolicyDocument:
        Version: '2012-10-17'
        Statement:
          - Sid: ''
            Effect: Allow
            Principal:
              Service: lambda.amazonaws.com
            Action: sts:AssumeRole
      ManagedPolicyArns:
        - arn:aws:iam::aws:policy/service-role/AWSLambdaVPCAccessExecutionRole
        - arn:aws:iam::aws:policy/service-role/AWSLambdaMSKExecutionRole
        - arn:aws:iam::aws:policy/AmazonMSKReadOnlyAccess
        - arn:aws:iam::aws:policy/SecretsManagerReadWrite
      Policies:
        -
          PolicyName: !Join
            - '_'
            - - CardPaymentFraudLambdaPolicy
              - !GetAtt UniqueSuffix.Value
          PolicyDocument:
            Version: "2012-10-17"
            Statement:
              -
                Effect: Allow
                Action:
                  - kms:Decrypt
                Resource:
                  - !Sub 'arn:aws:kms:${AWS::Region}:${AWS::AccountId}:key/*'
This section defines the S3 bucket. The replicated messages will be saved in this S3 bucket for offline training of AI/ML fraud models.
  CardPaymentFraudS3:
    Type: AWS::S3::Bucket
    Properties:
      BucketName: !Join
        - '-'
        -  - !Ref S3BucketName
           - !GetAtt UniqueSuffix.Value
      AccessControl: Private
      PublicAccessBlockConfiguration:
        BlockPublicAcls: True
        BlockPublicPolicy: True
        IgnorePublicAcls: True
        RestrictPublicBuckets: True
      VersioningConfiguration:
        Status: Enabled
      Tags:
        -
          Key: Name
          Value: !Join
          - '_'
          - - !Ref ApplicationName
            - s3
This section defines the RDS database resources. Replicated messages will be stored in the RDS database, which may be used by real-time fraud detection calls to enhance the messages with historical data before sending to the model for prediction.
  RDSDBSubnetGroup:
    Type: AWS::RDS::DBSubnetGroup
    Properties:
      DBSubnetGroupDescription: !Sub "DB Subnet group in ${AWS::Region}"
      DBSubnetGroupName: !Join
        - '-'
        -  - !Ref ApplicationName
           - 'db-instance'
           - !GetAtt UniqueSuffix.Value
      SubnetIds:
        - Ref: SubnetOne
        - Ref: SubnetTwo
        - Ref: SubnetThree

  CardPaymentFraudRDS:
    Type: 'AWS::RDS::DBInstance'
    Properties:
      DBInstanceIdentifier: !Join
        - '-'
        -  - !Ref ApplicationName
           - 'db-instance'
           - !GetAtt UniqueSuffix.Value
      DBName: !Ref RDSDatabaseName
      DBInstanceClass: db.t3.micro
      AllocatedStorage: 20
      Engine: postgres
      EngineVersion: "15.5"
      MasterUsername: !Ref RDSAdminUsername
      MasterUserPassword: !Ref RDSAdminUserPassword
      PubliclyAccessible: No
      VPCSecurityGroups: [!GetAtt CardPaymentFraudSecurityGroup.GroupId]
      DBSubnetGroupName: !Ref RDSDBSubnetGroup
      AvailabilityZone:
        Fn::Select:
          - 0
          - Fn::GetAZs:
              Ref: AWS::Region
This section defines the Amazon Redshift resources that will be used for analytics and deriving business insights.
  RedshiftServerlessNamespace:
    Type: 'AWS::RedshiftServerless::Namespace'
    Properties:
      AdminUsername:
        Ref: RSAdminUsername
      AdminUserPassword:
        Ref: RSAdminUserPassword
      DbName:
        Ref: RSDatabaseName
      NamespaceName:
        Ref: NamespaceName
      IamRoles:
        - !GetAtt CardPaymentFraudRedshiftKafkaRole.Arn

  RedshiftServerlessWorkgroup:
    Type: 'AWS::RedshiftServerless::Workgroup'
    Properties:
      WorkgroupName:
        Ref: WorkgroupName
      NamespaceName:
        Ref: NamespaceName
      BaseCapacity: 8
      PubliclyAccessible: false
      SubnetIds:
        - !Ref SubnetOne
        - !Ref SubnetTwo
        - !Ref SubnetThree
      SecurityGroupIds:
        - !GetAtt CardPaymentFraudSecurityGroup.GroupId
      EnhancedVpcRouting: false
    DependsOn:
      - RedshiftServerlessNamespace

  CardPaymentFraudRedshiftKafkaRole:
    Type: AWS::IAM::Role
    Properties:
      AssumeRolePolicyDocument:
        Version: '2012-10-17'
        Statement:
          - Sid: ''
            Effect: Allow
            Principal:
              Service: redshift.amazonaws.com
            Action: sts:AssumeRole
      Policies:
        -
          PolicyName: !Join
            - '_'
            - - CardPaymentFraudRolePolicy
              - !GetAtt UniqueSuffix.Value
          PolicyDocument:
            Version: "2012-10-17"
            Statement:
              -
                Effect: Allow
                Action:
                  - kafka-cluster:Connect
                  - kafka-cluster:DescribeCluster
                  - kafka-cluster:AlterCluster
                  - kafka-cluster:DescribeClusterDynamicConfiguration
                  - kafka:BatchAssociateScramSecret
                  - kafka:BatchDisassociateScramSecret
                  - kafka:GetBootstrapBrokers
                  - kafka:GetClusterPolicy
                Resource:
                  - !Sub "arn:aws:kafka:${AWS::Region}:${AWS::AccountId}:cluster/*"
              -
                Effect: Allow
                Action:
                  - kafka-cluster:ReadData
                  - kafka-cluster:AlterCluster
                Resource:
                  - !Sub "arn:aws:kafka:${AWS::Region}:${AWS::AccountId}:topic/*"
This section defines the MSK cluster, the AWS KMS key, and secret. Precisely publishes the messages from Apply Engine to this MSK cluster.
  CardPaymentFraudMSKCluster:
    Type: AWS::MSK::Cluster
    Properties:
      BrokerNodeGroupInfo:
        ClientSubnets:
          - Ref: SubnetOne
          - Ref: SubnetTwo
          - Ref: SubnetThree
        InstanceType: kafka.m5.large
        SecurityGroups:
          - Fn::GetAtt:
              - CardPaymentFraudSecurityGroup
              - GroupId
        StorageInfo:
          EBSStorageInfo:
            VolumeSize: 100
      ClusterName: !Join
        - '-'
        - - CardPaymentFraudMskCluster
          - !GetAtt UniqueSuffix.Value
      ClientAuthentication:
        Sasl:
          Scram:
            Enabled: true
          Iam:
            Enabled: true
      EncryptionInfo:
        EncryptionInTransit:
          ClientBroker: TLS
          InCluster: true
      EnhancedMonitoring: PER_TOPIC_PER_BROKER
      KafkaVersion: 3.5.1
      NumberOfBrokerNodes: 3

  CardPaymentFraudKmsKey:
    Type: AWS::KMS::Key
    Properties:
      Description: 'Symmetric key for Msk secret'
      EnableKeyRotation: true
      KeyPolicy:
        Version: 2012-10-17
        Statement:
          - Effect: 'Allow'
            Principal:
              AWS: !Sub arn:aws:iam::${AWS::AccountId}:root
            Action: 'kms:*'
            Resource: "*"

  CardPaymentFraudMskSecret:
    Type: AWS::SecretsManager::Secret
    Properties:
      Name: !Join
        - '_'
        -  - AmazonMSK
           - CardPaymentFraud
           - !GetAtt UniqueSuffix.Value
      Description: 'Msk Credential for CardPaymentFraud Kafka'
      KmsKeyId: !GetAtt CardPaymentFraudKmsKey.Arn
      GenerateSecretString:
        SecretStringTemplate: '{"username": "admin"}'
        GenerateStringKey: "password"
        PasswordLength: 8
        ExcludePunctuation: true
        ExcludeNumbers: true
        ExcludeUppercase: true

  CardPaymentFraudMskSecretAttach:
    Type: AWS::MSK::BatchScramSecret
    Properties:
      ClusterArn: !GetAtt CardPaymentFraudMSKCluster.Arn
      SecretArnList:
        - !Ref CardPaymentFraudMskSecret
The creation of an MSK cluster may take more than 30 minutes.
This section defines the VPC endpoints for access to the serverless resources such as Lambda, Secrets Manager, and other services from within the VPC using AWS PrivateLink.
  CardPaymentFraudSecretManagerEndpoint:
    Type: 'AWS::EC2::VPCEndpoint'
    Properties:
      VpcEndpointType: 'Interface'
      ServiceName: !Sub 'com.amazonaws.${AWS::Region}.secretsmanager'
      VpcId: !Ref VPC
      PrivateDnsEnabled: true
      SubnetIds:
        - !Ref SubnetOne
        - !Ref SubnetTwo
        - !Ref SubnetThree
      SecurityGroupIds:
        - !Ref CardPaymentFraudSecurityGroup

  CardPaymentFraudLambdaEndpoint:
    Type: 'AWS::EC2::VPCEndpoint'
    Properties:
      VpcEndpointType: 'Interface'
      ServiceName: !Sub 'com.amazonaws.${AWS::Region}.lambda'
      VpcId: !Ref VPC
      PrivateDnsEnabled: true
      SubnetIds:
        - !Ref SubnetOne
        - !Ref SubnetTwo
        - !Ref SubnetThree
      SecurityGroupIds:
        - !Ref CardPaymentFraudSecurityGroup

  CardPaymentFraudPipesDataEndpoint:
    Type: 'AWS::EC2::VPCEndpoint'
    Properties:
      VpcEndpointType: 'Interface'
      ServiceName: !Sub 'com.amazonaws.${AWS::Region}.pipes-data'
      VpcId: !Ref VPC
      PrivateDnsEnabled: true
      SubnetIds:
        - !Ref SubnetOne
        - !Ref SubnetTwo
        - !Ref SubnetThree
      SecurityGroupIds:
        - !Ref CardPaymentFraudSecurityGroup


  CardPaymentFraudStsEndpoint:
    Type: 'AWS::EC2::VPCEndpoint'
    Properties:
      VpcEndpointType: 'Interface'
      ServiceName: !Sub 'com.amazonaws.${AWS::Region}.sts'
      VpcId: !Ref VPC
      PrivateDnsEnabled: true
      SubnetIds:
        - !Ref SubnetOne
        - !Ref SubnetTwo
        - !Ref SubnetThree
      SecurityGroupIds:
        - !Ref CardPaymentFraudSecurityGroup
2. Subscribe Precisely on AWS Marketplace
- On the AWS Marketplace console, select Discover products and then search for AWS Mainframe Modernization - Data Replication for IBM z/OS. Select the link to proceed.
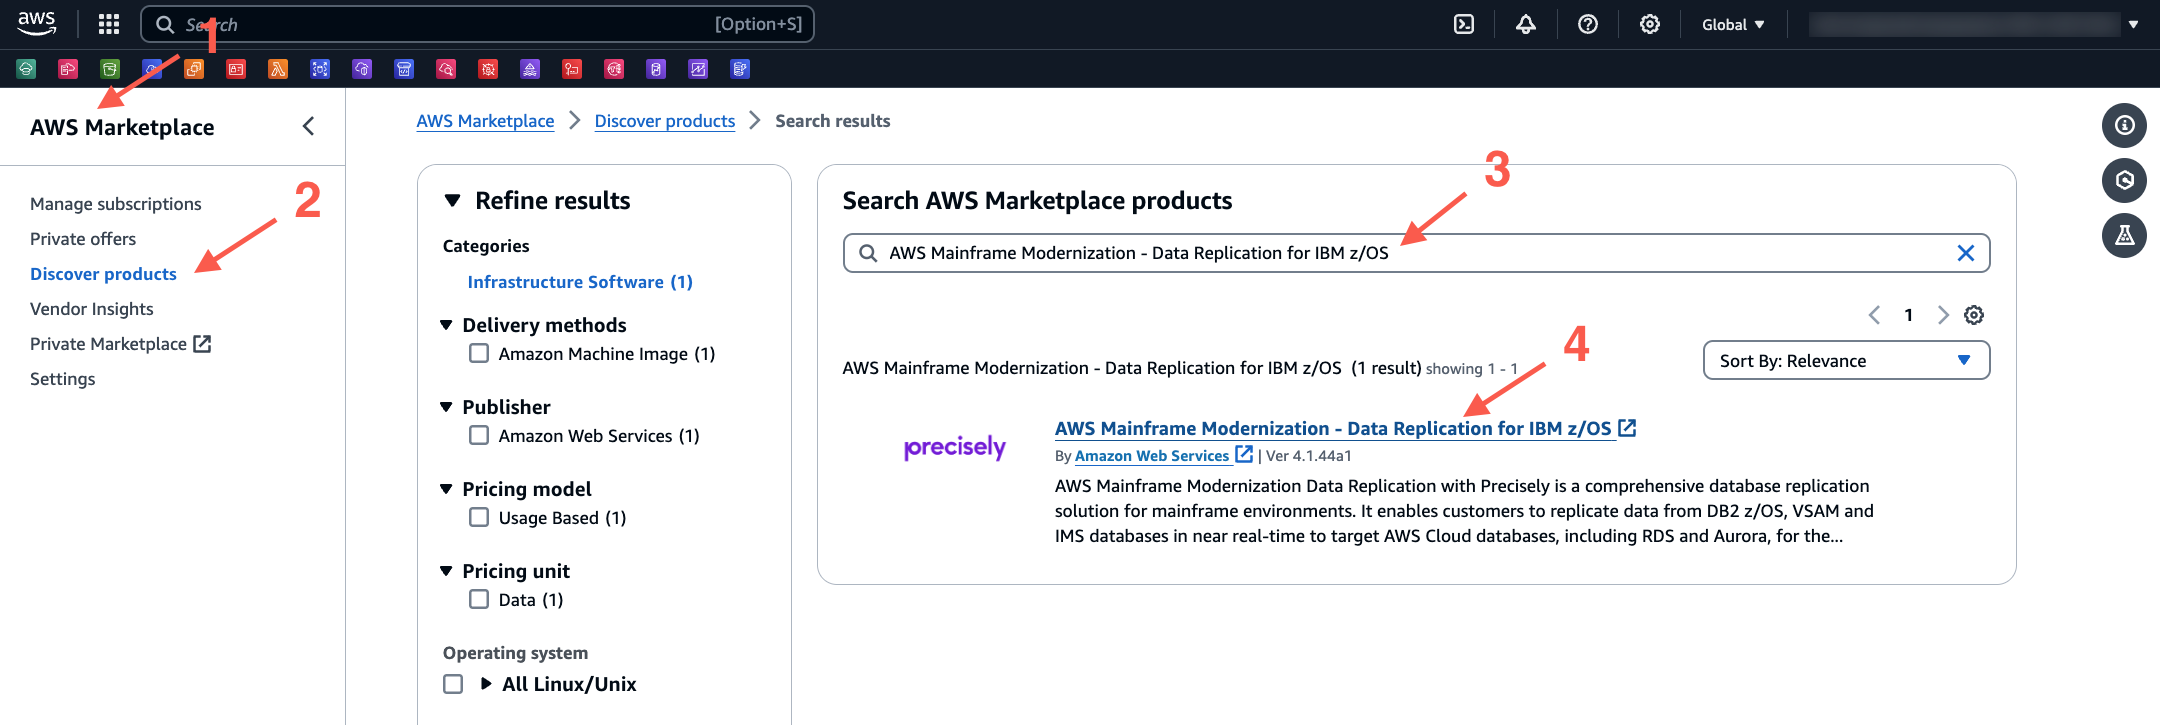
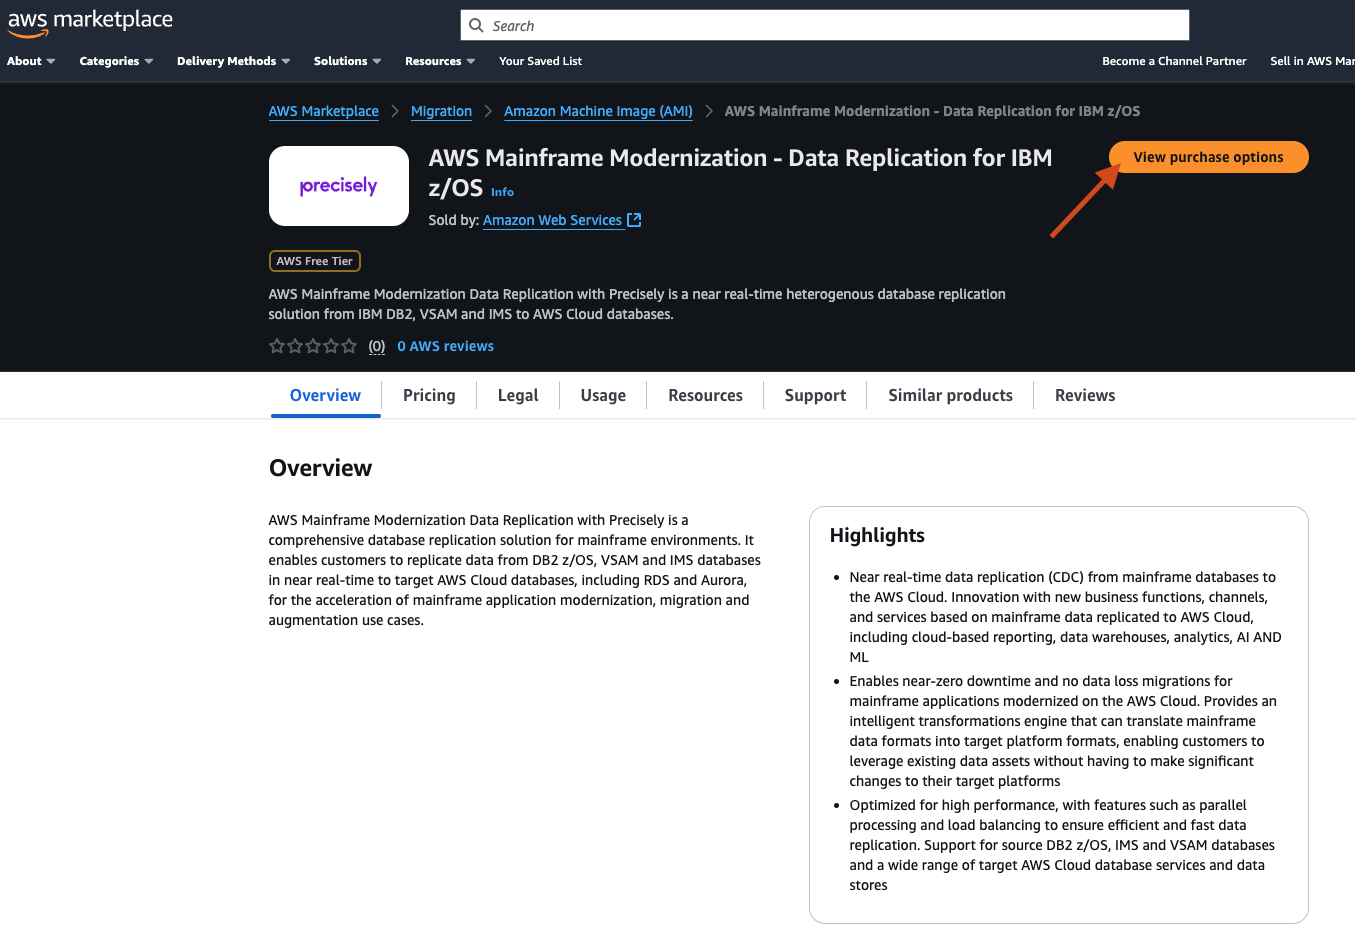
- On the newly opened page, review the details and then select View purchase options, and follow the instructions to complete the subscription.
There is no cost to subscribe Precisely on Marketplace. The fee is for the amount to data transferred during replication.
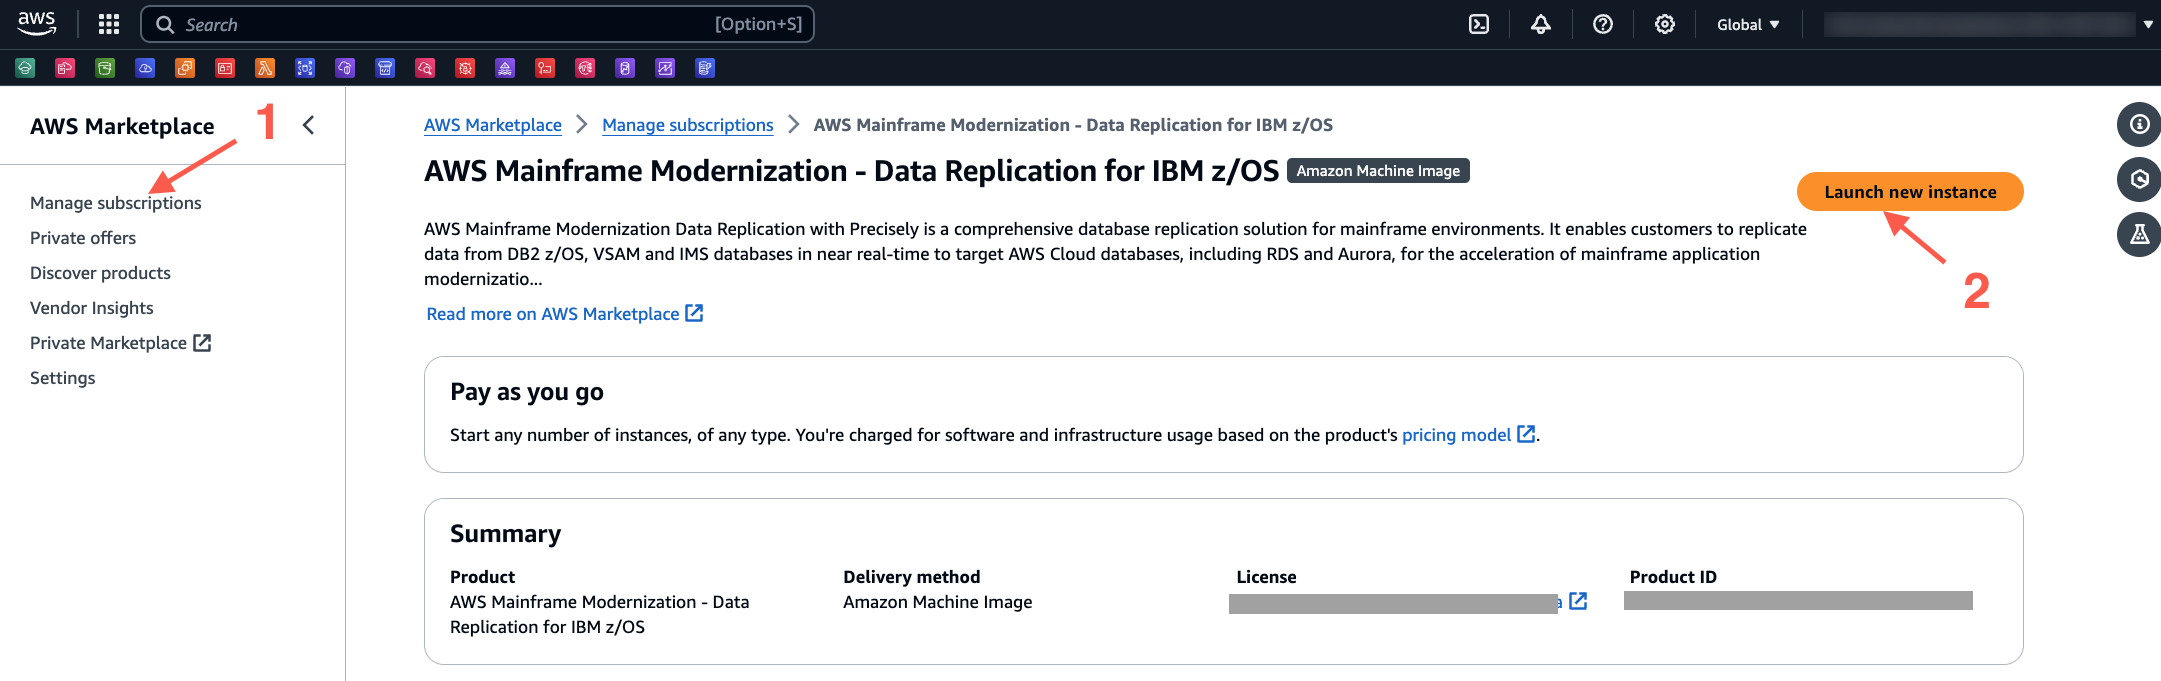
3. Launch Precisely on an Amazon EC2 instance
You can only start the following steps when the previously submitted CloudFormation template is complete.
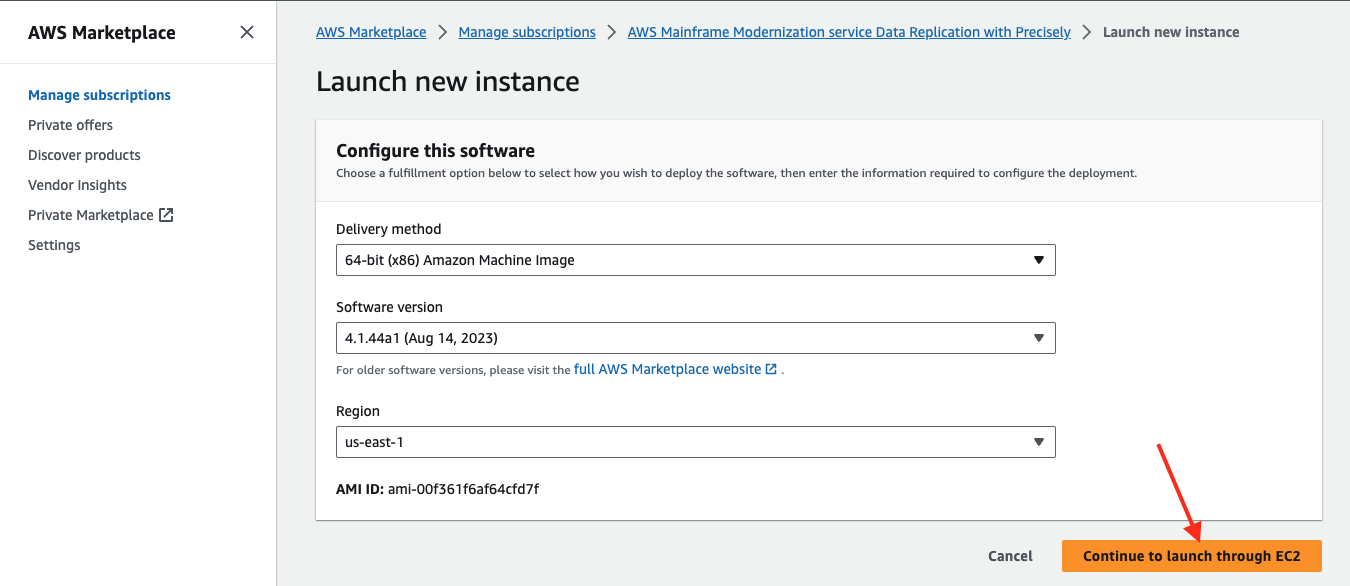
- On the AWS Marketplace page, select Manage subscriptions, and then select Launch new instance.
- Select Continue to launch through EC2. Select the AWS Region where the VPC and other resources are created.
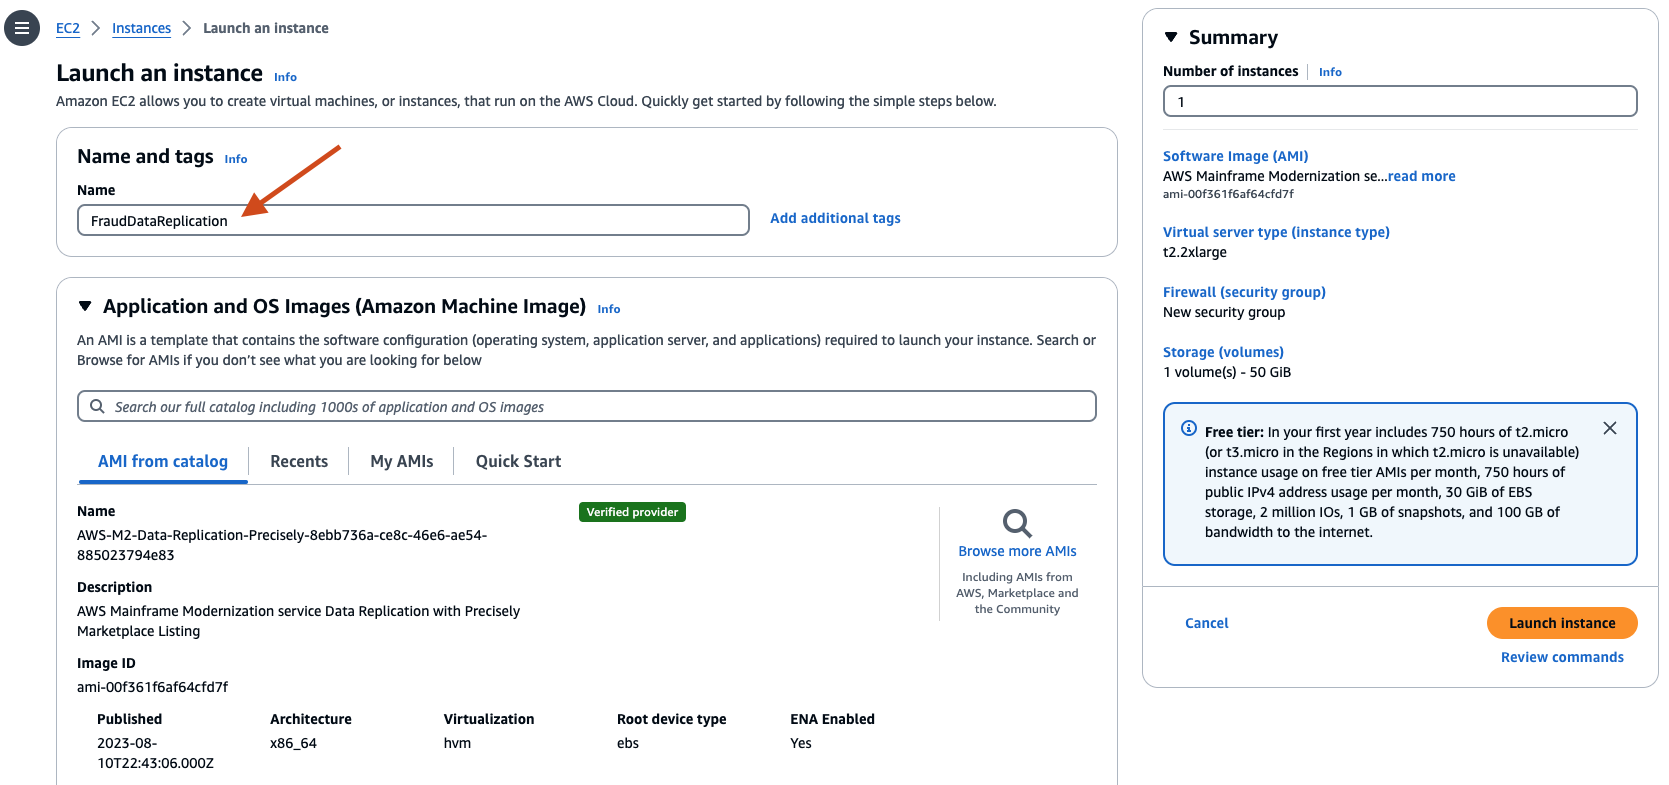
- Provide a name for the instance, for example: FraudDataReplication.
- Scroll down to Key pair (login), and for Key pair name, select Proceed without a key pair.

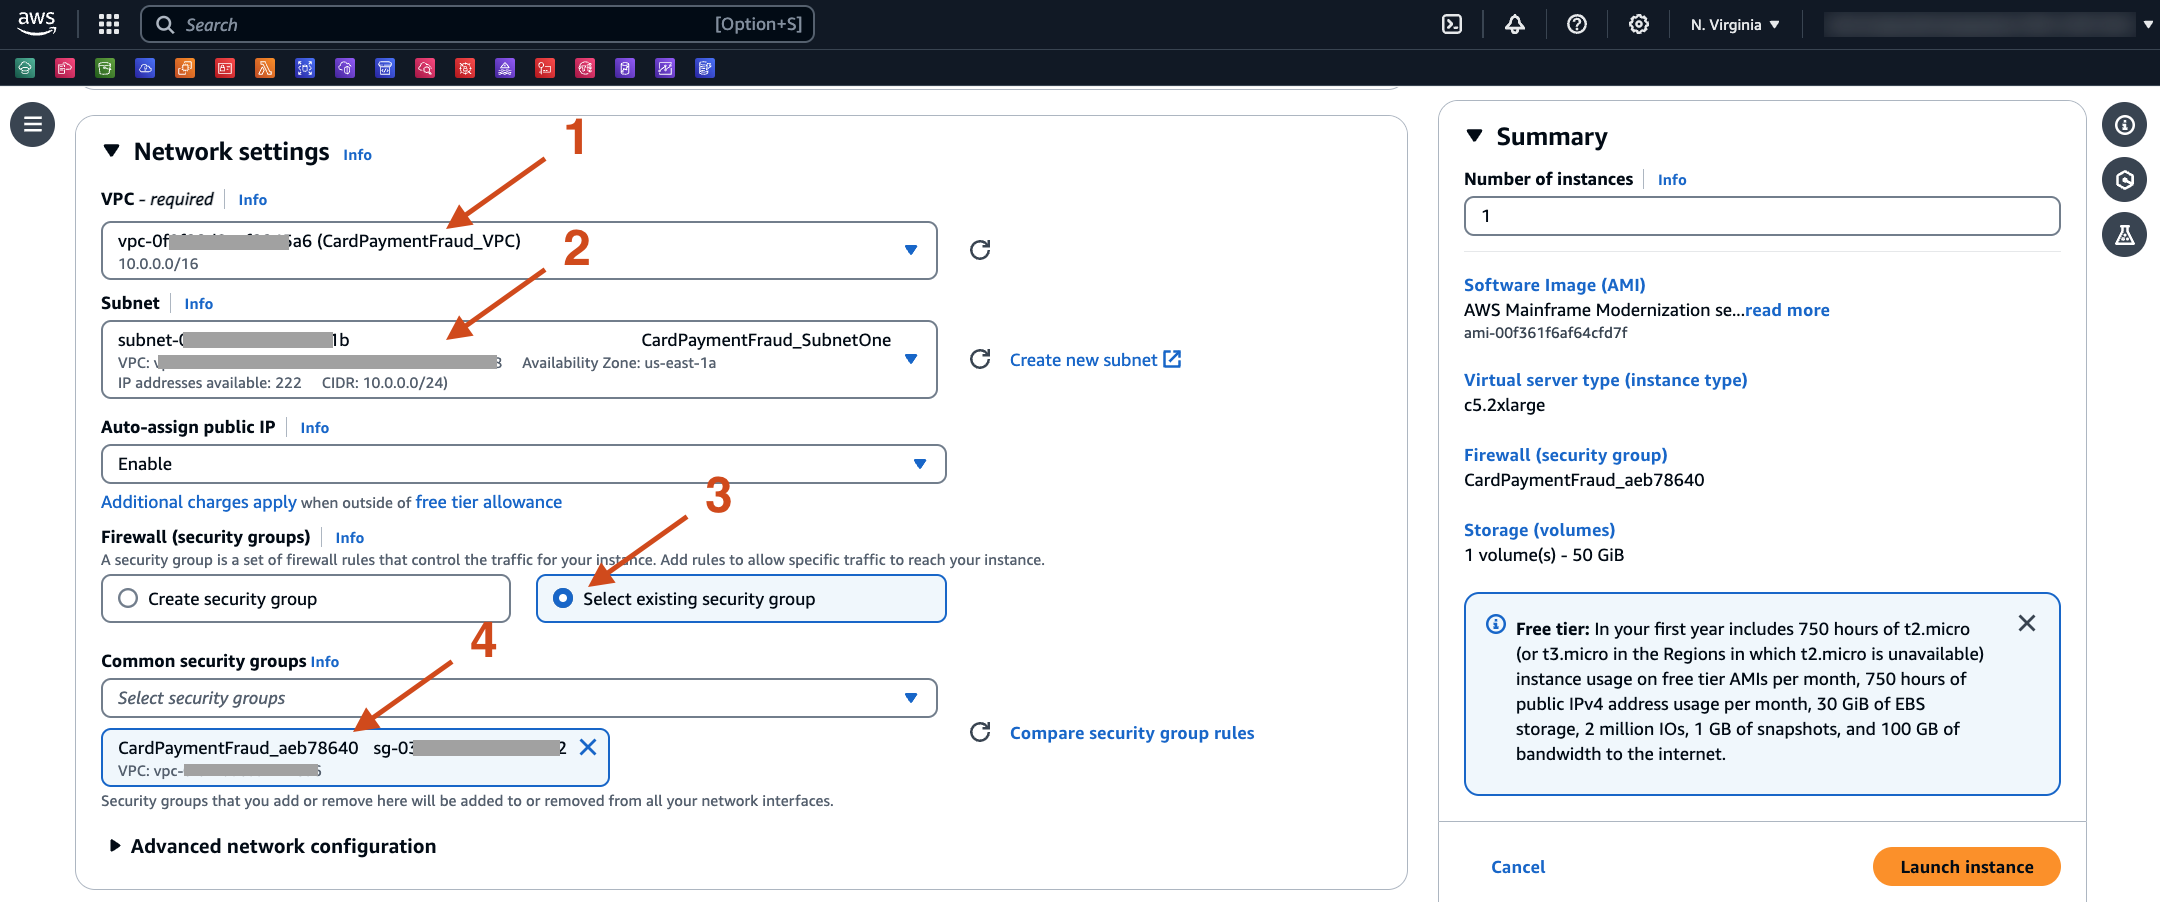
- Scroll down to Network settings, and select Edit.

- On the Network settings for VPC, select the one created earlier for the example CardPaymentFraud_VPC. Next, choose Select existing security group and then for Common security groups, select the one created by the CloudFormation template (for example, the one starting with CardPaymentFraud_).
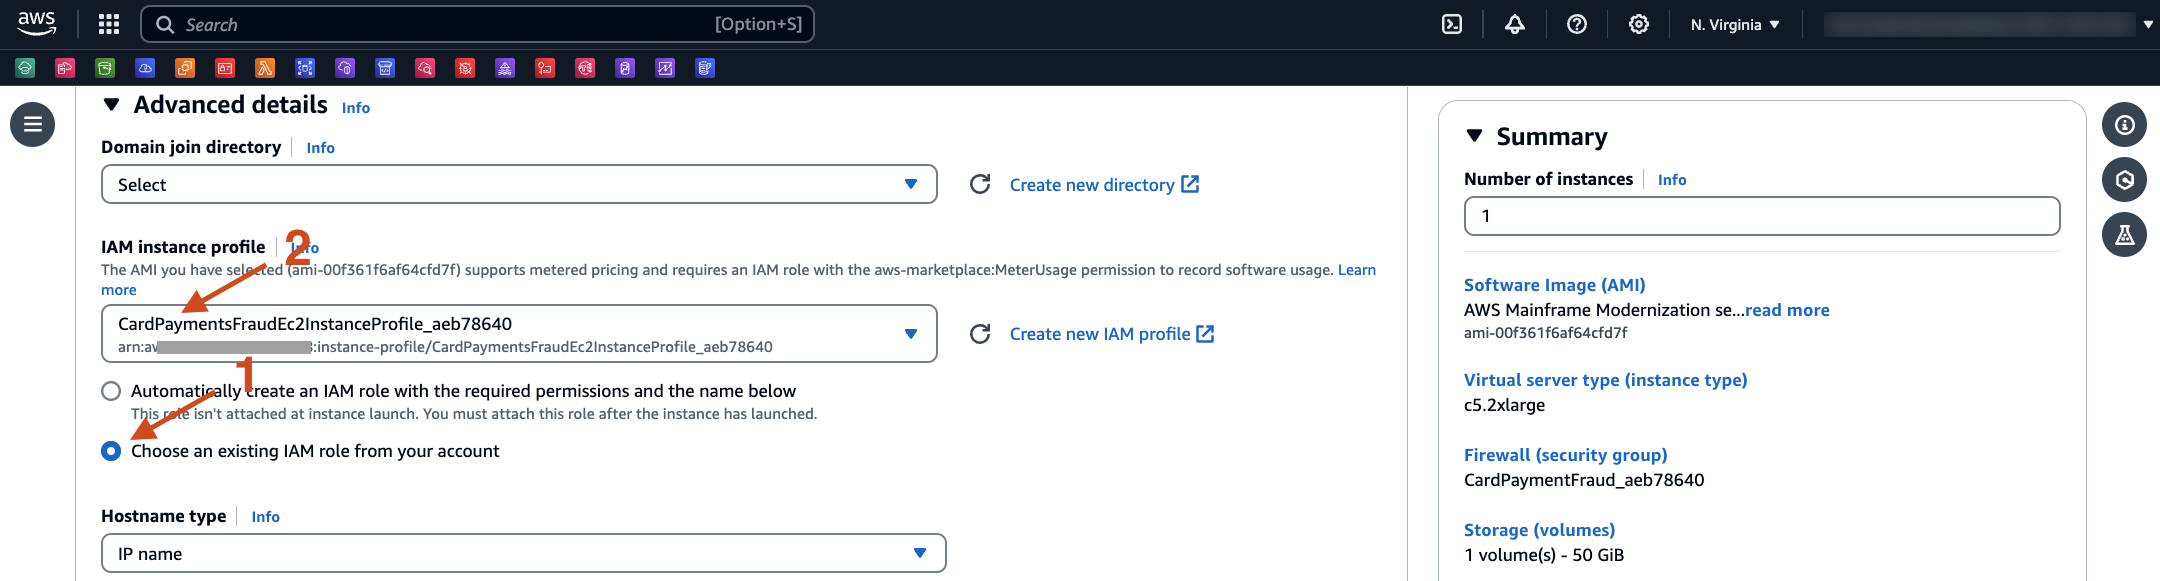
- Scroll down to Advanced details, and select Choose an existing IAM role from your account. Select the IAM role created by the CloudFormation template, for example, the one starting with CardPaymentFraudEc2InstanceProfile_. Then, select Launch Instance.
- After a few seconds, it will show Success.

4. Install software on EC2 instance
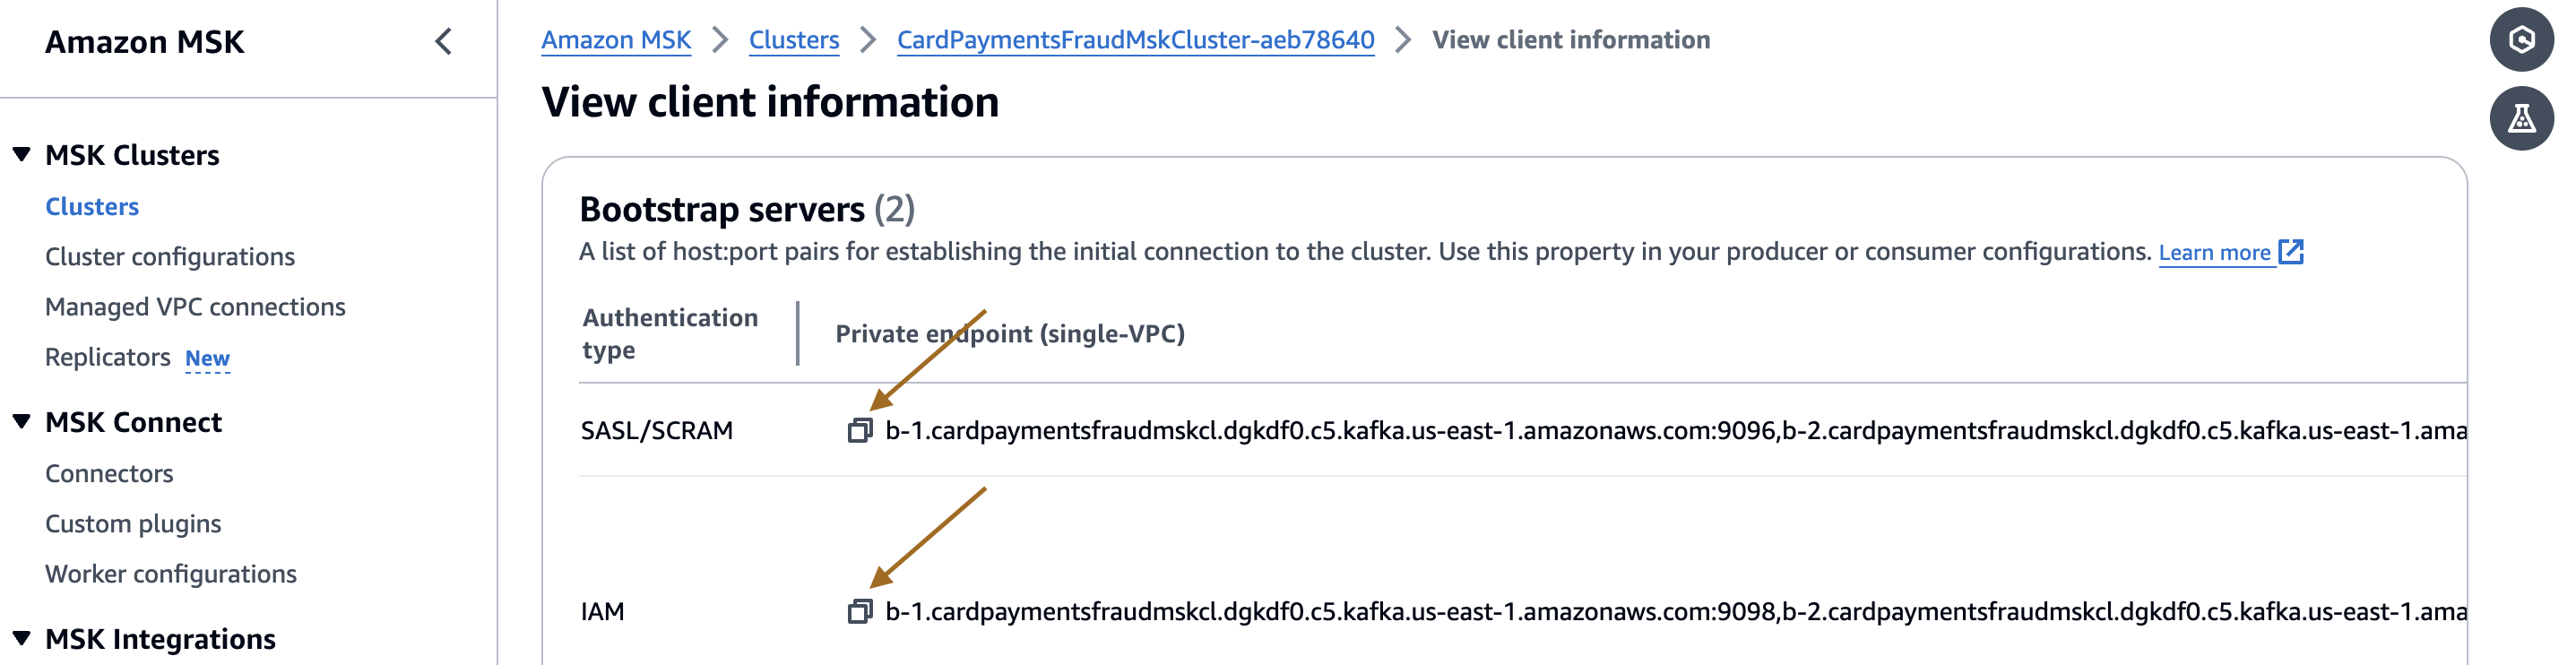
- Gather the MSK cluster client information from the AWS MSK console.

- Note the URLs corresponding to SASL/SCRAM and IAM. The client connection details will be required in the subsequent step.
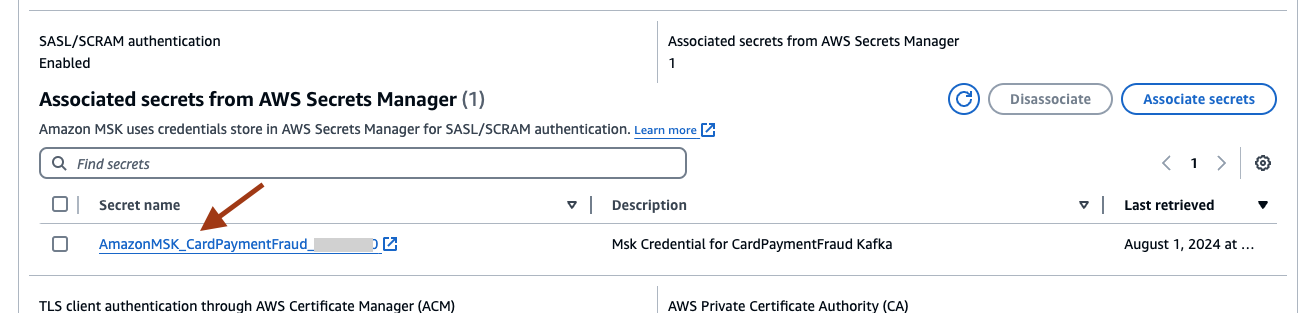
- Select the Secret name under Associated secrets from AWS Secrets Manager to retrieve the password from Secrets Manager.
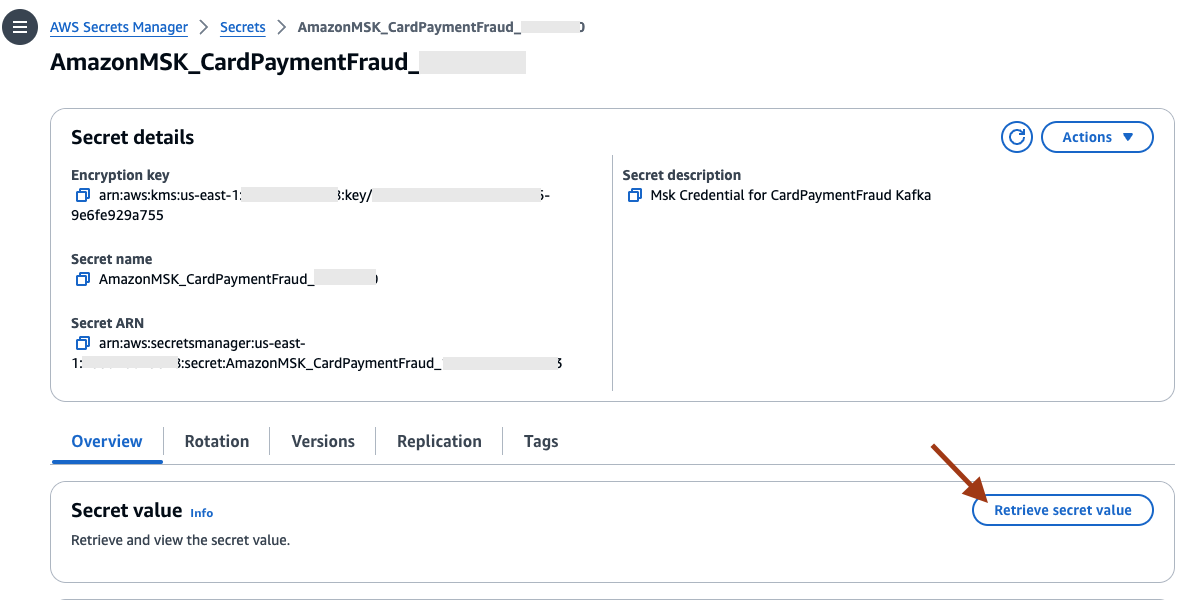
- Select Retrieve secret value to view the secret value. Remember the password as this will be used inside the EC2 script in the following section.
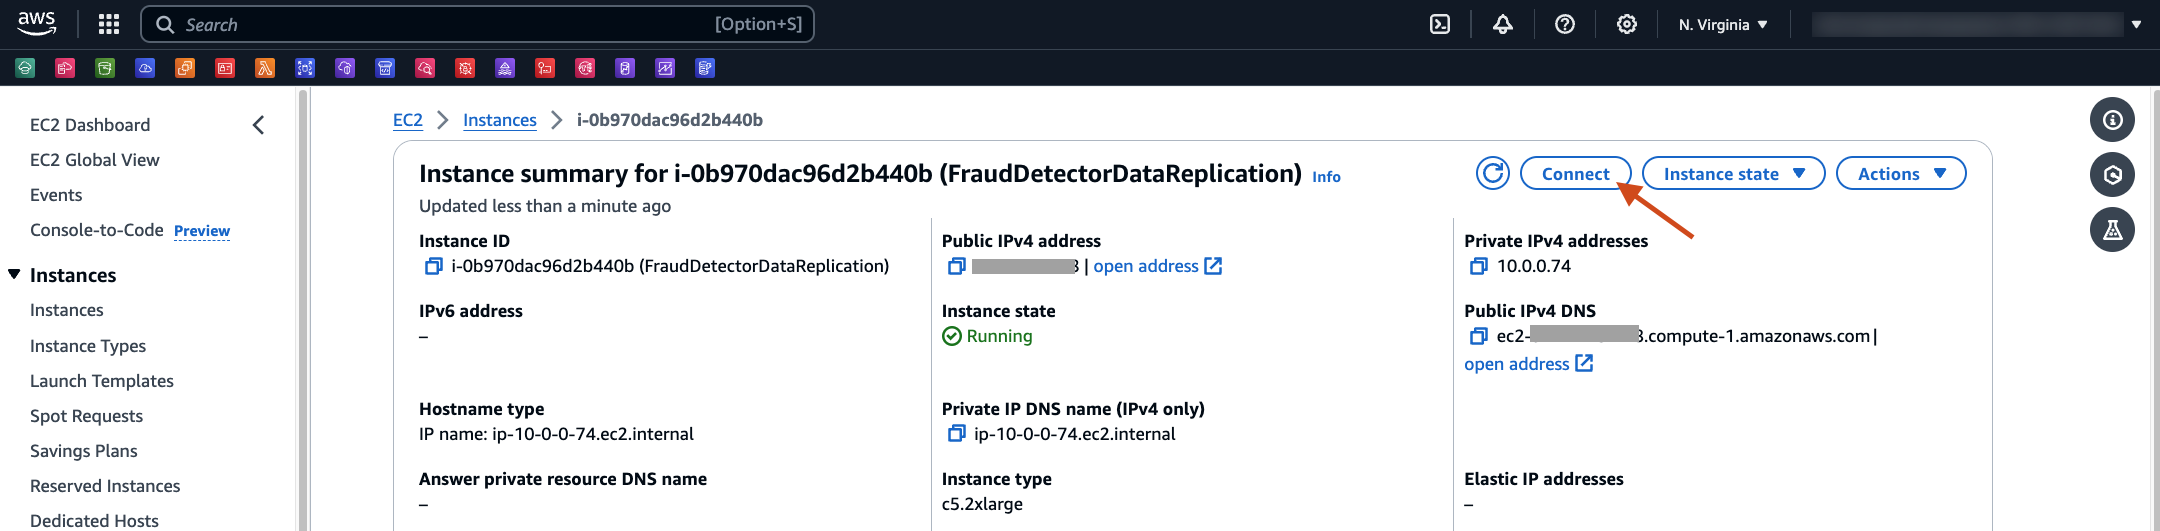
- Navigate to the EC2 Console page, and select the instance created.

- Select Connect.
- Select tab EC2 instance Connect. Change the User name to ec2-user, and then select Connect.
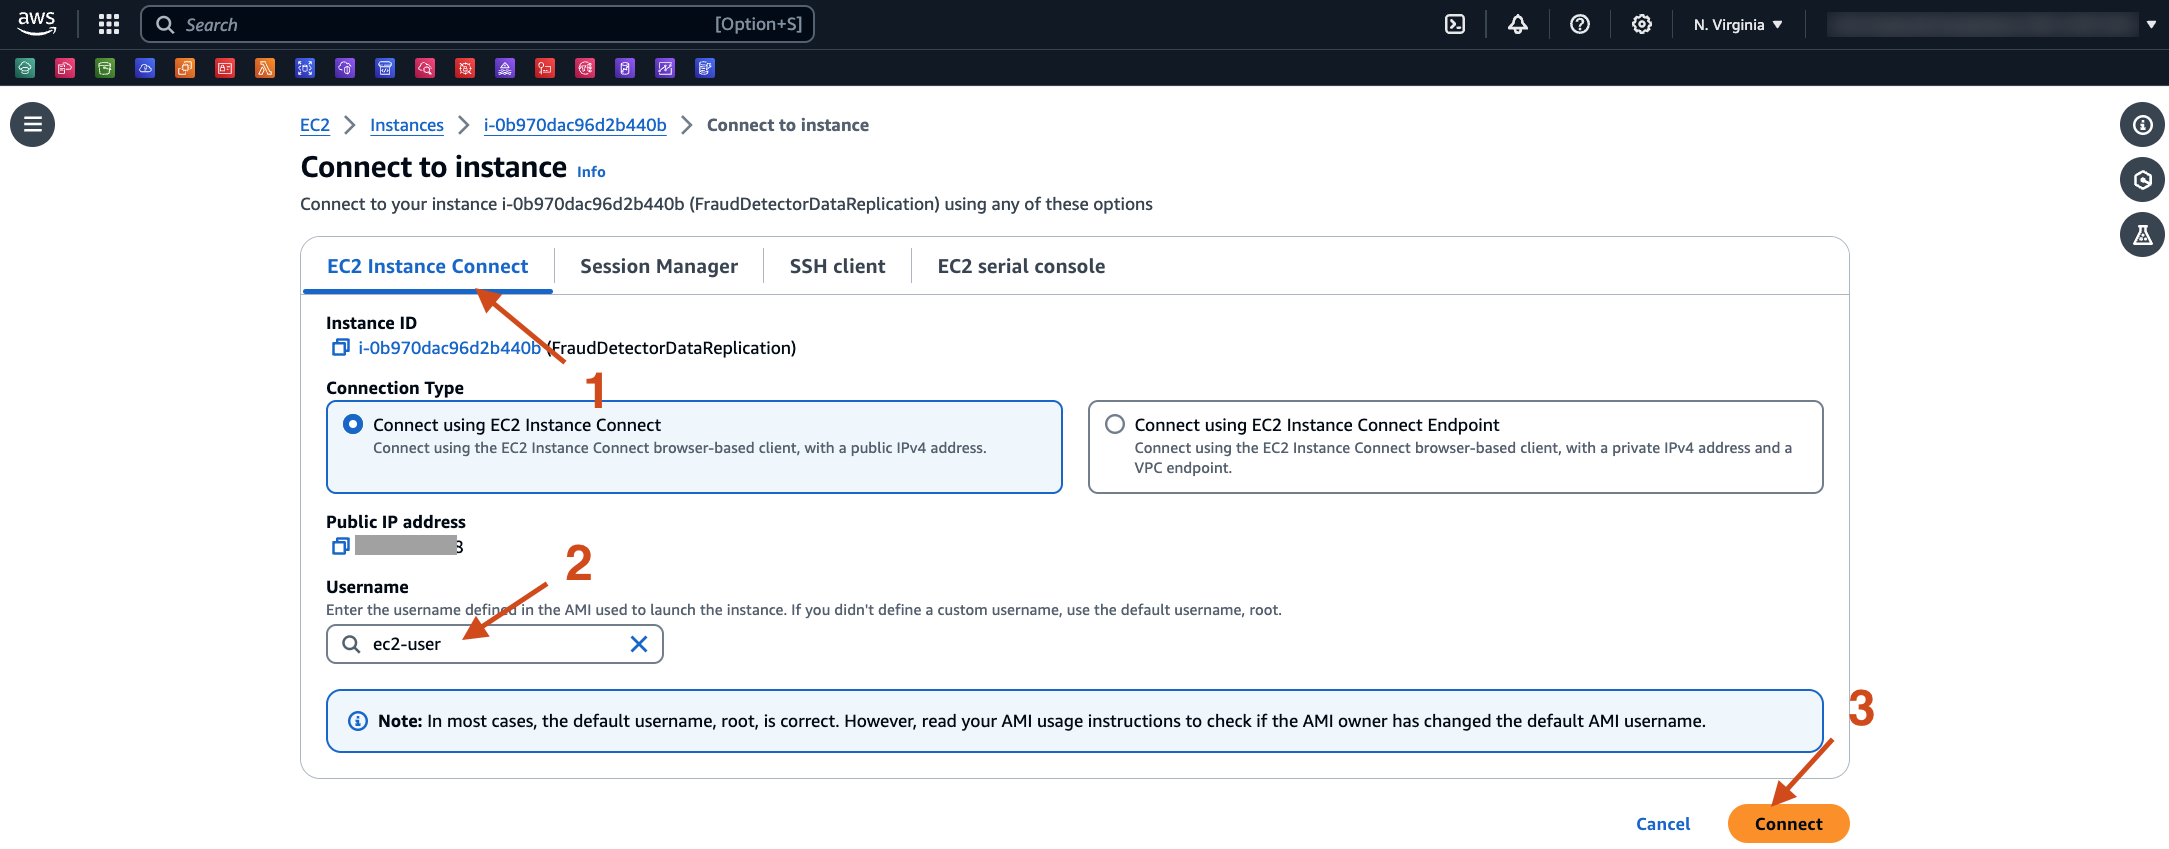
- This will open a new browser tab with the EC2 instance prompt. Create a bash script file, say script.sh in /home/ec2-user directory.

- Paste the below commands in the script.sh file.
Make sure to replace the «msk_iam_brokers» and «msk_iam_brokers» details as obtained from the MSK console. Similarly, replace «sasl_password» with the password retrieved earlier from Secrets Manager.
#!/bin/bash
exec 3>&1 4>&2
trap 'exec 2>&4 1>&3' 0 1 2 3
exec 1>log.out 2>&1

echo 'Starting script..'
#Install softwares
sudo yum update -y
sudo yum install -y librdkafka-devel jq tree postgresql15

#Install psycopg2 python library for Lambda Layer [https://docs.aws.amazon.com/lambda/latest/dg/python-layers.html#python-layer-packaging]
echo 'Installing psycopg2..'
mkdir psycopg2; cd psycopg2; mkdir python
pip3 install aws-psycopg2 -t python
zip -r aws_psycopg2.zip *
echo 'Creating Lambda Layer for psycopg2..'
aws lambda publish-layer-version --layer-name psycopg2 --zip-file fileb://aws_psycopg2.zip --compatible-runtimes python3.10
cd

#Install Java Kafka Libraries
echo 'Installing kafka..'
cd /home/ec2-user; mkdir kafka; cd kafka
wget https://archive.apache.org/dist/kafka/3.5.1/kafka_2.12-3.5.1.tgz
tar -xzf kafka_2.12-3.5.1.tgz

#Install Java Kafka IAM authentication jar
echo 'Installing kafka IAM authentication..'
cd /home/ec2-user/kafka/kafka_2.12-3.5.1/libs/
wget https://github.com/aws/aws-msk-iam-auth/releases/download/v1.1.1/aws-msk-iam-auth-1.1.1-all.jar
cd /home/ec2-user/kafka/kafka_2.12-3.5.1/bin/

#Create IAM authentication properties file
echo 'Generating client.properties file..'
cat > client.properties << EOF
security.protocol=SASL_SSL
sasl.mechanism=AWS_MSK_IAM
sasl.jaas.config=software.amazon.msk.auth.iam.IAMLoginModule required;
sasl.client.callback.handler.class=software.amazon.msk.auth.iam.IAMClientCallbackHandler
EOF

# Create Topic
export MSK_IAM_BROKERS=<<msk_iam_brokers>>

echo 'Creating kafka topic..'
./kafka-topics.sh --bootstrap-server $MSK_IAM_BROKERS --command-config client.properties --create --replication-factor 3 --partitions 6 --topic card-payment-authorization-messages-topic

# Create Consumer Group
echo 'Creating consumer group..'
./kafka-consumer-groups.sh --command-config client.properties --bootstrap-server $MSK_IAM_BROKERS --topic card-payment-authorization-messages-topic --group cardpaymentfraudnotification --to-earliest --reset-offsets --execute


# Create SASL authentication confiuration file
cd /home/ec2-user/; mkdir precisely; cd /home/ec2-user/precisely

MSK_SASL_BROKERS=<<msk_sasl_brokers>>

echo 'Creating sqdata_kafka_producer.conf file..'
cat > sqdata_kafka_producer.conf << EOF
builtin.features=SASL_SCRAM
security.protocol=SASL_SSL
sasl.mechanism=SCRAM-SHA-512
sasl.username=admin
sasl.password=<<sasl_password>>
metadata.broker.list=$MSK_SASL_BROKERS
EOF

# SET the PATH variable for Precisely bin directory
cd /home/ec2-user/
export PATH=$PATH:/usr/sbin:/opt/precisely/di/sqdata/bin

# Run keygen command to create public/private key files
echo 'Creating key files..'
sqdutil keygen --force

echo 'Completed Script..'
- Change the script file permission to execute using chmod +x script.sh command, and then submit the script by running the ./script.sh command.
The script logs are written in /home/ec2-user/log.out file. In case you need to debug, the command logs are available in the file.
5. Obtain Precisely software to install on mainframe
- The mainframe installation zip file can be found in the EC2 instance at the location: /home/ec2-user/software/agent.
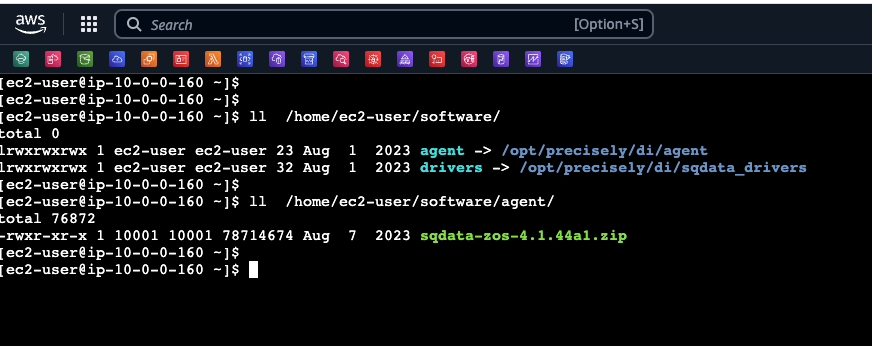
drivers: This directory contains the database drivers that are already installed on the AMI. agent: This directory contains the agent binaries that need to be installed on the Mainframe z/OS.
- The script executed earlier generated the private and public keys to be used by Precisely. The location of the key files are - /home/ec2-user/.nacl/
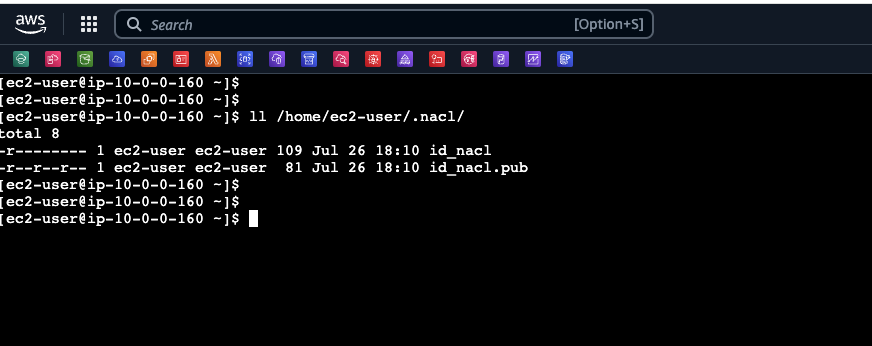
The public key will be transferred to mainframe and will be provided to Daemon job for authentication.
6. Install Precisely on mainframe
- Login to your z/OS USS shell and sftp copy over the zipped distribution files and unpack them. To use this method, your z/OS system must be enabled for SSH using the Setting up the sshd daemon instructions from IBM.
The screenshots and instructions are specific to Precisely software version 4.1.43. For other versions, some of the following instructions may be different and the screenshots may not match.
UID> mkdir -p software; cd software
UID> sftp -i ~/.ssh/ami-ec2-user.pem ec2-user@<ami public name or IP>
sftp> cd /opt/precisely/di/agent
sftp> get sqdata-zos-4.1.43a2.zip
sftp> quit
UID> unzip sqdata-zos-4.1.43a2.zip
UID> ls -l sqdata-zos-4.1.43a2
-rw-r--r-- 1 WWCJFA CONNECT 74752 Jul 5 13:38     SQDATA.ZOS.V40143a2.CNTL.TERSE
-rw-r--r-- 1 WWCJFA CONNECT 45056 Jul 5 13:38     SQDATA.ZOS.V40143a2.DBRMLIB.TERSE
-rw-r--r-- 1 WWCJFA CONNECT 323584 Jul 5 13:39    SQDATA.ZOS.V40143a2.ISPFLIB.TERSE
-rw-r--r-- 1 WWCJFA CONNECT 8192 Jul 5 13:38      SQDATA.ZOS.V40143a2.PARMLIB.TERSE
-rw-r--r-- 1 WWCJFA CONNECT 79428608 Jul 5 13:38  SQDATA.ZOS.V40143a2.PGMOBJ.TERSE
-rw-r--r-- 1 WWCJFA CONNECT 6144 Jul 5 13:39      SQDATA.ZOS.V40143a2.PROCLIB.TERSE
-rw-r--r-- 1 WWCJFA CONNECT 67584 Jul 5 13:39     SQDATA.ZOS.V40143a2.SAMPLIB.TERSE
- Copy the distribution files into the z/OS datasets.
UID> cd sqdata-zos-4.1.43a2
UID> find SQDATA.ZOS.V40143a2.*.TERSE -exec cp -P "recfm=FB,lrecl=1024,blksize=27648,space=(CYL,(50,10),RLSE)" {} "//'{}'" \;
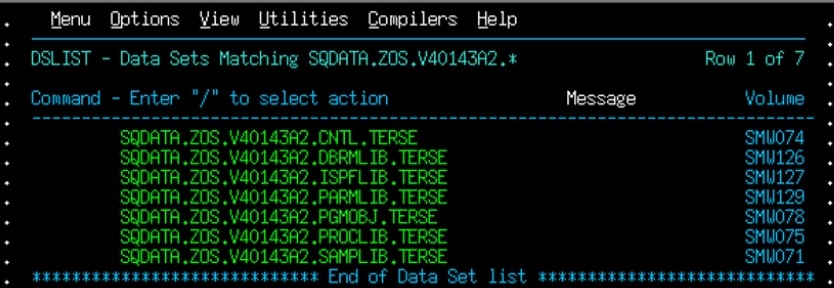
- Validate you have the zOS datasets using ISPF.
- Follow the instructions provided in the section Install Connect CDC (SQData) using JCL in Precisely documentation to install Precisely software on mainframe.
Mainframe administrator access might be required to install Precisely on mainframe.
- Next, follow the instructions provided in the section Start the ISPF interface in Precisely documentation to access the Precisely ISPF interface.
Additional AWS-specific instructions on how to setup Precisely on mainframe are available at AWS Mainframe Modernization service Data Replication with Precisely Documentation.
7. Set up Precisely Daemon and Publisher on mainframe
In this section, you will use the Precisely Differ process to replicate VSAM data. The Connect CDC (SQData) Keyed File Compare Capture, also known as “The Differ”, determines the differences between two files of the same format and writes the Change data, including both before and after images to a z/OS System LogStream. The zLog Publisher component then manages the captured data by communicating with downstream Engines using TCP/IP. Once an individual unit-of-work has been forwarded to all target engines and consumed, the zLog Publisher marks the data in the LogStream as done.
- Prepare Precisely environment: Use the instructions Prepare environment. For this Guidance, you may create the VSAM based LogStream, but in a production scenario, we recommended using Coupling Facility based LogStreams.
Sample VSAM based LogStream creation job with stream name - SQDATA.VSMCDC.LOG1
//IXCMDEFL JOB 1,MSGLEVEL=(1,1),MSGCLASS=H,NOTIFY=&SYSUID
//*
//*--------------------------------------------------------
//DEFINE   EXEC PGM=IXCMIAPU
//SYSPRINT DD   SYSOUT=*
//SYSOUT   DD   SYSOUT=*
//SYSIN    DD   *
 DATA TYPE (LOGR) REPORT(YES)
  DELETE LOGSTREAM NAME(SQDATA.VSMCDC.LOG1)
  DEFINE LOGSTREAM NAME(SQDATA.VSMCDC.LOG1)
         DASDONLY(YES)
         LOWOFFLOAD(40)
         HIGHOFFLOAD(80)
         MAXBUFSIZE(65276)
         LS_SIZE(3500)
         STG_SIZE(10000)
/*
- Set up Deamon job: Follow the instructions Setup capture controller daemon to set up the Daemon job.
To authenticate the Apply agent that will be running on an EC2 instance, copy the public key file content from the EC2 instance and append to the file XXXXXXXX.SQDATA.NACL.AUTH.KEYS used in the Deamon job.
Sample Precisely Daemon job:
//CRDAEMNS JOB 1,MSGLEVEL=(1,1),MSGCLASS=H,NOTIFY=&SYSUID
//*--------------------------------------------------------------------
//*  JCL TO RUN DAEMON: SQDAEMON AS A BATCH JOB
//*--------------------------------------------------------------------
//SQDAEMON EXEC PGM=SQDAEMON,REGION=256M
//STEPLIB  DD DISP=SHR,DSN=XXXXXXXX.SQDATA.V40136.LOADLIB
//SQDPUBL  DD DISP=SHR,DSN=XXXXXXXX.NACL.PUBLIC
//SQDPKEY  DD DISP=SHR,DSN=XXXXXXXX.NACL.PRIVATE
//SQDAUTH  DD DISP=SHR,DSN=XXXXXXXX.SQDATA.NACL.AUTH.KEYS
//SYSOUT   DD SYSOUT=*
//SYSPRINT DD SYSOUT=*
//CEEDUMP  DD SYSOUT=*
//SQDLOG   DD SYSOUT=*
//SQDPARMS DD *
  --service=2626 --tcp-buffer-size=262144
  -d /home/sqdata/daemon
/*
The job uses the default Precisely PORT 2626. Please work with your mainframe network team to allow-list the PORT you want to use, and replace the same on the JCL. The PORT should be accessible from your AWS environment.
- Submit the JOB to start the Daemon process. When it has successfully started, you will see output messages in JOB JESMSGLG, similar to the below:
13.46.56 JOB07957 SQDD801I SQDAEMON(67109387) started on port 2626 with rc = 0x0
- Set up the Publisher job: Follow the instructions Setup CDCzLog publisher agent to set up the Publisher configuration job.
Sample job to create the Publisher configuration CAB file:
/SQDCONFP JOB 1,MSGLEVEL=(1,1),MSGCLASS=H,NOTIFY=&SYSUID
//*
//*--------------------------------------------------------------------
//*   Create CAB File for zLOGC Publisher Agent
//*--------------------------------------------------------------------
//*   Note: 1) Parameter Keywords must be entered in lower case
//*         2) Parameters Values are Case Sensitive.
//*         3) Engine Name should be in Upper Case for z/OS JCL
//*********************************************************************
//*-------------------------------------------
//*   Create New zLog Publisher CAB File
//*-------------------------------------------
//CRCONF   EXEC PGM=SQDCONF
//SYSPRINT DD SYSOUT=*
//SYSOUT   DD SYSOUT=*
//SQDPARMS DD *
create /home/sqdata/VSMTOMSK.cab
    --type=zlog
    --zlog='SQDATA.VSMCDC.LOG1'
//*
//*--------------------------------------------------------------------
//*   Register/Add Files Files to the zLOGC Publisher CAB File
//*   and Set the Target Subscription
//*--------------------------------------------------------------------
//*
//*-----------------------------------------------
//*   Publish File VSAMPURC to Subscription VSMTOMSK
//*-----------------------------------------------
//ADDFI1   EXEC PGM=SQDCONF
//SYSPRINT DD SYSOUT=*
//SYSOUT   DD SYSOUT=*
//SQDPARMS DD *
add /home/sqdata/VSMTOMSK.cab
    --key=VSAMPURC
    --datastore=cdc:////VSMTOMSK
    --active
//*
//*-----------------------------------------
//*   Display the Publisher CAB File
//*-----------------------------------------
//DISPLAY  EXEC PGM=SQDCONF
//SYSPRINT DD SYSOUT=*
//SYSOUT   DD SYSOUT=*
//SQDPARMS DD *
display /home/sqdata/VSMTOMSK.cab
//*
Sample Publisher job:
//VSMPUBSG JOB (COBOL),CLASS=A,MSGCLASS=H,MSGLEVEL=(1,1),
//         REGION=5M,NOTIFY=&SYSUID
//*----------------------------------------------------------------
//*      JCL TO RUN IMS/VSAM PUBLISHER: VSMTOMSK AS A BATCH JOB
//*----------------------------------------------------------------
//VSMTOMSK EXEC PGM=SQDZLOGC,REGION=256M
//STEPLIB  DD DISP=SHR,DSN=XXXXXXXX.SQDATA.V40136.LOADLIB
//SYSOUT   DD SYSOUT=*
//SYSPRINT DD SYSOUT=*
//CEEDUMP  DD SYSOUT=*
//VSMTOMSK DD SYSOUT=*
//SQDLOG   DD SYSOUT=*
//SQDPARMS DD *
 --apply --start
 /home/sqdata/VSMTOMSK.cab
/*
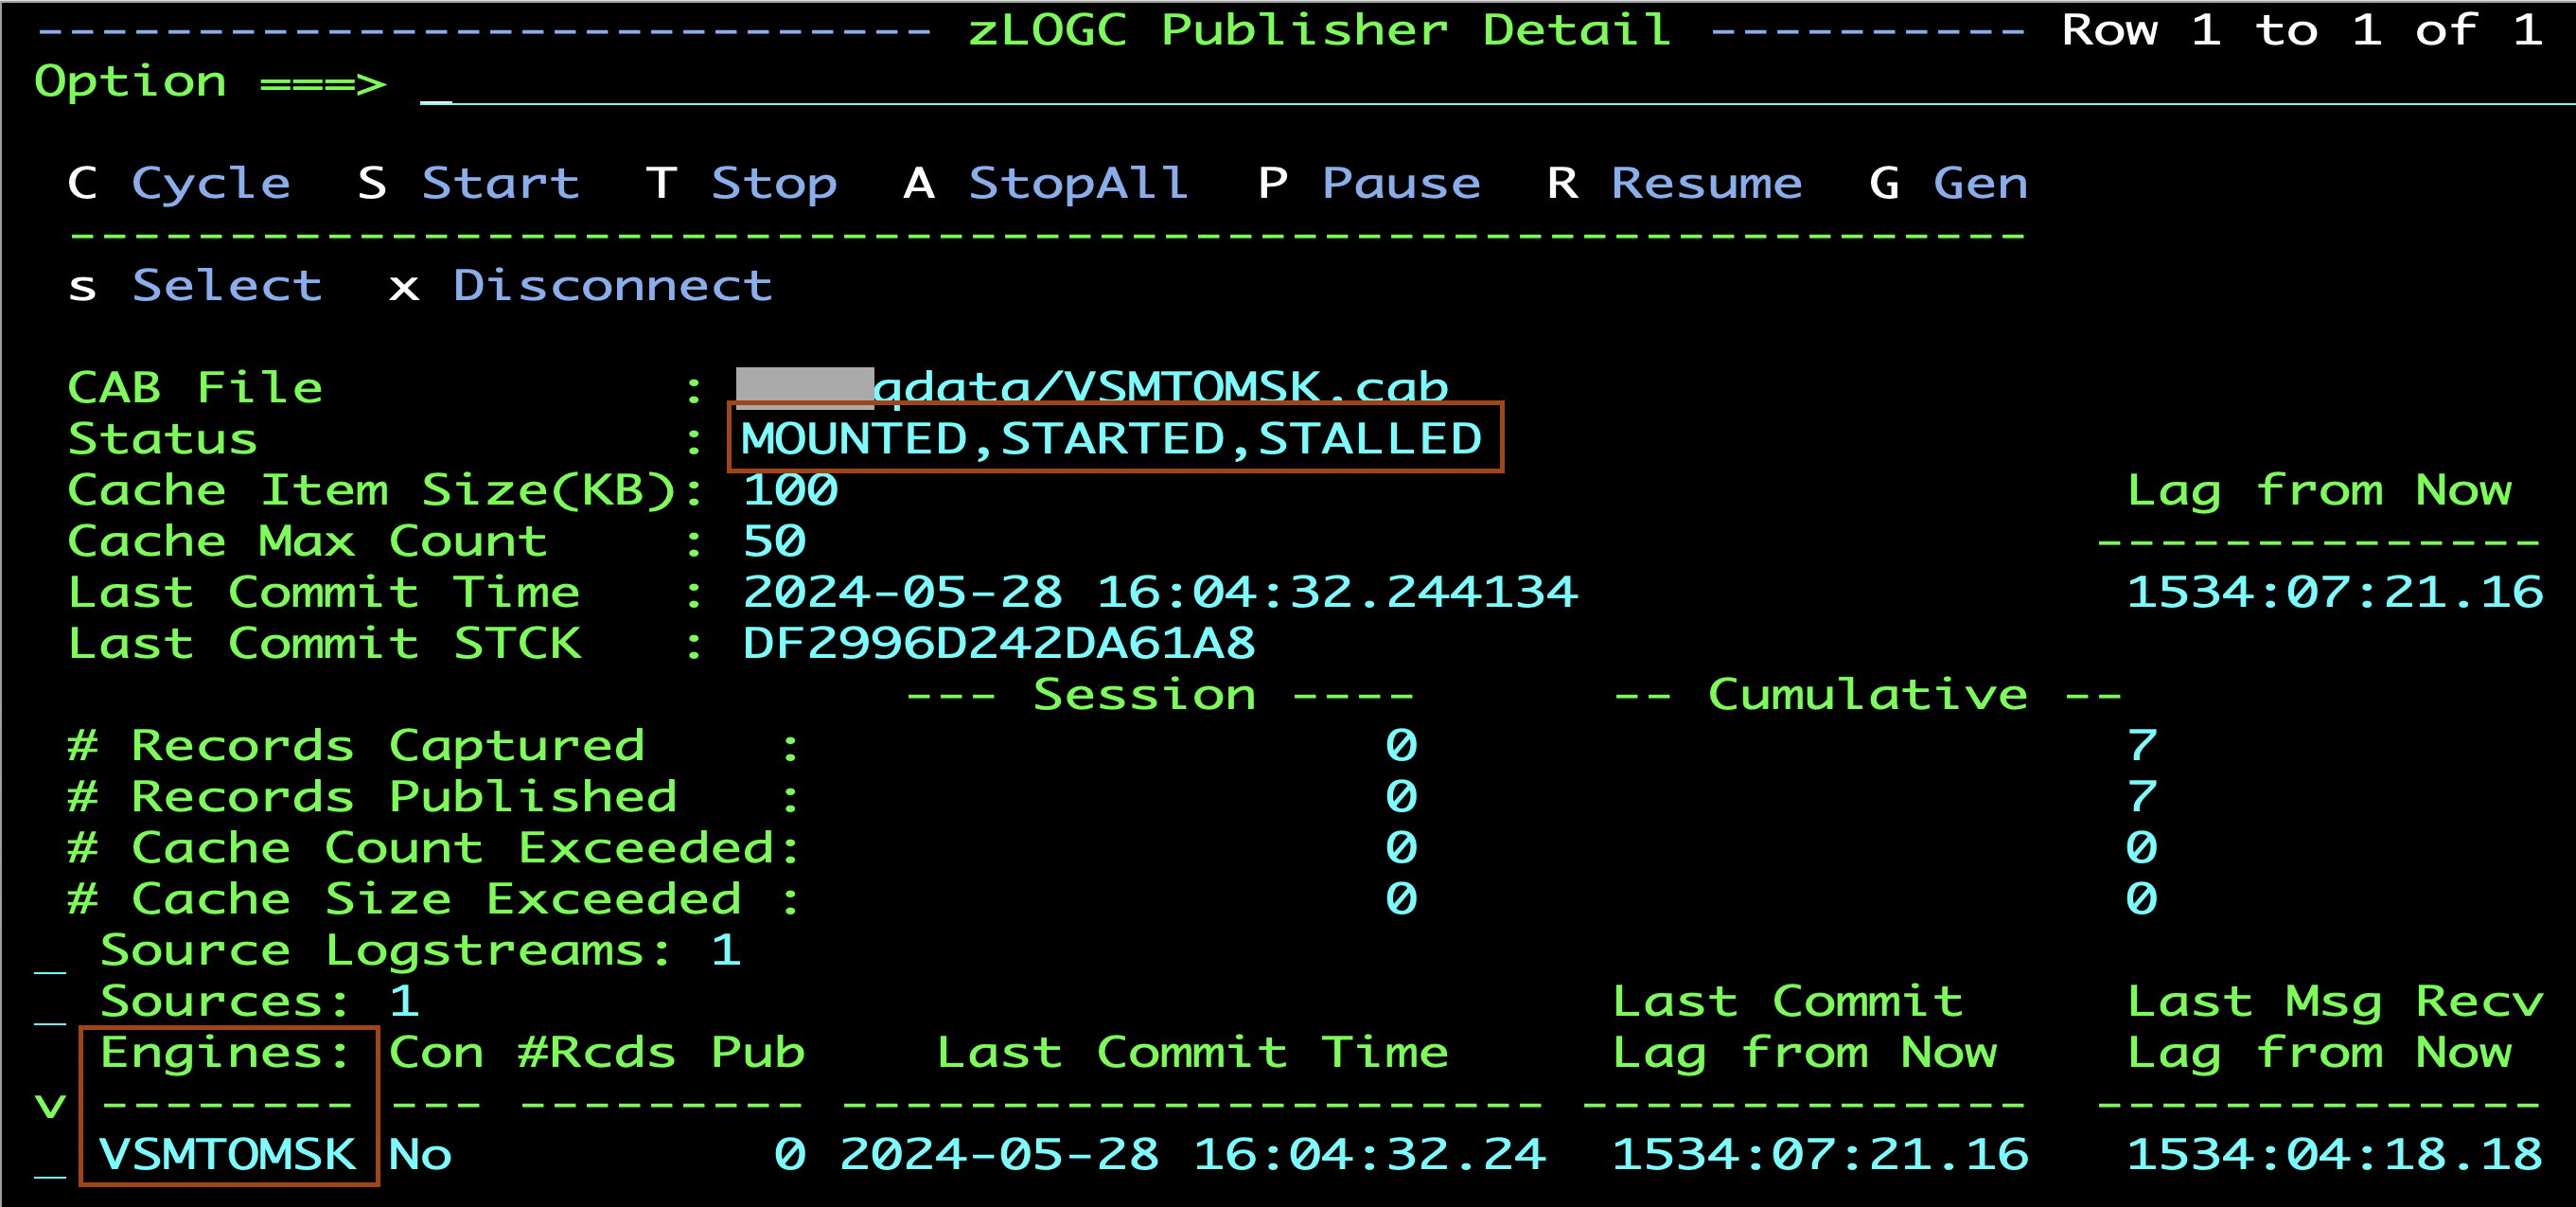
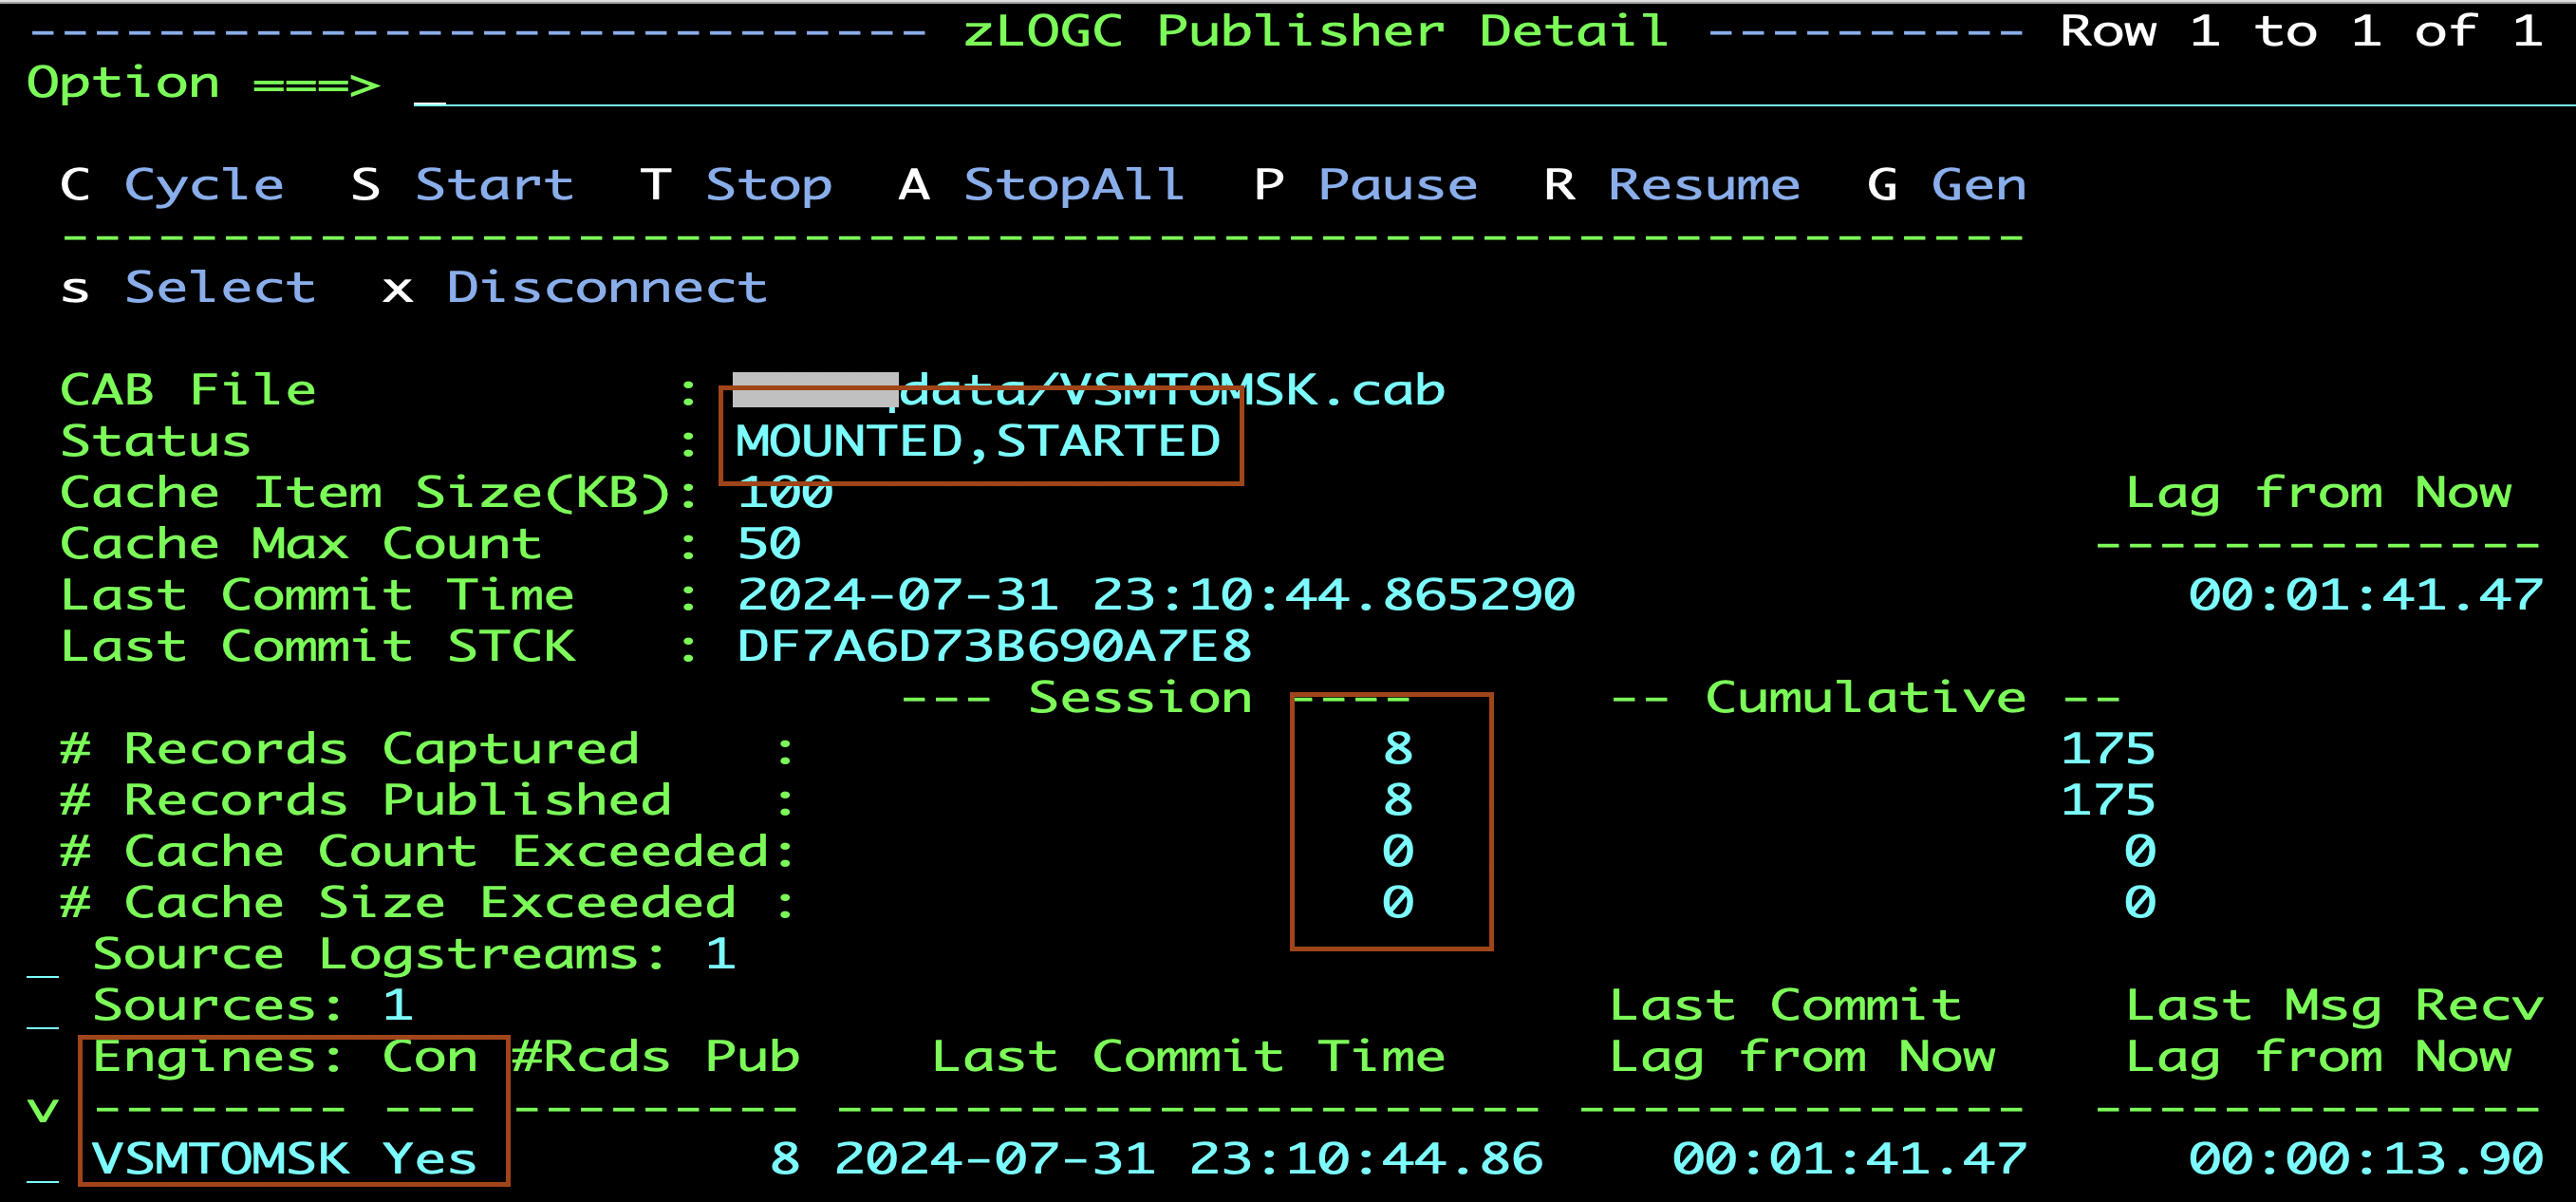
- Submit the jobs. Once the Publisher job is successfully started, if you have set up the ISPF UI, you can view the Publisher statistics similar to one below. You can reach this panel from Menu Option 3, and the Insert option to add the CAB file. The Status will be showing as MOUNTED,STARTED,STALLED when the Apply Engine is not connected. The name VSMTOMSK that is created by the Configuration Job is shown under Engines.
- To create some sample credit card transaction records, use the below copybook. Save the copybook in a PDS file to use it with file editor utilities such as File-aid or File Manager. Sample transaction data can be found in the GitHub sample project aws-fraud-detector-samples.
Copybook:
           05  PA-TRANSACTION-ID            PIC  X(33).
           05  PA-TRANS-TIMESTAMP           PIC  X(20).
           05  PA-CUSTOMER-ID               PIC  X(11).
           05  PA-CARD-BIN                  PIC  9(06).
           05  PA-CUSTOMER-NAME             PIC  X(40).
           05  PA-BILLING-STREET            PIC  X(30).
           05  PA-BILLING-CITY              PIC  X(20).
           05  PA-BILLING-STATE             PIC  X(02).
           05  PA-BILLING-ZIP               PIC  X(05).
           05  PA-BILLING-COUNTRY           PIC  X(03).
           05  PA-CUSTOMER-JOB              PIC  X(30).
           05  PA-IP-ADDRESS                PIC  X(15).
           05  PA-CUSTOMER-EMAIL            PIC  X(30).
           05  PA-BILLING-PHONE             PIC  X(20).
           05  PA-USER-AGENT                PIC  X(20).
           05  PA-PRODUCT-CATEGORY          PIC  X(20).
           05  PA-ORDER-PRICE               PIC  S9(11)V99 COMP-3.
           05  PA-PAYMENT-CURRENCY          PIC  X(03).
           05  PA-MERCHANT-NAME             PIC  X(35).
- Setup file compare capture explains how to setup the compare job.
Sample JCL step to run the Differ process:
//*****************************************
//* PROC FOR RUN DIFFER
//*****************************************
//RUNDIFFR PROC
//*
//SQCDC    EXEC PGM=SQDDFCDC,PARM='DD:SQDPARM'
//STEPLIB  DD DISP=SHR,DSN=XXXXXXXX.SQDATA.V40043.LOADLIB
//SYSPRINT DD SYSOUT=*
//SQDLOG   DD SYSOUT=*
//SQDPARM  DD *
OLDDS='XXXXXXXX.PURCHASE.HISTORY.BASELINE'  -- BSAELINE FILE
NEWDS='XXXXXXXX.PURCHASE.HISTORY.CURRENT'   -- CURRENT FILE
RPTFREQ=1000                        -- REPORT FREQUENCY
CMITFREQ=1000                       -- MQSERIES COMMIT FREQUENCY
RECALIAS=VSAMPURC                   -- FILE NAME AS DEFINED IN PUBLISHER
OUTURL=zlog:///SQDATA.VSMCDC.LOG1   -- TARGET LOGSTREAM
KEYOFF=1                            -- OFFSET OF KEY
KEYLEN=33                           -- LENGTH OF KEY
/*
8. Create Amazon RDS tables
- Obtain the RDS database endpoint details from the Amazon RDS console.
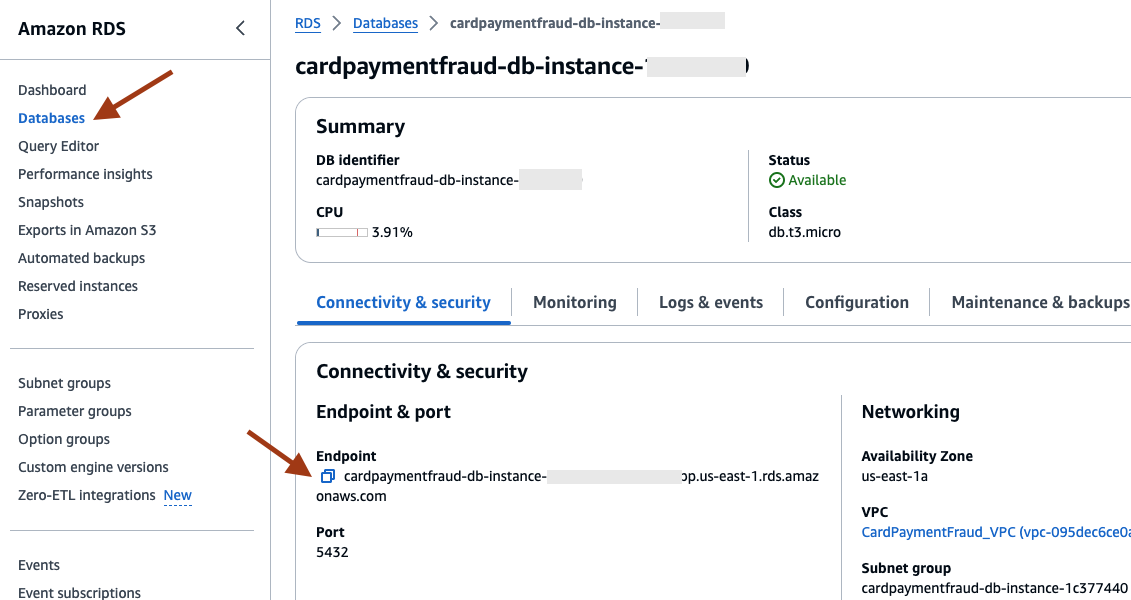
- Run the psql command to connect to the RDS database. Make sure to update the «endpoint», username «postgres», and dbname «cardpaymentfraud» as applicable. Provide the database user password (as set in the CloudFormation template parameter) when requested.
psql --host=<<endpoint>> --port=5432 --username=<<postgres>> --dbname=<<cardpaymentfraud>>
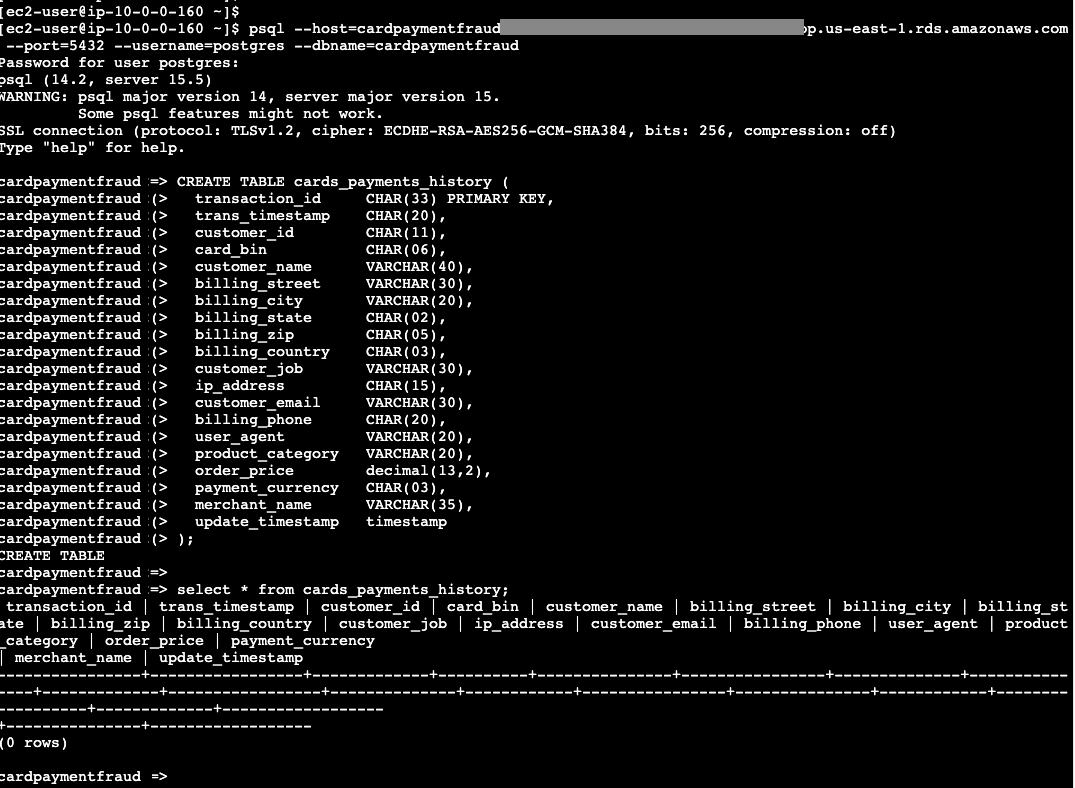
- In the psql prompt, paste the command below to create the table and store the replicated data.
CREATE TABLE card_payment_history (
  transaction_id     CHAR(33) PRIMARY KEY,
  trans_timestamp    CHAR(20),
  customer_id        CHAR(11),
  card_bin           CHAR(06),
  customer_name      VARCHAR(40),
  billing_street     VARCHAR(30),
  billing_city       VARCHAR(20),
  billing_state      CHAR(02),
  billing_zip        CHAR(05),
  billing_country    CHAR(03),
  customer_job       VARCHAR(30),
  ip_address         CHAR(15),
  customer_email     VARCHAR(30),
  billing_phone      CHAR(20),
  user_agent         VARCHAR(20),
  product_category   VARCHAR(20),
  order_price        decimal(13,2),
  payment_currency   CHAR(03),
  merchant_name      VARCHAR(35),
  update_timestamp   timestamp
);
- To validate that the table is created correctly, run the command below.
select * from card_payment_history;
- Type \q to exit the psql command prompt.
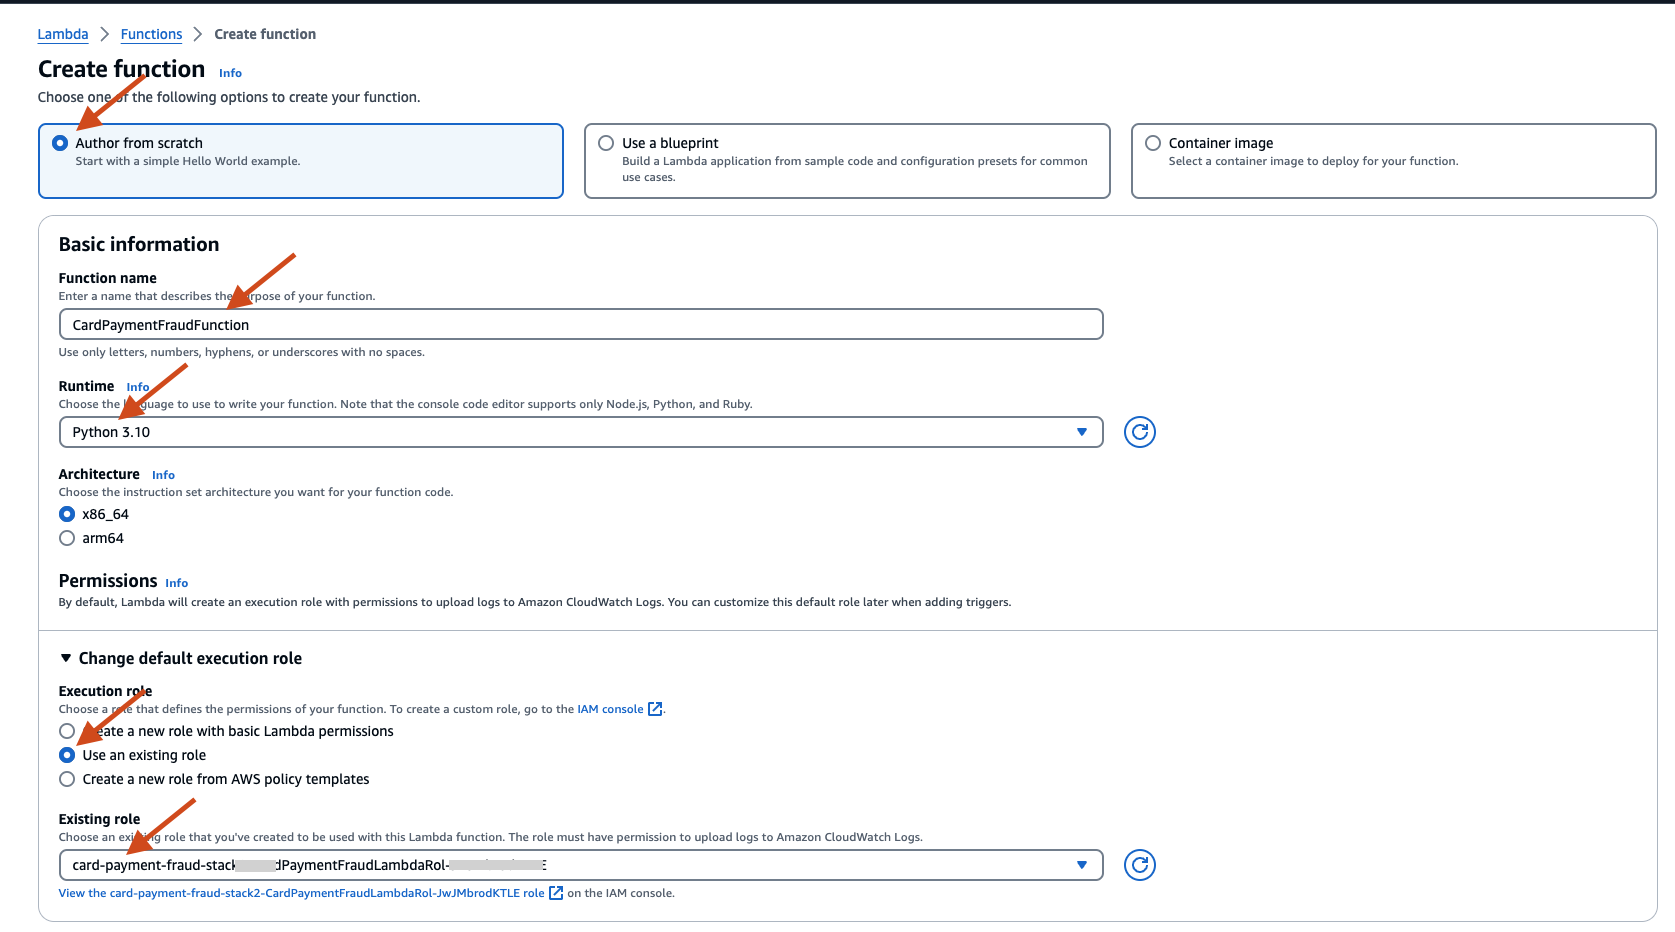
9. Create AWS Lambda function to insert replicated messages to RDS
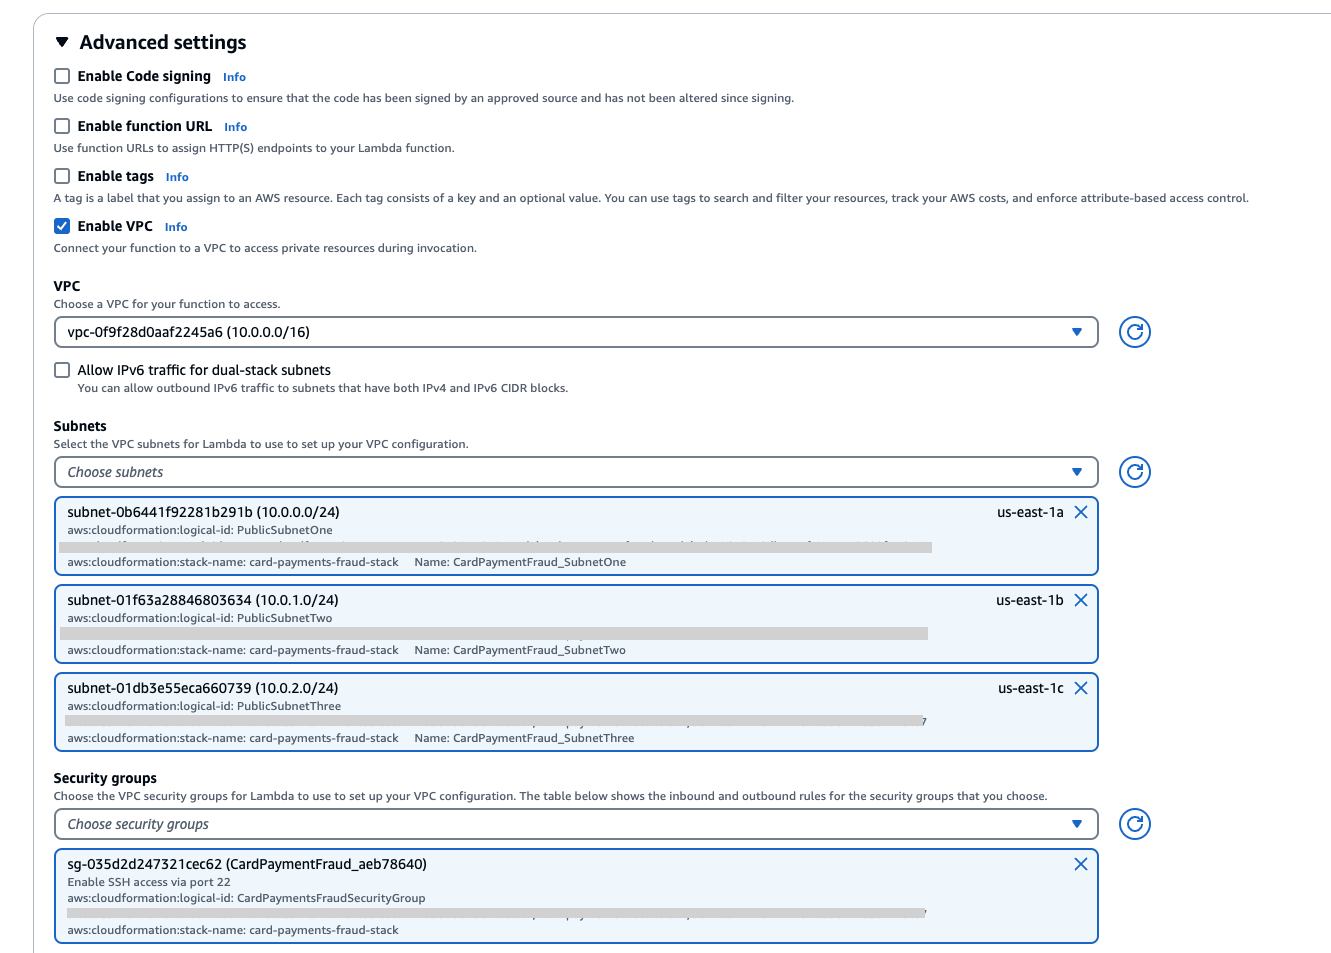
- On the AWS Lambda console, create the Lambda function. Provide a name, for example CardPaymentFraudFunction. Select runtime python 3.10 and Existing role as the LambdaRole created by the CloudFormation template.
- On Advanced settings, check Enable VPC and then select the VPC, subnets, and security groups created by the CloudFormation template.
- On the Code source page, paste the python code below. The code reads the replicated messages from the MSK topic and inserts them into the RDS table.
import json
import logging
import base64
import psycopg2
import os
import boto3
import sys

# rds settings
user_name = os.environ['USER_NAME']
password = os.environ['PASSWORD']
rds_host = os.environ['RDS_HOST']
db_name = os.environ['DB_NAME']

logger = logging.getLogger()
logger.setLevel(logging.INFO)

# create the database connection outside of the handler to allow connections to be
# re-used by subsequent function invocations.
try:
        conn = psycopg2.connect(host=rds_host, user=user_name, password=password, dbname=db_name, connect_timeout=5)
except psycopg2.Error as e:
    logger.error("ERROR: Unexpected error: Could not connect to Postgres instance.")
    logger.error(e)
    sys.exit(1)

logger.info("SUCCESS: Connection to RDS for Postres instance succeeded")

def lambda_handler(event, context):
    """
    This function creates a new RDS database table and writes records to it
    """
    message = event['records']
    item_count = 0

    for key in message.keys():
        print (key)

        records = event['records'][key]
        for record in records:
            payload=base64.b64decode(record["value"]).decode()
            print("Decoded payload: " + str(payload))

            data = json.loads(payload)
            item_count += 1

            if "after_image" in data:
                record = data["after_image"]["sqd_gen_rec_00001"]

                transaction_id = record["pa_transaction_id"]
                trans_timestamp = record["pa_trans_timestamp"]
                customer_id = record["pa_customer_id"]
                card_bin = record["pa_card_bin"]
                customer_name = record["pa_customer_name"]
                billing_street = record["pa_billing_street"]
                billing_city = record["pa_billing_city"]
                billing_state = record["pa_billing_state"]
                billing_zip = record["pa_billing_zip"]
                billing_country = record["pa_billing_country"]
                customer_job = record["pa_customer_job"]
                ip_address = record["pa_ip_address"]
                customer_email = record["pa_customer_email"]
                billing_phone = record["pa_billing_phone"]
                user_agent = record["pa_user_agent"]
                product_category = record["pa_product_category"]
                order_price = record["pa_order_price"]
                payment_currency = record["pa_payment_currency"]
                merchant_name = record["pa_merchant_name"]


                sql_string = f"insert into card_payment_history (transaction_id, trans_timestamp, customer_id, card_bin, customer_name, billing_street, billing_city, billing_state, billing_zip, billing_country, customer_job, ip_address, customer_email, billing_phone, user_agent, product_category, order_price, payment_currency, merchant_name, update_timestamp) values(%s, %s, %s, %s, %s, %s, %s, %s, %s, %s, %s, %s, %s, %s, %s, %s, %s, %s, %s, current_timestamp)"

                with conn.cursor() as cur:
                    cur.execute(sql_string, (transaction_id, trans_timestamp, customer_id, card_bin, customer_name, billing_street, billing_city, billing_state, billing_zip, billing_country, customer_job, ip_address, customer_email, billing_phone, user_agent, product_category, order_price, payment_currency, merchant_name))
                    conn.commit()

                conn.commit()

    return "Added %d items to RDS for Postgres table" %(item_count)
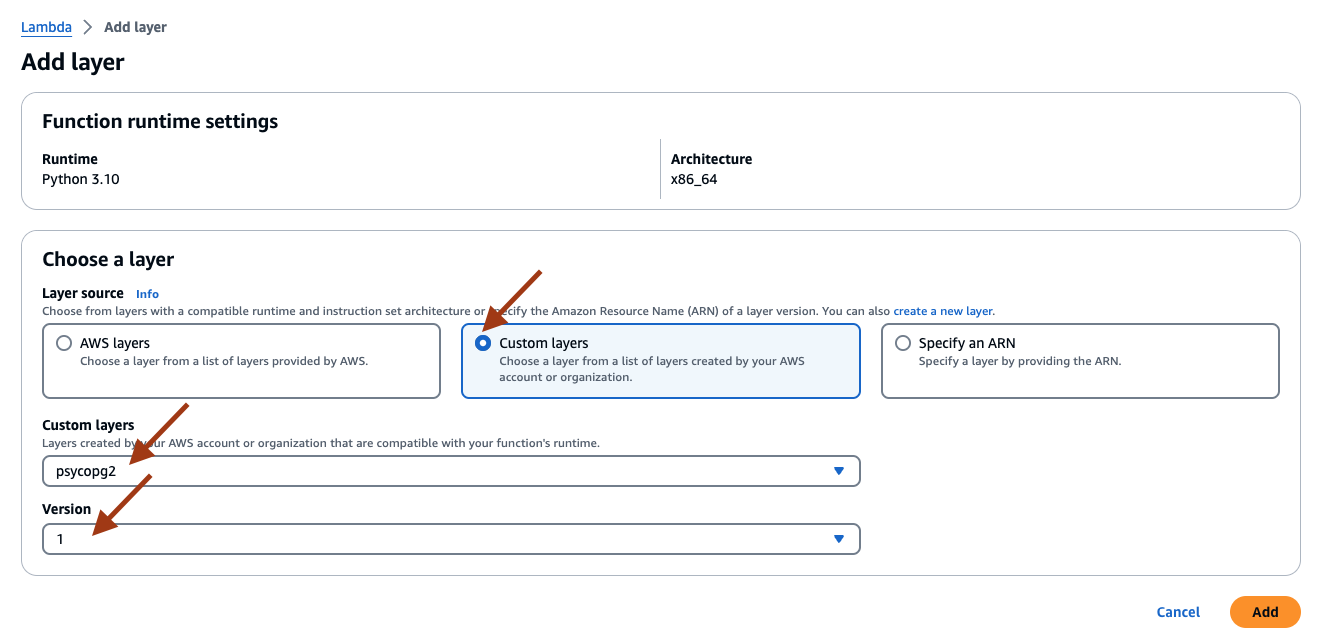
The Lambda Python environment does not have any Python library that interacts with the Amazon RDS Postgres database. In this Guidance, you will be using the psycopg2 library to interface with Amazon RDS. A Lambda layer is created with the script.sh earlier.
- Add the psycopg2 Lambda layer to the function. Select Add a layer at the end of the Code tab to add the layer. Select Custom layers, then select psycopg2 as the customer layer name and appropriate version.
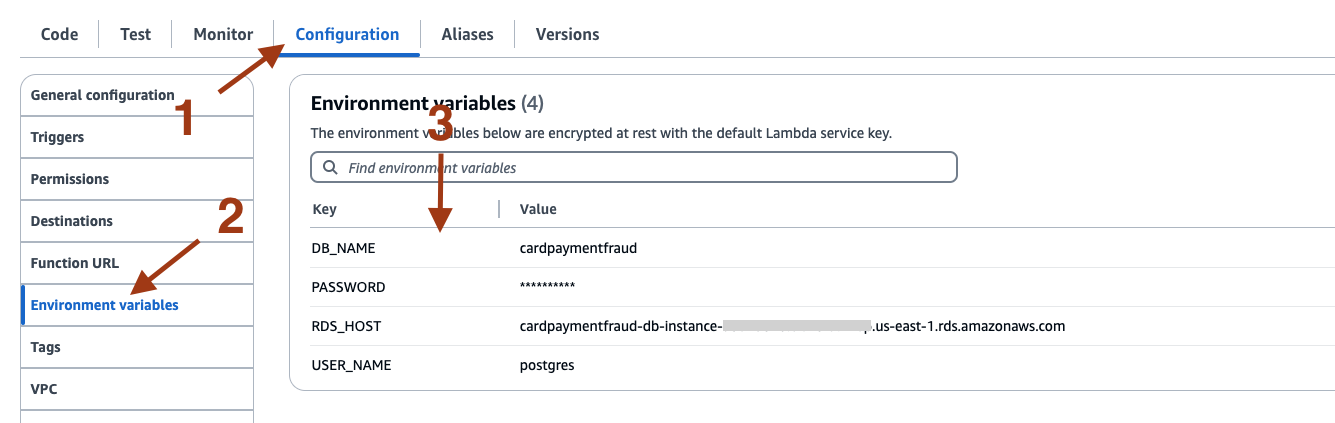
- Set up the Environment variables on the Configuration tab. This sets the values for DB_NAME, USER_NAME, PASSWORD as provided in the CloudFormation template, and RDS_HOST as an endpoint URL obtained from the Amazon RDS console earlier.
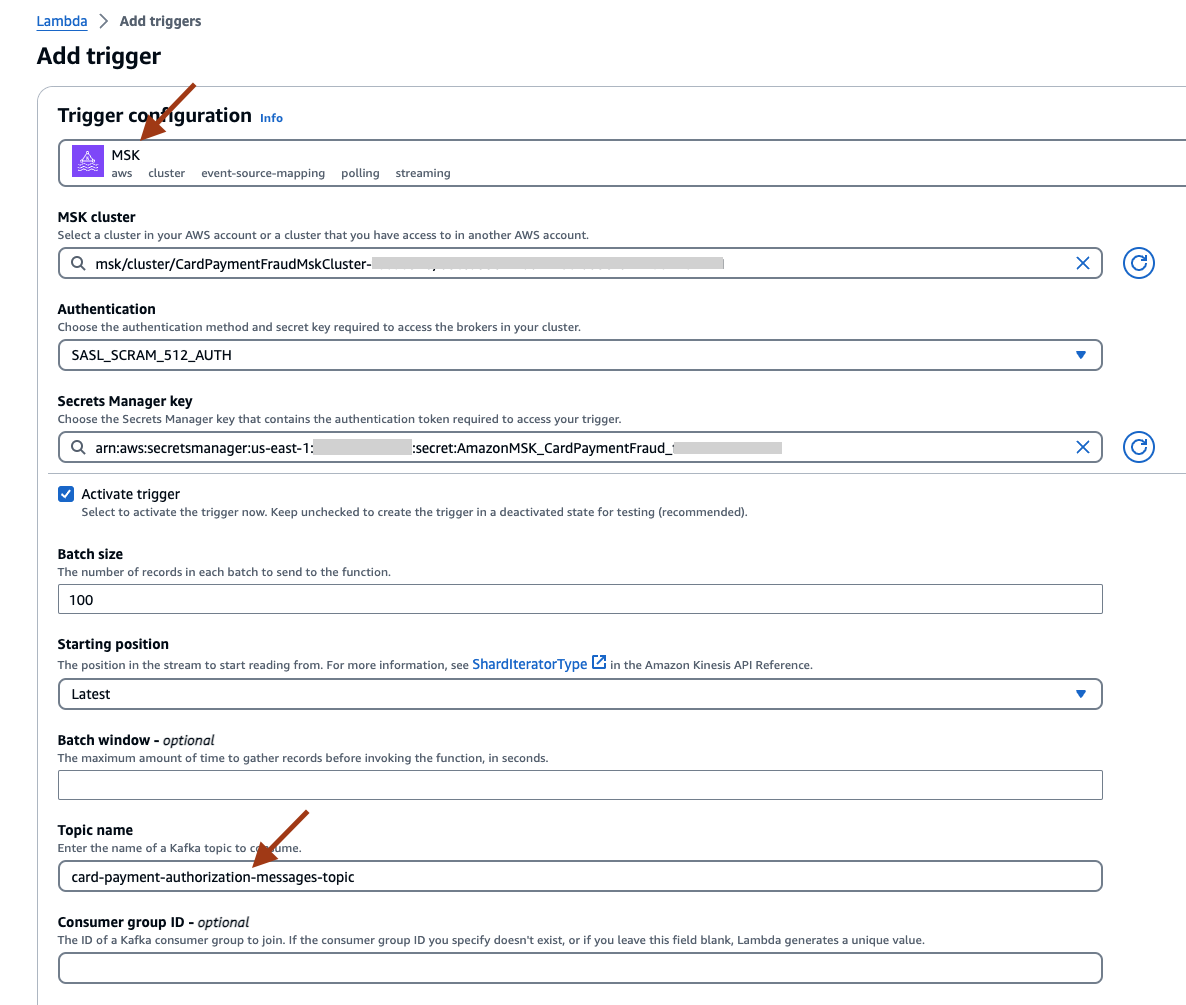
- To configure the trigger for the Lambda function, select Add trigger.
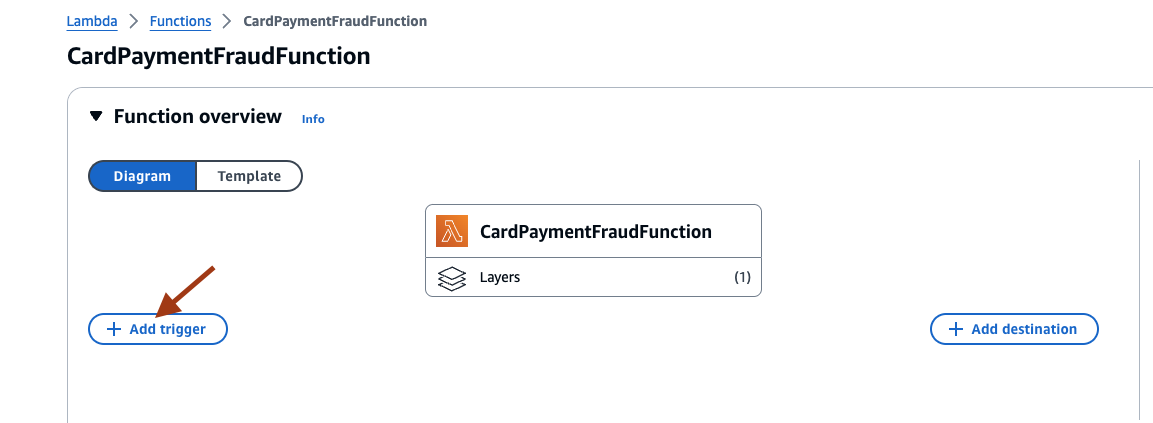
- Select the Trigger configuration as MSK. Select the MSK cluster and Secrets Manager key created by the CloudFormation template, select Authentication SASL_SCRAM_512_AUTH, and set the topic name as card-payment-authorization-messages-topic.
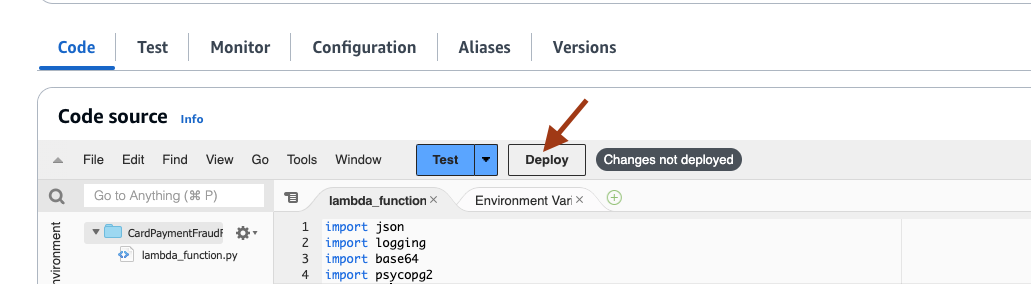
- On the Code page, select Deploy to deploy the code.
10. Set up Precisely Apply Engine on an EC2 instance
- Switch to the EC2 console, and execute the script below to create the Apply Engine script replication_script.sqd and the message metadata, providing the copybook content in the file card_payment.
cd /home/ec2-user/precisely
mkdir -p cpy;

cd /home/ec2-user/precisely/cpy

cat > card_payment << EOF
           05  PA-TRANSACTION-ID            PIC  X(33).
           05  PA-TRANS-TIMESTAMP           PIC  X(20).
           05  PA-CUSTOMER-ID               PIC  X(11).
           05  PA-CARD-BIN                  PIC  9(06).
           05  PA-CUSTOMER-NAME             PIC  X(40).
           05  PA-BILLING-STREET            PIC  X(30).
           05  PA-BILLING-CITY              PIC  X(20).
           05  PA-BILLING-STATE             PIC  X(02).
           05  PA-BILLING-ZIP               PIC  X(05).
           05  PA-BILLING-COUNTRY           PIC  X(03).
           05  PA-CUSTOMER-JOB              PIC  X(30).
           05  PA-IP-ADDRESS                PIC  X(15).
           05  PA-CUSTOMER-EMAIL            PIC  X(30).
           05  PA-BILLING-PHONE             PIC  X(20).
           05  PA-USER-AGENT                PIC  X(20).
           05  PA-PRODUCT-CATEGORY          PIC  X(20).
           05  PA-ORDER-PRICE               PIC  S9(11)V99 COMP-3.
           05  PA-PAYMENT-CURRENCY          PIC  X(03).
           05  PA-MERCHANT-NAME             PIC  X(35).
EOF

cd /home/ec2-user/precisely

cat > replication_script.sqd << EOF

JOBNAME VSAMTOMSK;
REPORT EVERY 1;
-- Change Op has been ‘I’ for insert, ‘D’ for delete , and ‘R’ for Replace. For RDS it is 'U' for update
OPTIONS
  CDCOP('I', 'U', 'D'),
  PSEUDO NULL = NO,
  USE AVRO COMPATIBLE NAMES;

-- SOURCE DESCRIPTIONS

BEGIN GROUP CARD_PAYMENT_SRC;
  DESCRIPTION COBOL ./cpy/card_payment AS VSAMPURC;
END GROUP;

-- SOURCE DATASTORE (IP & Publisher name)

  DATASTORE cdc://XX.XX.XX.XX:2626/VSMTOMSK/VSMTOMSK
    OF VSAMCDC
    AS CDCIN
    DESCRIBED BY GROUP CARD_PAYMENT_SRC;

-- TARGET DATASTORE(s)

  DATASTORE 'kafka:///card-payment-authorization-messages-topic/root_key'
    OF JSON
    AS CDCOUT
    DESCRIBED BY GROUP CARD_PAYMENT_SRC;

--MAIN SECTION

PROCESS INTO CDCOUT
SELECT
{
--  OUTMSG(0,'Segment=',IMSSEGNAME(CDCIN),' CDCOP=',CDCOP(CDCIN))
  REPLICATE(CDCOUT)
}
FROM CDCIN;
EOF
- For the source DATASTORE, update the IP address and PORT [cdc://XX.XX.XX.XX:2626/VSMTOMSK/VSMTOMSK] to the mainframe IP address and port in which the Daemon job is running.
The details of the script parameters can be found in documentation for Apply Engine script development
11. Set up MSK to Amazon S3 data pipeline
- On AWS MSK console, click on the Properties tab for the cluster, and then select Edit under Network settings to turn ON AWS PrivateLink.
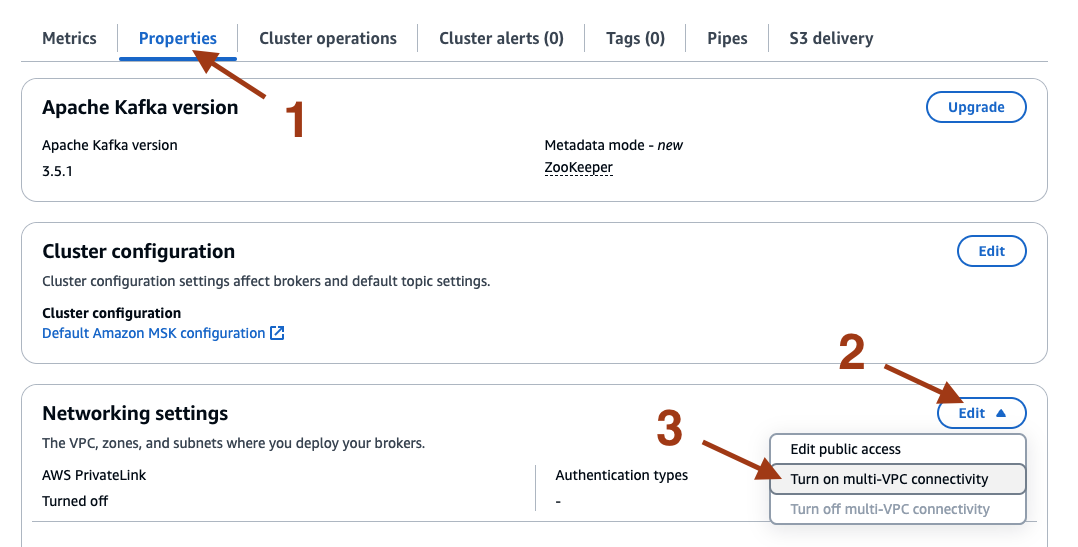
- Check the box for IAM role-based authentication, and select Turn on selection.

The MSK cluster update takes around 30 to 45 minutes to complete.
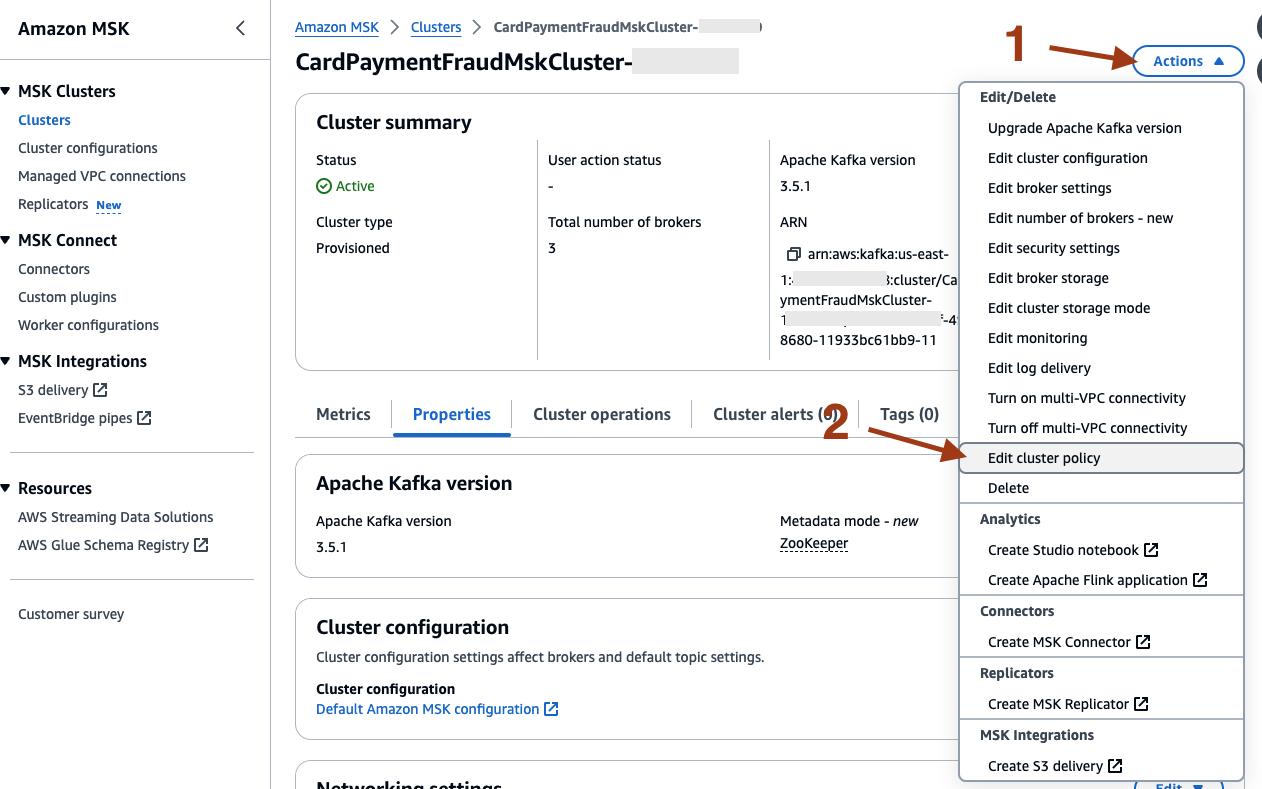
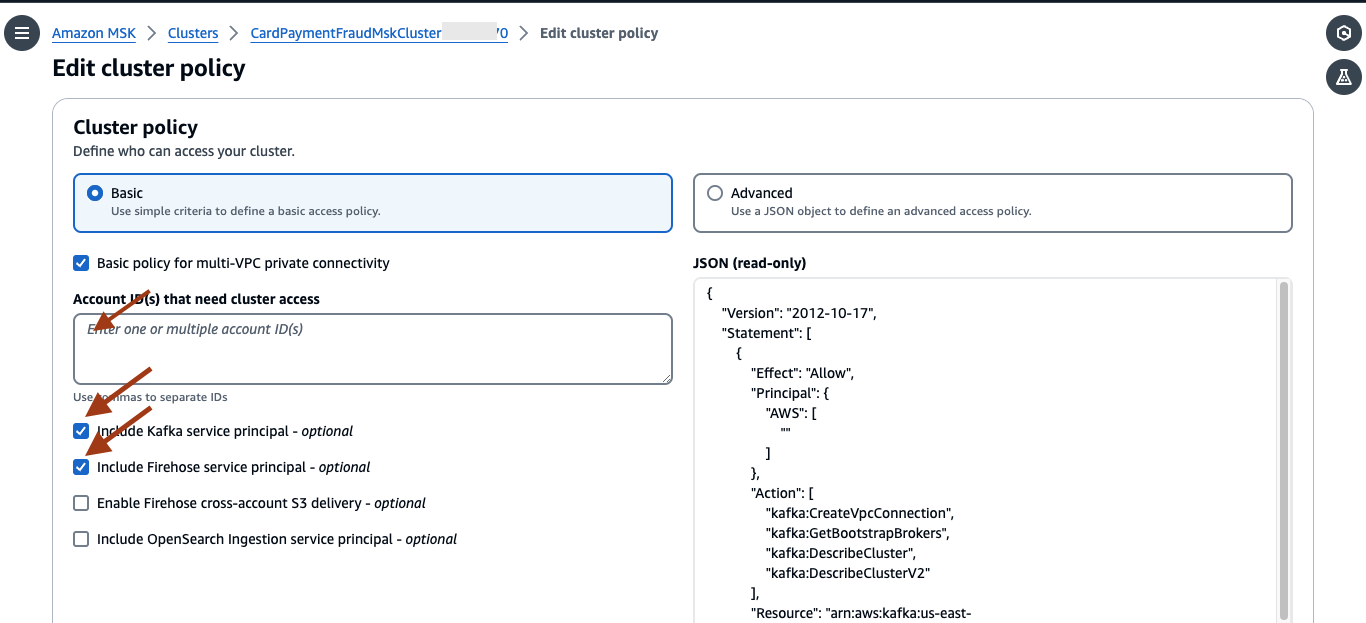
- After the cluster update is complete, select Actions and then Edit cluster policy.
- Check the box for Include Kafka service principal and Include Firehose service principal. Provide the account ID in the box and select Save changes.
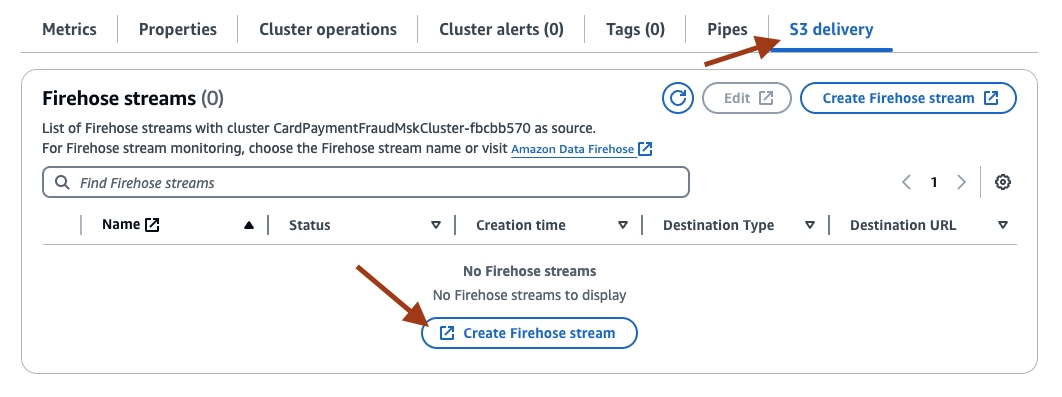
- Next, select the S3 delivery tab, and select Create Firehose stream.
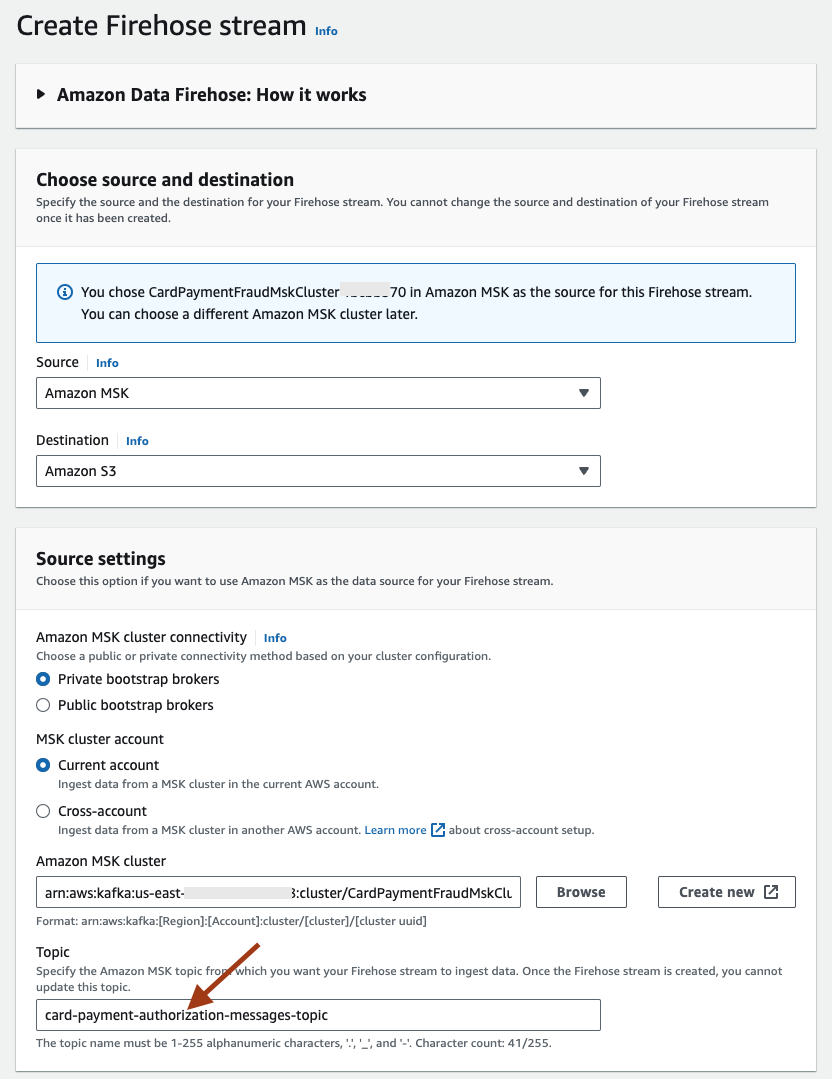
- This will open a new page with a few of the fields (such as Source, Destination, Amazon MSK cluster) pre-populated. Set the Topic to card-payment-authorization-messages-topic.
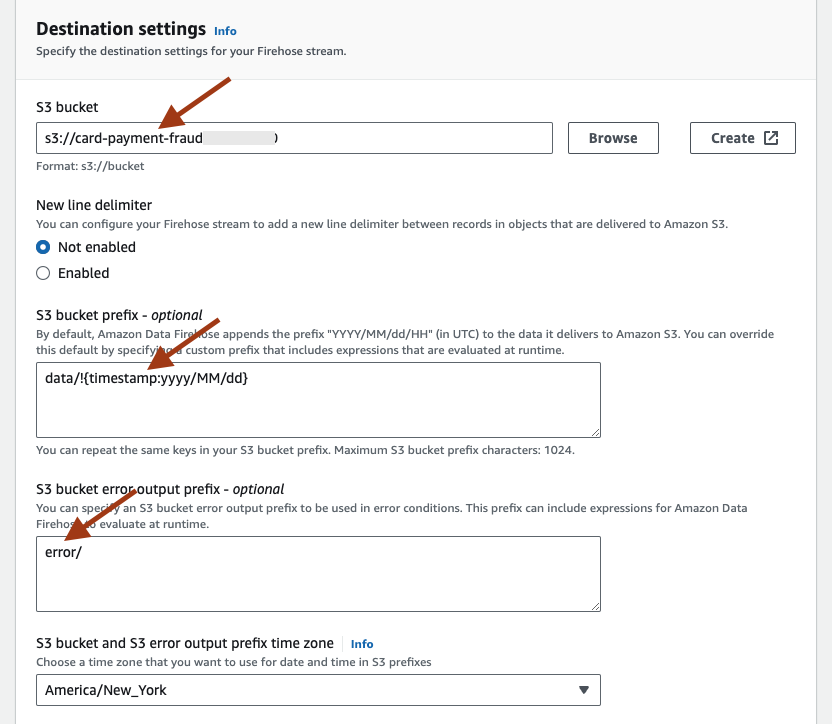
- Provide a name for the stream, for example, MSK-S3-Card-Payment-Fraud-Stream. Under Destination settings, set the S3 bucket to the one created by the CloudFormation template, S3 bucket prefix as data/!{timestamp:yyyy/MM/dd}, S3 bucket error output prefix as error/ and S3 bucket and S3 error output prefix time zone as time zone of your preference.
12. Set up Amazon EventBridge to Amazon SNS (Optional)
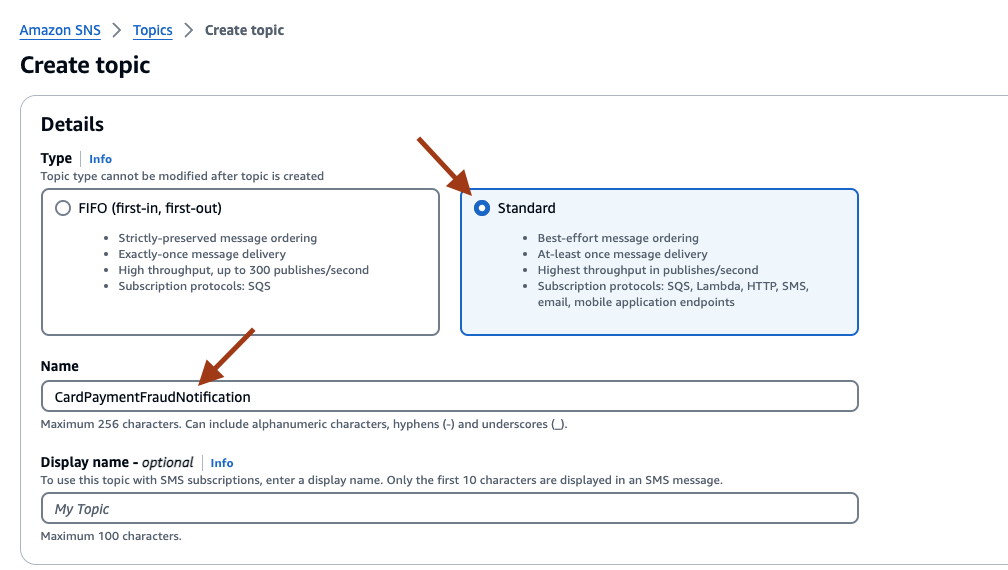
- On the AWS SNS console, select Create topic, and select Standard for type. Provide a name, such as CardPaymentFraudNotification, and select Create topic.
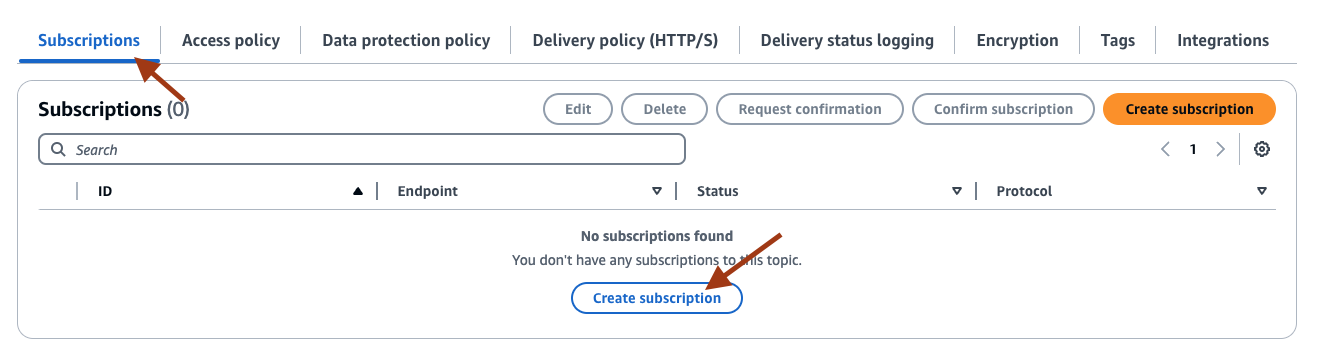
- Inside the topic page, select Subscriptions and then Create subscription. To receive the replicated messages in email, on the Create Subscription page, select the Protocol as Email, and provide your email address for Endpoint. Select Create subscription. You will receive an email to approve the subscription.
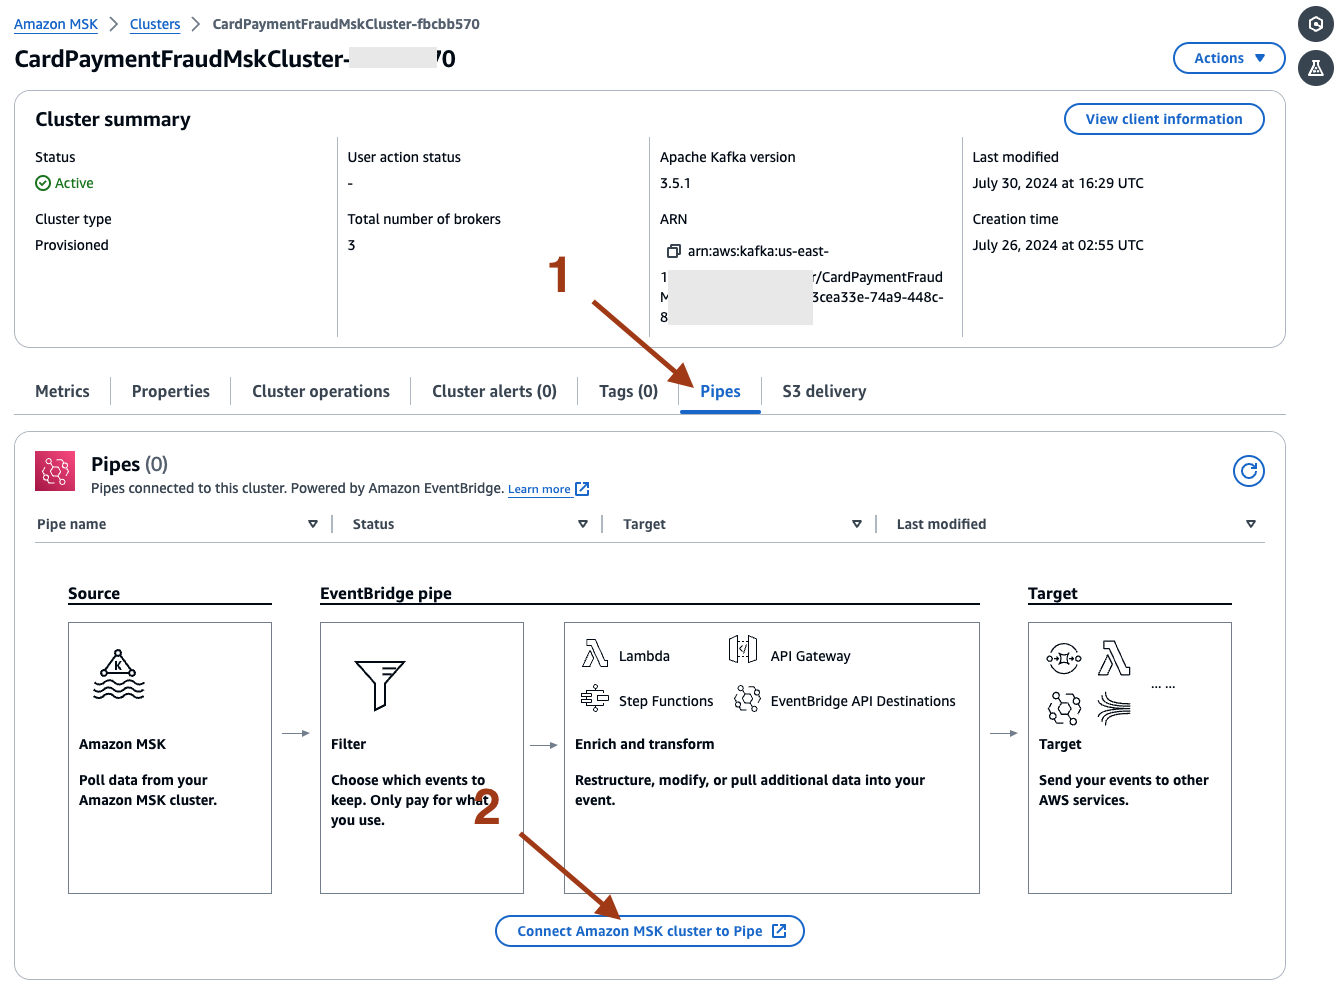
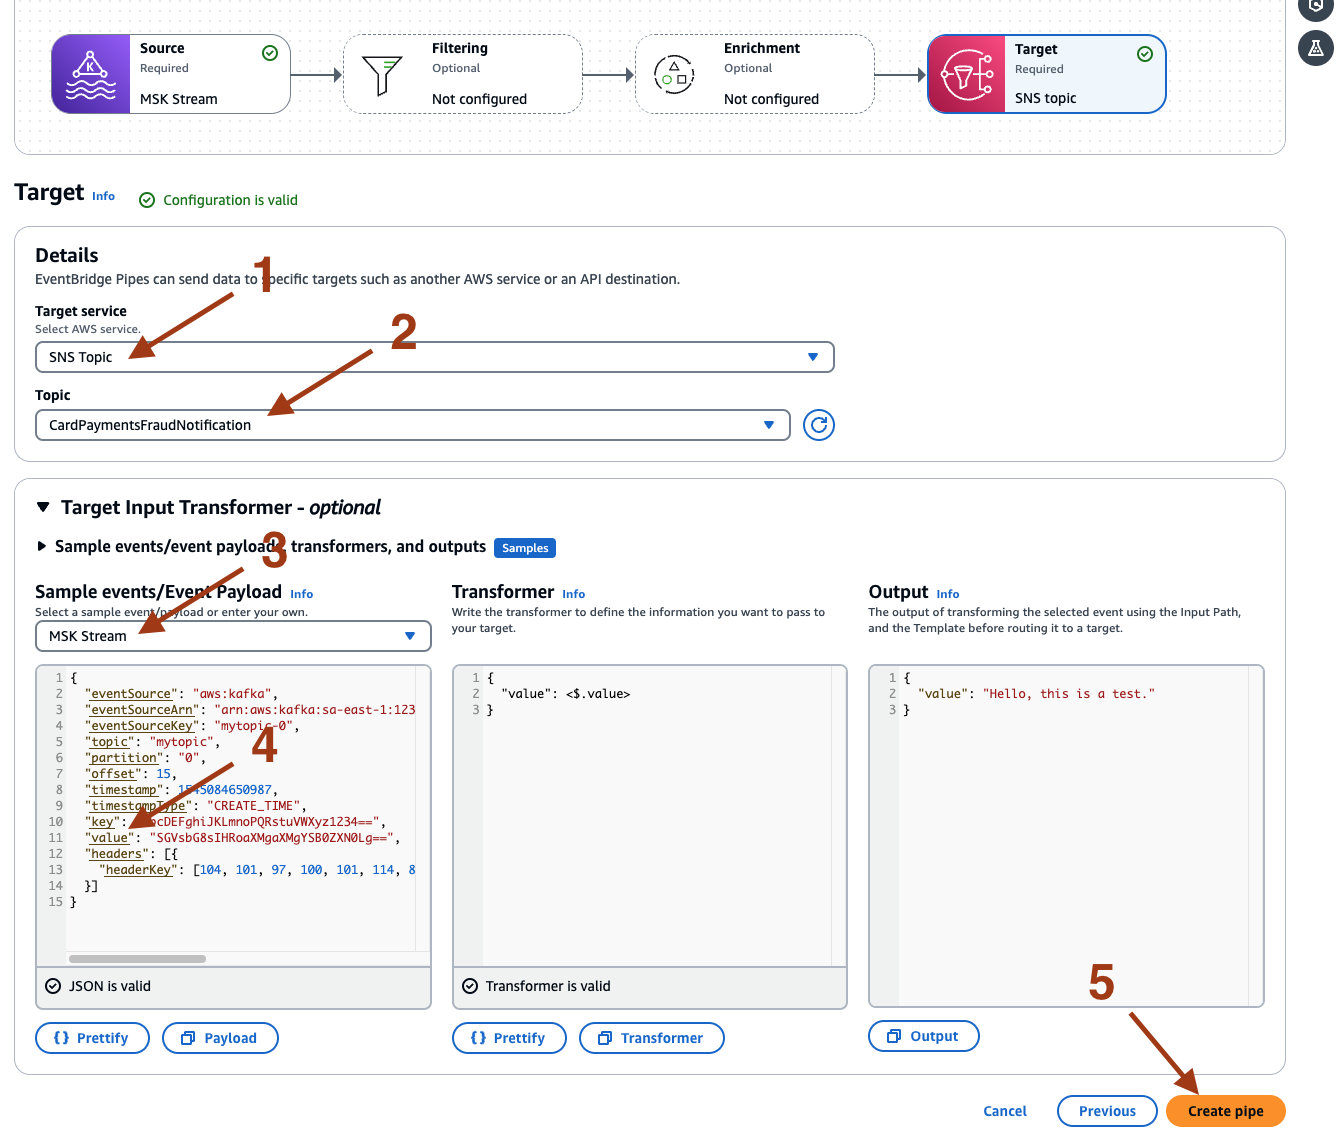
- Next, on the AWS MSK console, select the Pipes tab, and then select Connect Amazon MSK cluster to Pipe.
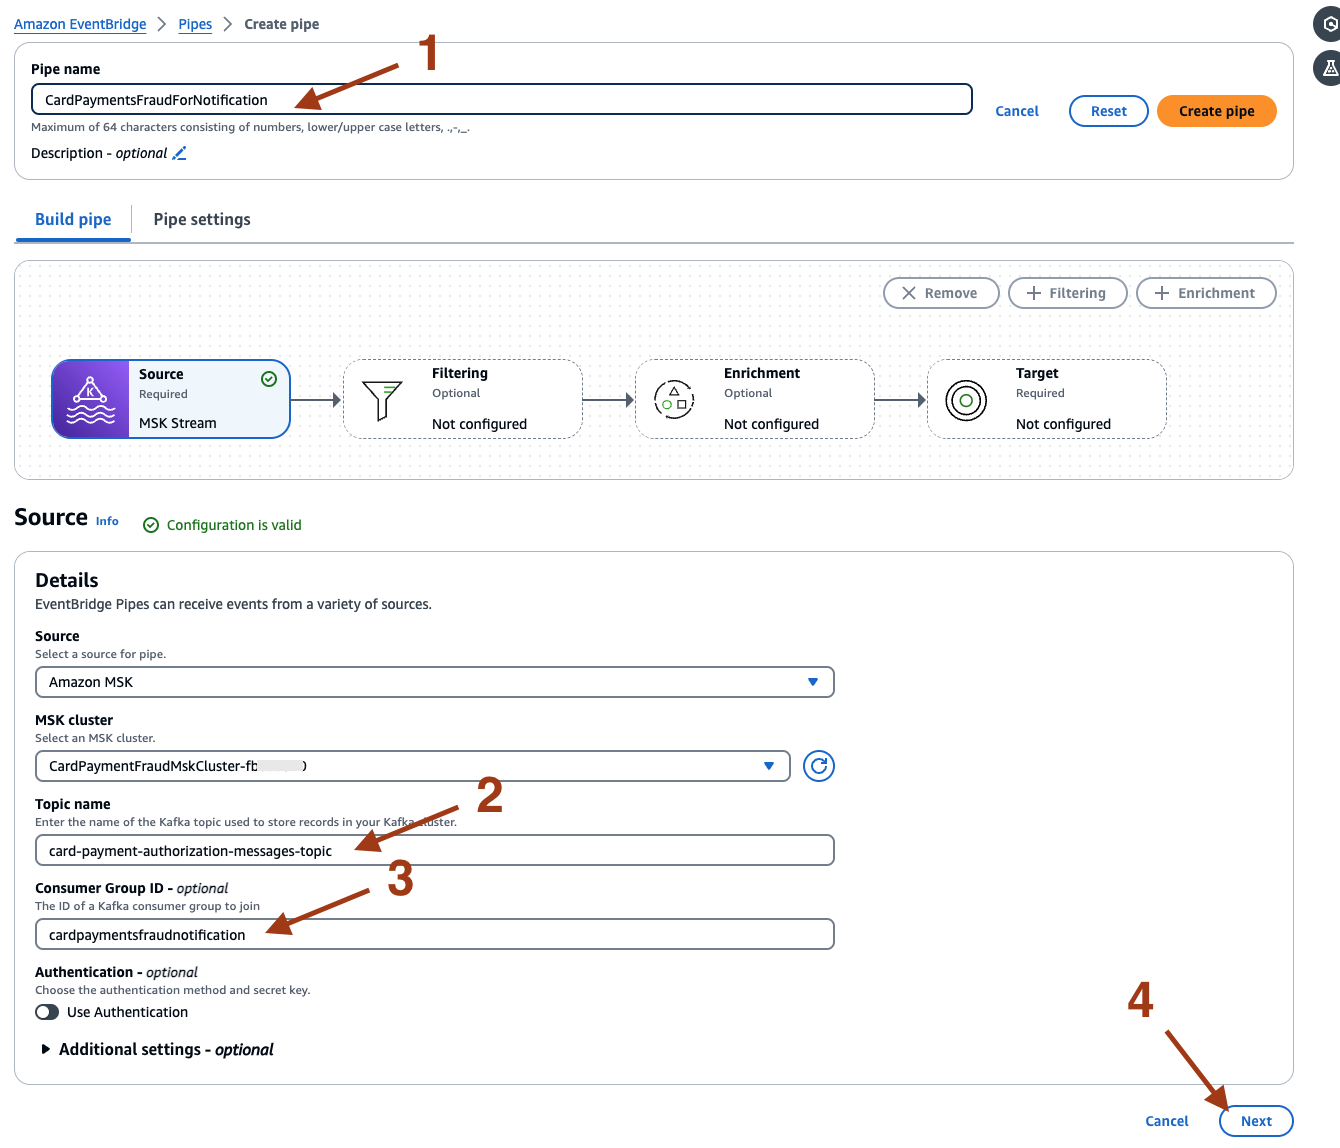
- On the newly opened page, provide the Pipe source details for example, name as CardPaymentFraudForNotification, topic name as card-payment-authorization-messages-topic, and consumer Group ID as cardpaymentfraudnotification. Select Next.
- Select Next on the Filtering and Enrichment page. On the Target page, select SNS Topic for Target service and provide the Topic name as CardPaymentFraudNotification created earlier. On the Sample events/Event Payload, select MSK Stream, and then select value. This will extract the replicated record from the Kafka message and publish it to the SNS topic. Select Create pipe.
- Once the Pipe is successfully created, select the Execution Role under Settings to update the policy.

- On the IAM Roles page, under Permissions, expand the policy name starting with MskPipeSourceTemplate, and select Edit.

- Add the below additional policy statements.
        {
            "Effect": "Allow",
            "Action": [
                "kafka:ListScramSecrets",
                "kafka-cluster:Connect",
                "kafka-cluster:DescribeGroup",
                "kafka-cluster:AlterGroup",
                "kafka-cluster:DescribeTopic",
                "kafka-cluster:ReadData",
                "kafka-cluster:DescribeClusterDynamicConfiguration"
            ],
            "Resource": "*"
        },
        {
            "Effect": "Allow",
            "Action": [
                "kms:Decrypt"
            ],
            "Resource": "*"
        },
        {
            "Effect": "Allow",
            "Action": [
                "secretsmanager:GetSecretValue"
            ],
            "Resource": [
                "arn:aws:secretsmanager:us-east-1:*:secret:AmazonMSK_CardPaymentFraud_*"
            ]
        }
Running the Guidance
1. Start the Apply Engine
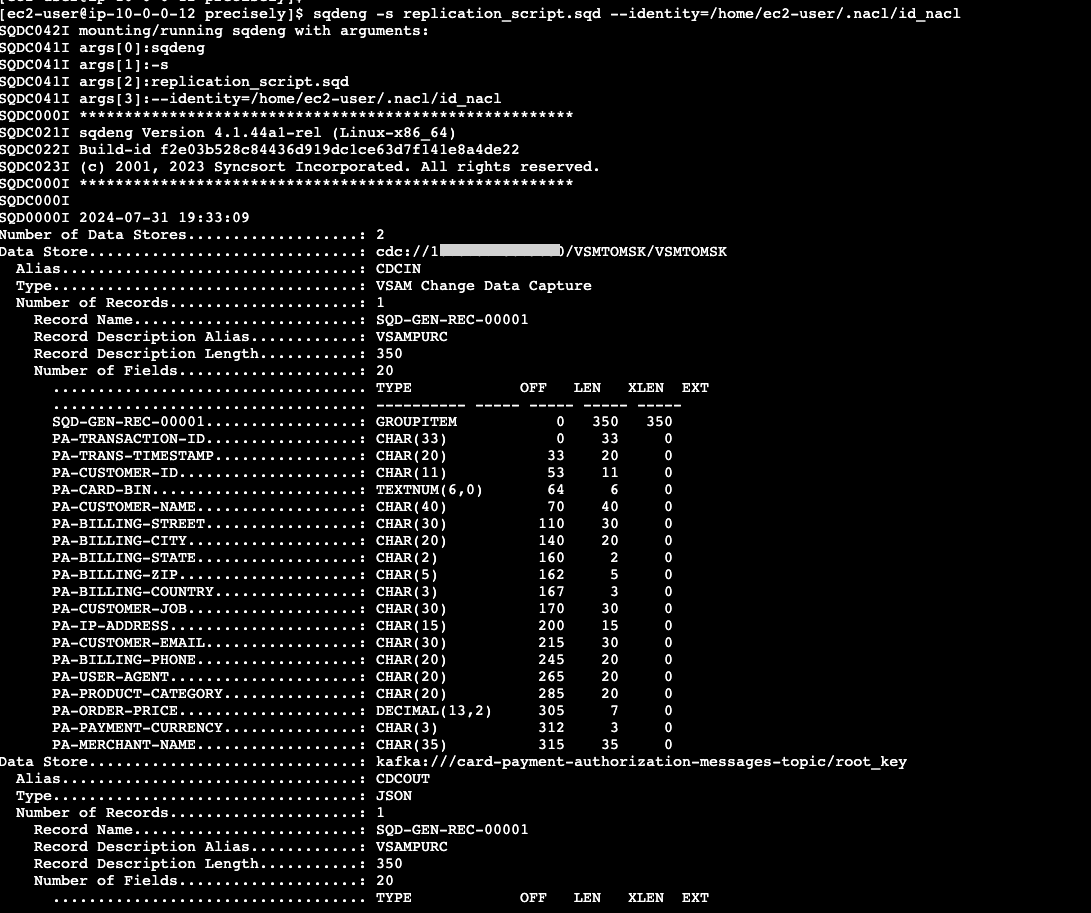
- Switch to the EC2 console, and execute the following commands.
cd /home/ec2-user/precisely
export PATH=$PATH:/usr/sbin:/opt/precisely/di/sqdata/bin

sqdeng -s replication_script.sqd --identity=/home/ec2-user/.nacl/id_nacl
- You will see log messages similar to the below screenshot. The Apply Engine is now connected to Publisher and waiting for messages.
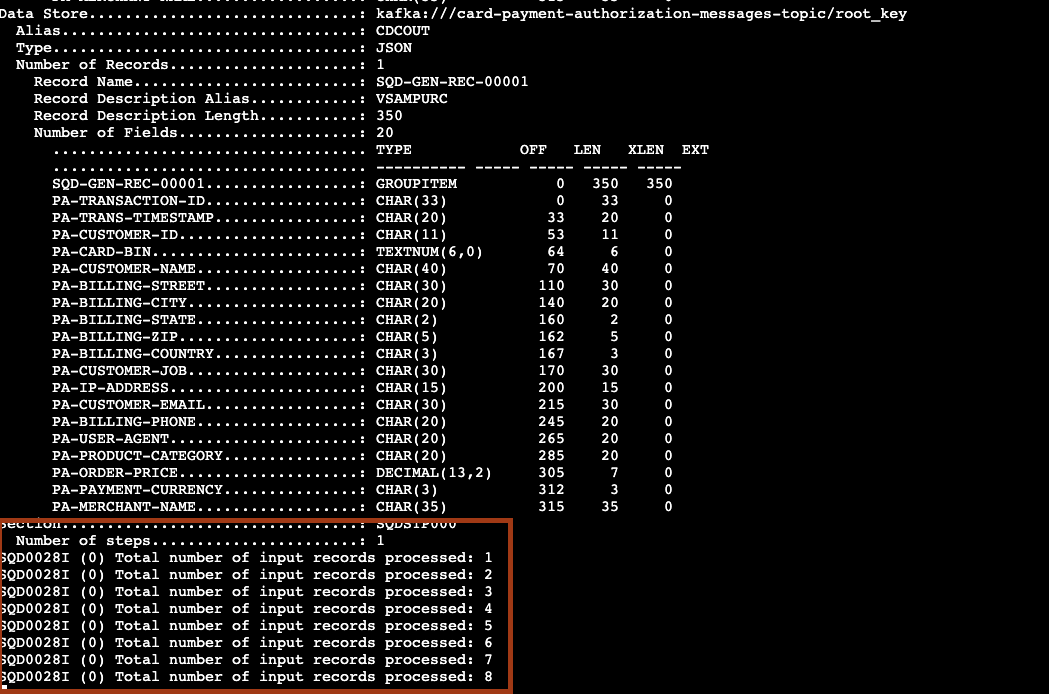
- Switch to the mainframe TSO/ISPF console, update records on the NEWDS file, and submit the Differ JCL. On the EC2 console, you will see the logs reporting the replicated messages.
2. Check the ISPF Precisely stats
- The ISPF Precisely Publisher dashboard will show the Status as MOUNTED,STARTED, changes in the # Records Captured, and # Records Published. The Engine Con will show Yes.
3. Validate Data on RDS database
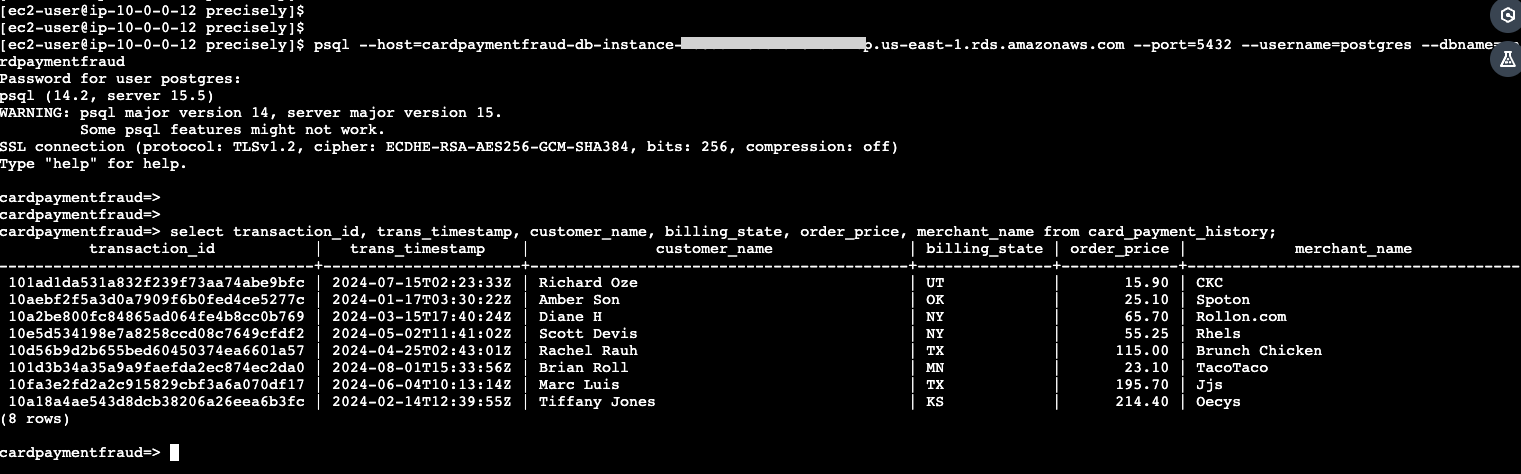
- Open a new EC2 console, and access the psql command. Update the host, username, and dbname as appropriate.
psql --host=<<endpoint>> --port=5432 --username=<<postgres>> --dbname=<<cardpaymentfraud>>
- Then, run the following SQL.
select transaction_id, trans_timestamp, customer_name, billing_state, order_price, merchant_name from card_payment_history;
- The query output will show replicated records inserted into the RDS Postgres database by the Lambda function, similar to the below.
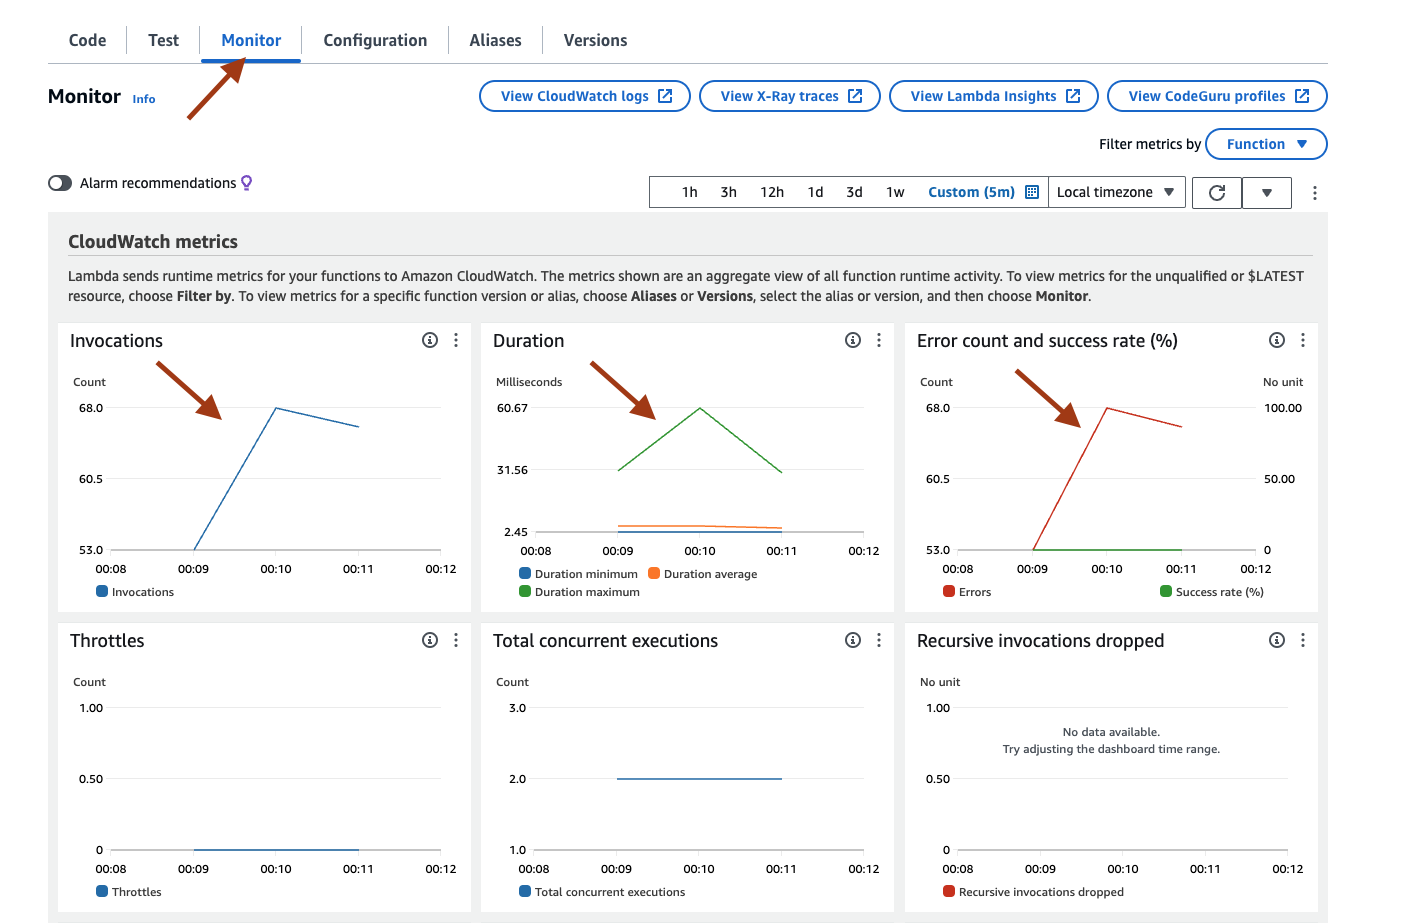
- The CloudWatch metrics for the Lambda function will show the invocations.
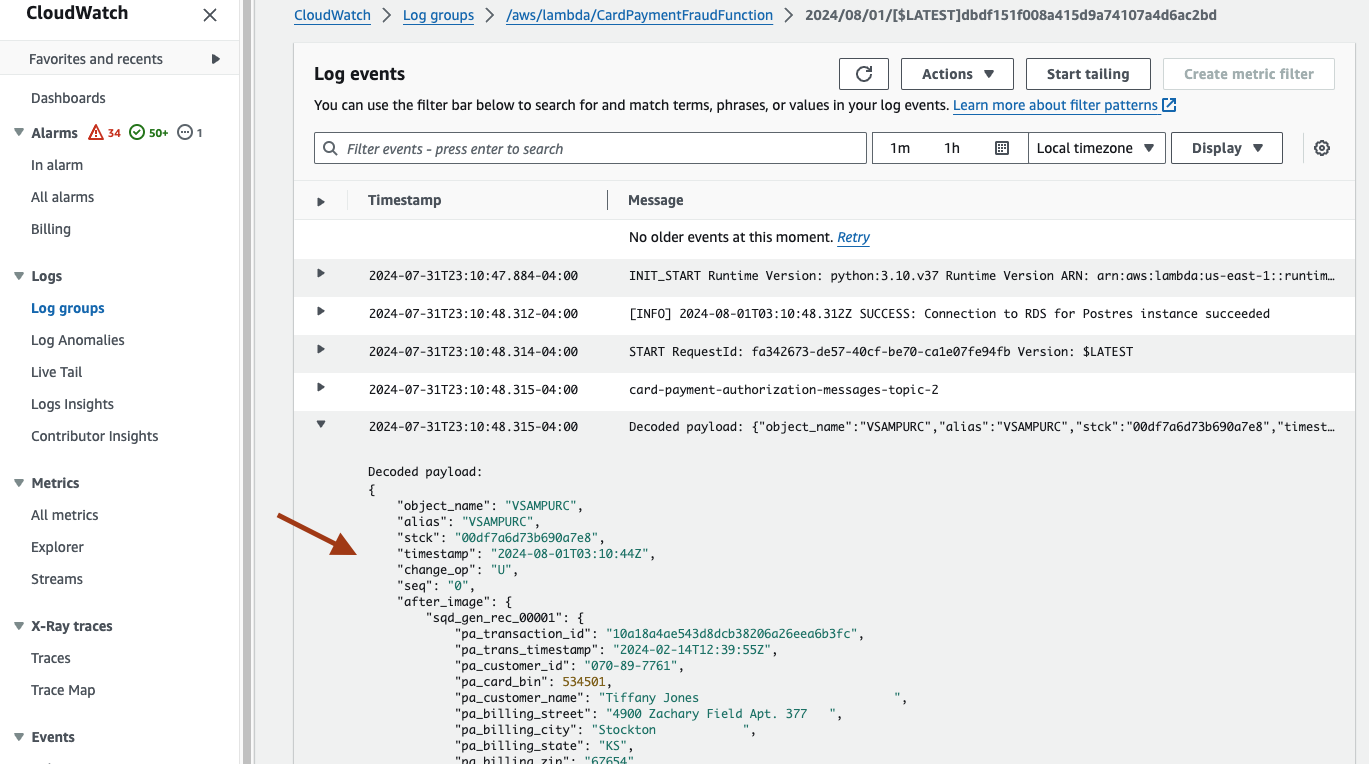
- The CloudWatch logs of the Lambda function also prints the JSON payload messages received from Amazon MSK.
4. Check data on S3 bucket
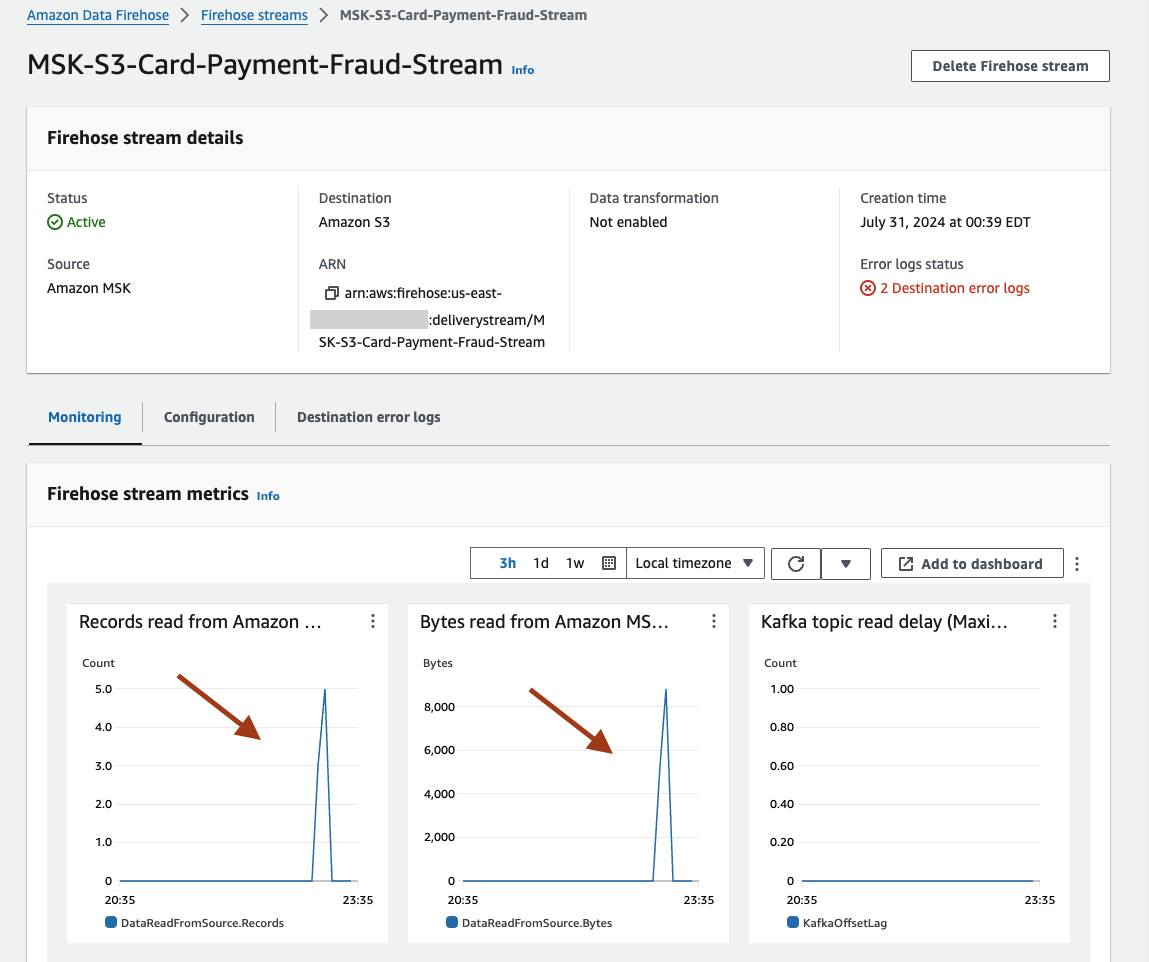
- The metrics for MSK-S3-Card-Payment-Fraud-Stream on the Amazon Data Firehose console will show the statistics.
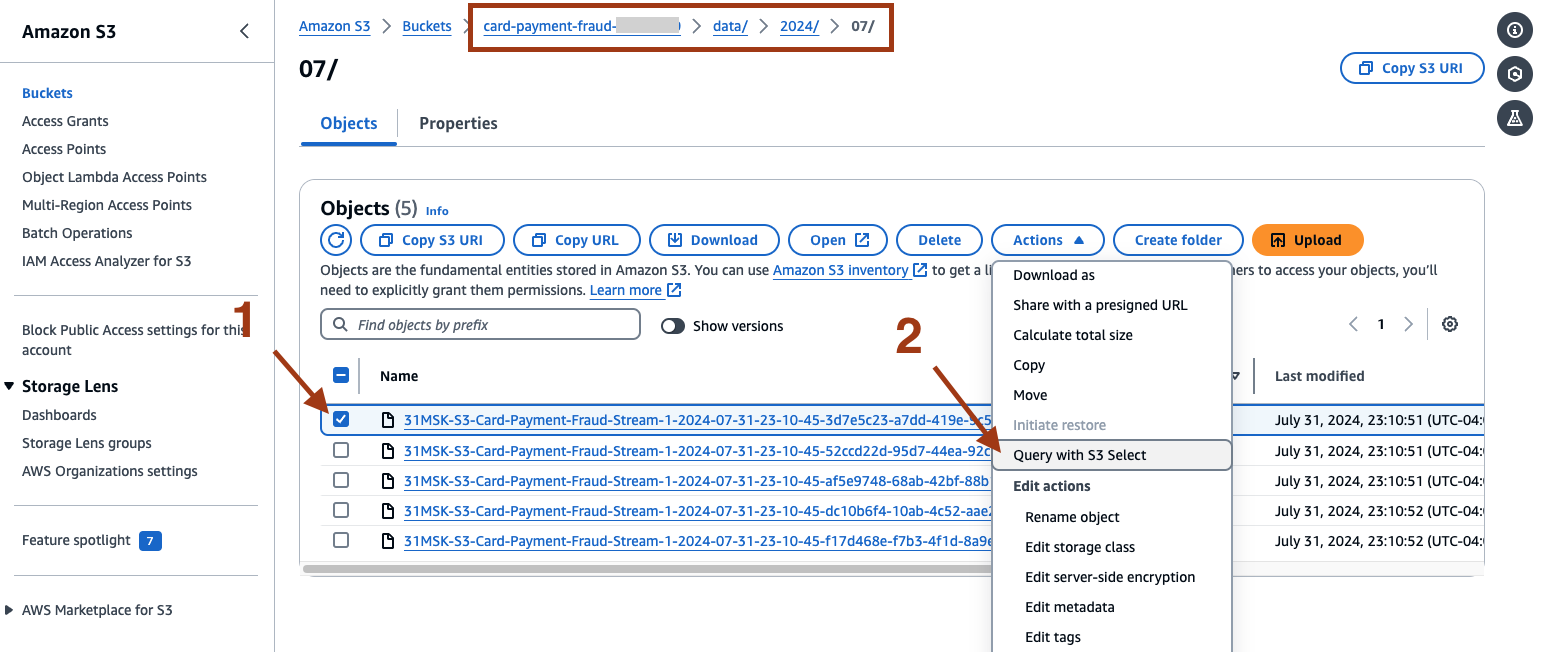
- On the Amazon S3 console, select the S3 bucket created by the CloudFormation template where the replicated records are stored. Navigate the folder structure data/YYYY/MM, then select an object and click Actions, then Query with S3 select.
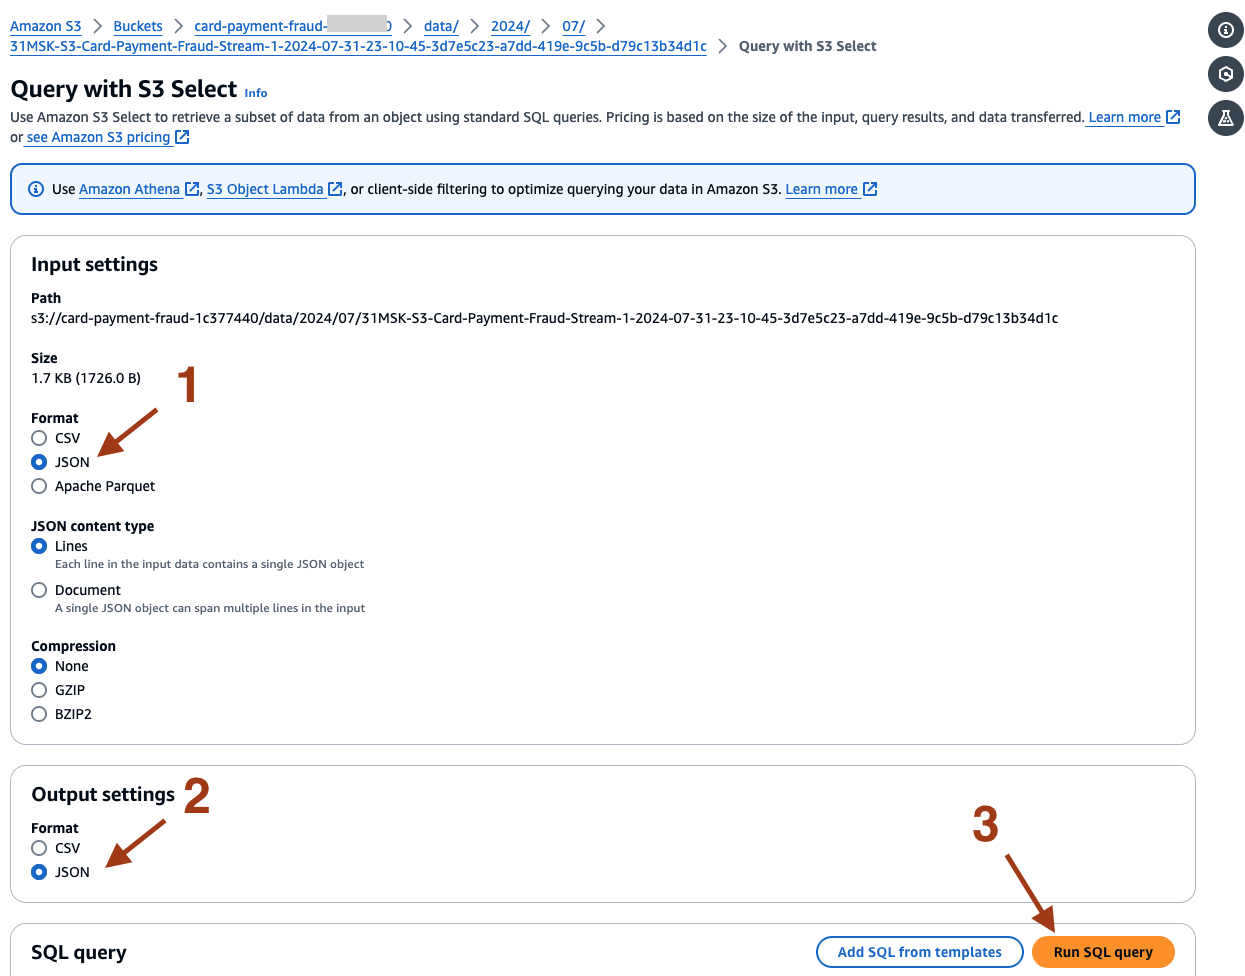
- Select JSON for Format and Output settings, and select Run SQL query.
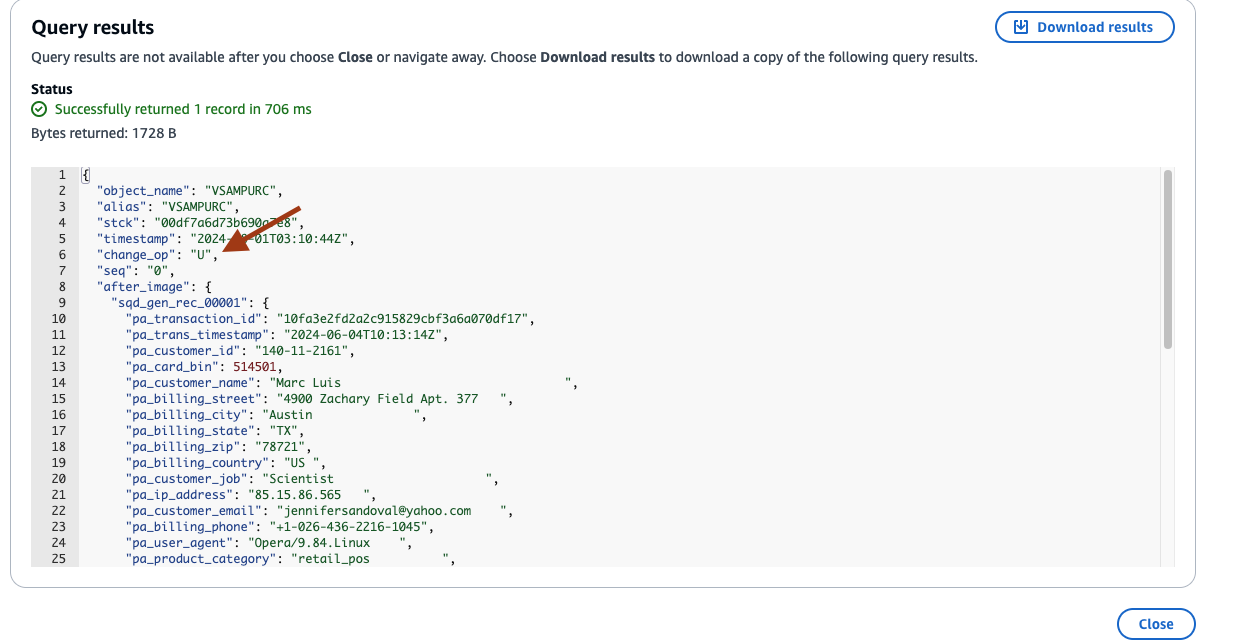
- The Query results window will show the JSON messages created by the Precisely Apply Engine and published to MSK. Among the other fields, the change_op field denotes the type of operation on the database. In this case, ‘U’ denotes it was an update to an existing message. Similarly, ‘I’ will denote an Insert operation and ‘D’ will denote a delete operation.
5. SNS notification (Optional)
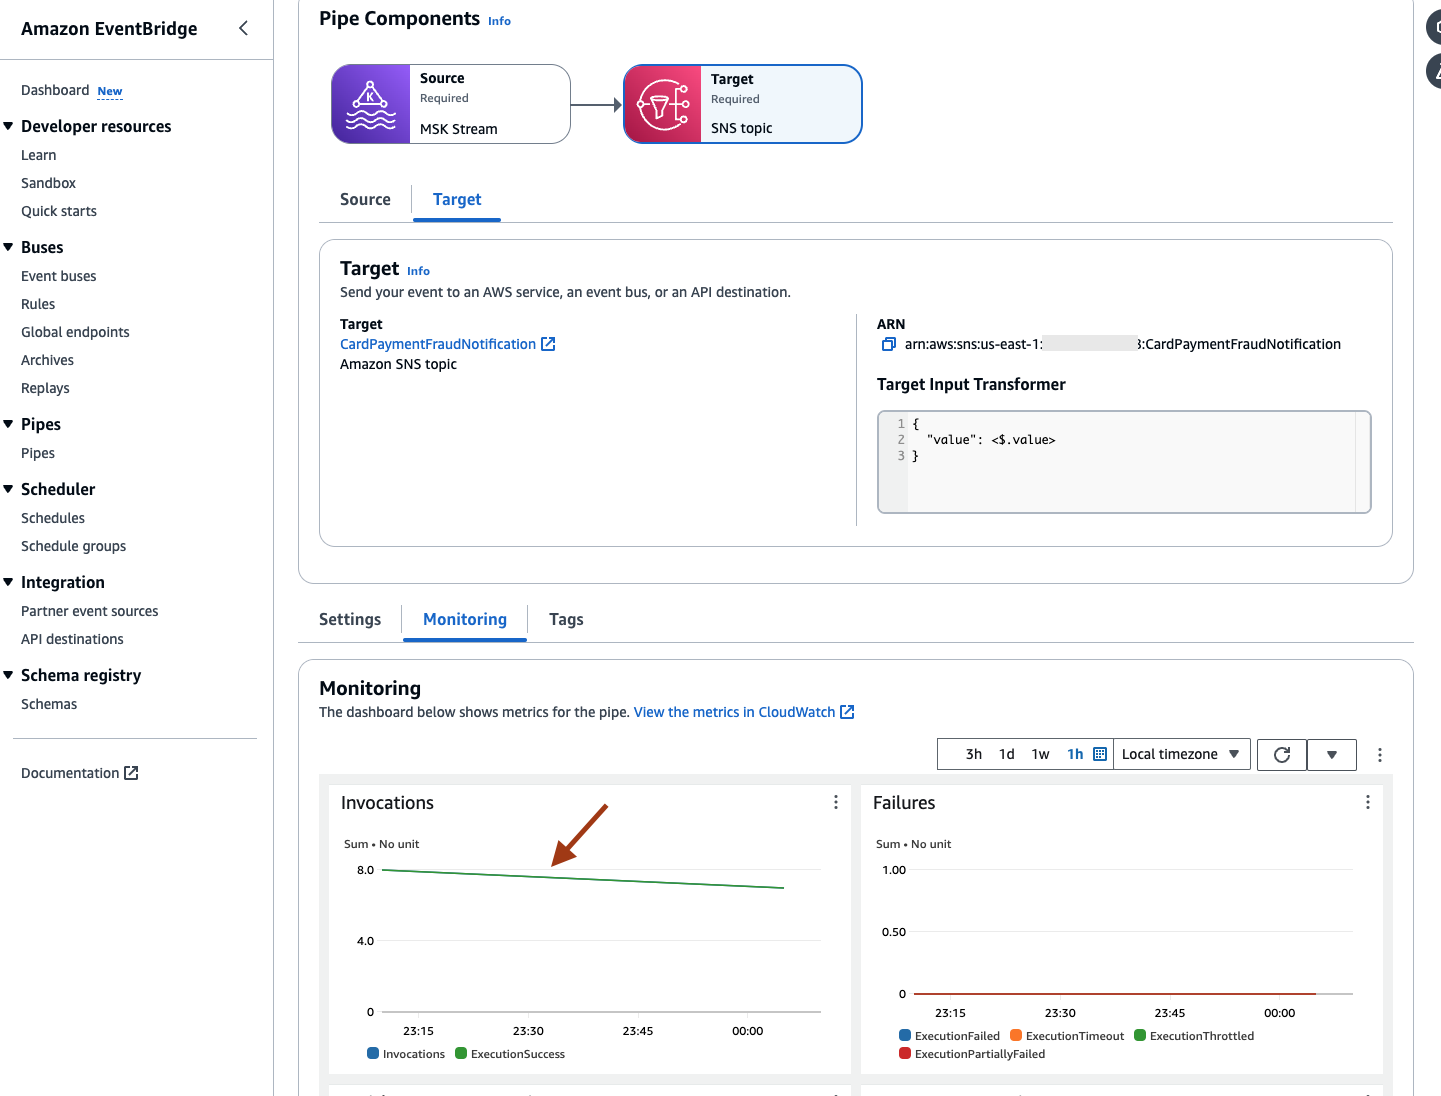
- If you have set up the Amazon SNS notification through Amazon EventBridge, you will have the Invocations on EventBridge Pipes metrics.
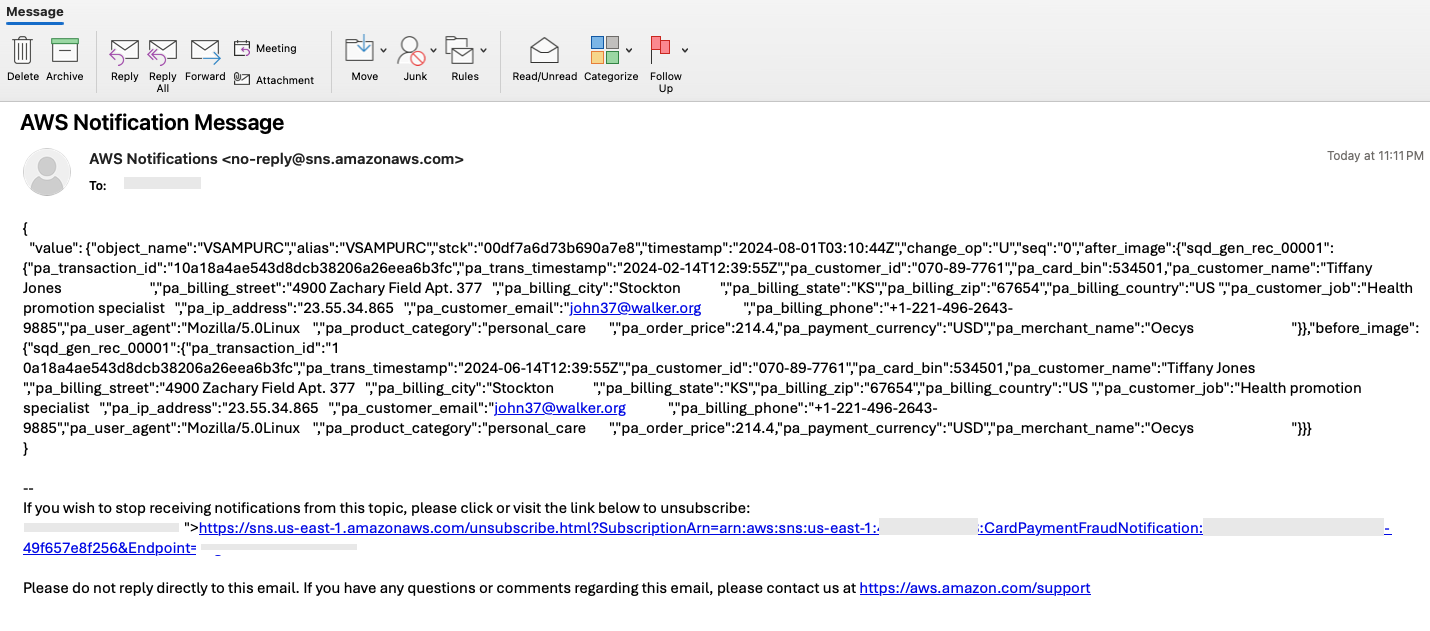
- The below is a sample email received with a raw JSON message published by the Precisely Apply Engine onto MSK, picked up by EventBridge, and delivered by Amazon SNS.
6. Query using natural language
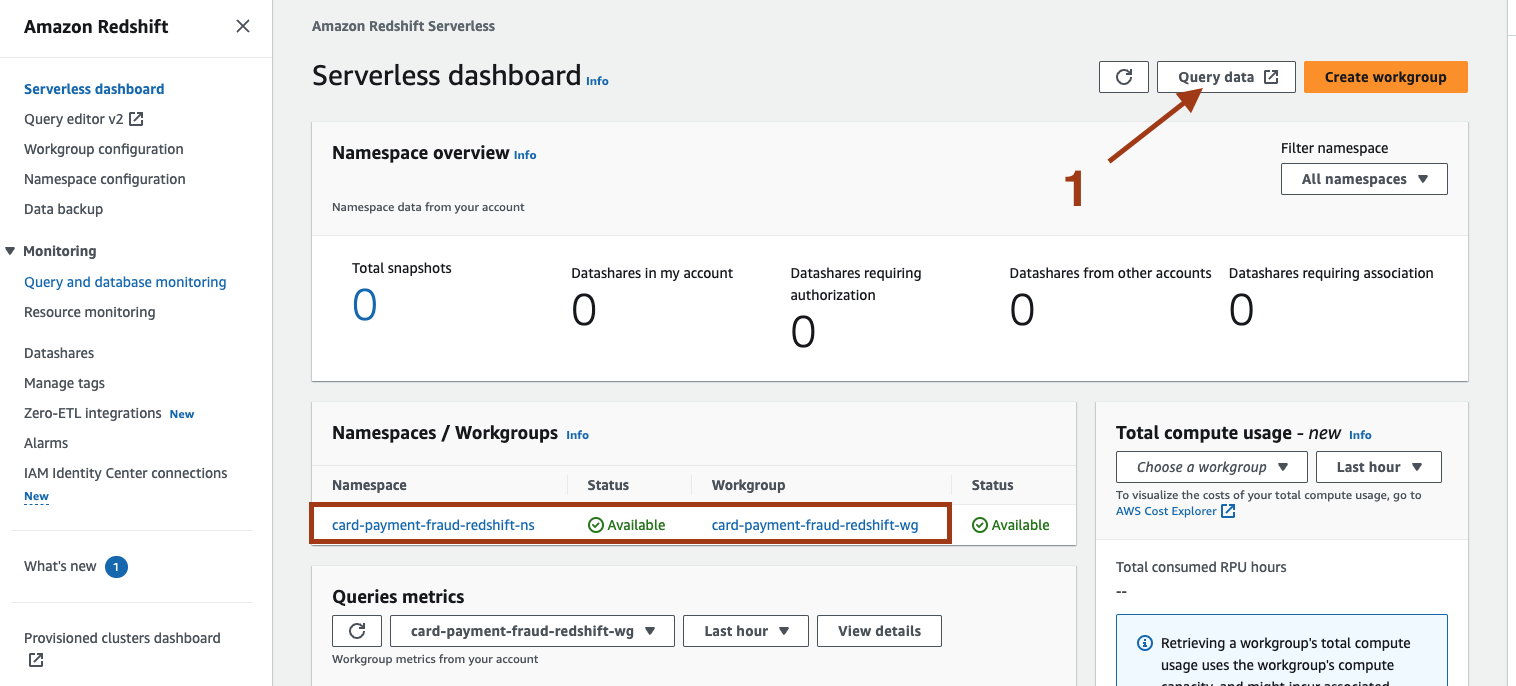
- On the Amazon Redshift console, select the namespace card-payment-fraud-redshift-ns and workgroup card-payment-fraud-redshift-wg or the ones that you have specified in the CloudFormation template. Then, select Query data.
On the editor, set up the database connection by providing the database, username, and password details as mentioned in the CloudFormation template. Make sure to select the correct workgroup name and database name on top of the editor.
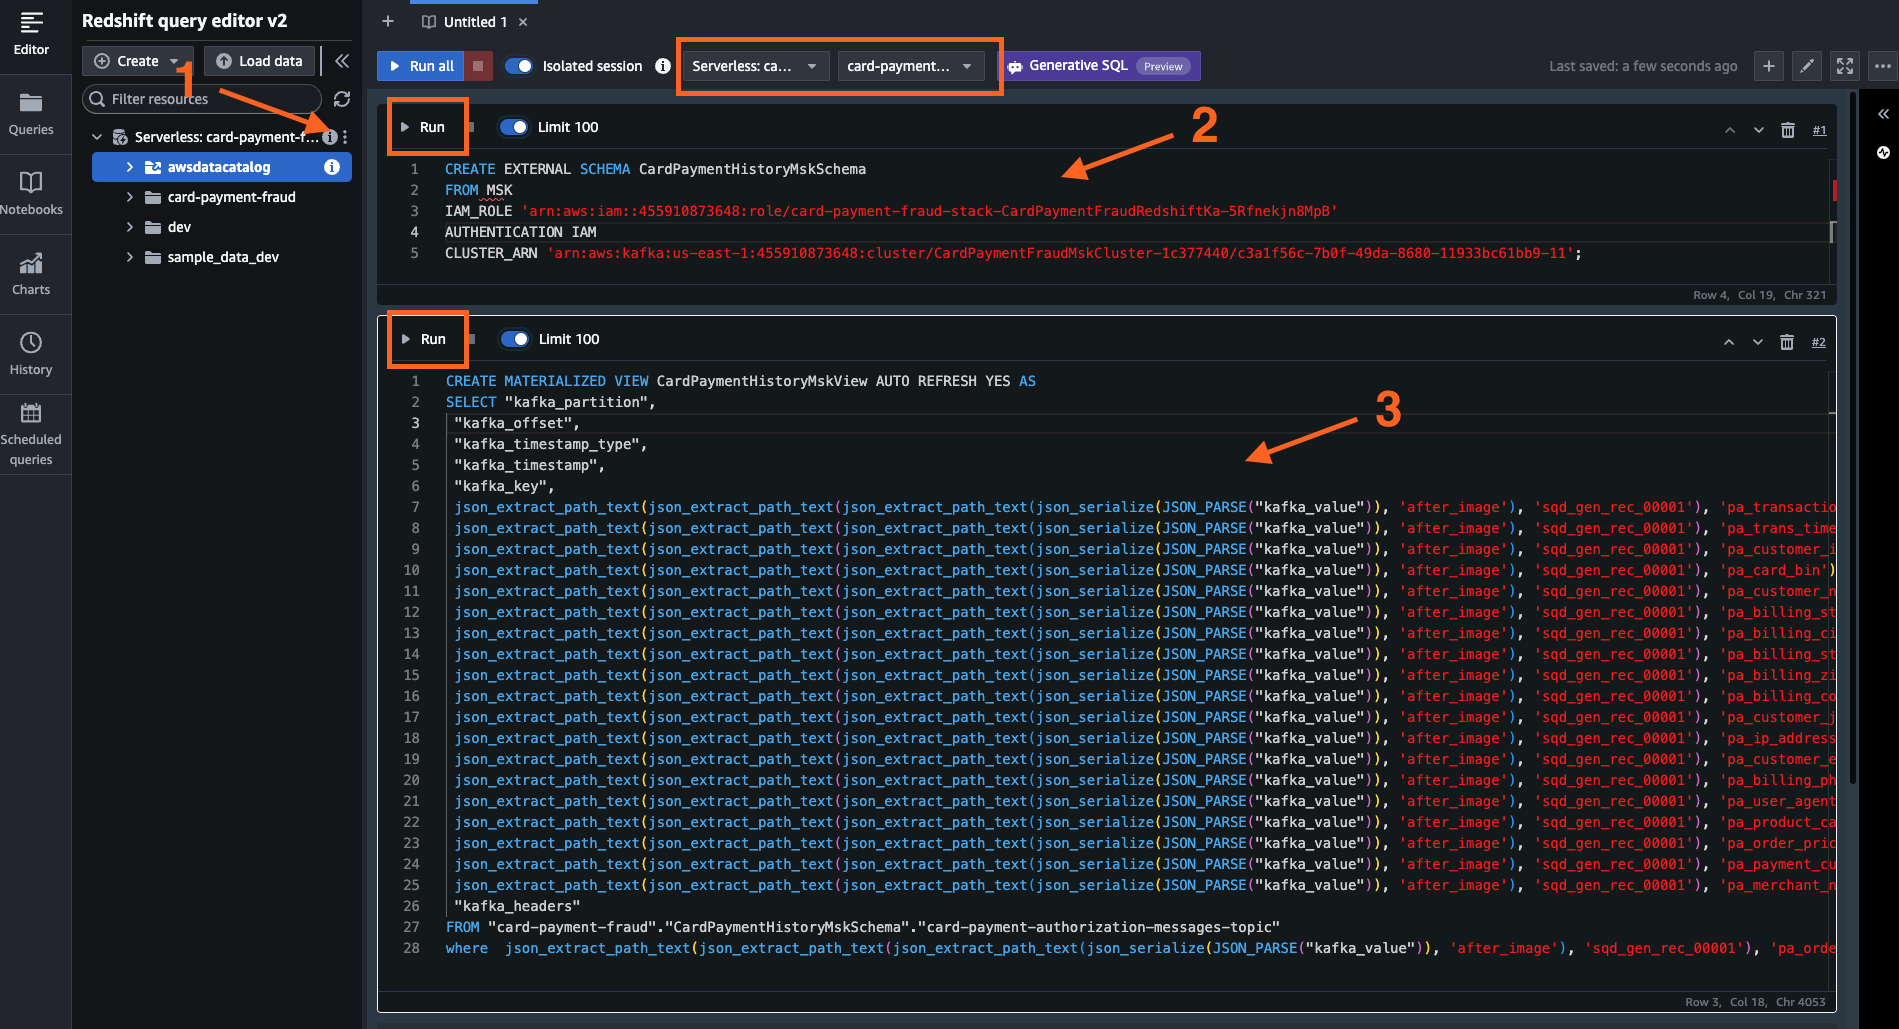
Run the following queries. Replace «arn-CardPaymentFraudRedshiftKafka-role» with the ARN of the IAM Role created by the CloudFormation template for resource CardPaymentFraudRedshiftKafkaRole and «arn-msk» with the ARN of the MSK cluster.
Query to create the Schema:
CREATE EXTERNAL SCHEMA CardPaymentHistoryMskSchema
FROM MSK
IAM_ROLE '<<arn-CardPaymentFraudRedshiftKafka-role>>'
AUTHENTICATION IAM
CLUSTER_ARN '<<arn-msk>>';
Query to create MATERIALIZED VIEW:
CREATE MATERIALIZED VIEW CardPaymentHistoryMskView AUTO REFRESH YES AS
SELECT "kafka_partition",
 "kafka_offset",
 "kafka_timestamp_type",
 "kafka_timestamp",
 "kafka_key",
 json_extract_path_text(json_extract_path_text(json_extract_path_text(json_serialize(JSON_PARSE("kafka_value")), 'after_image'), 'sqd_gen_rec_00001'), 'pa_transaction_id')  as event_id,
 json_extract_path_text(json_extract_path_text(json_extract_path_text(json_serialize(JSON_PARSE("kafka_value")), 'after_image'), 'sqd_gen_rec_00001'), 'pa_trans_timestamp') as event_timestamp,
 json_extract_path_text(json_extract_path_text(json_extract_path_text(json_serialize(JSON_PARSE("kafka_value")), 'after_image'), 'sqd_gen_rec_00001'), 'pa_customer_id') as customer_id,
 json_extract_path_text(json_extract_path_text(json_extract_path_text(json_serialize(JSON_PARSE("kafka_value")), 'after_image'), 'sqd_gen_rec_00001'), 'pa_card_bin') as card_bin,
 json_extract_path_text(json_extract_path_text(json_extract_path_text(json_serialize(JSON_PARSE("kafka_value")), 'after_image'), 'sqd_gen_rec_00001'), 'pa_customer_name') as customer_name,
 json_extract_path_text(json_extract_path_text(json_extract_path_text(json_serialize(JSON_PARSE("kafka_value")), 'after_image'), 'sqd_gen_rec_00001'), 'pa_billing_street') as billing_street,
 json_extract_path_text(json_extract_path_text(json_extract_path_text(json_serialize(JSON_PARSE("kafka_value")), 'after_image'), 'sqd_gen_rec_00001'), 'pa_billing_city') as billing_city,
 json_extract_path_text(json_extract_path_text(json_extract_path_text(json_serialize(JSON_PARSE("kafka_value")), 'after_image'), 'sqd_gen_rec_00001'), 'pa_billing_state') as billing_state,
 json_extract_path_text(json_extract_path_text(json_extract_path_text(json_serialize(JSON_PARSE("kafka_value")), 'after_image'), 'sqd_gen_rec_00001'), 'pa_billing_zip') as billing_zip,
 json_extract_path_text(json_extract_path_text(json_extract_path_text(json_serialize(JSON_PARSE("kafka_value")), 'after_image'), 'sqd_gen_rec_00001'), 'pa_billing_country') as billing_country,
 json_extract_path_text(json_extract_path_text(json_extract_path_text(json_serialize(JSON_PARSE("kafka_value")), 'after_image'), 'sqd_gen_rec_00001'), 'pa_customer_job') as customer_job,
 json_extract_path_text(json_extract_path_text(json_extract_path_text(json_serialize(JSON_PARSE("kafka_value")), 'after_image'), 'sqd_gen_rec_00001'), 'pa_ip_address') as ip_address,
 json_extract_path_text(json_extract_path_text(json_extract_path_text(json_serialize(JSON_PARSE("kafka_value")), 'after_image'), 'sqd_gen_rec_00001'), 'pa_customer_email') as customer_email,
 json_extract_path_text(json_extract_path_text(json_extract_path_text(json_serialize(JSON_PARSE("kafka_value")), 'after_image'), 'sqd_gen_rec_00001'), 'pa_billing_phone') as billing_phone,
 json_extract_path_text(json_extract_path_text(json_extract_path_text(json_serialize(JSON_PARSE("kafka_value")), 'after_image'), 'sqd_gen_rec_00001'), 'pa_user_agent') as user_agent,
 json_extract_path_text(json_extract_path_text(json_extract_path_text(json_serialize(JSON_PARSE("kafka_value")), 'after_image'), 'sqd_gen_rec_00001'), 'pa_product_category') as product_category,
 json_extract_path_text(json_extract_path_text(json_extract_path_text(json_serialize(JSON_PARSE("kafka_value")), 'after_image'), 'sqd_gen_rec_00001'), 'pa_order_price') as purchase_amount,
 json_extract_path_text(json_extract_path_text(json_extract_path_text(json_serialize(JSON_PARSE("kafka_value")), 'after_image'), 'sqd_gen_rec_00001'), 'pa_payment_currency') as payment_currency,
 json_extract_path_text(json_extract_path_text(json_extract_path_text(json_serialize(JSON_PARSE("kafka_value")), 'after_image'), 'sqd_gen_rec_00001'), 'pa_merchant_name') as merchant_name,
 "kafka_headers"
FROM "card-payment-fraud"."CardPaymentHistoryMskSchema"."card-payment-authorization-messages-topic"
where  json_extract_path_text(json_extract_path_text(json_extract_path_text(json_serialize(JSON_PARSE("kafka_value")), 'after_image'), 'sqd_gen_rec_00001'), 'pa_order_price') > 0;
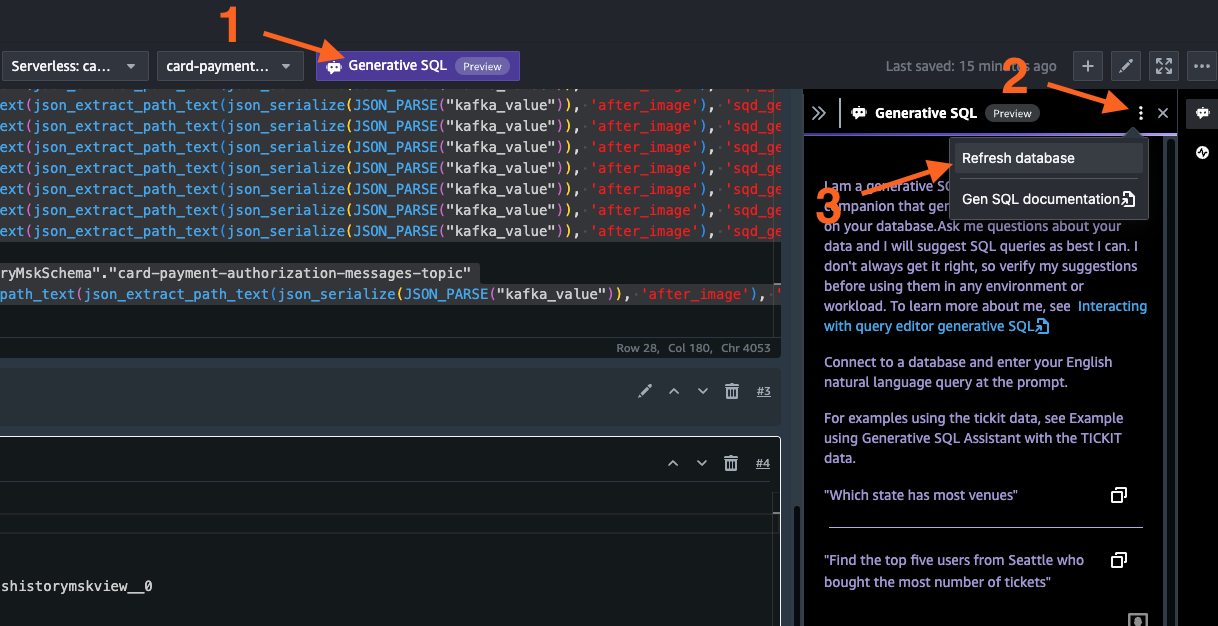
- Next, select Generative SQL. This will open the char window on right-hand side. Select Refresh database on top of the window.
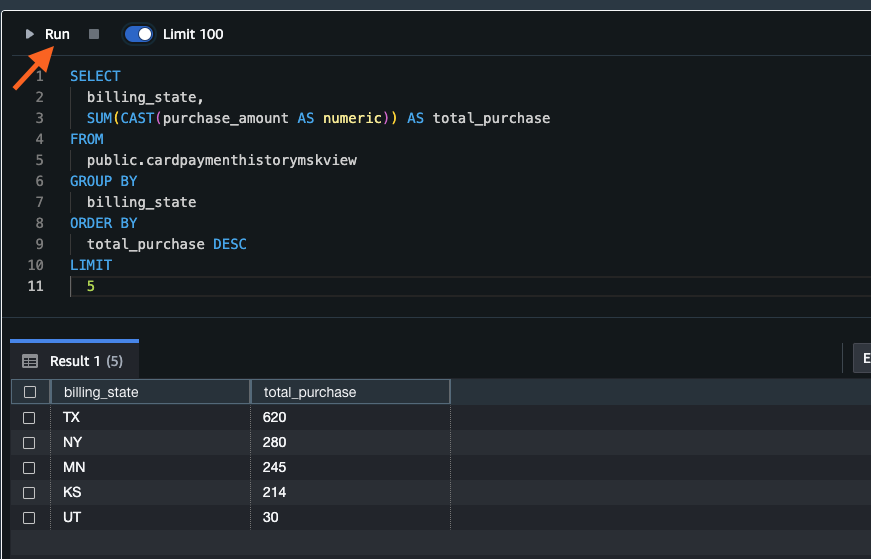
- On the chat window, type a query in natural language, for example show top 5 states by purchase, and press Enter. Amazon Redshift, backed by large language models (LLM), interprets the user requested and generates the SQL query on behalf of user.
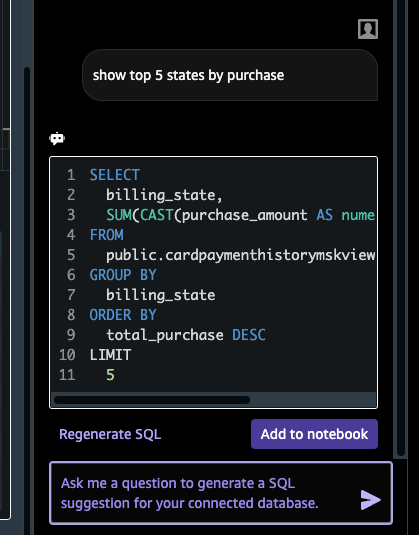
- Select Add to notebook and Run the query. The result is shown in tabular format.
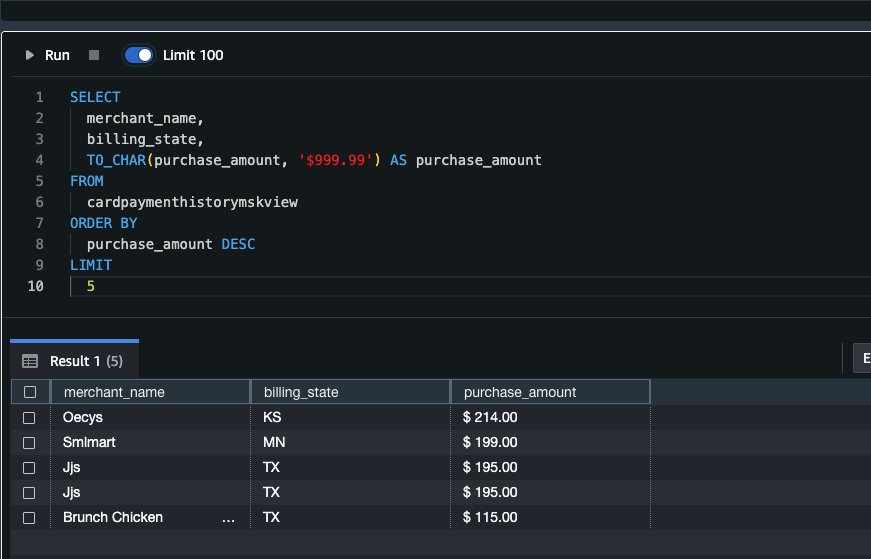
- Try completing the same process. Ask the chat: Show top 5 merchants with highest single purchase. Include state of purchase. Show the purchase amount in currency format.
- If at any time you need to drop and recreate the schema, use the commands below.
DROP MATERIALIZED view CardPaymentsHistoryMskView;
DROP SCHEMA CardPaymentsHistoryMskSchema cascade;
7. Dashboard and visualization using QuickSight
- To integrate Amazon Redshift with QuickSight, follow the instructions here. You can find additional demos and quick guides in the QuickSight Getting Started Guide.
8. Implement fraud detection using machine learning
- To implement fraud detection using Amazon SageMaker, refer to Guidance for Fraud Detection Using Machine Learning on AWS.
Uninstall the Guidance
To uninstall this Guidance, you have to delete the resources created manually from the AWS console, which generally are the following:
- Amazon EC2 instance - FraudDataReplication
- AWS Lambda function - CardPaymentFraudFunction [disable the Trigger to the MSK before deleting the Lambda function]
- Amazon Data Firehose - MSK-S3-Card-Payment-Fraud-Stream
- SNS Topic - CardPaymentFraudNotification and the associated Subscription
- Empty the Amazon S3 bucket - card-payment-fraud-
Next, delete the CloudFormation stack. This will automatically delete all the AWS resources created by the CloudFormation template.
Make sure to stop the Daemon and Publisher Jobs on mainframe when not in use to reduce MIPS usage.
Related resources
- A demonstration of this solution is available on YouTube.
- To integrate Amazon Redshift with QuickSight, follow the instructions here.
Contributors
- Souma Suvra Ghosh, Sr. Specialist Solution Architect LinkedIn
If you have any question regarding this Guidance or AWS Mainframe Modernization in general, ask a question at aws re:Post and make sure to add the Tags as AWS Mainframe Modernization.
Notices
Customers are responsible for making their own independent assessment of the information in this document. This document: (a) is for informational purposes only, (b) represents AWS current product offerings and practices, which are subject to change without notice, and (c) does not create any commitments or assurances from AWS and its affiliates, suppliers or licensors. AWS products or services are provided “as is” without warranties, representations, or conditions of any kind, whether express or implied. AWS responsibilities and liabilities to its customers are controlled by AWS agreements, and this document is not part of, nor does it modify, any agreement between AWS and its customers.