Guidance for Automated Deployment of Layer 2 Stretch Network Extensions with Cisco 8000v on AWS
Summary: This implementation guide provides an overview of the Guidance for Automated Deployment of Layer 2 Stretch Network Extensions with Cisco 8000v on AWS, its reference architecture and components, considerations for planning the deployment, and configuration steps for deploying the Guidance name to Amazon Web Services (AWS). This guide is intended for solution architects, business decision makers, DevOps engineers, data scientists, and cloud professionals who want to implement Guidance for Automated Deployment of Layer 2 Stretch Network Extensions with Cisco 8000v on AWS in their environment.
Overview
This guide demonstrates how to deploy Layer 2 Extensions (L2E) between on-premises data centers and AWS VPCs using Cisco Catalyst 8000v virtual appliances. Layer 2 Extensions allow a single network subnet or broadcast domain to be extended across two disconnected network segments, enabling seamless migration of workloads without IP address changes.
Architecture Overview
This deployment consists of:
- AWS Cloud: Cisco Catalyst 8000V deployed via CloudFormation in an AWS VPC
- On-Premises: Cisco Catalyst 8000V deployed as an OVA on VMware vSphere
- Connectivity: IPSec tunnel over the internet with LISP providing Layer 2 extension
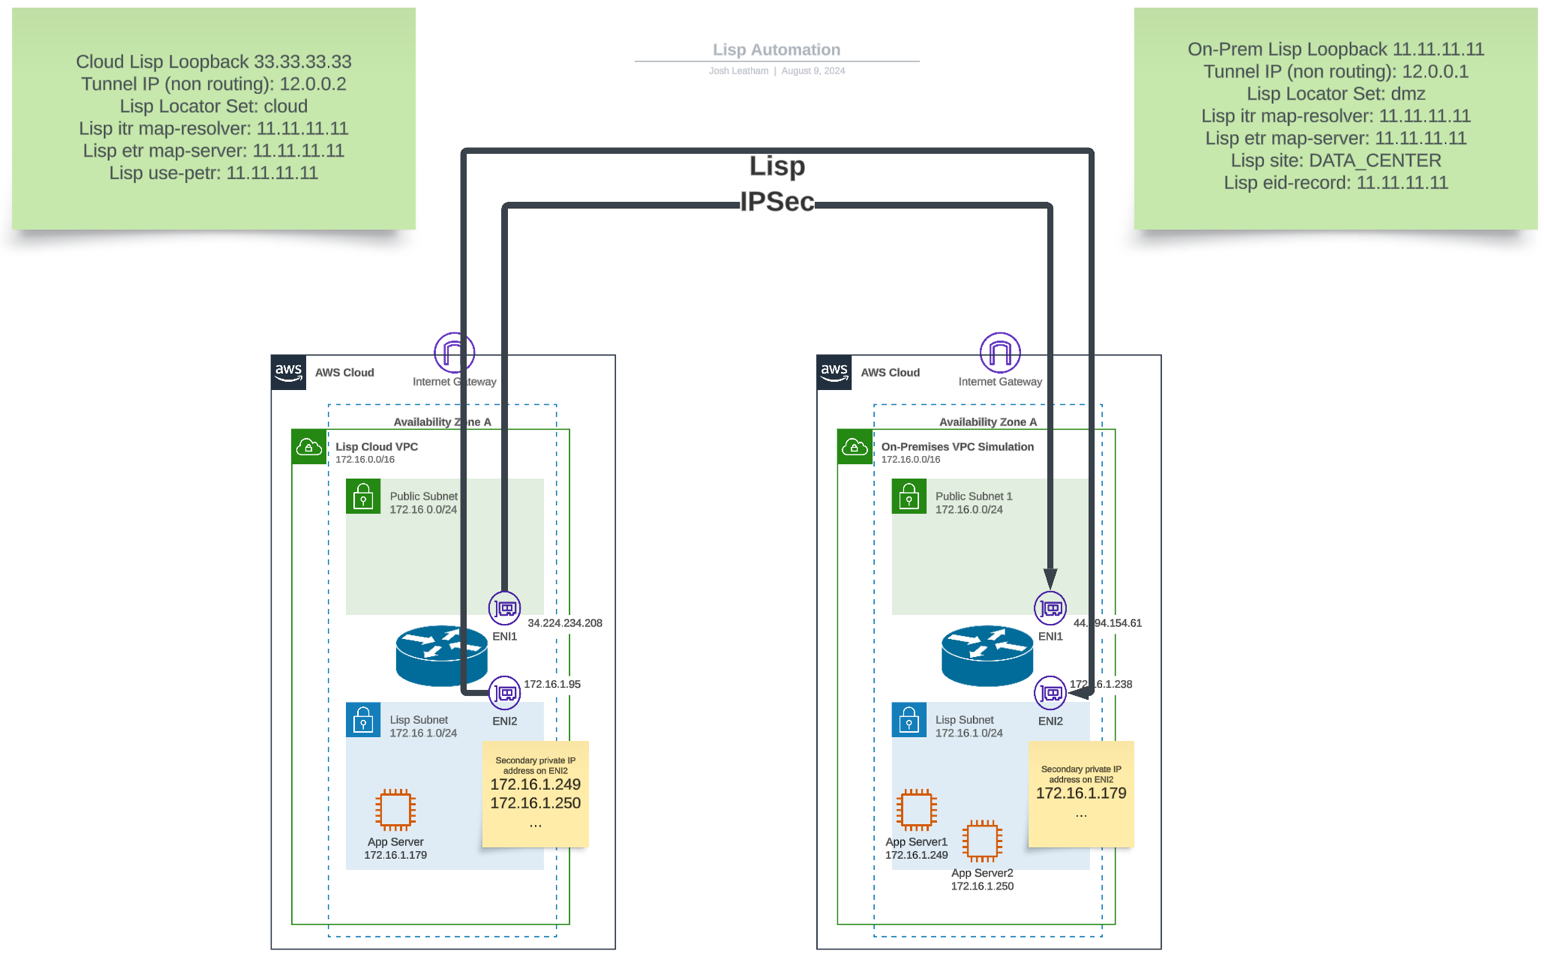
Figure 1. Guidance Reference Architecture - LISP automation
Note: The Solution architecture supports multiple application servers on each side. The number of servers is limited by the ENI secondary IP capacity on AWS and available IP addresses in the extended subnet. With proper planning, you can extend this number by using AWS prefixes with /16 CIDRs each.
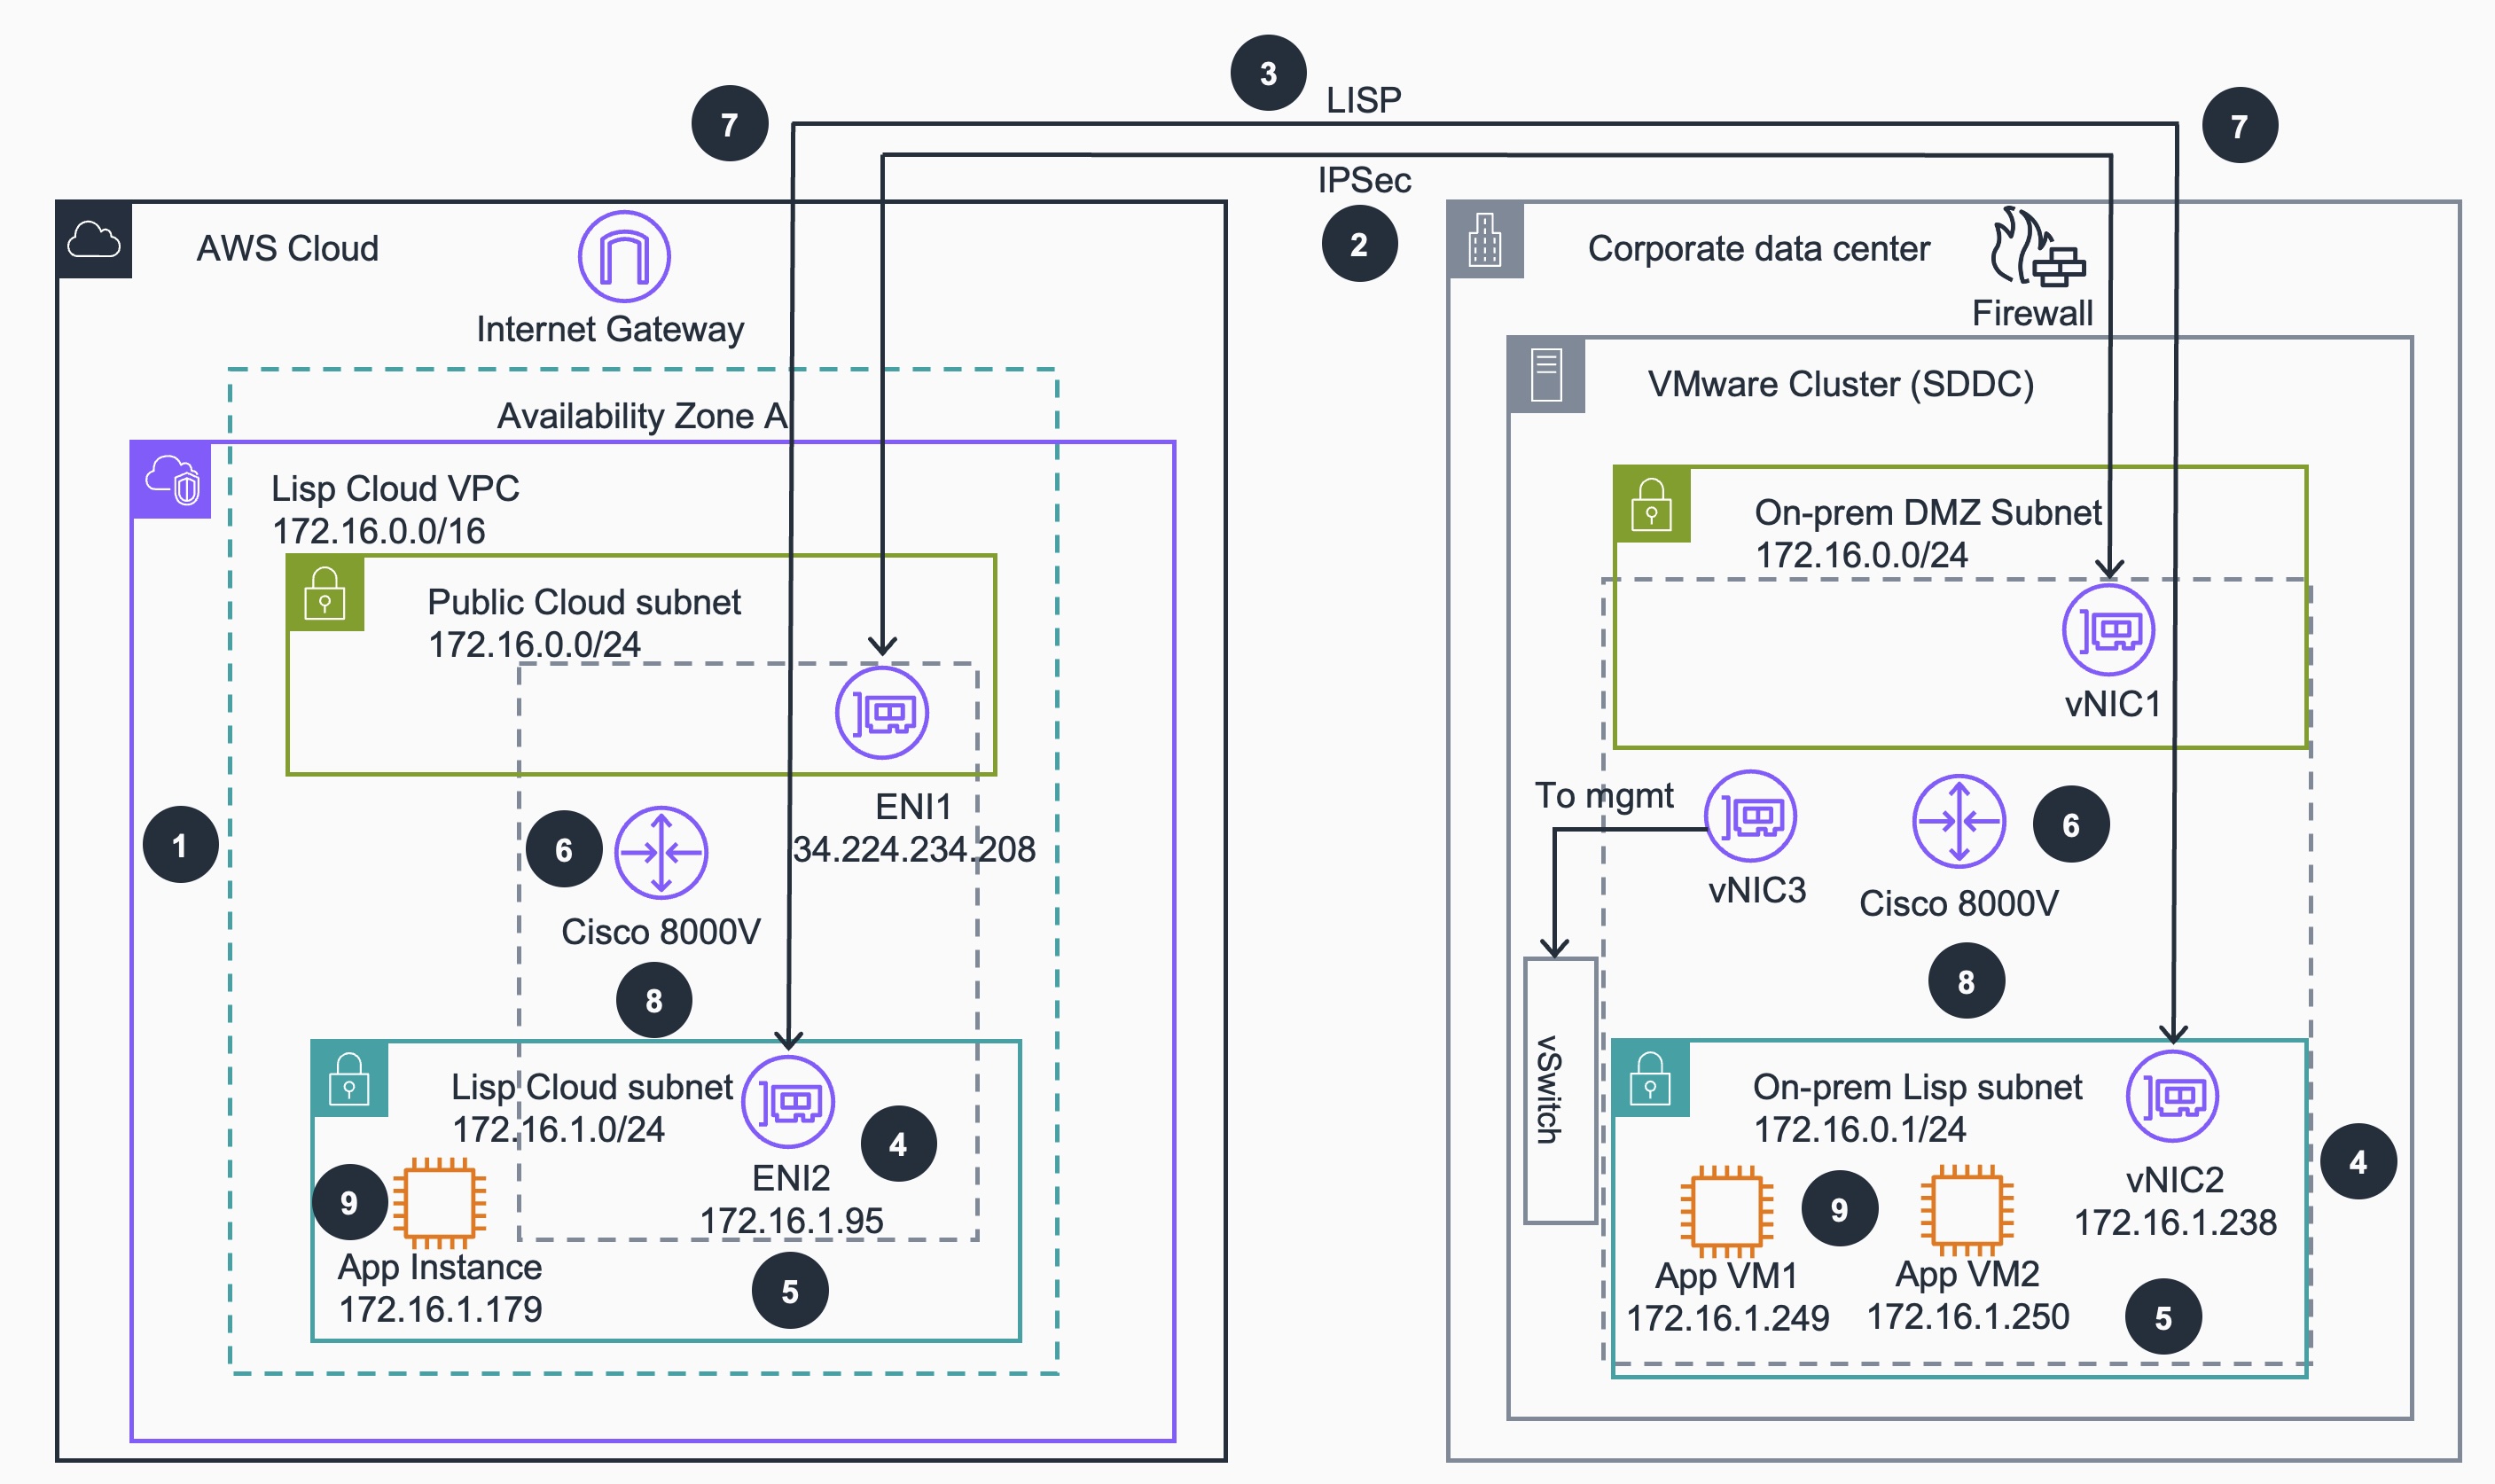
Figure 2. Guidance Reference Architecture - AWS Services and workflow
** Reference Architecture workflow**
AWS CloudFormation deploys the infrastructure, provisioning both the AWS Cloud and on-premises Cisco Catalyst 8000V routers with pre-configured LISP, IPSec, and OSPF settings.
A secure IPSec tunnel is established between the on-premises Cisco Catalyst 8000V via Virtual Network Interface Card 1 (vNIC1) and the AWS Cisco Catalyst 8000V via Elastic Network Interface1 (ENI1) through the AWS Internet Gateway.
The LISP protocol initializes on both routers, separating endpoint identifiers (EIDs) from routing locators (RLOCs) to enable Layer 2 network extension.
Secondary IP addresses are configured on router interfaces, Elastic Network Interface2 (ENI2) on the AWS side. vNIC2 on-prem learns hosts directly through ARP broadcasts. This activate the Layer 2 extension capability.
Traffic originates from either environment, whether from on-premises application virtual machines (App VM1: 172.16.1.249, App VM2: 172.16.1.250) or from the AWS Cloud (App Instance: 172.16.1.179).
The Cisco Catalyst 8000V (either on-premises or AWS Cloud) encapsulates Layer 2 frames with LISP headers to enable transport across Layer 3 networks.
The encapsulated traffic is encrypted using IPSec and transmitted through the secure tunnel via the AWS Internet Gateway on the AWS Cloud side and Firewall on the Corporate data center
The destination Cisco Catalyst 8000V (either AWS Cloud or on-premises) decrypts and decapsulates the traffic, then routes it to the appropriate subnet via ENI2 or vNIC2.
The packets reach their destination application, maintaining the original Layer 2 addressing throughout the entire flow regardless of traffic direction.
Use Cases
Layer 2 Network Extensions are ideal for:
- Data Center Migration: Move workloads to AWS without re-IPing applications
- Disaster Recovery: Extend production networks to AWS for DR purposes
- Hybrid Cloud: Enable seamless communication between on-premises and cloud workloads
- Legacy Application Support: Migrate applications with hardcoded IP addresses
Plan your Deployment
AWS Requirements
- AWS account with appropriate IAM permissions
- Access to the AWS Management Console
- VPC with available CIDR space
- Internet Gateway for public connectivity
AWS Marketplace Subscription
Subscribe to the “Cisco Catalyst 8000V BYOL AMI” in AWS marketplace before proceeding:
- Navigate to AWS Marketplace
- Search for “Cisco Catalyst 8000V Edge Software”
- Subscribe to the BYOL (Bring Your Own License) version
- Accept the terms and conditions
On-Premise Requirements
- VMware vSphere 6.7 or later
- Cisco Catalyst 8000V OVA image (download from Cisco.com)
- Valid Cisco DNA license for Catalyst 8000V
- Three available port groups:
- Management network (for router administration)
- Public/WAN network (internet-facing for IPSec tunnel)
- Private/LAN network (the network to be extended)
- Static public IP address or NAT with port forwarding (UDP 500, 4500)
Network Planning
Before deployment, plan the following:
| Component | AWS Cloud | On-Premises |
|---|---|---|
| Router Public IP | Elastic IP (assigned by AWS) | Static IP or NAT IP |
| Router Private IP | From VPC private subnet | From LAN subnet |
| Extended Subnet | Matching on-prem subnet | Existing LAN subnet |
| Tunnel IP | 192.168.100.1/30 | 192.168.100.2/30 |
| OSPF Router ID | Unique ID | Unique ID |
Operating System
These deployment instructions work on macOS, Linux, or Windows. The CloudFormation template can be deployed entirely from the AWS Management Console (a web browser is the only requirement) or from a terminal using the AWS CLI.
Required Tools:
- A web browser with access to the AWS Management Console (Option 1).
- AWS CLI v2.x — only required for the CLI-based deployment (Option 2). Verify with
aws --version.
Third-party tools
Cisco Catalyst 8000V License
- The BYOL Marketplace AMI includes a rate-limited perpetual license suitable for evaluation and testing
- A license purchased directly from Cisco is required for production throughput and Cisco TAC support
- Subscribe to Cisco Catalyst 8000V in AWS Marketplace before deployment
AWS account requirements
Required Pre-requisites:
- AWS Marketplace Subscription
- Subscribe to Cisco Catalyst 8000V in AWS Marketplace
- EC2 Key Pair
- Create an EC2 key pair in your target region for SSH access
- IAM Permissions
- CloudFormation full access
- EC2 full access
- VPC full access
- IAM role creation permissions
- VPC Quotas
- Ensure sufficient VPC quota for creating new VPCs
- Default limit: 5 VPCs per region (can be increased)
- Elastic IP Address
- Requires 1 available Elastic IP for the 8000V public interface
- Default limit: 5 EIPs per region (can be increased)
Service limits
Critical Service Limits:
- EC2 Instance Limits: Ensure your account has sufficient quota for
c5n.largeinstances (or your chosen instance type) - Elastic Network Interfaces: Each deployment requires multiple ENIs
- IPv4 CIDR Blocks: Ensure your chosen CIDR blocks don’t conflict with existing VPCs
- Secondary Private IPs per ENI: Default limit is ~50 per ENI (varies by instance type)
- IPv4 Prefixes per ENI: Scales better than secondary IPs (up to 464 IPs on
c5n.4xlargewith 29 prefixes)
To request limit increases, visit the AWS Service Quotas console.
Supported Regions
This Guidance includes AMI mappings for 32 AWS Regions, including commercial, GovCloud, and newer regions. The CloudFormation template will deploy in any region listed in the AMI mappings section of the template.
Note: IOS-XE version 17.13.01a is not available in all regions (ap-east-2, mx-central-1, ap-southeast-5, ap-southeast-7). Use version 17.15.03a (default) or 17.09.08 in those regions.
Security
- This Guidance creates public IP addresses for 8000V management The following security best practices are recommended:
- IPSec tunnels are encrypted but validate pre-shared key security
- Restrict management access to known IP addresses only
- Regularly update Cisco IOS-XE software for security patches
- All traffic between sites is encrypted via IPSec
- Pre-shared keys should be strong and rotated periodically
- Consider using certificate-based authentication for production
- Implement network segmentation on the extended subnet
- Monitor for unauthorized devices on the extended network
Security note: Inbound IPSec ports (UDP 500 and UDP 4500) on the Cisco 8000V are scoped to the
TunnelDestinationPublicIPyou supply at the deployment time — they are not opened to0.0.0.0/0. Management ports (SSH, HTTPS, ICMP) are similarly scoped to theParticipantIPAddressyou supply.
Deploy the Guidance
Follow these steps to deploy the L2 Stretch Network guidance:
Option 1: Deploy via the AWS CloudFormation Console (Recommended)
This option uses only a web browser — no CLI, scripts, or local tooling required.
Download the CloudFormation template
Either clone the repository:
git clone https://github.com/aws-solutions-library-samples/guidance-for-l2-stretch-network-with-cisco-8000v.gitOr download
deployment/L2E-lisp-cloud-vpc.yamldirectly from the repository’s GitHub pageOpen the CloudFormation console
Sign in to the AWS Management Console, switch to your target Region (must be one of the supported Regions), and open the CloudFormation console.
Create a new stack
- Choose Create stack → With new resources (standard).
- Under Specify template, select Upload a template file, click Choose file, and select the
L2E-lisp-cloud-vpc.yamlfile you downloaded in Step 1. - Choose Next.
Specify stack details
Enter a stack name (for example,
lisp-cloud-extension), then fill in the parameters. Parameters are grouped on the form to match the template’sParameterGroups.Network Configuration
Parameter Required? Guidance LispCloudVpcCidrRequired VPC CIDR for the AWS side. Must be a superset of the stretched subnet and must not overlap any existing on-prem or AWS network. Example: 172.16.0.0/16.LispCloudPublicSubnetCidrRequired Public subnet for the 8000V’s external interface. Must be inside the VPC CIDR. Example: 172.16.0.0/24.LispCloudPrivateSubnetCidrRequired The subnet stretched between on-prem and AWS via LISP. Must exactly match the on-prem subnet you intend to extend. Example: 172.16.1.0/24.LispCloud8KvPrivateInterfaceIPOptional Specific IP for the 8000V private interface. Leave blank for automatic assignment. 8000v Instance Configuration
Parameter Required? Guidance LispCloud8KvInstanceTypeRequired EC2 instance type. Default c5n.large. Use larger c5n/c6in instances for higher throughput.LispCloud8KvVersionRequired Cisco IOS-XE version. Default 8kv171503a. Note:8kv171301ais not available inap-east-2,mx-central-1,ap-southeast-5, orap-southeast-7.HostnameRequired Hostname applied to the Cisco 8000V (e.g., lisp-cloud-router).AuthenticationTypeRequired KeyPair(default, recommended) orUsernamePassword.KeyNameRequired if AuthenticationType= KeyPairName of an existing EC2 key pair in this Region. Create one in the EC2 console first if needed. UsernameRequired if AuthenticationType= UsernamePasswordAdmin username for the router. PrivilegePwdRequired if AuthenticationType= UsernamePasswordAdmin password (NoEcho — not displayed in the console or stored in the events log). LISP Configuration
The two loopback addresses below are used as LISP RLOCs and are reachable only inside the encrypted IPSec/LISP tunnel — they are never advertised to the public internet, so they do not need to be part of your routable address space.
Parameter Required? Guidance LispCloudLoopbackRequired RLOC for the AWS 8000V. Avoid picking a value that conflicts with addresses you actually route on either side. Example: 33.33.33.33.LispOnPremLoopbackRequired RLOC for the on-prem 8000V. Must match the loopback configured on your on-prem Cisco router. Example: 11.11.11.11.IPSec Configuration
Parameter Required? Guidance IPSecPreShareKeyRequired Pre-shared key for the IPSec/LISP tunnel (NoEcho). The on-prem router must use the same value. TunnelDestinationPublicIPRequired Public IP of your on-prem Cisco router (the IPSec peer). Must be a single IP, not a CIDR. Security Configuration
Parameter Required? Guidance ParticipantIPAddressRequired Your administrative IP in x.x.x.x/32form. Used to scope the public security group rules for SSH, HTTPS, and ICMP. Find your IP at https://checkip.amazonaws.com/.Application Server Configuration
Parameter Required? Guidance DeployAppServerOptional Yes(default) deploys a smallt3.microtest web server in the stretched subnet.Noskips it.Choose Next.
Configure stack options
Defaults are fine for most deployments. Optionally add tags. Choose Next.
Review and create the stack
Review the parameters, scroll to the bottom, Acknowledge that CloudFormation will create IAM resources, and choose Submit.
Monitor stack creation
Stack creation typically completes in 5–10 minutes. Watch the Events tab; the stack should reach
CREATE_COMPLETE.Retrieve stack outputs
Open the Outputs tab. Note the values for
LispCloud8KvPublicIp,C8KVInstanceId,LispCloud8KvPrivateInterfaceId, and (if deployed)LispCloudAppServerPrivateIp— you will need them to configure the on-prem side and to validate the deployment.
Option 2: Deploy via AWS CLI
- Clone the repository
git clone https://github.com/aws-solutions-library-samples/guidance-for-l2-stretch-network-with-cisco-8000v.git cd guidance-for-l2-stretch-network-with-cisco-8000v - Deploy the CloudFormation stack
aws cloudformation create-stack \ --stack-name lisp-cloud-extension \ --template-body file://deployment/L2E-lisp-cloud-vpc.yaml \ --parameters \ ParameterKey=LispCloudVpcCidr,ParameterValue=172.16.0.0/16 \ ParameterKey=LispCloudPublicSubnetCidr,ParameterValue=172.16.0.0/24 \ ParameterKey=LispCloudPrivateSubnetCidr,ParameterValue=172.16.1.0/24 \ ParameterKey=LispCloud8KvInstanceType,ParameterValue=c5n.large \ ParameterKey=LispCloud8KvPrivateInterfaceIP,ParameterValue='' \ ParameterKey=ParticipantIPAddress,ParameterValue=1.2.3.4/32 \ ParameterKey=Hostname,ParameterValue=lisp-cloud-router \ ParameterKey=AuthenticationType,ParameterValue=KeyPair \ ParameterKey=KeyName,ParameterValue=your-key-name \ ParameterKey=Username,ParameterValue=admin \ ParameterKey=PrivilegePwd,ParameterValue=<YOUR-PASSWORD> \ ParameterKey=LispCloudLoopback,ParameterValue=33.33.33.33 \ ParameterKey=LispOnPremLoopback,ParameterValue=11.11.11.11 \ ParameterKey=IPSecPreShareKey,ParameterValue=<YOUR-IPSEC-PRESHARED-KEY> \ ParameterKey=TunnelDestinationPublicIP,ParameterValue=12.34.56.78 \ --capabilities CAPABILITY_IAM \ --profile <YOUR-PROFILE> - Monitor stack creation
aws cloudformation wait stack-create-complete \ --stack-name lisp-cloud-extension \ --profile <YOUR-PROFILE> - Retrieve important outputs
# Get 8000v public IP address
aws cloudformation describe-stacks \
  --stack-name lisp-cloud-extension \
  --query 'Stacks[0].Outputs[?OutputKey==`LispCloud8KvPublicIp`].OutputValue' \
  --output text

# Get 8000v instance ID
aws cloudformation describe-stacks \
  --stack-name lisp-cloud-extension \
  --query 'Stacks[0].Outputs[?OutputKey==`C8KVInstanceId`].OutputValue' \
  --output text

# Get private ENI ID
aws cloudformation describe-stacks \
  --stack-name lisp-cloud-extension \
  --query 'Stacks[0].Outputs[?OutputKey==`LispCloud8KvPrivateInterfaceId`].OutputValue' \
  --output text
NOTE: please see the Implementation Guide for detailed steps for deployment and validation of this guidance
Deployment Validation
Validate CloudFormation Stack
- Check stack status
aws cloudformation describe-stacks \
  --stack-name lisp-cloud-extension \
  --query 'Stacks[0].StackStatus' \
  --output text
Expected output:
CREATE_COMPLETE - Verify all resources created
aws cloudformation describe-stack-resources \
  --stack-name lisp-cloud-extension \
  --output table
Validate EC2 Instances
- Verify Cisco 8000V instance is running
INSTANCE_ID=$(aws cloudformation describe-stacks \
  --stack-name lisp-cloud-extension \
  --query 'Stacks[0].Outputs[?OutputKey==`C8KVInstanceId`].OutputValue' \
  --output text)

aws ec2 describe-instances \
  --instance-ids $INSTANCE_ID \
  --query 'Reservations[0].Instances[0].State.Name' \
  --output text
Expected output:
running
Validate Network Configuration
- Verify Elastic IP association
aws ec2 describe-addresses \ --filters "Name=instance-id,Values=$INSTANCE_ID" \ --query 'Addresses[0].PublicIp' \ --output text - Verify ENI attachments
aws ec2 describe-instances \
  --instance-ids $INSTANCE_ID \
  --query 'Reservations[0].Instances[0].NetworkInterfaces[*].{Index:Attachment.DeviceIndex,ENI:NetworkInterfaceId,PrivateIP:PrivateIpAddress}' \
  --output table
Expected: Two network interfaces (index 0 and 1)
Validate Cisco 8000V Configuration
- SSH to Cisco 8000V
PUBLIC_IP=$(aws cloudformation describe-stacks \ --stack-name lisp-cloud-extension \ --query 'Stacks[0].Outputs[?OutputKey==`LispCloud8KvPublicIp`].OutputValue' \ --output text) ssh -i your-key.pem admin@$PUBLIC_IP - Verify LISP configuration
show ip lisp show ip lisp database show running-config | section lisp - Verify IPSec configuration
show crypto isakmp sa
show crypto ipsec sa
show running-config | section crypto
Running the Guidance
Initial Setup
After successful deployment, configure the on-premises settings and test connectivity:
1. Configure On-Premises Cisco 8000V
Deploy matching configuration on your on-premises Cisco router:
! Configure loopback interface
interface Loopback1
 ip address 11.11.11.11 255.255.255.255

! Configure IPSec
crypto isakmp policy 200
 encryption aes
 hash sha
 authentication pre-share
 group 21
 lifetime 28800

crypto isakmp key <YOUR-PRESHARED-KEY> address 0.0.0.0
crypto isakmp keepalive 10 10

crypto ipsec transform-set dmvpn esp-aes esp-sha-hmac
 mode tunnel

crypto ipsec profile Catalyst8000v1
 set transform-set dmvpn

! Configure tunnel (replace AWS_8KV_PUBLIC_IP with actual IP)
interface Tunnel0
 ip address 12.0.0.1 255.255.255.0
 ip mtu 1400
 ip tcp adjust-mss 1360
 tunnel source GigabitEthernet1
 tunnel mode ipsec ipv4
 tunnel destination <AWS_8KV_PUBLIC_IP>
 tunnel protection ipsec profile Catalyst8000v1

! Configure LISP
router lisp
 locator-set onprem
  11.11.11.11 priority 1 weight 100
 exit-locator-set
 service ipv4
  itr map-resolver 33.33.33.33
  itr
  etr map-server 33.33.33.33 key <YOUR-PRESHARED-KEY>
  etr
  use-petr 33.33.33.33
 exit-service-ipv4
 instance-id 0
  dynamic-eid subnet1
   database-mapping 172.16.1.0/24 locator-set onprem
   map-notify-group 239.0.0.1
  exit-dynamic-eid
  service ipv4
   eid-table default
  exit-service-ipv4
 exit-instance-id
exit-router-lisp

! Configure OSPF
router ospf 1
 network 12.0.0.0 0.0.0.255 area 0
 network 11.11.11.11 0.0.0.0 area 0
2. Verify Tunnel Establishment
On AWS 8000V:
show crypto isakmp sa
! Expected: QM_IDLE state

show crypto ipsec sa
! Expected: Active SAs with encaps/decaps counters incrementing

show ip ospf neighbor
! Expected: Neighbor 12.0.0.1 in FULL state
On On-Premises 8000V:
show crypto isakmp sa
show crypto ipsec sa
show ip ospf neighbor
! Expected: Neighbor 12.0.0.2 in FULL state
3. Verify LISP Registration
show ip lisp map-cache
! Expected: See mappings for remote subnet

show ip lisp database
! Expected: See local subnet mappings

show ip lisp statistics
! Expected: Map-Requests/Replies counters incrementing
4. Test Connectivity
From AWS test instance:
# Get test instance private IP
aws cloudformation describe-stacks \
  --stack-name lisp-cloud-extension \
  --query 'Stacks[0].Outputs[?OutputKey==`LispCloudAppServerPrivateIp`].OutputValue' \
  --output text

# SSH to test instance and ping on-premises
ping <on-prem-server-ip>
Expected Output:
Successful Deployment Indicators:
- IPSec tunnel status:
QM_IDLE - OSPF neighbor state:
FULL - LISP map-cache populated with remote subnet
- Ping successful between AWS and on-premises subnets
- Continuous packet flow without drops
5. Configure IPv4 Prefixes for Scale (Optional)
For deployments requiring Layer 2 extension support for many on-premises endpoints, IPv4 prefixes provide superior scalability compared to individual secondary IP addresses. Instead of managing IPs one at a time (limited to ~50 per ENI), IPv4 prefixes allow you to allocate entire /28 subnets to the Cisco 8000V’s private network interface. Each /28 prefix provides 16 usable IP addresses, and instance types like c5n.4xlarge support up to 29 prefixes, enabling connectivity for up to 464 on-premises endpoints through a single Cisco 8000V instance.
This approach is essential for enterprise migrations where hundreds of on-premises servers with static IP addresses need to maintain their addresses while moving workloads to AWS. The prefixes enable the LISP protocol to properly register and route traffic for all on-premises endpoint IPs through the Layer 2 extension tunnel.
Scalability with IPv4 Prefixes:
c5n.large: Up to 144 IPs (9 prefixes × 16 IPs each)c5n.2xlarge: Up to 224 IPs (14 prefixes × 16 IPs each)c5n.4xlarge: Up to 464 IPs (29 prefixes × 16 IPs each)
Step 1: Retrieve the Private ENI ID
First, get the private network interface ID from your CloudFormation stack outputs:
PRIVATE_ENI=$(aws cloudformation describe-stacks \
  --stack-name lisp-cloud-extension \
  --query 'Stacks[0].Outputs[?OutputKey==`LispCloud8KvPrivateInterfaceId`].OutputValue' \
  --output text)

echo "Private ENI ID: $PRIVATE_ENI"
Step 2: Plan Your /28 Prefix Allocations
For a 172.16.1.0/24 private subnet:
# /28 subnets provide 16 IPs each
172.16.1.0/28    → 172.16.1.0 - 172.16.1.15    (16 IPs)
172.16.1.16/28   → 172.16.1.16 - 172.16.1.31   (16 IPs)
172.16.1.32/28   → 172.16.1.32 - 172.16.1.47   (16 IPs)
172.16.1.48/28   → 172.16.1.48 - 172.16.1.63   (16 IPs)
172.16.1.64/28   → 172.16.1.64 - 172.16.1.79   (16 IPs)
172.16.1.80/28   → 172.16.1.80 - 172.16.1.95   (16 IPs)
172.16.1.96/28   → 172.16.1.96 - 172.16.1.111  (16 IPs)
172.16.1.112/28  → 172.16.1.112 - 172.16.1.127 (16 IPs)
172.16.1.128/28  → 172.16.1.128 - 172.16.1.143 (16 IPs)
# ... and so on
Important: All 16 IPs in each /28 are usable, including boundary addresses (e.g., .16 and .31 in a .16/28 range).
Step 3: Assign IPv4 Prefixes via AWS Console
- Navigate to the EC2 Console → Network Interfaces
- Search for the ENI ID from step 1
- Select the network interface and choose Actions → Manage IP addresses
- In the IPv4 Prefixes section, click Assign new IP prefix
- Enter your /28 CIDR blocks (e.g.,
172.16.1.16/28) - Add additional prefixes as needed for your on-premises endpoints
- Click Save
Step 4: Verify Prefix Assignment
You can verify the assigned prefixes in the EC2 console under the network interface details, or use AWS CLI:
aws ec2 describe-network-interfaces \
  --network-interface-ids $PRIVATE_ENI \
  --query 'NetworkInterfaces[0].Ipv4Prefixes[*].Ipv4Prefix' \
  --output table
Best Practices for IPv4 Prefix Management
- Plan Your Addressing
- Document which /28 ranges correspond to on-premises server groups
- Leave the first /28 (172.16.1.0/28) for AWS resources if needed
- Assign consecutive /28 blocks for easier management
- Scale Appropriately
- Choose instance type based on the number of on-premises endpoints
- Each /28 supports 16 on-premises servers
- Calculate:
Required_Prefixes = ceil(Total_OnPrem_Servers / 16)
- Production Best Practices
- Document your prefix allocations in a spreadsheet or configuration management system
- Map each prefix to specific on-premises server groups or VLANs
- Plan for growth by reserving additional prefix space
- Test with a small number of prefixes before scaling up
IPv4 Prefix vs Secondary IP Decision Guide
Use IPv4 Prefixes when:
- You have more than 50 on-premises endpoints
- You need to scale beyond secondary IP limits
- You want to allocate IPs in bulk by subnet ranges
- Your on-premises servers are logically grouped
Use Secondary IPs when:
- You have fewer than 50 on-premises endpoints
- You need precise control over individual IPs
- Your on-premises endpoints are scattered across the subnet
- You prefer simpler management for small deployments
Troubleshooting IPv4 Prefix Assignment
Common Issues:
- Prefix Limit Reached
# Check current prefix count aws ec2 describe-network-interfaces \ --network-interface-ids $PRIVATE_ENI \ --query 'length(NetworkInterfaces[0].Ipv4Prefixes[*])' # Compare with instance type limits aws ec2 describe-instance-types \ --instance-types c5n.large \ --query 'InstanceTypes[0].NetworkInfo.Ipv4PrefixesPerInterface' - Overlapping Prefixes
- Ensure /28 ranges don’t overlap
- Use a subnet calculator to plan allocations
- Verify against existing secondary IPs
- Subnet CIDR Conflicts
# Verify prefix is within subnet range
aws ec2 describe-subnets \
  --subnet-ids $(aws ec2 describe-network-interfaces \
    --network-interface-ids $PRIVATE_ENI \
    --query 'NetworkInterfaces[0].SubnetId' \
    --output text) \
  --query 'Subnets[0].CidrBlock'
Next Steps
Enhance your deployment with these recommendations:
1. High Availability
- Deploy a second Cisco 8000V instance in a different Availability Zone
- Configure BGP or OSPF for redundant routing
- Use multiple IPSec tunnels for path diversity
2. Monitoring and Logging
- VPC Flow Logs are enabled by default, delivering to a CloudWatch Logs group with 14-day retention
- Configure CloudWatch alarms for:
- EC2 instance health
- Network throughput
- Tunnel status
- Use AWS Systems Manager Session Manager for secure access
3. Security Enhancements
- Security groups include explicit egress rules and descriptions on all rules
- IPSec ports (UDP 500/4500) are restricted to the on-premises tunnel source IP
- IAM policy is scoped to specific CloudFormation read and SSM actions
- Consider implementing AWS WAF for application layer protection
- Consider enabling AWS GuardDuty for threat detection
- Consider using AWS Secrets Manager for credential management
4. Performance Optimization
- Upgrade to larger instance types for higher throughput (
c5n.2xlarge,c5n.4xlarge) - Enable Enhanced Networking (already enabled on c5n instances)
- Configure MTU optimization for tunnel overhead
- Implement QoS policies for traffic prioritization
5. Cost Optimization
- Use Reserved Instances or Savings Plans for predictable workloads
- Implement auto-scaling for variable workloads
- Review data transfer patterns and optimize accordingly
- Consider AWS Direct Connect for high-volume data transfer
6. Operational Excellence
- Document custom configurations
- Implement Infrastructure as Code with version control
- Create runbooks for common operational tasks
- Schedule regular backup and disaster recovery tests
er with LISP and IPSec support on-premises
Troubleshooting
IPSec Tunnel Issues
Tunnel not establishing:
- Symptom: IPSec SA shows
MM_WAIT_MSG2orMM_NO_STATE - Cause: Firewall blocking UDP 500/4500, or incorrect pre-shared key
- Resolution:
- Verify security group allows UDP 500 and 4500 from on-premises IP
- Confirm pre-shared key matches on both sides
- Check on-premises firewall rules
- Review IKE/IPSec policies match on both routers
Diagnostic commands:
show crypto isakmp sa
show crypto ipsec sa
debug crypto isakmp
debug crypto ipsec
OSPF Issues
Neighbors not forming:
- Verify IPSec tunnel is up first
- Check area IDs match
- Confirm network statements include tunnel interface
- Verify router IDs are unique
Diagnostic commands:
show ip ospf interface
show ip ospf neighbors detail
debug ip ospf adj
LISP Issues
Map-cache not populating:
- Symptom:
show ip lisp databaseempty or incomplete - Cause: LISP configuration mismatch or tunnel not established
- Resolution:
- Ensure IPSec tunnel is up first
- Verify LISP map-server/map-resolver IPs are correct
- Check LISP shared key matches
- Confirm EID prefix matches the extended subnet
- Clear map-cache and regenerate
Diagnostic commands:
show ip lisp map-cache
show ip lisp database
show lisp service ipv4 summary
debug lisp control-plane all
General Diagnostic Commands
show ip route
show interface summary
show interface tunnel0
show ip lisp map-cache
show ip lisp database
show crypto ipsec sa
show ip ospf neighbors
Understanding the Guidance
Layer 2 Extension Benefits
- IP Preservation: Applications maintain their IP addresses during migration
- Reduced Complexity: No DNS changes or application reconfiguration required
- Flexible Migration: Supports gradual, host-by-host migration
- Rollback Capability: Easy to move workloads back if needed
LISP Protocol Overview
LISP (Locator/ID Separation Protocol) separates endpoint identifiers from network locations:
- Endpoint Identifiers (EIDs): Host IP addresses in the extended subnet
- Routing Locators (RLOCs): Router tunnel interface addresses
- Map-Server/Map-Resolver: Provides EID-to-RLOC mapping services
When a host sends traffic to the extended network:
- The local router intercepts the traffic
- LISP looks up the destination EID in the map-cache
- Traffic is encapsulated and sent to the remote RLOC
- The remote router decapsulates and delivers to the destination
Maintenance and Operations
Monitoring
Regularly monitor:
- IPSec tunnel status and SA lifetimes
- OSPF neighbor stability
- LISP map-cache entries
- Interface statistics and errors
- Bandwidth utilization on tunnel interfaces
Adding New Hosts
To extend Layer 2 connectivity to additional hosts:
- Add secondary IP to the appropriate router interface
- Verify LISP registration via
show ip lisp map-cache - Test connectivity from both directions
- Document the added host in your network inventory
License Management
Ensure Cisco DNA licenses remain valid:
- Monitor license expiration dates
- Plan for license renewal
- Keep licenses backed up
Uninstall the Guidance
To avoid ongoing charges, delete the deployed AWS resources:
Option 1: Delete via CloudFormation Console
- Open the CloudFormation console
- Select your stack (e.g.,
lisp-cloud-extension) - Click Delete
- Confirm deletion
Option 2: Delete via AWS CLI
# Delete the stack
aws cloudformation delete-stack \
  --stack-name lisp-cloud-extension

# Wait for deletion to complete
aws cloudformation wait stack-delete-complete \
  --stack-name lisp-cloud-extension
Manual Cleanup Steps
If you added IPv4 prefixes or secondary IPs manually through the AWS console, remove them before deleting the stack:
- Navigate to the EC2 console → Network Interfaces
- Find the private network interface for the Cisco 8000V (use the
LispCloud8KvPrivateInterfaceIdoutput) - Select the network interface and choose Manage IP addresses
- Remove any IPv4 prefixes you added
- Remove any secondary private IP addresses you added
- Click Save
Then proceed with stack deletion.
Verify Cleanup
# Verify stack deletion
aws cloudformation describe-stacks \
  --stack-name lisp-cloud-extension

# Expected: Stack does not exist error
Verify Cleanup
# Verify stack deletion
aws cloudformation describe-stacks \
  --stack-name lisp-cloud-extension

# Expected: Stack does not exist error
FAQ, known issues, additional considerations, and limitations
Known Issues
Issue 1: Tunnel Not Establishing
- Symptom: IPSec SA shows
MM_WAIT_MSG2orMM_NO_STATE - Cause: Firewall blocking UDP 500/4500, or incorrect pre-shared key
- Resolution:
- Verify security group allows UDP 500 and 4500 from on-premises IP
- Confirm pre-shared key matches on both sides
- Check on-premises firewall rules
Issue 2: LISP Database Not Populating
- Symptom:
show ip lisp databaseempty or incomplete - Cause: LISP configuration mismatch or tunnel not established
- Resolution:
- Ensure IPSec tunnel is up first
- Verify LISP map-server/map-resolver IPs are correct
- Check LISP shared key matches
Issue 3: Maximum Secondary IPs Reached
- Symptom: Cannot add more secondary IPs to the private network interface
- Cause: Hit ENI secondary IP limit (~50 for most instance types)
- Resolution: Use IPv4 prefixes instead - they provide better scalability (up to 464 IPs on
c5n.4xlarge)
Additional Considerations
Billing Considerations:
- Cisco 8000V instances run 24/7 and incur continuous charges
- Data transfer out to Internet incurs charges ($0.09/GB in us-east-1)
- NAT Gateway charges are per hour and per GB processed
- Elastic IPs are free when attached to running instances
Performance Considerations:
- IPSec encryption adds CPU overhead - monitor instance CPU utilization
- MTU should be reduced for tunnel overhead (1400 bytes recommended)
- c5n instance types provide enhanced networking and up to 100 Gbps network performance
- Each /28 IPv4 prefix provides 16 usable IP addresses for on-premises endpoint connectivity
Security Considerations:
- This guidance creates public IP addresses for 8000V management
- IPSec tunnels are encrypted but validate pre-shared key security
- Management access (SSH, HTTP, HTTPS, ICMP) is restricted to the participant IP address
- IPSec ports (UDP 500/4500) are restricted to the on-premises tunnel destination IP
- All security groups define explicit egress rules; the app server egress is limited to HTTP/HTTPS/ICMP
- VPC Flow Logs are enabled for network traffic visibility and auditing
- Source/Destination Check is disabled on both Cisco 8000V network interfaces — this is required for the router to forward traffic not addressed to itself (standard for virtual router appliances on AWS)
- Regularly update Cisco IOS-XE software for security patches
Limitations
- Maximum Endpoints per 8000V Instance: Limited by ENI IP capacity:
- ~50 endpoints with secondary IPs only
- Up to 464 endpoints with IPv4 prefixes (
c5n.4xlarge)
- Supported Instance Types: Tested with c5, c5n, and c6in instance families (t3.medium also permitted for minimal testing)
- IPv6: This Guidance focuses on IPv4; IPv6 support requires additional LISP configuration
- Multicast: LISP-based L2E has limited multicast support (some multicast may not work)
- Broadcast: Broadcast traffic is not forwarded across LISP tunnels by design
- Tunnel Overlay Subnet: The IPSec tunnel interface uses
12.0.0.0/24(cloud:12.0.0.2, on-prem:12.0.0.1). This address range is only used inside the encrypted tunnel and is not advertised externally, but avoid using this range elsewhere in your routing if possible. This is not configurable via CloudFormation parameters. - LISP Loopback Addresses: The default loopback IPs (
33.33.33.33and11.11.11.11) are used as LISP routing locators (RLOCs) and are only reachable over the IPSec tunnel — they are not routed on the public internet. - On-Premises Requirement: Requires compatible Cisco rout
Additional Resources
- Cisco Catalyst 8000V Documentation
- Cisco Catalyst 8000V Installation Guide for VMware
- LISP Configuration Guide
- AWS VPC Documentation
- AWS CloudFormation User Guide
- Cisco DNA Licensing
Additional Considerations
Billing Considerations:
- Cisco 8000V instances run 24/7 and incur continuous charges
- Data transfer out to Internet incurs charges ($0.09/GB in us-east-1)
- NAT Gateway charges are per hour and per GB processed
- Elastic IPs are free when attached to running instances
Performance Considerations:
- IPSec encryption adds CPU overhead - monitor instance CPU utilization
- MTU should be reduced for tunnel overhead (1400 bytes recommended)
- c5n instance types provide enhanced networking and up to 100 Gbps network performance
- Each /28 IPv4 prefix provides 16 usable IP addresses for on-premises endpoint connectivity
Limitations
- Maximum Endpoints per Cisco 8000V Instance: Limited by ENI IP capacity:
- ~50 endpoints with secondary IPs only
- Up to 464 endpoints with IPv4 prefixes (c5n.4xlarge)
- Supported Instance Types: Cisco 8000V requires compute-optimized instances (c5/c5n/c6in family)
- IPv6: This Guidance focuses on IPv4; IPv6 support requires additional LISP configuration
- Multicast: LISP-based L2E has limited multicast support (some multicast may not work)
- Broadcast: Broadcast traffic is not forwarded across LISP tunnels by design
- On-Premises Requirement: Requires compatible Cisco router with LISP and IPSec support on-premises
Authors
- Josh Leatham - Sr. Partner Solutions Architect, AWS
- Craig Herring - Sr. Specialist SA, AWS
- Daniel Zilberman - Sr. Specialist SA, AWS
Notices
Customers are responsible for making their own independent assessment of the information in this document. This document: (a) is for informational purposes only, (b) represents AWS current product offerings and practices, which are subject to change without notice, and (c) does not create any commitments or assurances from AWS and its affiliates, suppliers or licensors. AWS products or services are provided “as is” without warranties, representations, or conditions of any kind, whether express or implied…