Guidance for Edit in the Cloud on AWS
Summary: Build a virtual video editing environment using Edit in the Cloud on AWS.
Overview
Edit in the Cloud on AWS helps you, the content creator, to build a virtual, video editing environment in the Amazon Web Services (AWS) Cloud. This allows you to reach your editors and creative professionals where they reside and scale up and down elastically. There is no upfront cost for high-priced GPU workstations. And the guidance saves you costs associated with transferring large assets to collaborators or shipping unencrypted drives using couriers.
The guidance provides the following features:
An edit host that runs your favorite video editing software for news, sports, promotional, or post-production work.
A shared pool of high-performance network storage so that you can collaborate with other users on projects.
A remote streaming application so that you can access your workstation remotely and securely without having to transfer content to on-premises.
This implementation guide provides an overview of the Edit in the Cloud guidance, its reference architecture and components, considerations for planning the deployment, configuration steps for deploying the guidance to the AWS Cloud.
The guide is intended for DevOps teams who have practical experience architecting in the AWS Cloud.
Use this navigation table to quickly find answers to these questions:
| If you want to . . . | Read . . . |
|---|---|
| Know the cost for running this guidance. The estimated cost for running this guidance in the US East (N. Virginia) Region is USD $1,323.04 per month. | Cost |
| Understand the security considerations | Security |
| Know how to plan for quotas for this guidance. | Quotas |
| Know which AWS Regions support this guidance. | Supported AWS Regions |
| View or download the AWS CloudFormation template included in this guidance to automatically deploy the infrastructure resources (the “stack”) for this guidance. | AWS CloudFormation template |
Features and benefits
The guidance provides the following features:
Cost savings
There is no upfront cost for high-priced GPU workstations on AWS.
Works with your favorite software
This guidance has been tested with industry standard editing and graphics software to provide reliability and flexibility.
Scales to the number of collaborators
This guidance uses shared network storage, which is accessible across multi-pool editors, creating a collaboration system without the need for additional software.
Provides two remote display protocol options
This guidance is integrated with Teradici Cloud Access software, which uses the PC-over-IP(PCoIP) protocol. Alternatively, you can choose Amazon DCV for remote desktop and application streaming.
Simplifies the video editing process
AWS CloudFormation automates the deployment of GPU drivers, Teradici or NICE DCV, and shared storage. Simply load your favorite post-production applications and plugins, then upload media to begin working on your project.
Integration with AWS Service Catalog AppRegistry and AWS Systems Manager Application Manager
This guidance includes a Service Catalog AppRegistry resource to register the guidance CloudFormation template and its underlying resources as an application in both AWS Service Catalog AppRegistry and AWS Systems Manager Application Manager. With this integration, you can centrally manage the guidance resources.
Use cases
Post production
Studios and content creators must have scalable solutions to onboard editors and artists for visual effects and animation. A smooth onboarding process helps editors and artists increase output, meet deadlines, manage production costs, and satisfy requirements for localized tax credits. With Edit in the Cloud on AWS, you pay only for what you use, even as you scale services up and down to meet production schedules.
Concepts and definitions
This section describes key concepts and defines terminology specific to this guidance:
Video editing
The manipulation and arrangement of video shots. Video editing is used to structure and present all video information, including films and television shows, video advertisements and video essays.
Remote desktop protocol
A secure network communication protocol that provides a user with a graphical interface to connect to another computer over a network connection.
Network storage
Network-attached storage is a file-level computer data storage server connected to a computer network providing data access to a heterogeneous group of clients.
For a general reference of AWS terms, see the AWS glossary in the AWS General Reference.
Architecture overview
This section provides a reference implementation architecture diagram for the components deployed with this guidance.
Architecture steps
Deploying this guidance with the default parameters deploys the following components in your AWS account.
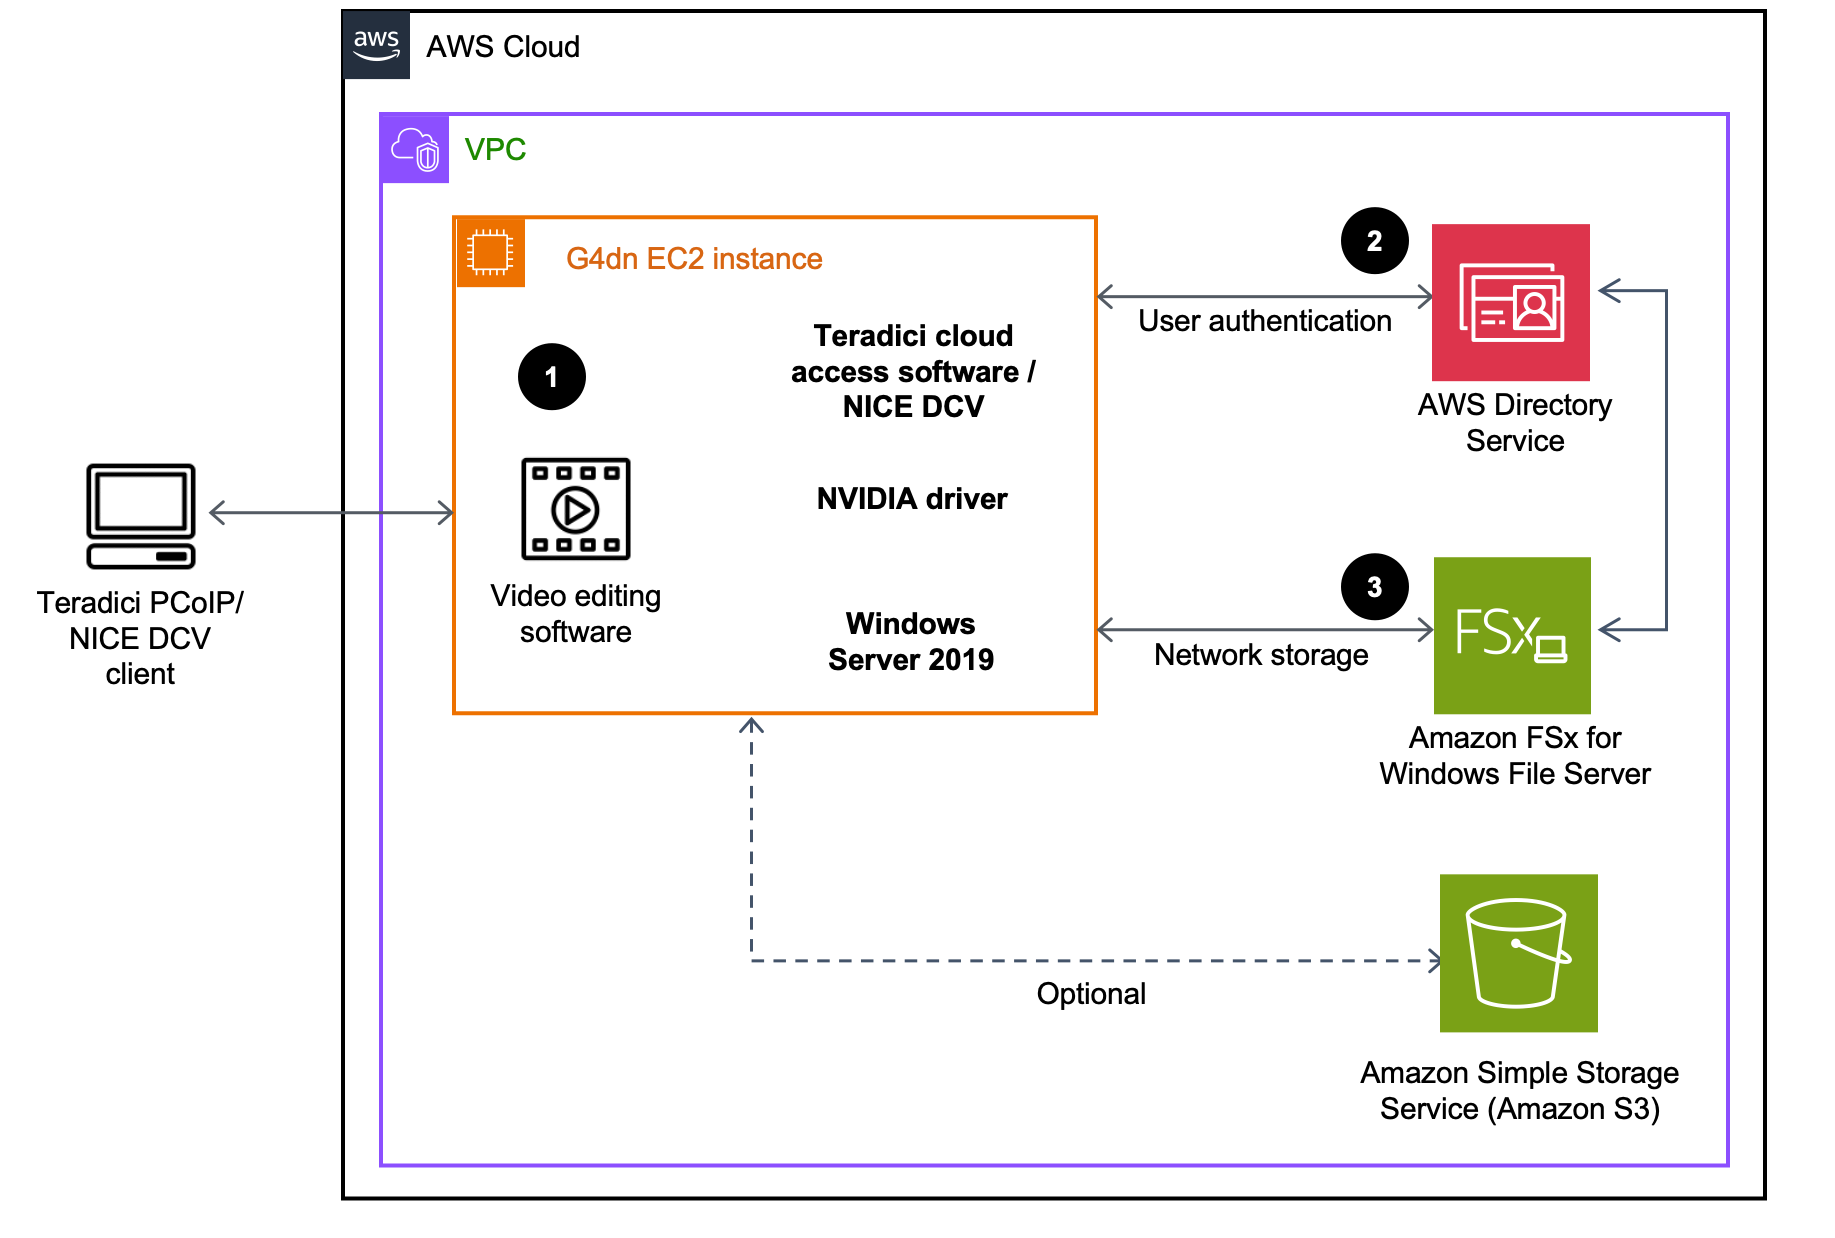
Figure 1: Edit in the Cloud on AWS architecture
The high-level process flow for the guidance components deployed with the AWS CloudFormation template is as follows:
An Amazon Elastic Compute Cloud (Amazon EC2) instance for Windows Server 2019 with Teradici Cloud Access Software or NICE DCV and NVIDIA T4 GPU drivers for running your Non-Linear Editor (NLE) software of choice. During deployment, the guidance gives you the option to install either Teradici’s Cloud Access Software, or NICE DCV. Users can then access the cloud workstation using either Teradici’s PC-over-IP (PCoIP) client or the NICE DCV client, accordingly.
AWS Directory Service for user authentication.
Amazon FSx for Windows File Server to access digital assets via the Amazon EC2 instance through your editor of choice. FSx for Windows File Server will auto-mount the network share upon startup of the Windows Amazon EC2 instance. FSx for Windows File Server will be used for storing your media assets to be used by your non-linear editor (NLE).
This guidance does not deploy an Amazon S3 bucket with associated IAM roles for access. However, it allows you to configure your own S3 bucket for media file storage.
AWS Well-Architected design considerations
This guidance uses the best practices from the AWS Well-Architected Framework, which helps customers design and operate reliable, secure, efficient, and cost-effective workloads in the cloud.
This section describes how the design principles and best practices of the Well-Architected Framework benefit this guidance.
Operational excellence
This section describes how we architected this guidance using the principles and best practices of the operational excellence pillar.
Edit in the Cloud on AWS tracks all assets through AWS CloudTrail, logs from Amazon EC2, FSx for Windows File Server, and Directory Service to provide observability into the infrastructure and guidance components.
Security
This section describes how we architected this guidance using the principles and best practices of the security pillar.
This guidance uses Directory Service for user administration and authentication. Amazon FSx works with Microsoft Active Directory to integrate with your existing Microsoft Windows environments. Active Directory is the Microsoft directory service used to store information about objects on the network and make this information easy for administrators and users to find and use. These objects typically include shared resources such as file servers, network users, and computer accounts.
AWS Identity and Access Management (IAM) roles allow customers to assign granular access policies and permissions to services and users on the AWS Cloud. This guidance creates a role attached to the EC2 instance with least privilege, allowing access to specific Amazon S3 buckets (when applicable).
The security groups created in this guidance are designed to control and isolate network traffic between specified public IP ranges and the edit host instance. Security groups are also used to control access to Amazon FSx from the edit host. Microsoft Active Directory and Amazon FSx access is also controlled via security group access. For more information, refer to Using Amazon FSx with AWS Directory Service for Microsoft Active Directory.
Reliability
This section describes how we architected this guidance using the principles and best practices of the reliability pillar.
The guidance uses FSx for Windows File Server, which sets up and provisions file servers and storage volumes, replicates data, manages failover and failback, and eliminates much of the administrative overhead.
Performance efficiency
This section describes how we architected this guidance using the principles and best practices of the performance efficiency pillar.
This guidance uses the Amazon EC2 G4dn instance which provides high performance and is cost effective for graphics applications that are optimized for NVIDIA GPUs. G4dn instances have up to 1.8X better graphics performance and up to 2X video transcoding capability over the previous generation G3 instances.
This guidance is automatically tested and reviewed by architects and subject matter experts for areas to experiment and improve.
Cost optimization
This section describes how we architected this guidance using the principles and best practices of the cost optimization pillar.
The cost for running Edit in the Cloud on AWS varies based on a number of factors, including how long you keep your EC2 running, how much data you transfer into AWS, and other service costs associated with this guidance. For example, this guidance does not deploy an Amazon S3 bucket; however, it allows you to configure your own Amazon S3 bucket for media file storage.
Customers can measure the efficiency of the workloads, and the costs associated with delivery, by using Application Manager.
Sustainability
This section describes how we architected this guidance using the principles and best practices of the sustainability pillar.
Video editors, loggers, graphic designers, colorists, and other post-production team members work on cloud-based virtual computers instead of dedicated systems at their desk. This reduces editor travel, provides the right-size computer to meet project requirements, and reduces idle resources and need for temporary transfer storage devices.
Architecture details
This section describes the components and AWS services that make up this guidance and the architecture details on how these components work together.
Amazon EC2
The Amazon EC2 G4 GPU instance family used in this guidance provides the latest generation NVIDIA T4 Tensor Core GPU, AWS custom Intel Cascade Lake CPUs, up to 100 Gbps of networking throughput, and up to 1.8 TB of local non-volatile memory express (NVMe) storage. These instances are well-suited for streaming graphics-intensive applications that rely on NVIDIA GPU libraries such as CUDA.
Teradici
Using Teradici’s PC-over-IP (PCoIP) technology, you can modify content by connecting to a remote workstation, instead of transferring large files to a local machine. The Teradici client runs on your desktop or laptop and gives access to an EC2 G4dn instance.
We also recommend that you familiarize yourself with Cloud Access Software from Teradici that runs on the EC2 instance and serves up the PCoIP protocol.
NICE DCV
With NICE DCV and Amazon EC2, customers can run graphics-intensive applications remotely on EC2 instances, and stream their user interface to simple client machines, eliminating the need for expensive dedicated workstations. The NICE DCV client runs on your desktop or laptop and gives access to an EC2 G4dn instance.
We also recommend that you familiarize yourself with the NICE DCV server software that runs on the EC2 instance and serves the DCV protocol. For additional information, refer to What is NICE DCV? in the NICE DCV Administrator Guide.
Amazon FSx for Windows File Server
FSx for Windows File Server provides fully managed, highly reliable, and scalable file storage that is accessible over the industry-standard Server Message Block (SMB) protocol. It delivers a wide range of administrative features such as user quotas, end-user file restore, and Microsoft Active Directory integration. It also offers single-AZ and multi-AZ deployment options, fully managed backups, and encryption of data at rest and in transit.
AWS services in this guidance
| AWS service | Description |
|---|---|
| Amazon EC2 | Core. It provides the G4dn instance for Windows Server 2019 with Teradici Cloud Access Software or NICE DCV, and NVIDIA T4 GPU drivers, for running your Non-Linear Editor(NLE) software of choice. |
| Amazon FSx for Windows File Server | Core. It provides the file system to access digital media assets via the Amazon EC2 instance through your NLE editor of choice. FSx for Windows File Server will auto-mount the network share upon startup of the Windows Amazon EC2 instance. |
| AWS Directory Service | Core. It provides managed active directory for user authentication. |
| Amazon S3 | Optional. It provides an optional S3 bucket for additional media file storage. |
| NICE DCV | Optional. It provides the remote display protocol to configure on the EC2 instance for remote access. The NICE DCV client runs on your desktop or laptop and gives access to the EC2 G4dn instance. |
Plan your deployment
This section describes the cost, security, quotas, and other considerations prior to deploying the guidance.
Cost
You are responsible for the cost of the AWS services used while running this guidance. The total cost will depend on your activity. This depends on how long you keep your EC2 running, how much data you transfer into AWS, and other service costs that are associated with this guidance. For example, this guidance does not deploy an Amazon S3 bucket; however, it allows you to configure your own S3 bucket for media file storage.
The default EC2 this guidance deploys is a g4dn.4xlarge EC2 instance for running Windows. As of this revision, the cost for running this guidance with the default settings in the US East (N. Virginia) Region is $1,323.04 per month. This includes estimated charges for FSx for Windows File Server and Directory Service. To reduce cost, consider turning off your Windows EC2 instance when not in use.
See the pricing webpage for each AWS service used in this guidance.
We recommend creating a budget through AWS Cost Explorer to help manage costs. Prices are subject to change. For full details, see the pricing webpage for each AWS service used in this guidance.
Sample cost table
The following table provides a sample cost breakdown for deploying this guidance with the default parameters in the US East (N. Virginia) Region for one month.
| AWS service | Dimensions | Cost [USD] |
|---|---|---|
| AWS Directory Service | Base price: Standard x 730 hours (entire month) | $87.60 |
| Amazon EC2 | On-Demand pricing: G4dn.4xlarge x 160 hours (work hours only) | $192.64 |
| Outbound data transfer: 10 Mbps x 160 hours (work hours only) (4.5 GB x 160 hours) | $64.80 | |
| Amazon FSx for Windows File Server | Storage: 5 TB x $0.130 | $650.00 |
| Throughput: 16 MBps x $4.50/MBps | $72.00 | |
| Backup: 5 TB x $0.050/GB | $256.00 | |
| Total | $1,323.04 [USD/month] |
Security
When you build systems on AWS infrastructure, security responsibilities are shared between you and AWS. This shared responsibility model reduces your operational burden because AWS operates, manages, and controls the components including the host operating system, the virtualization layer, and the physical security of the facilities in which the services operate. For more information about AWS security, visit AWS Cloud Security.
AWS Directory Service
This guidance uses Directory Service for user administration and authentication. Amazon FSx works with Microsoft Active Directory to integrate with your existing Microsoft Windows environments. Active Directory is the Microsoft directory service used to store information about objects on the network and make this information easy for administrators and users to find and use. These objects typically include shared resources such as file servers and network user and computer accounts.
IAM roles
AWS Identity and Access Management (IAM) roles allow customers to assign granular access policies and permissions to services and users on the AWS Cloud. This guidance creates a role attached to the EC2 instance with least privilege, allowing access to specific S3 buckets (when applicable).
Security groups
The guidance creates security groups designed to control and isolate network traffic between specified public IP ranges and the edit host instance. Security groups are also used to control access to Amazon FSx from the edit host. Microsoft Active Directory and Amazon FSx access is also controlled via security group access. For more information, refer to Using Amazon FSx with AWS Directory Service for Microsoft Active Directory.
Supported AWS Regions
This guidance uses AWS Directory Service, Amazon EC2, and FSx for Windows File Server which are available in all AWS Regions. For the most current availability of AWS services by Region, see the AWS Regional Services List.
Quotas
Service quotas, also referred to as limits, are the maximum number of service resources or operations for your AWS account. Before deploying the guidance, you must request a vCPU limit increase based on the G4dn instance size you want to run. For details about submitting a limit increase, see How do I calculate an EC2 vCPU limit increase request for my On-Demand Instance?
Quotas for AWS services in this guidance
Make sure you have sufficient quota for each of the services implemented in this guidance. For more information, refer tp AWS service quotas.
Use the following links to go to the page for that service. To view the service quotas for all AWS services in the documentation without switching pages, view the information in the Service endpoints and quotas page in the PDF instead.
Deploy the guidance
This guidance uses AWS CloudFormation templates and stacks to automate its deployment. The CloudFormation template(s) specifies(y) the AWS resources included in this guidance and their properties. The CloudFormation stack provisions the resources that are described in the template(s).
Deployment process overview
Follow the step-by-step instructions in this section to configure and deploy the guidance into your account.
Before you launch the guidance, review the cost, architecture, network security, and other considerations discussed earlier in this guide.
Time to deploy: Approximately one hour
Launch the AWS CloudFormation template into your AWS account.
Enter values for required parameters.
Review the template parameters, and adjust if necessary.
Step 2. (Optional) Add Teradici license to the EC2 instance
If you have chosen to deploy the instance using Teradici’s Cloud Access Software, you must obtain a license for this software from Teradici. To apply for the license, follow these high-level steps:
Obtain the EC2 IP address.
Activate the Teradici license.
- Use Windows PowerShell terminal to mount the NVMe disk.
Step 4. (Optional) Load data from Amazon S3
- Use Windows PowerShell terminal to load data from Amazon S3.
This guidance includes an option to send anonymized operational metrics to AWS. We use this data to better understand how customers use this guidance and related services and products. AWS owns the data gathered though this survey. Data collection is subject to the AWS Privacy Policy.
To opt out of this feature, download the template, modify the AWS CloudFormation mapping section, and then use the AWS CloudFormation console to upload your updated template and deploy the guidance. For more information, see the Anonymized data collection section of this guide.
AWS CloudFormation template
You can download the CloudFormation template for this guidance before deploying it.
Edit-in-the-cloud-on-aws.template - Download this template to launch the guidance and all associated components. The default configuration deploys the core and supporting services found in the AWS services in this guidance section. You can customize the template based on your specific needs.
If you have previously deployed this guidance, see Update the guidance for update instructions.
Step 1: Launch the stack
Follow the step-by-step instructions in this section to configure and deploy the guidance into your account.
Time to deploy: Approximately one hour
Sign in to the AWS Management Console and select Launch solution to launch the aws-edit-in-the-cloud AWS CloudFormation template.
The template launches in the US East (N. Virginia) Region by default. To launch the guidance in a different AWS Region, use the Region selector in the console navigation bar.
On the Create stack page, verify that the correct template URL is in the Amazon S3 URL text box and choose Next.
On the Specify stack details page, assign a name to your guidance stack. For information about naming character limitations, see IAM and AWS STS quotas in the AWS Identity and Access Management User Guide.
Under Parameters, review the parameters for this guidance template and modify them as necessary. This guidance uses the following default values.
| Parameter | Default | Description |
|---|---|---|
| Network Configuration | ||
| Availability Zones | Requires input | Select two Availability Zones to use for the VPC subnets. The template presents all Availability Zones available, select two. |
| VPC CIDR | 10.0.0.0/16 | CIDR block for the VPC that contains the Windows EC2 instance. |
| Private Subnet 1 CIDR | 10.0.0.0/19 | CIDR block for private subnet 1 located in Availability Zone 1. |
| Private Subnet 2 CIDR | 10.0.32.0/19 | CIDR block for private subnet 2 located in Availability Zone 2. |
| Public Subnet 1 CIDR | 10.0.128.0/20 | CIDR block for the public DMZ subnet 1 located in Availability Zone 1. |
| Public Subnet 2 CIDR | 10.0.144.0/20 | CIDR block for the public DMZ subnet 2 located in Availability Zone 2. |
| Amazon EC2 Configuration | ||
| Amazon EC2 instance type for the video editing server | g4dn.4xlarge | The Amazon EC2 instance type for the video editing servers. You can change the size of the EC2 instance that you can use for editing; however, the majority of the price is based on the size of the EC2 instance that you select here. Check the Cost section for more information. |
| Edit Host Access CIDR | Requires input | The CIDR block that is used for the security group on your Amazon EC2 instance editing host. Use a website such as https://checkip.amazonaws.com to determine your public facing IP address for this step. |
| Key Pair Name | Requires input | The PEM key that allows you to securely connect to your EC2 instance after it launches. You can create a PEM key in the Amazon EC2 console. |
| Remote Display Protocol | nicedcv | The remote display protocol to access. Select either teradici or nicedcv. |
| Teradici Download Token | <Required if choosing Remote Display Protocol> | Refer to the implementation (Optional) Add Teradici as Teradici license to the EC2 instance for additional steps. Download Token for Teradici Graphics Agent for Windows installer. Copy this 16-character token, located immediately after ‘https://dl.teradici.com/’ in the download URLs. These are provided within the “Download using a script" section of https://docs.teradici.com/find/product/cloud-access-software, after signing in and agreeing to the EULA. |
| Microsoft Active Directory Configuration | ||
| Domain DNS Name | example.com | Fully qualified domain name (FQDN) of the forest root domain. |
| Domain NetBIOS Name | Example | NetBIOS name of the domain (up to 15 characters) for users of earlier versions of Windows. |
| Domain Admin User | Admin | User name for the account that will be added as Domain Administrator. This is separate from the default Administrator account. |
| Domain Admin Password | Requires input | Password for the Domain Administrator user. Must be at least 8 characters containing letters, numbers, and symbols. |
| Standard or Enterprise | Standard | AWS Directory Service edition. Select Standard or Enterprise from the dropdown. |
| FSx Configuration | ||
| FSx File System Size | 1024 | The storage capacity of the file system being created. 32 GiB - 65,536 GiB (64 TiB) |
| FSx Throughput | 16 | The throughput capacity of an Amazon FSx file system, measured in megabytes per second in powers of 2 (8, 16, 32, .., 1024), with the recommended value based on the file system size: 8 for <800 GiB, 16 for <1,600 GiB,… 512 for <51,200 GiB, 1,024 for >=51,200 GiB |
| FSx AZ Deployment Mode | SINGLE_AZ_2 | Specifies the file system deployment type. |
| Other Parameters | ||
| Project | edit-in-the-cloud-on-aws | Used for billing and resource groups. |
Choose Next.
On the Configure stack options page, choose Next.
On the Review page, review and confirm the settings. Check the box acknowledging that the template will create AWS Identity and Access Management (IAM) resources.
Choose Create stack to deploy the stack.
You can view the status of the stack in the AWS CloudFormation console in the Status column. You should receive a CREATE_COMPLETE status in approximately one hour.
This guidance includes the custom-resource AWS Lambda function, which runs only during initial configuration or when resources are updated or deleted. Do not delete this function because it is necessary to manage associated resources.
Step 2. (Optional) Add Teradici license to the EC2 instance
If you have chosen to deploy your instance with NICE DCV as the Remote Desktop Protocol, skip this step and move to Step 3. Mount the NVMe disk.
If you have chosen to deploy your instance with Teradici Cloud Access Software, you must purchase a software license from Teradici and install it on the instance after deployment.
After the stack deploys, use Windows Remote Desktop to add a Teradici license to the EC2 instance. First, obtain the public IP address of the EC2 edit host.
To download the Teradici CAS Graphics Agent for Windows, Teradici provides you with a unique download token. This guidance uses this token as a parameter of the CloudFormation template.
To obtain the download token from Teradici:
Open https://docs.teradici.com/find/product/cloud-access-software
Select the download link for the Teradici Graphics Agent for Windows.
You will be prompted to sign in (if not already signed in).
After signing in, select the Downloads and scripts link.
A EULA will prompt. After reviewing and agreeing to the EULA, select the Download using a script link.
Example download commands using cURL will display. Each sample command contains a download URL that contains a 16-character token that immediately follows "https://dl.teradici.com/".
For example, in the URLhttps://dl.teradici.com/1234567890abcdef/pcoip-agent/,1234567890abcdefis the token.Copy this token; it is unique to your Teradici login.
Paste this token in the TeradiciDownloadToken parameter required by the CloudFormation template.
NICE DCV installation notes
You do not need a license server to install and use NICE DCV on an EC2 instance. This guidance sets up the necessary access to a specific Amazon S3 bucket, which is used to obtain a license for NICE DCV when running on EC2.
NICE DCV clients for Windows, MacOS and Linux can be downloaded from the download page.
Obtain the EC2 IP address
Navigate to the Amazon Elastic Compute Cloud console.
In the navigation pane, choose Instances.
Select the
win-hostEC2 instance.On the Networking tab, copy the value for Public IPv4 address.
Windows connection steps
Open Remote Desktop. If you can’t find it, choose Start, enter MSTSC, and press Enter.
When prompted, enter the IP address of the edit host and choose Connect.
When prompted, enter the sign-in credentials. The username is the value that you entered for the Domain Admin User parameter (
Adminby default). The password is the value that you entered for the Domain Admin Password parameter when launching the stack.
MacOS connection steps
If you use MacOS, you must download the Microsoft Remote Desktop Client from the App Store.
Open Microsoft Remote Desktop.
Select the + icon, then select Add PC.
For PC Name, enter the IP address of the edit host. You can specify a friendly name for easy reference, such as Edit Host.
Choose Add.
When the new PC appears in your connection options, select it to connect to the EC2 instance.
When prompted, enter the sign-in credentials. The username is the value that you entered for the Domain Admin User parameter (Admin by default). The password is the value that you entered for the Domain Admin Password parameter when launching the stack.
Activate the Teradici license
In order to use Teradici, you must purchase a license first.
- Select the Teradici icon (refer to Teradici icon figure), and choose Licensing:
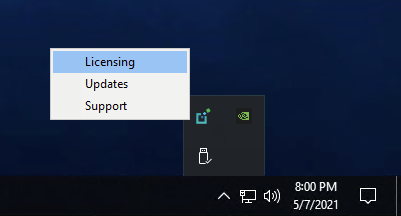
- In the PCoIP Control Panel box, enter your registration code, and choose Register.
Connect to the edit host
After activating your Teradici license, connect to the edit host using a Teradici PCoIP Client.
On the connection screen, enter in the IP address of your edit host and a connection name for future reference.
When prompted for a sign-in credentials, use the same credentials you used earlier to connect to the instance using Windows Remote Desktop.
You are now connected to your edit host using Teradici.
Step 3. Mount the NVMe disk
In this deployment, we will mount ephemeral storage to the edit host for a scratch media edit space. Ephemeral storage provides low-latency to the host as it is physically attached storage.
Any assets stored on this volume will be lost upon edit host reboot or termination. We recommend saving all project assets to the FSx file share.
- Open Windows PowerShell terminal:
a. Choose Start.
b. Enter “powershell” in the Search bar.
c. Right click the Windows PowerShell icon and choose Run as Administrator.
d. If prompted with an alert to allow Windows PowerShell to make changes on your device, select Yes.
- In the Windows PowerShell terminal, enter the following PowerShell command to change to the correct directory:
cd C:\\ProgramData\\Amazon\\EC2-Windows\\Launch\\Scripts
- Enter the following PowerShell command to mount the NVMe disk:
.\\InitializeDisks.ps1
The FSx file share mounts to the F drive upon user sign in.
Step 4. (Optional) Load data from Amazon S3
Follow these steps to move your media assets from Amazon S3 to FSx for Windows File Server.
Choose Start.
Enter “powershell” in the Search bar.
Select Windows PowerShell for AWS.
Change to the FSx File Share drive mapping:
F:
- Create a new directory for media:
mkdir Media
- Use the following command to list the contents of your S3 bucket:
aws s3 ls s3://\<bucket-name\>
- Use the following command to load the data from your S3 Bucket into the FSx File Share:
aws s3 sync s3://\<bucket-name\>/*\<key-prefix\>* .\\Media\\
key-prefix is any folder or object you want to load into the file share.
To verify that your files were synchronized from S3 to the FSx file share:
Navigate to your Windows File Explorer, then to your FSx File Share, which is mounted to the F: Drive.
From your file share, verify that the Media folder is there.
Open the Media folder and check that the contents of your S3 Bucket have synchronized.
Monitoring the guidance with AWS Service Catalog AppRegistry
Edit in the Cloud on AWS includes a Service Catalog AppRegistry resource to register the CloudFormation template and underlying resources as an application in both AWS Service Catalog AppRegistry and AWS Systems Manager Application Manager.
AWS Systems Manager Application Manager gives you an application-level view into this guidance and its resources so that you can:
Monitor its resources, costs for the deployed resources across stacks and AWS accounts, and logs associated with this guidance from a central location.
View operations data for the resources of this guidance in the context of an application. For example, deployment status, CloudWatch alarms, resource configurations, and operational issues.
The following figure depicts an example of the application view for the Edit in the Cloud on AWS stack in Application Manager:
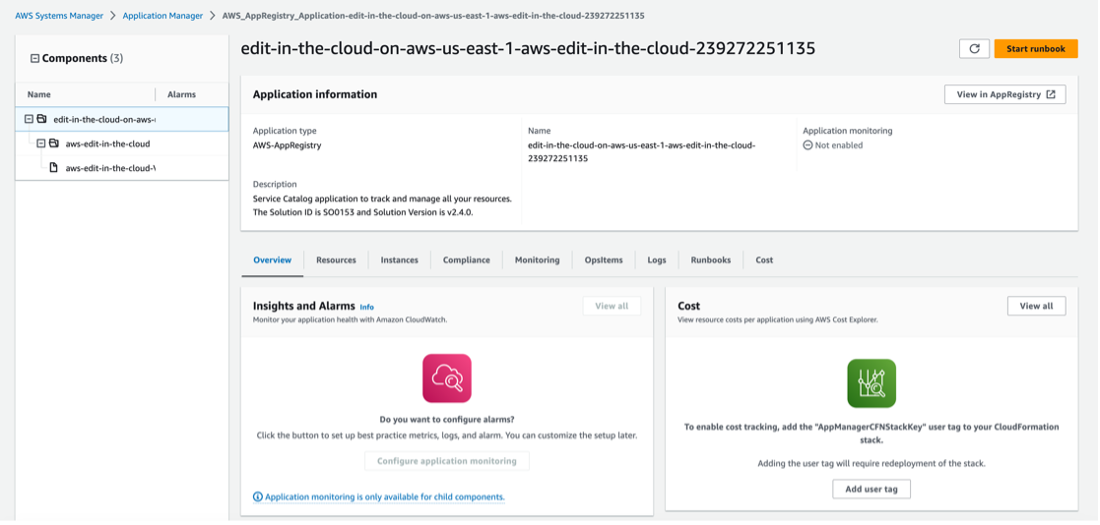
Figure 3: Edit in the Cloud on AWS stack in Application Manager
You must activate CloudWatch Application Insights, AWS Cost Explorer, and cost allocation tags associated with this guidance. They are not activated by default.
Activate CloudWatch Application Insights
Sign in to the Systems Manager console.
In the navigation pane, choose Application Manager.
In Applications, choose AppRegistry applications.
In AppRegistry applications, search for the application name for this guidance and select it.
The next time you open Application Manager, you can find the new application for your guidance in the AppRegistry application category.
In the Components tree, choose the application stack you want to activate.
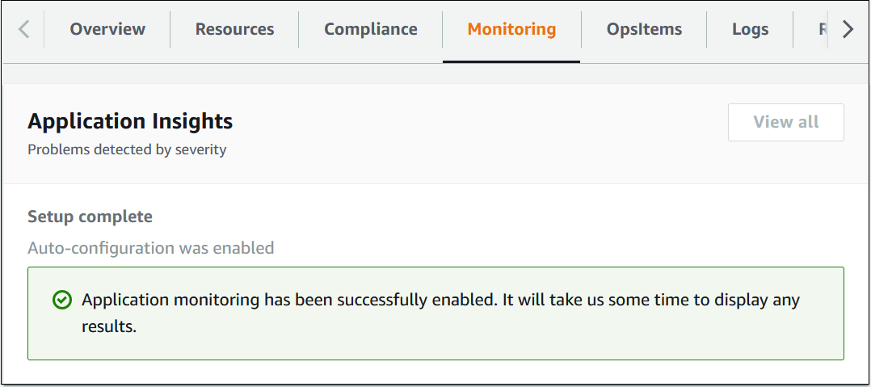
In the Monitoring tab, in Application Insights, select Auto-configure Application Monitoring:
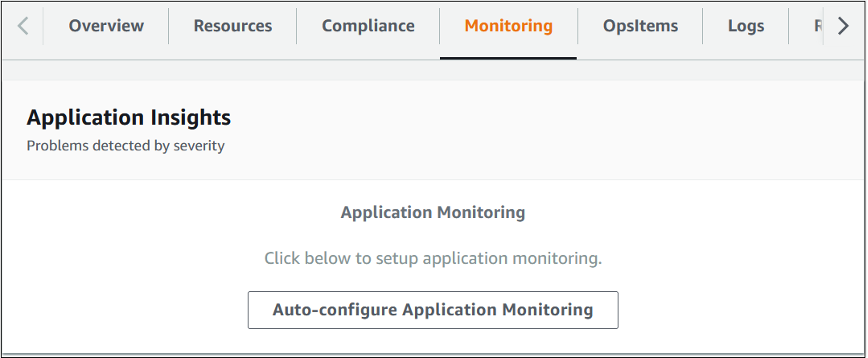
Monitoring for your applications is now activated and the following status box appears:
Activate AWS Cost Explorer
You can see the overview of the costs associated with the application and application components within the Application Manager console through integration with AWS Cost Explorer which must be first activated. Cost Explorer helps you manage costs by providing a view of your AWS resource costs and usage over time. To activate Cost Explorer for this guidance:
Sign in to the AWS Cost Management console.
In the navigation pane, select Cost Explorer.
On the Welcome to Cost Explorer page, choose Launch Cost Explorer.
The activation process can take up to 24 hours to complete. Once activated, you can open the Cost Explorer user interface to further analyze cost data for the guidance.
Activate cost allocation tags associated with the guidance
After you activate Cost Explorer, you must activate the cost allocation tags associated with this guidance to see the costs for this guidance. The cost allocation tags can only be activated from the management account for the organization. To activate cost allocation tags:
Sign in to the AWS Billing and Cost Management console.
In the navigation pane, select Cost Allocation Tags.
On the Cost allocation tags page, filter for the
AppManagerCFNStackKeytag, then select the tag from the results shown.Choose Activate.
The activation process can take up to 24 hours to complete and the tag data to appear.
Update the guidance
If you have previously deployed the guidance, follow this procedure to update the guidance’s CloudFormation stack to get the latest version of this guidance’s framework.
Sign in to the AWS CloudFormation console, select your existing Edit in the Cloud on AWS CloudFormation stack, and select Update.
Select Replace current template.
Under Specify template:
a. Select Amazon S3 URL.
b. Copy the link of the latest template.
c. Paste the link in the Amazon S3 URL box.
d. Verify that the correct template URL shows in the Amazon S3 URL text box, and choose Next. Choose Next again.
Under Parameters, review the parameters for the template and modify them as necessary. For details about the parameters, see Step 1. Launch the Stack.
Choose Next.
On the Configure stack options page, choose Next.
On the Review page, review and confirm the settings. Check the box acknowledging that the template will create AWS Identity and Access Management (IAM) resources.
Choose View change set and verify the changes.
Choose Update stack to deploy the stack.
You can view the status of the stack in the AWS CloudFormation console in the Status column. You should receive an UPDATE_COMPLETE status in approximately one hour.
Uninstall this guidance
You can uninstall the Edit on the Cloud on AWS guidance from the AWS Management Console or by using the AWS Command Line Interface. If you added additional resources, such as an Amazon S3 bucket, you must delete these manually.
Using the AWS Management Console
Sign in to the AWS CloudFormation console.
On the Stacks page, select this guidance’s installation stack.
Choose Delete.
Using AWS Command Line Interface
Determine whether the AWS Command Line Interface (AWS CLI) is available in your environment. For installation instructions, refer to What Is the AWS Command Line Interface in the AWS CLI User Guide. After confirming that the AWS CLI is available, run the following command.
$ aws cloudformation delete-stack --stack-name
<installation-stack-name>
Developer guide
Source code
Visit our guidance GitHub repository. to download the source files for this guidance and to share your customizations with others. Refer to the README.md file for additional information.
Reference
This section includes information about an optional feature for collecting unique metrics for this guidance, pointers to related resources, and a list of builders who contributed to this AWS guidance.
Anonymized data collection
This guidance includes an option to send anonymized operational metrics to AWS. We use this data to better understand how customers use this guidance and related services and products. When invoked, the following information is collected and sent to AWS:
Solution ID - The AWS guidance identifier
Unique ID (UUID) - Randomly generated, unique identifier for each Edit in the Cloud on AWS deployment
Timestamp - Data-collection timestamp
Example: Instance Data - Count of the state and type of instances that are managed by the EC2 Scheduler in each AWS Region
Example data:
Running: {t2.micro: 2}, {m3.large:2}
Stopped: {t2.large: 1}, {m3.xlarge:3}
AWS owns the data gathered though this survey. Data collection is subject to the AWS Privacy Notice. To opt out of this feature, complete the following steps before launching the AWS CloudFormation template.
Download the AWS CloudFormation template to your local hard drive.
Open the AWS CloudFormation template with a text editor.
Modify the AWS CloudFormation template mapping section from:
Required. AWS CloudFormation template updated to Anonymized from Anonymous.
AnonymizedData:
SendAnonymizedData:
Data: Yes
to:
AnonymizedData:
SendAnonymizedData:
Data: No
Sign in to the AWS CloudFormation console.
Select Create stack.
On the Create stack page, Specify template section, select Upload a template file.
Under Upload a template file, choose Choose file and select the edited template from your local drive.
Choose Next and follow the steps in Launch the stack in the Deploy the guidance section of this guide.
Related resources
Blog posts
Contributors
Leah Siddall
Eddie Goynes
Brandon Dold
Mark Stephens
Matt Herson
Alastair Cousins
Eric Thoman
San Dim Ciin
David Chung
Raul Marquez
Revisions
Refer to the CHANGELOG.md file in the GitHub repository.
Notices
Customers are responsible for making their own independent assessment of the information in this document. This document: (a) is for informational purposes only, (b) represents AWS current product offerings and practices, which are subject to change without notice, and (c) does not create any commitments or assurances from AWS and its affiliates, suppliers or licensors. AWS products or services are provided “as is” without warranties, representations, or conditions of any kind, whether express or implied. AWS responsibilities and liabilities to its customers are controlled by AWS agreements, and this document is not part of, nor does it modify, any agreement between AWS and its customers.
Edit in the Cloud on AWS is licensed under the terms of the of the Apache License Version 2.0 available at The Apache Software Foundation.