Guidance for Training Protein Language Models (ESM-2) with Amazon SageMaker HyperPod on AWS
Summary: This implementation guide provides an overview of the Guidance for Training Protein Language Models (ESM-2) with Amazon SageMaker HyperPod. It covers the reference architecture and components, considerations for planning the deployment, and configuration steps for implementing the solution. This guide is intended for solution architects, business decision makers, DevOps engineers, data scientists, and cloud professionals who want to implement this guidance in their AWS environment.
Overview
This guidance aims to instruct users on how to provision SageMaker HyperPod clusters using both Slurm and Kubernetes based orchestrations. In addition, this guidance provides code examples for pre-training popular computational protein folding models such as Evolutionary Scale Models (ESM) 2nd generation using the DDP and FSDP and NVIDIA BioNemo frameworks on Amazon SageMaker Hyperpod clusters.
Table of Contents
- Overview
- Prerequisites
- Plan your deployment
- Security
- Deployment Steps
- Deployment Validation
- Running the Guidance
- Next Steps
- Uninstall
- Related Resources
- Contributors
- Notices
Overview
As Generative Artificial Intelligence (Generative AI) continues to transform industries, the life sciences sector is leveraging these advanced technologies to accelerate drug discovery. Generative AI tools powered by deep learning models make it possible to analyze massive datasets, identify patterns, and generate insights to aid the search for new drug compounds. However, running these generative AI workloads requires a full-stack approach that combines robust computing infrastructure with optimized domain-specific software that can accelerate time to solution.
With the recent proliferation of new models and tools in this field, researchers are looking for help to simplify the training, customization, and deployment of these generative AI models. And our high performance computing (HPC) customers are asking for how to easily perform distributed training with these models on AWS. In this guidance, we’ll demonstrate how to pre-train the Evolutionary Scale Modeling ESM-2 model using NVIDIA GPUs on AWS SageMaker HyperPod highly available managed application platform.
NVIDIA BioNeMo
NVIDIA BioNeMo is a Generative AI platform for drug discovery that simplifies and accelerates the training of models using your own data. BioNeMo provides researchers and developers a fast and easy way to build and integrate state-of-the-art generative AI applications across the entire drug discovery pipeline—from target identification to lead optimization—with AI workflows for 3D protein structure prediction, de novo design, virtual screening, docking, and property prediction.
The BioNeMo framework facilitates centralized model training, optimization, fine-tuning, and inferencing for protein and molecular design. Researchers can build and train foundation models from scratch at scale, or use pre-trained model checkpoints provided with the BioNeMo Framework for fine-tuning for downstream tasks. Currently, BioNeMo supports biomolecular AI architectures that can be scaled to billions of parameters, such as BERT, Striped Hyena, along with models such as ESM-2, Evo-2, and Geneformer.
Architecture overview
This section provides architecture diagrams and describes the components/services deployed with this Guidance.
Architecture of SageMaker HyperPod SLURM Orchestrator Cluster
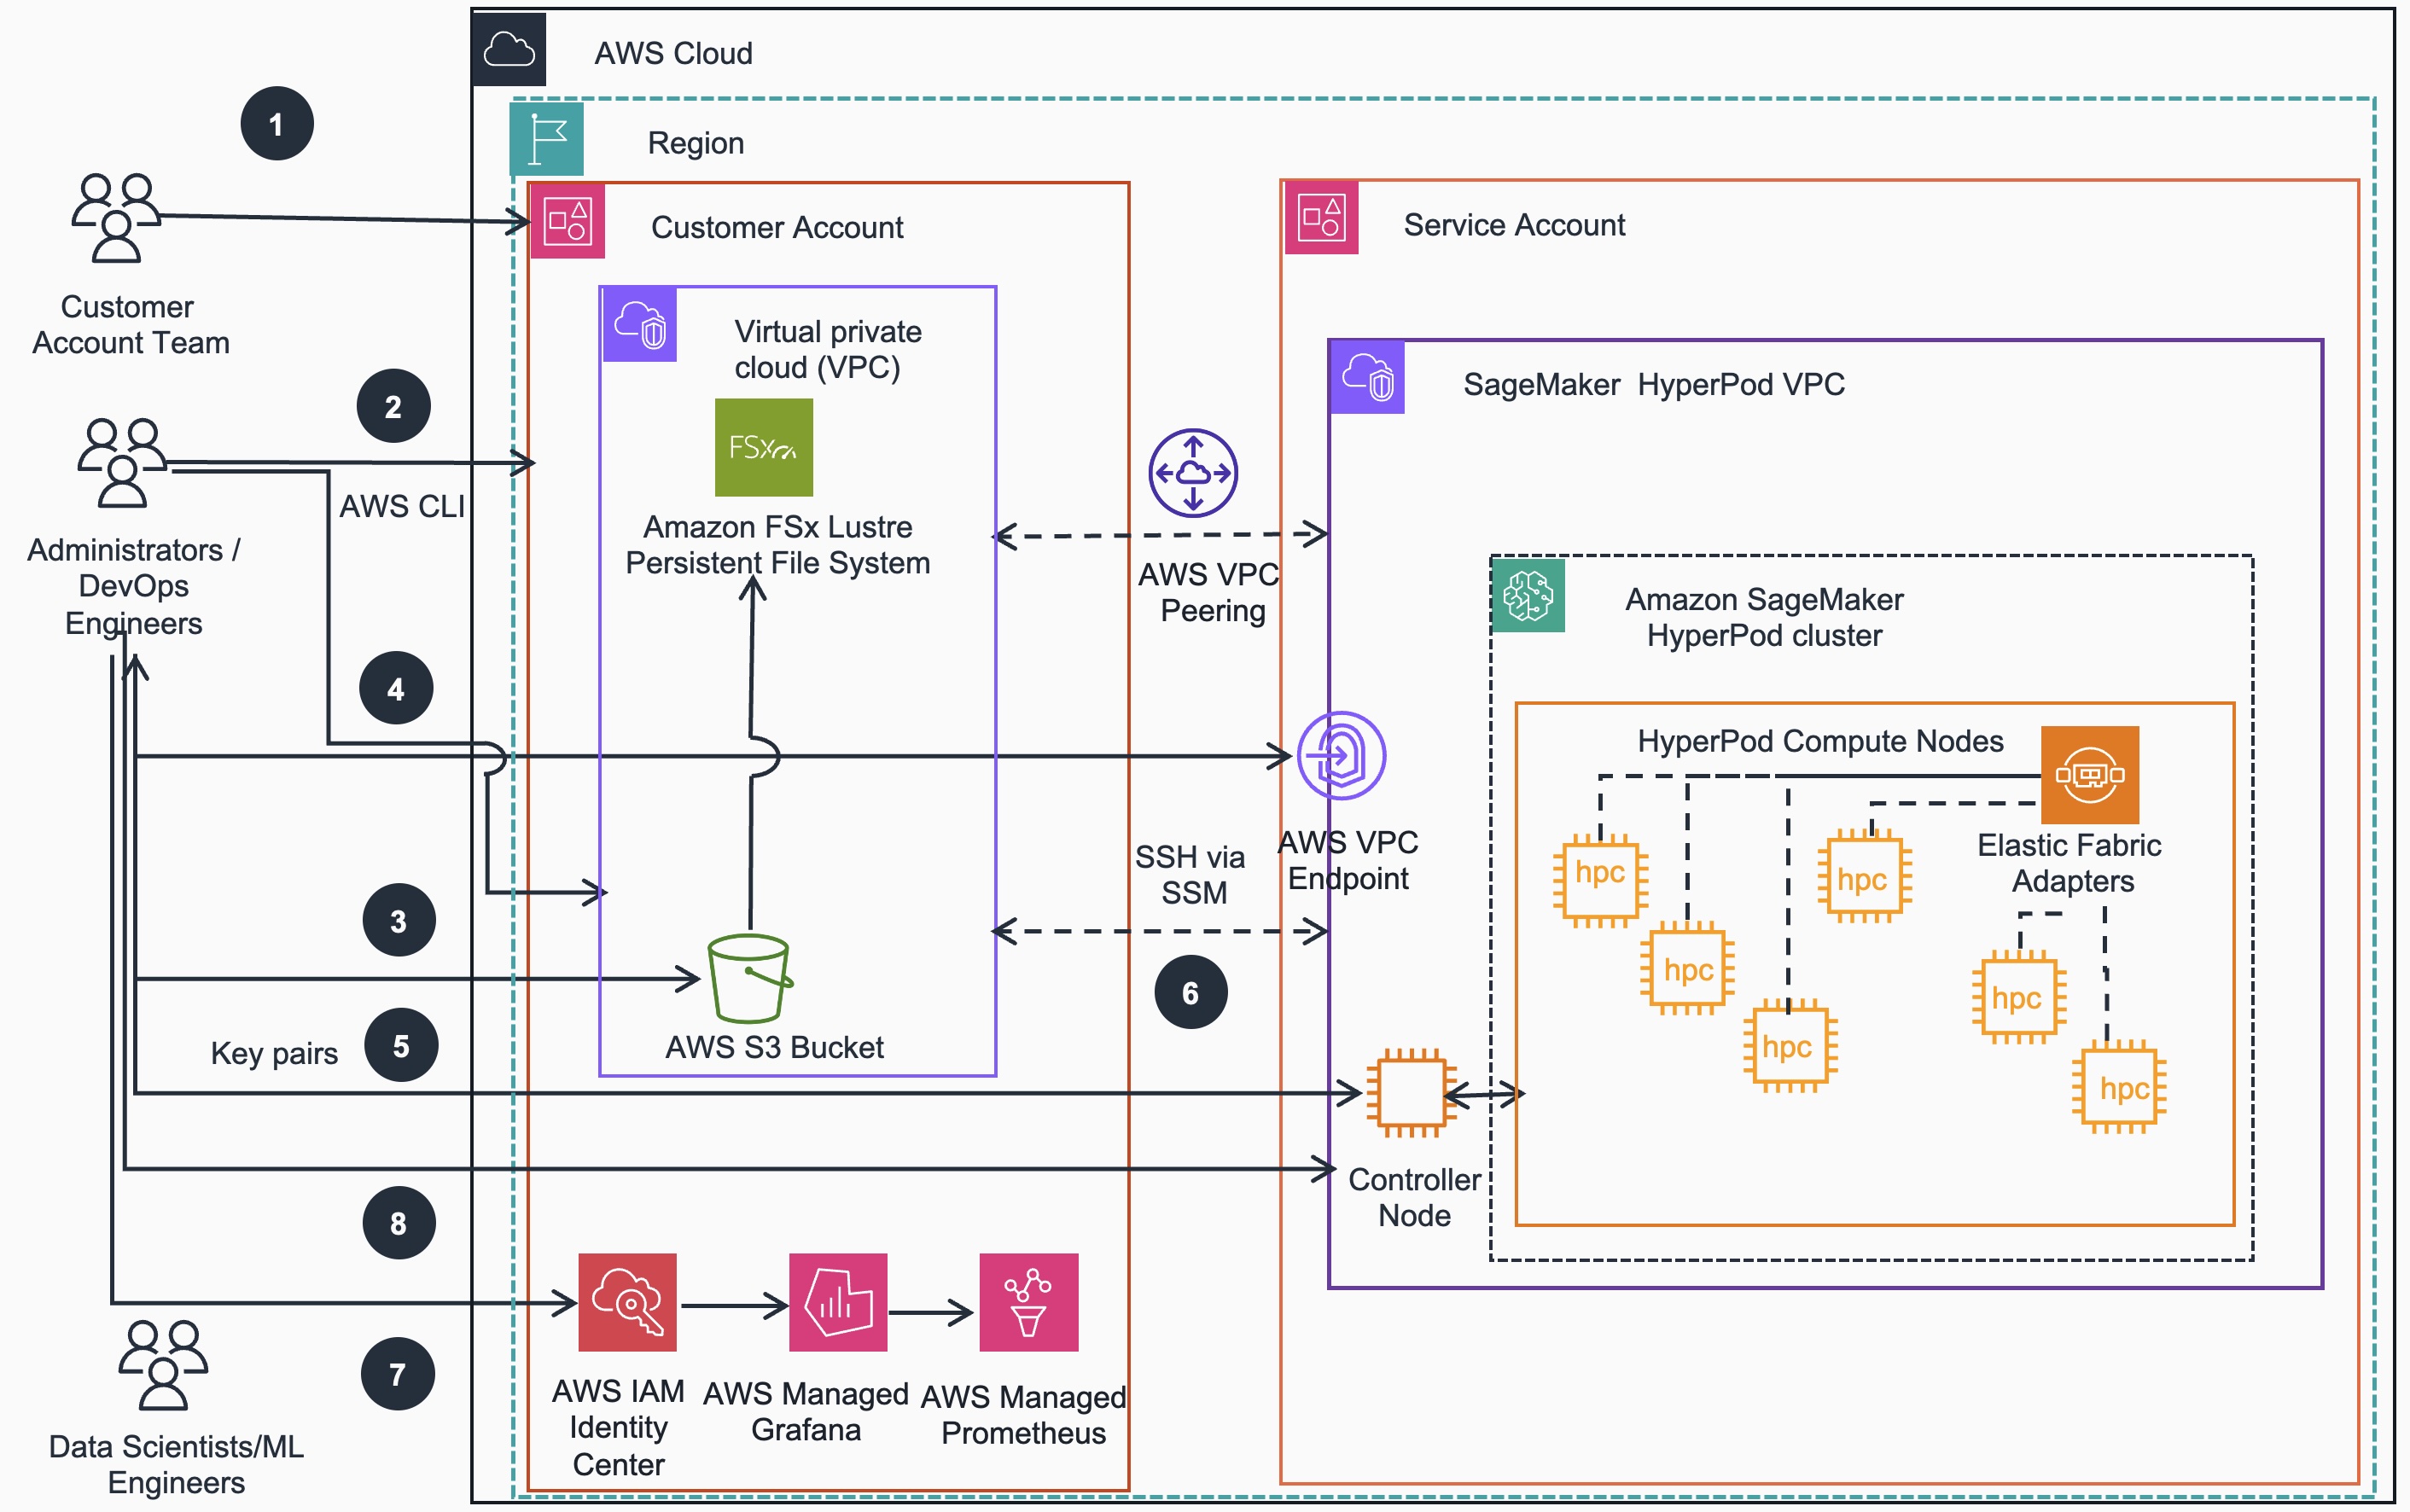
SageMaker HyperPod cluster (SLURM) provisioning workflow:
- If required for target EC2 instance types to be used as HyperPod cluster nodes, account team may reserve with On-Demand Capacity Reservation (ODCR) or Amazon SageMaker HyperPod Flexible Training Plans
- Administrators/DevOps Engineers use the AWS CloudFormation stack to deploy Virtual Private Cloud (VPC) networking, Amazon Simple Storage Service (S3) or FSx for Lustre (FSxL) storage and Identity and Access Management (IAM) resources into Customer Account
- Administrators/DevOps Engineers push Lifecycle scripts to S3 bucket created in the previous step
- Administrators/DevOps Engineers use the AWS CLI to create the SageMaker HyperPod cluster,including Controller Node, Compute nodes etc.
- Administrators/DevOps Engineers generate key pair to establish access to the Controller Node of the SageMaker HyperPod cluster.
- Once the SageMaker HyperPod cluster is created, Administrators/DevOps Engineers and Data Scientists/ML engineers can test SSH access to the Controller and Compute nodes and examine the cluster
- Administrators/DevOps Engineers configure IAM to use Amazon Managed Prometheus to collect metrics and Amazon Managed Grafana for metric visualization
- Administrators/DevOps Engineers can make further changes to the cluster using the AWS CLI
Architecture of SageMaker HyperPod EKS Orchestrator Cluster
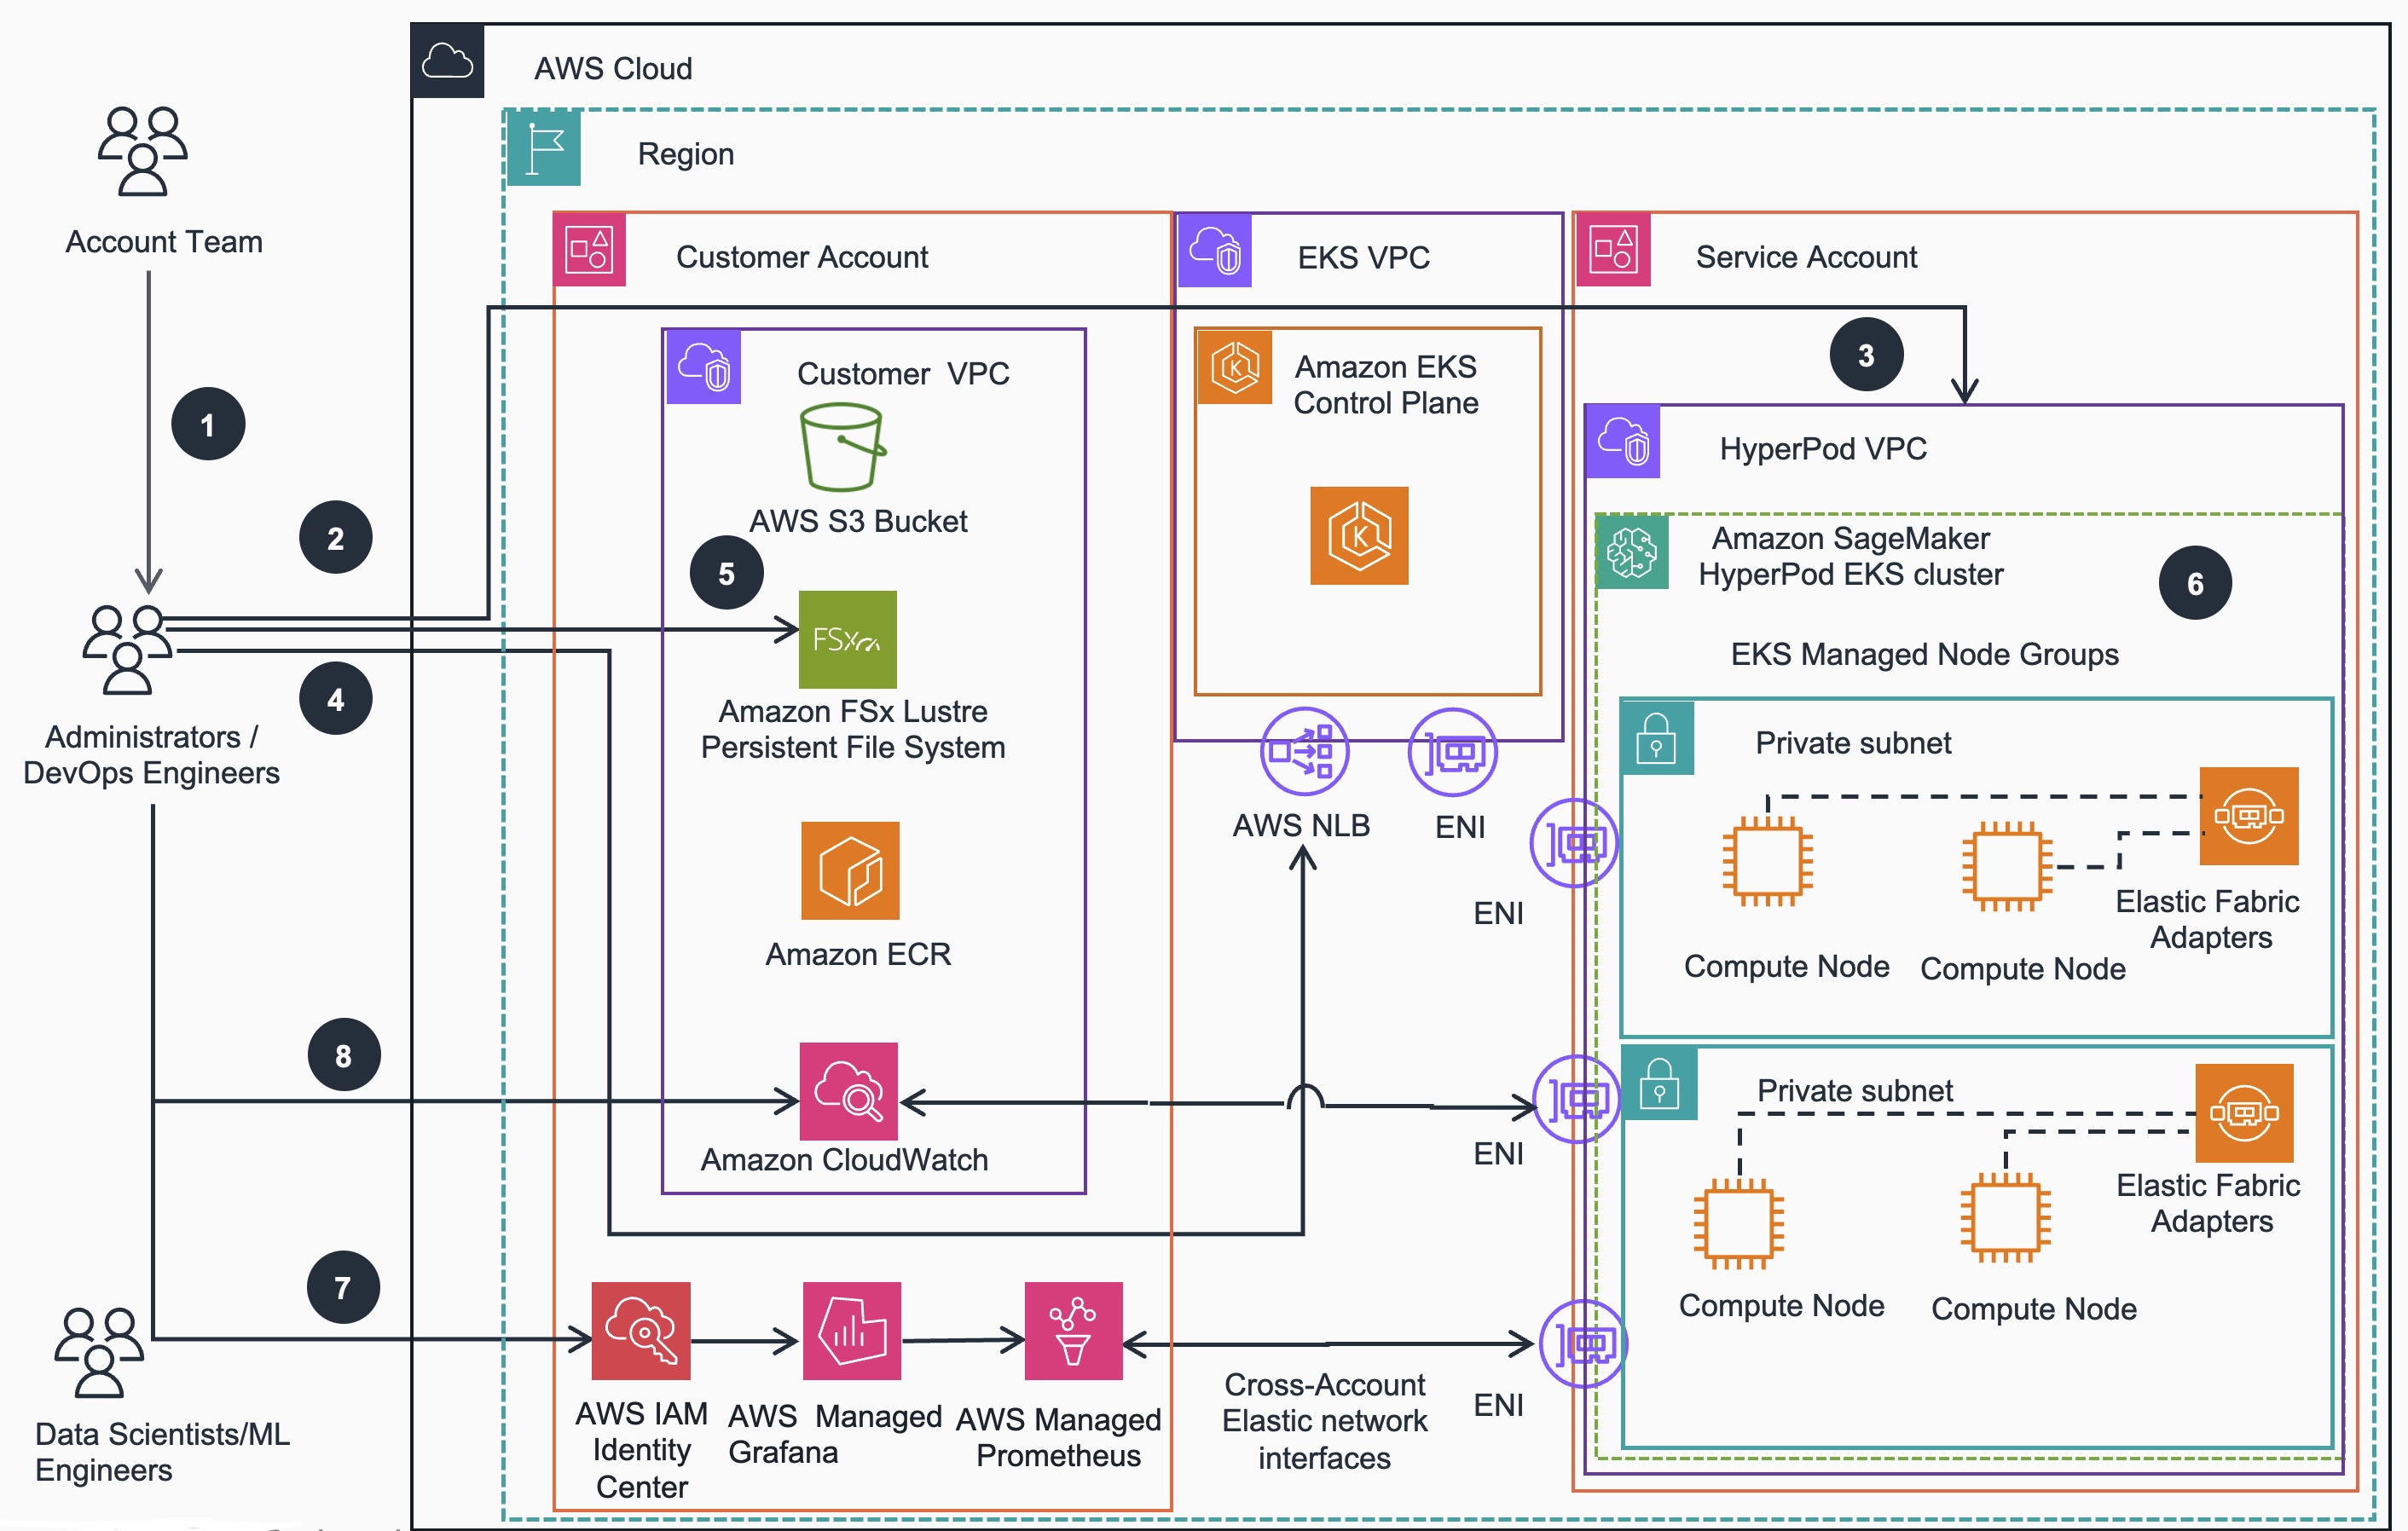
SageMaker HyperPod cluster (EKS) provisioning workflow:
- If required for target EC2 instance types to be used as HyperPod cluster nodes, account team may reserve compute capacity with On-Demand Capacity Reservation (ODCR) or Amazon SageMaker HyperPod Flexible Training Plans.
- Administrators/DevOps Engineers can use eksctl CLI to provision an Amazon EKS cluster
- Administrators/DevOps Engineers use the SageMaker HyperPod VPC stack to deploy Hyperpod managed node group on the EKS cluster
- Administrators/DevOps Engineers verify access to EKS cluster and SSM access to HyperPod nodes.
- Administrators/DevOps Engineers can install FSx for Lustre CSI driver and mount file system on the EKS cluster
- Administrators/DevOps Engineers install Amazon EFA Kubernetes device plugin
- Administrators/DevOps Engineers configures IAM to use Amazon Managed Prometheus to collect metrics and Amazon Managed Grafana to set up the observability stack
- Administrators/DevOps Engineers can configure Container Insights to push metrics to Amazon CloudWatch
AWS services in this Guidance
The following AWS Services are deployed by this Guidance:
For SLURM based HyperPod clusters:
| AWS service | Role | Description |
|---|---|---|
| Amazon Virtual Private Cloud | Core service | provides additional Networking isolation and security |
| Amazon EC2 | Core Service | EC2 instances used as cluster nodes |
| Amazon API Gateway | Core service | Create, publish, maintain, monitor, and secure APIs at scale |
| Amazon Cognito | Core service | Provides user identity and access management (IAM) services |
| Amazon Lambda | Core service | Provides serverless automation of user authentication |
| Amazon FSx for Lustre | Core service | Provides high-performance Lustre file system |
| Amazon Parallel Cluster | Core service | Open source cluster management tool for deployment and management of High Performance Computing (HPC) clusters |
| Amazon High Performance Computing HPC cluster | Core service | High performance compute resource |
| Amazon System Manager Session Manager | Auxiliary service | Instance connection management |
For EKS based HyperPod clusters:
| AWS Service | Role | Description |
|---|---|---|
| Amazon Elastic Kubernetes Service ( EKS) | Core service | Manages the Kubernetes control plane and worker nodes for container orchestration. |
| Amazon Elastic Compute Cloud (EC2) | Core service | Provides the compute instances for EKS worker nodes and runs containerized applications. |
| Amazon Virtual Private Cloud (VPC) | Core service | Creates an isolated network environment with public and private subnets across multiple Availability Zones. |
| Amazon Elastic Container Registry (ECR) | Supporting service | Stores and manages Docker container images for EKS deployments. |
| Elastic Load Balancing (NLB) | Supporting service | Distributes incoming traffic across multiple targets in the EKS cluster. |
| Amazon Elastic Block Store (EBS) | Supporting service | Provides persistent block storage volumes for EC2 instances in the EKS cluster. |
| AWS Identity and Access Management (IAM) | Supporting service | Manages access to AWS services and resources securely, including EKS cluster access. |
| Amazon Managed Grafana (AMG) | Observability service | Provides a fully managed service for metrics visualization and monitoring. |
| Amazon Managed Service for Prometheus (AMP) | Observability service | Offers managed Prometheus-compatible monitoring for container metrics. |
| AWS Certificate Manager (ACM) | Security service | Manages SSL/TLS certificates for secure communication within the cluster. |
| Amazon CloudWatch | Monitoring service | Collects and tracks metrics, logs, and events from EKS and other AWS resources provisoned in the guidance |
| AWS Systems Manager | Management service | Provides operational insights and takes action on AWS resources. |
| AWS Key Management Service (KMS) | Security service | Manages encryption keys for securing data in EKS and other AWS services. |
Plan your deployment
Cost
You are responsible for the cost of the AWS services deployed and used while running this Guidance.
Refer to the pricing webpage for each AWS service used in this Guidance.
We recommend creating a budget through AWS Cost Explorer to help manage costs. Prices are subject to change. For full details, refer to the pricing webpage for each AWS service used in this Guidance.
Sample Cost Table
The following table provides a sample cost breakdown for deploying this Guidance with the default parameters in the US East (N. Virginia) Region for one month. As of September, 2025 the costs for running this guidance with the default settings in the US East (N. Virginia) us-east-1 region are shown below, for SLURM and EKS based clusters respectively:
SageMaker HyperPod with SLURM Infrastructure
| AWS service | Dimensions | Cost [USD] / month |
|---|---|---|
| Compute | 2 * ml.g5.8xlarge | 4467.60 |
| Compute | 1 * ml.m5.12xlarge | 2018.45 |
| Storage | S3 (1GB) | 00.02 |
| Storage | EBS (500GB) | 344.87 |
| Storage | FSx (1.2TB) | 720.07 |
| Network | VPC, Subnets, NAT Gateway, VPC Endpoints | 513.20 |
| Total | $8064.21/month |
Please see details in this AWS Calculator instance
SageMaker HyperPod with EKS Infrastructure
| AWS service | Dimensions | Cost [USD] / month |
|---|---|---|
| Compute | EC2 2 * ml.g5.8xlarge | 4467.60 |
| Control Plane | EKS Control Plane | 73.00 |
| Container Registry | ECR | 01.32 |
| Storage | S3 (1GB) | 00.02 |
| Storage | EBS (500GB) | 229.92 |
| Storage | FSx (1.2TB) | 720.07 |
| Network | VPC, Subnets, NAT Gateway, VPC Endpoints | 507.80 |
| Total | $5999.73/month |
Please see details in this AWS Calculator instance
Security
When you build systems on AWS infrastructure, security responsibilities are shared between you and AWS. This shared responsibility model reduces your operational burden because AWS operates, manages, and controls the components including the host operating system, the virtualization layer, and the physical security of the facilities in which the services operate. For more information about AWS security, visit AWS Cloud Security.
This guidance implements several security best practices and AWS services to enhance the security posture of your HyperPod Cluster. Here are the key security components and considerations:
Identity and Access Management (IAM)
- IAM Roles: The architecture uses predefined IAM roles to manage access to the HPC or EKS cluster resources. This follows the principle of least privilege, ensuring users and services have only the permissions necessary to perform their tasks.
- EKS Managed Node Groups: These use IAM roles with specific permissions required for nodes to join the EKS cluster and for pods to access AWS services.
- HPC Managed Node Groups: These use IAM roles with specific permissions required for nodes to join the HPC cluster
Network Security
- Amazon VPC: The EKS cluster is deployed within a custom VPC with public and private subnets across multiple Availability Zones, providing network isolation.
- Security Groups: Although not explicitly shown in the diagram, security groups are typically used to control inbound and outbound traffic to EC2 instances and other resources within the VPC.
- NAT Gateways: Deployed in public subnets to allow outbound internet access for resources in private subnets while preventing inbound access from the internet.
Data Protection
- Amazon EBS Encryption: EBS volumes used by EC2 instances are typically encrypted to protect data at rest.
- Amazon FSx for Lustre: FSx for Lustre shared data volumes mounted by SLURM or EKS clusters encrypt data at rest
- AWS Key Management Service (KMS): Used for managing encryption keys for various services, including EBS volume encryption.
Kubernetes-specific Security
- Kubernetes RBAC: Role-Based Access Control is implemented within the EKS cluster to manage fine-grained access to Kubernetes resources.
- AWS Certificate Manager: Integrated to manage SSL/TLS certificates for secure communication within the cluster.
Monitoring and Logging
- Amazon CloudWatch: Used for monitoring and logging of AWS resources and applications running on the EKS cluster including ContainerInsights for in depth monitoring of containers running on HyperPod clusters
- Amazon Managed Grafana and Prometheus: Provide additional monitoring and observability capabilities, helping to detect and respond to security events.
Container Security
- Amazon ECR: Stores container images in a secure, encrypted repository. It includes vulnerability scanning to identify security issues in your container images.
Secrets Management
- AWS Secrets Manager: While not explicitly shown in the diagrams, secrets are commonly used to securely store and manage sensitive information such as database credentials, API keys, and other secrets used by applications running on EKS.
Additional Security Considerations
- Regularly update and patch HPC and EKS clusters, compute nodes, and container images.
- Implement network policies to control pod-to-pod communication within the cluster.
- Use Pod Security Policies or Pod Security Standards to enforce security best practices for pods.
- Implement proper logging and auditing mechanisms for both AWS and Kubernetes resources.
- Regularly review and rotate IAM and Kubernetes RBAC permissions.
Supported AWS Regions
The core components of “Guidance for Training Protein Language Models (ESM-2) with Amazon SageMaker HyperPod on AWS” are available in all AWS Regions where Amazon SageMaker HyperPod services is supported. The observability components of this guidance may use Amazon Managed Service for Prometheus (AMP) and Amazon Managed Grafana (AMG).
These services are available in the following regions (as of September, 2025):
| Region Name | Region Code |
|---|---|
| US East (N. Virginia) | us-east-1 |
| US East (Ohio) | us-east-2 |
| US West (California) | us-west-1 |
| US West (Oregon) | us-west-2 |
| Asia Pacific (Mumbai) | ap-south-1 |
| Asia Pacific (Seoul) | ap-northeast-2 |
| Asia Pacific (Singapore) | ap-southeast-1 |
| Asia Pacific (Sydney) | ap-southeast-2 |
| Asia Pacific (Tokyo) | ap-northeast-1 |
| Europe (Frankfurt) | eu-central-1 |
| Europe (Ireland) | eu-west-1 |
| Europe (London) | eu-west-2 |
| Europe (Stockholm) | eu-north-1 |
| South America (São Paulo) | sa-east-1 |
Quotas
Service quotas, also referred to as limits, are the maximum number of service resources or operations for your AWS account.
Quotas for AWS services in this Guidance
Make sure you have sufficient quota for each of the services implemented in this guidance. For more information, see AWS service quotas.
Specifically, make sure you have sufficient service quota for SageMaker EC2 instances you are planning to deploy with the HyperPod clusters, whether SLURM or EKS orchestrator is used.
To view the service quotas for all AWS services in the documentation without switching pages, view the information in the Service endpoints and quotas page in the PDF instead.
Deploy the Guidance
Prerequisites
Operating Systems
Amazon SageMaker HyperPod compute nodes support the following operating systems:
- Amazon Linux 2
- Ubuntu 20.04
- Ubuntu 22.04
These Linux-based operating systems are optimized for machine learning workloads and are fully compatible with SageMaker HyperPod’s distributed training capabilities. The OS images are managed and maintained by AWS to ensure security and performance optimizations for ML training workloads. We highly recommend using optimized SageMaker Studio Code Editor environment to run HyperPod cluster provisioning commands
Third-party tools
- Install the AWS CLI (both kinds of HyperPod clusters) Depending on the OS that you are using, run a command similar to:
curl "https://awscli.amazonaws.com/awscli-exe-linux-x86_64.zip" -o "awscliv2.zip" unzip awscliv2.zip sudo ./aws/install --update - Install kubectl (for EKS based clusters) The following command installs K8s API CLI client:
curl -O https://s3.us-west-2.amazonaws.com/amazon-eks/1.30.4/2024-09-11/bin/linux/amd64/kubectl chmod +x ./kubectl mkdir -p $HOME/bin && cp ./kubectl $HOME/bin/kubectl && export PATH=$HOME/bin:$PATH echo 'export PATH=$HOME/bin:$PATH' >> ~/.bashrc - Install eksctl CLI utility (for EKS based clusters) The following command installs
eksctlAWS command line utility to manage EKS clusters
# for ARM systems, set ARCH to: `arm64`, `armv6` or `armv7`
ARCH=amd64
PLATFORM=$(uname -s)_$ARCH
curl -sLO "https://github.com/eksctl-io/eksctl/releases/latest/download/eksctl_$PLATFORM.tar.gz"
# (Optional) Verify checksum
curl -sL "https://github.com/eksctl-io/eksctl/releases/latest/download/eksctl_checksums.txt" | grep $PLATFORM | sha256sum --check
tar -xzf eksctl_$PLATFORM.tar.gz -C /tmp && rm eksctl_$PLATFORM.tar.gz
sudo mv /tmp/eksctl /usr/local/bin
- Install Helm Package manager Helm is a package manager for Kubernetes that will be used to install various dependencies using Charts , which bundle together all the resources needed to deploy an application to a Kubernetes cluster.
curl -fsSL -o get_helm.sh https://raw.githubusercontent.com/helm/helm/main/scripts/get-helm-3
chmod 700 get_helm.sh
./get_helm.sh
- Acquire long-term AWS access credentials
Using the AWS credentials you fetched above, use aws configure to add the credentials to your terminal. See configure aws credentials for more details.
$ aws configure
AWS Access Key ID [None]: AKIAIOSFODNN7EXAMPLE
AWS Secret Access Key [None]: wJalrXUtnFEMI/K7MDENG/bPxRfiCYEXAMPLEKEY
Default region name [None]: us-west-2
Default output format [None]: json
Deployment of SLURM orchestrator based SageMaker HyperPod cluster
First, clone the guidance repository and navigate to the corresponding deployment instructions folder:
git clone https://github.com/aws-solutions-library-samples/guidance-for-protein-language-esm-model-training-with-nvidia-bionemo-framework.git
cd guidance-for-protein-language-esm-model-training-with-sagemaker-hyperpod/infra/hyperpod/slurm
- SageMaker HyperPod uses a collection of lifecycle scripts to bootstrap the cluster, these scripts are responsible for setting up Slurm, mounting the FSx Lustre filesystem, among other actions. We’ll be customizing these scripts in order to mount our FSx Lustre filesystem. A description of what each script does is included below:
| Script | Description |
|---|---|
| config.py | Configuration file for the lifecycle scripts |
| lifecycle_script.py | This is the main entrypoint, sets everything else up. |
| on_create.sh | Entrypoint for clusters. This script calls lifecycle_script.py |
| fsx_ubuntu.sh | Maps home directory to /fsx |
| setup_mariadb_accounting.sh | Sets up Slurm Accounting with a local mariadb server running on the HeadNode |
| setup_rds_accounting.sh | Sets up Slurm Accounting with a RDS endpoint |
| setup_sssd.py | Set up Active Directory/LDAP integration with SSSD |
| install_docker.sh - enabled by default | Installs docker, and sets data-root to /opt/dlami/nvme if available |
| install_enroot_pyxis.sh - enabled by default | Installs NVIDIA Enroot and Pyxis , and sets data-root to /opt/dlami/nvme if available. |
| start_slurm.sh | Starts the Slurm scheduler daemon |
| add_users.sh - Optional | creates posix users specified in a file shared_users.txt |
| shared_users_sample.txt | Sample of how to specify users for the add_users.sh script |
| update_neuron_sdk.sh | Configurableif specified in config.py, will update neuron version |
| provisioning_parameters.json | Defines scheduler type Slurm and sets the partitions up. Will be created in a later step |
- Setup Environment
Source in all the environment variables you need leveraging the output from cloudformation stack:
curl 'https://raw.githubusercontent.com/aws-solutions-library-samples/guidance-for-protein-language-esm-model-training-with-sagemaker-hyperpod/refs/heads/main/infra/hyperpod/slurm/create_config.sh' --output create_config.sh
bash create_config.sh
source env_vars
Confirm all the environment variables were correctly set:
cat env_vars
-------------
export AWS_REGION=us-west-2
export INSTANCES=g5.12xlarge
export VPC_ID=vpc-0a53ef2f27b1a7593
export SUBNET_ID=subnet-068d440c0547a14d9
export FSX_ID=fs-0505889b9c83939e0
export FSX_MOUNTNAME=ub2ejbev
export SECURITY_GROUP=sg-07b82de9f3afed48d
export ROLE=arn:aws:iam::xxxxx:role/sagemakervpc-AmazonSagemakerClusterExecutionRole-xxxxxx
export ROLENAME=sagemakervpc-AmazonSagemakerClusterExecutionRole-xxxxxx
export BUCKET=sagemaker-lifecycle-xxxxxxxx
- Next, navigate to the
Lifecycle scripts:
#git clone --depth=1 https://github.com/aws-solutions-library-samples/guidance-for-protein-language-esm-model-training-with-sagemaker-hyperpod
cd guidance-for-protein-language-esm-model-training-with-sagemaker-hyperpod/infra/hyperpod/slurm/LifecycleScripts
- Modify
AmazonSagemakerClusterExecutionRole:
Additionally, it is required to add the following 2 AWS Managed IAM policies to your AmazonSagemakerClusterExecutionRole prior to creating HyperPod cluster:
arn:aws:iam::aws:policy/AmazonPrometheusRemoteWriteAccess (permissions to allow prometheus remote-write on cluster to send metrics to Amazon Managed Prometheus )
arn:aws:iam::aws:policy/AWSCloudFormationReadOnlyAccess (permissions to fetch the Prometheus remote write URL used in prometheus config on controller node)
Attach policies to IAM roles:
aws iam attach-role-policy --role-name $ROLENAME --policy-arn arn:aws:iam::aws:policy/AmazonPrometheusRemoteWriteAccess
aws iam attach-role-policy --role-name $ROLENAME --policy-arn arn:aws:iam::aws:policy/AWSCloudFormationReadOnlyAccess
- Upload the artifacts to the bucket:
# upload data
aws s3 cp --recursive base-config/ s3://${BUCKET}/src

# move back to env_var directory
cd ../../../..
Now, we can proceed with HyperPod SLURM cluster deployment
- First we’ll create the cluster config, for example in the following we have the configuration for
p5.48xlargecompute nodes and a m5.12xlarge headnode. Please modify the config that corresponds to your desired capacity type.
source env_vars
cat > cluster-config.json << EOL
{
    "ClusterName": "ml-cluster",
    "InstanceGroups": [
      {
        "InstanceGroupName": "login-group",
        "InstanceType": "ml.m5.4xlarge",
        "InstanceStorageConfigs": [
          {
            "EbsVolumeConfig": {
              "VolumeSizeInGB": 500
            }
          }
        ],
        "InstanceCount": 1,
        "LifeCycleConfig": {
          "SourceS3Uri": "s3://${BUCKET}/src",
          "OnCreate": "on_create.sh"
        },
        "ExecutionRole": "${ROLE}",
        "ThreadsPerCore": 2
      },
      {
        "InstanceGroupName": "controller-machine",
        "InstanceType": "ml.m5.12xlarge",
        "InstanceStorageConfigs": [
          {
            "EbsVolumeConfig": {
              "VolumeSizeInGB": 500
            }
          }
        ],
        "InstanceCount": 1,
        "LifeCycleConfig": {
          "SourceS3Uri": "s3://${BUCKET}/src",
          "OnCreate": "on_create.sh"
        },
        "ExecutionRole": "${ROLE}",
        "ThreadsPerCore": 2
      },
      {
        "InstanceGroupName": "worker-group-1",
        "InstanceType": "ml.p5.48xlarge",
        "InstanceCount": 1,
        "InstanceStorageConfigs": [
          {
            "EbsVolumeConfig": {
              "VolumeSizeInGB": 500
            }
          }
        ],
        "LifeCycleConfig": {
          "SourceS3Uri": "s3://${BUCKET}/src",
          "OnCreate": "on_create.sh"
        },
        "ExecutionRole": "${ROLE}",
        "ThreadsPerCore": 1
      }
    ],
    "VpcConfig": {
      "SecurityGroupIds": ["$SECURITY_GROUP"],
      "Subnets":["$SUBNET_ID"]
    }
}
EOL
- Create a configuration with the
FSx Lustreand upload it to the S3 bucket we created previously:
instance_type=$(jq '.InstanceGroups[] | select(.InstanceGroupName == "worker-group-1").InstanceType' cluster-config.json)
cat > provisioning_parameters.json << EOL
{
  "version": "1.0.0",
  "workload_manager": "slurm",
  "controller_group": "controller-machine",
  "login_group": "login-group",
  "worker_groups": [
    {
      "instance_group_name": "worker-group-1",
      "partition_name": ${instance_type}
    }
  ],
  "fsx_dns_name": "${FSX_ID}.fsx.${AWS_REGION}.amazonaws.com",
  "fsx_mountname": "${FSX_MOUNTNAME}"
}
EOL
- Now upload that configuration to S3 bucket:
# copy to the S3 Bucket
aws s3 cp provisioning_parameters.json s3://${BUCKET}/src/
Verify that the S3 file was copied successfully:
aws s3 cp s3://${BUCKET}/src/provisioning_parameters.json -
- Validate our cluster configuration:
curl -O https://github.com/aws-solutions-library-samples/guidance-for-protein-language-esm-model-training-with-sagemaker-hyperpod/blob/main/infra/hyperpod/slurm/validate-config.py
# install boto3
pip3 install boto3

# check config for known issues
python3 validate-config.py --cluster-config cluster-config.json --provisioning-parameters provisioning_parameters.json
If this commands succeeds, you should see an output like below:
✔️  Validated instance group name worker-group-1 is correct ...
✔️  Validated subnet subnet-0a1ccd53ea971f92a ...
✔️  Validated security group sg-0d9483c69a4847fac ingress rules ...
✔️  Validated security group sg-0d9483c69a4847fac egress rules ...
✔️  Validated FSx Lustre DNS name fs-00eb138bda97b40b2.fsx.us-east-1.amazonaws.com
✔️  Validated FSx Lustre mount name dzfijbev
✅ Cluster Validation succeeded
- Create FSx for Lustre Storage
FSx for Lustre provides a shared high performance file system that’s accessible across all nodes in your HyperPod cluster.
Similar to the VPC we just created, you can create an FSx for Lustre volume using 3.FSxLustre.yaml, or by using
1-Click Deploy 🚀
Change the stack name, capacity, throughput, and compression configurations as you wish. Select the latest Lustre version (2.15 by default). Under Network Options, select the Security Group ID and Private Subnet ID you created using the VPC CloudFormation stack in the previous step. Once again, you can leave the IAM role blank.
Note: Your FSx for Lustre volume will take about 10 minutes to deploy. In the meantime, we can setup our lifecycle scripts.
- Create the HyperPod cluster: If you see the error
Unknown parameter in InstanceGroups[0]: "InstanceStorageConfigs", must be one of: InstanceCount, InstanceGroupName, InstanceType, LifeCycleConfig, ExecutionRole, ThreadsPerCorethis means your AWS CLI version is too old and doesn’t support Configurable cluster storage . Please seeInstall AWS CLI for updateinstructions above.
aws sagemaker create-cluster \
    --cli-input-json file://cluster-config.json \
    --region $AWS_REGION
We can review the state of the cluster:
aws sagemaker list-clusters --output table
You’ll see output similar to the following:
-------------------------------------------------------------------------------------------------------------------------------------------------
|                                                                 ListClusters                                                                  |
+-----------------------------------------------------------------------------------------------------------------------------------------------+
||                                                              ClusterSummaries                                                               ||
|+----------------------------------------------------------------+----------------------+----------------+------------------------------------+|
||                           ClusterArn                           |     ClusterName      | ClusterStatus  |           CreationTime             ||
|+----------------------------------------------------------------+----------------------+----------------+------------------------------------+|
||  arn:aws:sagemaker:us-west-2:XXXXXXXXXXXXXX:cluster/uwme6r18mhic |  ml-cluster          |  Creating     |  2023-12-07T16:59:09.433000+00:00   ||
|+----------------------------------------------------------------+----------------------+----------------+------------------------------------+|
You can find more details about HyperPod SLURM cluster deployment and validation in this README
Deployment Validation - HyperPod SLURM Cluster
SSH into HyperPod SLURM cluster
To log into your HyperPod cluster, you need the cluster ID from the cluster ARN, instance ID of your controller node, and instance group name of your controller group. You can your HyperPod cluster ID with
aws sagemaker describe-cluster --cluster-name ml-cluster --region us-west-2

{
    "ClusterArn": "arn:aws:sagemaker:us-west-2:123456789012:cluster/2hd31rmi9mde",
    "ClusterName": "ml-cluster",
In this case, the cluster ID is 2hd31rmi9mde
Get your controller machine instance ID with the following command:
aws sagemaker list-cluster-nodes --cluster-name ml-cluster --region us-west-2

{
    "NextToken": "",
    "ClusterNodeSummaries": [
        {
            "InstanceGroupName": "controller-machine",
            "InstanceId": "i-09e7576cbc230c181",
            "InstanceType": "ml.c5.xlarge",
            "LaunchTime": "2023-11-26T15:28:20.665000-08:00",
            "InstanceStatus": {
                "Status": "Running",
                "Message": ""
            }
        },
And login with the following sample settings:
CLUSTER_ID=2hd31rmi9mde
CONTROLLER_GROUP=controller-machine
INSTANCE_ID=i-09e7576cbc230c181
TARGET_ID=sagemaker-cluster:${CLUSTER_ID}_${CONTROLLER_GROUP}-${INSTANCE_ID}
aws ssm start-session --target $TARGET_ID
To make this process easier, we’ve included an easy-ssh.sh script that takes your HyperPod SLURM cluster name and logs you in.
./easy-ssh.sh ml-cluster
If you used the base-config lifecycle scripts, you should be able to log in as ubuntu and run Slurm commands.
sudo su ubuntu
sinfo

PARTITION AVAIL  TIMELIMIT  NODES  STATE NODELIST
dev*         up   infinite      4   idle ip-10-1-4-190,ip-10-1-5-138,ip-10-1-18-53,ip-10-1-20-15
You should also find your FSx for Lustre volume mounted at /fsx.
Runtime validation before running workloads on SLURM HyperPod clusters
We included a runtime validation script hyperpod-precheck.py which lets you check the runtime before running any production workloads.
In order to run the script on multiple nodes at once use srun utility:
# this runs on 8 nodes
srun -N 8 python3 hyperpod-precheck.py
Follow the mitigations listed in this table if one of the checks fails:
| Test | Description | Failure mitigation |
|---|---|---|
| check_if_docker_installed | Life-cycle scripts ensure that docker is installed on all nodes This checks if docker is available on all compute nodes | Run life-cycle scripts manuallycd /tmp/sagemaker-lifecycle-* && cd src/utils/ && srun -N <no of nodes> bash install_docker.sh |
| check_enroot_runtime_path | Make sure the ENROOT_RUNTIME_PATH is pointed to the right directory | Follow these steps in the HyperPod workshop |
| check_docker_data_root | Docker data root should be at /opt/sagemaker (if mounted) or /opt/dlami/nvme/data-root | Run life-cycle scripts manuallycd /tmp/sagemaker-lifecycle-* && cd src/utils/ && srun -N <no of nodes> bash install_docker.sh |
| check_if_fsx_mounted | df -h should show /fsx as mounted | Speak to AWS; We have ensured provisioning parameters include this. So if it’s not mounted, we need to investigate this issue. |
| check_if_pyxis_installed | Pyxis is a container plugin for Slurm. Should be installed by default through life-cycle scripts when provisioning cluster | Run life-cycle scripts manually cd /tmp/sagemaker-lifecycle-* && cd src/utils/ && srun -N <no of nodes> bash install_enroot_pyxis.sh |
| check_slurmd_service_status | Check if slrumd is running across all compute instances | Sometimes slurm can fail due to an underlying error. If this check fails, ssh into the specific host and run sudo systemctl status slurmd and find the reason. Then restart it using sudo systemctl start slurmd. If it fails again check sudo journalctl -xe to see what has gone wrong |
| check_if_user_directory_on_fsx | This checks if users are sharing /fsx file system mount | Multi user setup will create /fsx/ If the user directory doesn't exist for nodes that have been replaced Run a variant of this command for your nodes `srun -N 2 usermod -d /fsx/ubuntu ubuntu` (Replace ubuntu with username) |
| nvidia_cli_installed | NVIDIA Container CLI is installed via docker life cycle scripts. It’s unlikely this will be an issue. | Go to this page in the HyperPod workshop and look for the command that runs the nvidia-container-cli installation. Create a script from those steps and either use sbatch or srun to execute across all compute nodes |
You can also run validation on the scripts you wish to run. This ensures you’re not using unsupported operations in the script.
Training ESM-2 models on HyperPod SLURM Based Cluster with PyTorch framework
Below is the Reference Architecture for training models on HyperPod SLURM based clusters:
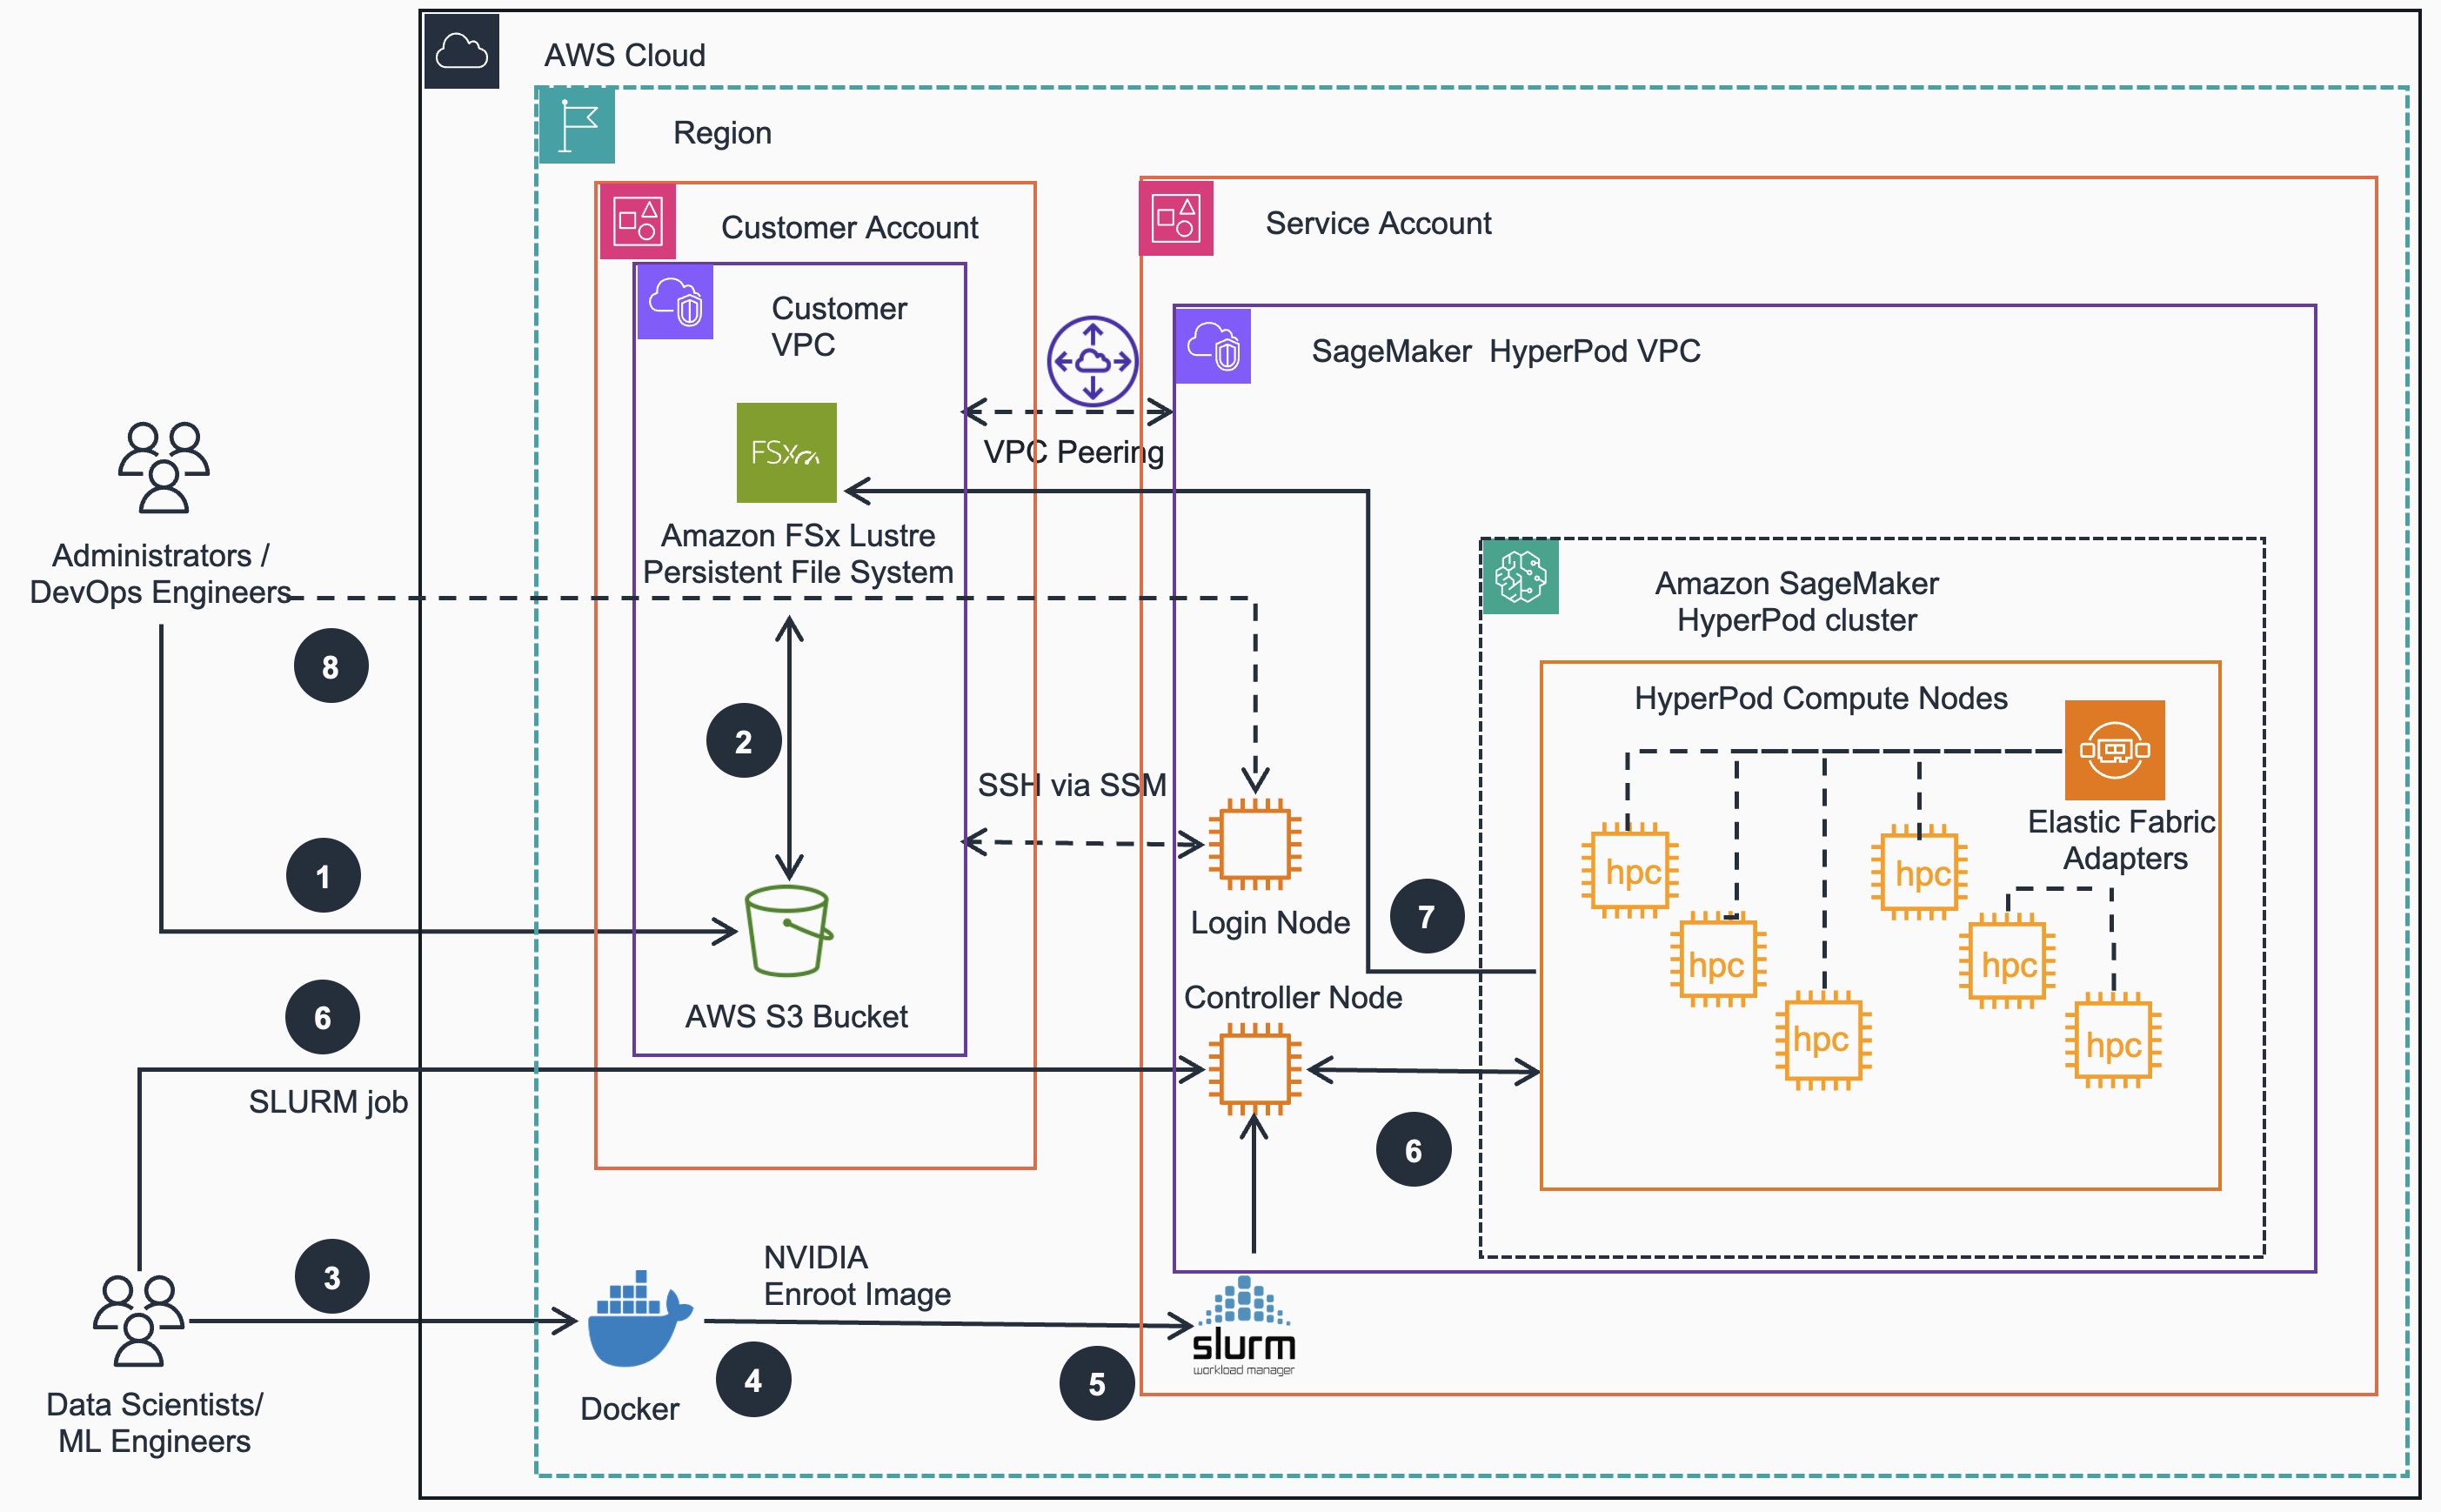
Model training steps:
- Administrators/DevOps Engineers move their training data from on-premise to an S3 bucket
- Administrators/DevOps Engineers can create Data Repository Associations between S3 bucket and FSx for Lustre file system
- Data scientists/ML Engineers build AWS optimized Docker container images with
as the base image - Data scientists/ML Engineers create nVIDIA Enroot image based on the Docker image
- Data scientists/ML Engineers create SLURM submission script
- Data scientists/ML Engineers submit training jobs that references ESM dataset and use container images built in Steps 3, 4 to run on the HyperPod compute nodes via Controller Node
- HyperPod SLURM cluster compute nodes run training job tasks and write checkpoints to the shared FSx file system. Data Scientists can monitor the training process via logs to determine when training job is completed
- (Optional) Administrators/DevOps Engineers can create Login nodes for Data scientists/ML Engineers to only submit jobs but without access to making changes to the cluster
Available ESM-2 models on HuggingFace
- facebook/esm2_t6_8M_UR50D
- facebook/esm2_t12_35M_UR50D
- facebook/esm2_t30_150M_UR50D
- facebook/esm2_t33_650M_UR50D
- facebook/esm2_t36_3B_UR50D
- facebook/esm2_t48_15B_UR50D
1. Setup environment variables
Navigate to the following source code directory:
cd guidance-for-protein-language-esm-model-training-with-sagemaker-hyperpod/train/esm2/slurm/pytorch
SSH into the head or login node of your HyperPod SLURM cluster and run the following commands:
# Path to save training data and checkpoints
export TARGET_PATH=/fsx/ubuntu/esm-slurm
export DOCKER_IMAGE_NAME=esm-slurm
export TAG=aws
#use a model that would be appropriate for compute nodes
export MODEL=facebook/esm2_t36_3B_UR50D
or just use the provided env.con file:
source ./env.conf
2. Build Docker Image
We provide an AWS optimized Docker image built file that sets up networking components (EFA, AWS-OFI-NCCL) for a multi-node cluster correctly. To initiate container image build, run the following command:
chmod 777 *.sh
./build.sh
Output:
---
 => [internal] load build definition from Dockerfile                                                                                                     0.0s
 => => transferring dockerfile: 710B                                                                                                                     0.0s
 => [internal] load metadata for nvcr.io/nvidia/pytorch:25.02-py3
...
 => [internal] load build context                                                                                                                        0.0s
 => => transferring context: 47.75kB                                                                                                                     0.0s
 => [2/6] COPY train.py /workspace                                                                                                                      15.8s
 => [3/6] COPY 0.download_data.py /workspace                                                                                                             0.0s
 => [4/6] COPY 1.tokenize_uniref_csv.py /workspace                                                                                                       0.0s
 => [5/6] COPY requirements.txt /workspace                                                                                                               0.0s
 => [6/6] RUN pip install -r requirements.txt                                                                                                           41.9s
 => exporting to image                                                                                                                                   1.5s
 => => exporting layers                                                                                                                                  1.5s
 => => writing image sha256:6ef0e285fe3b6d0c81902976b4ba3743a47dfd1523346e997647cab43444f559                                                             0.0s
 => => naming to docker.io/library/esm-slurm:aws
We can check that newly built Docker image is available in the local file system:
docker image list
Output:
REPOSITORY   TAG       IMAGE ID       CREATED              SIZE
esm-slurm    aws       6ef0e285fe3b   About a minute ago   24.9GB
3. Build Enroot Image
NVIDIA Enroot is a lightweight container runtime that allows users to run containerized applications without requiring full-fledged container engines like Docker. It is designed for HPC environments, particularly the Slurm Workload Manager. To convert Docker images to Enroot squash files, run the following script:
mkdir /fsx/ubuntu/esm-slurm
./enroot.sh
Output:
---
[INFO] Fetching image
9e55c640dba7f3a1f54a83f2b83557ddd1d371defbf6f39df3be312db558d967
[INFO] Extracting image content...
...
Parallel mksquashfs: Using 16 processors
Creating 4.0 filesystem on /fsx/ubuntu/esm-slurm/esm-slurm.sqsh, block size 131072.
[=======================================================================================================================================/] 389448/389448 100%

Exportable Squashfs 4.0 filesystem, lzo compressed, data block size 131072
        uncompressed data, uncompressed metadata, uncompressed fragments,
        uncompressed xattrs, uncompressed ids
        duplicates are not removed
Filesystem size 23777760.23 Kbytes (23220.47 Mbytes)
        99.92% of uncompressed filesystem size (23795682.16 Kbytes)
Inode table size 9225730 bytes (9009.50 Kbytes)
        100.00% of uncompressed inode table size (9225730 bytes)
Directory table size 8139303 bytes (7948.54 Kbytes)
        100.00% of uncompressed directory table size (8139303 bytes)
No duplicate files removed
Number of inodes 262919
.....
Number of socket nodes 0
Number of directories 32628
Number of ids (unique uids + gids) 1
Number of uids 1
        root (0)
Number of gids 1
        root (0)
We can also confirm that target file esm-slurm.sqsh is there in the shared directory:
ls -al $TARGET_PATH
Output:
-rw-r--r-- 1 ubuntu ubuntu 24348430336 Apr 29 19:28 esm-slurm.sqsh
4. Prepare dataset
Next we need to download the Uniref50 training data. You can do so by running the following command using the image previously built:
docker run -v ${TARGET_PATH}:/data ${DOCKER_IMAGE_NAME}:${TAG} python3 0.download_data.py --output_dir /data
Output:
----

=============
== PyTorch ==
=============

NVIDIA Release 25.02 (build 143088496)
PyTorch Version 2.7.0a0+ecf3bae
Container image Copyright (c) 2025, NVIDIA CORPORATION & AFFILIATES. All rights reserved.
Copyright (c) 2014-2024 Facebook Inc.
Copyright (c) 2011-2014 Idiap Research Institute (Ronan Collobert)
...
Copyright (c) 2013-2016 The Caffe contributors
All rights reserved.

Various files include modifications (c) NVIDIA CORPORATION & AFFILIATES.  All rights reserved.

This container image and its contents are governed by the NVIDIA Deep Learning Container License.
By pulling and using the container, you accept the terms and conditions of this license:
https://developer.nvidia.com/ngc/nvidia-deep-learning-container-license

WARNING: The NVIDIA Driver was not detected.  GPU functionality will not be available.
   Use the NVIDIA Container Toolkit to start this container with GPU support; see
   https://docs.nvidia.com/datacenter/cloud-native/ .

NOTE: The SHMEM allocation limit is set to the default of 64MB.  This may be
   insufficient for PyTorch.  NVIDIA recommends the use of the following flags:
   docker run --gpus all --ipc=host --ulimit memlock=-1 --ulimit stack=67108864 ...

04/30/2025 19:15:29 - INFO - Generating csv files
Reading FASTA file
498366it [00:12, 59214.38it/s]04/30/2025 19:15:41 - INFO - Writing 500000 records to /data/csv/x000.csv
996173it [00:51, 78288.46it/s]04/30/2025 19:16:21 - INFO - Writing 500000 records to /data/csv/x001.csv
1491434it [01:15, 89203.73it/s]04/30/2025 19:16:45 - INFO - Writing 500000 records to /data/csv/x002.csv
...
68949448it [13:11, 541961.50it/s]04/30/2025 19:28:41 - INFO - Writing 500000 records to /data/csv/x137.csv
69488478it [13:13, 87610.77it/s]
04/30/2025 19:28:42 - INFO - Writing 488478 records to /data/csv/csv/x138.csv
04/30/2025 19:28:44 - INFO - Save complete
That container execution should download the Uniref 50 training data as 50 .csv formatted files into the folder derived from ${TARGET_PATH}/csv environment variable. The whole process should take less than 30 mins.
To confirm that the dataset files are indeed saved to that directory, we can run the following command:
ls -al $TARGET_PATH/csv
Output:
total 20594019
drwxr-xr-x 3 root   root        41472 Apr 30 19:46 .
drwxrwxr-x 3 ubuntu ubuntu      33280 Apr 30 19:10 ..
-rw-r--r-- 1 root   root   1338965519 Apr 30 20:02 x000.csv
-rw-r--r-- 1 root   root    739136803 Apr 30 20:03 x001.csv
-rw-r--r-- 1 root   root    608770034 Apr 30 20:03 x002.csv
-rw-r--r-- 1 root   root    537187950 Apr 30 20:03 x003.csv
-rw-r--r-- 1 root   root    487469687 Apr 30 20:03 x004.csv
-rw-r--r-- 1 root   root    449800266 Apr 30 20:04 x005.csv
-rw-r--r-- 1 root   root    419801146 Apr 30 20:04 x006.csv
-rw-r--r-- 1 root   root    395810836 Apr 30 20:04 x007.csv
-rw-r--r-- 1 root   root    375021260 Apr 30 20:04 x008.csv
-rw-r--r-- 1 root   root    357140420 Apr 30 20:05 x009.csv
-rw-r--r-- 1 root   root    341566749 Apr 30 20:05 x010.csv
-rw-r--r-- 1 root   root    327643505 Apr 30 20:05 x011.csv
-rw-r--r-- 1 root   root    315227208 Apr 30 20:05 x012.csv
...
-rw-r--r-- 1 root   root     29808230 Apr 30 20:15 x137.csv
-rw-r--r-- 1 root   root     23821111 Apr 30 20:15 x138.csv
5. Convert CSV files to HuggingFace Dataset and Tokenize
Next we need to tokenize the downloaded dataset. This will split the data in training, test and validation folders, tokenize them and save the “arrow” files in processed folder.
docker run --rm -v ${TARGET_PATH}:/data ${DOCKER_IMAGE_NAME}:${TAG} /bin/bash -c "python3 1.tokenize_uniref_csv.py --input_dir /data/csv --output_dir /data/processed"
Output:
----
05/02/2025 20:47:00 - INFO - Parsing arguments
05/02/2025 20:47:00 - INFO - Loading csv files from /data/csv
Downloading data: 100%|██████████| 18/18 [00:00<00:00, 11694.16files/s]
Downloading data: 100%|██████████| 18/18 [00:00<00:00, 18048.64files/s]
Downloading data: 100%|██████████| 18/18 [00:00<00:00, 10751.56files/s]
Downloading data: 100%|██████████| 18/18 [00:00<00:00, 23038.59files/s]
Downloading data: 100%|██████████| 18/18 [00:00<00:00, 32486.00files/s]
...
Saving the dataset (62/62 shards): 100%|██████████| 10000000/10000000 [02:10<00:00, 76357.10 examples/s]
Saving the dataset (1/1 shards): 100%|██████████| 50000/50000 [00:00<00:00, 54862.74 examples/s]
Saving the dataset (1/1 shards): 100%|██████████| 50000/50000 [00:00<00:00, 54984.57 examples/s]
6. Training ESM-2 model Using DDP Framework
Now we are ready to submit distributed training jobs to pretrain ESM-2 models. We provide the train-ddp.ssh batch script to initialize PyTorch training job based on DDP framework on cluster compute nodes (e.g. ml.g5.8xlarge) with certain parameters for GPUs and EFSs . Make sure data paths and model configuration is correct if you are running on custom data.
To kick off distributed training job execute:
sbatch train_ddp.sh
To verify that the training jobs are running on requested number of HyperPod nodes, run the following command:
squeue
Output:
JOBID PARTITION     NAME     USER ST       TIME  NODES NODELIST(REASON)
1       dev  esm2-ddp   ubuntu  R       0:07      2 ip-10-1-29-[105,166]
If you need to follow the training process output, we can run a command like against the .OUT file
tail -f <esm2-ddp-esm2-ddp.N.out>
Output:
---
[INFO     | __main__           ]: *** Evaluate ***
0: [INFO|trainer.py:805] 2025-05-02 21:39:49,138 >> The following columns in the evaluation set don't have a corresponding argument in `EsmForMaskedLM.forward` and have been ignored: special_tokens_mask. If special_tokens_mask are not expected by `EsmForMaskedLM.forward`,  you can safely ignore this message.
0: [INFO|trainer.py:3788] 2025-05-02 21:39:49,140 >>
0: ***** Running Evaluation *****
0: [INFO|trainer.py:3790] 2025-05-02 21:39:49,140 >>   Num examples = 50000
0: [INFO|trainer.py:3793] 2025-05-02 21:39:49,140 >>   Batch size = 8
  3%|▎         | 98/3125 [00:02<01:04, 46.87it/s]
  6%|▋         | 198/3125 [00:04<01:02, 46.85it/s]
  9%|▉         | 293/3125 [00:06<01:00, 46.74it/s]
 12%|█▏        | 388/3125 [00:08<00:58, 46.69it/s]
 15%|█▌        | 483/3125 [00:10<00:56, 46.56it/s]
 18%|█▊        | 573/3125 [00:12<00:55, 46.35it/s]
 21%|██▏       | 668/3125 [00:14<00:53, 46.29it/s]
 24%|██▍       | 758/3125 [00:16<00:51, 46.11it/s]
 27%|██▋       | 848/3125 [00:18<00:49, 46.08it/s]
 30%|███       | 938/3125 [00:20<00:47, 45.93it/s]
 33%|███▎      | 1023/3125 [00:22<00:45, 45.91it/s]
...
 91%|█████████ | 2833/3125 [01:02<00:06, 43.71it/s]
 93%|█████████▎| 2903/3125 [01:04<00:05, 43.62it/s]
 95%|█████████�| 2973/3125 [01:05<00:03, 43.55it/s]
 98%|█████████▊| 3048/3125 [01:07<00:01, 43.45it/s]
100%|█████████▉| 3118/3125 [01:09<00:00, 43.44it/s]
1: [INFO     | __main__           ]: Metrics are {'eval_loss': 2.6093177795410156, 'eval_accuracy': 0.20685649827919567, 'eval_runtime': 75.8886, 'eval_samples_per_second': 658.86, 'eval_steps_per_second': 41.179, 'epoch': 1.0}
1: [INFO     | __main__           ]: Calculating perplexity
1: [INFO     | __main__           ]: Perplexity: 13.589776465064947
100%|██████████| 3125/3125 [01:16<00:00, 41.02it/s]
0: [INFO     | __main__           ]: Metrics are {'eval_loss': 2.6093177795410156, 'eval_accuracy': 0.20685649827919567, 'eval_runtime': 76.5074, 'eval_samples_per_second': 653.532, 'eval_steps_per_second': 40.846, 'epoch': 1.0}
0: [INFO     | __main__           ]: Calculating perplexity
0: [INFO     | __main__           ]: Perplexity: 13.589776465064947
0: ***** eval metrics *****
0:   epoch                   =        1.0
0:   eval_accuracy           =     0.2069
0:   eval_loss               =     2.6093
0:   eval_runtime            = 0:01:16.50
0:   eval_samples            =      50000
0:   eval_samples_per_second =    653.532
0:   eval_steps_per_second   =     40.846
0:   perplexity              =    13.5898
To validate that model was indeed trained, we can run the following command in the output directory:
/esm-slurm/out-ddp$ cat all_results.json
{
    "epoch": 1.0,
    "eval_accuracy": 0.20685649827919567,
    "eval_loss": 2.6093177795410156,
    "eval_runtime": 76.5074,
    "eval_samples": 50000,
    "eval_samples_per_second": 653.532,
    "eval_steps_per_second": 40.846,
    "perplexity": 13.589776465064947,
    "total_flos": 2304587980013568.0,
    "train_loss": 2.6276449169921876,
    "train_runtime": 439.0884,
    "train_samples": 100000,
    "train_samples_per_second": 227.745,
    "train_steps_per_second": 28.468
}
That confirms that ESM-2 model training was completed successfully with DDP framework.
7. Training ESM-2 Model Using FSDP Framework
Now we are ready to submit distributed training jobs to pretrain ESM-2 models. We provide the train-fsdp.ssh batch script to initialize PyTorch training job based on FSDP framework on cluster compute nodes (e.g. ml.g5.8xlarge) with certain parameters for GPUs and EFSs . Make sure data paths and model configuration is correct if you are running on custom data.
sbatch train_fsdp.sh
To verify that the training jobs are running on requested number of HyperPod nodes, run the following command:
squeue
Output:
JOBID PARTITION     NAME     USER ST       TIME  NODES NODELIST(REASON)
1       dev  esm2-fsdp   ubuntu  R       0:07      2 ip-10-1-29-[105,166]
An output of such command should be like shown below:
If you want to follow the output of FSDP training job, you can run a command like:
tail -f esm2-fsdp-esm2-fsdp.20.out
Output:
1: [INFO|trainer.py:2134] 2025-05-02 22:42:34,741 >>   Total train batch size (w. parallel, distributed & accumulation) = 88
1: [INFO|trainer.py:2135] 2025-05-02 22:42:34,741 >>   Gradient Accumulation steps = 11
1: [INFO|trainer.py:2136] 2025-05-02 22:42:34,741 >>   Total optimization steps = 1,136
1: [INFO|trainer.py:2137] 2025-05-02 22:42:34,742 >>   Number of trainable parameters = 3,920,390
1: ip-10-1-40-172:48007:48141 [0] NCCL INFO Connected binomial trees
0: ip-10-1-39-225:48124:48261 [0] NCCL INFO Connected binomial trees
0: {'loss': 3.0288, 'grad_norm': 1.4424070119857788, 'learning_rate': 4.929577464788733e-05, 'epoch': 0.01}
  2%|▏         | 18/1136 [00:08<08:31,  2.19it/s]
0: {'loss': 2.8485, 'grad_norm': 3.385751724243164, 'learning_rate': 4.8591549295774653e-05, 'epoch': 0.03}
  3%|▎         | 35/1136 [00:16<08:18,  2.21it/s]
0: {'loss': 2.7659, 'grad_norm': 1.916214942932129, 'learning_rate': 4.788732394366197e-05, 'epoch': 0.04}
  5%|▍         | 53/1136 [00:24<08:10,  2.21it/s]
0: {'loss': 2.7257, 'grad_norm': 2.18135142326355, 'learning_rate': 4.71830985915493e-05, 'epoch': 0.06}
  6%|▋         | 71/1136 [00:32<07:59,  2.22it/s]]
0: {'loss': 2.708, 'grad_norm': 2.5152652263641357, 'learning_rate': 4.647887323943662e-05, 'epoch': 0.07}
  8%|▊         | 89/1136 [00:40<07:55,  2.20it/s]
0: {'loss': 2.7009, 'grad_norm': 1.8158063888549805, 'learning_rate': 4.577464788732395e-05, 'epoch': 0.08}
  9%|▉         | 106/1136 [00:48<07:43,  2.22it/s]
...
0: {'loss': 2.6211, 'grad_norm': 0.8737764954566956, 'learning_rate': 1.4084507042253521e-06, 'epoch': 0.97}
 98%|█████████▊| 1117/1136 [08:21<00:08,  2.25it/s]
0: {'loss': 2.6324, 'grad_norm': 0.726458728313446, 'learning_rate': 7.042253521126761e-07, 'epoch': 0.99}
 99%|███████�█▉| 1129/1136 [08:26<00:03,  2.25it/s]
0: {'loss': 2.6166, 'grad_norm': 0.8394569158554077, 'learning_rate': 0.0, 'epoch': 1.0}
100%|██████████| 1136/1136 [08:29<00:00,  2.25it/s]/usr/local/lib/python3.12/dist-packages/torch/distributed/fsdp/fully_sharded_data_parallel.py:690: FutureWarning: FSDP.state_dict_type() and FSDP.set_state_dict_type() are being deprecated. Please use APIs, get_state_dict() and set_state_dict(), which can support different parallelisms, FSDP1, FSDP2, DDP. API doc: https://pytorch.org/docs/stable/distributed.checkpoint.html#torch.distributed.checkpoint.state_dict.get_sta
0: te_dict .Tutorial: https://pytorch.org/tutorials/recipes/distributed_checkpoint_recipe.html .
0:   warnings.warn(
0: [INFO|trainer.py:3478] 2025-05-02 22:51:04,774 >> Saving model checkpoint to /fsx/ubuntu/esm-slurm/out-fsdp/checkpoint-1136
0: [INFO|configuration_utils.py:472] 2025-05-02 22:51:04,779 >> Configuration saved in /fsx/ubuntu/esm-slurm/out-fsdp/checkpoint-1136/config.json
0: [INFO|modeling_utils.py:2690] 2025-05-02 22:51:04,844 >> Model weights saved in /fsx/ubuntu/esm-slurm/out-fsdp/checkpoint-1136/model.safetensors
0: [INFO|tokenization_utils_base.py:2574] 2025-05-02 22:51:04,847 >> tokenizer config file saved in /fsx/ubuntu/esm-slurm/out-fsdp/checkpoint-1136/tokenizer_config.json
0: [INFO|tokenization_utils_base.py:2583] 2025-05-02 22:51:04,850 >> Special tokens file saved in /fsx/ubuntu/esm-slurm/out-fsdp/checkpoint-1136/special_tokens_map.json
1: [INFO|trainer.py:2383] 2025-05-02 22:51:05,095 >>
1:
1: Training completed. Do not forget to share your model on huggingface.co/models =)
To validate that model was indeed trained we can run the following command in the output directory:
/esm-slurm/out-fsdp$ cat all_results.json
{
    "epoch": 0.99968,
    "eval_accuracy": 0.20331036132698413,
    "eval_loss": 2.628765344619751,
    "eval_runtime": 88.2792,
    "eval_samples": 50000,
    "eval_samples_per_second": 566.385,
    "eval_steps_per_second": 35.399,
    "perplexity": 13.856651147531753,
    "total_flos": 1151925283717120.0,
    "train_loss": 2.6576662063598633,
    "train_runtime": 510.4751,
    "train_samples": 100000,
    "train_samples_per_second": 195.896,
    "train_steps_per_second": 2.225
}
That confirms that ESM-2 model training was completed successfully with FSDP framework
Training NVIDIA BioNemo models on HyperPod SLURM Based Cluster with PyTorch framework
Prerequisites
Have a SLURM based Sagemaker HyperPod cluster with NVIDIA GPUs.
1. Clone the project repository (if not done yet)
cd ${TARGET_PATH}
git clone https://github.com/aws-solutions-library-samples/guidance-for-protein-language-esm-model-training-with-sagemaker-hyperpod.git
Change permissions for .sh scripts for executables in the folder:
cd guidance-for-protein-language-esm-model-training-with-sagemaker-hyperpod/train/esm2/slurm/bionemo
chmod 777 *.sh
2. Setup environment variables
Navigate to the following source code directory:
cd guidance-for-protein-language-esm-model-training-with-sagemaker-hyperpod/train/esm2/slurm/bionemo
SSH into the head or login node of your cluster and run:
# Path to save training data and checkpoints
export TARGET_PATH=/fsx/ubuntu/bionemo
export DOCKER_IMAGE_NAME=bionemo-slurm
export TAG=aws
export DATA_HOME_DIR=/fsx/ubuntu/bionemo
Or source the env.conf file provided in the directory like:
source ./env.conf
3. Build Docker Image for BioNemo models
We provide the Dockerfile for an AWS optimized Docker image that sets up networking components (EFA, AWS-OFI-NCCL) for a multi-node cluster correctly:
./build.sh
Output:
----
[+] Building 171.3s (3/21)                                                                                                                    docker:default
 => [ 1/18] FROM nvcr.io/nvidia/clara/bionemo-framework:2.5@sha256:fbd1393898db19a6f252ba962b768efa24ae2baea6a4b98d7a806d20f47318a3                   169.9s
 => => sha256:3e24a9b58eb740310a7c47d91afc44b39933c1f5d664457d2328ecf71572b576 13.29MB / 13.29MB                                                       51.6s
 => => sha256:9bc6c0fa41196d6a8763a9276fc7ddd6ba28427f13ab367f54c1381e2aadace5 41.53MB / 41.53MB                                                       53.7s
 => => sha256:56ec118b57b4afac941caf3d82bd1a78e7d67f4be83c709fc7509a50760f515e 7.50MB / 7.50MB                                                         54.8s
 => => sha256:badb1b86efce008a5a42855c600c113400e32dd44c85e530af9d712038d9ecb0 186.80MB / 186.80MB                                                     59.1s
 => => sha256:890830e955ecb8e9bf16ac99810c435bb1e247dd0599180901affe3850ae0807 6.78kB / 6.78kB
....
=> [13/18] RUN echo "hwloc_base_binding_policy = none" >> /opt/amazon/openmpi/etc/openmpi-mca-params.conf  && echo "rmaps_base_mapping_policy = slot"  0.3s
 => [14/18] RUN pip3 install awscli pynvml wandb                                                                                                       17.5s
 => [15/18] RUN mv /opt/amazon/openmpi/bin/mpirun /opt/amazon/openmpi/bin/mpirun.real  && echo '#!/bin/bash' > /opt/amazon/openmpi/bin/mpirun  && echo  0.3s
 => [16/18] WORKDIR /workspace/bionemo2/sub-packages/bionemo-esm2                                                                                       0.0s
 => [17/18] RUN pip install -e .                                                                                                                       69.8s
 => [18/18] WORKDIR /workspace                                                                                                                          0.0s
 => exporting to image                                                                                                                                  3.1s
 => => exporting layers                                                                                                                                 3.1s
 => => writing image sha256:0fb34e775d5c39753457404bed0df3afc6cea697bf1c6cd81f4dbc2727c15130                                                            0.0s
 => => naming to docker.io/library/bionemo-slurm:aws
4. Build Enroot Image
NVIDIA Enroot is a lightweight container runtime that allows users to run containerized applications without requiring full-fledged container engines like Docker. It is designed for HPC environments, particularly the Slurm Workload Manager. To convert Docker images to Enroot squash files:
./enroot.sh
Output:
----
Preparing  image  /fsx/ubuntu/bionemo/bionemo-slurm.sqsh ..
[INFO] Fetching image

0a9076bddd8d23a16471bc48d0ee58a3960e70be34e820e3e09fd8dfae5e5222
[INFO] Extracting image content...
Parallel mksquashfs: Using 16 processors
Creating 4.0 filesystem on /fsx/ubuntu/bionemo/bionemo-slurm.sqsh, block size 131072.
...
Number of socket nodes 0
Number of directories 36828
Number of ids (unique uids + gids) 1
Number of uids 1
        root (0)
Number of gids 1
        root (0)
5. Download UniProt training data
BioNeMo 2.5 container provides a CLI download_bionemo_data to download test or full UniProt dataset from NVIDIA Catalog which we can run as below. get-data.sh runs a container based on the Docker image created above, runs the download_bionemo_data CLI to download test data and kills the container when done and saves _sanity.tar.gz compressed file (71M) and _sanity.tar.gz.untar (134M) with training and validation data.
./get-data.sh
Output:
---
============
== PyTorch ==
=============

NVIDIA Release 25.01 (build 134983853)
PyTorch Version 2.6.0a0+ecf3bae
Container image Copyright (c) 2025, NVIDIA CORPORATION & AFFILIATES. All rights reserved.
Copyright (c) 2014-2024 Facebook Inc.
Copyright (c) 2011-2014 Idiap Research Institute (Ronan Collobert)
...
All rights reserved.

Various files include modifications (c) NVIDIA CORPORATION & AFFILIATES.  All rights reserved.

This container image and its contents are governed by the NVIDIA Deep Learning Container License.
By pulling and using the container, you accept the terms and conditions of this license:
https://developer.nvidia.com/ngc/nvidia-deep-learning-container-license

WARNING: The NVIDIA Driver was not detected.  GPU functionality will not be available.
   Use the NVIDIA Container Toolkit to start this container with GPU support; see
   https://docs.nvidia.com/datacenter/cloud-native/ .

NOTE: The SHMEM allocation limit is set to the default of 64MB.  This may be
   insufficient for PyTorch.  NVIDIA recommends the use of the following flags:
   docker run --gpus all --ipc=host --ulimit memlock=-1 --ulimit stack=67108864 ...

Downloading data from 'nvidia/clara/esm2_pretrain_nemo2_testdata:1.0' to file '/root/.cache/bionemo/006911f92bbc0ded7ea302bbdbfab4c694b409e699c32fd49de1c527a99dba3e-2024_03_sanity.tar.gz'.
{
    "download_end": "2025-05-07 23:24:09",
    "download_start": "2025-05-07 23:23:56",
    "download_time": "13s",
    "files_downloaded": 1,
    "local_path": "/root/.cache/bionemo/tmpc1vrxrpn/esm2_pretrain_nemo2_testdata_v1.0",
    "size_downloaded": "69.91 MB",
    "status": "COMPLETED"
}
Untarring contents of '/root/.cache/bionemo/006911f92bbc0ded7ea302bbdbfab4c694b409e699c32fd49de1c527a99dba3e-2024_03_sanity.tar.gz' to '/root/.cache/bionemo/006911f92bbc0ded7ea302bbdbfab4c694b409e699c32fd49de1c527a99dba3e-2024_03_sanity.tar.gz.untar'
/root/.cache/bionemo/006911f92bbc0ded7ea302bbdbfab4c694b409e699c32fd49de1c527a99dba3e-2024_03_sanity.tar.gz.untar
6. Pretrain BioNemo ESM-2 models
Now we are ready to submit distributed training jobs to pretrain ESM-2 models. We provide the train-esm.slurm script to run training on HyperPod compute nodes with respective GPU resources. Make sure data paths and model configuration is correct if you are running on custom data.
Modify the train-esm.sbatch script according to the actual GPU and EFA HyperPod cluster resources. Example:
#!/bin/bash
#SBATCH --nodes=2                    # number of HyperPod compute nodes
#SBATCH --ntasks-per-node=1         # n tasks per machine (one task per gpu) <required>
#SBATCH --exclusive                  # exclusive node access
#SBATCH --output bionemo-esm2-train-%j.out

export FI_PROVIDER=efa
export NCCL_DEBUG=INFO
To kick off distributed BioNemo model training, execute the following command:
sbatch train-esm.sbatch
Output:
Submitted batch job 1
To check the status of submitted job, run the following command:
squeue
Output:
JOBID PARTITION     NAME     USER   ST       TIME  NODES NODELIST(REASON)
      4     dev   train-es   ubuntu  R       0:07      2 ip-10-1-0-96,ip-10-1-39-225
Once training job starts you should see logs by running:
tail -f bionemo-esm2-train-4.out
Output:
--------
...
0: [NeMo I 2025-05-08 04:35:15 utils:302] Setting up optimizer with config OptimizerConfig(optimizer='adam', lr=0.0004, min_lr=None, decoupled_lr=None, decoupled_min_lr=None, weight_decay=0.01, fp16=False, bf16=True, params_dtype=torch.bfloat16, use_precision_aware_optimizer=False, main_grads_dtype=torch.float32, main_params_dtype=torch.float32, exp_avg_dtype=torch.float32, exp_avg_sq_dtype=torch.float32, loss_scale=None, initial_loss_scale=4294967296, min_loss_scale=1.0, loss_scale_window=1000, hysteresis=2, adam_beta1=0.9, adam_beta2=0.98, adam_eps=1e-08, sgd_momentum=0.9, use_distributed_optimizer=True, overlap_param_gather_with_optimizer_step=False, optimizer_cpu_offload=False, optimizer_offload_fraction=0.0, use_torch_optimizer_for_cpu_offload=False, overlap_cpu_optimizer_d2h_h2d=False, pin_cpu_grads=True, pin_cpu_params=True, clip_grad=1.0, log_num_zeros_in_grad=False, barrier_with_L1_time=False, timers=None, config_logger_dir='')
0: ┏━━━┳━━━━━━━━━━━━━━━━━━━━━━━━━━━━━━━━━━━━━┳━━━━━━━━━━━━━━━━━━━┳━━━━━━━━┳━━━━━━━┓
0: ┃   ┃ Name                                ┃ Type              ┃ Params ┃ Mode  ┃
0: ┡━━━╇━━━━━━━━━━━━━━━━━━━━━━━━━━━━━━━━━━━━━╇━━━━━━━━━━━━━━━━━━━╇━━━━━━━━╇━━━━━━━┩
0: │ 0 │ valid_metric                        │ Perplexity        │      0 │ train │
0: │ 1 │ module                              │ DDP               │  651 M │ train │
0: │ 2 │ module.module                       │ Float16Module     │  651 M │ train │
0: │ 3 │ module.module.module                │ ESM2Model         │  651 M │ train │
0: │ 4 │ module.module.module.embedding      │ ESM2Embedding     │  163 K │ train │
0: │ 5 │ module.module.module.rotary_pos_emb │ RotaryEmbedding   │      0 │ train │
0: │ 6 │ module.module.module.encoder        │ TransformerBlock  │  649 M │ train │
0: │ 7 │ module.module.module.lm_head        │ BertLMHead        │  1.6 M │ train │
0: │ 8 │ module.module.module.output_layer   │ ColumnParallelLi… │    128 │ train │
0: └───┴─────────────────────────────────────┴───────────────────┴────────┴───────┘
.....
0: Training epoch 0, iteration 28/99 | lr: 5.6e-06 | global_batch_size: 32 | global_step: 28 | reduced_train_loss: 2.778 | train_step_timing in s: 0.189 | consumed_samples: 928 | val_loss: 2.861 | val_ppl: 17.57
 0: Training epoch 0, iteration 29/99 | lr: 5.8e-06 | global_batch_size: 32 | global_step: 29 | reduced_train_loss: 2.782 | train_step_timing in s: 0.1903 | consumed_samples: 960 | val_loss: 2.861 | val_ppl: 17.57
 0: Training epoch 0, iteration 30/99 | lr: 6e-06 | global_batch_size: 32 | global_step: 30 | reduced_train_loss: 2.709 | train_step_timing in s: 0.1915 | consumed_samples: 992 | val_loss: 2.861 | val_ppl: 17.57
 0: Training epoch 0, iteration 31/99 | lr: 6.2e-06 | global_batch_size: 32 | global_step: 31 | reduced_train_loss: 2.803 | train_step_timing in s: 0.1894 | consumed_samples: 1024 | val_loss: 2.861 | val_ppl: 17.57
 0: Training epoch 0, iteration 32/99 | lr: 6.4e-06 | global_batch_size: 32 | global_step: 32 | reduced_train_loss: 2.886 | train_step_timing in s: 0.1921 | consumed_samples: 1056 | val_loss: 2.861 | val_ppl: 17.57
 0: Training epoch 0, iteration 33/99 | lr: 6.6e-06 | global_batch_size: 32 | global_step: 33 | reduced_train_loss: 2.791 | train_step_timing in s: 0.1893 | consumed_samples: 1088 | val_loss: 2.861 | val_ppl: 17.57
 0: Training epoch 0, iteration 34/99 | lr: 6.8e-06 | global_batch_size: 32 | global_step: 34 | reduced_train_loss: 2.788 | train_step_timing in s: 0.1902 | consumed_samples: 1120 | val_loss: 2.861 | val_ppl: 17.57
...
0: [NeMo I 2025-05-08 04:37:33 nemo_logging:393] Successfully saved checkpoint from iteration      99 to /fsx/ubuntu/bionemo/esm2/dev/checkpoints/epoch=0-val_loss=2.91-step=99-consumed_samples=400.0-last.ckpt
0: [NeMo I 2025-05-08 04:37:33 nemo_logging:393] Async checkpoint save for step 100 (/fsx/ubuntu/bionemo/esm2/dev/checkpoints/epoch=0-val_loss=2.91-step=99-consumed_samples=400.0-last.ckpt) finalized successfully.
0: [NeMo I 2025-05-08 04:37:35 nemo_logging:393] Async finalization time took 44.556 s
1: ip-10-1-39-225:19976:21178 [0] NCCL INFO misc/socket.cc:64 -> 3
1: ip-10-1-39-225:19976:21178 [0] NCCL INFO misc/socket.cc:80 -> 3
1: ip-10-1-39-225:19976:21178 [0] NCCL INFO misc/socket.cc:828 -> 3
1: ip-10-1-39-225:19976:20609 [0] NCCL INFO misc/socket.cc:880 -> 3
1: ip-10-1-39-225:19976:21178 [0] NCCL INFO comm 0x5a16dc30 rank 1 nranks 2 cudaDev 0 busId 1e0 - Abort COMPLETE
1: ip-10-1-39-225:19976:21191 [0] NCCL INFO comm 0x75823ff0 rank 0 nranks 1 cudaDev 0 busId 1e0 - Abort COMPLETE
Once training is done, running squeue will not show any active jobs.
To confirm model creation, you should be able see checkpoints stored in the ${TARGET_PATH}/esm2/dev/checkpoints folder:
ls -al /fsx/ubuntu/bionemo/esm2/dev/checkpoints/
Output:
------------
total 215
....
drwxrwxr-x 4 ubuntu ubuntu 25600 Mar 21 18:52 'epoch=0-val_loss=2.72-step=99-consumed_samples=3200.0'
drwxrwxr-x 4 ubuntu ubuntu 25600 Mar 21 18:52 'epoch=0-val_loss=2.72-step=99-consumed_samples=3200.0-last'
drwxrwxr-x 4 ubuntu ubuntu 25600 Mar 21 18:51 'epoch=0-val_loss=2.77-step=74-consumed_samples=2400.0'
drwxrwxr-x 4 ubuntu ubuntu 25600 May  8 04:36 'epoch=0-val_loss=2.91-step=99-consumed_samples=400.0'
drwxrwxr-x 4 ubuntu ubuntu 25600 May  8 04:36 'epoch=0-val_loss=2.91-step=99-consumed_samples=400.0-last'
drwxrwxr-x 4 ubuntu ubuntu 25600 May  8 04:36 'epoch=0-val_loss=3.04-step=74-consumed_samples=300.0'
That confirms that BioNemo ESM-2 model successfully completed training on SLURM HyperPod cluster
Deployment of EKS based SageMaker HyperPod cluster
Install dependencies and configure
- Clone the
Hyperpod-clisource repository for installation ofhyperpod-clicommand line interface
git clone https://github.com/aws/sagemaker-hyperpod-cli.git
cd sagemaker-hyperpod-cli/helm_chart
- Install the corresponding Helm Chart
Locally test the helm chart:
helm lint HyperPodHelmChart
Update the dependencies:
helm dependencies update HyperPodHelmChart
Conduct a dry run:
helm install dependencies HyperPodHelmChart --dry-run
Deploy the helm chart:
helm install dependencies HyperPodHelmChart --namespace kube-system
- Create SageMaker HyperPod EKS cluster
Now that we have all our infrastructure in place, we can provision a cluster.
You need to setup few environment variables required for creating cluster. You will need to set the below environment parameters accordingly as per your requirement.
export ACCEL_INSTANCE_TYPE=ml.g5.12xlarge #change this
export AWS_REGION=us-west-2 #change this
export ACCEL_COUNT=1 #change this
export ACCEL_VOLUME_SIZE=500 #the size in GB of the EBS volume attached to the compute node.
export GEN_INTANCE_TYPE= ml.m5.2xlarge	#The general purpose compute instance type you want to use
export GEN_COUNT=1	#The number of general purpose compute nodes you want to deploy
export GEN_VOLUME_SIZE=500 #The size in GB of the EBS volume attached to the general purpose compute nodes
export NODE_RECOVEY=AUTOMATIC
If you have used the full deployment option while deploying cloud formation you can use the helper script (create_config.sh to retreive all the required settings.
If you used Integrative Deployment Mode, set the below parameters:
export EKS_CLUSTER_ARN=<YOUR_EKS_CLUSTER_ARN_HERE>
export EKS_CLUSTER_NAME=<YOUR_EKS_CLUSTER_NAME_HERE>
If you used minimal deployment option you will have to explicitly set the below environment variables:
export EKS_CLUSTER_ARN=<YOUR_EKS_CLUSTER_ARN_HERE>
export EKS_CLUSTER_NAME=<YOUR_EKS_CLUSTER_NAME_HERE>
export VPC_ID=<YOUR_VPC_ID_HERE>
export SUBNET_ID=<YOUR_SUBNET_ID_HERE>
export SECURITY_GROUP=<YOUR_SECURITY_GROUP_ID_HERE>
Once set you can run the create_config.sh to set all the required environment variables.
export STACK_ID=hyperpod-eks-full-stack # change this accordingly
bash ./create_config.sh
source env_vars
Lifecycle Scripts
Clone the repository (if have not done that before) and navigate to the corresponding deployment instructions folder:
git clone https://github.com/aws-solutions-library-samples/guidance-for-protein-language-esm-model-training-with-nvidia-bionemo-framework.git
cd guidance-for-protein-language-esm-model-training-with-sagemaker-hyperpod/infra/hyperpod/eks
Lifecycle scripts tell SageMaker HyperPod how to setup your HyperPod cluster. You can use this to install any node level customizations needed for your cluster. We provide a base configuration to get started. Below is a brief description of what each script is doing.
| Script | Description |
|---|---|
| on_create.sh | Required dummy script that is needed to create cluster |
For now, let’s just use the base configuration provided. Upload the scripts to the bucket you created earlier.
aws s3 cp --recursive LifecycleScripts/base-config s3://${BUCKET_NAME}/LifecycleScripts/base-config
Cluster configuration
Next, we can configure our actual cluster. In this case, we are creating a cluster with 2 Instance Groups: One with ml.m5.2xlarge instance and one with ml.g5.12xlarge instance.
Note - You can modify the number of instance groups as per your requirement. It is not mandatory to have 2 instance groups for cluster creation.
Start by creating cluster-config.json cluster configuration using the below snippet that uses the environment variables.
cat > cluster-config.json << EOL
{
    "ClusterName": "ml-cluster",
    "Orchestrator": {
      "Eks":
      {
        "ClusterArn": "${EKS_CLUSTER_ARN}"
      }
    },
    "InstanceGroups": [
      {
        "InstanceGroupName": "worker-group-1",
        "InstanceType": "${ACCEL_INSTANCE_TYPE}",
        "InstanceCount": ${ACCEL_COUNT},
        "InstanceStorageConfigs": [
          {
            "EbsVolumeConfig": {
              "VolumeSizeInGB": ${ACCEL_VOLUME_SIZE}
            }
          }
        ],
        "LifeCycleConfig": {
          "SourceS3Uri": "s3://${BUCKET_NAME}",
          "OnCreate": "on_create.sh"
        },
        "ExecutionRole": "${EXECUTION_ROLE}",
        "ThreadsPerCore": 1,
        "OnStartDeepHealthChecks": ["InstanceStress", "InstanceConnectivity"]
      },
      {
        "InstanceGroupName": "worker-group-2",
        "InstanceType": "${GEN_INSTANCE_TYPE}",
        "InstanceCount": ${GEN_COUNT},
        "InstanceStorageConfigs": [
          {
            "EbsVolumeConfig": {
              "VolumeSizeInGB": ${GEN_VOLUME_SIZE}
            }
          }
        ],
        "LifeCycleConfig": {
          "SourceS3Uri": "s3://${BUCKET_NAME}",
          "OnCreate": "on_create.sh"
        },
        "ExecutionRole": "${EXECUTION_ROLE}",
        "ThreadsPerCore": 1
      }
    ],
    "VpcConfig": {
      "SecurityGroupIds": ["$SECURITY_GROUP"],
      "Subnets":["$SUBNET_ID"]
    },
    "NodeRecovery": "${NODE_RECOVERY}"
}
EOL
- You can configure up to 20 instance groups under the
InstanceGroupsparameter. - For
Orchestrator.Eks.ClusterArn, specify the ARN of the EKS cluster you want to use as the orchestrator. - For
OnStartDeepHealthChecks, addInstanceStressandInstanceConnectivityto enable deep health checks. - For
NodeRecovery, specifyAutomaticto enable automatic node recovery. HyperPod replaces or reboots instances (nodes) that fail the basic health or deep health checks (when enabled). - For the
VpcConfigparameter, specify the information of the VPC used in the EKS cluster. The subnets must be private
Launch a new cluster
Now that everything is in place, we can launch our EKS based HyperPod cluster with the command below:
aws sagemaker create-cluster \
    --cli-input-json file://cluster-config.json \
    --region $AWS_REGION
You can see the current state of the cluster with this command:
aws sagemaker list-clusters \
 --output table \
 --region $AWS_REGION
You’ll see output similar to the following:
-------------------------------------------------------------------------------------------------------------------------------------------------
|                                                                 ListClusters                                                                  |
+-----------------------------------------------------------------------------------------------------------------------------------------------+
||                                                              ClusterSummaries                                                               ||
|+----------------------------------------------------------------+----------------------+----------------+------------------------------------+|
||                           ClusterArn                           |     ClusterName      | ClusterStatus  |           CreationTime             ||
|+----------------------------------------------------------------+----------------------+----------------+------------------------------------+|
||  arn:aws:sagemaker:us-west-2:xxxxxxxxxxxx:cluster/uwme6r18mhic |  ml-cluster          |  Creating     |  2024-07-11T16:30:42.219000-04:00   ||
|+----------------------------------------------------------------+----------------------+----------------+------------------------------------+|
You can find more details about HyperPod EKS cluster deployment and validation in this README including script for automated HyperPod cluster creation such as this one
Deployment Validation - HyperPod EKS based Cluster
Connect to HyperPod EKS cluster
Once you’ve deployed the HyperPod Infrastructure, we’ll reference the EKS cluster as the orchestrator of the HyperPod compute nodes.
By default, the Amazon EKS service will automatically create an AccessEntry with AmazonEKSClusterAdminPolicy permissions for the IAM principal that you use to deploy the CloudFormation stack, which includes an EKS cluster resource. You can create additional access entries later through the EKS management console or the AWS CLI. For more information, see the documentation on managing access entries.
The create-access-entry command creates an access entry that gives an IAM principal access your EKS cluster:
aws eks create-access-entry \
 --cluster-name $EKS_CLUSTER_NAME \
 --principal-arn arn:aws:iam::xxxxxxxxxxxx:role/ExampleRole \
 --type STANDARD \
 --region $AWS_REGION
The associate-access-policy command associates an access policy and its scope to an access entry:
aws eks associate-access-policy \
 --cluster-name $EKS_CLUSTER_NAME \
 --principal-arn arn:aws:iam::xxxxxxxxxxxx:role/ExampleRole \
 --policy-arn arn:aws:eks::aws:cluster-access-policy/AmazonEKSClusterAdminPolicy \
 --access-scope type=cluster \
 --region $AWS_REGION
Run the aws eks update-kubeconfig command to update your local kubeconfig file (located at ~/.kube/config) with the credentials and configuration needed to connect to your EKS cluster using the kubectl command.
aws eks update-kubeconfig --name $EKS_CLUSTER_NAME
You can verify that you are connected to the EKS cluster by running this commands:
kubectl config current-context
arn:aws:eks:us-west-2:xxxxxxxxxxxx:cluster/hyperpod-eks-cluster
kubectl get svc
NAME             TYPE        CLUSTER-IP   EXTERNAL-IP PORT(S)   AGE
svc/kubernetes   ClusterIP   10.100.0.1   <none>      443/TCP   1m
SSH into instances in the HyperPod EKS Cluster
To SSH into the instances, you need the cluster ID from the cluster ARN, instance ID of your node, and instance group name of your controller group. You can your HyperPod cluster ID with
aws sagemaker describe-cluster --cluster-name ml-cluster --region us-west-2

{
    "ClusterArn": "arn:aws:sagemaker:us-west-2:123456789012:cluster/2hd31rmi9mde",
    "ClusterName": "ml-cluster",
In this case, the cluster ID is 2hd31rmi9mde
Get your machine instance ID with this command:
aws sagemaker list-cluster-nodes --cluster-name ml-cluster --region us-west-2

{
    "NextToken": "",
    "ClusterNodeSummaries": [
        {
            "InstanceGroupName": "controller-machine",
            "InstanceId": "i-09e7576cbc230c181",
            "InstanceType": "ml.c5.xlarge",
            "LaunchTime": "2023-11-26T15:28:20.665000-08:00",
            "InstanceStatus": {
                "Status": "Running",
                "Message": ""
            }
        },
And login with
CLUSTER_ID=2hd31rmi9mde
CONTROLLER_GROUP=controller-machine
INSTANCE_ID=i-09e7576cbc230c181
TARGET_ID=SageMaker-cluster:${CLUSTER_ID}_${CONTROLLER_GROUP}-${INSTANCE_ID}
aws ssm start-session --target $TARGET_ID
Training ESM-2 models on HyperPod EKS Based Cluster with PyTorch framework
This section of Implementation Guide covers training ESM-2 models on SageMaker HyperPod clusters EKS based orchestration.
Below is the Reference Architecture for training models on HyperPod EKS based cluster:
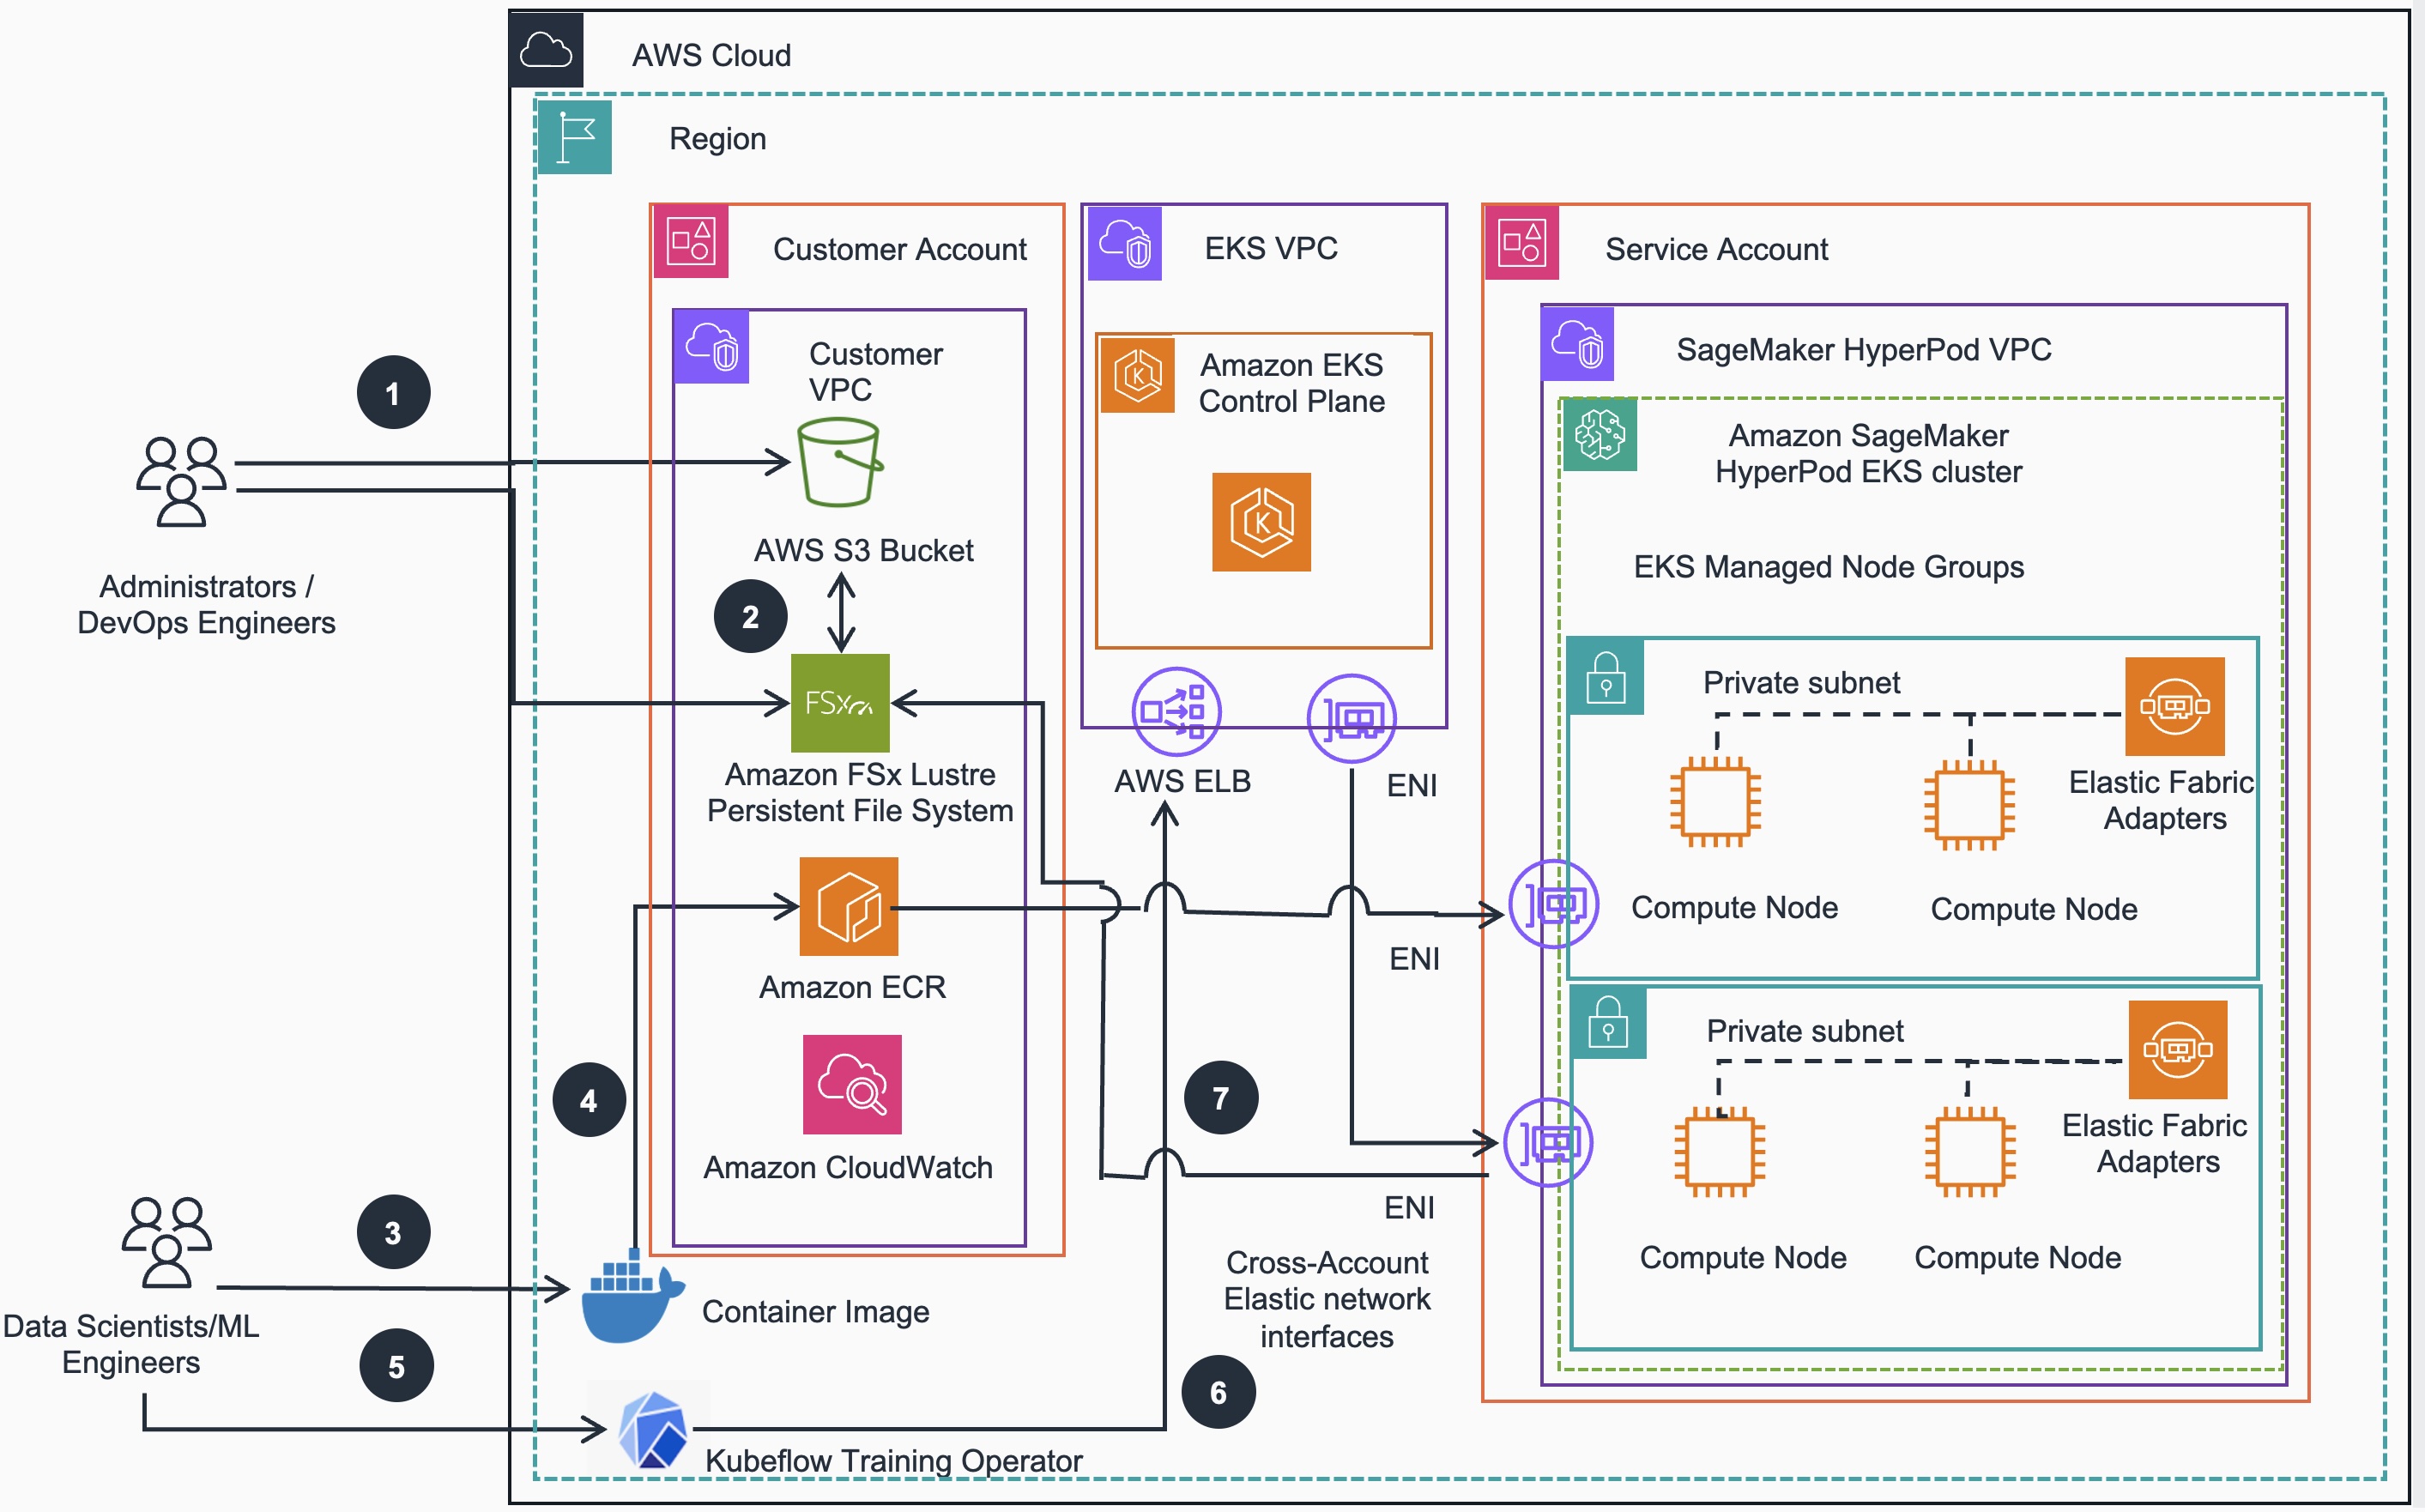
Model training workflow steps:
- Administrators/DevOps Engineers move their training data from on-premise storage to an AWS S3 bucket
- Administrators/DevOps Engineers can create Data Repository Associations between S3 and FSx for Lustre storage
- Data scientists/ML Engineers build AWS optimized Docker container images with a base image
- Data scientists/ML Engineers push Docker images to Amazon ECR
- Administrators/DevOps Engineers deploy Kubeflow Training operators to EKS cluster to orchestrate PyTorch based distributed training jobs on the HyperPod cluster.
- Data scientists/ML Engineers deploy Kubernetes model training manifests that reference ESM dataset and use container images built in Step 3 to kick-start training jobs on the compute nodes.
- HyperPod cluster compute nodes write checkpoints to the shared FSx file system. Data Scientists can monitor the training process via logs to determine when training job is completed..
Available ESM-2 models on HuggingFace
- facebook/esm2_t6_8M_UR50D
- facebook/esm2_t12_35M_UR50D
- facebook/esm2_t30_150M_UR50D
- facebook/esm2_t33_650M_UR50D
- facebook/esm2_t36_3B_UR50D
- facebook/esm2_t48_15B_UR50D
1. Setup environment variables
Navigate to the following source code folder corresponding to this model and infrastructure:
cd guidance-for-protein-language-esm-model-training-with-sagemaker-hyperpod/train/esm2/eks/pytorch
SSH into the head or login node of your cluster or connect to VM that has access to its Kubernetes API and run:
# Path to save training data and checkpoints
export TARGET_PATH=/fsx-shared/esm
export DOCKER_IMAGE_NAME=esm
export TAG=aws
export MODEL=facebook/esm2_t36_3B_UR50D
#use specific AWS region
export AWS_REGION=us-east-1
export ACCOUNT=$(aws sts get-caller-identity --query Account --output text)
export REGISTRY=${ACCOUNT}.dkr.ecr.${AWS_REGION}.amazonaws.com/

export GPU_PER_NODE=8
export EFA_PER_NODE=32

export NUM_NODES=2
export OUTPUT_DIR=/fsx-shared
or just source the env.conf file to set up those values:
source ./env.conf
2. Build and push Docker Image
We provide an AWS optimized Dockerfile that sets up networking components (EFA, AWS-OFI-NCCL) for a multi-node cluster correctly:
./build.sh
Once container image is built, you can push the it image to ECR as follows:
./push.sh
3. Prepare dataset of training data
Next we need to download the Uniref50 training data. You can do so by running the following K8s job:
cat download-data-template.yaml | envsubst > download-data-real.yaml
Then apply it via CLI call:
kubectl apply -f download-data-real.yaml
Output:
job/download-uniref-data created
It would download the data and partitions the data in 50 .csv files in the folder specified by the TARGET_PATH environment variable. The whole process should take less than 30 mins. You can monitor the process by tailing the pod created by the Job:
kubectl logs -f download-uniref-data-g245r
Output:
05/21/2025 21:35:03 - INFO - Parsing arguments
05/21/2025 21:35:03 - INFO - Downloading FASTA
05/21/2025 21:35:03 - INFO - Downloading https://ftp.uniprot.org/pub/databases/uniprot/uniref/uniref50/uniref50.fasta.gz to /workspace/tmphdt41nh1/fasta
https://ftp.uniprot.org/pub/databases/uniprot/uniref/uniref50/uniref50.fasta.gz: 100%|██████████| 13.6G/13.6G [01:05<00:00, 222MB/s]
05/21/2025 21:36:08 - INFO - Generating csv files
Reading FASTA file
498366it [00:10, 68862.07it/s]05/21/2025 21:36:19 - INFO - Writing 500000 records to /fsx-shared/esm/csv/x000.csv
992530it [00:32, 90643.92it/s]05/21/2025 21:36:41 - INFO - Writing 500000 records to /fsx-shared/esm/csv/x001.csv
1490619it [00:47, 103665.90it/s]05/21/2025 21:36:55 - INFO - Writing 500000 records to /fsx-shared/esm/csv/x002.csv
1992703it [00:59, 114299.16it/s]05/21/2025 21:37:08 - INFO - Writing 500000 records to /fsx-shared/esm/csv/x003.csv
2491566it [01:10, 124266.36it/s]05/21/2025 21:37:18 - INFO - Writing 500000 records to /fsx-shared/esm/csv/x004.csv
2987781it [01:19, 132450.56it/s]05/21/2025 21:37:28 - INFO - Writing 500000 records to /fsx-shared/esm/csv/x005.csv
...
8957193it [08:17, 686030.19it/s]04/18/2025 22:13:06 - INFO - Writing 500000 records to /fsx-shared/esm/csv/x137.csv
69290910it [08:18, 139067.03it/s]
04/18/2025 22:13:07 - INFO - Writing 290910 records to /fsx-shared/esm/csv/x138.csv
04/18/2025 22:13:09 - INFO - Save complete
If we check status of launched job and corresponding pod, they should be Complete and Completed respectively:
kubectl get job,po
Output:
NAME                             STATUS     COMPLETIONS   DURATION   AGE
job.batch/download-uniref-data   Complete   1/1           14m        24m

NAME                                                             READY   STATUS      RESTARTS      AGE
pod/download-uniref-data-g245r                                   0/1     Completed   0             24m
pod/fsx-share-test                                               1/1     Running     0             11m
pod/hyperpod-dependencies-aws-efa-k8s-device-plugin-dlxs8        1/1     Running     0             27h
We can also valildate contents of the shared data directory fsx-shared/esm using the provided view-fsx.yaml deployment descriptor that creates a pod with that directory mounted:
kubectl apply -f view-fsx.yaml
Output:
pod/fsx-share-test created
Using that pod, we can get “inside” and review contents of the shared data folder:
kubectl exec -it fsx-share-test -- ls -ltr /fsx-shared/esm/csv
Output:
total 20593930
-rw-r--r-- 1 root root 1338965519 May 21 21:36 x000.csv
-rw-r--r-- 1 root root  739136803 May 21 21:36 x001.csv
-rw-r--r-- 1 root root  608770034 May 21 21:37 x002.csv
-rw-r--r-- 1 root root  537187950 May 21 21:37 x003.csv
-rw-r--r-- 1 root root  487469687 May 21 21:37 x004.csv
-rw-r--r-- 1 root root  449800266 May 21 21:37 x005.csv
-rw-r--r-- 1 root root  419801146 May 21 21:37 x006.csv
...
-rw-r--r-- 1 root root   35932545 May 21 21:44 x135.csv
-rw-r--r-- 1 root root   32936597 May 21 21:44 x136.csv
-rw-r--r-- 1 root root   29808230 May 21 21:44 x137.csv
-rw-r--r-- 1 root root   23821111 May 21 21:44 x138.csv
4. Convert CSVs to HuggingFace Dataset and Tokenize
Next we need to tokenize the dataset in order to provide training data in the specified format. This will split the data in training, test and validation folders, tokenize them and save the arrow files in processed folder.
cat preprocess-template.yaml | envsubst > preprocess-data.yaml

A simpler version of the preprocessing data job file is below:

```bash
cat preprocess-data-new.yaml
apiVersion: v1
kind: Pod
metadata:
  name: preprocess-data
spec:
  containers:
  - name: preprocess-data
    image: 35491XXXXXX.dkr.ecr.us-east-1.amazonaws.com/esm:aws-new
    command: ["/bin/bash"]
    args: ["-c", "python3 1.tokenize_uniref_csv.py --input_dir /fsx-shared/esm/csv --output_dir /fsx-shared/esm/processed"]
    volumeMounts:
    - name: volume
      mountPath: /fsx-shared
  volumes:
  - name: volume
    persistentVolumeClaim:
      claimName: fsx-claims
For smaller footprint compute nodes (like ml.g5.8xlarge) use the following caching configuration in the env section:
cat preprocess-data.yaml
------
apiVersion: v1
kind: Pod
metadata:
  name: preprocess-data
spec:
  containers:
  - name: preprocess-data
    image: 35491XXXXXX.dkr.ecr.us-east-1.amazonaws.com/esm:aws
    imagePullPolicy: Always

    command: ["/bin/bash"]
    args: ["-c", "python3 1.tokenize_uniref_csv.py --input_dir /fsx-shared/esm/csv --output_dir /fsx-shared/esm/processed"]
    env:
      - name: TRANSFORMERS_CACHE
        value: "/fsx-shared/.cache/models"
      - name: HF_DATASETS_CACHE
        value: "/fsx-shared/.cache/datasets"
      - name: HF_HOME
        value: "/fsx-shared/.cache/hfhome"
    volumeMounts:
    - name: volume
      mountPath: /fsx-shared
  volumes:
  - name: volume
    persistentVolumeClaim:
      claimName: fsx-claim
Then initiate pre-processing job using generated deployment descriptor:
kubectl apply -f preprocess-data.yaml
Output:
pod/preprocess-data created
You can check the progress of data pre-processing by tailing that pod log:
kubectl logs -f preprocess-data
Output:
05/21/2025 22:02:00 - INFO - Parsing arguments
05/21/2025 22:02:00 - INFO - Loading csv files from /fsx-shared/esm/csv
Downloading data: 100%|██████████| 18/18 [00:00<00:00, 11893.11files/s]
Downloading data: 100%|██████████| 18/18 [00:00<00:00, 41688.28files/s]
Downloading data: 100%|██████████| 18/18 [00:00<00:00, 12151.53files/s]
Downloading data: 100%|██████████| 18/18 [00:00<00:00, 19210.55files/s]
Downloading data: 100%|██████████| 18/18 [00:00<00:00, 11163.31files/s]
Downloading data: 100%|██████████| 18/18 [00:00<00:00, 59028.52files/s]
Downloading data: 100%|██████████| 18/18 [00:00<00:00, 14725.47files/s]
Generating train split: 69488478 examples [00:44, 1576533.60 examples/s]
05/21/2025 22:02:49 - INFO - DatasetDict({
    train: Dataset({
        features: ['text'],
        num_rows: 69488478
    })
})
05/21/2025 22:02:49 - INFO - Splitting dataset
Flattening the indices: 100%|██████████| 10000000/10000000 [01:20<00:00, 124318.23 examples/s]
Flattening the indices: 100%|██████████| 50000/50000 [00:00<00:00, 117854.94 examples/s]
Flattening the indices: 100%|██████████| 50000/50000 [00:00<00:00, 116411.89 examples/s]
05/21/2025 22:04:16 - INFO - Saving splits to csv
...
05/21/2025 22:45:41 - INFO - Processing line by line
Running tokenizer on dataset line_by_line (num_proc=8): 100%|██████████| 10000000/10000000 [12:36<00:00, 13211.30 examples/s]
Running tokenizer on dataset line_by_line (num_proc=8): 100%|██████████| 50000/50000 [00:05<00:00, 9848.93 examples/s]
Running tokenizer on dataset line_by_line (num_proc=8): 100%|██████████| 50000/50000 [00:05<00:00, 9857.74 examples/s]
Saving the dataset (62/62 shards): 100%|██████████| 10000000/10000000 [00:51<00:00, 193657.14 examples/s]
Saving the dataset (1/1 shards): 100%|██████████| 50000/50000 [00:00<00:00, 190996.75 examples/s]
Saving the dataset (1/1 shards): 100%|██████████| 50000/50000 [00:00<00:00, 198004.43 examples/s]
To review the status of data tokenization, we can use the same fsx-share-test pod used in previous step and run the following command:
kubectl exec -it fsx-share-test -- ls -ltr /fsx-shared/esm/processed/arrow/train
Output:
total 7126383
-rw-r--r-- 1 root root 497488288 Apr 24 20:26 data-00000-of-00062.arrow
-rw-r--r-- 1 root root 497488288 Apr 24 20:26 data-00001-of-00062.arrow
-rw-r--r-- 1 root root 497488288 Apr 24 20:26 data-00002-of-00062.arrow
-rw-r--r-- 1 root root 497488288 Apr 24 20:26 data-00003-of-00062.arrow
-rw-r--r-- 1 root root 497488288 Apr 24 20:26 data-00004-of-00062.arrow
-rw-r--r-- 1 root root 497488288 Apr 24 20:26 data-00005-of-00062.arrow
-rw-r--r-- 1 root root 497488288 Apr 24 20:26 data-00006-of-00062.arrow
-rw-r--r-- 1 root root 497488288 Apr 24 20:26 data-00007-of-00062.arrow
-rw-r--r-- 1 root root 497488288 Apr 24 20:26 data-00008-of-00062.arrow
-rw-r--r-- 1 root root 497488288 Apr 24 20:26 data-00009-of-00062.arrow
-rw-r--r-- 1 root root 497488288 Apr 24 20:26 data-00010-of-00062.arrow
...
-rw-r--r-- 1 root root 497485216 May 21 22:19 data-00060-of-00062.arrow
-rw-r--r-- 1 root root      3846 May 21 22:19 state.json
-rw-r--r-- 1 root root     15333 May 21 22:19 dataset_info.json
-rw-r--r-- 1 root root 497485216 May 21 22:19 data-00061-of-00062.arrow
5. Training ESM-2 Model Using DDP Framework
Now we are ready to submit distributed training jobs to pretrain ESM-2 models. We provide the train-ddp-template.yaml template to run training on HyperPod EKS cluster compute nodes with certain number of GPUs, per node specification. Make sure data paths and model configuration is correct if you are running on custom data set.
To kick off DDP framework based distributed training execute, we first need to generate specific training job manifest for K8s:
cat train-ddp-template.yaml | envsubst > train-ddp.yaml
cat train-ddp.yaml
-----
apiVersion: v1
kind: Service
metadata:
  name: etcd
spec:
  ports:
    - name: etcd-client-port
      port: 2379
      protocol: TCP
      targetPort: 2379
  selector:
    app: etcd

---
apiVersion: apps/v1
kind: Deployment
metadata:
  labels:
    app: etcd
  name: etcd
spec:
  replicas: 1
  selector:
    matchLabels:
      app: etcd
  template:
    metadata:
      labels:
        app: etcd
    spec:
      containers:
        - name: etcd
          command: ["/usr/local/bin/etcd"]
          args:
            - "--data-dir"
            - "/var/lib/etcd"
            - "--enable-v2"
            - "--listen-client-urls"
            - "http://0.0.0.0:2379"
            - "--advertise-client-urls"
            - "http://0.0.0.0:2379"
            - "--initial-cluster-state"
            - "new"
          image: quay.io/coreos/etcd:v3.5.19
          ports:
            - containerPort: 2379
              name: client
              protocol: TCP
            - containerPort: 2380
              name: server
              protocol: TCP
      restartPolicy: Always
---
apiVersion: "kubeflow.org/v1"
kind: PyTorchJob
metadata:
  name: esm2
spec:
  elasticPolicy:
    rdzvBackend: etcd
    rdzvHost: etcd
    rdzvPort: 2379
    minReplicas: 1
    maxReplicas: 64
    maxRestarts: 100
    metrics:
      - type: Resource
        resource:
          name: cpu
          target:
            type: Utilization
            averageUtilization: 90
  pytorchReplicaSpecs:
    Worker:
      replicas: 4
      template:
        metadata:
          annotations:
            sidecar.istio.io/inject: "false"
        spec:
          tolerations:
            - key: nvidia.com/gpu
              operator: Exists
              effect: NoSchedule
          volumes:
          - name: fsx-pv-storage
            persistentVolumeClaim:
              claimName: fsx-claim
          containers:
            - name: pytorch
              image: 35491XXXXXX.dkr.ecr.us-east-1.amazonaws.com/esm:aws
              resources:
                requests:
                  nvidia.com/gpu: 1
                  vpc.amazonaws.com/efa: 1
                limits:
                  nvidia.com/gpu: 1
                  vpc.amazonaws.com/efa: 1
              env:
                - name: NCCL_DEBUG
                  value: "INFO"
              volumeMounts:
                - mountPath: /fsx-shared
                  name: fsx-pv-storage
              imagePullPolicy: Always
              command:
                - "torchrun"
                - --nproc_per_node=1
                - --nnodes=4
                - /workspace/train.py
                - --config_name=facebook/esm2_t6_8M_UR50D
                - --dataloader_num_workers=8
                - --bf16=True
                - --do_eval=True
                - --do_preprocess=False
                - --do_train=True
                - --gradient_accumulation_steps=1
                - --logging_steps=16
                - --num_train_epochs=1
                - --output_dir=/fsx-shared/esm/trained
                - --per_device_train_batch_size=8
                - --max_train_samples=100000
                - --tokenizer_name=facebook/esm2_t6_8M_UR50D
                - --dataset_dir=/fsx-shared/esm/processed/arrow
                - --torch_compile=True
                - --pad_to_max_length=True
                - --max_seq_length=512
                - --ddp_bucket_cap_mb=125
To initiate training, run the following command generated PyTorchJob deployment descriptor
kubectl apply -f train-ddp.yaml
Output:
service/etcd created
deployment.apps/etcd created
pytorchjob.kubeflow.org/esm2 created
To validate status of the ESM-2 training job containers, run the following command (assuming they run in the default namespace):
kubectl get job,po
Output:
NAME                                                             READY   STATUS              RESTARTS         AGE
pod/download-uniref-data                                         1/1     Running             11 (3m34s ago)   116m
pod/esm2-worker-0                                                0/1     ContainerCreating    3 (30s ago)      2m4s
pod/esm2-worker-1                                                0/1     ContainerCreating   0                2m4s
pod/esm2-worker-2                                                0/1     ContainerCreating   0                2m4s
pod/esm2-worker-3                                                0/1     ContainerCreating   0                2m4s
To trace the training job logs, run the following command:
kubectl logs -f esm2-worker-0
Output:
--
esm2-worker-0:53:269 [0] NCCL INFO [Proxy Service] Device 0 CPU core 10
esm2-worker-0:53:270 [0] NCCL INFO [Proxy Service UDS] Device 0 CPU core 15
esm2-worker-0:53:267 [0] NCCL INFO threadThresholds 8/8/64 | 32/8/64 | 512 | 512
esm2-worker-0:53:267 [0] NCCL INFO 2 coll channels, 2 collnet channels, 0 nvls channels, 2 p2p channels, 2 p2p channels per peer
esm2-worker-0:53:267 [0] NCCL INFO TUNER/Plugin: Failed to find ncclTunerPlugin_v4 symbol.
esm2-worker-0:53:267 [0] NCCL INFO TUNER/Plugin: Failed to find ncclTunerPlugin_v3 symbol.
esm2-worker-0:53:267 [0] NCCL INFO TUNER/Plugin: Failed to find ncclTunerPlugin_v2 symbol, using internal tuner instead.
esm2-worker-0:53:267 [0] NCCL INFO ncclCommInitRankConfig comm 0x36477e40 rank 3 nranks 4 cudaDev 0 nvmlDev 0 busId 1e0 commId 0x15c1c76db987339e - Init COMPLETE
esm2-worker-0:53:267 [0] NCCL INFO Init timings - ncclCommInitRankConfig: rank 3 nranks 4 total 1.16 (kernels 0.18, alloc 0.04, bootstrap 0.93, allgathers 0.00, topo 0.00, graphs 0.00, connections 0.00, rest 0.00)
esm2-worker-0:53:272 [0] NCCL INFO [Proxy Progress] Device 0 CPU core 24
esm2-worker-0:53:271 [0] NCCL INFO Channel 00/0 : 2[0] -> 3[0] [receive] via NET/Socket/0
esm2-worker-0:53:271 [0] NCCL INFO Channel 01/0 : 2[0] -> 3[0] [receive] via NET/Socket/0
esm2-worker-0:53:271 [0] NCCL INFO Channel 00/0 : 3[0] -> 0[0] [send] via NET/Socket/0
esm2-worker-0:53:271 [0] NCCL INFO Channel 01/0 : 3[0] -> 0[0] [send] via NET/Socket/0
esm2-worker-0:53:271 [0] NCCL INFO Connected all rings, use ring PXN 0 GDR 0
[INFO|trainer.py:2128] 2025-04-24 20:44:49,943 >> ***** Running training *****
[INFO|trainer.py:2129] 2025-04-24 20:44:49,943 >>   Num examples = 100,000
[INFO|trainer.py:2130] 2025-04-24 20:44:49,943 >>   Num Epochs = 1
[INFO|trainer.py:2131] 2025-04-24 20:44:49,943 >>   Instantaneous batch size per device = 8
[INFO|trainer.py:2134] 2025-04-24 20:44:49,943 >>   Total train batch size (w. parallel, distributed & accumulation) = 32
[INFO|trainer.py:2135] 2025-04-24 20:44:49,943 >>   Gradient Accumulation steps = 1
[INFO|trainer.py:2136] 2025-04-24 20:44:49,943 >>   Total optimization steps = 3,125
[INFO|trainer.py:2137] 2025-04-24 20:44:49,943 >>   Number of trainable parameters = 7,840,794
Depending on the dataset size, it can take variable time to complete the training jobs by ESM-2 training pods. After the ESM model training worker pods finish training jobs, they will be in COMPLETE state:
kubectl get pytorchjob,po
Output:
NAME                           STATE       AGE
pytorchjob.kubeflow.org/esm2   Succeeded   40m

NAME                                                             READY   STATUS      RESTARTS      AGE
pod/esm2-worker-0                                                0/1     Completed   0             40m
pod/esm2-worker-1                                                0/1     Completed   0             40m
pod/esm2-worker-2                                                0/1     Completed   0             40m
pod/esm2-worker-3                                                0/1     Completed   0             40m
Finally, to verify that model training has been indeed complete, you can display that following file with contents like shown below is expected at the $OUTPUT_DIR shared directory using the “helper” pod fsx-share-test:
kubectl exec -it fsx-share-test -- cat /fsx-shared/esm/output/train_results.json
Output:
{
    "epoch": 1.0,
    "total_flos": 2304587980079104.0,
    "train_loss": 2.638172448425293,
    "train_runtime": 278.2115,
    "train_samples": 100000,
    "train_samples_per_second": 359.439,
    "train_steps_per_second": 11.232
}
7. Training ESM-2 model Using FSDP Framework
Fully Sharded Data Parallel (FSDP) is an open-source distributed training technique provided by PyTorch. While Data Parallelism (DP) with no model sharding is typically the go-to method when a model fits within the memory of a single GPU, FSDP becomes an effective alternative for training models that exceed the memory capacity of a single GPU.
In order to prepare a FSDP based training job, to generate specific training job manifest for K8s similar to how we did for DDP based training:
cat train-fsdp-template.yaml | envsubst > train-fsdp.yaml
cat train-fsdp.yaml
--
apiVersion: v1
kind: Service
metadata:
  name: etcd
spec:
  ports:
    - name: etcd-client-port      port: 2379
      protocol: TCP
      targetPort: 2379
  selector:
    app: etcd

---
apiVersion: apps/v1
kind: Deployment
metadata:
  labels:
    app: etcd
  name: etcd
spec:
  replicas: 1
  selector:
    matchLabels:
      app: etcd
  template:
    metadata:
      labels:
        app: etcd
    spec:
      containers:
        - name: etcd
          command: ["/usr/local/bin/etcd"]
          args:
            - "--data-dir"
            - "/var/lib/etcd"
            - "--enable-v2"
            - "--listen-client-urls"
            - "http://0.0.0.0:2379"
            - "--advertise-client-urls"
            - "http://0.0.0.0:2379"
            - "--initial-cluster-state"
            - "new"
          image: quay.io/coreos/etcd:v3.5.19
          ports:
            - containerPort: 2379
              name: client
              protocol: TCP
            - containerPort: 2380
              name: server
              protocol: TCP
      restartPolicy: Always
---
apiVersion: "kubeflow.org/v1"
kind: PyTorchJob
metadata:
  name: esm2
spec:
  elasticPolicy:
    rdzvBackend: etcd
    rdzvHost: etcd
    rdzvPort: 2379
    minReplicas: 1
    maxReplicas: 64
    maxRestarts: 100
    metrics:
      - type: Resource
        resource:
          name: cpu
          target:
            type: Utilization
            averageUtilization: 90
  pytorchReplicaSpecs:
    Worker:
      replicas: 4
      template:
        metadata:
          annotations:
            sidecar.istio.io/inject: "false"
        spec:
          tolerations:
            - key: nvidia.com/gpu
              operator: Exists
              effect: NoSchedule
          volumes:
          - name: fsx-pv-storage
            persistentVolumeClaim:
              claimName: fsx-claim
          containers:
            - name: pytorch
              image: 35491XXXXXX.dkr.ecr.us-east-1.amazonaws.com/esm:aws
              resources:
                requests:
                  nvidia.com/gpu: 1
                  vpc.amazonaws.com/efa: 1
                limits:
                  nvidia.com/gpu: 1
                  vpc.amazonaws.com/efa: 1
              env:
                - name: NCCL_DEBUG
                  value: "INFO"
              volumeMounts:
                - mountPath: /fsx-shared
                  name: fsx-pv-storage
              imagePullPolicy: Always
              command:
                - accelerate
                - launch
                - --num_processes=2 # Total GPUs
                - --num_machines=2 # Num Nodes
                - --machine_rank=$(POD_RANK)
                - --rdzv_backend=etcd
                - --main_process_port=2379
                - --main_process_ip=etcd
                - --use_fsdp
                - --fsdp_sharding_strategy=FULL_SHARD
                - --fsdp_auto_wrap_policy=TRANSFORMER_BASED_WRAP
                - --fsdp_transformer_layer_cls_to_wrap=EsmLayer
                - --fsdp_backward_prefetch=BACKWARD_PRE
                - --fsdp_cpu_ram_efficient_loading=True
                - --fsdp_sync_module_states=True
                - --fsdp_use_orig_params=True
                - /workspace/train.py
                - --config_name=facebook/esm2_t6_8M_UR50D
                - --dataloader_num_workers=2
                - --bf16=True
                - --do_eval=True
                - --do_preprocess=False
                - --do_train=True
                - --gradient_accumulation_steps=11
                - --logging_steps=16
                - --num_train_epochs=1
                - --output_dir=/fsx-shared/fsdp-output
                - --overwrite_output_dir
                - --per_device_train_batch_size=4
                - --max_train_samples=100000
                - --tokenizer_name=facebook/esm2_t6_8M_UR50D
                - --dataset_dir=/fsx-shared/esm/processed/arrow
                - --torch_compile=False
                - --pad_to_max_length=True
                - --max_seq_length=512
---
To initiate FSDP based PyTurch training job, run the command:
kubectl apply -f train-fsdp.yaml
Output:
---
service/etcd created
deployment.apps/etcd created
pytorchjob.kubeflow.org/esm2 created
To monitor how ESM worker pods process FSDP based model training you can run the following command against one of the worker nodes:
kubectl logs -f esm2-worker-0
Output:
[WARNING  | accelerate.commands.launch]: The following values were not passed to `accelerate launch` and had defaults used instead:
        `--mixed_precision` was set to a value of `'no'`
        `--dynamo_backend` was set to a value of `'no'`
To avoid this warning pass in values for each of the problematic parameters or run `accelerate config`.
INFO 2025-05-06 04:09:27,315 Etcd machines: ['http://0.0.0.0:2379']
...
INFO 2025-05-06 04:09:27,391 Attempting to join next rendezvous
INFO 2025-05-06 04:09:27,463 New rendezvous state created: {'status': 'joinable', 'version': '1', 'participants': []}
INFO 2025-05-06 04:09:27,565 Joined rendezvous version 1 as rank 0. Full state: {'status': 'joinable', 'version': '1', 'participants': [0]}
INFO 2025-05-06 04:09:27,566 Waiting for remaining peers.
...
[INFO|tokenization_utils_base.py:2583] 2025-05-06 20:51:15,555 >> Special tokens file saved in /fsx-shared/fsdp-output/special_tokens_map.json
***** train metrics *****
  epoch                    =     0.9997
  total_flos               =  1072814GF
  train_loss               =     2.6578
  train_runtime            = 0:08:52.30
  train_samples            =     100000
  train_samples_per_second =    187.862
  train_steps_per_second   =      2.134
[INFO     | __main__           ]: *** Evaluate ***
[INFO|trainer.py:805] 2025-05-06 20:51:15,572 >> The following columns in the evaluation set don't have a corresponding argument in `FullyShardedDataParallel.forward` and have been ignored: special_tokens_mask. If special_tokens_mask are not expected by `FullyShardedDataParallel.forward`,  you can safely ignore this message.
[INFO|trainer.py:3788] 2025-05-06 20:51:15,574 >>
***** Running Evaluation *****
[INFO|trainer.py:3790] 2025-05-06 20:51:15,574 >>   Num examples = 50000
[INFO|trainer.py:3793] 2025-05-06 20:51:15,574 >>   Batch size = 8
100%|██████████| 3125/3125 [01:34<00:00, 33.23it/s]
[INFO     | __main__           ]: Metrics are {'eval_loss': 2.6308915615081787, 'eval_accuracy': 0.20261175918653207, 'eval_runtime': 94.2151, 'eval_samples_per_second': 530.7, 'eval_steps_per_second': 33.169, 'epoch': 0.99968}
[INFO     | __main__           ]: Calculating perplexity
[INFO     | __main__           ]: Perplexity: 13.886144736991477
***** eval metrics *****
  epoch                   =     0.9997
  eval_accuracy           =     0.2026
  eval_loss               =     2.6309
  eval_runtime            = 0:01:34.21
  eval_samples            =      50000
  eval_samples_per_second =      530.7
  eval_steps_per_second   =     33.169
  perplexity              =    13.8861
[INFO|modelcard.py:449] 2025-05-06 20:52:49,880 >> Dropping the following result as it does not have all the necessary fields:
{'task': {'name': 'Masked Language Modeling', 'type': 'fill-mask'}, 'metrics': [{'name': 'Accuracy', 'type': 'accuracy', 'value': 0.20261175918653207}]}
[rank0]:[W506 20:52:51.546147488 ProcessGroupNCCL.cpp:1487] Warning: WARNING: destroy_process_group() was not called before program exit, which can leak resources. For more info, please see https://pytorch.org/docs/stable/distributed.html#shutdown (function operator())
esm2-worker-0:161:315 [0] NCCL INFO misc/socket.cc:64 -> 3
esm2-worker-0:161:315 [0] NCCL INFO misc/socket.cc:80 -> 3
esm2-worker-0:161:315 [0] NCCL INFO misc/socket.cc:828 -> 3
esm2-worker-0:161:286 [0] NCCL INFO misc/socket.cc:880 -> 3
esm2-worker-0:161:315 [0] NCCL INFO comm 0x2e177b70 rank 0 nranks 2 cudaDev 0 busId 1e0 - Abort COMPLETE
To confirm that PyTorch training job completed successfully along with ESM worker pods, you can run the following command:
kubectl get pytorchjob,po,svc
Output:
NAME                           STATE       AGE
pytorchjob.kubeflow.org/esm2   Succeeded   122m

NAME                                                             READY   STATUS      RESTARTS      AGE
pod/esm2-worker-0                                                0/1     Completed   0             122m
pod/esm2-worker-1                                                0/1     Completed   0             122m
pod/etcd-6cd66c884c-t4xm7                                        1/1     Running     0             122m
pod/fsx-share-test                                               1/1     Running     0             108m
....
Finally, to verify that model training has been complete, you can check that following file with contents like shown below is expected at the $OUTPUT_DIR shared directory using the “helper” pod fsx-share-test:
kubectl exec -it fsx-share-test -- cat /fsx-shared/fsdp-output/train_results.json
Output:
{
    "epoch": 0.99968,
    "total_flos": 1151925283717120.0,
    "train_loss": 2.657833001982998,
    "train_runtime": 532.3045,
    "train_samples": 100000,
    "train_samples_per_second": 187.862,
    "train_steps_per_second": 2.134
}
Training NVIDIA BioNemo models on HyperPod EKS Based Clusters
1. Setup environment variables
Navigate to the following source code directory:
cd guidance-for-protein-language-esm-model-training-with-sagemaker-hyperpod/train/esm2/eks/bionemo
Set the following values in the OS environment where you will be running the BioNemo training:
# Path to save training data and checkpoints

export AWS_REGION=us-west-1
export DOCKER_IMAGE_NAME=bionemo
export TAG=aws
export ACCOUNT=$(aws sts get-caller-identity --query Account --output text)
export REGISTRY=${ACCOUNT}.dkr.ecr.${AWS_REGION}.amazonaws.com/

export GPU_PER_NODE=8
export EFA_PER_NODE=32

export NUM_NODES=2
export OUTPUT_DIR=/fsx-shared/bionemo
Or just following command using the env.conf file provided:
source .env.conf
2. Clone guidance GitHub repo (if not done yet)
git clone https://github.com/aws-solutions-library-samples/guidance-for-protein-language-esm-model-training-with-nvidia-bionemo-framework.git

cd guidance-for-protein-language-esm-model-training-with-sagemaker-hyperpod/train/esm2/eks/bionemo
chmod 777 *.sh
3. Build and push Docker Image
We provide an AWS optimized Dockerfile that sets up networking components (EFA, AWS-OFI-NCCL) for a multi-node cluster correctly:
./build.sh
Once container image is built, you can push it to AWS ECR as follows:
./push.sh
You can verify that an image with tag ending with bionemo:aws is indeed present in the ECR
4. Download Training data
BioNeMo 2.5 container provides a CLI command download_bionemo_data to download test or full UniProt dataset from NVIDIA Catalog which we can run as below. To that end we provide a get-data-template.yaml. First substitute the environment variables to generate get-data.yaml like below:
cat download-data-template.yaml | envsubst > download-data.yaml
cat download-data.yaml
---
apiVersion: batch/v1
kind: Job
metadata:
  name: download-bionemo-data
spec:
  template:
    spec:
       containers:
       - name: download-bionemo-data
         image: 35491XXXXXX.dkr.ecr.us-east-1.amazonaws.com/bionemo:aws
         command: ["/bin/bash"]
         args: ["-c", "download_bionemo_data esm2/testdata_esm2_pretrain:2.0"]
         volumeMounts:
          - name: bionemo-cache-volume
            mountPath: /root/.cache/bionemo
       volumes:
       - name: bionemo-cache-volume
         persistentVolumeClaim:
           claimName: fsx-claim
       restartPolicy: OnFailure
The you can initiate the data downloading job, as shown below. The job will take roughly 6-8 minutes to start as it is a about 35GB image.
kubectl apply -f download-data.yaml
Output:
job.batch/download-bionemo-data created
You can monitor progress of data download by running a command that tails logs from the corresponding pod:
kubectl logs -f download-bionemo-data-xk9dk
Output:
---
/root/.cache/bionemo/006911f92bbc0ded7ea302bbdbfab4c694b409e699c32fd49de1c527a99dba3e-2024_03_sanity.tar.gz.untar
To check data download job status completion, you can run the following command:
kc get job,po
Output:
NAME                              STATUS     COMPLETIONS   DURATION   AGE
job.batch/download-bionemo-data   Complete   1/1           7m57s      8m16s

NAME                                                             READY   STATUS      RESTARTS      AGE
pod/download-bionemo-data-xk9dk                                  0/1     Completed   0             8m16s
To verify that the download data is available in the shared filesystem, we need a dummy pod with that shared filesystem mounted. For that purpose we provide view-fsx.yaml descriptor that creates a pod called fsx-share-test. To view the contents of the file system we can exec the following command against that pod, as shown below:
# Create the pod
kubectl apply -f view-fsx.yaml
# Exec in the pod and list the directory contents
kubectl exec fsx-share-test -- ls -al /fsx-shared
Output:
total 71990
....
-rw-r--r--  1 root root 73307674 May  6 23:38 006911f92bbc0ded7ea302bbdbfab4c694b409e699c32fd49de1c527a99dba3e-2024_03_sanity.tar.gz
drwxr-xr-x  3 root root    25600 May  6 23:38 006911f92bbc0ded7ea302bbdbfab4c694b409e699c32fd49de1c527a99dba3e-2024_03_sanity.tar.gz.untar
Once data download is completed, export the DATA_DIR as an environment variable as below using the *.untar folder name prefixing that with shared data folder path:
export DATA_DIR=/fsx-shared/006911f92bbc0ded7ea302bbdbfab4c694b409e699c32fd49de1c527a99dba3e-2024_03_sanity.tar.gz.untar
5. Pretrain BioNemo ESM-2 models
Now we are ready to submit distributed training jobs to pretrain ESM-2 BioNemo models. We provide the esm2-pretrain-template.yaml script to run training on various SageMaker HyperPod compute nodes with various number of GPUs. Make sure data paths and model configuration parameters is correct if you are running using custom data.
To kick off distributed training, first we need to generate customized deployment descriptor for BioNemo training job:
cat esm2-pretrain-template.yaml | envsubst > esm2-bionemo-pretrain.yaml
Review the resulting training job deployment descriptor:
cat esm2-bionemo-pretrain.yaml
---
apiVersion: v1
kind: Service
metadata:
  name: etcd
spec:
  ports:
    - name: etcd-client-port
      port: 2379
      protocol: TCP
      targetPort: 2379
  selector:
    app: etcd

---
apiVersion: apps/v1
kind: Deployment
metadata:
  labels:
    app: etcd
  name: etcd
spec:
  replicas: 1
  selector:
    matchLabels:
      app: etcd
  template:
    metadata:
      labels:
        app: etcd
    spec:
      containers:
        - name: etcd
          command: ["/usr/local/bin/etcd"]
          args:
            - "--data-dir"
            - "/var/lib/etcd"
            - "--enable-v2"
            - "--listen-client-urls"
            - "http://0.0.0.0:2379"
            - "--advertise-client-urls"
            - "http://0.0.0.0:2379"
            - "--initial-cluster-state"
            - "new"
          image: quay.io/coreos/etcd:v3.5.19
          ports:
            - containerPort: 2379
              name: client
              protocol: TCP
            - containerPort: 2380
              name: server
              protocol: TCP
      restartPolicy: Always
---
apiVersion: "kubeflow.org/v1"
kind: PyTorchJob
metadata:
  name: bionemo-esm2
spec:
  elasticPolicy:
    rdzvBackend: etcd
    rdzvHost: etcd
    rdzvPort: 2379
    minReplicas: 1
    maxReplicas: 64
    maxRestarts: 100
    metrics:
      - type: Resource
        resource:
          name: cpu
          target:
            type: Utilization
            averageUtilization: 90
  pytorchReplicaSpecs:
    Worker:
      replicas: 2
      template:
        metadata:
          annotations:
            sidecar.istio.io/inject: "false"
        spec:
          tolerations:
            - key: nvidia.com/gpu
              operator: Exists
              effect: NoSchedule
          volumes:
          - name: fsx-pv-storage
            persistentVolumeClaim:
              claimName: fsx-claim
          - name: shmem
            hostPath:
              path: /dev/shm
          containers:
            - name: pytorch
              image: 3549183XXXXX.dkr.ecr.us-east-1.amazonaws.com/bionemo:aws
              resources:
                requests:
                  nvidia.com/gpu: 1
                  vpc.amazonaws.com/efa: 1
                limits:
                  nvidia.com/gpu: 1
                  vpc.amazonaws.com/efa: 1
              env:
                - name: NCCL_DEBUG
                  value: "INFO"
                #- name: LOGLEVEL
                #  value: "DEBUG"
                #- name: FI_PROVIDER
                #  value: efa
                #- name: FI_EFA_USE_DEVICE_RDMA
                #  value: "1"
                #- name: FI_EFA_FORK_SAFE
                #  value: "1"
                #- name: FI_LOG_LEVEL
                #  value: "1"
                #- name: FI_EFA_ENABLE_SHM_TRANSFER
                #  value: "1"
                #- name: TORCH_DISTRIBUTED_DEBUG
                #  value: "DETAIL"
                #- name: TORCH_NCCL_ASYNC_ERROR_HANDLING
                #  value: "1"
                #- name: PYTORCH_CUDA_ALLOC_CONF
                #  value: "expandable_segments:True"
                #- name: NCCL_SOCKET_IFNAME
                #  value: "^lo"
              volumeMounts:
                - mountPath: /fsx-shared
                  name: fsx-pv-storage
                - mountPath: /dev/shm
                  name: shmem
              imagePullPolicy: Always
              command:
                - torchrun
                - --nproc_per_node=1
                - --nnodes=2
                - /workspace/bionemo2/sub-packages/bionemo-esm2/src/bionemo/esm2/scripts/train_esm2.py
                - --train-cluster-path=/fsx-shared/006911f92bbc0ded7ea302bbdbfab4c694b409e699c32fd49de1c527a99dba3e-2024_03_sanity.tar.gz.untar/2024_03_sanity/train_clusters_sanity.parquet
                - --train-database-path=/fsx-shared/006911f92bbc0ded7ea302bbdbfab4c694b409e699c32fd49de1c527a99dba3e-2024_03_sanity.tar.gz.untar/2024_03_sanity/train_sanity.db
                - --valid-cluster-path=/fsx-shared/006911f92bbc0ded7ea302bbdbfab4c694b409e699c32fd49de1c527a99dba3e-2024_03_sanity.tar.gz.untar/2024_03_sanity/valid_clusters.parquet
                - --valid-database-path=/fsx-shared/006911f92bbc0ded7ea302bbdbfab4c694b409e699c32fd49de1c527a99dba3e-2024_03_sanity.tar.gz.untar/2024_03_sanity/validation.db
                - --precision=bf16-mixed
                - --num-gpus=1
                - --num-nodes=2
                - --num-steps=100
                - --val-check-interval=25
                - --max-seq-length=1024
                - --limit-val-batches=2
                - --micro-batch-size=2
                - --num-layers=33
                - --hidden-size=1280
                - --num-attention-head=20
                - --ffn-hidden-size=5120
                - --tensor-model-parallel-size=1
                - --create-tensorboard-logger
                - --result-dir=/fsx-shared/bionemo
To initiate a training job, apply generated deployment descriptor to using EKS CLI:
kubectl apply -f esm2-pretrain.yaml
Output:
service/etcd created
deployment.apps/etcd created
pytorchjob.kubeflow.org/bionemo-esm2 created
To monitor EM2 BioNemo training job, you can check status of PyTorchJob, Deployment and Pod related objects in EKS:
kubectl get pytorchjob,deploy,po,svc
Output:
NAME                                   STATE     AGE
pytorchjob.kubeflow.org/bionemo-esm2   Running   2m37s

NAME                                                        READY   UP-TO-DATE   AVAILABLE   AGE
deployment.apps/etcd                                        1/1     1            1           2m37s
deployment.apps/hyperpod-dependencies-hyperpod-helm-chart   1/1     1            1           118d
deployment.apps/hyperpod-dependencies-mpi-operator          1/1     1            1           118d

NAME                                                             READY   STATUS              RESTARTS      AGE
pod/bionemo-esm2-worker-0                                        1/1     Running             0             2m37s
pod/bionemo-esm2-worker-1                                        0/1     ContainerCreating   0             2m37s
..
To tail ESM-2 model training running pod logs, you can run the following command:
kubectl logs -f bionemo-esm2-worker-0
Output:
INFO 2025-05-15 23:40:46,089 Etcd machines: ['http://0.0.0.0:2379']
....
INFO 2025-05-15 23:40:46,099 Attempting to join next rendezvous
INFO 2025-05-15 23:40:46,107 New rendezvous state created: {'status': 'joinable', 'version': '1', 'participants': []}
INFO 2025-05-15 23:40:46,207 Joined rendezvous version 1 as rank 1. Full state: {'status': 'frozen', 'version': '1', 'participants': [0, 1], 'keep_alives': []}
INFO 2025-05-15 23:40:46,207 Waiting for remaining peers.
INFO 2025-05-15 23:40:46,207 All peers arrived. Confirming membership.
INFO 2025-05-15 23:40:46,230 Waiting for confirmations from all peers.
INFO 2025-05-15 23:40:46,272 Rendezvous version 1 is complete. Final state: {'status': 'final', 'version': '1', 'participants': [0, 1], 'keep_alives': ['/torchelastic/p2p/run_none/rdzv/v_1/rank_1', '/torchelastic/p2p/run_none/rdzv/v_1/rank_0'], 'num_workers_waiting': 0}
INFO 2025-05-15 23:40:46,272 Creating EtcdStore as the c10d::Store implementation

Initializing distributed: GLOBAL_RANK: 1, MEMBER: 2/2
bionemo-esm2-worker-0:53:53 [0] NCCL INFO cudaDriverVersion 12040
bionemo-esm2-worker-0:53:53 [0] NCCL INFO NCCL_SOCKET_IFNAME set by environment to ^docker,lo,veth
bionemo-esm2-worker-0:53:53 [0] NCCL INFO Bootstrap: Using eth0:10.1.75.163<0>
bionemo-esm2-worker-0:53:53 [0] NCCL INFO NCCL version 2.25.1+cuda12.8
bionemo-esm2-worker-0:53:53 [0] NCCL INFO Comm config Blocking set to 1
bionemo-esm2-worker-0:53:323 [0] NCCL INFO NET/Plugin: Failed to find ncclNetPlugin_v9 symbol.
bionemo-esm2-worker-0:53:323 [0] NCCL INFO NET/Plugin: Loaded net plugin Libfabric (v8)
bionemo-esm2-worker-0:53:323 [0] NCCL INFO NET/Plugin: Failed to find ncclCollNetPlugin_v9 symbol.
bionemo-esm2-worker-0:53:323 [0] NCCL INFO NET/Plugin: Failed to find ncclCollNetPlugin symbol (>= v5). ncclCollNetPlugin symbols v4 and lower are not supported.
bionemo-esm2-worker-0:53:323 [0] NCCL INFO NET/OFI Initializing aws-ofi-nccl 1.13.2-aws
bionemo-esm2-worker-0:53:323 [0] NCCL INFO NET/OFI Using Libfabric version 1.22
bionemo-esm2-worker-0:53:323 [0] NCCL INFO NET/OFI Using CUDA driver version 12040 with runtime 12080
bionemo-esm2-worker-0:53:323 [0] NCCL INFO NET/OFI Configuring AWS-specific options
bionemo-esm2-worker-0:53:323 [0] NCCL INFO NET/OFI Setting provider_filter to efa
bionemo-esm2-worker-0:53:323 [0] NCCL INFO NET/OFI Setting FI_EFA_FORK_SAFE environment variable to 1
bionemo-esm2-worker-0:53:323 [0] NCCL INFO NET/OFI Setting NCCL_NVLSTREE_MAX_CHUNKSIZE to 512KiB
bionemo-esm2-worker-0:53:323 [0] NCCL INFO NET/OFI Setting NCCL_NVLS_CHUNKSIZE to 512KiB
bionemo-esm2-worker-0:53:323 [0] NCCL INFO NET/OFI Internode latency set at 75.0 us
bionemo-esm2-worker-0:53:323 [0] NCCL INFO NET/OFI Selected Provider is efa (found 1 nics)
bionemo-esm2-worker-0:53:323 [0] NCCL INFO NET/OFI NIC group 0 device #0 0000:00:1d.0
bionemo-esm2-worker-0:53:323 [0] NCCL INFO NET/OFI Selected Provider is efa (found 1 nics)
bionemo-esm2-worker-0:53:323 [0] NCCL INFO NET/OFI Using transport protocol SENDRECV
bionemo-esm2-worker-0:53:323 [0] NCCL INFO NET/OFI Creating one domain per process
bionemo-esm2-worker-0:53:323 [0] NCCL INFO NET/OFI Could not disable CUDA API usage for HMEM, disabling GDR
bionemo-esm2-worker-0:53:323 [0] NCCL INFO NET/OFI Setting FI_OPT_EFA_SENDRECV_IN_ORDER_ALIGNED_128_BYTES not supported.
bionemo-esm2-worker-0:53:323 [0] NCCL INFO NET/OFI Setting NCCL_PROTO to "simple"
bionemo-esm2-worker-0:53:323 [0] NCCL INFO NET/OFI Support for global registrations: false
bionemo-esm2-worker-0:53:323 [0] NCCL INFO NET/OFI Support for DMA-BUF registrations: false
bionemo-esm2-worker-0:53:323 [0] NCCL INFO PROFILER/Plugin: Could not find: libnccl-profiler.so.
bionemo-esm2-worker-0:53:323 [0] NCCL INFO Using network Libfabric
bionemo-esm2-worker-0:53:323 [0] NCCL INFO DMA-BUF is available on GPU device 0
bionemo-esm2-worker-0:53:323 [0] NCCL INFO ncclCommInitRankConfig comm 0x276ecff0 rank 1 nranks 2 cudaDev 0 nvmlDev 0 busId 1e0 commId 0xbbcf61767c6f7be7 - Init START
bionemo-esm2-worker-0:53:323 [0] NCCL INFO RAS client listening socket at ::1<28028>
bionemo-esm2-worker-0:53:323 [0] NCCL INFO Bootstrap timings total 0.002316 (create 0.000031, send 0.000485, recv 0.000787, ring 0.000243, delay 0.000000)
bionemo-esm2-worker-0:53:323 [0] NCCL INFO NCCL_NVLS_ENABLE set by environment to 0.
bionemo-esm2-worker-0:53:323 [0] NCCL INFO comm 0x276ecff0 rank 1 nRanks 2 nNodes 2 localRanks 1 localRank 0 MNNVL 0
bionemo-esm2-worker-0:53:323 [0] NCCL INFO Trees [0] -1/-1/-1->1->0 [1] 0/-1/-1->1->-1
bionemo-esm2-worker-0:53:323 [0] NCCL INFO P2P Chunksize set to 131072
bionemo-esm2-worker-0:53:325 [0] NCCL INFO [Proxy Service] Device 0 CPU core 10
bionemo-esm2-worker-0:53:326 [0] NCCL INFO [Proxy Service UDS] Device 0 CPU core 6
bionemo-esm2-worker-0:53:323 [0] NCCL INFO NCCL_PROTO set by environment to simple
bionemo-esm2-worker-0:53:323 [0] NCCL INFO threadThresholds 8/8/64 | 16/8/64 | 512 | 512
bionemo-esm2-worker-0:53:323 [0] NCCL INFO 2 coll channels, 2 collnet channels, 0 nvls channels, 2 p2p channels, 2 p2p channels per peer
bionemo-esm2-worker-0:53:323 [0] NCCL INFO TUNER/Plugin: Failed to find ncclTunerPlugin_v4 symbol.
bionemo-esm2-worker-0:53:323 [0] NCCL INFO TUNER/Plugin: Failed to find ncclTunerPlugin_v3 symbol.
bionemo-esm2-worker-0:53:323 [0] NCCL INFO TUNER/Plugin: Failed to find ncclTunerPlugin_v2 symbol, using internal tuner instead.
bionemo-esm2-worker-0:53:323 [0] NCCL INFO ncclCommInitRankConfig comm 0x276ecff0 rank 1 nranks 2 cudaDev 0 nvmlDev 0 busId 1e0 commId 0xbbcf61767c6f7be7 - Init COMPLETE
bionemo-esm2-worker-0:53:323 [0] NCCL INFO Init timings - ncclCommInitRankConfig: rank 1 nranks 2 total 0.19 (kernels 0.12, alloc 0.06, bootstrap 0.00, allgathers 0.00, topo 0.00, graphs 0.00, connections 0.00, rest 0.00)
bionemo-esm2-worker-0:53:328 [0] NCCL INFO [Proxy Progress] Device 0 CPU core 3
bionemo-esm2-worker-0:53:327 [0] NCCL INFO Channel 00/0 : 0[0] -> 1[0] [receive] via NET/Libfabric/0
bionemo-esm2-worker-0:53:327 [0] NCCL INFO Channel 01/0 : 0[0] -> 1[0] [receive] via NET/Libfabric/0
bionemo-esm2-worker-0:53:327 [0] NCCL INFO Channel 00/0 : 1[0] -> 0[0] [send] via NET/Libfabric/0
bionemo-esm2-worker-0:53:327 [0] NCCL INFO Channel 01/0 : 1[0] -> 0[0] [send] via NET/Libfabric/0
bionemo-esm2-worker-0:53:327 [0] NCCL INFO Connected all rings, use ring PXN 0 GDR 0
LOCAL_RANK: 0 - CUDA_VISIBLE_DEVICES: [0]
bionemo-esm2-worker-0:53:53 [0] NCCL INFO Comm config Blocking set to 1
bionemo-esm2-worker-0:53:401 [0] NCCL INFO Using network Libfabric
bionemo-esm2-worker-0:53:401 [0] NCCL INFO DMA-BUF is available on GPU device 0
bionemo-esm2-worker-0:53:401 [0] NCCL INFO ncclCommInitRankConfig comm 0x3133b010 rank 1 nranks 2 cudaDev 0 nvmlDev 0 busId 1e0 commId 0xcfe7f3dc6fd0384b - Init START
bionemo-esm2-worker-0:53:401 [0] NCCL INFO Bootstrap timings total 0.002248 (create 0.000032, send 0.000431, recv 0.000773, ring 0.000521, delay 0.000000)
bionemo-esm2-worker-0:53:401 [0] NCCL INFO comm 0x3133b010 rank 1 nRanks 2 nNodes 2 localRanks 1 localRank 0 MNNVL 0
bionemo-esm2-worker-0:53:401 [0] NCCL INFO Trees [0] -1/-1/-1->1->0 [1] 0/-1/-1->1->-1
bionemo-esm2-worker-0:53:401 [0] NCCL INFO P2P Chunksize set to 131072
bionemo-esm2-worker-0:53:402 [0] NCCL INFO [Proxy Service] Device 0 CPU core 27
bionemo-esm2-worker-0:53:403 [0] NCCL INFO [Proxy Service UDS] Device 0 CPU core 6
bionemo-esm2-worker-0:53:401 [0] NCCL INFO NCCL_PROTO set by environment to simple
bionemo-esm2-worker-0:53:401 [0] NCCL INFO threadThresholds 8/8/64 | 16/8/64 | 512 | 512
bionemo-esm2-worker-0:53:401 [0] NCCL INFO 2 coll channels, 2 collnet channels, 0 nvls channels, 2 p2p channels, 2 p2p channels per peer
bionemo-esm2-worker-0:53:401 [0] NCCL INFO ncclCommInitRankConfig comm 0x3133b010 rank 1 nranks 2 cudaDev 0 nvmlDev 0 busId 1e0 commId 0xcfe7f3dc6fd0384b - Init COMPLETE
bionemo-esm2-worker-0:53:401 [0] NCCL INFO Init timings - ncclCommInitRankConfig: rank 1 nranks 2 total 0.01 (kernels 0.00, alloc 0.00, bootstrap 0.00, allgathers 0.00, topo 0.00, graphs 0.00, connections 0.00, rest 0.00)
bionemo-esm2-worker-0:53:405 [0] NCCL INFO [Proxy Progress] Device 0 CPU core 24
bionemo-esm2-worker-0:53:404 [0] NCCL INFO Channel 00/0 : 0[0] -> 1[0] [receive] via NET/Libfabric/0
bionemo-esm2-worker-0:53:404 [0] NCCL INFO Channel 01/0 : 0[0] -> 1[0] [receive] via NET/Libfabric/0
bionemo-esm2-worker-0:53:404 [0] NCCL INFO Channel 00/0 : 1[0] -> 0[0] [send] via NET/Libfabric/0
bionemo-esm2-worker-0:53:404 [0] NCCL INFO Channel 01/0 : 1[0] -> 0[0] [send] via NET/Libfabric/0
bionemo-esm2-worker-0:53:404 [0] NCCL INFO Connected all rings, use ring PXN 0 GDR 0
bionemo-esm2-worker-0:53:53 [0] NCCL INFO Comm config Blocking set to 1
bionemo-esm2-worker-0:53:710 [0] NCCL INFO Using network Libfabric
bionemo-esm2-worker-0:53:710 [0] NCCL INFO DMA-BUF is available on GPU device 0
bionemo-esm2-worker-0:53:710 [0] NCCL INFO ncclCommInitRankConfig comm 0x4d447740 rank 0 nranks 1 cudaDev 0 nvmlDev 0 busId 1e0 commId 0x776afb8cbd2c57bc - Init START
bionemo-esm2-worker-0:53:710 [0] NCCL INFO Bootstrap timings total 0.000367 (create 0.000033, send 0.000094, recv 0.000102, ring 0.000001, delay 0.000000)
....
[NeMo I 2025-05-15 23:42:46 nemo_logging:393] Async finalization time took 0.001 s
Validation: iteration 1/2
Validation: iteration 2/2
[NeMo I 2025-05-15 23:42:47 nemo_logging:393] Async finalization time took 0.001 s
[INFO     | pytorch_lightning.utilities.rank_zero]: `Trainer.fit` stopped: `max_steps=100` reached.
[NeMo I 2025-05-15 23:42:47 nemo_logging:393] Pending async checkpoint saves. Finalizing them synchronously now
[NeMo I 2025-05-15 23:42:54 nemo_logging:393] Successfully saved checkpoint from iteration      49 to /fsx-shared/bionemo/esm2/dev/checkpoints/epoch=0-val_loss=3.11-step=49-consumed_samples=200.0.ckpt
[NeMo I 2025-05-15 23:42:54 nemo_logging:393] Async checkpoint save for step 50 (/fsx-shared/bionemo/esm2/dev/checkpoints/epoch=0-val_loss=3.11-step=49-consumed_samples=200.0.ckpt) finalized successfully.
[NeMo I 2025-05-15 23:43:04 nemo_logging:393] Successfully saved checkpoint from iteration      49 to /fsx-shared/bionemo/esm2/dev/checkpoints/epoch=0-val_loss=3.11-step=49-consumed_samples=200.0-last.ckpt
[NeMo I 2025-05-15 23:43:04 nemo_logging:393] Async checkpoint save for step 50 (/fsx-shared/bionemo/esm2/dev/checkpoints/epoch=0-val_loss=3.11-step=49-consumed_samples=200.0-last.ckpt) finalized successfully.
[NeMo I 2025-05-15 23:43:22 nemo_logging:393] Successfully saved checkpoint from iteration      74 to /fsx-shared/bionemo/esm2/dev/checkpoints/epoch=0-val_loss=3.04-step=74-consumed_samples=300.0.ckpt
[NeMo I 2025-05-15 23:43:22 nemo_logging:393] Async checkpoint save for step 75 (/fsx-shared/bionemo/esm2/dev/checkpoints/epoch=0-val_loss=3.04-step=74-consumed_samples=300.0.ckpt) finalized successfully.
[NeMo I 2025-05-15 23:43:22 nemo_logging:393] Successfully saved checkpoint from iteration      74 to /fsx-shared/bionemo/esm2/dev/checkpoints/epoch=0-val_loss=3.04-step=74-consumed_samples=300.0-last.ckpt
[NeMo I 2025-05-15 23:43:22 nemo_logging:393] Async checkpoint save for step 75 (/fsx-shared/bionemo/esm2/dev/checkpoints/epoch=0-val_loss=3.04-step=74-consumed_samples=300.0-last.ckpt) finalized successfully.
[NeMo I 2025-05-15 23:43:23 nemo_logging:393] Successfully saved checkpoint from iteration      99 to /fsx-shared/bionemo/esm2/dev/checkpoints/epoch=0-val_loss=2.91-step=99-consumed_samples=400.0.ckpt
[NeMo I 2025-05-15 23:43:23 nemo_logging:393] Async checkpoint save for step 100 (/fsx-shared/bionemo/esm2/dev/checkpoints/epoch=0-val_loss=2.91-step=99-consumed_samples=400.0.ckpt) finalized successfully.
[NeMo I 2025-05-15 23:43:25 nemo_logging:393] Successfully saved checkpoint from iteration      99 to /fsx-shared/bionemo/esm2/dev/checkpoints/epoch=0-val_loss=2.91-step=99-consumed_samples=400.0-last.ckpt
[NeMo I 2025-05-15 23:43:25 nemo_logging:393] Async checkpoint save for step 100 (/fsx-shared/bionemo/esm2/dev/checkpoints/epoch=0-val_loss=2.91-step=99-consumed_samples=400.0-last.ckpt) finalized successfully.
...
Once completed, we should see the bionemo-esm2 job in Succeeded state as well as the bionemo-esm2-worker-0 and bionemo-esm2-worker-1 pods are in Completed one:
kubectl get pytorchjob,po,svc
Output:
NAME                                   STATE       AGE
pytorchjob.kubeflow.org/bionemo-esm2   Succeeded   4h

NAME                                                             READY   STATUS      RESTARTS      AGE
pod/bionemo-esm2-worker-0                                        0/1     Completed   0             4h
pod/bionemo-esm2-worker-1                                        0/1     Completed   0             4h
pod/etcd-6cd66c884c-hzxpd                                        1/1     Running     0             20m
pod/fsx-share-test                                               1/1     Running     0             3h11m
We can also verify that model and training configurations and artifacts are present in the $OUTPUT_DIR by running the command via
kubectl exec -it fsx-share-test -- ls -al /fsx-shared/bionemo/esm2/dev/checkpoints
Output:
total 140
drwxr-xr-x 5 root root 33280 May 15 23:43  .
drwxr-xr-x 3 root root 33280 May 15 23:41  ..
drwxr-xr-x 4 root root 25600 May 15 23:42 'epoch=0-val_loss=2.91-step=99-consumed_samples=400.0'
drwxr-xr-x 4 root root 25600 May 15 23:42 'epoch=0-val_loss=2.91-step=99-consumed_samples=400.0-last'
drwxr-xr-x 4 root root 25600 May 15 23:42 'epoch=0-val_loss=3.04-step=74-consumed_samples=300.0'
....
And, if needed, confirm that model.yaml is present in its subfolders:
kubectl exec -it fsx-share-test -- ls -al /fsx-shared/bionemo/esm2/dev/checkpoints/'epoch=0-val_loss=3.04-step=74-consumed_samples=300.0'/context
Output:
total 141
drwxr-xr-x 2 root root 33280 May 16 21:40 .
drwxr-xr-x 4 root root 25600 May 16 21:40 ..
-rw-r--r-- 1 root root   127 May 16 21:40 2d2e44cf-7478-40f1-8fe6-d40d73719578
-rw-r--r-- 1 root root   584 May 16 21:40 d2fe299b-b3d7-4abf-9371-84ad36c74309
-rw-r--r-- 1 root root   202 May 16 21:40 df77a1e0-8fc7-4c00-88dc-fd90e8cd2877
-rw-r--r-- 1 root root   203 May 16 21:40 f788a2eb-3392-4c3e-ba60-bba4dd4c3bbb
-rw-r--r-- 1 root root 40683 May 16 21:40 io.json
-rw-r--r-- 1 root root  8967 May 16 21:40 model.yaml
That (or similar) output confirm that model training using BioNemo tframework completed successfully..
Running the Guidance
Running this guidance can be essentially referred to as Training ESM-2 models (NVIDIA BioNemo and HuggingFace) on HyperPod clusters based on SLURM and EKS job orchestrators Please see sections above for detailed instructions:
- Training models on SLURM based HyperPod Clusters based on PyTorch
- Training models on SLURM based HyperPod Clusters NVIDIA BioNemo framework
- Training models on EKS based HyperPod Clusters based on PyTorch framework
- Training models on EKS based HyperPod Clusters based on NVIDIA BioNemo framework
Next Steps
Patching your HyperPod clusters
NOTE: it is very important to periodically update your HyperPod cluster software by running
update-cluster-softwarecommand for software and security patches provided by the SageMaker HyperPod service. For more details, please see Update the SageMaker HyperPod platform software of a cluster in the Amazon SageMaker Developer Guide.
aws sagemaker update-cluster-software --cluster-name ml-cluster --region $AWS_REGION
----
{
    "ClusterArn": "arn:aws:sagemaker:us-east-1:35491XXXXXX:cluster/ceua864f6l7h"
}
You can validate software upgrade completion when your HyperPod cluster shows InService status again after showing SystemUpdating for a while:
aws sagemaker list-clusters --output table
---
-----------------------------------------------------------------------------------------------------------------------------------------
|                                                             ListClusters                                                              |
+---------------------------------------------------------------------------------------------------------------------------------------+
||                                                          ClusterSummaries                                                           ||
|+----------------------------------------------------------------+--------------+----------------+------------------------------------+|
||                           ClusterArn                           | ClusterName  | ClusterStatus  |           CreationTime             ||
|+----------------------------------------------------------------+--------------+----------------+------------------------------------+|
||  arn:aws:sagemaker:us-east-1:35491XXXXXX:cluster/ceua864f6l7h |  ml-cluster  |  SystemUpdating|  2025-01-07T20:02:34.324000-08:00  ||
|+----------------------------------------------------------------+--------------+----------------+------------------------------------+|
Uninstall the Guidance
You can uninstall the services deployed by the “Guidance for Training Protein Language Models (ESM-2) with Amazon SageMaker HyperPod on AWS” from the AWS Management Console or by using the AWS Command Line Interface based commands and scripts.
When you’re done with your HyperPod SLURM or EKS based cluster, you can delete it with the following command:
aws sagemaker delete-cluster --cluster-name <CLUSTER_NAME> --region <AWS_REGION>
Your FSx for Lustre storage volumes will retain anything saved to them, and can be reattached to a future cluster or deleted separately.
Related resources
- Amazon SageMaker HyperPod SLURM documentation
- Amazon SageMaker HyperPod EKS documentation
- nVIDIA BioNemo framework
- nVIDIA BioNemo ESM-2 model
- Amazon AWS EKS documentation
- SLURM documentation
Contributors
- Daniel Zilberman, Sr WW Solutions Architect, AWS Tech Solutions
- Mark Vinciguerra, Associate WW Specialist Solutions Architect, AWS GenAI
- Alex Iankoulski, Principal WW Specialist Solutions Architect, AWS GenAI
Notices
Customers are responsible for making their own independent assessment of the information in this document. This document: (a) is for informational purposes only, (b) represents AWS current product offerings and practices, which are subject to change without notice, and (c) does not create any commitments or assurances from AWS and its affiliates, suppliers or licensors. AWS products or services are provided “as is” without warranties, representations, or conditions of any kind, whether express or implied. AWS responsibilities and liabilities to its customers are controlled by AWS agreements, and this document is not part of, nor does it modify, any agreement between AWS and its customers.