Guidance for SQL-Based ETL with Apache Spark on Amazon EKS
Summary: This implementation guide provides an overview of the Guidance for SQL-Based ETL with Apache Spark on Amazon EKS, which accelerates common extract, transform, load (ETL) practices to help you increase data process productivity. The implementation guide includes the Guidance reference architecture and components, considerations for planning the deployment, and configuration steps for deploying code to Amazon Web Services (AWS).
Overview
‘Guidance for SQL-Based ETL with Apache Spark on Amazon EKS’ provides declarative data processing support, codeless extract, transform, load (ETL) capabilities, and workflow orchestration automation to help business users (such as analysts and data scientists) access their data and create meaningful insights without a need for manual IT processes.
This guidance abstracts common ETL activities, including formatting, partitioning, and transforming datasets, into configurable and productive data processes. This abstraction results in actionable insights derived more quickly to help you accelerate your data-driven business decisions. Additionally, it uses an open-source Arc data processing framework, run on Amazon Elastic Kubernetes Service (Amazon EKS) and powered by Apache Spark and container technologies to simplify Spark application development and deployment.
This guidance uses GitHub as the source repository to track ETL asset changes, such as JupyterHub notebook scripts and SQL script updates, allowing for application version control and standardized continuous integration and continuous delivery (CI/CD) deployments. It unifies analytical workloads and IT operations using standardized and automated processes, providing a simplified ETL deployment management capability for your organization’s DevOps team. These automated processes help you avoid unintentional human mistakes caused by manual, repetitive tasks.
Features and benefits
Guidance for SQL-Based ETL with Apache Spark on Amazon EKS offers the following features:
Build, test, and debug ETL jobs in Jupyter: Use JupyterHub, a web-based interactive integrated development environment (IDE) to simplify your ETL development experience. It includes a custom Arc kernel that enables you to define each ETL task or stage in separate blocks. The execution of each block produces data results and a task log. The log captures real-time data processing status and exception messages that can be valuable for debugging.
Use a SQL-first approach: Implement business logic and data quality checks in ETL pipeline development using Spark SQL. You can process and manipulate data in Spark using your existing SQL expertise.
Orchestrate jobs without code: Use Argo Workflows to schedule jobs and manage complex Spark job run dependencies without the need to code. Argo Workflows allow you declaratively define job implementation target state, orders, and relationships. It provides a user-friendly graphical dashboard to help you track workflow status and resource usage patterns. The job orchestration tool in This guidance is a switchable plug-in and can be replaced by another tool of your choice, for example Apache Airflow or Volcano.
Auto-deploy Docker images: Set up an AWS CI/CD pipeline to securely store the Guidance’s Arc Docker image in Amazon Elastic Container Registry (Amazon ECR).
Automate ETL artifact deployment: Integrate the Jupyter integrated development environment (IDE) with the Guidance GitHub repository to detect the state of an ETL application change. As a one-off setup with your choice of CI/CD tool, a GitHub change activates a file sync-up process between your repository and the artifact store, an Amazon Simple Storage Service (Amazon S3) bucket. As a result, Argo Workflows can refer to the latest or versioned application assets in Amazon S3, such as a JupyterHub notebook (ETL job specification) file, then orchestrate an ETL job that runs either on-demand or based on a time or an event.
Use cases
Driven by the modern Data Lake architecture, data engineers usually have to implement formatting, partitioning, and transforming of datasets, before making data available to data analysts and data scientists, so that they can start to produce insights for business with well-formed data. For organizations that are operating on SQL-based data management systems or tools, adapting to a modern data lake practice with Apache Spark technology slows down the progress of data to insight. A business’s success increasingly depends on its agility in transforming data into actionable insights, which requires efficient and automated data processes. The gap between data consumption requirements and low-level data engineering activities is addressed by this guidance.
To accelerate data innovation with faster time to insight, this guidance provides you a codeless ETL option driven by a SQL-centric architecture. By using an open-source data framework (Arc) powered by Apache Spark and Container technologies, it enables you to easily build a modern data structure on an AWS managed container service. Additionally, if you want to take advantage of an optimized Amazon EMR runtime for Apache Spark and other features offered by Amazon EMR, you can use the Arc framework in an Amazon EMR on Amazon EKS deployment option with no code changes.
Architecture overview
This section provides an architecture diagram and describes the components deployed with this guidance.
Architecture diagram
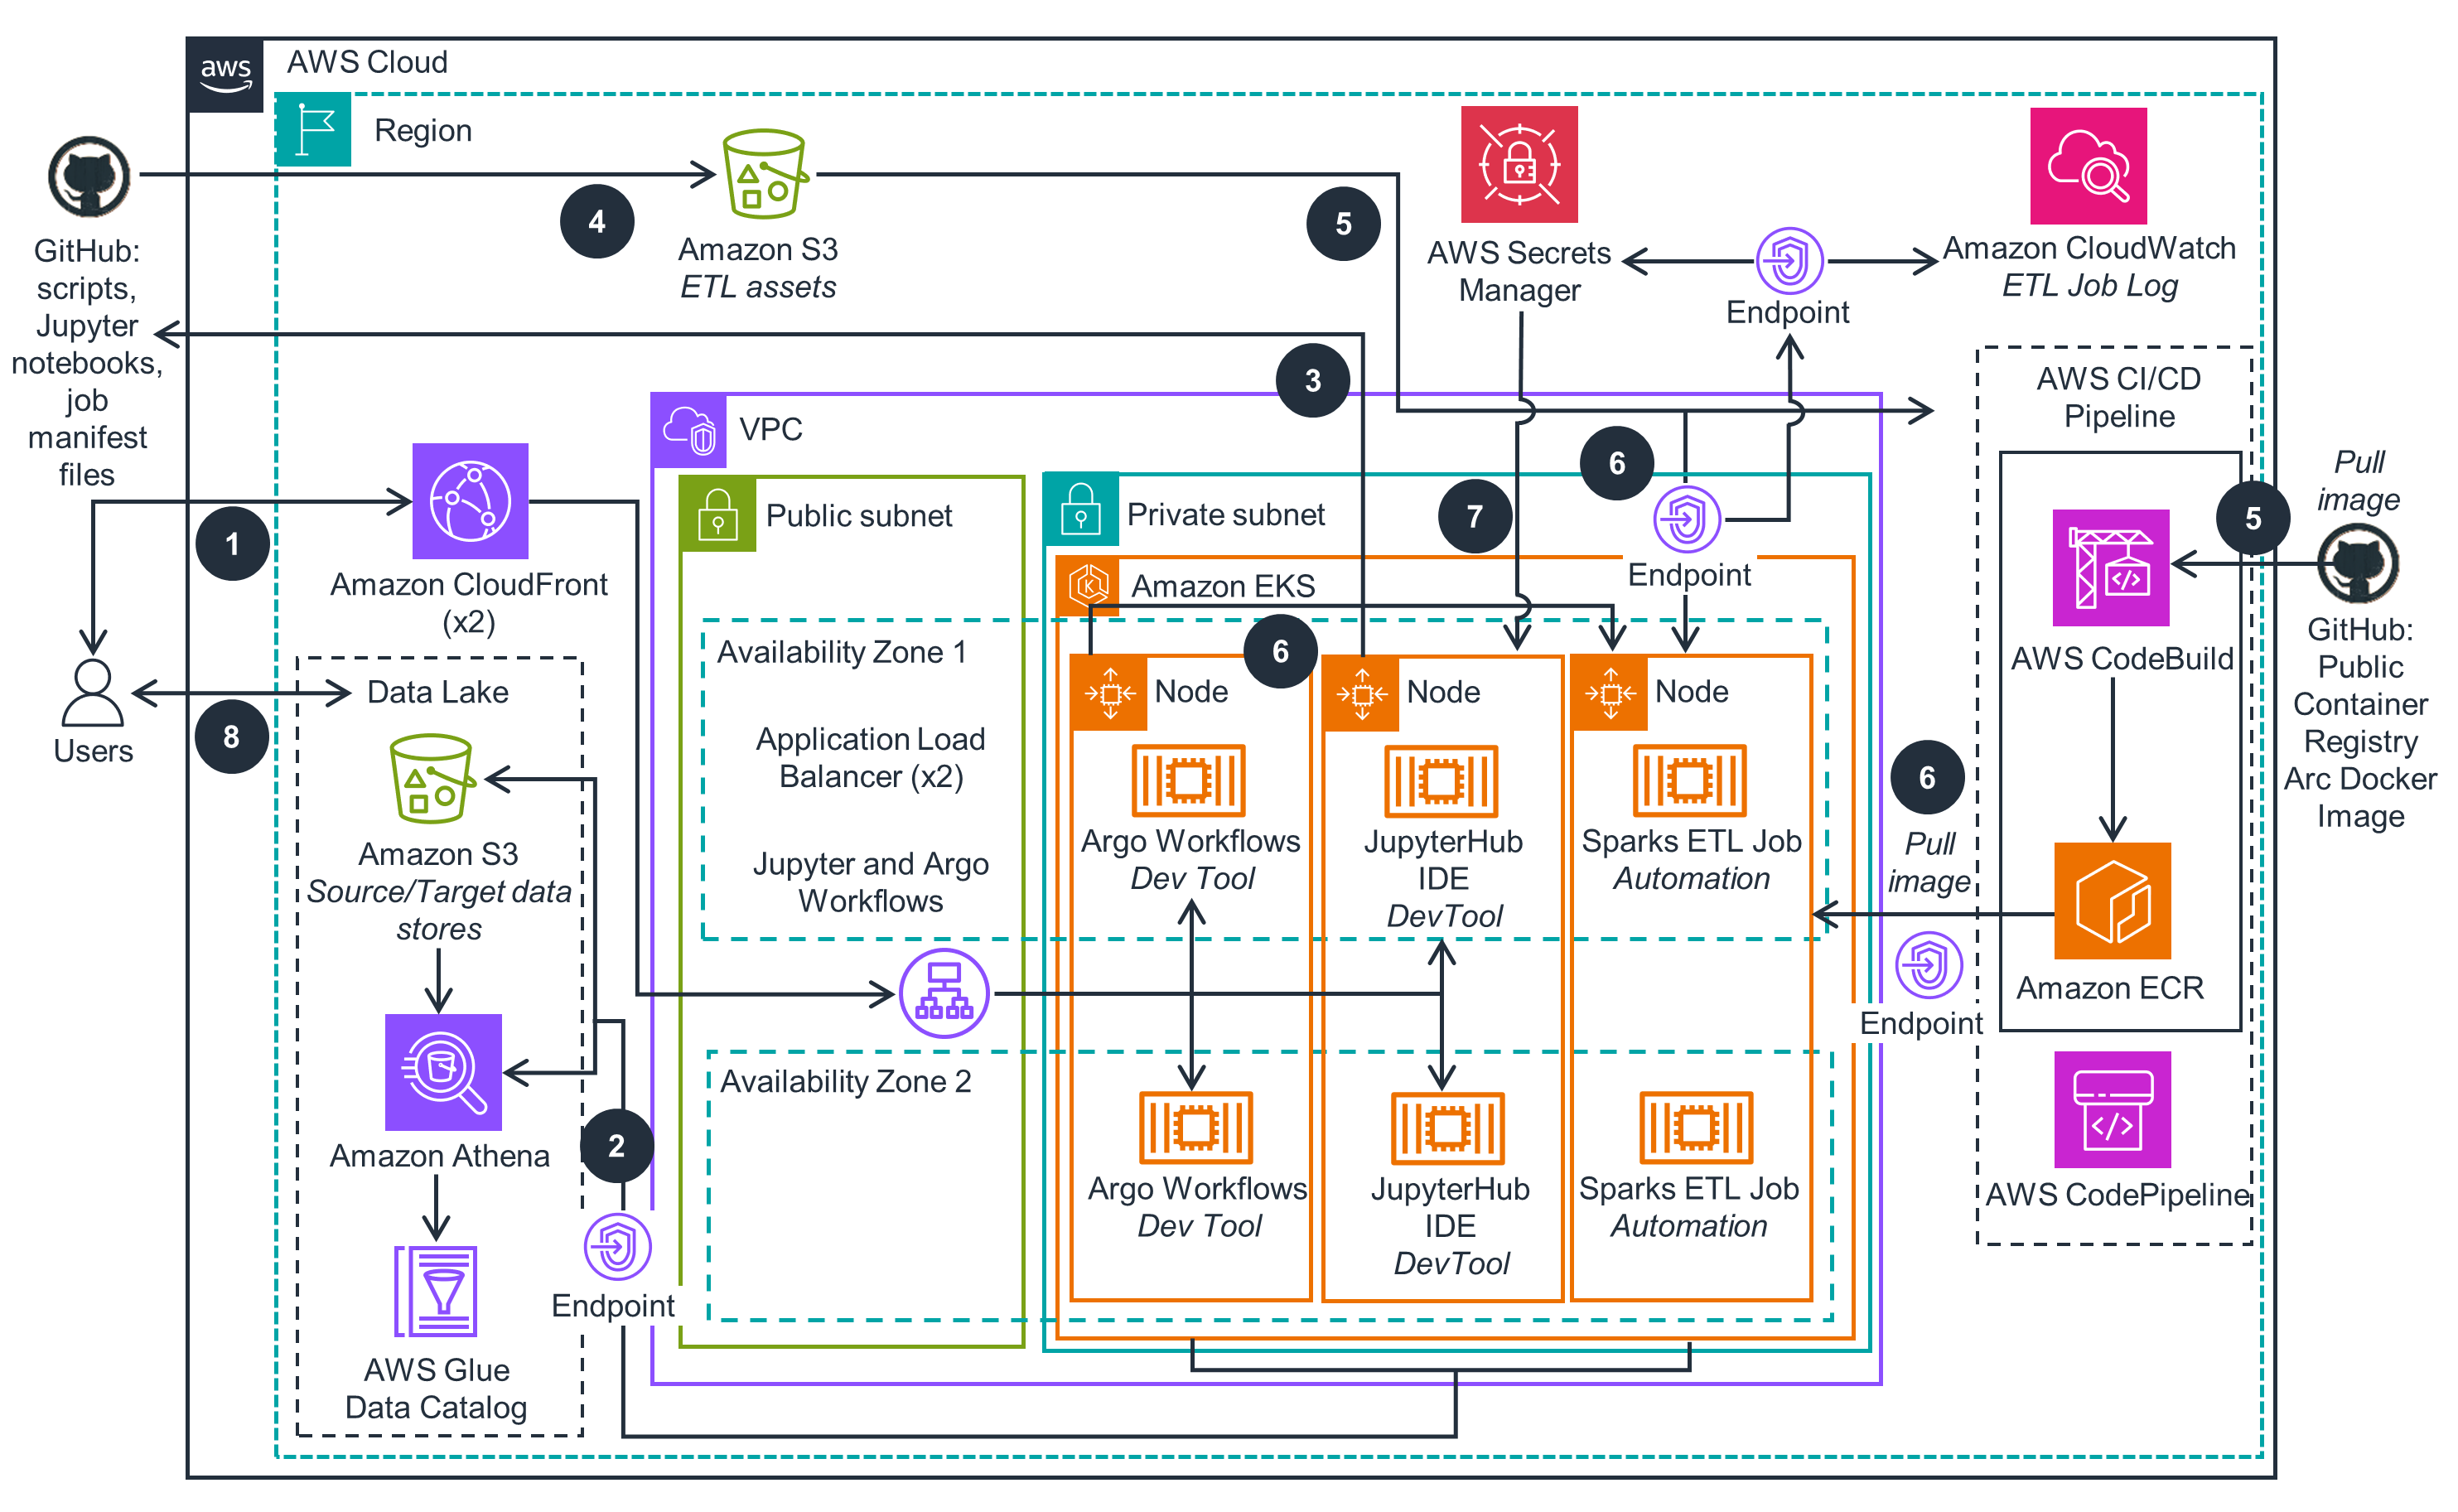
Figure 1: Reference architecture for SQL-Based ETL with Apache Spark deployed on Amazon EKS
Architecture steps
- Users interact with Extraction, Transformation and Loading (ETL) development and orchestration tools via Amazon CloudFront endpoints with Application Load Balancer origins, which provide secure connections between clients and ETL tools’ endpoints.
- Users interactively develop, test and schedule ETL jobs that process batch and stream data. The data traffic between ETL processes and data stores flows through Amazon Virtual Private Cloud (VPC) Endpoints (AWS PrivateLink) without leaving the AWS network.
- JupyterHub, Argo Workflows and Kubernetes Operator for Apache Spark are running as containers on Amazon Elastic Kubernetes Service (EKS) cluster. JupyterHub IDE can integrate with a source code repository (GitHub) to track ETL assets changes made by users. The assets include JupyterHub notebook files, SQL scripts etc., to be run with the Arc ETL framework.
- ETL assets can be updated by users in the source code repository (GitHub), then uploaded to an Amazon S3 bucket. The synchronization process can be implemented by an automated CI/CD deployment process triggered by updates in the source code repository or performed manually.
- Users can change Docker build source code uploaded from a code repository to the S3 ETL Asset bucket. It activates an AWS CodeBuild /AWS CodePipeline CI/CD pipeline to automatically rebuild and push the Arc ETL Framework container image to Amazon ECR private registry.
- Users schedule ETL jobs via Argo Workflows to be run on Amazon EKS cluster. These jobs automatically pull Arc ETL Framework container image from ECR, download ETL assets from the artifact S3 bucket, and send application execution logs to Amazon CloudWatch. Access to all the AWS services is secured via VPC endpoints.
- JupyterHub IDE automatically retrieves login credentials from Amazon Secrets Manager to validate sign-in user requests. Authenticated users can interactively develop and test their notebooks as ETL jobs in JupyterHub.
- Users can access the ETL output data stored in the S3 bucket that supports the transactional Data lake format and query the Delta Lake tables through Amazon Athena integrated with AWS Glue Data Catalog.
AWS services used in this guidance
| AWS service | Description |
|---|---|
| Amazon Elastic Kubernetes Service (Amazon EKS) | Core service - Amazon EKS hosts the Guidance workloads |
| Amazon Virtual Private Cloud (Amazon VPC) | Core Service - Network security layer |
| Amazon Elastic Compute Cloud (Amazon EC2) | Core Service - Amazon EC2 instances power On Demand and Spot based Amazon EKS compute node groups for running container workloads |
| Amazon Elastic Container Registry (Amazon ECR) | Core service - Amazon ECR registry hosts the container images for Spark jobs and Arc ETL framework |
| Amazon Elastic Map Reduce (Amazon EMR) on Amazon EKS | Auxiliary service - Alternative way to configure and run ETL jobs on Amazon EKS |
| Amazon Athena | Core service - Used for SQL syntax querying of sample ETL job results from Amazon S3 |
| AWS Glue Data Catalog | Auxiliary service - Exposes ETL related data stores |
| Amazon Simple Storage Service (Amazon S3) | Core service - Object storage for users’ ETL assets from GitHub |
| Amazon CloudFront | Auxiliary service - Provides SSL entry points for Jupyter and Argo Workflows tools |
| Amazon CloudWatch | Auxiliary service - Provides observability for core services |
| AWS Secretes Manager | Auxiliary service - Provides user credentials management for Jupyter IDE |
| AWS CodeBuild | Core service - CI/CD automation for building Arc ETL framework images |
| AWS CodePipeline | Core service - CI/CD automation for pushing Arc ETL framework images into the Amazon ECR registry |
Plan your deployment
This section includes information to help you plan your deployment.
Cost
You are responsible for the cost of the AWS services used running this guidance. As of February 2024, the estimated cost for running it with the default two-node Amazon EKS cluster in the US East (N. Virginia) Region is approximately $0.64 an hour or $467.76 per month. Refer to the AWS pricing webpage for each AWS service deployed.
Sample Cost table
The following table provides a sample cost breakdown for deploying this Guidance with the default parameters in the US East (N. Virginia) Region for one month.
| AWS service | Dimensions | Cost [USD] |
|---|---|---|
| Amazon EKS cluster (no compute) | $0.10 per hour per cluster X 1 | $73.00 |
| Amazon EC2 (On-Demand) | $0.1632 per hour X 1 m7g.xlarge instance | $119.14 |
| Amazon EC2 (Spot) | $0.1174 per hour X 1 r4.xlarge instance | $85.70 |
| Amazon EC2 (Graviton Spot) | $0.0966 per hour X 1 r7g.xlarge instance | $70.52 |
| Elastic Load Balancing | $0.0225 Application Load Balancer per hour X 2 ALBs | $32.85 |
| Elastic Load Balancing | $0.008 Load Balancer Capacity Units (LCU) per hour X 2 ALBs | $11.68 |
| VPC Endpoint | $0.01 per hour per VPC endpoint per Availability Zone (AZ) X 5 endpoints (Amazon S3, Amazon Athena, Amazon ECR, AWS KMS, and Amazon CloudWatch) X 2 AZs | $73.00 |
| VPC Endpoint | $0.01 per GB data processed per month X 10 GB | $0.1 |
| Amazon S3 (storage) | $0.023 per GB for First 50 TB/month X 1 GB | $0.02 |
| AWS CodeBuild | $0.005 per build minute on general1.small X 150 minutes per month | $0.75 |
| AWS CodePipeline | $1.00 per active pipeline per month X 1 | $1.00 |
| **Total estimated cost per month: | $467.76** |
Amazon CloudFront cost is not included in the estimation, as its monthly Free Tier can fully cover the usage in this guidance. To avoid the instance capacity issue, additional types of r5.xlarge and r5a.xlarge are included in the EC2 Spot Instance fleet, and r6g.xlarge and r6gd.xlarge are included into Graviton Spot instance fleet. Their pricing varies based on the time period those instances are running. For more information on Spot Instance pricing, refer to the Amazon EC2 Spot Instances Pricing page.
Security
When you build systems on AWS infrastructure, security responsibilities are shared between you and AWS. This shared responsibility model reduces your operational burden because AWS operates, manages, and controls the components including the host operating system, the virtualization layer, and the physical security of the facilities in which the services operate. For more information about AWS security, visit AWS Cloud Security.
IAM roles
AWS Identity and Access Management (IAM) roles allow customers to assign granular access policies and permissions to services and users in the AWS Cloud. This guidance creates a set of IAM roles for service account and add-ins running on Amazon EKS. The sample ETL jobs are controlled by IAM roles that allow you access to the required data sources in an S3 bucket.
AWS Secrets Manager
Secrets Manager generates a random password for a user to sign in to the JupyterHub web tool. This password is encrypted by a customer master key (CMK) created by AWS Key Management Service (AWS KMS) that automatically rotates each year.
This guidance does not provide the ability to rotate the Jupyter login password in Secrets Manager.
Alternatively, you can remove the need for Secrets Manager by reconfiguring the JupyterHub authenticator to support Single Sign-On (SSO) or LDAP authentication. For a list of supported authenticators, refer to Authenticators in the JupyterHub GitHub repository.
Amazon CloudFront
In this guidance, JupyterHub and Argo Workflows development tools with respective user interfaces (UIs) are installed on Amazon EKS. They are fronted by respective Application Load Balancers (ALBs) that forward incoming requests without an encrypted HTTP connection. Amazon CloudFront distributions using those ALBs as origins are deployed to enable secure HTTPS protocol between users and CloudFront endpoints, with a default domain offered by the AWS managed service.

Figure 2: CloudFront Endpoints and distribution origins for Argo Workflows and JupyterHub
We recommend removing CloudFront endpoints from the Guidance deployment architecture and generating your SSL/TLS certificate with your own domain to encrypt the communication between users and the ALBs. Using this approach, you must attach your certificates to ALBs. For more information, refer to How can I associate an ACM SSL/TLS certificate with an Application Load Balancer?
Security Groups
The security groups deployed by this guidance are designed to control and isolate network traffic between the VPC endpoint, ALB, Amazon ECR, and Amazon EKS. We recommend that you review the security groups and further restrict access as needed, using inbound rules, once your deployment is up and running. For example, the VPC endpoint security group restricts inbound traffic to HTTPS port 443 only.
Important: The Guidance deploys two ALBs for JupyterHub and Argo Workflows web applications. Both of the ALBs’ security groups contain an inbound rule that only allows the incoming request initialized from CloudFront, such as limited sets of IP address ranges that are provided and maintained by the AWS Managed Prefix List com.amazonaws.global.cloudfront.origin-facing. We suggest further limiting the ALBs’ incoming traffic based on your requester’s IP address range, preventing any non-CloudFront or non-user’s traffic from reaching your web applications.
Supported AWS Regions
Guidance for SQL-Based ETL with Apache Spark on Amazon EKS is supported but not limited to the following AWS Regions. By default, the deployment AWS CloudFormation template supports US East (N. Virginia) - us-east-1 region. To deploy to other Regions, follow this customization instructions to generate your CloudFormation deployment template.
| Region Name | Notes |
|---|---|
| US East (N. Virginia) | us-east-1 |
| US West (Oregon) | us-west-2 |
| Asia Pacific (Sydney) | ap-southeast-2 |
| Asia Pacific (Singapore) | ap-southeast-1 |
| Europe (Frankfurt) | eu-central-1 |
Quotas for AWS services in this guidance
Service quotas, also referred as limits, are the maximum number of service resources or operations for your AWS account. Make sure you have sufficient quota for each of the services implemented in this guidance. For more information, see AWS service quotas.
To view the service quotas for all AWS services in the documentation without switching pages, view the information in the Service endpoints and quotas page in the PDF instead.
Deploy the Guidance
This section includes information to help you successfully deploy the Guidance.
Considerations
This deployment uses default settings that you may want to adjust, such as the default timeout settings for the JupyterHub and Argo Workflows web interfaces. It also provides sample Spark job definitions and optional AWS services that you can run to test the Guidance functionalities. These resources can be removed to save on costs.
If you don’t want to customize the guidance, skip this section and go to the “Deployment prerequisites” directly.
Any changes that you make to the Guidance, such as editing the timeout settings, require you to redeploy the CloudFormation stack. This is necessary to meet CI/CD deployment standards.
Follow the Customization procedure to automatically update your CloudFormation template. Alternatively, you can use the GitHub repository to fork and update the Guidance or directly deploy changes via the AWS Cloud Deployment Kit (AWS CDK).
Changing default timeout settings
The Guidance provides the following default timeout settings:
- JupyterHub web console idle timeout: 30 minutes
- Argo Workflows web console timeout: 15 minutes
Important: When these timeout limits are reached, you will be logged off the application and unsaved work will be lost.
Use the following steps to change JupyterHub’s idle timeout setting if needed:
- Download or fork the guidance source code from the GitHub repository to your computer, if you haven’t already done so.
- Open the source/app_resources/jupyter-values.yaml JupyterHub configuration file.
- Locate the attribute, then adjust the timeout:1800 setting. The time unit is in seconds. For information about this setting, refer to the jupyterhub-idle-culler GitHub repository.
...
cull:
 timeout: 1800
Argo Workflows’ idle timeout value is inherited from the underlying Amazon EKS bearer token refresh frequency, which is not adjustable. However, you can reconfigure the Argo server Authentication mode to SSO mode with a longer and adjustable expiration time (default: 10 hours).
Use the following steps to change the Auth mode if needed:
- Open the source/app_resources/argo-values.yaml Argo Workflows configuration file.
- Locate the setting
--auth-mode. - Change the mode from
clienttoSSOmode. - Follow the instruction on the Argo Server SSO page to configure the secrets, RBAC, and SSO expiry time in Kubernetes environment.
Removing sample resources
This guidance deploys the following resources to help you test and become familiar with the available functionality. You can remove them all or replace by your own ETL job assets:
- deployment/app_code/data – sample datasets
- deployment/app_code/job – sample jobs
- deployment/app_code/meta – sample metadata definition
- deployment/app_code/sql – sample SQL scripts
- source/example – sample notebooks and job scheduler definitions for testing
Following ETL automation standards for CI/CD deployment, these resources under the “deployment” directory are automatically uploaded to the Guidance S3 bucket. When you are ready to use your own resources, you can organize and construct your ETL assets by the same pattern that is provided in the deployment folder. The layout in the deployment directory is designed to be portable, scalable, and readable for real-world use cases.
If you choose to remove the automated S3 bucket deployment from the Guidance:
- Ensure you have an automatic process to upload ETL assets to the S3 bucket.
- Edit the source/lib/cdk_infra/s3_app_code.py file by removing the code blocks start with “proj_dir=” and “self.deploy=”.
Remove optional AWS services for saving costs
These following AWS services automate and secure the Guidance and provide a blueprint you can follow when deploying this guidance in your AWS environment. However, these services are optional, and you can remove them to save on costs:
- CloudFront – Provides secure HTTPs endpoints for JupyterHub and Argo Workflows
- CodeBuild and CodePipeline – Provides CI/CD automation to build and deploy Arc Docker image to the Amazon ECR private repository.
If you choose to remove the optional CloudFront service from the guidance deployment:
- Ensure you have your TLS/SSL certificate associated with your ALBs.
- Open the Guidance source/app.py entry point file.
- Remove four lines related to the keyword “cf_nested_stack”, preventing the CloudFront stack from being deployed to your account.
- Search the remaining project source code for the keyword “cloudfront” and remove the block of code related to CloudFront. The entire source/lib/cloud_front_stack.py file can be removed if needed.
- Note that your ALB’s security group only allows CloudFront’s IP addresses. The inbound rule needs to be adjusted.
If you have existing CI/CD tools or have preferences for the deployment automation, you can remove the optional CodeBuild and CodePipeline services:
- Ensure you have an ECR Docker deployment process in place.
- Open the Guidance main stack source/lib/spark_on_eks_stack.py file.
- Remove the three lines that contains the key word “ecr_image”, so the Amazon ECR automation will not be activated during your deployment.
- Optionally, delete the entire directory source/lib/ecr_build/. Search the remaining source code by the keyword “IMAGE_URI”, and modify the code to remove any references on the Amazon ECR Docker image URL.
Deployment prerequisites
Before you launch the Guidance, review the cost, architecture, security, and other considerations described above. Follow the step-by-step instruction to configure and deploy the Guidance into your AWS account.
In order to configure or customize the Guidance, you must download the source code from the GitHub repository and use AWS Command Line Interface version 1 (AWS CLI) to interact with AWS remotely from your computer.
If you don’t want to install anything on your computer, use AWS CloudShell, a browser-based shell that makes it easy to run scripts with the pre-installed AWS CLI. Review the supported AWS Regions for CloudShell. If your deployment Region is not on the list, review the prerequisites in this section to set up your local environment.
If you do not have AWS CLI installed in your environment, refer to the following links to download the appropriate version based on your operating system:
- For Windows OS, download the MSI installer.
- For Linux or macOS, download the bundled installer.
- For Python 3.6 or later, download Python here.
- Verify that the AWS CLI can communicate with AWS services in your AWS account where this guidance will be deployed. For example, check the S3 bucket connection by running the command:
aws s3 ls
If no connection is found, run the following command to configure your AWS account access:
aws configure
For more details, refer to the configuration basics document.
Deployment Overview
Deployment Time: About 30-40 minutes
Follow these high-level steps for deployment and validation of the Guidance sample code:
- Review deployment parameters and enter or adjust the default values if needed.
- Deploy infrastructure into your AWS account.
- Set up command line tools in CloudShell or your local environment.
- Test an ETL job in JupyterHub notebook with a custom kernel.
- Quick start with a sample job on Argo Workflows Web UI.
- Submit the same ETL job with Argo CLI.
- Schedule a native Spark job with the Kubernetes Operator for Spark.
Deployment Details
Download the source code:
git clone https://github.com/aws-solutions-library-samples/guidance-for-sql-based-extraction-transformation-and-loading-with-apache-spark-on-amazon-eks.git
cd guidance-for-sql-based-extraction-transformation-and-loading-with-apache-spark-on-amazon-eks
The project is set up like a standard Python project. The source/cdk.json file tells where the application entry point is. The provisioning takes about 30 minutes to complete. See the Troubleshooting section if you face deployment problems.
1. Deploy AWS resources
There are two ways to deploy the project:
- CloudFormation template
- AWS CDK.
Deploy through Cloud Formation template
| Region | Launch Template |
|---|---|
| US East 1 (N. Virginia) |  |
Option 1: (Recommended) Deploy with default settings. Review the Customization section below to deploy in a different Region.
Option 2: If ETL uses your own data, input the parameter
datalakebucketwith your S3 bucket.
Your existing S3 bucket must be in the same Region as the Guidance deployment Region.
Customization
Without using the pre-build CloudFormation template above, you can customize the project then regenerate the CloudFormation template on your own. For example, you can reconfigure the JupyterHub notebook, or regenerate the CloudFormation template for a different Region as shown below:
export BUCKET_NAME_PREFIX=<your_bucket_name> # bucket where customized code will reside
export BUCKET_NAME_PREFIX=<my-bucket-name> # bucket where the customized CFN templates will reside
export AWS_REGION=<your-region>
export SOLUTION_NAME=sql-based-etl
export VERSION=aws-solution-v2 # version number for the customized code

./deployment/build-s3-dist.sh $BUCKET_NAME_PREFIX $SOLUTION_NAME $VERSION

# create the bucket where customized code will reside
aws s3 mb s3://$BUCKET_NAME_PREFIX-$AWS_REGION --region $AWS_REGION

# Upload deployment assets to the S3 bucket
aws s3 cp ./deployment/global-s3-assets/ s3://$BUCKET_NAME_PREFIX-$AWS_REGION/$SOLUTION_NAME/$VERSION/ --recursive --acl bucket-owner-full-control
aws s3 cp ./deployment/regional-s3-assets/ s3://$BUCKET_NAME_PREFIX-$AWS_REGION/$SOLUTION_NAME/$VERSION/ --recursive --acl bucket-owner-full-control

echo -e "\nIn web browser, paste the URL to launch the template: https://console.aws.amazon.com/cloudformation/home?region=$AWS_REGION#/stacks/quickcreate?stackName=SparkOnEKS&templateURL=https://$BUCKET_NAME_PREFIX-$AWS_REGION.s3.amazonaws.com/$SOLUTION_NAME/$VERSION/sql-based-etl-with-apache-spark-on-amazon-eks.template\n"
Deploy through AWS CDK
Without using the previous two approaches to deploy the required resources into your AWS account you can, alternatively, change the project’s source code and deploy them on the fly through the AWS CDK tool.
Deploying with AWS CDK offers the following benefits:
- AWS CDK provides a local debug feature and fails fast.
- It is convenient to customize the Guidance with a quicker test response. For example, you can remove a nested stack CloudFront and enable TLS in ALB.
The AWS CDK deployment requires Node.js (>= 14.15.0) and the AWS CDK Toolkit. To install Node.js, visit the node.js website. To install the AWS CDK toolkit, follow these instructions. If it’s your first time deploying an AWS CDK app into an AWS account, you need to also install a “bootstrap stack” to your CloudFormation template.
Review the Troubleshooting section if you experience issues deploying the application through AWS CDK. More details about AWS CDK can be found here.
python3 -m venv .env
If you are in a Windows platform, you would activate the virtualenv with the following:
% .env\Scripts\activate.bat
After the virtualenv is created, you can use the following to activate your virtualenv and install the required dependencies:
source .env/bin/activate
pip install -e source
- Option 1: (Recommended) Deploy with default parameters
cd source cdk deploy --require-approval never - Option 2: If using your own ETL data, use the parameter
datalakebucket. By default, the deployment creates a new S3 bucket containing sample data and ETL job configurations. If using your own input data to build an ETL job, replace the<existing_datalake_bucket>to your S3 bucket.
cd source
cdk deploy --parameters datalakebucket=<existing_datalake_bucket>
Your S3 bucket must be in the same Region as the deployment Region.
2. Post-deployment
The project source code contains a set of application configurations. It is available from the Guidance GitHub repository. Download the source code to CloudShell or a local host if you haven’t yet:
git clone https://github.com/aws-solutions-library-samples/guidance-for-sql-based-extraction-transformation-and-loading-with-apache-spark-on-amazon-eks.git
cd guidance-for-sql-based-extract-transform-and-loading-with-apache-spark-on-amazon-eks
Install command tool
The post-deployment script deployment/post-deployment.sh will install kubectl and Argo CLI tools into your environment. If you don’t want to install them to your computer, use CloudShell and select your deployment Region in the AWS Console. Review the supported Regions for CloudShell, and ensure your deployment Region is on the list. Otherwise, run the following post deployment commands from your local computer.
The script supports linux OS by default. For other operating system, such as MacOS, review the links provided by the script and amend deployment/post-deployment.sh accordingly.
The script accepts two input parameters:
export stack_name="${1:-SparkOnEKS}"
export region="${2:-us-east-1}"
Run the script with defaults if the CloudFormation stack name and AWS Region were not changed. Otherwise, input the parameters:
#use default
./deployment/post-deployment.sh
#use different CFN name or region, if necessary
./deployment/post-deployment.sh <cloudformation_stack_name> <aws_region>
It should produce an output similar to the following:
=================================================================================================
  Make sure your CloudFormation stack name SparkOnEKS is correct and exists in region: us-east-1
  If you use a different name, rerun the script with parameters:
      ./deployment/post-deployment.sh <stack_name> <region>
=================================================================================================
Updated ECR endpoint in sample job files in source/example/
================================================================================
  Installing kubectl tool on Linux ...
  For other operating system, install the kubectl > v1.27 here:
  https://docs.aws.amazon.com/eks/latest/userguide/install-kubectl.html
================================================================================
  % Total    % Received % Xferd  Average Speed   Time    Time     Time  Current
                                 Dload  Upload   Total   Spent    Left  Speed
100   138  100   138    0     0   1767      0 --:--:-- --:--:-- --:--:--  1792
100 53.2M  100 53.2M    0     0  7152k      0  0:00:07  0:00:07 --:--:-- 7561k
Installed kubectl version:
Client Version: v1.28.3
Kustomize Version: v5.0.4-0.20230601165947-6ce0bf390ce3
================================================================================================
 Installing argoCLI tool on Linux ...
 Check out https://github.com/argoproj/argo-workflows/releases for other OS type installation.
================================================================================================
Password:
Installed argoCLI version:
argo: v3.5.4
Updated context arn:aws:eks:REGION:ACCOUNTID:cluster/spark-on-eks in /Users/USERNAME/.kube/config
Testing EKS connection...
NAME                     TYPE        CLUSTER-IP       EXTERNAL-IP   PORT(S)   AGE
kubernetes               ClusterIP   172.20.0.1       <none>        443/TCP   29h
spark-operator-webhook   ClusterIP   172.20.169.214   <none>        443/TCP   28h

=============================== JupyterHub Login ==============================================

JUPYTER_URL: https://d14vchzorgvi9r.cloudfront.net
LOGIN: {"password":"XXXXXXXXXXXXX","username":"sparkoneks"}
================================================================================================

=============================== ARGO Workflows Login ==============================================

ARGO_URL: https://d18bttsd0qjpf4.cloudfront.net
================================================================================================
Double check that the image tag in the source/example/native-spark-job-scheduler.yaml Spark Job scheduler file setting matches an actual Amazon ECR image, as shown in the screenshot below:

Figure 3: Amazon ECR repository for ARC ETL Framework container image
3. Test ETL job in JupyterHub notebook
Follow these steps to test the ETL job in JupyterHub notebook:
Log in to JupyterHub with the details from the above script output. Or, look up the credentials from your Secrets Manager console.
Use the default server size (unless your workload requires more powerful compute).
Following best security practices, the notebook session refreshes every 30 minutes. Log in again if that happens. You may lose your work if it hasn’t been saved in time. The notebook allows you to download files, and is configurable, meaning you can disable it in order to improve your data security.
Open a sample job scd2-job.ipynb from your Notebook instance. Select a
refreshbutton if can’t see the file. The job outputs a table to support the Slowly Changing Dimension (SCD) Type 2 business use cases.The source contacts data was generated by a python script, stored in /deployment/app_code/data/ folder.
Figure 4: Test data used for SCD job generated by Python script
- Execute each block and observe results. You will get a hands-on experience with the SQL-based ETL job powered by Apache Spark SQL and the Arc ETL framework.
Figure 5: In-progress SCD job in JupyterHub notebook
Upon completion of all tasks in the JupyterHub notebook, you should see an expected result at the outputs:
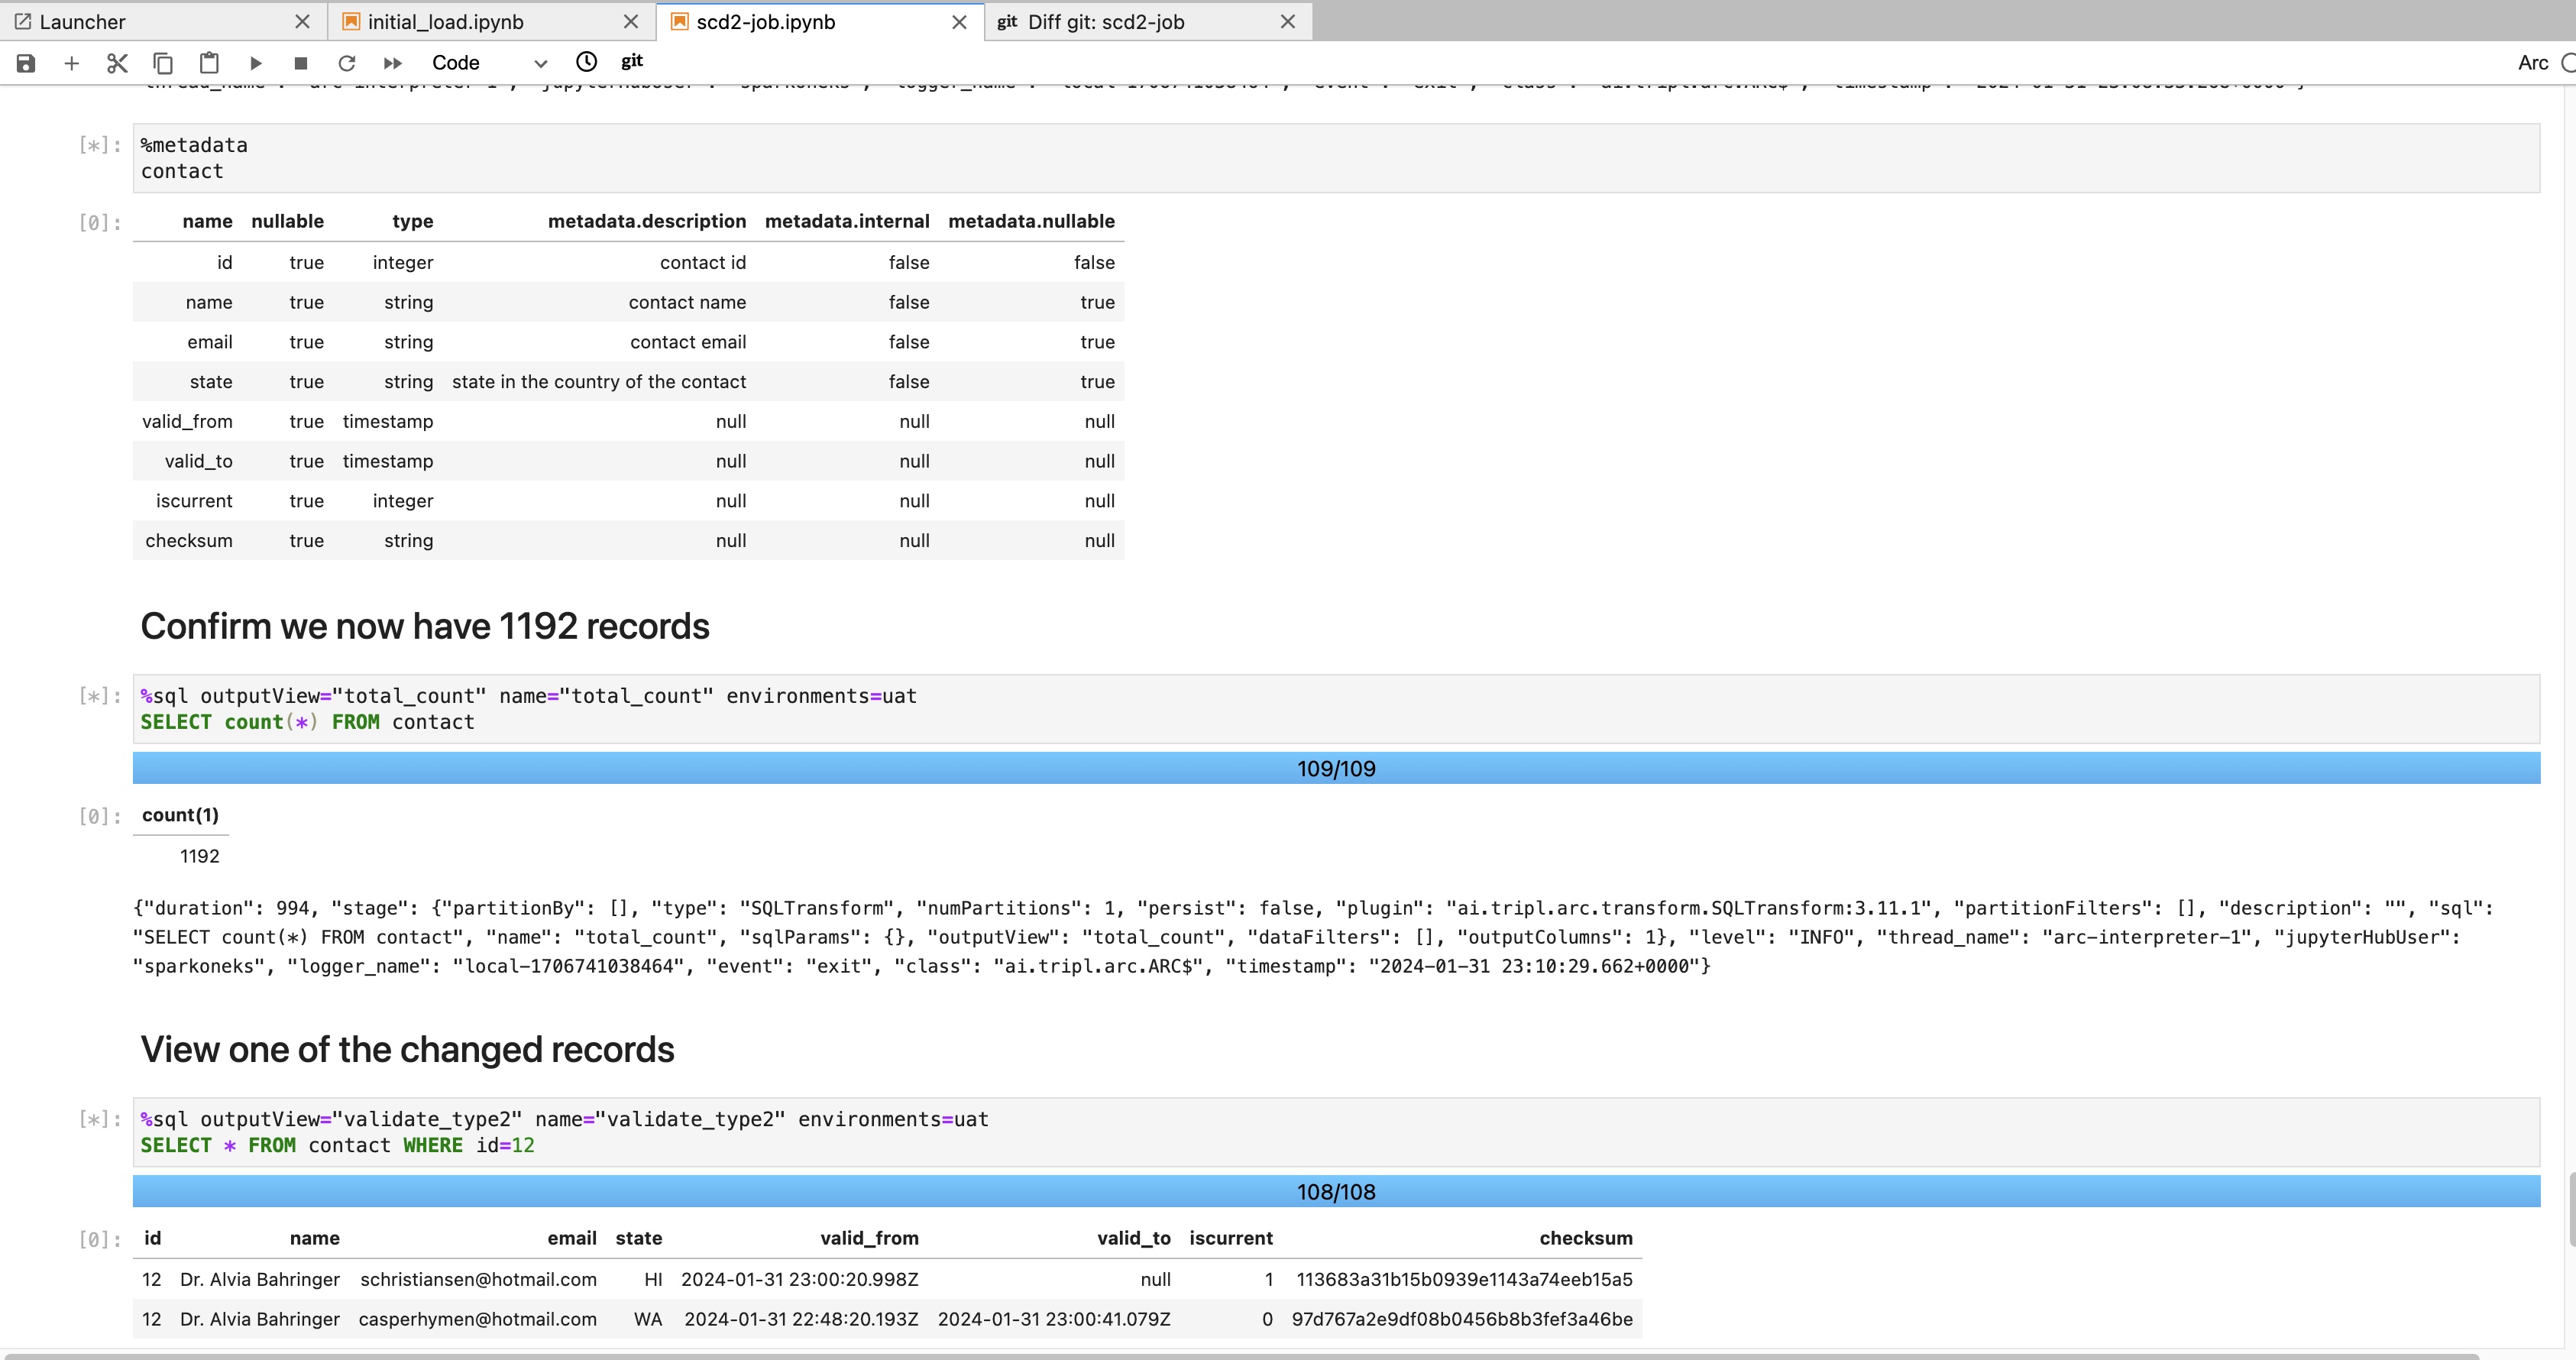
Figure 6: Completed SCD2 job in JupyterHub notebook
To demonstrate the best practice in Data DevOps, the JupyterHub is configured to synchronize the latest notebook code from a GitHub repo. In a real-life scenario, you must save all code changes to your source repository in order to save and invoke your ETL pipelines.
Run a query in the Athena console to confirm that it is a SCD2 type table.
SELECT * FROM default.deltalake_contact_jhub WHERE id=12
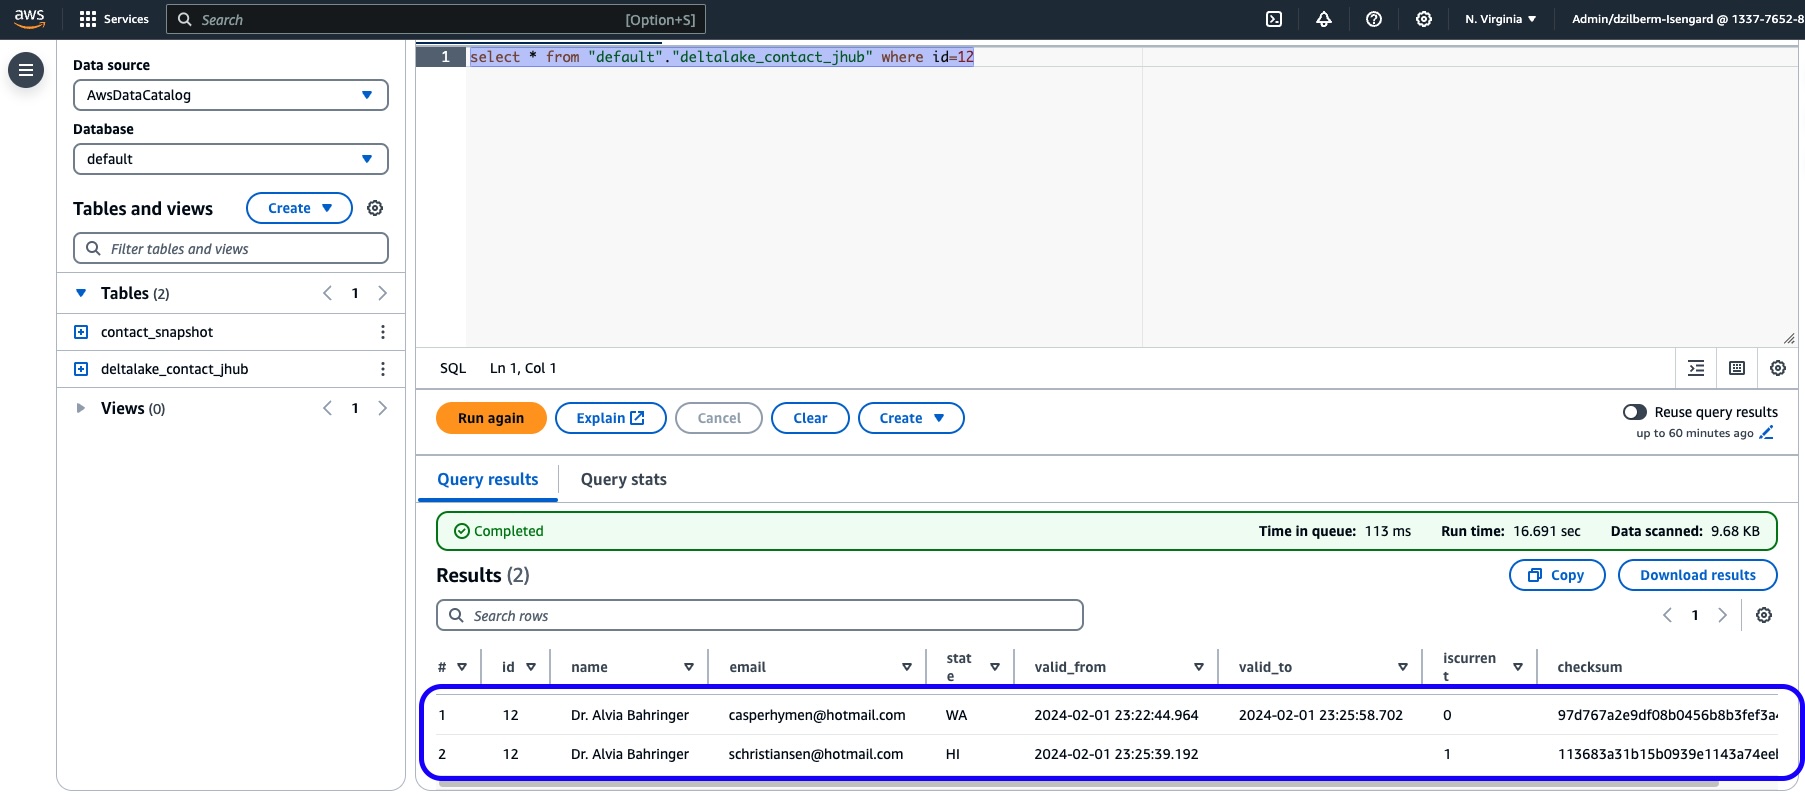
Figure 7: Athena query against a SCD2 type of Delta Lake table created from JuypyterHub
If it’s the first time you are running Athena based queries in your AWS Account, configure the query result location to an S3 bucket path (use the same “appcode” bucket) as shown below:
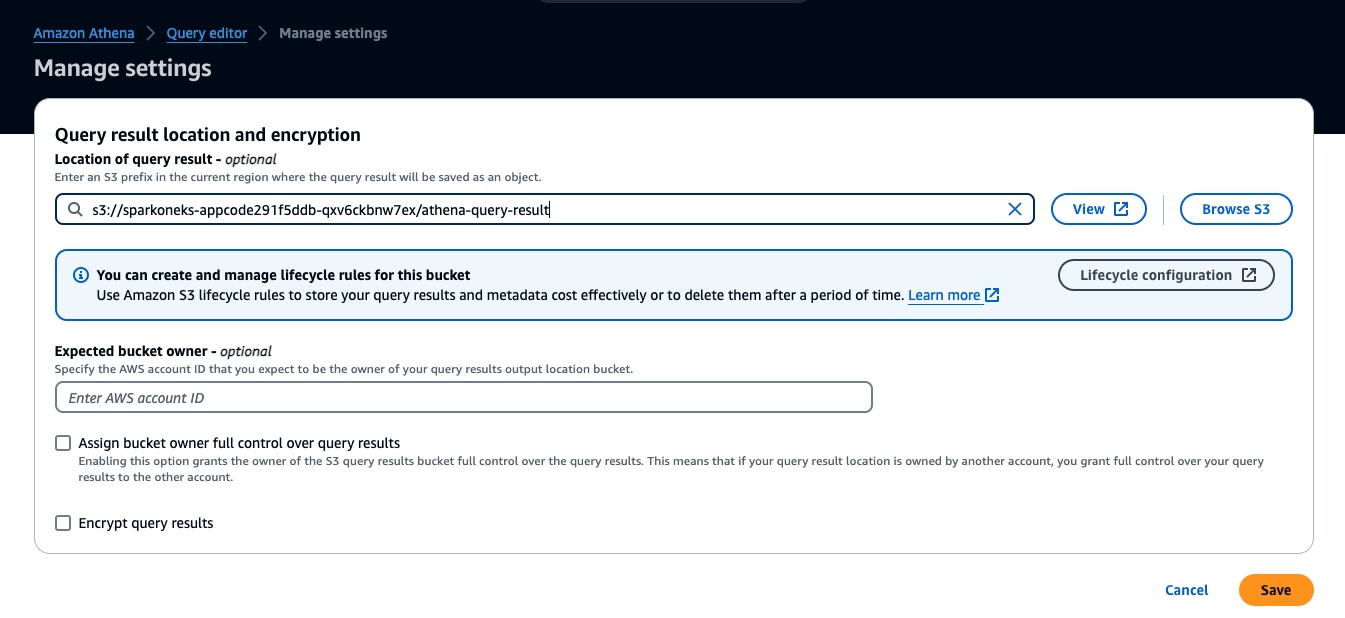
Figure 8: Configure Athena output location prior to running queries
4. Submit job through Argo Workflows UI
Follow these steps to submit a job through the Argo Workflows UI:
- Check your connections. If there’s no access to an Amazon EKS cluster or no Argo CLI installed, run the post-deployment script again.
argo version --short

# the current running nodes in the EKS cluster
kubectl get node --label-columns=eks.amazonaws.com/capacityType,topology.kubernetes.io/zone,node.kubernetes.io/instance-type
- Log in to the Argo website through a session token. The authentication token refreshes every 10 minutes (and is configurable). Run the script again if the session times out.
# use your CFN stack name if it is different
export stack_name=<cloudformation_stack_name>
ARGO_URL=$(aws cloudformation describe-stacks --stack-name $stack_name --query "Stacks[0].Outputs[?OutputKey=='ARGOURL'].OutputValue" --output text)
LOGIN=$(argo auth token)
echo -e "\nArgo website:\n$ARGO_URL\n" && echo -e "Login token:\n$LOGIN\n"
- Select the
Workflowsside menu, then select theSUBMIT NEW WORKFLOWbutton.
Figure 9: Screenshot showing initiation of Argo Workflows job from UI
- Navigate to
Edit using full workflow options, and replace the sample code with the following content built for the ETL job nyctaxi.ipynb. Finally, click theCREATEbutton to submit this notebook as a Spark job.
apiVersion: argoproj.io/v1alpha1
kind: Workflow
metadata:
  generateName: nyctaxi-job-
  namespace: spark
spec:
  serviceAccountName: arcjob
  entrypoint: nyctaxi
  nodeselector:
    kubernetes.io/arch: amd64
  templates:
  - name: nyctaxi
    dag:
      tasks:
        - name: step1-query
          templateRef:
            name: spark-template
            template: sparklocal
          arguments:
            parameters:
            - name: jobId
              value: nyctaxi
            - name: tags
              value: "project=sqlbasedetl, owner=myowner, costcenter=66666"
            - name: configUri
              value: https://raw.githubusercontent.com/tripl-ai/arc-starter/master/examples/kubernetes/nyctaxi.ipynb
            - name: image
              value: ghcr.io/tripl-ai/arc:arc_4.2.0_spark_3.3.4_scala_2.12_hadoop_3.3.2_4.2.1_slim
            - name: parameters
              value: "--ETL_CONF_DATA_URL=s3a://nyc-tlc/csv_backup \
              --ETL_CONF_JOB_URL=https://raw.githubusercontent.com/tripl-ai/arc-starter/master/examples/kubernetes"
- Select a pod (dot) on the Argo UI to check the Spark job status and application logs.
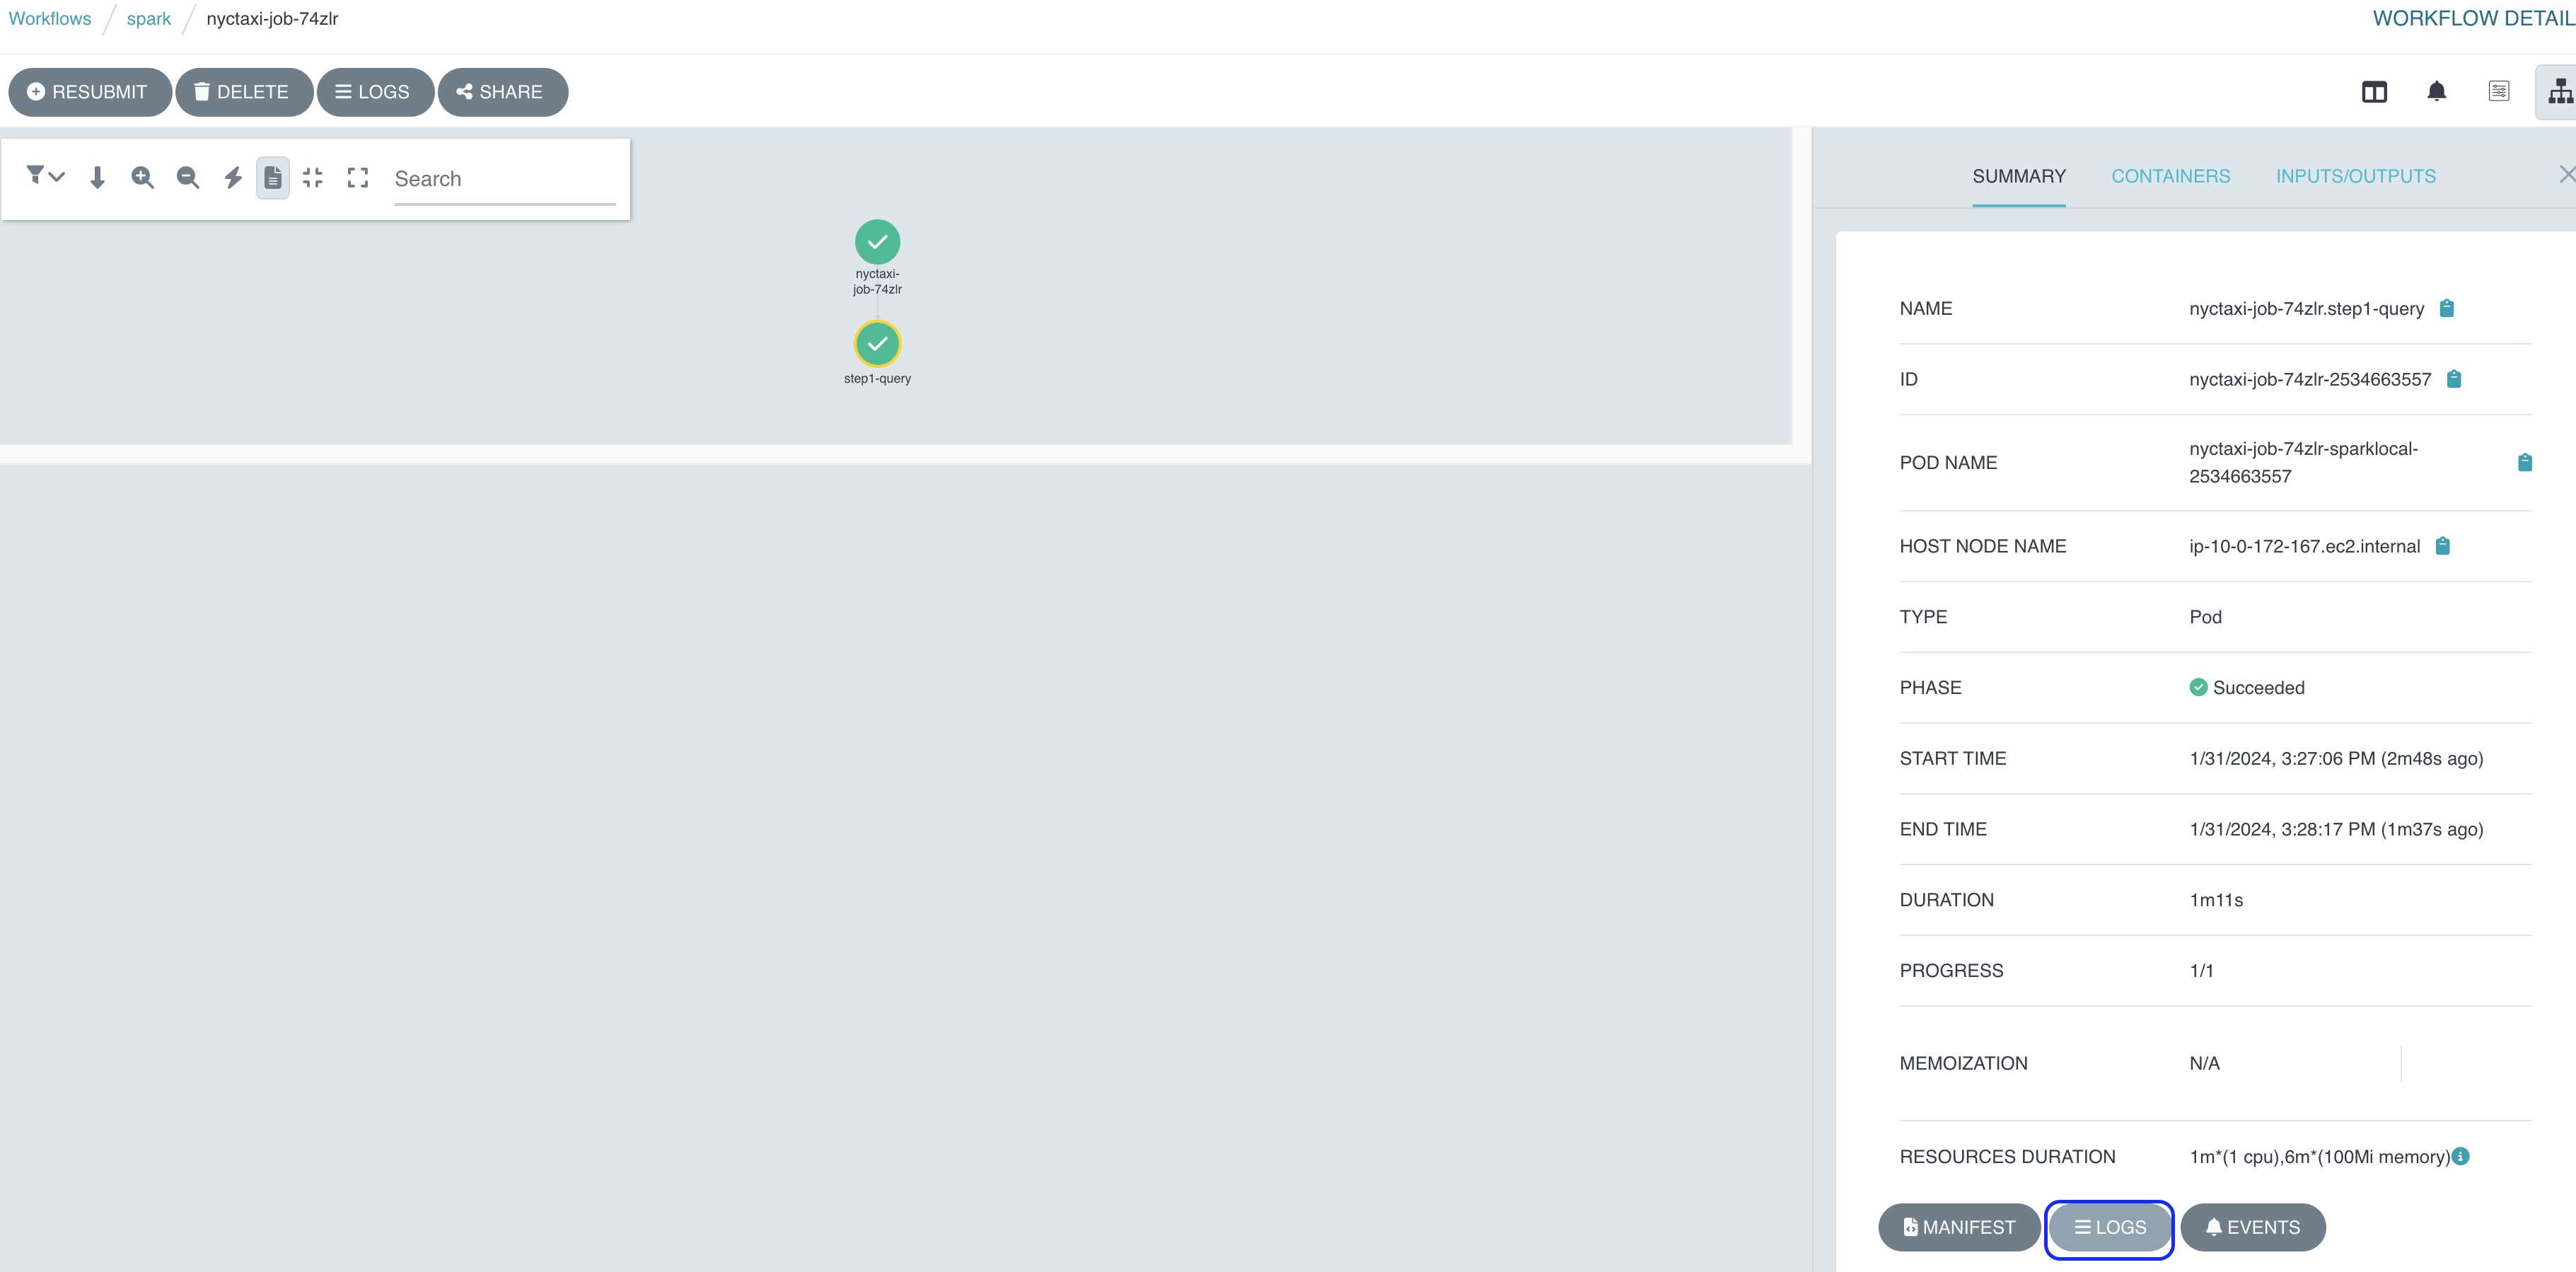
Figure 10: Completed Argo workflow Spark job logs
5. Submit ETL job through Argo CLI
In this section, you will submit the same ‘SCD2’ ETL job tested in the JupyterHub notebook earlier. To demonstrate Argo’s orchestration advantage with a job dependency feature, the single notebook is broken down into three files, or 3 ETL jobs, stored in deployment/app_code/job/ folder. It usually takes about 5 minutes to complete all jobs.
Total Run Time: 5 minutes
Follow these steps:
- Make sure you are at the project root directory.
cd guidance-for-sql-based-extract-transform-and-loading-with-apache-spark-on-amazon-eks
- Submit the job in CloudShell or your local command tool, then check the progress in the Argo Workflows web console.
# change to your CFN stack name if it is different
export stack_name=<cloudformation_stack_name>
app_code_bucket=$(aws cloudformation describe-stacks --stack-name $stack_name --query "Stacks[0].Outputs[?OutputKey=='CODEBUCKET'].OutputValue" --output text)
argo submit source/example/scd2-job-scheduler.yaml -n spark --watch -p codeBucket=$app_code_bucket
You should get an output in the terminal similar to what’s shown below:
Name:                scd2-job-4hlwr
Namespace:           spark
ServiceAccount:      arcjob
Status:              Succeeded
Conditions:
	PodRunning          False
	Completed           True
Created:             Fri Feb 02 12:15:14 -0800 (6 minutes ago)
Started:             Fri Feb 02 12:15:15 -0800 (6 minutes ago)
Finished:            Fri Feb 02 12:22:10 -0800 (now)
Duration:            6 minutes 55 seconds
Progress:            3/3
ResourcesDuration:   1h27m22s*(100Mi memory),16m33s*(1 cpu)
Parameters:
	codeBucket:        sparkoneks-appcode291f5ddb-qxv6ckbnw7ex

STEP                  TEMPLATE                 PODNAME                             DURATION  MESSAGE
	✔ scd2-job-4hlwr     scd2-process
	├─✔ delta-load(0)    spark-template/smalljob  scd2-job-4hlwr-smalljob-238698181   2m
	├─✔ initial-load(0)  spark-template/smalljob  scd2-job-4hlwr-smalljob-2937516159  2m
	└─✔ SCD2-merge(0)    spark-template/smalljob  scd2-job-4hlwr-smalljob-2594444049  3m
You can also observe a dependency tree of multiple Spark Jobs in the Argo Workflows UI. Select a dot on the UI to check each job status and their logs.
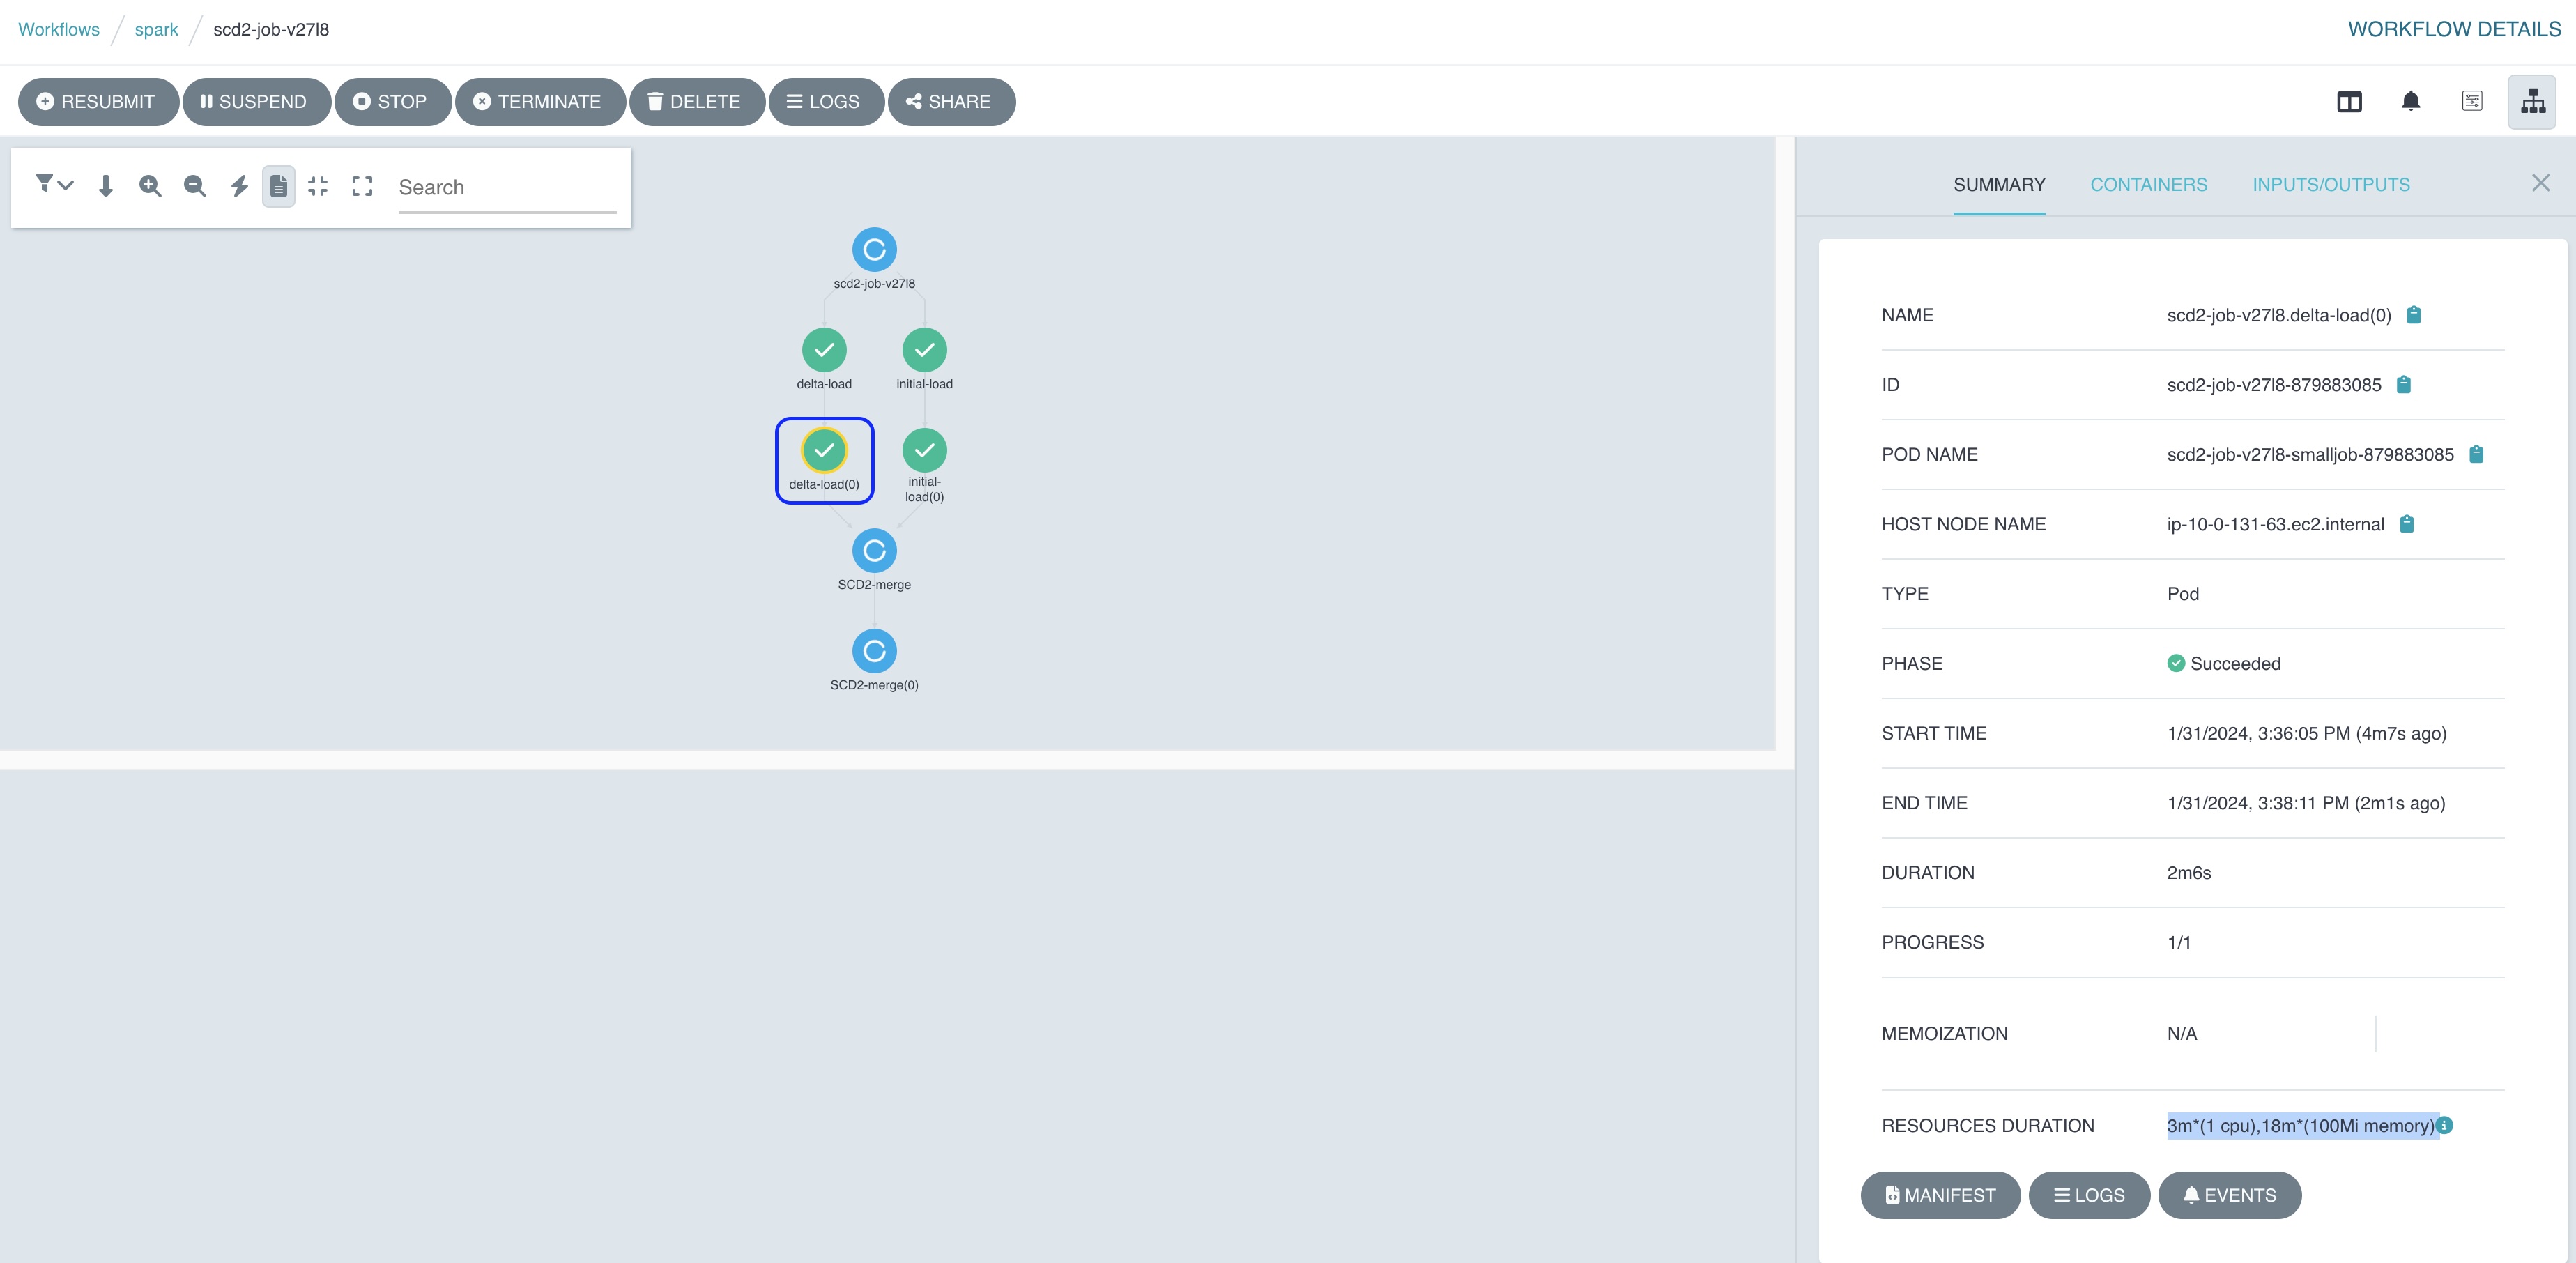
Figure 11: Argo Workflows showing Spark Job dependencies
- Once the Argo job is completed, query the table in the Athena console to see if it returns the same result as the test in JupyterHub notebook above.
SELECT * FROM default.contact_snapshot WHERE id=12
6. Submit a native Spark ETL job using Spark Operator
In the previous sections, we ran the JSON-based declarative ETL job defined in JupyterHub notebook. They are powered by the Arc data framework. This significantly simplifies and accelerates the Spark application development with zero lines of code.
In this example, we will reuse the Arc docker image, because it contains an open-source Spark distribution. This section demonstrates how to run a native Spark job that is defined by k8s’s CRD Spark Operator. It saves efforts on DevOps operations, as the way of deploying Spark application follows the same declarative approach in k8s. It is consistent with other business applications CI/CD deployment processes. The example demonstrates how to:
- Save costs with Amazon EC2 Spot instance types
- Dynamically scale a Spark application through Dynamic Resource Allocation
- Self-recover after losing a Spark driver
- Monitor a job on Spark Web UI
Initiate a PySpark job
Submit a job deployment/app_code/job/wordcount.py to run in the Amazon EKS cluster through a job definition source/example/native-spark-job-scheduler.yaml:
# get an S3 bucket name from CFN output
export stack_name=<cloudformation_stack_name>
app_code_bucket=$(aws cloudformation describe-stacks --stack-name $stack_name --query "Stacks[0].Outputs[?OutputKey=='CODEBUCKET'].OutputValue" --output text)
echo $app_code_bucket
# dynamically map an s3 bucket to the Spark job (one-off)
kubectl create -n spark configmap special-config --from-literal=codeBucket=$app_code_bucket
Optionally, delete the configmap and recreate the S3 mapping if needed:
kubectl delete -n spark configmap special-config
kubectl create -n spark configmap special-config --from-literal=codeBucket=$app_code_bucket
Submit an ETL job using Spark Operator:
kubectl apply -f source/example/native-spark-job-scheduler.yaml
The last command should produce an output such as the following:
sparkapplication.sparkoperator.k8s.io/word-count created
Check Spark job progress:
kubectl get pod -n spark --watch
The output shows the job progress:
NAME                                             READY   STATUS      RESTARTS   AGE
nyc-taxi-vendor-count-89d4f18e08365ae4-exec-1    1/1     Running     0          2m57s
nyc-taxi-vendor-count-89d4f18e08365ae4-exec-10   1/1     Running     0          2m46s
nyc-taxi-vendor-count-89d4f18e08365ae4-exec-11   1/1     Running     0          2m46s
nyc-taxi-vendor-count-89d4f18e08365ae4-exec-12   1/1     Running     0          2m46s
nyc-taxi-vendor-count-89d4f18e08365ae4-exec-13   1/1     Running     0          2m46s
nyc-taxi-vendor-count-89d4f18e08365ae4-exec-15   1/1     Running     0          2m46s
nyc-taxi-vendor-count-89d4f18e08365ae4-exec-16   1/1     Running     0          2m46s
nyc-taxi-vendor-count-89d4f18e08365ae4-exec-17   1/1     Running     0          2m44s
nyc-taxi-vendor-count-89d4f18e08365ae4-exec-18   1/1     Running     0          2m44s
nyc-taxi-vendor-count-89d4f18e08365ae4-exec-19   1/1     Running     0          2m44s
nyc-taxi-vendor-count-89d4f18e08365ae4-exec-2    1/1     Running     0          2m50s
nyc-taxi-vendor-count-89d4f18e08365ae4-exec-20   1/1     Running     0          2m44s
nyc-taxi-vendor-count-89d4f18e08365ae4-exec-21   1/1     Running     0          69s
nyc-taxi-vendor-count-89d4f18e08365ae4-exec-3    1/1     Running     0          2m49s
nyc-taxi-vendor-count-89d4f18e08365ae4-exec-4    1/1     Running     0          2m49s
nyc-taxi-vendor-count-89d4f18e08365ae4-exec-5    1/1     Running     0          2m48s
nyc-taxi-vendor-count-89d4f18e08365ae4-exec-6    1/1     Running     0          2m48s
nyc-taxi-vendor-count-89d4f18e08365ae4-exec-7    1/1     Running     0          2m48s
nyc-taxi-vendor-count-89d4f18e08365ae4-exec-8    1/1     Running     0          2m48s
nyc-taxi-vendor-count-89d4f18e08365ae4-exec-9    1/1     Running     0          2m46s
word-count-driver                                1/1     Running     0          3m4s
Optionally, run the following command on your local computer to monitor the job status (since CloudShell won’t work in this case). If necessary, execute the post deployment script deployment/post-deployment.sh that installs the required kubectl tool. Verify your Amazon EKS API connection by running the command kubectl get svc before starting port forwarding using the following command:
# watch the job progress on SparkUI
kubectl port-forward word-count-driver 4040:4040 -n spark
Navigate to http://localhost:4040 from your web browser. You should be able to monitor Spark jobs in progress as shown below:
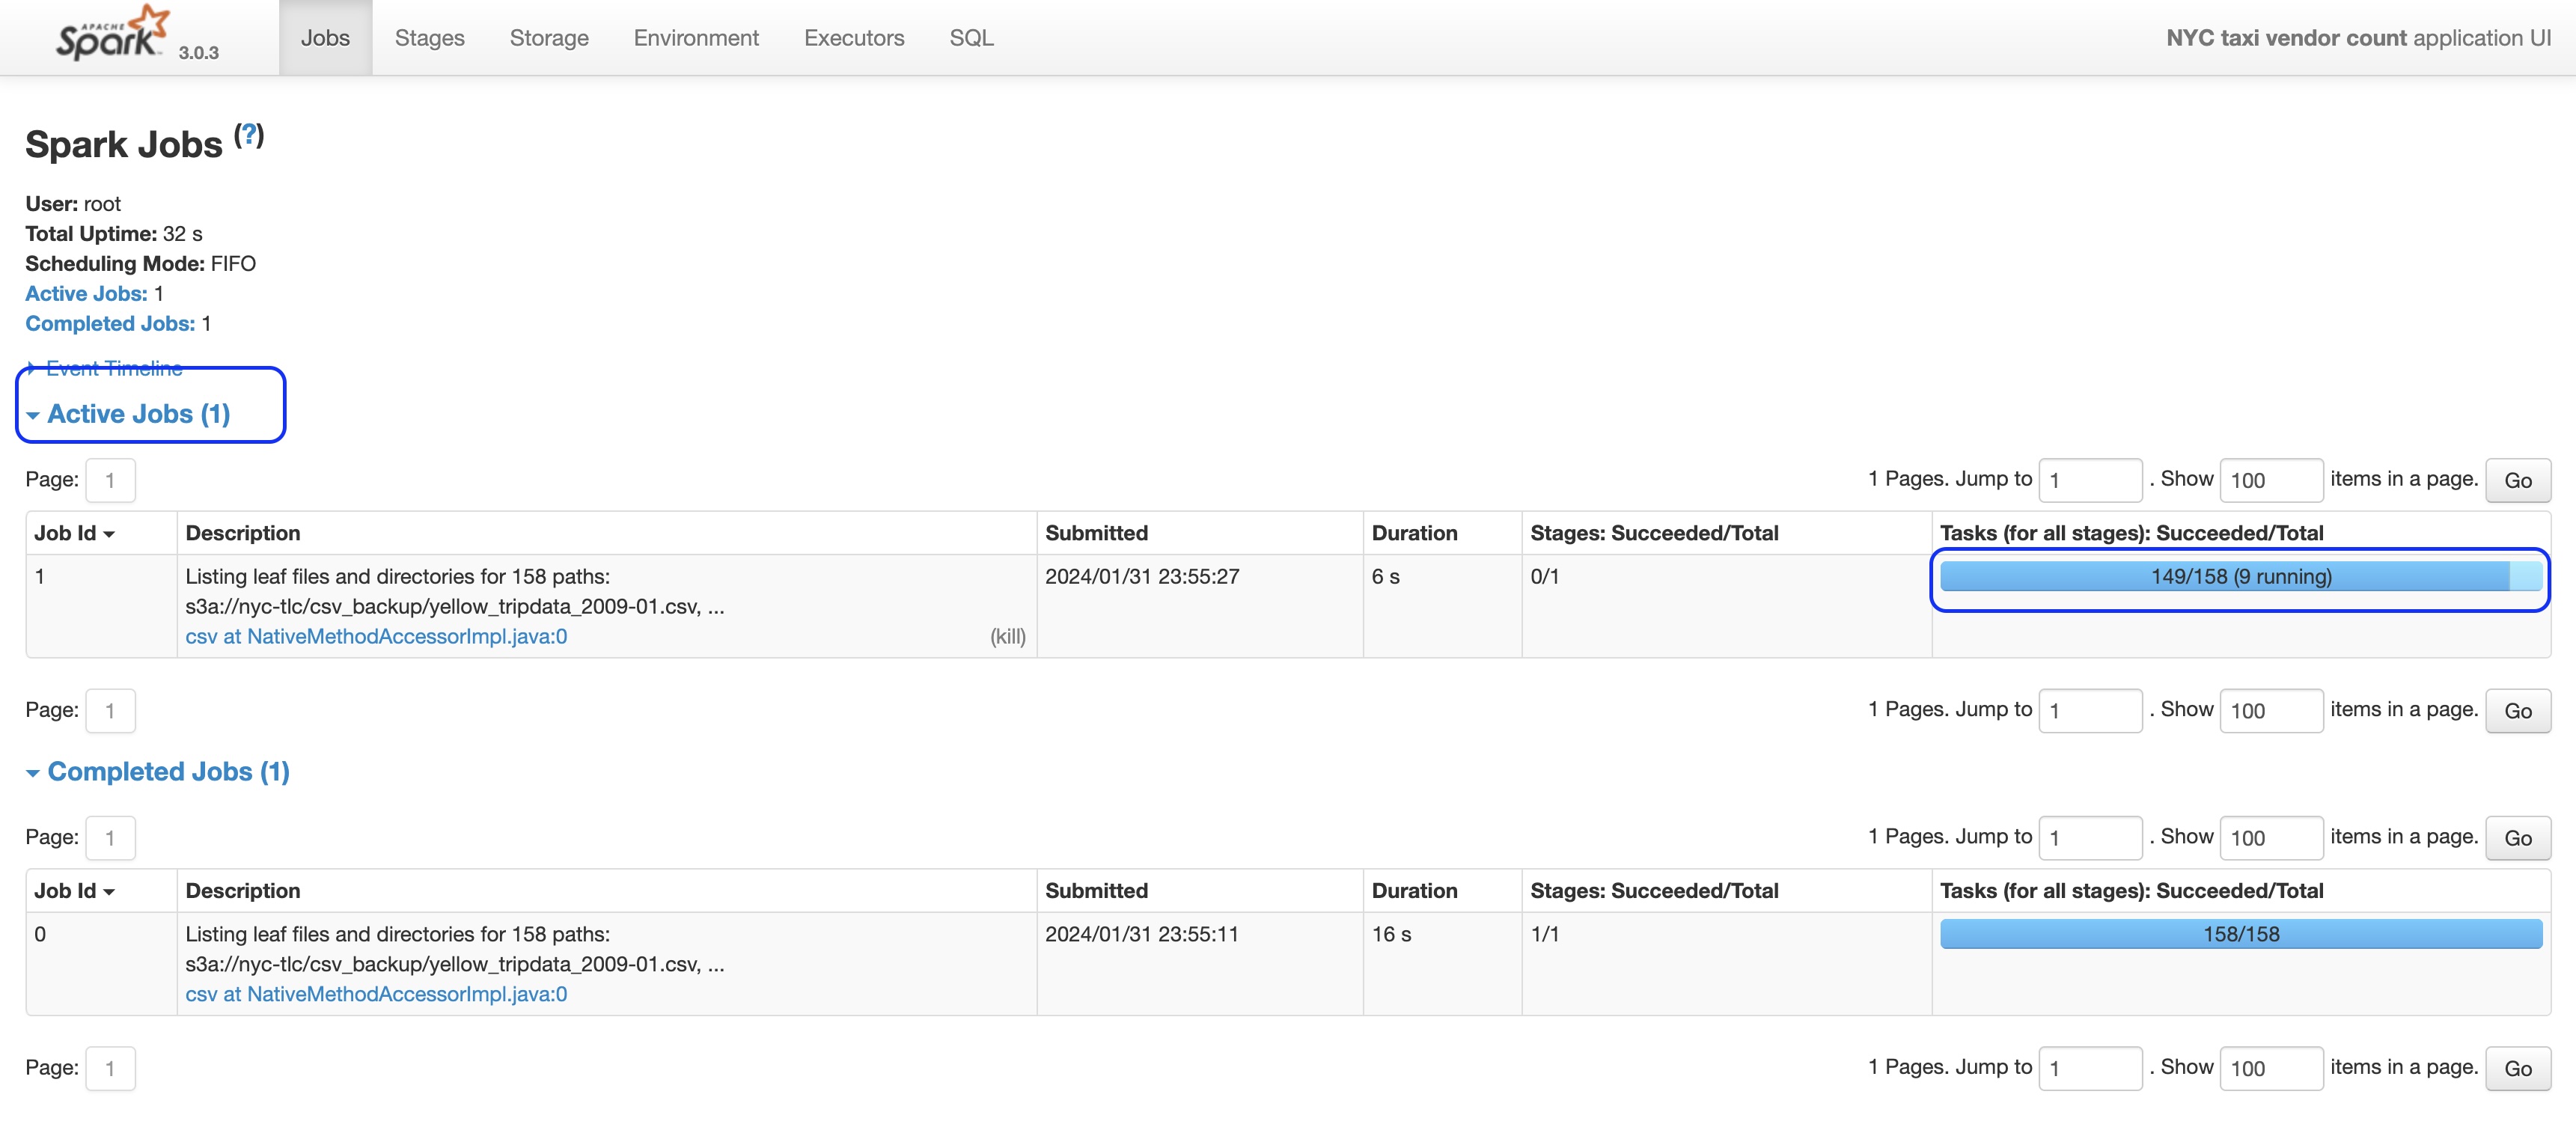
Figure 12: Spark Job execution monitoring through Spark UI
Run the Spark ETL job again if necessary after deleting the previous job instance:
kubectl delete -f source/example/native-spark-job-scheduler.yaml
kubectl apply -f source/example/native-spark-job-scheduler.yaml
Autoscaling and dynamic allocation support
The Sample job ends up spawning 20 Spark executor pods and 1 Spark driver pod running on 7 EC2 nodes in total. For the testing purpose, the job is configured to run on 100% Spot EC2 instances, regardless if they are Intel or Arm-based CPUs. It takes around 7 minutes to complete.
kubectl get nodes -o wide
NAME                           STATUS   ROLES    AGE     VERSION               INTERNAL-IP    EXTERNAL-IP   OS-IMAGE         KERNEL-VERSION                   CONTAINER-RUNTIME
ip-10-0-138-214.ec2.internal   Ready    <none>   4m      v1.27.9-eks-5e0fdde   10.0.138.214   <none>        Amazon Linux 2   5.10.209-198.858.amzn2.aarch64   containerd://1.7.11
ip-10-0-155-241.ec2.internal   Ready    <none>   2d6h    v1.27.9-eks-5e0fdde   10.0.155.241   <none>        Amazon Linux 2   5.10.209-198.858.amzn2.aarch64   containerd://1.7.11
ip-10-0-159-250.ec2.internal   Ready    <none>   4m1s    v1.27.9-eks-5e0fdde   10.0.159.250   <none>        Amazon Linux 2   5.10.209-198.858.amzn2.aarch64   containerd://1.7.11
ip-10-0-166-163.ec2.internal   Ready    <none>   3m59s   v1.27.9-eks-5e0fdde   10.0.166.163   <none>        Amazon Linux 2   5.10.209-198.858.amzn2.aarch64   containerd://1.7.11
ip-10-0-206-196.ec2.internal   Ready    <none>   3m53s   v1.27.9-eks-5e0fdde   10.0.206.196   <none>        Amazon Linux 2   5.10.209-198.858.amzn2.aarch64   containerd://1.7.11
ip-10-0-241-192.ec2.internal   Ready    <none>   3m48s   v1.27.9-eks-5e0fdde   10.0.241.192   <none>        Amazon Linux 2   5.10.209-198.858.amzn2.aarch64   containerd://1.7.11
ip-10-0-249-164.ec2.internal   Ready    <none>   4h36m   v1.27.9-eks-5e0fdde   10.0.249.164   <none>        Amazon Linux 2   5.10.209-198.858.amzn2.aarch64   containerd://1.7.11
Once the job kicks in, you will see a Spark cluster scaling from 0 to 15 executors first, because of the Spark config "spark.kubernetes.allocation.batch.size": "15" . Eventually, it lands to 20 executors, driven by the Dynamic Resource Allocation feature in Spark.
The autoscaling is configured to be balanced across two Availability Zones.
kubectl get node --label-columns=eks.amazonaws.com/capacityType,topology.kubernetes.io/zone,node.kubernetes.io/instance-type
kubectl get pod -n spark

Figure 13: Spark Jobs and autoscaling settings
If you are concerned about the Spark job performance and data transfer costs incurred due to running executor pods across multiple Availability Zones, simply uncomment the Spark Configuration in source/example/native-spark-job-scheduler.yaml:
...
sparkConf:
	# By design, the nodegroup label enables us scale ARM-based instances within a single AZ
	"spark.kubernetes.node.selector.nodegroup": "single-az-graviton"
Then, delete and rerun the job:
kubectl delete -f source/example/native-spark-job-scheduler.yaml
kubectl apply -f source/example/native-spark-job-scheduler.yaml
# watch the scale in a single AZ
get node --label-columns=eks.amazonaws.com/capacityType,topology.kubernetes.io/zone,node.kubernetes.io/instance-type -w
Self-recovery test
Always keep in mind that the Spark driver pod is a single point of failure for a containerized Spark operator-based application. If that driver pod dies, all other Spark job linked components will be discarded too. Outside of the Kubernetes realm, that requires extra effort to set up a job rerun in order to provide the fault tolerance capability. However, it is much simpler to implement in Amazon EKS using few lines of retry definitions in Spark Job manifest without extra coding:
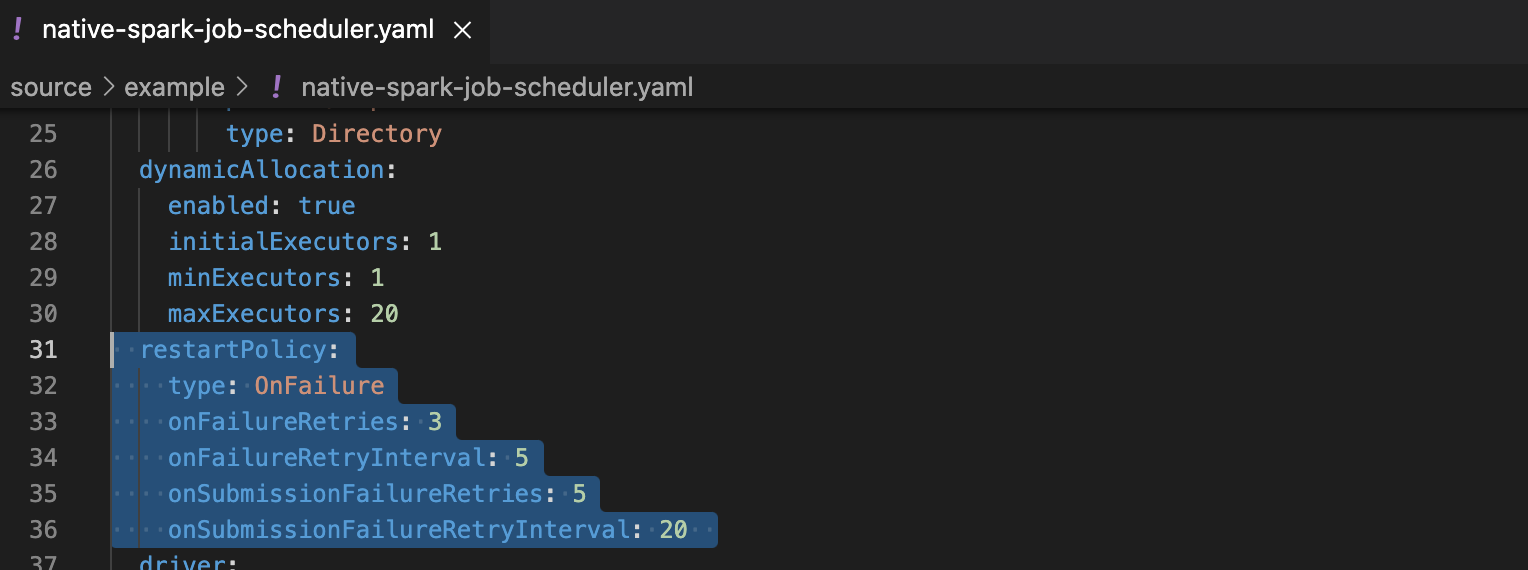
Figure 14: Restart policy settings for Spark job scheduler example
Test the self-recovery against a running Spark job invoked by the previous step. If the job is completed before this test, re-run the same job.
Spark Driver test
Manually delete the EC2 instance compute node running your Spark driver:
# monitor the driver restart progress
kubectl get po -n spark -w
# in a second terminal, locate the EC2 host
ec2_host_name=$(kubectl describe pod word-count-driver -n spark | grep "Successfully assigned" | awk '{print $9}')
# manually delete
kubectl delete node $ec2_host_name
# Within a minute, did you see a new Spark driver created?
Review the demonstration simulating a Spot interruption scenario below:
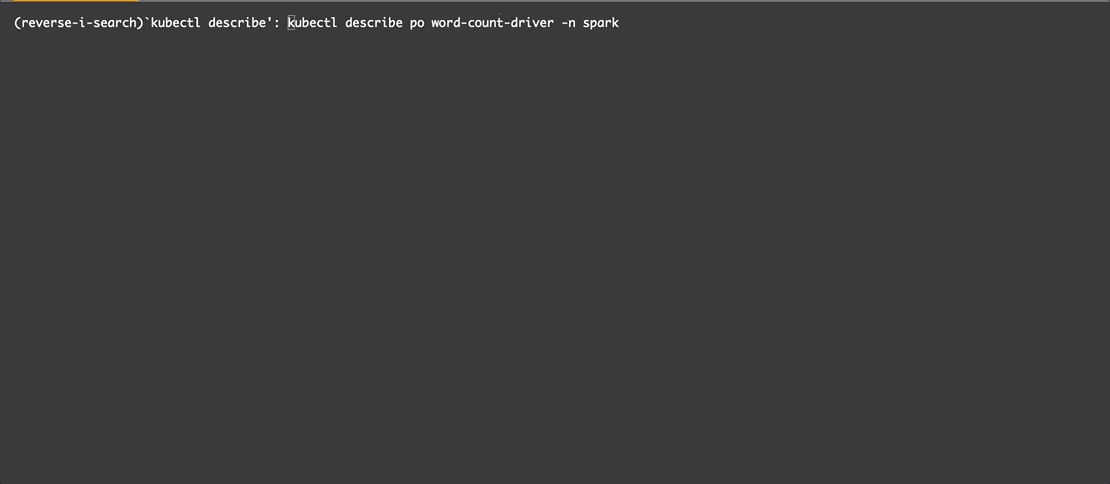
Figure 15: Demo of Spark Driver interruption and recovery
Park Executor test
When all executors’ status is running, delete one of them:
exec_name=$(kubectl get pod -n spark | grep "exec-1" | awk '{print $1}')
echo $exec_name

kubectl delete -n spark pod $exec_name --force
# check the log, has it come back with a different number suffix?
kubectl logs word-count-driver -n spark | grep delete
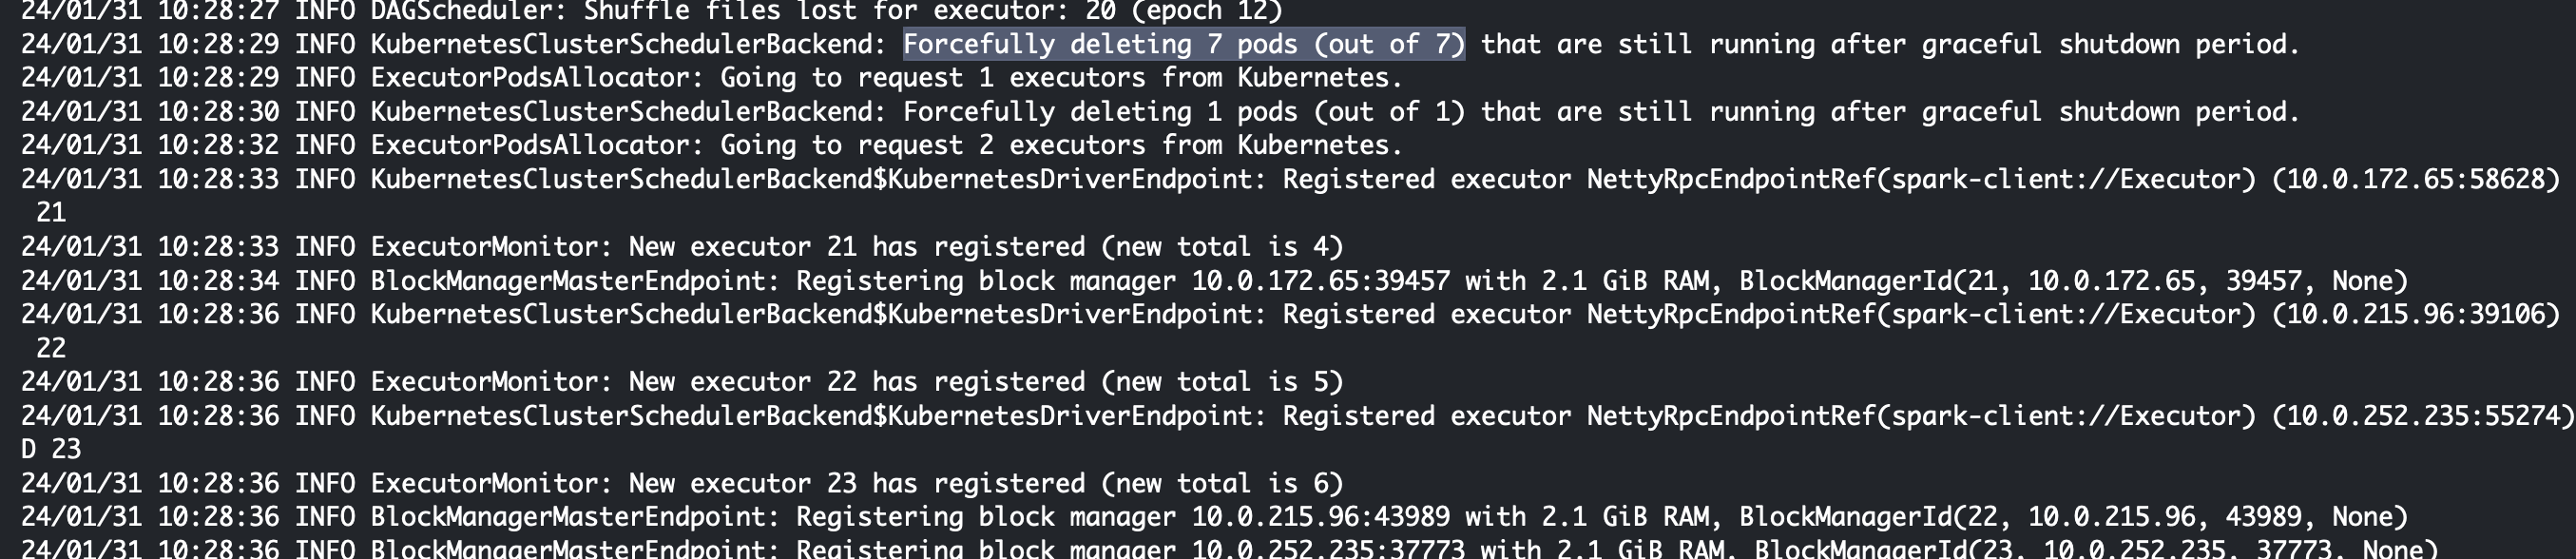
Figure 16: Demo of Spark job executor pod deletion and recovery
Check EC2 Spot instance usage by Spark jobs and related cost savings
Navigate to Spot Requests menu in EC2 console. Then, select the “Savings summary” button. It will show you how much running cost you saved.
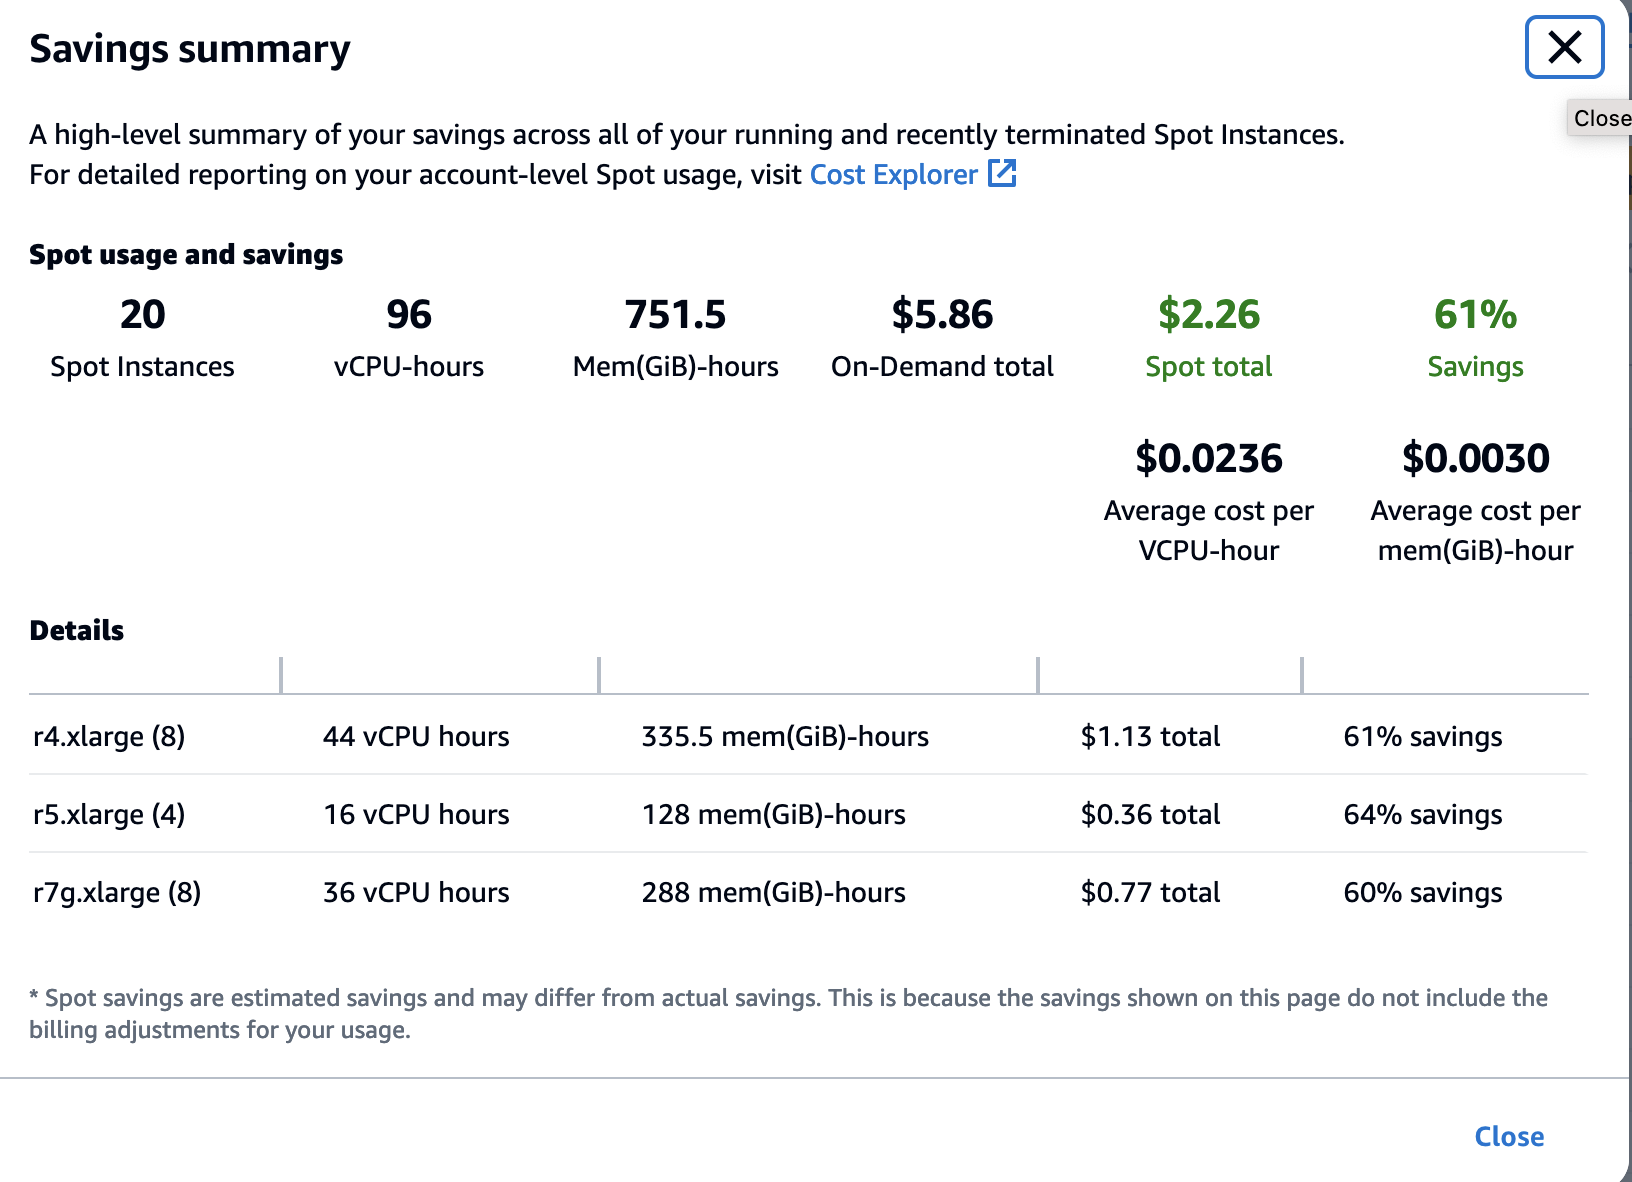
Figure 17: Savings Summary for EC2 Spot instances
Troubleshooting
Review the following two troubleshooting scenarios:
If you see the issue
[SSL: CERTIFICATE_VERIFY_FAILED] certificate verify failed: unable to get local issuer certificate (_ssl.c:1123), it most likely means that there is no default certificate authority for your Python installation on OSX. Refer to the this answer. InstallingInstall Certificates.commandshould fix your local environment. Otherwise, use Cloud9 IDE to deploy the AWS CDK instead.If this error appears during the AWS CDK deployment:
Failed to create resource. IAM role’s policy must include the "ec2:DescribeVpcs" action, consider the following possible causes:- You have reached the quota limits of Amazon VPC resources per Region in your AWS account. Please deploy to a different region or a different account.
- Based on this AWS CDK issue, you can retry without any changes, and it will work.
- If you are in a branch new AWS account, manually delete the AWSServiceRoleForAmazonEKS from the IAM role console before the deployment.
Extending the Guidance
This guidance can be extended in the following ways:
- Support Amazon EMR on Amazon EKS deployment option
- Run Spark ETL jobs on AWS Graviton instances (ARM-based CPU) for better cost-performance balance
- Support the Data Mesh paradigm in multi-cloud
Amazon EMR on Amazon EKS
You can deploy Spark applications into your AWS environment in multiple ways. This guidance supports the Amazon EMR on Amazon EKS deployment option. By adjusting a few lines in the declarative job specification for Amazon EMR on Amazon EKS Spark Operator, or using Python code to initiate the spark-submit job through the workflow tool Apache Airflow or using AWS CLI to submit the job through StartJobRun API. You can use the optimized Spark runtime in Amazon EMR to enjoy the faster running performance than standard Apache Spark on Amazon EKS.
In this example, AWS CLI is used to interact with Amazon EMR on Amazon EKS to schedule the wordcount.py Spark job without a need to change the application.
Follow the following steps to run an ETL job using Amazon EMR on Amazon EKS:
Run the following code snippet to create an IAM role that Amazon EMR will use for job scheduling. This is the role that Amazon EMR jobs will assume when they run on Amazon EKS.
Important: Replace the stack_name parameter value if you used a custom name for your CloudFormation stacks
 stack_name=<YOUR_CFN_NAME: SparkOnEKS>

 # get the s3 bucket from CFN output
 app_code_bucket=$(aws cloudformation describe-stacks --stack-name $stack_name --query "Stacks[0].Outputs[?OutputKey=='CODEBUCKET'].OutputValue" --output text)

 cat << EoF > /tmp/emr-trust-policy.json
 {
   "Version": "2012-10-17",
   "Statement": [
     {
       "Effect": "Allow",
       "Principal": {
         "Service": "elasticmapreduce.amazonaws.com"
       },
       "Action": "sts:AssumeRole"
     }
   ]
 }
 EoF

 cat << EoF > /tmp/EMRContainers-JobExecutionRole.json
 {
     "Version": "2012-10-17",
     "Statement": [
         {
             "Effect": "Allow",
             "Action": [
                 "s3:ListBucket",
                 "s3:GetBucketLocation"
             ],
             "Resource": [
                 "arn:aws:s3:::nyc-tlc",
                 "arn:aws:s3:::${app_code_bucket}"
             ]
         },
         {
             "Effect": "Allow",
             "Action": [
                 "s3:PutObject",
                 "s3:GetObject"
             ],
             "Resource": [
                 "arn:aws:s3:::nyc-tlc/*",
                 "arn:aws:s3:::${app_code_bucket}/*"
                 ]
         },
         {
             "Effect": "Allow",
             "Action": [
                 "s3:DeleteObject"
             ],
             "Resource": [
                 "arn:aws:s3:::${app_code_bucket}/*"
             ]
         },
         {
             "Effect": "Allow",
             "Action": [
                 "logs:PutLogEvents",
                 "logs:CreateLogStream",
                 "logs:DescribeLogGroups",
                 "logs:DescribeLogStreams"
             ],
             "Resource": [
                 "arn:aws:logs:*:*:*"
             ]
         }
     ]
 }
 EoF

 aws iam create-role --role-name EMRContainers-JobExecutionRole --assume-role-policy-document file:///tmp/emr-trust-policy.json
 aws iam put-role-policy --role-name EMRContainers-JobExecutionRole --policy-name EMR-Containers-Job-Execution --policy-document file:///tmp/EMRContainers-JobExecutionRole.json
 aws emr-containers update-role-trust-policy --cluster-name spark-on-eks --namespace spark --role-name EMRContainers-JobExecutionRole
Install the latest version of
eksctlcommand tool:curl --silent --location "https://github.com/weaveworks/eksctl/releases/latest/download/eksctl_$(uname -s)_amd64.tar.gz" | tar xz -C /tmp sudo mv /tmp/eksctl /usr/local/bin echo "Installed eksctl version: " eksctl versionVerify the current IAM user doesn’t have the permission to register Amazon EMR with the Amazon EKS cluster:
 aws sts get-caller-identity --query Arn --output text
 eksctl get iamidentitymapping --cluster spark-on-eks
Expected output:
Error: getting auth ConfigMap: UnauthorizedAssume the Amazon EKS cluster admin role to get the permission:
 # Locate the EKS cluster admin role ARN
 stack_name=<YOUR_CFN_NAME: SparkOnEKS>

 clusterAdminARN=$(aws cloudformation describe-stacks --stack-name $stack_name --region $AWS_DEFAULT_REGION --query "Stacks[0].Outputs[?starts_with(OutputKey,'eksclusterEKSConfig')].OutputValue" --output text | awk -F ' ' '{print $9}')
 # Run aws sts assume-role and capture the output
 assume_role_output=$(aws sts assume-role --role-arn ${clusterAdminARN} --role-session-name eks-admin)
 # Extract temporary credentials from the output
 export AWS_ACCESS_KEY_ID=$(echo $assume_role_output | jq -r '.Credentials.AccessKeyId')
 export AWS_SECRET_ACCESS_KEY=$(echo $assume_role_output | jq -r '.Credentials.SecretAccessKey')
 export AWS_SESSION_TOKEN=$(echo $assume_role_output | jq -r '.Credentials.SessionToken')
Now, your user should have the required permissions:
 aws sts get-caller-identity --query Arn --output text

 arn:aws:sts::ACCOUNTID:assumed-role/SparkOnEKS-iamrolesclusterAdminB8F65074-IsItYvFFzmMd/eks-admin

 eksctl get iamidentitymapping --cluster spark-on-eks

 ARN                                                                                     USERNAME                                                                              GROUPS
 arn:aws:iam:: ACCOUNTID:role/SparkOnEKS-iamrolesNodeInstanceRole92F5BB2E-WtR95jAqP6tQ system:node:                                                     system:bootstrappers,system:nodes
 arn:aws:iam:: ACCOUNTID:role/SparkOnEKS-iamrolesNodeInstanceRole92F5BB2E-WtR95jAqP6tQ system:node:                                                     system:bootstrappers,system:nodes
 arn:aws:iam:: ACCOUNTID:role/SparkOnEKS-iamrolesNodeInstanceRole92F5BB2E-WtR95jAqP6tQ system:node:                                                     system:bootstrappers,system:nodes
 arn:aws:iam:: ACCOUNTID:role/SparkOnEKS-iamrolesclusterAdminB8F65074-IsItYvFFzmMd     arn:aws:iam::ACCOUNTID:role/SparkOnEKS-iamrolesclusterAdminB8F65074-IsItYvFFzmMd   	system:masters
Register the existing Amazon EKS cluster with Amazon EMR by running the command. Ensure you have installed the latest eksctl tool and your current user has permission to take the following action.
 eksctl create iamidentitymapping --cluster spark-on-eks  --namespace spark --service-name "emr-containers"

 aws emr-containers create-virtual-cluster \
 --name emr-demo \
 --container-provider '{
     "id": "spark-on-eks",
     "type": "EKS",
     "info": {
         "eksInfo": {
             "namespace": "spark"
         }
     }
 }'
Return back to regular user by unsetting the
adminrole.unset AWS_ACCESS_KEY_ID AWS_SECRET_ACCESS_KEY AWS_SESSION_TOKEN aws sts get-caller-identity --query Arn --output textSubmit the NYC Taxi job from the previous Argo example to Amazon EMR on Amazon EKS.
 stack_name=<YOUR_CFN_NAME: SparkOnEKS>

 export VIRTUAL_CLUSTER_ID=$(aws emr-containers list-virtual-clusters --query "virtualClusters[?state=='RUNNING' && name=='emr-demo'].id" --output text)
 export EMR_ROLE_ARN=$(aws iam get-role --role-name EMRContainers-JobExecutionRole --query Role.Arn --output text)
 export app_code_bucket=$(aws cloudformation describe-stacks --stack-name $stack_name --query "Stacks[0].Outputs[?OutputKey=='CODEBUCKET'].OutputValue" --output text)
aws emr-containers start-job-run \ --virtual-cluster-id $VIRTUAL_CLUSTER_ID \ --name emreks-nyctaxi-job \ --execution-role-arn $EMR_ROLE_ARN \ --release-label emr-6.11.0-latest \ --job-driver '{ "sparkSubmitJobDriver": { "entryPoint": "https://repo1.maven.org/maven2/ai/tripl/arc_2.12/4.2.0/arc_2.12-4.2.0.jar", "entryPointArguments":["--etl.config.uri=https://raw.githubusercontent.com/tripl-ai/arc-starter/master/examples/kubernetes/nyctaxi.ipynb"], "sparkSubmitParameters": "--packages com.typesafe:config:1.4.0 --class ai.tripl.arc.ARC --conf spark.executor.instances=1"}}' \ --configuration-overrides '{ "applicationConfiguration": [{ "classification": "spark-defaults", "properties": { "spark.kubernetes.driverEnv.ETL_CONF_ENV": "production", "spark.kubernetes.driverEnv.ETL_CONF_DATA_URL": "s3a://nyc-tlc/csv_backup", "spark.kubernetes.driverEnv.ETL_CONF_JOB_URL": "https://raw.githubusercontent.com/tripl-ai/arc-starter/master/examples/kubernetes", "spark.hadoop.fs.s3a.aws.credentials.provider": "com.amazonaws.auth.WebIdentityTokenCredentialsProvider"}}] }'
For more examples of Arc ETL jobs with Amazon EMR on Amazon EKS, review the following example submit-arc-job.sh.
Run on AWS Graviton Instances
AWS Graviton is part of a family of AWS efficient compute processors designed to deliver the best price/performance for your cloud workloads, including data analytics. In 2023, AWS launched new EC2 instance types: m7g and the r7g, which are powered by the latest generation of AWS Graviton3 ARM processors. They are designed to deliver up to 19% better performance for Spark workloads than equivalent sixth-generation (m6g and r6g) instances, making them better performers for Big Data analytics solutions.
In this guidance’s CloudFormation template, we have included two AWS Graviton-based EKS compute node groups:
- etl-ondemand node group node group contains a single instance type m7g.xlarge ($0.1632/hr cost), scalable from 1 to 5 nodes across 2 Availability Zones.
- single-az-graviton node group node group contains a fleet of r7g.xlarge (min. $0.0966/hr cost), r6g.xlarge (min.$0.0756/hr cost), and r6gd.xlarge (min.$0.1083/hr cost). This node group is scalable from 1 to 30 nodes in a single Availability Zone.
To demonstrate how to switch from the Intel (X86_64) to AWS Graviton based instances, you can use the previous NYC Taxi example submitting ETL job via the Argo Workflows UI.
Before submitting the Spark job again, simply change the CPU architecture attribute in the
nodeSelectorsection of the job definition manifest toarm64and save the YAML file:... # ---------- Previous ---------- nodeselector: kubernetes.io/arch: amd64 ... # ---------- Updated ---------- nodeselector: kubernetes.io/arch: arm64Log in to Argo Workflows UI console after obtaining a new session token (it expires every 10 minutes.)
 # use your CFN stack name if it is different rom default one
 export stack_name=<cloudformation_stack_name>

 ARGO_URL=$(aws cloudformation describe-stacks --stack-name $stack_name --query "Stacks[0].Outputs[?OutputKey=='ARGOURL'].OutputValue" --output text)
 LOGIN=$(argo auth token)
 echo -e "\nArgo website:\n$ARGO_URL\n" && echo -e "Login token:\n$LOGIN\n"
Navigate to
Submit New Workflow, selectEdit using full workflow options, replace the content with the following, and select theCreatebutton.apiVersion: argoproj.io/v1alpha1 kind: Workflow metadata: generateName: graviton-job- namespace: spark spec: serviceAccountName: arcjob entrypoint: nyctaxi nodeselector: kubernetes.io/arch: arm64 templates: - name: nyctaxi dag: tasks: - name: step1-query templateRef: name: spark-template template: sparklocal arguments: parameters: - name: jobId value: nyctaxi - name: tags value: "project=sqlbasedetl, owner=myowner, costcenter=66666" - name: configUri value: https://raw.githubusercontent.com/tripl-ai/arc-starter/master/examples/kubernetes/nyctaxi.ipynb - name: image value: ghcr.io/tripl-ai/arc:arc_4.2.0_spark_3.3.4_scala_2.12_hadoop_3.3.2_4.2.1_slim - name: parameters value: "--ETL_CONF_DATA_URL=s3a://nyc-tlc/csv_backup \ --ETL_CONF_JOB_URL=https://raw.githubusercontent.com/tripl-ai/arc-starter/master/examples/kubernetes"Alternatively, save the contents of above YAML file as
graviton-spark-job.yaml, and submit the job through the Argo CLI:argo submit graviton-spark-job.yamlMonitor the pods running on AWS Graviton Spot instances. The command below can be run in CloudShell or your command line session assuming active connection to the Amazon EKS cluster:
kubectl get pods -n spark --field-selector spec.nodeName=$(kubectl get node -l lifecycle=Ec2Spot,kubernetes.io/arch=arm64 | grep ip | awk '{print $1}')You will get this result:
 NAME                                      READY   STATUS            RESTARTS   AGE
 nyctaxi-job-8wmxw-sparklocal-2140621377   0/2     Completed         0          6d15h
 graviton-job-jztg8-sparklocal-44229027    0/2     PodInitializing   0          20s
 nyctaxi-job-zmwvg-sparklocal-3854373613   0/2     Completed         0          7d16h
 scd2-job-jzd2j-smalljob-3580899368        0/2     Completed         0          21h
 graviton-job-jztg8-sparklocal-44229027    2/2     Running           0          25s
Data mesh in multi-cloud
Data mesh is a type of data platform architecture that handles the ubiquity of data in the enterprise by using a domain-oriented, self-service design.
This guidance simplifies Spark ETL across multiple cloud data sources, for a diverse range of users: analysts, data scientists, and SQL authors or business users, allowing them to develop data workflows without the need to write code in a programming language, such as Python. You can use the architectural pattern in this guidance to drive your data ownership shift from IT to non-IT, data-focused stakeholders who have a better understanding of your organization’s business operations and needs.
If your organization currently uses a data mesh architecture or is looking to evolve your data platform with a data mesh, you can leverage this guidance to decentralize the monolithic data platform, build a self-serve data infrastructure as a platform, and allow your data consumer and data producer to interact with the data they own efficiently. To learn more about designing a data mesh in the AWS environment, refer to the example implementation in the consumer packaged goods (CPG) industry. For reference, review the AWS blog posts: Design a Data Mesh Architecture using AWS Lake Formation and AWS Glue and Let’s Architect! Architecting a data mesh.
Useful CLI Commands
Below is a list of helpful commands that can be used to test and validate the Guidance:
argo submit source/example/nyctaxi-job-scheduler.yamlSubmit a Spark job through Argoargo list --all-namespacesShow all jobs scheduled through Argokubectl get pod -n sparkList running Spark jobskubectl delete pod --all -n sparkDelete all Spark jobskubectl delete configmap special-config -n sparkRemove the S3 bucket config mapkubectl apply -f source/app_resources/spark-template.yamlCreate a reusable Spark job template
Uninstall the Guidance
To uninstall the Guidance, navigate to the source code root directory, and run the clean-up script delete_all.sh with your CloudFormation stack and Region names as parameters. The default value is ‘SparkOnEKS’. Otherwise, please provide your CloudFormation stack name as a parameter.
The script accepts two inputs with the following defaults:
export stack_name="${1:-SparkOnEKS}"
export region="${2:-us-east-1}"
Run the script with defaults if the CloudFormation stack name and AWS region are unchanged. Otherwise, run it with your parameters.
cd guidance-for-sql-based-extract-transform-and-loading-with-apache-spark-on-amazon-eks
# use default parameters
./deployment/delete_all.sh
# Or use different CFN name or region
./deployment/delete_all.sh <cloudformation_stack_name> <aws_region>
If an error “(ResourceInUse) when calling the DeleteTargetGroup operation” occurs, simply run the script again.
Navigate to your CloudFormation console (or other Regions if the customized template was deployed), and manually delete Guidance stacks and the remaining resources, if needed.
Contributors
- Melody Yang, Sr Analytics Architect
- Daniel Zilberman, Sr Specialist SA
- Frank Fan, Sr Containers Specialist SA
Notices
Customers are responsible for making their own independent assessment of the information in this document. This document: (a) is for informational purposes only, (b) represents AWS current product offerings and practices, which are subject to change without notice, and (c) does not create any commitments or assurances from AWS and its affiliates, suppliers or licensors. AWS products or services are provided “as is” without warranties, representations, or conditions of any kind, whether express or implied. AWS responsibilities and liabilities to its customers are controlled by AWS agreements, and this document is not part of, nor does it modify, any agreement between AWS and its customers.