Guidance for Multi-Cluster Application Management with Karmada and Amazon EKS
Summary: This document provides a comprehensive overview of the Guidance for Multi-Cluster Application Management with Karmada and Amazon EKS. It covers the reference architecture and key components, considerations for planning the deployment, as well as the detailed configuration steps for deploying the Guidance on Amazon Web Services (AWS). This guide is intended for solution architects, business decision-makers, DevOps engineers, data scientists, and cloud professionals who aim to manage and operate their own cloud-native applications across multiple Kubernetes clusters on AWS.
Overview
This implementation guide describes the architectural considerations and configuration steps for deploying a federated Kubernetes environment in the Amazon Web Services (AWS) Cloud. It uses Amazon Elastic Kubernetes Service(Amazon EKS) and the Cloud Native Computing Foundation (CNCF) open-source Kubernetes project, Armada (Karmada).
Karmada is a Kubernetes cluster management system with advanced scheduling capabilities, which enables you to deploy and run your cloud-native applications across multiple Kubernetes clusters with no changes to your applications. This guide focuses on deploying Karmada with highly available Amazon EKS clusters.
The intended audience of this guide is infrastructure engineers, architects, system administrators, devops professionals, and platform engineers who have practical experience architecting in the AWS Cloud and are familiar with Kubernetes technology.
Features and benefits
This Guidance provides the following features:
Instructions to deploy manually:
- An Amazon EKS cluster to host the Karmada control plane and serve as the parent cluster for multi-cluster management.
- Karmada configured in high availability mode with a network load balancer.
- Amazon EKS clusters to act as member clusters for Karmada.
- Sample workload using Karmada multi-cluster deployment replicas.
Shell script to deploy automatically:
- An Amazon EKS cluster to host the Karmada control plane and serve as the parent cluster for multi-cluster management.
- Karmada configured in high availability mode with a network load balancer.
- Amazon EKS clusters to act as member clusters for Karmada.
- Sample workload using Karmada multi-cluster deployment replicas.
AWS Cloud Development Kit (CDK) application to deploy automatically:
- An Amazon Virtual Private Cloud (VPC) with three public and three private subnets, along with a NAT gateway.
- A management host (EC2 instance) for Amazon EKS and Karmada.
- An Amazon EKS cluster to host the Karmada control plane and serve as the parent cluster for multi-cluster management.
- Karmada configured in high availability mode with a network load balancer.
Use cases
With Karmada, organizations can streamline workload distribution, optimize resource utilization, and enhance resilience across diverse Kubernetes environments. The key use cases for EKS multi-cluster management with Karmada include:
Hybrid Deployments: Karmada is instrumental in facilitating hybrid deployments, enabling organizations to seamlessly distribute applications across diverse environments, including on-premises data centers, AWS, and other cloud providers. This enables organizations to leverage the benefits of both environments while ensuring consistent management and orchestration through Kubernetes. With Karmada, organizations can optimize resource utilization, enhance resilience, and maintain operational efficiency across their hybrid cloud infrastructure.
Geographically Distributed Workloads: For customers with a global presence, Karmada facilitates the deployment of applications across geographically distributed Kubernetes clusters. This provides low-latency access for Regional users while delivering fault tolerance through redundant deployments.
Resource Optimization and Scaling: Karmada enables efficient resource utilization by dynamically scaling application instances across multiple clusters based on real-time demand. This helps organizations minimize infrastructure costs while ensuring optimal performance and responsiveness for their applications.
Disaster Recovery and High Availability: Karmada supports disaster recovery strategies by replicating critical workloads across multiple clusters. In the event of a cluster failure or outage, Karmada automatically redirects traffic to healthy clusters. This minimizes downtime and maintains business continuity.
Multi-Tenancy and Isolation: Karmada enables multi-tenancy through workload separation, enhancing security and isolation. It also provides centralized management and visibility through a unified control plane.
Blue-Green and Canary Deployments: With Karmada, organizations can implement advanced deployment strategies such as blue-green and canary deployments across multiple clusters. This facilitates risk-free testing of new features and versions before production rollout.
Architecture overview
Below are two architecture diagrams that illustrate a sample Karmada-based cluster architecture. The first architecture features a parent cluster and managed cluster, the second features the centralized containerized application deployment process across these clusters.
Architecture diagrams and steps
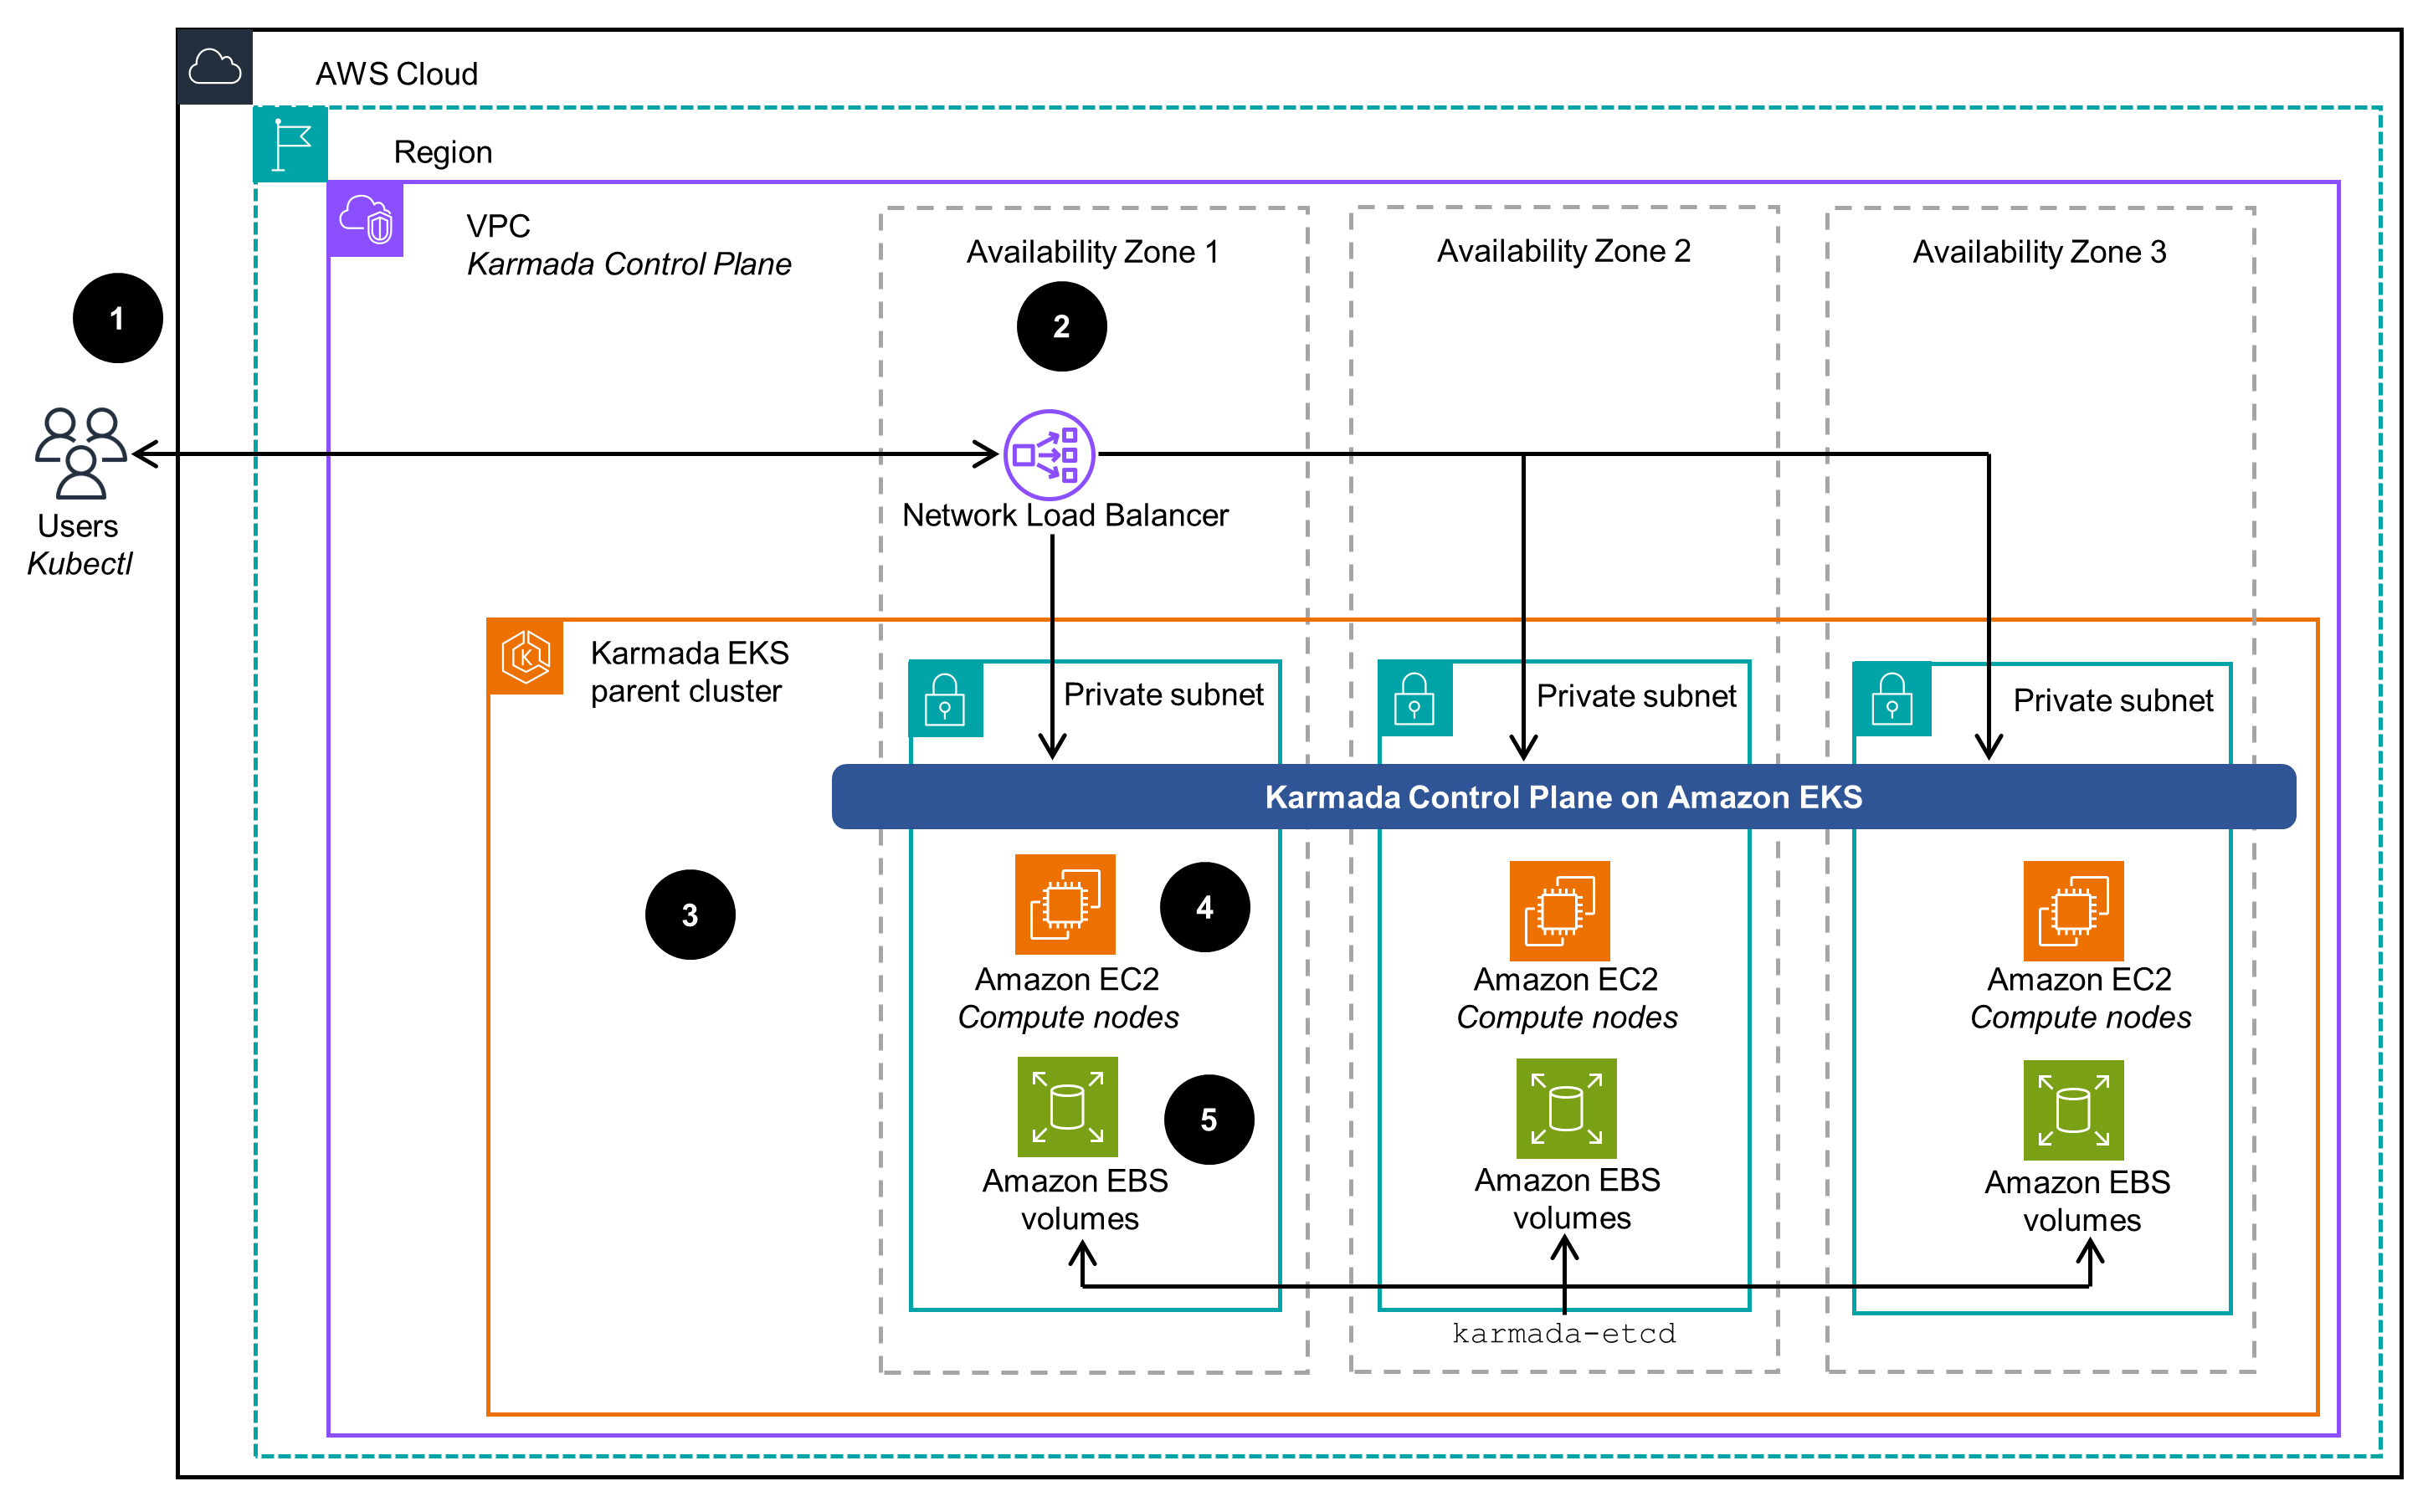
Figure 1: Multi-cluster application management with Amazon EKS and Karmada - managed clusters
Architecture steps:
- User interacts with the Karmada API server (part of the Karmada Control Plane) using the
kubectlutility with the Karmada plugin and a Network Load Balancer as the endpoint. - A Network Load Balancer provides SSL termination and acts as a proxy for the Karmada API server running on the Amazon EKS parent cluster.
- The Karmada Control Plane exposes the Karmada API through its API server in addition to the Kubernetes API, which receives calls for Kubernetes and Karmada management tasks.
- Karmada runs several components on the Amazon EKS compute nodes. To keep records of API objects and states, its API server uses its own etcd database.
- The Karmada etcd database uses Amazon Elastic Block Storage (Amazon EBS) volumes attached to compute nodes and EC2 instances to maintain its state and consistency. All state changes and updates persist in EBS volumes across all EC2 compute nodes that host etcd pods.
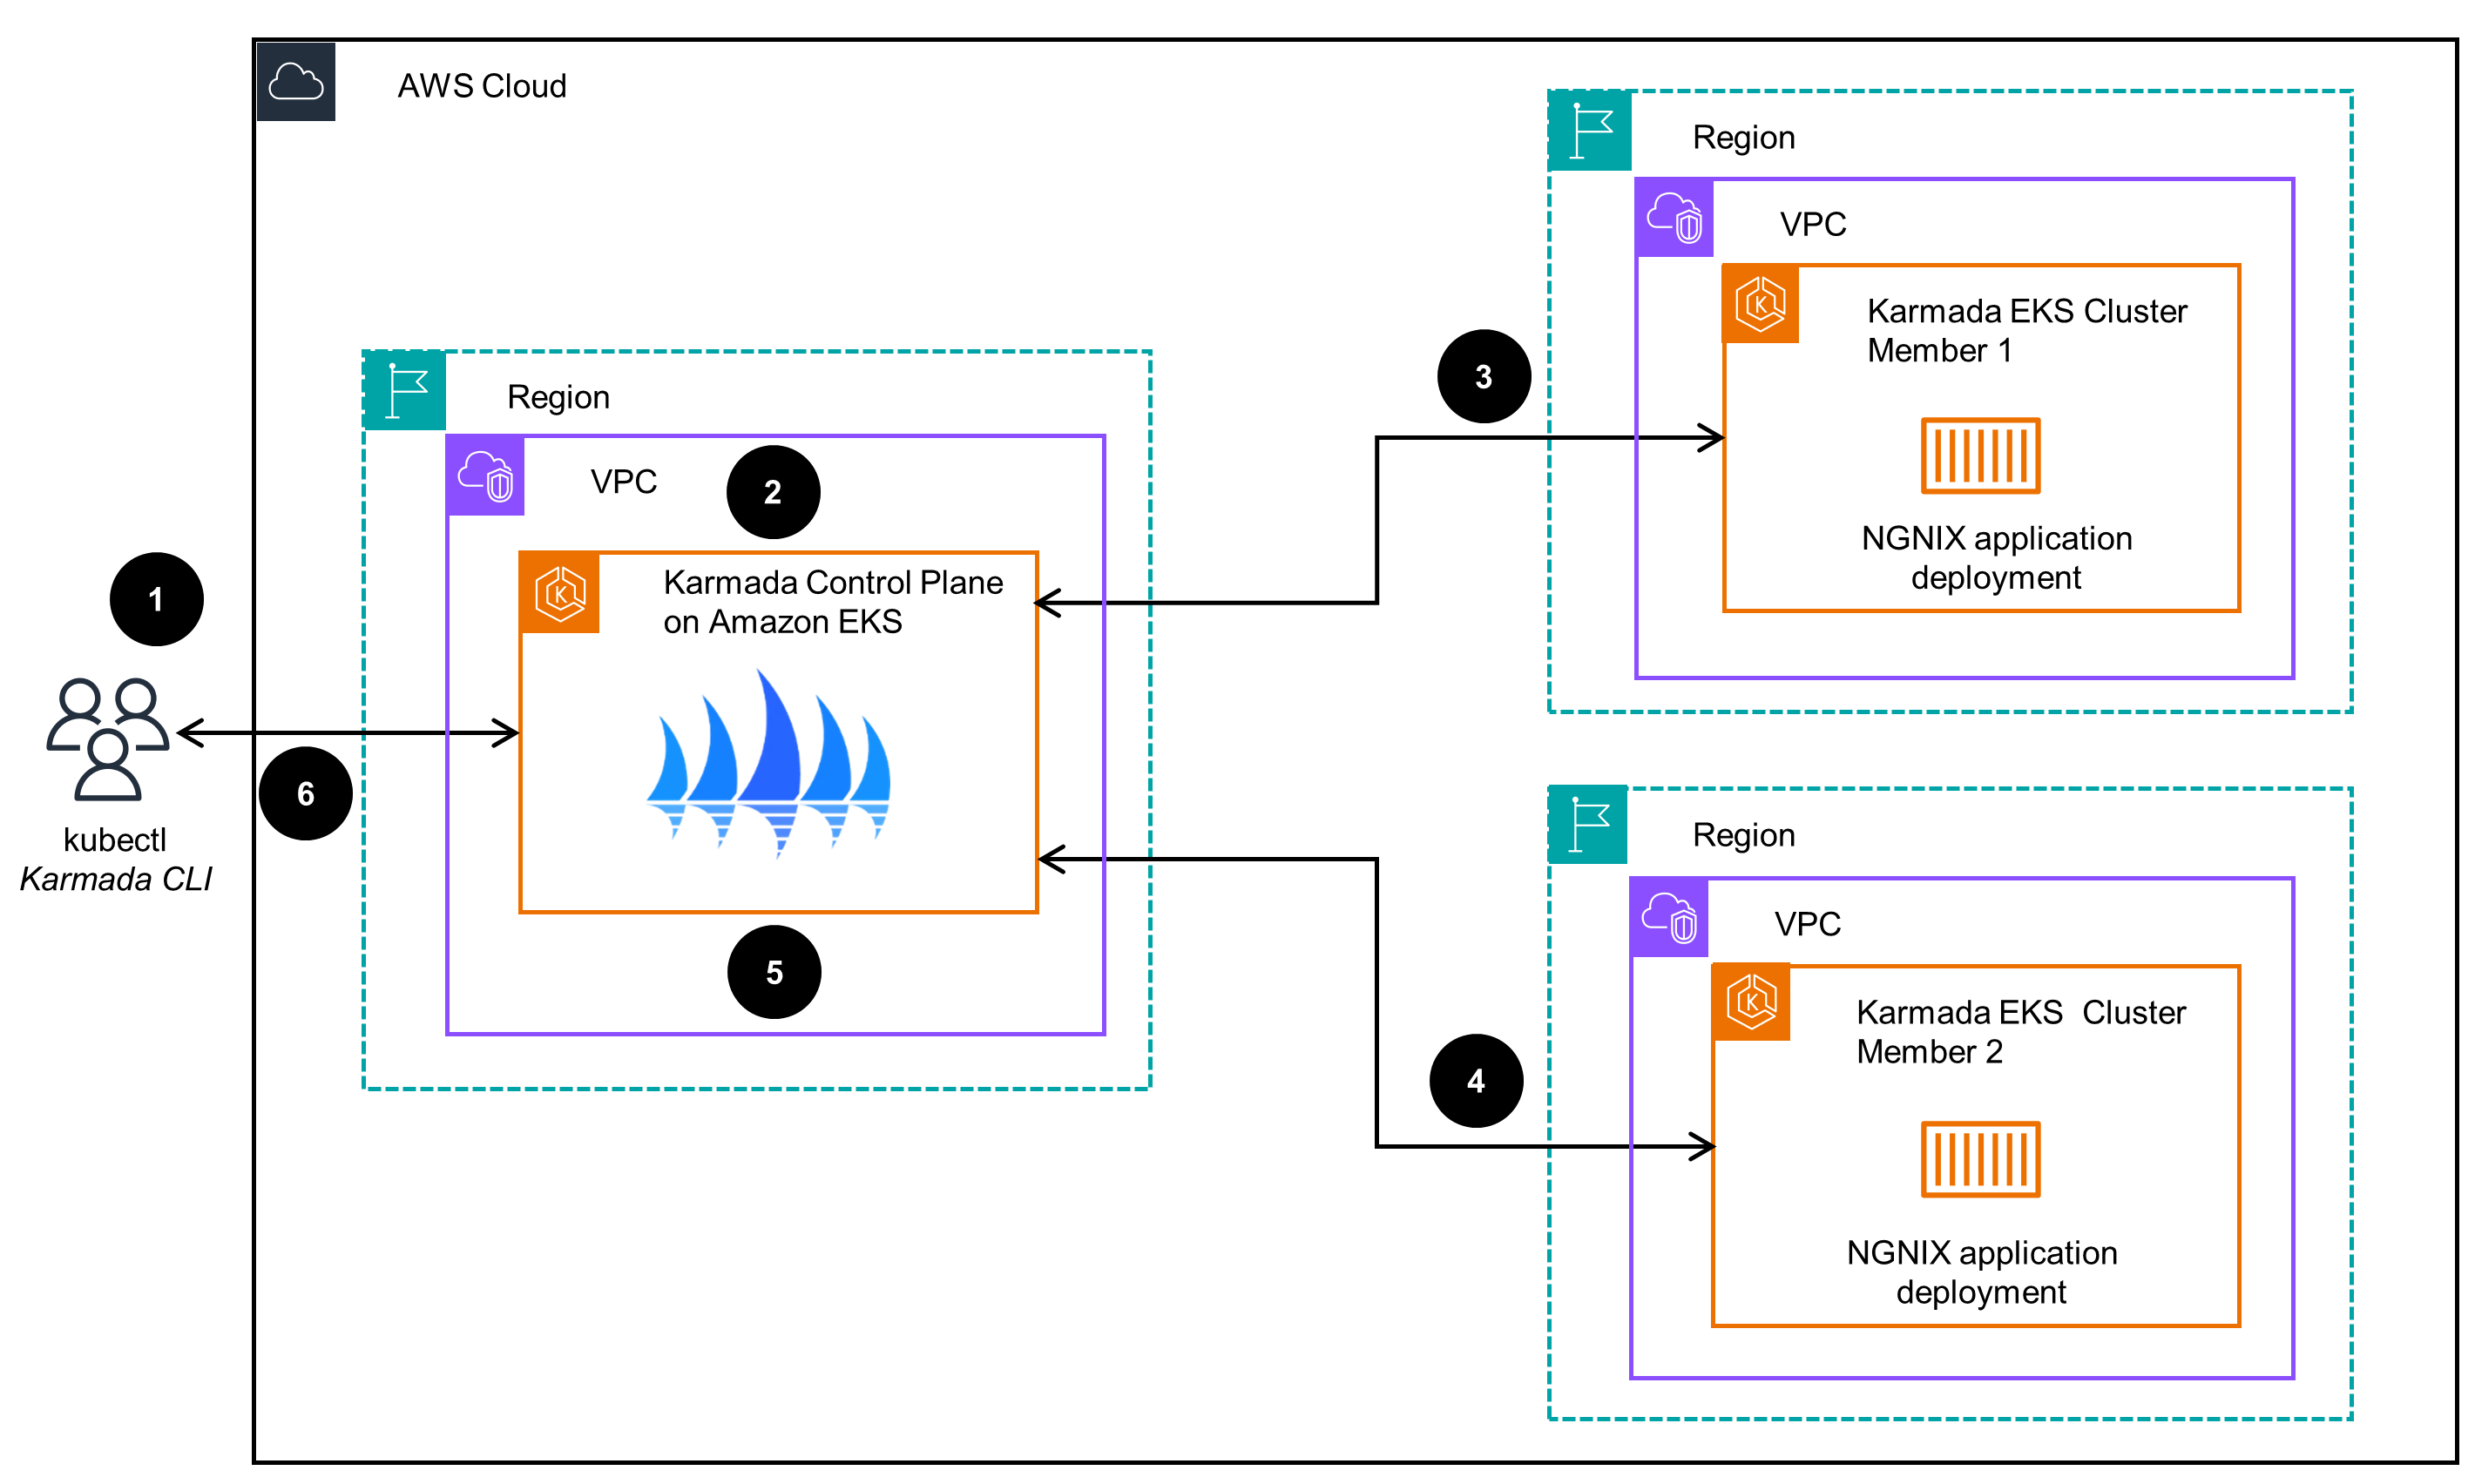
Figure 2: Multi-cluster application management with Amazon EKS and Karmada - application deployment
Architecture steps:
- User interacts with the Karmada API server (part of the Karmada Control Plane) using the
kubectlCLI with the Karmada plugin. User sends a command for multiple clusters (like a multi-Region deployment of the NGINX application with equal weight across two member EKS clusters). - The Karmada Control Plane maintains the status and state of all member EKS clusters. Upon receiving the user request, it interprets the requirement and instructs member clusters accordingly (for example, it will run an NGINX deployment in each member cluster).
- The EKS cluster member 1 receives instructions from the Karmada Control Plane to deploy and run an NGINX container application deployment.
- The EKS cluster member 2 receives instructions from the Karmada Control Plane to deploy and run an NGINX container application deployment.
- The EKS Karmada Control Plane cluster checks the application deployment status on the member clusters and updates the state in its etcd database.
- User validates the status of the multi-cluster application deployment communicating with the Karmada Control Plane through the
kubectlKarmada CLI.
In a similar fashion, you can:
- Deploy applications on multiple Amazon EKS clusters that provide a highly available environment.
- Create the infrastructure that caters to workloads compliant with local regulations about data residency.
AWS services used in this Guidance
| AWS service | Role | Description |
|---|---|---|
| Amazon Elastic Kubernetes Service (EKS) | Core service | EKS service is used to host the Karmada solution that uses containers. In essence, it is an extension of the Kubernetes API. |
| Amazon Elastic Compute Cloud (EC2) | Core service | EC2 service is used as the host of the containers needed for this Guidance. |
| Amazon Virtual Private Cloud (VPC) | Core Service | Network security layer |
| Amazon Elastic Conatiner Registry (ECR) | Supporting service | Used for storing container images required by the runtimes. |
| Network Load Balancer (NLB) | Supporting service | The NLB acts as a proxy for Karmada services running on the Amazon EKS parent cluster. The load balancer is the entry point to interact with the Karmada API server and forwards traffic to any healthy backend node to make sure that this Guidance will work in case of any single node or Availability Zone failure. |
| Amazon Elastic Block Store (EBS) | Supporting service | Encrypted EBS volumes are used by the Karmada etcd database attached to compute nodes and EC2 instances to keep its state and consistency. All state changes and updates persist in EBS volumes across all EC2 compute nodes that host etcd pods. |
| AWS Identity and Access Management (IAM) | Supporting service | IAM service is used for the creation of an IAM user with adequate permissions to create and delete Amazon EKS cluster access. |
Plan your deployment
This Guidance is based on using Amazon EKS as a Kubernetes cluster to host Karmada and manage other Amazon EKS clusters. However, as Karmada is an extension to the native Kubernetes API, you can extend this Guidance and expand the multi-cluster management to any Kubernetes cluster, no matter the deployment method, tool, or location.
Cost
You are responsible for the cost of the AWS services used while running this Guidance. As of February 2024, the cost for running this Guidance with the default settings in the US-East (N. Virginia) us-east-1 Region is $0.10 per hour for each Amazon EKS cluster you have created. On top of this, you have to take into account the costs incurred by the AWS resources used for the EKS cluster (for example: Amazon Elastic Compute Cloud (EC2) Instances and Amazon Elastic Block Store (EBS) volumes).
We recommend creating a budget through AWS Cost Explorer to help manage costs. Prices are subject to change. For full details, refer to the pricing webpage for each AWS service used in this Guidance.
Estimated monthly cost breakdown
The following table provides a sample cost breakdown for deploying this Guidance with three Amazon EKS clusters (one Karmada control plane and two managed clusters) in the US-East-1 us-east-1 Region for one month. Refer to the cost calculator for more details. Cost calculations are based on the default configuration options of the End-to-end, fully automated deployment method described below.
| AWS service | Dimensions | Cost, month [USD] |
|---|---|---|
| Amazon EKS | 1 cluster | $ 219 |
| Amazon EC2 | 3 EC2 compute cluster nodes in each of the 3 clusters | $ 328.50 |
| Amazon EBS | 5GB worth of EBS disk GP3 type | $ 1.25 |
| Amazon ELB | 1 Network Load Balancer | $ 20.81 * |
| NAT Gateway | 1 instance | $ 112.05 |
| Public IP address | 9 IPs | $ 32.85 |
| TOTAL | $ 714.41 |
* An NLCU measures the dimensions on which the Network Load Balancer processes your traffic (averaged over an hour). The three dimensions measured are:
- New connections or flows: Number of newly established connections or flows per second. Many technologies (such as HTTP and WebSockets) reuse Transmission Control Protocol (TCP) connections for efficiency. The number of new connections is typically lower than your request or message count.
- Active connections or flows: Peak concurrent connections and flows, sampled minutely.
- Processed bytes: The number of bytes processed by the load balancer in GBs.
You are charged only on one of those dimensions that has the highest usage for the hour.
Security
When you build systems on AWS infrastructure, security responsibilities are shared between you and AWS. This shared responsibility model reduces your operational burden because AWS operates, manages, and controls the components, including the host operating system, the virtualization layer, and the physical security of the facilities in which the services operate. For more information about AWS security, visit AWS Cloud Security.
This Guidance relies on many reasonable default options and “principle of least privilege” access for all resources. Users that deploy it in production should go through all the deployed resources and ensure those defaults comply with their security requirements and policies, have adequate logging levels and alarms enabled, and protect access to publicly exposed APIs. Since the Kubernetes clusters should be able to communicate with each other and can be deployed on different VPCs, AWS Regions, AWS accounts, or even in non-AWS infrastructure, this Guidance assumes publicly exposed Kubernetes APIs that utilize inherent Kubernetes mechanisms to protect access.
By deploying this Guidance, you also expose publicly the Karmada API service on port tcp/32443 that utilizes inherent certificate-based access control to protect unauthorized access. In the event that those certificates are exposed and a malicious user gets access to the Karmada API service, they will then be able to create or manipulate any workloads managed by Karmada, such as multicluster deployments. To minimize the attack surface and enhance protection for your publicly exposed Kubernetes and Karmada APIs, you should adjust the security groups attached to the Amazon EKS clusters and the Karmada load balancer accordingly, and allow communication only from designated and authorized IP addresses or networks.
All resources deployed by this Guidance rely on inherent AWS security controls, including but not limited to VPC security groups, IAM users and roles, and security certificates. By default, this Guidance exposes only the necessary endpoints, such as the Kubernetes API and the Karmada API, protected with end-to-end encryption.
Supported AWS Regions
The AWS services used for this Guidance are supported in all AWS regions.
Quotas
Service quotas, also referred to as limits, are the maximum number of service resources or operations enabled for your AWS account.
Quotas for AWS services in this Guidance
Make sure you have sufficient quotas for each of the services implemented in this Guidance. For more information, refer to AWS service quotas.
To view the service quotas for all AWS services in the documentation without switching pages, view the information in the Service endpoints and quotas page in the PDF instead.
Deploy the Guidance
Before you launch the Guidance, review the cost, architecture, security, and other considerations discussed. Follow the step-by-step instructions in this section to configure and deploy the Guidance into your account.
Time to deploy: Approximately 30–60 minutes, depending on the number of clusters deployed.
Deployment methods
To deploy this Guidance, you have three options with varying levels of flexibility, control, and complexity. The options are the following:
End-to-end, fully automated We recommend this method for novice users or users that need a quick end-to-end solution for testing capabilities and evaluating purposes. This method uses a shell script to deploy three Amazon EKS clusters, the Karmada control plane, two clusters as member clusters in this multi-cluster environment, and a sample workload deployment with Karmada across the two member clusters.
Parent Amazon EKS cluster and Karmada control-plane only We recommend this method for experienced users or users that need a quick and easy way to deploy an Amazon EKS cluster and the Karmada control plane. This method uses the AWS Cloud Development Kit (CDK) to deploy one Amazon EKS cluster, the Karmada control plane, and an EC2 instance configured accordingly to act as the multi-cluster management host.
End-to-end, manual We recommend this method for advanced users or users that need full control and visibility over every single step of the deployment. This method uses the AWS CLI, Amazon EKS CLI,
kubectl, and Karmada plugins. It is a step-by-step procedure to deploy an Amazon EKS cluster and Karmada control plane, any number of Amazon EKS clusters to join as members, and a sample workload deployment with Karmada across member clusters.
Prerequisites
Whichever deployment method you choose, you will need to have the following:
- An active AWS account.
- A user with administrator access to this account.
For the End-to-end, fully automated, and the End-to-end, manual methods, you also need the following:
- Αn Amazon VPC. You can use the option to create a VPC plus other VPC resources to simplify the network setup. In that case, you must edit each public subnet and enable the option to auto-assign public IPv4 addresses. If you do not use this option, your VPC you must have the following:
- Three (3) public subnets across three different availability zones, with the option to auto-assign public IPv4 addresses enabled.
- Three (3) private subnets across three different Availability Zones, with the option to auto-assign public IPv4 addresses disabled.
- An Internet Gateway to allow Internet access for all cluster nodes
- A NAT gateway with s default route from private subnets to allow Internet access for all cluster nodes.
- An access key or secret access key to configure the AWS Command Line Interface (AWS CLI).
Deployment options
Whichever deployment method you choose, you have various options to run the necessary code or commands. Since Karmada deployment stores configuration files and states on the host that you use for the deployment, we strongly recommend either deploy with management host or deploy with AWS Cloud9. For testing purposes only, you can deploy with AWS CloudShell.
Deploy with management host
We recommend deploying an EC2 instance in your VPC and assigning an instance profile with administrator access to deploy EKS clusters and other services. After the EC2 instance is ready, proceed with the “Deployment commands” of the method of deployment of your choice.
Deploy with AWS Cloud9
Another option to have a stable and stateful deployment with minimum administration overhead and reduced cost is to use AWS Cloud9. Follow the official documentation for creating an EC2 Environment to create a new Cloud9 environment in the same VPC as the one you are going to use for Karmada deployment. Due to the nature of the deployment, you cannot use AWS Cloud9 temporary credentials; instead, you have to either create and use an instance profile to manage temporary credentials, or create and store permanent access credentials in an Environment; you will need to setup the credentials, start a new terminal session (on the menu bar, choose Window, New Terminal), and proceed with the “Deployment commands” of the method of deployment of your choice.
Deploy with AWS CloudShell
You also have the option to use the AWS Management Console using the AWS CloudShell for your convinience. The use of CloudShell for this Guidance is only recommended as a means for quick testing. If you want to perform a production grade deployment using an AWS service with more flexible timeouts and data persistency, we recommend using the deploy with AWS Cloud9 or the deploy with management hostmethods. Assuming you are logged in to the AWS Management Console as a user with adequate permissions, open a CloudShell and proceed with the “Deployment commands” of the method of deployment of your choice.
CloudShell is designed for focused, task-based activities. It is not meant for tasks that need to keep state and persistent data (such as installation of system packages). Also, your shell session automatically ends after approximately 20–30 minutes if you don’t interact with CloudShell using your keyboard or pointer. Running processes don’t count as interactions, so while running this script, make sure that you interact with the shell (for example, press the Enter key) every 15 minutes to avoid timeouts and interrupting the script’s run. Its use in this Guidance is only recommended as a means for quick testing, and you should never rely on it for production use.
End-to-end fully automated
This script automates the deployment of a Karmada cluster on Amazon EKS. It creates an EKS cluster to serve as the Karmada control plane, deploys the Karmada components on it, and joins a user-specified number of EKS clusters as member clusters to Karmada.
The flow of the script is:
- Install, if missing, some prerequisites (jq, kubectl, eksctl, aws cli v2)
- Deploy an Amazon EKS cluster for the Karmada control plane (parent)
- Deploy the EBS CSI driver and create a GP3 storage class on the control plane cluster (parent)
- Deploy a network load balancer for the Karmada API server
- Install the kubectl Karmada plugin
- Initialize Karmada on the control plane of the EKS cluster (parent)
- Deploy a specified number (default 2) of EKS clusters to serve as member clusters
- Register each member cluster to the Karmada control plane
- Deploy a sample Kubernetes workload across two member clusters with an equal (50%–50%) distribution
The script takes various arguments to override defaults; run it with -h for details:
./deploy-karmada-run.sh -h
The script is not idempotent, but all reasonable effort has been put into this direction and can be safely run again with the same parameters. If it has failed before, fix the error and run it again; it should be able to recover from most of the errors that can make it fail. In any case, there are numerous checks within the script to avoid creating duplicate resources.
Example Usage
The following run deploys infrastructure in the US East (N. Virginia) Region. It will deploy three member clusters (three members and one parent) and all EKS clusters’ names will have the prefix “mykarmada”. All other options are the default.
./deploy-karmada-run.sh -r us-east-1 -c mykarmada -s 3
Deployment commands
- Clone the code from Github:
git clone https://github.com/aws-solutions-library-samples/guidance-for-multi-cluster-management-eks-karmada.git
This command clones the specified GitHub repository, which contains the code for this Guidance using Amazon EKS and Karmada.
- Access the script folder:
cd guidance-for-multi-cluster-management-eks-karmada/eks-karmada-deploy/
- Make the executable script runnable::
chmod +x deploy-karmada-run.sh
This command adds execute permissions to the deploy-karmada-run.sh script, allowing you to run it.
- Run the script with the required parameters. Assuming you have a VPC with the name
KarmadaVPC, use the following command to deploy three Amazon EKS clusters (one parent and two members) with the prefix “karmada” in the Europe (Stockholm) Region.
./deploy-karmada-run.sh -r eu-north-1 -v KarmadaVPC -c karmada-guidance
Alternatively, you can run the script with the -h flag to display the help menu and available options:
./deploy-karmada-run.sh -h
- Wait for the script to run. As long as you do not have any EKS clusters already deployed, expect roughly 60 minutes for the script to complete. Below is a sample output of a successful end-to-end run:
$ ./deploy-karmada-run.sh -v KarmadaVPC -c karmada-guidance
Ready to run the Karmada deployment script with the following parameters:
  Amazon EKS version: latest
  VPC name: KarmadaVPC
  Region: eu-north-1
  Cluster name prefix: karmada-guidance
  Cluster nodes: 3
  Cluster nodes CPUs: 2
  Cluster nodes memory: 4
  Cluster CPU arch: x86_64
  Number of karmada member clusters: 2
  Karmada HOME dir: /home/ec2-user/.karmada
Depending on the number of clusters you are deploying, this script may take a while to complete (expect 20+ minutes per cluster).
Press enter to continue or Ctrl-C to abort
▷ Checking prerequisites
        ✔ jq already installed
        ✔ kubectl already installed
        ◔ eksctl could not be found or is not the latest version, installing/upgrading now ✔
        ✔ aws cli v2 already installed
▷ Prepare some parameters
        ✔ VPC ID: vpc-XXX
        ✔ Private Subnets: subnet-XXX,subnet-XXX,subnet-XXX
        ✔ Public Subnets: subnet-XXX,subnet-XXX,subnet-XXX
        ✔ Account ID: XXX
▷ Deploy cloudformation stack for usage recording
        ◔ Deploy dummy cloudformation for solution metadata code recording      ✔
▷ Creating the Karmada parent cluster
        ◔ check if cluster karmada-guidance-parent exists ✘
        ◔ deploy cluster karmada-guidance-parent (this will take several minutes)
(.....)
        ✔ Cluster deployed successfully
        ◔ update kube config for karmada-guidance-parent ✔
▷ Deploy the EBS addon for Karmada HA
        ◔ switching to the right context ✔
        ◔ Check IAM OIDC provider ✘
        ◔ associate the IAM OIDC provider ✔
        ◔ Check IAM service account ✘
        ◔ create IAM service account ✔
        ◔ Check EBS addonError ✘
        ◔ deploy EBS addon ✔
        ◔ create gp3 ebs storage class ✔
▷ Deploy Karmada Load Balancer
        ◔ switching to the right context ✔
        ◔ switching to the right context ✔
        ◔ check if namespace karmada-system exists ✘
        ◔ create Karmada namespace ✔
        ◔ check if karmada network load balancer exists ✘
        ◔ deploy karmada network load balancer ✔
        ◔ Waiting for the load balancer to become ready.......... ✔
        ✔ Karmada Load Balancer DNS name: XXX.elb.eu-north-1.amazonaws.com
▷ Deploy Karmada Control Plane
        ◔ switching to the right context ✔
        ✔ kubectl-karmada already installed
        ◔ check if karmada is already initialised ✘
        ◔ deploy Karmada api server
I0501 14:03:06.939474   33555 deploy.go:245] kubeconfig file: , kubernetes: https://XXX.gr7.eu-north-1.eks.amazonaws.com
I0501 14:03:08.063893   33555 deploy.go:265] karmada apiserver ip: [XXX.XXX.XXX.XXX]
(.....)
I0501 14:05:14.380691   33555 idempotency.go:291] Service karmada-system/karmada-webhook has been created or updated.

------------------------------------------------------------------------------------------------------
 █████   ████   █████████   ███████████   ██████   ██████   █████████   ██████████     █████████
░░███   ███░   ███░░░░░███ ░░███░░░░░███ ░░██████ ██████   ███░░░░░███ ░░███░░░░███   ███░░░░░███
 ░███  ███    ░███    ░███  ░███    ░███  ░███░█████░███  ░███    ░███  ░███   ░░███ ░███    ░███
 ░███████     ░███████████  ░██████████   ░███░░███ ░███  ░███████████  ░███    ░███ ░███████████
 ░███░░███    ░███░░░░░███  ░███░░░░░███  ░███ ░░░  ░███  ░███░░░░░███  ░███    ░███ ░███░░░░░███
 ░███ ░░███   ░███    ░███  ░███    ░███  ░███      ░███  ░███    ░███  ░███    ███  ░███    ░███
 █████ ░░████ █████   █████ █████   █████ █████     █████ █████   █████ ██████████   █████   █████
░░░░░   ░░░░ ░░░░░   ░░░░░ ░░░░░   ░░░░░ ░░░░░     ░░░░░ ░░░░░   ░░░░░ ░░░░░░░░░░   ░░░░░   ░░░░░
------------------------------------------------------------------------------------------------------
Karmada is installed successfully.

Register Kubernetes cluster to Karmada control plane.

Register cluster with 'Push' mode

Step 1: Use "kubectl karmada join" command to register the cluster to Karmada control plane. --cluster-kubeconfig is kubeconfig of the member cluster.
(In karmada)~# MEMBER_CLUSTER_NAME=$(cat ~/.kube/config  | grep current-context | sed 's/: /\n/g'| sed '1d')
(In karmada)~# kubectl karmada --kubeconfig /home/ec2-user/.karmada/karmada-apiserver.config  join ${MEMBER_CLUSTER_NAME} --cluster-kubeconfig=$HOME/.kube/config

Step 2: Show members of karmada
(In karmada)~# kubectl --kubeconfig /home/ec2-user/.karmada/karmada-apiserver.config get clusters


Register cluster with 'Pull' mode

Step 1: Use "kubectl karmada register" command to register the cluster to Karmada control plane. "--cluster-name" is set to cluster of current-context by default.
(In member cluster)~# kubectl karmada register XXX.XXX.XXX.XXX:32443 --token XXX--discovery-token-ca-cert-hash sha256:XXX

Step 2: Show members of karmada
(In karmada)~# kubectl --kubeconfig /home/ec2-user/.karmada/karmada-apiserver.config get clusters

        ◔ deploy Karmada api server ✔
▷ Creating the Karmada member clusters
        ◔ check if cluster karmada-guidance-member-1 exists ✘
        ◔ deploy cluster karmada-guidance-member-1 (this will take several minutes)
(.....)
        ✔ Cluster deployed successfully
        ◔ update kube config for karmada-guidance-member-1 ✔
        ◔ check if cluster karmada-guidance-member-2 exists ✘
        ◔ deploy cluster karmada-guidance-member-2 (this will take several minutes)
(.....)
        ✔ Cluster deployed successfully
        ◔ update kube config for karmada-guidance-member-2 ✔
▷ Registering the Karmada member cluster karmada-guidance-member-1 to Karmada
        ✔ kubectl-karmada already installed
        ◔ switching to the right context ✔
        ◔ check if karmada-guidance-member-1 is already registered to Karmada cluster ✘
        ◔ switching to the right context ✔
cluster(karmada-guidance-member-1) is joined successfully  ✔
▷ Registering the Karmada member cluster karmada-guidance-member-2 to Karmada
        ✔ kubectl-karmada already installed
        ◔ switching to the right context ✔
        ◔ check if karmada-guidance-member-2 is already registered to Karmada cluster ✘
        ◔ switching to the right context ✔
cluster(karmada-guidance-member-2) is joined successfully ✔
▷ Deploy demo workload with Karmada
▷ Deploying demo application (nginx) to member clusters karmada-guidance-member-1 and karmada-guidance-member-2
        ◔ switching to the right context ✔
        ◔ check if propagation policy existsNo resources found in default namespace.  ✘
        ◔ create propagation policy for demo nginx deployment to two member cluster ✔
        ◔ check if deployment existsNo resources found in default namespace.  ✘
        ◔ deploying 4 nginx pods across two clusters ✔
        ◔ check from parent cluster the deployment across the two member clusters
NAME                                 CLUSTER                     READY   STATUS    RESTARTS   AGE
karmada-demo-nginx-f68bf9f77-7mjrz   karmada-guidance-member-1   1/1     Running   0          11s
karmada-demo-nginx-f68bf9f77-g6khq   karmada-guidance-member-1   1/1     Running   0          11s
karmada-demo-nginx-f68bf9f77-gtct6   karmada-guidance-member-2   1/1     Running   0          11s
karmada-demo-nginx-f68bf9f77-x7tpg   karmada-guidance-member-2   1/1     Running   0          11s
▷ Switching to the Karmada parent cluster context
        ◔ switching to the right context ✔
▷ Installation is complete

▷▷▷ Karmada deployment is complete
        ▷ Karmada settings directory: /home/ec2-user/.karmada

        ▷ To get info for your cluster status run:
          kubectl --kubeconfig /home/ec2-user/.karmada/karmada-apiserver.config get clusters

          You can get more info for advanced Karmada capabilities such as multi-cluster scaling, multi-cluster failover or autoscaling across different clusters
          by visiting the official Karmada documentation at https://karmada.io/docs/userguide/
Parent Amazon EKS cluster and Karmada control-plane deployment
This package provides a fully automated deployment of a multi-cluster application management solution using Amazon EKS and Karmada on AWS. It utilizes the AWS CDK in Java to deploy an Amazon EKS parent cluster and the Karmada control plane, which enables you to join and manage additional Amazon EKS or other Kubernetes clusters.
Deployment commands
- Install Node.js on the CloudShell instance by running the following command:
curl -o- https://raw.githubusercontent.com/nvm-sh/nvm/v0.39.7/install.sh | bash
AWS does not control the following code. Before you run it, be sure to verify its authenticity and integrity. More information about this code can be found in the nvm GitHub repository.
- Install the AWS CDK (aws-cdk package) using the Node.js package manager by running the following command:
sudo npm install -g aws-cdk
This command installs the AWS CDK globally, making it available for use in the deployment script.
- Install the latest version of Amazon Corretto for Amazon Linux:
sudo yum install -y java-21-amazon-corretto-headless
- Download and install the latest version of Apache Maven, extract it, and temporarily change the path to include the Apache Maven bin directory:
curl -sLO https://dlcdn.apache.org/maven/maven-3/3.9.6/binaries/apache-maven-3.9.6-bin.tar.gz
tar xzf apache-maven-3.9.6-bin.tar.gz
echo "export PATH=$PATH:~/apache-maven-3.9.6/bin" >> ~/.bashrc
source ~/.bashrc
command -v mvn
- Download the source code from GitHub and navigate to the CDK code directory, then run the preparation step. If it’s your first run, you need to run the
cdk bootstrapcommand:
git clone https://github.com/aws-solutions-library-samples/guidance-for-multi-cluster-management-eks-karmada.git
cd guidance-for-multi-cluster-management-eks-karmada/cdk/solution-guidance-federated-k8s/
mvn clean package
cdk bootstrap
cdk synth
- Deploy the application using the AWS CDK:
cdk deploy
End-to-end, manual
This deployment procedure provides full control and visibility over every step of the process. It utilizes the AWS CLI, Amazon EKS CLI, kubectl, and the Karmada plugin, offering a step-by-step approach to deploy an Amazon EKS cluster and Karmada control plane, join any number of Amazon EKS clusters as members, and deploy a sample workload across the member clusters using Karmada.
Preliminary steps
- Install AWS CLI v2:
cd /tmp
curl https://awscli.amazonaws.com/awscli-exe-linux-x86_64.zip -o awscliv2.zip
unzip awscliv2.zip
sudo ./aws/install --bin-dir /usr/local/bin --install-dir /usr/local/aws-cli --update
- Install the
eksctlutility to deploy and manage Amazon EKS clusters in your account:
cd /tmp
curl -sLO "https://github.com/weaveworks/eksctl/releases/latest/download/eksctl_Linux_amd64.tar.gz"
tar -xzf eksctl_Linux_amd64.tar.gz -C /tmp && rm eksctl_Linux_amd64.tar.gz
chmod +x eksctl
sudo mv /tmp/eksctl /usr/local/bin
- Install the
kubectlutility:
cd /tmp
curl -LO "https://dl.k8s.io/release/$(curl -L -s https://dl.k8s.io/release/stable.txt)/bin/linux/amd64/kubectl"
chmod +x ./kubectl
sudo mv kubectl /usr/local/bin
- Install the
jqutility to handle json files from the command line:
sudo yum install jq
- Configure the AWS CLI by providing your user’s Access Key and Secret Access Key:
$ aws configure

AWS Access Key ID [None]: <Access_Key_ID>
AWS Secret Access Key [None]: <Secret_Access_Key>
Default region name [None]: <region_where_VPC_resides>
Default output format [None]:
Deploy Amazon EKS management cluster for Karmada
After completing the preliminary steps, proceed with deploying an Amazon EKS cluster that will host Karmada.
- Define environment variables for the AWS account ID, the AWS Region to deploy the Amazon EKS management cluster, the preferred cluster name, and the VPC:
KARMADA_REGION="us-east-1"
KARMADA_CLUSTERNAME="karmada-parent"
KARMADA_ACCOUNTID="$(aws sts get-caller-identity --query "Account" --output text)"
KARMADA_VPC="KarmadaVPC"
- Populate the environment variable KARMADA_VPCID with the VPC ID of the VPC where you want to deploy the Karmada cluster:
KARMADA_VPCID=$(aws ec2 describe-vpcs --region ${KARMADA_REGION} --filter "Name=tag:Name,Values=${KARMADA_VPC}" --query "Vpcs[].VpcId" --output text)
- Get the list of private subnets for this VPC and store it in the
KARMADA_PRIVATESUBNETSenvironment variable:
KARMADA_PRIVATESUBNETS=$(aws ec2 describe-subnets --region ${KARMADA_REGION} --filters "Name=vpc-id,Values=${KARMADA_VPCID}" --query 'Subnets[?MapPublicIpOnLaunch==`false`].SubnetId' | jq -r '. | @csv')
- Get the public subnets for this VPC and store them in the
KARMADA_PUBLICSUBNETSenvironment variable:
KARMADA_PUBLICSUBNETS=$(aws ec2 describe-subnets --region ${KARMADA_REGION} --filters "Name=vpc-id,Values=${KARMADA_VPCID}" --query 'Subnets[?MapPublicIpOnLaunch==`true`].SubnetId' | jq -r '. | @csv')
Each public subnet must have the the option to auto-assign public IPv4 addresses enabled.
- Deploy an Amazon EKS cluster with three compute nodes:
eksctl create cluster --nodes 3 --nodes-min 3 --nodes-max 3 \
--auto-kubeconfig --alb-ingress-access --asg-access \
--region ${KARMADA_REGION} \
--instance-prefix ${KARMADA_CLUSTERNAME} \
--vpc-private-subnets ${KARMADA_PRIVATESUBNETS} \
--vpc-public-subnets ${KARMADA_PUBLICSUBNETS} \
--name ${KARMADA_CLUSTERNAME}
This operation will take approximately 20 minutes.
- Update the
kubectlconfig file:
aws eks update-kubeconfig --region "${KARMADA_REGION}" --name ${KARMADA_CLUSTERNAME}
- To allow the AWS Management Console access to the cluster (if connecting with a different user than the CLI user), run the following command, replacing
with your actual username:
eksctl create iamidentitymapping \
--cluster ${KARMADA_CLUSTERNAME} \
--arn "arn:aws:iam::${KARMADA_ACCOUNTID}:user/<your_username>" \
--username <your_username> \
--group system:masters --no-duplicate-arns
- Deploy the EBS add-on:
a. Associate the IAM OIDC provider:
eksctl utils associate-iam-oidc-provider \
--region ${KARMADA_REGION} \
--cluster ${KARMADA_CLUSTERNAME} \
--approve
b.Create the necessary IAM service account for the EBS CSI controller:
eksctl create iamserviceaccount \
--cluster ${KARMADA_CLUSTERNAME} \
--region ${KARMADA_REGION} \
--name ebs-csi-controller-sa --namespace kube-system  \
--attach-policy-arn arn:aws:iam::aws:policy/service-role/AmazonEBSCSIDriverPolicy \
--approve --role-only \
--role-name AmazonEKS_EBS_CSI_DriverRole_${KARMADA_REGION}_${KARMADA_CLUSTERNAME}
c. Deploy the EBS storage add-on:
eksctl create addon \
--cluster ${KARMADA_CLUSTERNAME} \
--region ${KARMADA_REGION} \
--name aws-ebs-csi-driver \
--service-account-role-arn arn:aws:iam::${KARMADA_ACCOUNTID}:role/AmazonEKS_EBS_CSI_DriverRole_${KARMADA_REGION}_${KARMADA_CLUSTERNAME} \
--force
- Create the configuration for a storage class for encrypted EBS storage:
cat > ebs-sc.yaml <<EOF
apiVersion: storage.k8s.io/v1
kind: StorageClass
metadata:
  name: ebs-sc
provisioner: ebs.csi.aws.com
volumeBindingMode: WaitForFirstConsumer
parameters:
  type: gp3
  encrypted: true
EOF
- Create the storage class in your EKS cluster:
kubectl apply -f ./ebs-sc.yaml
If this command fails with access denied errors, you may need to remove the aws_session_token = line from the ~/.aws/credentials file.*
- Verify the operation of the Amazon EKS cluster using the AWS Management Console or the
kubectlutility:
kubectl get svc -A
kubectl get pods -A
kubectl get sc -A
kubectl describe sc ebs-sc
kubectl get nodes -A -o wide
For your convenience, here is the sample output of the commands above for our testing cluster:
Get all services in the cluster:
$ kubectl get svc -A
NAMESPACE     NAME         TYPE        CLUSTER-IP    EXTERNAL-IP   PORT(S)         AGE
default       kubernetes   ClusterIP   172.20.0.1    <none>        443/TCP         28m
kube-system   kube-dns     ClusterIP   172.20.0.10   <none>        53/UDP,53/TCP   28m
Get all pods information:
$ kubectl get pods -A
NAMESPACE     NAME                                  READY   STATUS    RESTARTS   AGE
kube-system   aws-node-5dj6f                        1/1     Running   0          20m
kube-system   aws-node-fsgcf                        1/1     Running   0          20m
kube-system   aws-node-j8shd                        1/1     Running   0          20m
kube-system   coredns-5947f47f5f-c2vkh              1/1     Running   0          28m
kube-system   coredns-5947f47f5f-m97dx              1/1     Running   0          28m
kube-system   ebs-csi-controller-64d647d966-96gbm   6/6     Running   0          115s
kube-system   ebs-csi-controller-64d647d966-mtvrf   6/6     Running   0          115s
kube-system   ebs-csi-node-6cccm                    3/3     Running   0          115s
kube-system   ebs-csi-node-9gvr5                    3/3     Running   0          115s
kube-system   ebs-csi-node-nrnqz                    3/3     Running   0          115s
kube-system   kube-proxy-2xqfw                      1/1     Running   0          20m
kube-system   kube-proxy-pqwkb                      1/1     Running   0          20m
kube-system   kube-proxy-xhpl4                      1/1     Running   0          20m
Get all storage classes available in the cluster:
$ kubectl get sc -A
NAME            PROVISIONER             RECLAIMPOLICY   VOLUMEBINDINGMODE      ALLOWVOLUMEEXPANSION   AGE
ebs-sc          ebs.csi.aws.com         Delete          WaitForFirstConsumer   false                  44s
gp2 (default)   kubernetes.io/aws-ebs   Delete          WaitForFirstConsumer   false                  28m
Get details for the storage class ebs-sc:
$ kubectl describe sc ebs-sc
Name:            ebs-sc
IsDefaultClass:  No
Annotations:     kubectl.kubernetes.io/last-applied-configuration={"apiVersion":"storage.k8s.io/v1","kind":"StorageClass","metadata":{"annotations":{},"name":"ebs-sc"},"parameters":{"encrypted":"true","type":"gp3"},"provisioner":"ebs.csi.aws.com","volumeBindingMode":"WaitForFirstConsumer"}

Provisioner:           ebs.csi.aws.com
Parameters:            encrypted=true,type=gp3
AllowVolumeExpansion:  <unset>
MountOptions:          <none>
ReclaimPolicy:         Delete
VolumeBindingMode:     WaitForFirstConsumer
Events:                <none>
Get infortmation for all cluster nodes:
$ kubectl get nodes -A -o wide
NAME                                        STATUS   ROLES    AGE   VERSION                INTERNAL-IP   EXTERNAL-IP     OS-IMAGE         KERNEL-VERSION                 CONTAINER-RUNTIME
ip-10-0-2-204.eu-west-1.compute.internal    Ready    <none>   21m   v1.22.17-eks-0a21954   10.0.2.204    <public_IP_A>   Amazon Linux 2   <public_IP_X>.amzn2.x86_64   docker://20.10.23
ip-10-0-20-99.eu-west-1.compute.internal    Ready    <none>   21m   v1.22.17-eks-0a21954   10.0.20.99    <public_IP_B>   Amazon Linux 2   <public_IP_X>.amzn2.x86_64   docker://20.10.23
ip-10-0-34-232.eu-west-1.compute.internal   Ready    <none>   21m   v1.22.17-eks-0a21954   10.0.34.232   <public_IP_C>   Amazon Linux 2   <public_IP_X>.amzn2.x86_64   docker://20.10.23
Deploy Karmada
You are now ready to deploy Karmada, which will extend the capabilities of your new Amazon EKS cluster with additional Karmada functionality. By design, Karmada uses an internal etcd database to keep its state, so in order to deploy a resilient Karmada cluster, you need an odd number of nodes to run Karmada workloads, which is three (3) in this case. You also need a load balancer to distribute the load across all available Karmada pods and continue working in case of any single node or Availability Zone (AZ) failure.
Install a load balancer for the Karmada API server
- Create the
karmada-systemnamespace:
kubectl create namespace karmada-system
- Create the configuration for the Network Load Balancer that will handle traffic for the Karmada API server:
cat > karmada-lb.yaml <<EOF
apiVersion: v1
kind: Service
metadata:
  name: karmada-service-loadbalancer
  namespace: karmada-system
  annotations:
    service.beta.kubernetes.io/aws-load-balancer-type: nlb
    service.beta.kubernetes.io/aws-load-balancer-name: karmada-lb
    service.beta.kubernetes.io/aws-load-balancer-scheme: internet-facing
    service.beta.kubernetes.io/aws-load-balancer-nlb-target-type: ip
spec:
  type: LoadBalancer
  selector:
    app: karmada-apiserver
  ports:
  - protocol: TCP
    port: 32443
    targetPort: 5443
EOF
- Deploy the load balancer:
kubectl apply -f karmada-lb.yaml
- Get the load balancer hostname:
KARMADA_LB=$(kubectl get svc karmada-service-loadbalancer -n karmada-system -o jsonpath='{.status.loadBalancer.ingress[0].hostname}')
- Wait for the load balancer to be fully provisioned. The load balancer is fully provisioned when the status of the following command is “active”:
aws elbv2 describe-load-balancers --region "${KARMADA_REGION}" --query "LoadBalancers[?DNSName==\`${KARMADA_LB}\`].State.Code" --output text
- Install the karmada plugin for kubectl:
curl -s https://raw.githubusercontent.com/karmada-io/karmada/master/hack/install-cli.sh | sudo bash -s kubectl-karmada
AWS does not control the following code. Before you run it, be sure to verify its authenticity and integrity. For more information, refer to the installation process of the kubectl-karmada plugin.
- Get the IP address of the load balancer:
KARMADA_LB_IP=$(getent hosts ${KARMADA_LB} | head -1 | awk '{print $1}')
While the load balancer is highly available in three Availability Zones, the Karmada API server has the limitation to accept only one IP address.
- Define the Karmada directory. In this directory, the deployment of Karmada will store configuration data and certificates. With the following command, we store all Karmada-related files in the
.karmadafolder under our user’s home directory:
KARMADA_HOME="~/.karmada"
- Deploy the Karmada control plane using the IP address of the load balancer. You should also add the wildcard domain name for AWS load balancers to the API server certificate:
kubectl karmada init \
--karmada-apiserver-advertise-address "${KARMADA_LB_IP}" \
--karmada-apiserver-replicas 3 --etcd-replicas 3 \
--etcd-storage-mode PVC --storage-classes-name ebs-sc \
--cert-external-dns="*.elb.${KARMADA_REGION}.amazonaws.com" \
--karmada-data "${KARMADA_HOME}" --karmada-pki="${KARMADA_HOME}/pki"
When the initialization is complete, karmada displays important information on how to join member clusters.
- Make a note of the security token and the CA cert hash. You will need them when registering other Amazon EKS clusters to Karmada with the “Pull” method.
(... output text ...)
------------------------------------------------------------------------------------------------------
 █████   ████   █████████   ███████████   ██████   ██████   █████████   ██████████     █████████
░░███   ███░   ███░░░░░███ ░░███░░░░░███ ░░██████ ██████   ███░░░░░███ ░░███░░░░███   ███░░░░░███
 ░███  ███    ░███    ░███  ░███    ░███  ░███░█████░███  ░███    ░███  ░███   ░░███ ░███    ░███
 ░███████     ░███████████  ░██████████   ░███░░███ ░███  ░███████████  ░███    ░███ ░███████████
 ░███░░███    ░███░░░░░███  ░███░░░░░███  ░███ ░░░  ░███  ░███░░░░░███  ░███    ░███ ░███░░░░░███
 ░███ ░░███   ░███    ░███  ░███    ░███  ░███      ░███  ░███    ░███  ░███    ███  ░███    ░███
 █████ ░░████ █████   █████ █████   █████ █████     █████ █████   █████ ██████████   █████   █████
░░░░░   ░░░░ ░░░░░   ░░░░░ ░░░░░   ░░░░░ ░░░░░     ░░░░░ ░░░░░   ░░░░░ ░░░░░░░░░░   ░░░░░   ░░░░░
------------------------------------------------------------------------------------------------------
Karmada is installed successfully.

Register Kubernetes cluster to Karmada control plane.

Register cluster with 'Push' mode

Step 1: Use "kubectl karmada join" command to register the cluster to Karmada control plane. --cluster-kubeconfig is kubeconfig of the member cluster.
(In karmada)~# MEMBER_CLUSTER_NAME=$(cat ~/.kube/config  | grep current-context | sed 's/: /\n/g'| sed '1d')
(In karmada)~# kubectl karmada --kubeconfig ~/.karmada/karmada-apiserver.config  join ${MEMBER_CLUSTER_NAME} --cluster-kubeconfig=$HOME/.kube/config

Step 2: Show members of karmada
(In karmada)~# kubectl --kubeconfig ~/.karmada/karmada-apiserver.config get clusters

Register cluster with 'Pull' mode

Step 1: Use "kubectl karmada register" command to register the cluster to Karmada control plane. "--cluster-name" is set to cluster of current-context by default.
(In member cluster)~# kubectl karmada register <public_IP>:32443 --token <security-token> --discovery-token-ca-cert-hash <ca-cert-hash>

Step 2: Show members of karmada
(In karmada)~# kubectl --kubeconfig ~/.karmada/karmada-apiserver.config get clusters
Join member clusters to Karmada
Now that you’ve deployed an Amazon EKS cluster with a highly available Karmada API server and a Network Load Balancer to handle incoming traffic, the next step is to register your member Amazon EKS clusters with Karmada. Karmada offers two different methods for registering member clusters: Push or Pull. Refer to the Karmada documentation for more information on these methods.
Cluster name limitation As of June 2024, Karmada has a limitation where the cluster name cannot be more than 48 characters. This can be a blocker if your full cluster name (the name you use in the kubectl config file) is longer than 48 characters. In such cases, use simpler names with only small Latin characters and numbers (no spaces, no capital letters, no symbols).
Specifically, the name must consist of lower case alphanumeric characters or ‘-‘, and must start and end with an alphanumeric character (such as ‘my-name’ or ‘123-abc’). The regex used for validation is ‘[a-z0-9]([-a-z0-9]*[a-z0-9])?’.
If your cluster name exceeds the 48-character limit, you can change the name in the ~/.kube/config file directly for the desired member cluster. Ensure that you have a backup of the file before editing it.
- Locate the cluster and context sections in the ~/.kube/config file for the cluster you want to rename.
- Change the appropriate entries (clusters -> cluster -> name, contexts -> context -> cluster, context -> name, current-context) with a compliant name.
Here’s an example of a config file snippet for a cluster with the name _myclustername.<region>.eksctl.io_
apiVersion: v1
clusters:
- cluster:
    certificate-authority-data:
    (few lines of certificate data)
    server: https://<id>.<region>.eks.amazonaws.com
  name: myclustername.<region>.eksctl.io
contexts:
- context:
    cluster: myclustername.<region>.eksctl.io
    user: user@myclustername.<region>.eksctl.io
  name: user@myclustername.<region>.eksctl.io
current-context: myclustername.<region>.eksctl.io
After renaming the cluster to a friendly and compliant name, such as myclustername, the config file will look like this:
apiVersion: v1
clusters:
- cluster:
    certificate-authority-data:
    (few lines of certificate data)
    server: https://<id>.<region>.eks.amazonaws.com
  name: myclustername
contexts:
- context:
    cluster: myclustername
    user: user@myclustername.<region>.eksctl.io
  name: myclustername
current-context: myclustername
Register cluster with pull mode
Ensure you are logged in to the Karmada management host, and that you have the member clusters configured and accessible with the kubectl utility. As an example, we have three clusters that we are managing: two in Europe (Frankfurt) -eu-central-1, and one in the US East (N. Virginia) – us-east-1.
- List the available cluster contexts:
kubectl config get-contexts
Sample output
CURRENT   NAME                                  CLUSTER                          AUTHINFO                                NAMESPACE
*         user@EKSUSMGT01.us-east-1.eksctl.io   EKSUSMGT01.us-east-1.eksctl.io   user@EKSUSMGT01.us-east-1.eksctl.io
          ekseucl01                             ekseucl01                        user@EKSEUCL01.eu-central-1.eksctl.io
          ekseucl02                             ekseucl02                        user@EKSEUCL02.eu-central-1.eksctl.io
          eksuscl01                             eksuscl01                        user@EKSUSCL01.us-east-1.eksctl.io
- Change context to the cluster you are registering with Karmada:
kubectl config use-context ekseucl01
- Register the cluster to Karmada:
$ kubectl karmada --kubeconfig ~/.karmada/karmada-apiserver.config join ekseucl01 --cluster-kubeconfig=~/.kube/config
Sample output:
cluster(ekseucl01) is joined successfully
Repeat the previous steps for the other clusters as well.
Check Karmada cluster status:
$ kubectl --kubeconfig ~/.karmada/karmada-apiserver.config get clusters
Sample output
NAME        VERSION               MODE   READY   AGE
ekseucl01   v1.27.6-eks-f8587cb   Push   True    9h
ekseucl02   v1.27.6-eks-f8587cb   Push   True    9h
eksuscl01   v1.27.6-eks-f8587cb   Push   True    9h
At this point, you have joined the clusters to Karmada and you are able to access all Karmada features.
Register cluster with push mode
The registration of a member cluster with push mode requires accessing a cluster from a host that has no Karmada components installed. This method also deploys the karmada-agent in your cluster so that it can push information and receive commands from the Karmada API server. You also have to make sure that your cluster and the management host can access the Karmada API server (for example, over the internet or through VPC peering).
Log in to the host from which you can access the member cluster.
Install the karmada plugin:
curl -s https://raw.githubusercontent.com/karmada-io/karmada/master/hack/install-cli.sh | sudo bash -s kubectl-karmada
- Run the command below to register this cluster with Karmada, using the load balancer IP from the previous step, and the security token and certification hash you noted during the Karmada API installation:
kubectl karmada register ${KARMADA_LB_IP}:32443 \
--token <security-token> \
--discovery-token-ca-cert-hash <ca-cert-hash> \
--cluster-name=<name_of_cluster_member>
At this point, you have joined the cluster to Karmada, and you are able to access all Karmada features.
Multi-cluster scheduling with Karmada
Karmada enables many advanced capabilities, such as multi-cluster scheduling, multi-cluster failover, or autoscaling across different clusters.
As an example, assume you have three clusters registered with Karmada: two in the eu-central-1 Region and one in the us-east-1 Region. You can deploy a simple NGINX application that will span across all three clusters. You also want to equally spread the capacity across clusters in Europe and North America. Since you have two clusters in the eu-central-1 Region, you want each to have 25% of the pods, so you give a weight 1. For the us-east-1 Region, you want to have 50% of the pods in the only cluster available, so you give a weight 2.
- Create a propagation policy that will give the required weights to different clusters:
apiVersion: policy.karmada.io/v1alpha1
kind: PropagationPolicy
metadata:
  name: sample-propagation
spec:
  resourceSelectors:
    - apiVersion: apps/v1
      kind: Deployment
      name: nginx
  placement:
    clusterAffinity:
      clusterNames:
        - ekseucl01
        - ekseucl02
        - eksuscl01
    replicaScheduling:
      replicaDivisionPreference: Weighted
      replicaSchedulingType: Divided
      weightPreference:
        staticWeightList:
          - targetCluster:
              clusterNames:
                - ekseucl01
                - ekseucl02
            weight: 1
          - targetCluster:
              clusterNames:
                - eksuscl01
            weight: 2
- If necessary, switch to the right context so that you run commands against the Karmada management cluster:
$ kubectl config use-context user@EKSUSMGT01.us-east-1.eksctl.io
Switched to context "user@EKSUSMGT01.us-east-1.eksctl.io".

$ kubectl config get-contexts
CURRENT   NAME                                  CLUSTER                          AUTHINFO                                NAMESPACE
*         user@EKSUSMGT01.us-east-1.eksctl.io   EKSUSMGT01.us-east-1.eksctl.io   user@EKSUSMGT01.us-east-1.eksctl.io
          ekseucl01                             ekseucl01                        user@EKSEUCL01.eu-central-1.eksctl.io
          ekseucl02                             ekseucl02                        user@EKSEUCL02.eu-central-1.eksctl.io
          eksuscl01                             eksuscl01                        user@EKSUSCL01.us-east-1.eksctl.io
- Apply the propagation policy:
$kubectl --kubeconfig ~/.karmada/karmada-apiserver.config create -f propagation-policy.yaml
propagationpolicy.policy.karmada.io/sample-propagation created
- Create the NGINX deployment with 12 replicas:
$ kubectl --kubeconfig ~/.karmada/karmada-apiserver.config create deployment nginx --image nginx --replicas=12
deployment.apps/nginx created
- Check that you get 6 application pod replicas in North America and 3 replicas in each cluster in Europe:
$ kubectl config use-context eksuscl01
Switched to context "eksuscl01".

$ kubectl get pod -l app=nginx
NAME                     READY   STATUS    RESTARTS   AGE
nginx-77b4fdf86c-c5f6b   1/1     Running   0          2m39s
nginx-77b4fdf86c-g5fnr   1/1     Running   0          2m39s
nginx-77b4fdf86c-kw42g   1/1     Running   0          2m39s
nginx-77b4fdf86c-qcvt2   1/1     Running   0          2m39s
nginx-77b4fdf86c-r5phj   1/1     Running   0          2m39s
nginx-77b4fdf86c-rns48   1/1     Running   0          2m39s

$ kubectl config use-context ekseucl01
Switched to context "ekseucl01".

$ kubectl get pod -l app=nginx
NAME                     READY   STATUS    RESTARTS   AGE
nginx-77b4fdf86c-2zd49   1/1     Running   0          4m40s
nginx-77b4fdf86c-5pcvf   1/1     Running   0          4m40s
nginx-77b4fdf86c-c7w8q   1/1     Running   0          4m40s

$ kubectl config use-context ekseucl02
Switched to context "ekseucl02".

$ kubectl get pod -l app=nginx
NAME                     READY   STATUS    RESTARTS   AGE
nginx-77b4fdf86c-bhftk   1/1     Running   0          4m48s
nginx-77b4fdf86c-bp4jr   1/1     Running   0          4m48s
nginx-77b4fdf86c-txjk5   1/1     Running   0          4m48s
Troubleshooting
The setup of this Guidance involves many different infrastructure components and numerous configurations. This makes debugging and troubleshooting challenging, and in case of issues, you should first try to isolate the component that produces the issue and then identify the root cause and resolve it. The “End-to-end, fully automated” option for deploying this Guidance uses a shell script that utilizes the AWS CLI, eksctl, and kubectl utilities to deploy at least three different Amazon EKS clusters, Karmada on the parent cluster, and a sample workload spread equally across the two member clusters.
- “VPC XXXX not found, exiting” Ensure that: (a) You have specified the VPC name correctly with the “-v” parameter. (b) The VPC is in the same Region as the one you are using to deploy the Guidance, as defined with the “-r” parameter. (c) You have “ec2:DescribeVpcs” permission with your user.
- “Public subnet subnet-XXXX does not have map ip on launch, exiting” The Amazon EKS deployment of this Guidance uses a publicly accessible control plane, so it requires the auto-assign public IPv4 address during instance launch enabled.
- Load Balancer Failure Use the AWS Management Console or the AWS CLI to check the status of the load balancer. In case you have other load balancers privisioned, ensure that none of the non-Karmada load balancers have the tag “kubernetes.io/service-name” set to “karmada-system/karmada-service-loadbalancer”. With the automated deployment, you cannot have two different Karmada API deployments in the same account and Region. In that case, use the manual deployment method and adjust the load balancer tags accordingly.
- “The connection to the server XXX.XXX.XXX.XXX:32443 was refused - did you specify the right host or port?” The error indicates an issue with the communication with the load balancer that handles traffic towards the Karmada API server. Check the following: (a) The load balancer for Karmada is Active, it has a Listener “TCP:32443”, and that listener Forwards to the target group k8s-karmadas-karmadas-XXXXX. Check in this target group that you have healthy targets. (b) Use the regular Kubernetes config file and run the following command:
kubectl get pods -n karmada-system
You should get an output like this:
NAME                                            READY   STATUS    RESTARTS   AGE
etcd-0                                          1/1     Running   0          20h
etcd-1                                          1/1     Running   0          20h
etcd-2                                          1/1     Running   0          20h
karmada-aggregated-apiserver-5bd4fbdc7c-z8kml   1/1     Running   0          20h
karmada-apiserver-655c446cbd-4j9x9              1/1     Running   0          20h
karmada-apiserver-655c446cbd-ltlt6              1/1     Running   0          20h
karmada-apiserver-655c446cbd-rr7jt              1/1     Running   0          20h
karmada-controller-manager-84d8f77fc-w6w44      1/1     Running   0          20h
karmada-scheduler-6b57b59d9-559n2               1/1     Running   0          20h
karmada-webhook-744f96f6c6-9s2tx                1/1     Running   0          20h
kube-controller-manager-759b94c566-wlpwj        1/1     Running   0          20h
- Decommissioning the Karmada API To decommission the Karmada API without removing the parent Amazon EKS cluster, ensure that you have a backup of any Karmada-related data you might need, as this is a destructive and non-reversible operation that will remove all Karmada-related resources from your parent cluster.
Any workloads deployed through Karmada will remain active on the respective clusters, but you need to make the necessary adjustments to delete references specific to Karmada.
To remove Karmada from your parent cluster, ensure that you are using the right Kubernetes context (use the command kubectl config current-context) to connect to the parent cluster and run the following command:
kubectl karmada deinit
Below is a sample output:
removes Karmada from Kubernetes
Please type (y)es or (n)o and then press enter:y
delete deployment "karmada-apiserver"
delete StatefulSet: "etcd"
delete Service "etcd"
delete Service "karmada-apiserver"
delete Secrets "etcd-cert"
delete Secrets "karmada-cert"
delete Secrets "karmada-webhook-cert"
delete Secrets "kubeconfig"
node not found by label "karmada.io/etcd"
remove Karmada from Kubernetes successfully.

deinit will not delete etcd data, if the etcd data is persistent, please delete it yourself.
the default persistence path for etcd data is '/var/lib/karmada-etcd'
- “Karmada deployment seems not to have the correct pods running, please check and run the script again” If your Karmada deployment does not have the minimum expected number of pods running (etcd pods: 3, apiserver pods: 3, aggregated-apiserver pods: 1, controller-manager pods: 1, scheduler pods: 1, webhook pods: 1), check the Running pods on the parent cluster with
kubectl get pods -n karmada-systemand fix any issues. You can also remove Karmada and redeploy as described in the question on how to decommission the Karmada AP.
- “error: empty context names are not allowed” If you have an Amazon EKS cluster with the name the script checks for (you can check the script output for the last “check if cluster XXX exists” and XXX is the cluster name) but your
kubectlconfig file does not have any information about it, update yourkubectlconfig file with this command:
aws eks update-kubeconfig --name XXX
Uninstall the Guidance
To uninstall this Guidance, you have to remove all resources created, which generally are the following:
- Amazon EKS cluster(s)
- Network Load Balancer
- EBS volumes
- VPC (which includes public and private subnets, internet gateway, and NAT gateway)
Check Karmada cluster registration for how to unregister the cluster in case you only want to remove a cluster from the Karmada control plane.
Below are further instructions depending on the deployment method you have chosen.
Uninstall for “End-to-End, fully automated” method
The script has the -d parameter to perform a basic clean up of the environment. The script deletes the deployed EKS clusters with the prefix name you define and deletes the configuration directory of karmada. Be VERY CAREFUL using this automatic cleanup function, and ensure you pass the correct parameters to avoid deleting the wrong Amazon EKS clusters in your environment. Since there is no safe way to do a complete cleanup, check and delete the following resources manually if necessary, as they were deployed by the script:
- Network load balancer
- IAM roles
- EBS volumes
Uninstall for “Parent Amazon EKS cluster and Karmada control-plane only” method
To uninstall the solutions and remove all relevant resources, navigate to the terminal where you have the CDK code and used to deploy, and run the following command:
cdk destroy
Uninstall for “End-to-end, manual” method
To remove the Karmada and the related resources, run the following command to delete the parent Amazon EKS cluster you have deployed for Karmada. Repeat the process for any member clusters you have deployed:
eksctl delete cluster —name ${KARMADA_CLUSTERNAME}
Check also for load balancers and EBS volumes that where not deleted with the deletion of your EKS clusters.
Related Resoucres
This Guidance is based on the Open, Multi-Cloud, Multi-Cluster Kubernetes Orchestration Management system called Karmada.
Contributors
The following individuals contributed to this document:
- Pavlos Kaimakis, Sr SA AWS (pkaim@amazon.com)
- Dimitrios Papageorgiou, Sr SA AWS (dpapageo@amazon.com)
- Alexandros Soumplis, Sr SA AWS (soumplis@amazon.com)
- Konstantinos Tzouvanas, Sr SA AWS (ktzouvan@amazon.com)
- Daniel Zilberman, Sr SA AWS Tech Solutions Team (dzilberm@amazon.com)
Notices
Customers are responsible for making their own independent assessment of the information in this document. This document: (a) is for informational purposes only, (b) represents AWS current product offerings and practices, which are subject to change without notice, and (c) does not create any commitments or assurances from AWS and its affiliates, suppliers or licensors.
AWS products or services are provided “as is” without warranties, representations, or conditions of any kind, whether express or implied. AWS responsibilities and liabilities to its customers are controlled by AWS agreements, and this document is not part of, nor does it modify, any agreement between AWS and its customers.