Guidance for Building a Spot Placement Score Tracker on AWS
Summary: This implementation guide provides an overview for building a Spot Placement Score tracker dashboard on AWS. It includes a reference architecture, considerations for planning the deployment, and configuration steps for deploying the guidance. It is intended for solution architects, business decision makers, DevOps engineers, data scientists, and cloud professionals who want to implement this guidance into their environment.
Overview
Amazon Elastic Compute Cloud - EC2 and Spot Instances let you take advantage of unused EC2 capacity in the AWS cloud. Spot Instances are available at up to a 90% discount compared to On-Demand prices. Spot Placement Score (SPS) is a feature that helps EC2 Spot customers by providing recommendations about which are the best-suited AWS Region(s) or Availability Zone(s) to run a diversified configuration that adjusts to the customer’s requirements.
Spot capacity fluctuates. You can’t be sure that you’ll always get the capacity that you need. A Spot Placement Score (SPS) indicates how likely it is that a Spot request will succeed in totality in a Region or Availability Zone; lower scores generally indicate insufficient capacity, which may be overcome through longer durations. A Spot placement score provides a score from 1 to 10 of how successful your experience when using Spot instances would be on a set of Regions.
Features and benefits
This Guidance automates the capture of Spot Placement Scores and stores these metrics in Amazon CloudWatch. Historic metrics can then be visualized using CloudWatch dashboards. CloudWatch can also be used to invoke alarms and automate events, such as moving your workload to a Region where capacity is available.
Use cases
Spot instances can be used to optimize the scale, cost, and execution time of various workloads. This includes containers (running on Kubernetes, Amazon EKS, and Amazon ECS), and loosely coupled HPC, and high throughput computing (AWS Batch and Parallel Cluster). Data analytics workloads that use Spark, Flink, Presto, CICD, and rendering can also use Spot instances, as can most workloads that are repeatable, scalable, and stateless.
Spot instances can be managed through Auto Scaling Groups, an EC2 Fleet configuration, and open source auto-scaling solutions such as Karpenter. If configuration of your workload follows Spot best practices, a Spot instance will receive a notification for termination. Auto Scaling Groups, Amazon EMR, Karpenter, and more will automate the replacement of the instance from another Spot pool where there is capacity available. Allocation strategies, such as price-capacity-optimization and capacity-optimization help select the optimal pools to reduce frequency of interruption and cost of your workloads.
Spot Placement Score considers a diversified fleet as an input. With the Spot Placement Score tracker** with CloudWatch dashboards, you will be able to monitor and evaluate how to apply Spot Instance best practices. As a result, you can optimize your workload to make the most of spare capacity at scale. Some of the best practices you should consider are:
- Increase instance diversification by adding instances from other sizes and families.
- Consider flexibility in your workloads by selecting multiple Availability Zones and, if your workload allows, exploring the possibility of using multiple Regions.
- Consider running at times of the day when spare capacity is more available.
The following graph shows one of the Spot Placement Score dashboards with SPS metrics changing over time for different EC2 spot capacities:
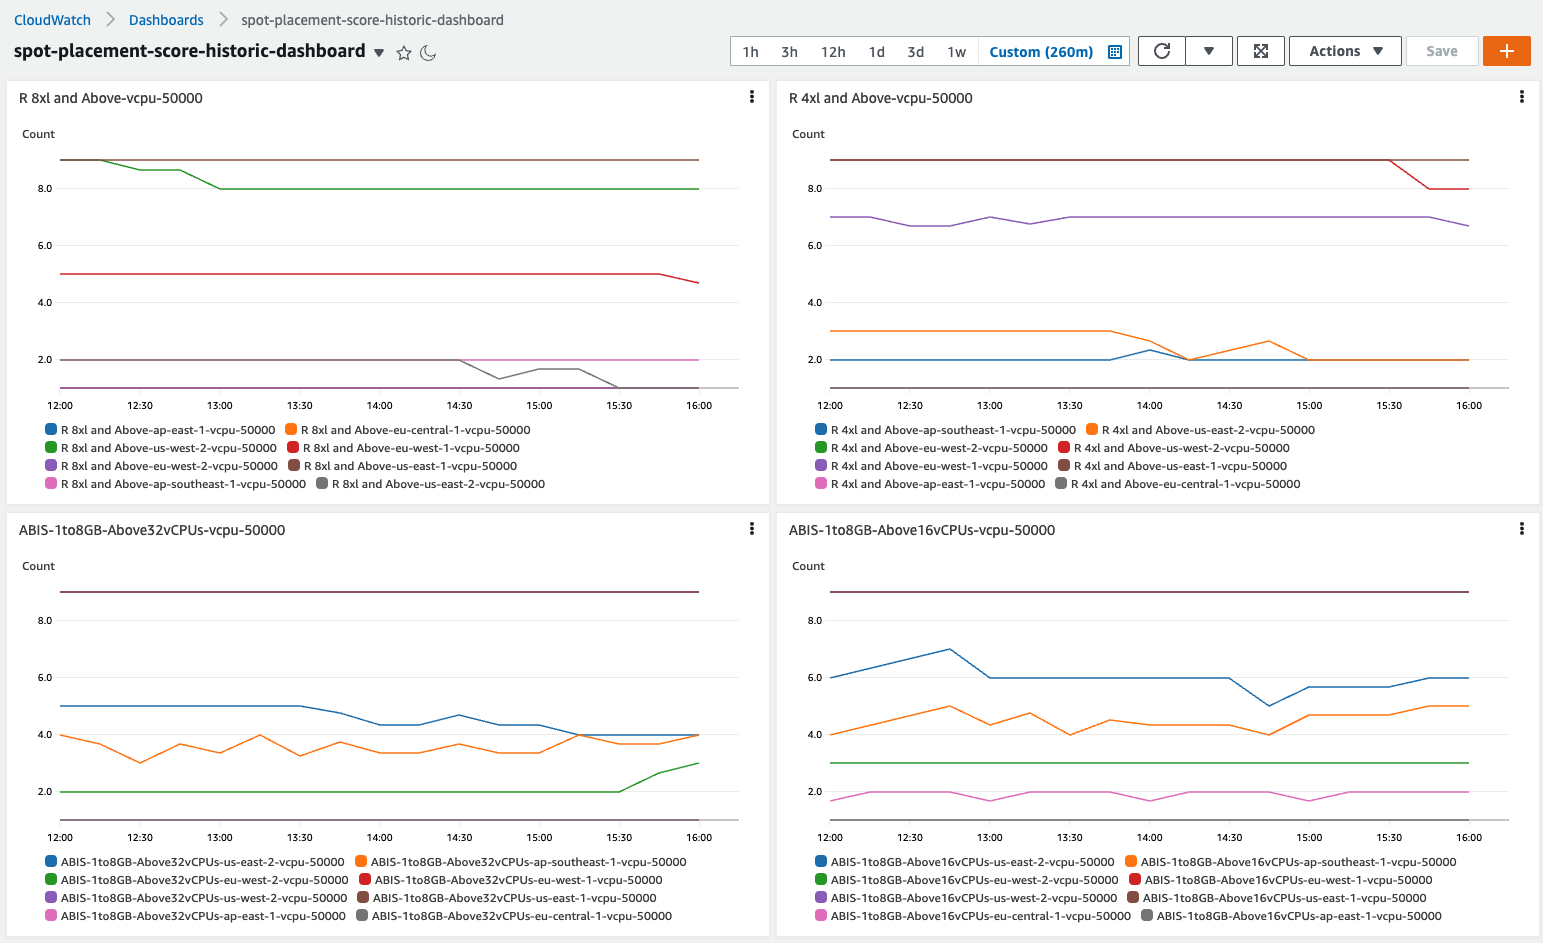
Figure 1: Spot Placement Score dashboards with SPS metrics changing over time for different EC2 spot capacities
Architecture overview
This section provides an architecture diagram and describes the components deployed with this Guidance.
Architecture Diagram
The project provides Infrastructure as Code (IaaC) automation using CDK to deploy the infrastructure. It includes AWS Identity and Access Management (IAM) roles and policies required to run the Lambda function. That function is invoked every 5 minutes to collect the Spot Placement Scores for as many diversified configurations as needed.
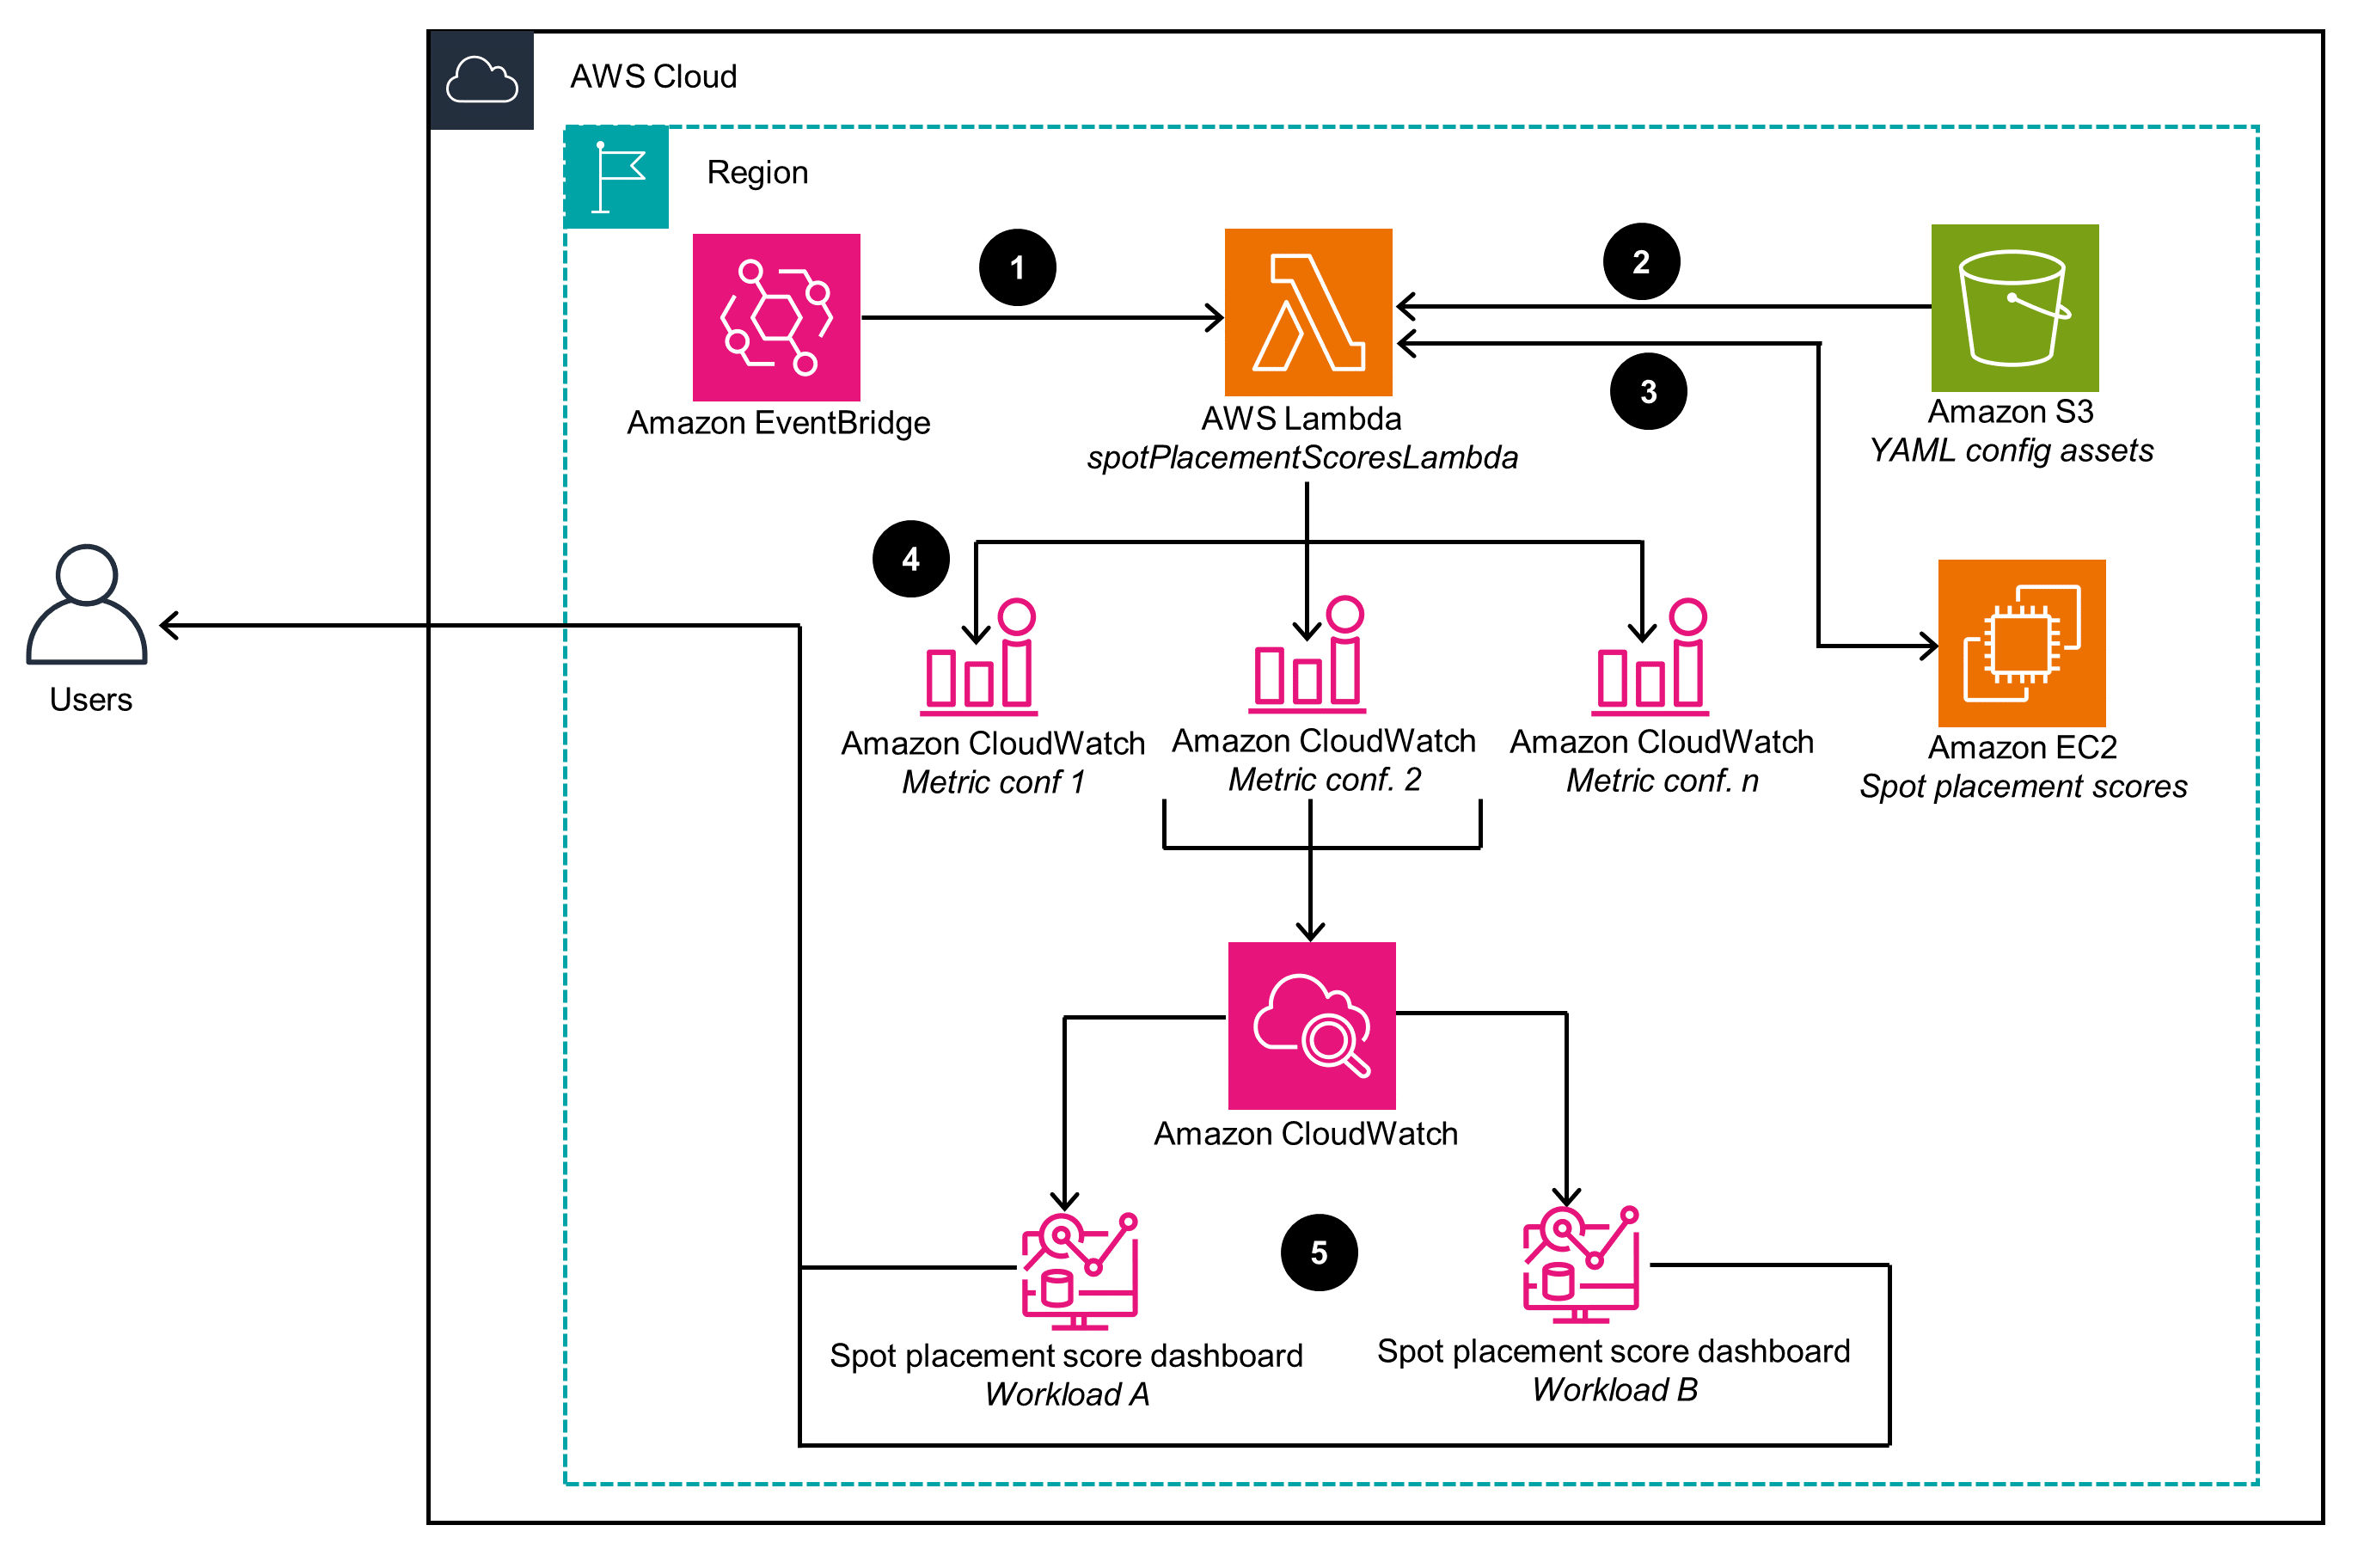
Figure 2: Spot Placement Score Tracker deployment architecture
Architecture steps
Below are the steps of the Architecture invocation:
- An Amazon EventBridge cron expression invokes the AWS Lambda function spotPlacementScoresLambda every 5 minutes. Those processes update the Spot Placement Scores displayed on Amazon CloudWatch dashboards.
- The Amazon Lambda function retrieves dashboard configuration files in YAML format from Amazon Simple Storage Service (Amazon S3) bucket.
- The Lambda function handles batches of metric requests. For each request, it queries the Amazon Elastic Cloud Compute (Amazon EC2) API’s Spot Placement Score feature to obtain a Spot placement Score.
- The Lambda function receives Spot Placement Score responses. It then creates and stores metrics in CloudWatch based on a metrics specified in the project Metric configuration (Metric conf.) file
- CloudWatch collects metrics for projected workloads, as specified in the Metric configuration (Metric conf.) file. These metrics populate the CloudWatch Spot Placement Score dashboards. Users can access these dashboards to optimize their Amazon EC2 Spot Instance Requests.
AWS Services in this Guidance
The following AWS services are used in this Guidance:
| AWS service | Description |
|---|---|
| Amazon EventBridge | Core Service - schedules regular invocations of the project code |
| Amazon Elastic Compute Cloud - Spot Placement Score | Core Service - EC2 Spot Placement Score API is used for getting Spot Placement Scores |
| Amazon Virtual Private Cloud - VPC | Core Service - to provide additional networking isolation and security |
| Amazon CloudWatch | Core service - provides metrics and dashboard for Spot Placement Scores |
| Amazon Simple Storage Service -S3 | Core service - stores Spot Placement Scores configurations and dashboard definitions |
| Amazon Lambda | Core service - provides serverless automation for configuration retrieval and metric processing |
Plan your deployment
Cost
You are responsible for the cost of the AWS services used while running this Guidance. As of July, 2025, the cost of running this Guidance with the default settings in the US East (N. Virginia) Region is approximately $8.00 per month.
This Guidance deploys serverless services that minimize costs. The costs for the default configuration are outlined below. You can find more specific details about costs for both CloudWatch (metrics and dashboard) and AWS Lambda. By default, the Lambda function runs every 5 minutes (~8,640 times per month) and publishes eight metrics to one dashboard. Adjusting these defaults will increase or reduce the costs accordingly.
We recommend creating a budget through AWS Cost Explorer to help manage costs. Prices are subject to change, please refer to pricing pages for each of AWS services used in this Guidance for full details.
Sample cost table
The following table provides a sample cost breakdown for deploying this Guidance with the default parameters in the US East (N. Virginia) Region for one month.
| AWS service | Dimensions | Cost [USD] |
|---|---|---|
| CloudWatch Dashboard | Dashboard | $3.00 per month |
| CloudWatch Metrics | First 10,000 metrics | $0.30 per metric per month |
| CloudWatch Metrics | Next 240,000 metrics | $0.10 per metric per month |
| AWS Lambda | $ 0.0000166667 for every GB-second | $0.15 per month |
| AWS Lambda requests | $ 0.20 per 1M requests | $0.20 per month |
Security
When you build systems on AWS infrastructure, security responsibilities are shared between you and AWS. This shared responsibility model reduces your operational burden because AWS operates, manages, and controls the components. These components include the host operating system, the virtualization layer, and the physical security of the facilities in which the services operate. For more information about AWS security, visit AWS Cloud Security.
Supported AWS Regions
This Guidance is supported in all currently available AWS Regions.
Quotas
Service quotas, also referred to as limits, are the maximum number of service resources or operations for your AWS account.
Quotas for AWS services in this Guidance
Make sure you have sufficient quotas for each of the services implemented in this solution. For more information, see AWS service quotas.
To view the service quotas for all AWS services in the documentation without switching pages, view the information in the Service endpoints and quotas page in the PDF instead.
Deploy the Guidance
Spot Placement Score Dashboard Configuration
The project configuration file sps_configuration.yaml provides an example configuration that you can modify and adapt to your needs. This file will be used and deployed by CloudFormation stack to AWS Cloud and will be kept in S3 bucket as the source configuration. The file has YAML format that follows a compatible schema as the one used by Spot Placement Score API calls. You can find more information on the Spot Placement Score API structure for Python at get_spot_placement_scores.
Before proceeding with the deployment of the dashboards using Cloud Development Kit (CDK), you will need to modify the configuration file that defines the different Spot configurations.
To learn how to better adjust your configurations, please review configuration settings which will help you understand how to get actionable insights based on your goals to optimize your workloads.
Required tools
- CDK
- Python =>3.8
- virtualenv
- IAM Permissions run AWS CDK stacks and request for Spot Placement Score
- Docker container run-time environment
Spot Placement Score Limits imposed by AWS
Spot Placement Score APIs impose a set of limits that you should be aware of:
- Limit on the number of instances, vCPU, and memory for each request. This limit will be equivalent to the number of instances that you are already using in your account in a regular way, so that you can evaluate your current workload in different Regions or AZs.
- Limit on the number of configurations. Spot Placement Score limits you to a few (10) different configurations. If you set up too many configurations, you may find that the Lambda function will fail and will be limited to just querying a few of the configurations. This will also be checked as part of the CDK based deployment process.
The following log snippet shows one of these throttling limits in action:
botocore.exceptions.ClientError: An error occurred (MaxConfigLimitExceeded) when
calling the GetSpotPlacementScores operation: You have exceeded your maximum allowed
Spot placement configurations. You can retry configurations that you used within the
last 24 hours, or wait for 24 hours before specifying a new configuration.
Deployment process overview
Before you launch the Guidance, review the architecture, costs, security, and other considerations discussed above. Follow the step-by-step instructions in this section to configure and deploy the Guidance into your account.
Time to deploy: Approximately 30 minutes
An AWS user deploying this guidance should have permissions to create AWS Cloud9 environments, create and deploy CloudFormation stacks, create or map extra IAM roles, and run Spot Placement Score queries.
Deploying CDK project using AWS Cloud9 IDE
An easy way to setup and deploy the guidance in your environment is using AWS Cloud9, an integrated development environment (IDE), following the instructions below.
Create a Cloud9 environment
- In the AWS console, run the following commands:
- Create an AWS Cloud9 environment in your AWS account.
If you use a pre-existing AWS Cloud9 environment, you may need to upgrade your python and npm versions. It is recommended to use at least 30 GB attached storage for the EC2 instance running AWS Cloud 9, as shown below:
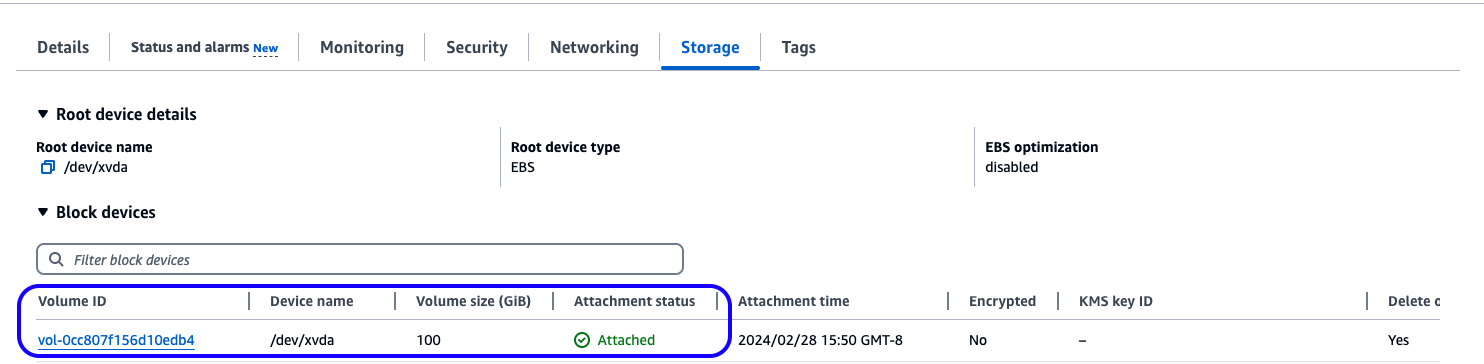
Figure 3. Recommended storage for EC2 instance running Cloud 9 IDE
- Run the following commands in Cloud 9 terminal (you can copy and paste)
export VERSION=1.0.4  #check in the repo for a tagged version youd like to deploy
wget https://github.com/aws-solutions-library-samples/guidance-for-ec2-spot-placement-score-tracker/archive/refs/tags/v$VERSION.tar.gz -O ec2-spot-placement-score-tracker-v$VERSION.tar.gz
tar xzvf ec2-spot-placement-score-tracker-v$VERSION.tar.gz
cd $HOME/environment/guidance-for-ec2-spot-placement-score-tracker-$VERSION
Configuring the AWS Cloud9 environment for deployment
At this stage, you can open the Cloud 9 editor and edit the configuration file.
There is an example SPS configuration file containing a few passwords, but we also recommend checking dashboard setup best practices. Use those best practices to define dashboards that are meaningful for your configuration.
Deploy dependencies
Once your configuration file is ready, you should install AWS CDK and the rest of the dependencies:
npm install -g --force aws-cdk
pip install virtualenv
virtualenv .env
source .env/bin/activate
pip install -r requirements.txt
Bootstrapoing AWS resources
Deploying AWS CDK apps into an AWS environment may require that you provision the resources it needs to perform the deployment. These resources include an Amazon S3 bucket for storing files and IAM roles for access management. We will also use that S3 bucket to upload our dashboard configuration.
Run the following command to bootstrap your environment:
cdk bootstrap
For more information about preparing your environment for deployment, refer to bootstrapping
Deploying the Application & Dashboards
Run the following command to deploy:
cdk deploy
If successfull, this command should produce an output similar to the one shown below that displays the progress of CloudFormation deployment and resources created:
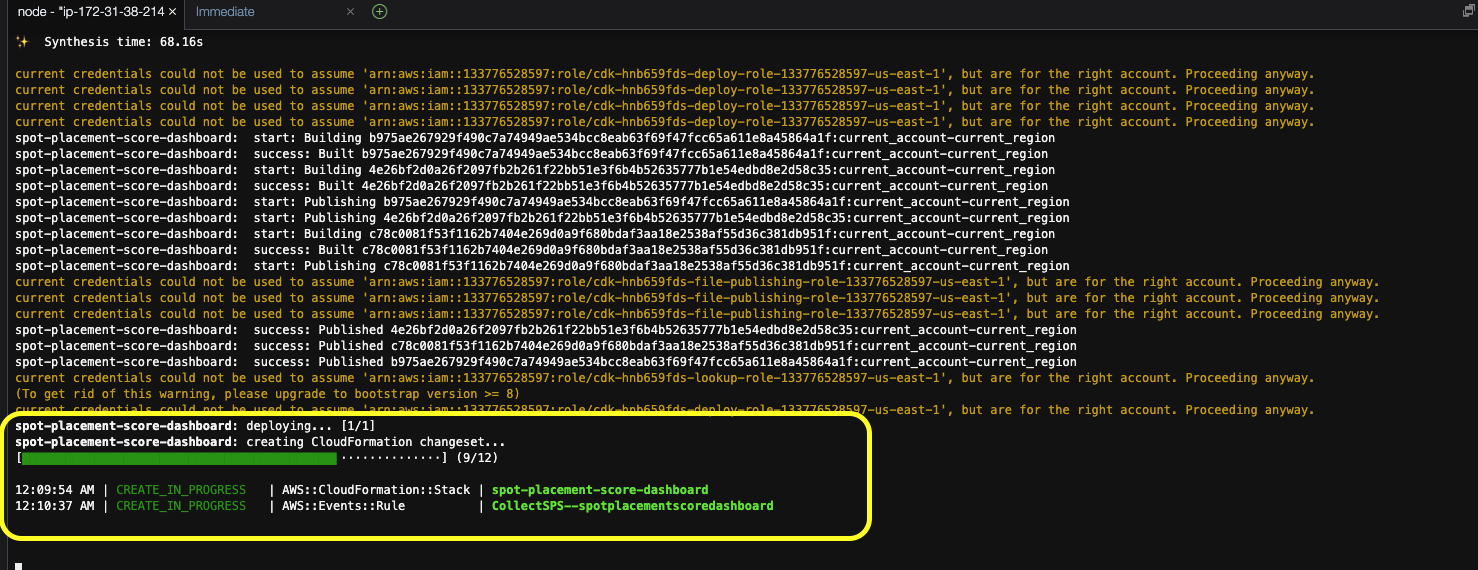
Figure 4. Output of cdk deploy command showing deployment progress
Once deployed, navigate to your AWS console and visit the CloudWatch dashboard section. Locate the dashboard having the same name as specified in the SPS dashboard configuration file. The dashboard metrics display Spot Placement Scores obtained from the specified Regions, aggregated over a period of 15 minutes.
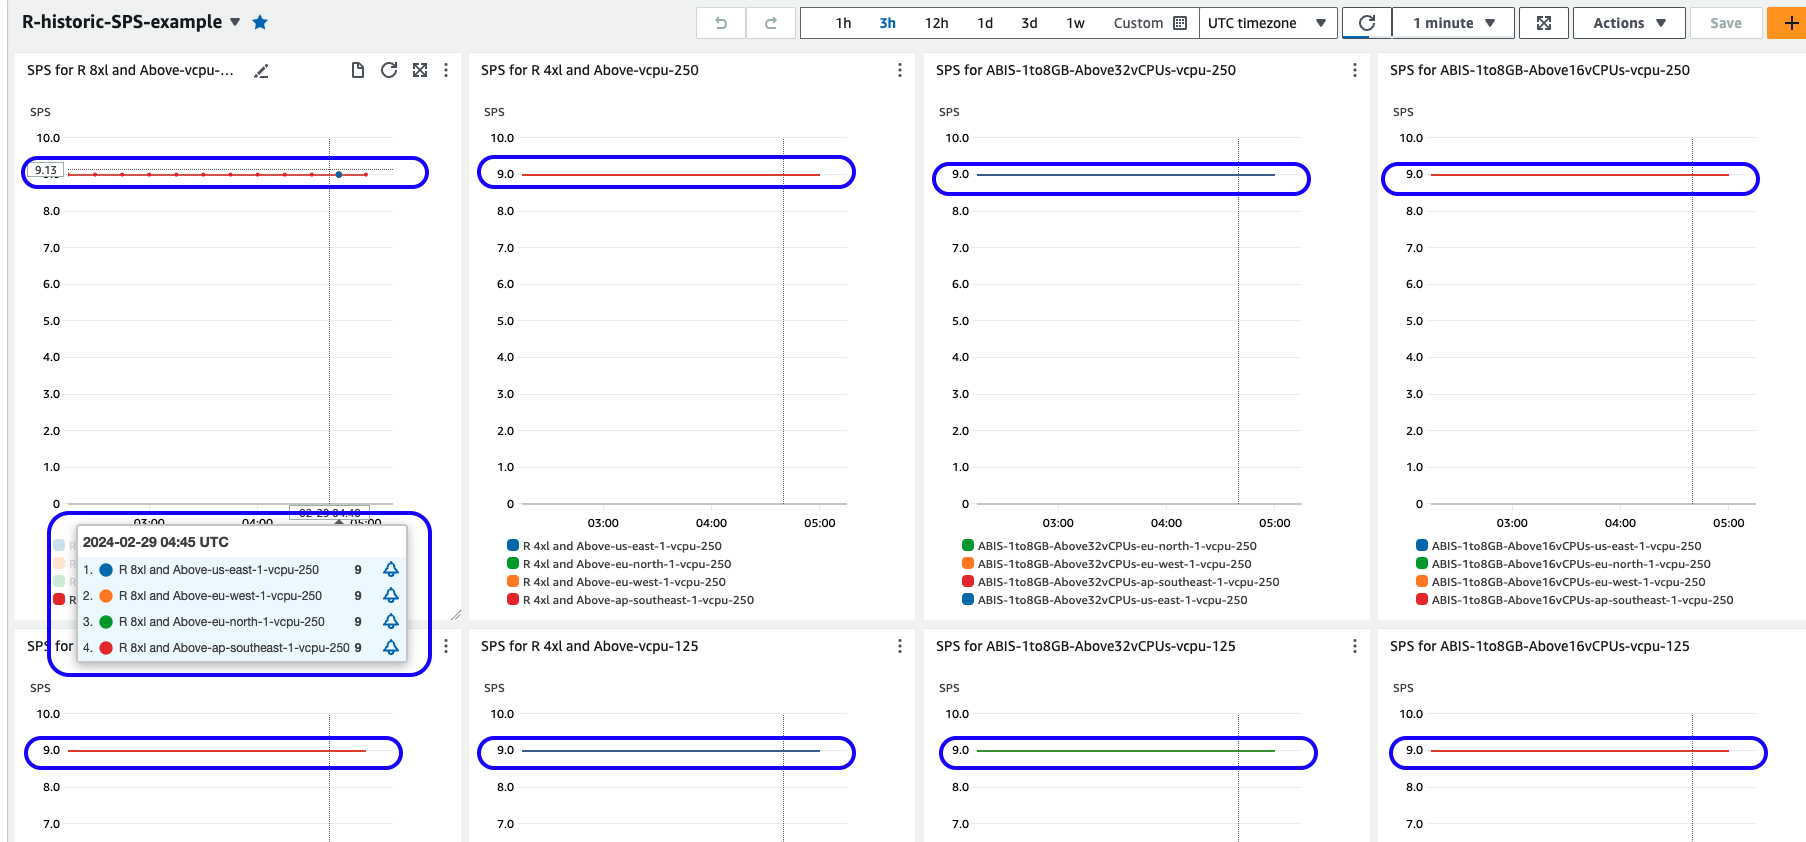
Figure 5. Sample dashboard displaying Spot Placement Score metrics for various AWS Regions
Configuration settings
The SPS dashboard configuration file contains a defined vector of dashboards. For example, the following code snippet shows how to configure two dashboards for respetive workloads. Each dashboard can define DefaultWidgetHeight and DefaultWidgetWidth to set the size of each individual chart. The maximum width of a CloudWatch Grid is 24, so in this example below, we will be creating rows of 2 charts with a height of 12. The Sps section defines a list of Spot Placement Score (SPS) metric configurations to evaluate.
- Dashboard: MySpsDashboard-for-Workload-A
  DefaultWidgetHeight: 12    # Default : 6
  DefaultWidgetWidth: 12     # Default : 6, Grid Maximum Width:24
  Sps:
    ...
- Dashboard: MySpsDashboard-for-Workload-B
  DefaultWidgetHeight: 12    # Default : 6
  DefaultWidgetWidth: 12     # Default : 6, Grid Maximum Width:24
  Sps:
    ...
Now that we know how to create more than one dashboard, let’s check the Sps section. That section defines an array of SPS configurations. Each individual Sps section contains a named SPS query. The request format is the same as the serialized version of the call to the SPS API’s. As a reference, use the Boto3 1.34.68 documentation or the aws-cli for Spot Placement Scores documentation.
Below is an example of a dashboard with a single Spot Placement Score chart. This configuration shows a dashboard for ‘Workload-A’ with 2 charts per row. The first chart has a name Compute Xlarge and uses the schemas defined in the link above to diversify over c5.xlarge and similarly sized instances from the AWS compute instance family. Aside from the key ConfigurationName, the rest of the parameters follow the schemas provided in the links above to target European Regions (eu-west-1, eu-west-2) up to 2000 vCPUs. Note that the configuration below is for a Compute Xlarge instance family; there is a second one for a Compute 2Xlarge instance family.
- Dashboard: MySpsDashboard-for-Workload-A
  DefaultWidgetHeight: 12    # Default : 6
  DefaultWidgetWidth: 12     # Default : 6, Grid Maximum Width:24
  Sps:
  # Second configuration this one for Compute 2xlarge
  - ConfigurationName: Compute Xlarge
    InstanceTypes:
    - c5.xlarge
    - c6i.xlarge
    - c5a.xlarge
    - c5d.xlarge
    ...
    RegionNames:
    - eu-west-1
    - eu-west-2
    ...
    SingleAvailabilityZone: False
    TargetCapacity: 2000
    TargetCapacityUnitType: vcpu

  # Second configuration this one for Compute 2xlarge
  - ConfigurationName: Compute 2Xlarge
    ...
Instead of using InstanceTypes, we recommend using InstanceRequirementsWithMetadata. This maps to requesting diversification using instance attributes rather than AWS instance names. You can read more about Attribute-Based Instance Selection. We strongly recommend that you define your configurations using Attribute-Based-Instance Selection. By following that path, you will have a simple configuration to maximize the diversification and instance types that your workload can use, and that will consider new instances as they are released by AWS.
- Dashboard: MySpsDashboard-for-Workload-A
  DefaultWidgetHeight: 12    # Default : 6
  DefaultWidgetWidth: 12     # Default : 6, Grid Maximum Width:24
  Sps:
  # Second configuration this one for Compute 2xlarge
  - ConfigurationName: Compute Xlarge
    InstanceRequirementsWithMetadata:
      ArchitectureTypes:
      - x86_64
      InstanceRequirements:
        VCpuCount:
          Min: 32
        MemoryMiB:
          Min: 256
        AcceleratorCount:
          Max: 0
        BareMetal: excluded
        BurstablePerformance: excluded
        CpuManufacturers:
        - intel
        - amd
        InstanceGenerations:
        - current
        MemoryGiBPerVCpu:
          Min: 8
        SpotMaxPricePercentageOverLowestPrice: 50

  # Second configuration this one for Compute 2xlarge
  - ConfigurationName: Compute 2Xlarge
    ...
Advanced Configurations
Although the configuration file by default supports definitions of multiple dashboards, in some scenarios you may want to have multiple configuration files or deploy multiple times a CloudFormation stack with a different name and a different configuration.
Creating a stack with a different configuration file
The default configuration file is stored in the **$HOME/environment/guidance-for-ec2-spot-placement-score-tracker-$VERSION/sps_config.yaml**. You can point to any other file by using the context key sps-config when launching CDK commands:
cdk deploy --context "sps-config=./my_sps_dashboard_configuration.yaml"
Creating and deploying multiple stacks in the same AWS account
In some situations, you may want to deploy two different configuration files simultaneously on the same account. You can do that by using the following command:
cdk deploy --context "sps-config=./my_sps_dashboard_configuration.yaml" --context "stack-name=my-sps-demo"
This will create a new stack named my-sps-demo. To destroy or remove the stack, you can use CloudFormation directly.
Dashboard Setup Best Practices
You can use this Guidance and the sample code from Spot Interruption Dashboard to configure right level of observability for your workloads and optimize this solution to fit your use case.
The goal when setting up the Spot Placement Score dashboard is to find actionable configurations that will help to improve the way that your workload provisions Spot capacity at the scale you need. The next steps will guide you through a set of steps to define your dashboard configuration.
Consider using one dashboard per workload. We will focus your attention on the workload and evaluate which other configurations can improve your current configurations.
Understand your workload requirements and find: (a) How many vCPUs will you need? (b) What is the minimum configuration that qualifies for your workload? (c) Whether or not the workload can be deployed across different AZs. (d) Which Regions can your organization use, and which ones are you consider using in the future?
Set the first configuration of the dashboard to be your current workload configuration defined in this step.
Decide which other configurations you’d like to compare to your current one and how that will increase diversification. Select up to the configurations from the ones you think have more chances to increase your access to spare capacity. Three or four should be enough; adding more configurations can make an analysis confusing (and you can try others later).
To consider a new configuration, you can use a mix of these techniques, such as: (a) Use attribute-based instance type selection instead of a list of instances. (b) Use instances of larger sizes, or smaller sizes if appropriate, for your workload. (c) Consider expanding Availability Zones if you have not done it yet (and it is appropriate for your workload).
Consider adding potential Regions where your workload could run in the future. Capacity pools may have seasonality, which you can use to run your flexible workload at a different time, find the next Region to expand on, or find where you’d run your disaster recovery Regional workload copy.
Create the extra configurations in the same dashboard. Make sure the properties for
RegionNames,SingleAvailabilityZone, andTargetCapacitystay the same so you can compare the configurations like for like.Adapt the dashboard
DefaultWidgetWidthto define how many charts or configurations you want per row. For example, if you have four configurations, you can set theDefaultWidgetWidthto six so that each row contains the four configurations side by side, making them easier to compare.With the first row already configured, we will follow the same pattern in the second row. We can make a copy of all the configurations and then change just one dimension. The idea is that we can use the row or column pattern to identify configurations. For example, we could choose the
TargetCapacitydimension, copying all the previous configurations, and then checking what would happen if our workload doubled in size, or if we could reduce in two and run two copies in different Regions.
Uninstall the Guidance
Once you are done with the project, you can destroy the CDK deployment and delete an AWS Cloud9 environment (if it was provisiond to deploy it) by running the following command:
cd $HOME/environment/guidance-for-ec2-spot-placement-score-tracker-$VERSION
cdk destroy
You can also delete all deployed AWS resources by deleting the stack called spot-placement-score-dashboard through CloudFormation.
Related resources
- AWS blog Optimizing Amazon EC2 Spot Instances with Spot Placement Scores on Optimizing EC2 Placement Instances with Spot Placement Scores.
- AWS blog Attribute-Based Instance Type Selection for EC2 Auto Scaling and EC2 Fleet on attribute-based-instance-selection.
- AWS Command Line Interface (CLI) reference for aws-cli for Spot Placement Scores.
Contributors
- Carlos Manzanedo Rueda, WW SA Leader, Flexible Compute
- Steve Cole, Principal SA, Efficient Compute
- Daniel Zilberman, Sr.SA, Technical Solutions
Notices
Customers are responsible for making their own independent assessment of the information in this document. This document: (a) is for informational purposes only, (b) represents AWS current product offerings and practices, which are subject to change without notice, and (c) does not create any commitments or assurances from AWS and its affiliates, suppliers or licensors. AWS products or services are provided “as is” without warranties, representations, or conditions of any kind, whether express or implied. AWS responsibilities and liabilities to its customers are controlled by AWS agreements, and this document is not part of, nor does it modify, any agreement between AWS and its customers.