InsuranceLake Full Deployment Guide
This section provides complete instructions for three deployment environments, and a separate central deployment account for pipelines.
Contents
Architecture
Logistical Requirements
Four AWS accounts for full deployment: One account acts like a central deployment account. The other three accounts are for development, test, and production accounts. To test this solution with a single account refer to the Quickstart guide for detailed instructions.
Branches in your git repository: You need the source code in your own repository and to have at least one branch (for example, a
developbranch) to start using this solution. Test and production branches can be added at the beginning or after the deployment of the data lake infrastructure on the development environment.Administrator privileges: You need administrator privileges to bootstrap your AWS environments and complete the initial deployment. Usually, these steps can be performed by a DevOps administrator of your team. After these steps, you can revoke administrative privileges. Subsequent deployments are based on AWS CDK roles and pipeline self-mutation.
AWS Region selection: For simplicity, we recommend you use the same AWS Region for deployment, development, test, and production accounts. However, this is not a hard requirement.
Self-mutating Pipelines with AWS CDK
The pipeline you have created using the CDK Pipelines module is self-mutating. That means the pipeline itself is infrastructure-as-code and can be changed as part of the deployment. During the build stage the pipeline will determine if its own stack is changed, redeploy the pipeline, and repeat the build stage using the new pipeline definition.
Centralized Deployment
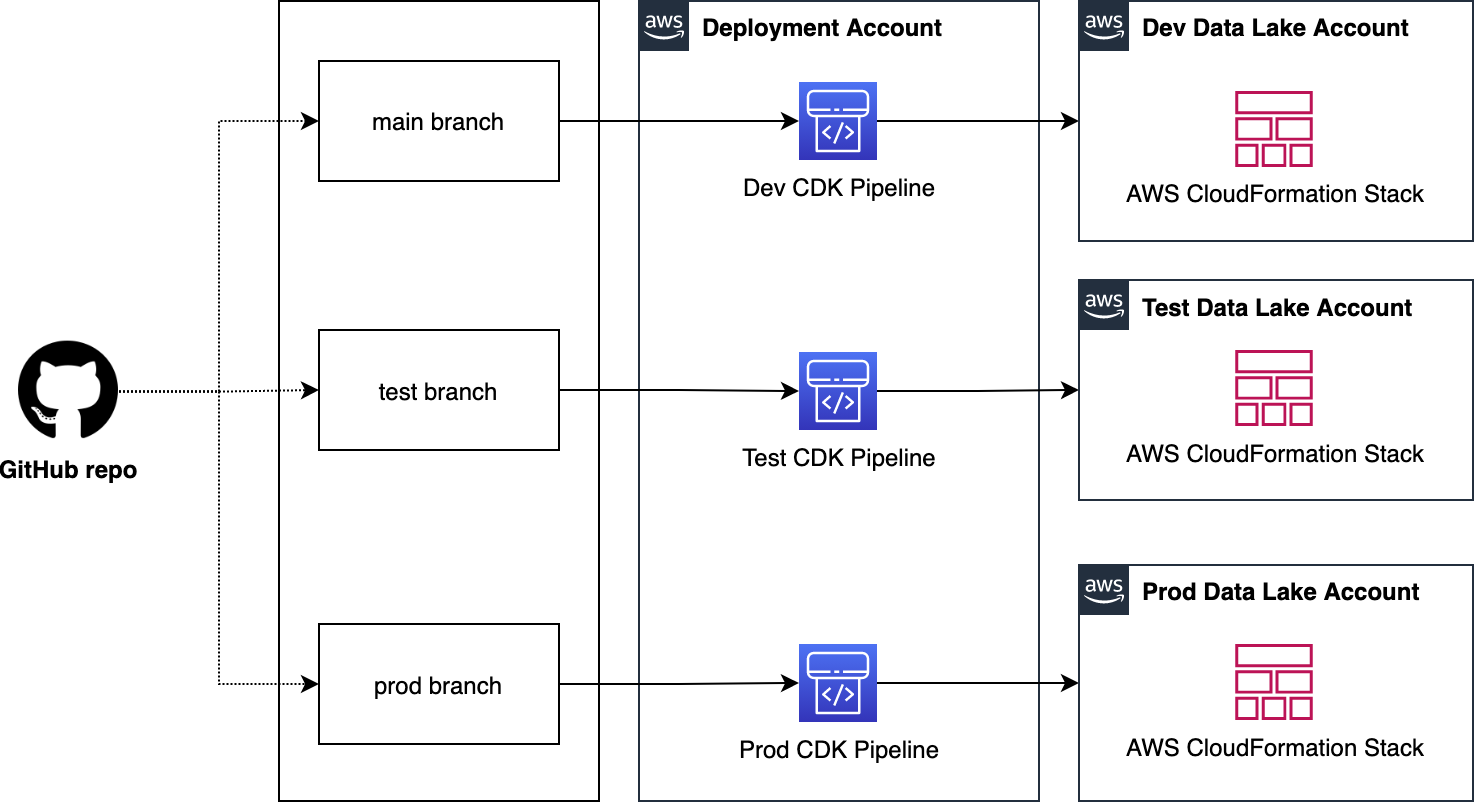
Using AWS CDK Pipelines, you can deploy data lake ETL workloads from a central deployment account to multiple AWS environments such as development, testing, and production. As shown in the figure below, you can organize InsuranceLake ETL source code into three branches: develop, test, and main. The architecture uses a dedicated AWS account to create AWS CDK Pipelines. Each branch is mapped to a pipeline which is mapped to a target environment. This way, code changes made to the branches are deployed iteratively to their respective target environment.
To deploy this solution, you need four AWS accounts as follows:
- Central deployment account to create AWS CDK Pipelines
- Dev account for one or more development data lakes
- Test account for testing or staging the data lake
- Prod account for the production data lake
The figure below represents the centralized deployment model.
Note the following considerations:
- Both source code repositories should be organized into three branches, one for each environment (main branch is often used for production).
- Both branches are mapped to an AWS CDK Pipeline and a target environment. This way, code changes made to the branches are deployed iteratively to their respective target environment.
- Using AWS CDK, you can apply the the following bootstrapping design:
- The central deployment account will utilize a standard bootstrap.
- Each target account will require a cross account trust policy to allow access from the centralized deployment account.
Continuous Delivery of Data Lake Infrastructure using CDK Pipelines
The figure below illustrates the continuous delivery of ETL resources for the data lake.
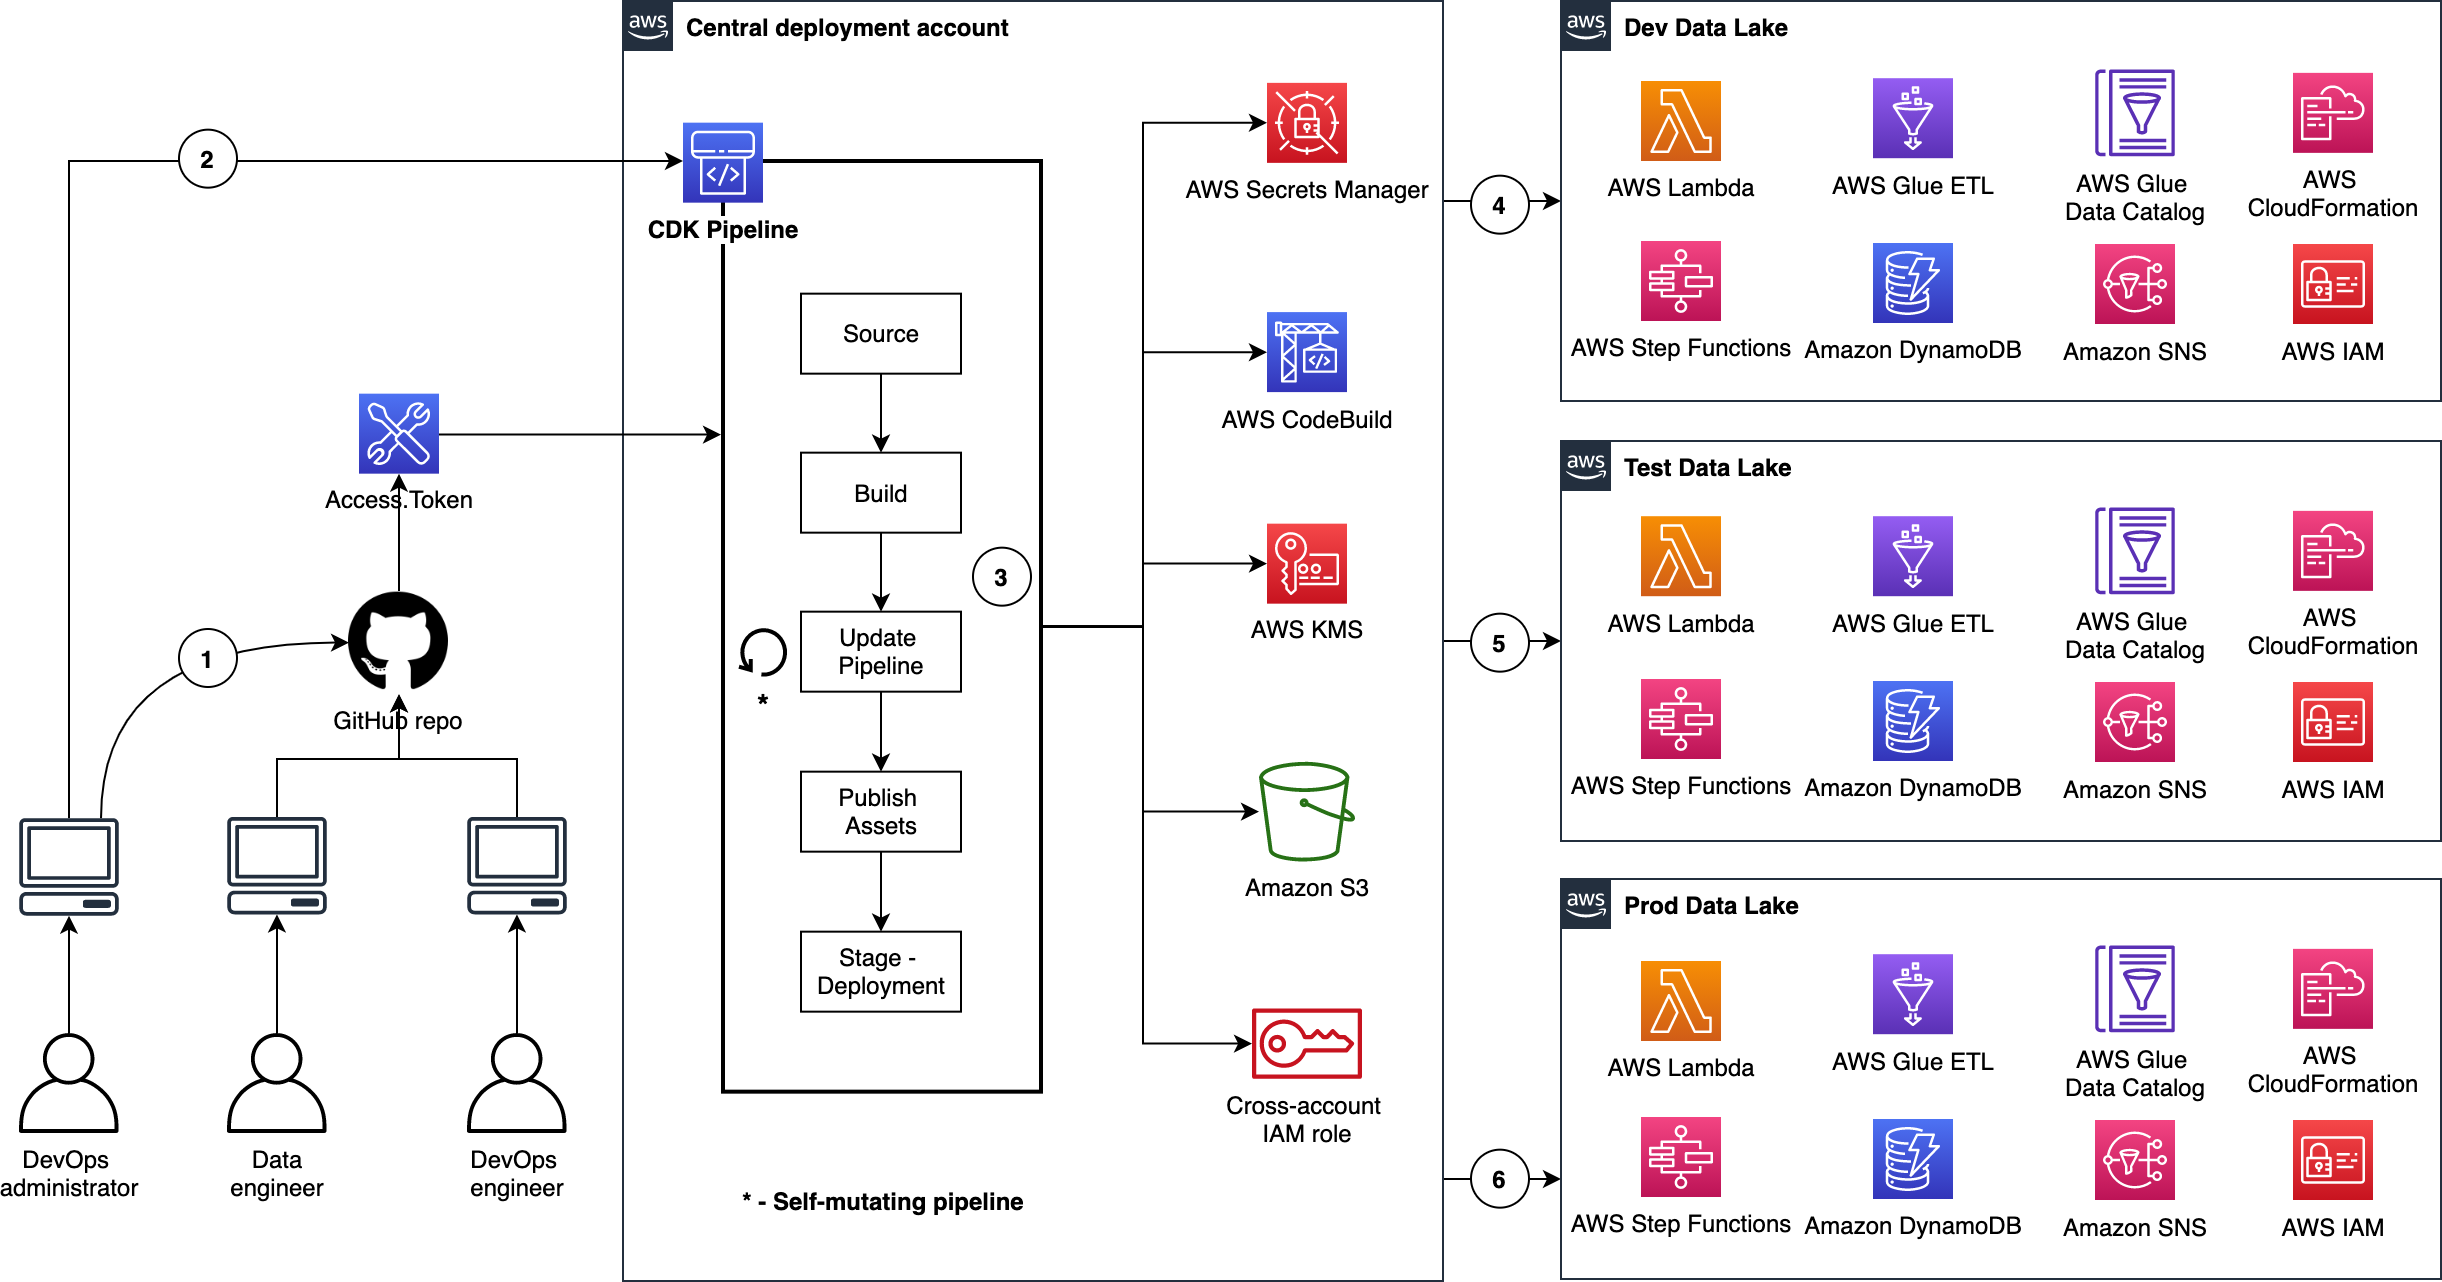
- The DevOps administrator checks in the code to the repository.
- The DevOps administrator (with elevated access) facilitates a one-time manual deployment on a target environment. Elevated access includes administrative privileges on the central deployment account and target AWS environments.
- CodePipeline periodically listens to commit events on the source code repositories. This is the self-mutating nature of CodePipeline. It’s configured to work with and is able to update itself according to the provided definition.
- Code changes made to the
developbranch of the repo are automatically deployed to the dev environment of the data lake. - Code changes to the
testbranch of the repo are automatically deployed to the test environment. - Code changes to the
mainbranch of the repo are automatically deployed to the prod environment.
Deployment
This section provides the details for full deployment.
Software Installation
AWS CLI: Confirm you have AWS CLI configured on your system. If not, refer to Configuring the AWS CLI for more details.
Python: Confirm you have Python installed on your system. Python 3.9 and above is required.
Node.js and AWS CDK: AWS CDK for Python requires Node.js and the Node.js AWS CDK CLI to be installed on your system
Github Fork: We recommend you fork the repository or make your own copy of the repository so you can make commits to the repository, such as configuration changes.
AWS Environment Bootstrapping
Environment bootstrap is a standard AWS CDK process to prepare an AWS environment ready for deployment. Follow these steps:
Open a command line interface (CLI) or terminal.
Go to project root directory where the app.py file exists.
Create a Python virtual environment; this is a one-time activity.
python3 -m venv .venvExpected output: you will see a folder with name
.venvcreated in project root folder. You can run the following command to see its contents:ls -la .venvtotal 8 drwxr-xr-x 6 user_id staff 192 Aug 30 23:21 ./ drwxr-xr-x 33 user_id staff 1056 Sep 14 11:42 ../ drwxr-xr-x 27 user_id staff 864 Sep 8 13:11 bin/ drwxr-xr-x 3 user_id staff 96 Aug 30 23:21 include/ drwxr-xr-x 3 user_id staff 96 Aug 30 23:21 lib/ -rw-r--r-- 1 user_id staff 328 Aug 30 23:21 pyvenv.cfgActivate the Python virtual environment.
source .venv/bin/activateInstall application dependencies.
pip install -r requirements.txtBefore you bootstrap the central deployment account account, set the
AWS_PROFILEenvironment variable.export AWS_PROFILE=replace_it_with_deployment_account_profile_name_before_running- This command is based on configuration and credential profiles for the AWS CLI. Instructions can be found here.
- If you want to use an alternative option, then refer to Configuring the AWS CLI and Environment variables to configure the AWS CLI for details. Be sure to follow those steps for each configuration step moving forward.
Bootstrap the central deployment account.
Your configured environment must target the central deployment account.
Your accounts may have already been bootstrapped for CDK. If so, you do not need to bootstrap them again. Using the CloudFormation console, check if a stack called
CDKToolkitexists. If it does, you can skip this step. Each environment must be checked separately.By default CDK bootstrapping will use the Administrator Access policy attached to the current session’s role. If your organization requires a specific policy for CloudFormation deployment, use the
--cloudformation-execution-policiescommand line option to specify the policies to attach.Run the following command:
./lib/prerequisites/bootstrap_deployment_account.shIf your organization requires specific resource tags, you can pass that tag list on the script command line using
--tags. Multiple tags are passed as follows:./lib/prerequisites/bootstrap_deployment_account.sh --tags 'COSTCENTER'='Analytics' --tags 'AssetID'='555'If your organization requires a permissions boundary attached to all IAM roles, use the following parameter:
./lib/prerequisites/bootstrap_deployment_account.sh --custom-permissions-boundary OrgPermissionBoundaryPolicyProvided permissions boundary will only be applied to the AWS CDK execution role, not the other roles that are created as part of the bootstrap process.
If your organization requires additional customizations to the bootstrap process, you may need to customize and deploy the bootstrap template. For more information, refer to the Customizing bootstrapping section of the AWS CDK documentation.
When you see the following text, enter
y, and press enter.Are you sure you want to bootstrap { "UserId": "user_id", "Account": "deployment_account_id", "Arn": "arn:aws:iam::deployment_account_id:user/user_id" }? (y/n)y- Expected outputs:
- In your terminal, the following will show:
✅ Environment aws://deployment_account_id/us-east-2 bootstrapped.You will see a stack created in your deployment account as follows:

An S3 bucket will be created in the central deployment account. The name will follow the convention:
cdk-hnb659fds-<assets-deployment_account_id>-<region name>.
Before you bootstrap the dev account, set the
AWS_PROFILEenvironment variable.export AWS_PROFILE=replace_it_with_dev_account_profile_name_before_runningBootstrap the dev account.
- Enter the following command:
./lib/prerequisites/bootstrap_target_account.sh <central_deployment_account_id> arn:aws:iam::aws:policy/AdministratorAccess- When you see the following text, enter
y, and press enter.
Are you sure you want to bootstrap { "UserId": "user_id", "Account": "dev_account_id", "Arn": "arn:aws:iam::dev_account_id:user/user_id" } providing a trust relationship to: deployment_account_id using policy arn:aws:iam::aws:policy/AdministratorAccess? (y/n)- In your terminal, the following will show:
✅ Environment aws://dev_account_id/us-east-2 bootstrapped.Before you bootstrap the test account, set the
AWS_PROFILEenvironment variable.export AWS_PROFILE=replace_it_with_test_account_profile_name_before_runningBootstrap the test account.
- Enter the following command:
./lib/prerequisites/bootstrap_target_account.sh <central_deployment_account_id> arn:aws:iam::aws:policy/AdministratorAccess- When you see the following text, enter
y, and press enter.
Are you sure you want to bootstrap { "UserId": "user_id", "Account": "test_account_id", "Arn": "arn:aws:iam::test_account_id:user/user_id" } providing a trust relationship to: deployment_account_id using policy arn:aws:iam::aws:policy/AdministratorAccess? (y/n)- In your terminal, the following will show:
✅ Environment aws://test_account_id/us-east-2 bootstrapped.Before you bootstrap the prod account, set the
AWS_PROFILEenvironment variable.export AWS_PROFILE=replace_it_with_prod_account_profile_name_before_runningBootstrap the prod account.
- Enter the following command:
./lib/prerequisites/bootstrap_target_account.sh <central_deployment_account_id> arn:aws:iam::aws:policy/AdministratorAccess- When you see the following text, enter
y, and press enter.
Are you sure you want to bootstrap { "UserId": "user_id", "Account": "prod_account_id", "Arn": "arn:aws:iam::prod_account_id:user/user_id" } providing a trust relationship to: deployment_account_id using policy arn:aws:iam::aws:policy/AdministratorAccess? (y/n)- In your terminal, the following will show:
✅ Environment aws://prod_account_id/us-east-2 bootstrapped.
Application Configuration
This deployment will depend on both the Infrastructure and ETL repositories associated with the project.
Before you deploy your resources, you must provide the manual variables and upon deployment the AWS CDK Pipelines will programmatically export outputs for managed resources. Follow the below steps to set up your custom configuration:
Open the application file lib/configuration.py and fill in values under the
local_mappingdictionary within the functionget_local_configurationas desired.You should commit these values to your repository.
Example:
 local_mapping = {
     DEPLOYMENT: {
         ACCOUNT_ID: 'add_your_deployment_account_id_here',
         REGION: 'us-east-2',

         # If you use Github, Gitlab, Bitbucket Cloud or any other supported CodeConnections
         # provider, specify the CodeConnections ARN
         CODECONNECTIONS_ARN: '',

         # CodeConections repository owner or workspace name if using CodeConnections
         CODECONNECTIONS_REPOSITORY_OWNER_NAME: '',

         # Leave empty if you do not use CodeConnections
         CODECONNECTIONS_REPOSITORY_NAME: '',

         # Use only if your repository is already in CodecCommit, otherwise leave empty!
         CODECOMMIT_REPOSITORY_NAME: '',

         # Name your CodeCommit mirror repo here (recommend matching your external repo)
         # Leave empty if you use CodeConnections or your repository is in CodeCommit already
         CODECOMMIT_MIRROR_REPOSITORY_NAME: 'aws-insurancelake-infrastructure',

         # This is used in the Logical Id of CloudFormation resources.
         # We recommend Capital case for consistency, e.g. DataLakeCdkBlog
         LOGICAL_ID_PREFIX: 'InsuranceLake',

         # Important: This is used as a prefix for resources that must be **globally** unique!
         # Resource names may only contain alphanumeric characters, hyphens, and cannot contain trailing hyphens.
         # S3 bucket names from this application must be under the 63 character bucket name limit
         RESOURCE_NAME_PREFIX: 'insurancelake',
     },
     DEV: {
         ACCOUNT_ID: 'add_your_dev_account_id_here',
         REGION: 'us-east-2',
         LINEAGE: True,
         # Comment out if you do not need VPC connectivity
         VPC_CIDR: '10.20.0.0/22',
         CODE_BRANCH: 'develop',
     },
     TEST: {
         ACCOUNT_ID: 'add_your_test_account_id_here',
         REGION: 'us-east-2',
         LINEAGE: True,
         # Comment out if you do not need VPC connectivity
         VPC_CIDR: '10.10.0.0/22',
         CODE_BRANCH: 'test',
     },
     PROD: {
         ACCOUNT_ID: 'add_your_production_account_id_here',
         REGION: 'us-east-2',
         LINEAGE: True,
         # Comment out if you do not need VPC connectivity
         VPC_CIDR: '10.0.0.0/22',
         CODE_BRANCH: 'main',
     }
 }
Copy the
configuration.pyfile to the ETL repository.cp lib/configuration.py ../aws-insurancelake-etl/lib/Edit the
configuration.pyin the ETL repository and modify the repository configuration parameters to reference the ETL code repository.We recommend that you keep the logical ID prefix and resource name prefix consistent between repositories.
Open the application file lib/tagging.py and adjust the tag names and values in the
tag_mapdictionary within the functionget_tagas needed by your organization. You can edit the existing tag parameters, or add your own tag parameters.If you added any tag parameters, make sure you add them to the
cdk.Tags.ofcalls in thetagfunction.Example:
 tag_map = {
     COST_CENTER: [
         'MyOrg:cost-center',
         'AnalyticsDepartment',
     ],
     TAG_ENVIRONMENT: [
         f'{resource_name_prefix}:environment',
         target_environment,
     ],
     TEAM: [
         f'{resource_name_prefix}:team',
         f'{logical_id_prefix}Admin',
     ],
     APPLICATION: [
         f'{resource_name_prefix}:application',
         f'{logical_id_prefix}Etl',
     ],
     'ASSETID': [
         'MyOrg:software-asset-id',
         '123456'
     ]
 }
Copy the
tagging.pyfile to the ETL repository.cp lib/tagging.py ../aws-insurancelake-etl/lib/
AWS CodePipeline and Git Integration
Integration between AWS CodePipeline and Github, Gitlab, or Atlassian Bitbucket requires creating an AWS CodeConnections connection. This same configuration can be used for any provider supported by AWS CodeConnections.
In the AWS Console, browse to the CodePipeline service.
Select
Settingsto expand the menu options, and clickConnections.Enter a connection name.
The Bitbucket provider is selected by default. If a different provider is selected, the following steps will vary slightly. Follow the instructions to establish a trust between AWS CodeConnections and your git provider.
Select the orange
Connect to Bitbucketbutton.If you are not already logged into Bitbucket, you will be prompted to log in now.
Select the
Grantaccess button to confirm you want to allow AWS CodeConnections to connect.Select
Install a new app.You will be prompted to install the AWS CodeConnections app for Bitbucket. Ensure the workspace selected contains the InsuranceLake repositories. Select
Grant access.Select the orange
Connectbutton.Copy the ARN displayed under Connection settings to your clipboard.
Paste the ARN in
lib/configuration.pyfor theCODECONNECTIONS_ARNparameter.Enter the workspace name for the
CODECONNECTIONS_REPOSITORY_OWNER_NAMEparameter, and the repository name for theCODECONNECTIONS_REPOSITORY_NAME.Ensure that other configurations variables for CodeCommit are empty strings.
Deploying CDK Stacks
Configure your AWS profile to target the central deployment account as an Administrator; set the
AWS_PROFILEenvironment variable:export AWS_PROFILE=replace_it_with_deployment_account_profile_name_before_runningGo to the infrastructure project root directory where
cdk.jsonandapp.pyexist.Run the command
cdk ls.Check the following CloudFormation stack names listed on your terminal:
Deploy-InsuranceLakeInfrastructureMirrorRepository Dev-InsuranceLakeInfrastructurePipeline Test-InsuranceLakeInfrastructurePipeline Prod-InsuranceLakeInfrastructurePipeline Dev-InsuranceLakeInfrastructurePipeline/Dev/InsuranceLakeInfrastructureS3BucketZones Dev-InsuranceLakeInfrastructurePipeline/Dev/InsuranceLakeInfrastructureVpc Test-InsuranceLakeInfrastructurePipeline/Test/InsuranceLakeInfrastructureS3BucketZones Test-InsuranceLakeInfrastructurePipeline/Test/InsuranceLakeInfrastructureVpc Prod-InsuranceLakeInfrastructurePipeline/Prod/InsuranceLakeInfrastructureS3BucketZones Prod-InsuranceLakeInfrastructurePipeline/Prod/InsuranceLakeInfrastructureVpc- The
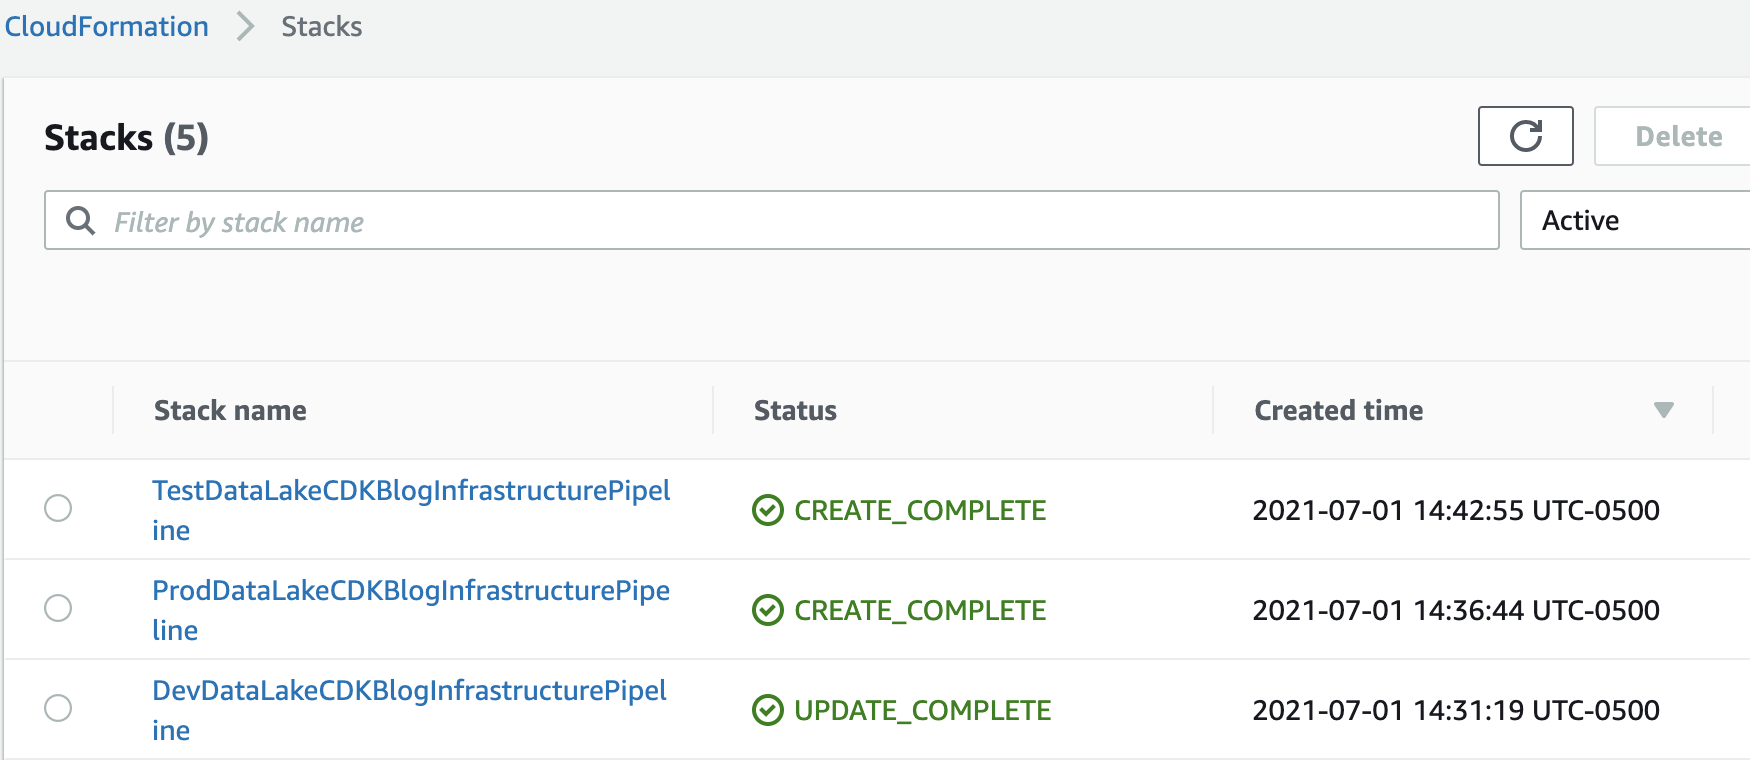
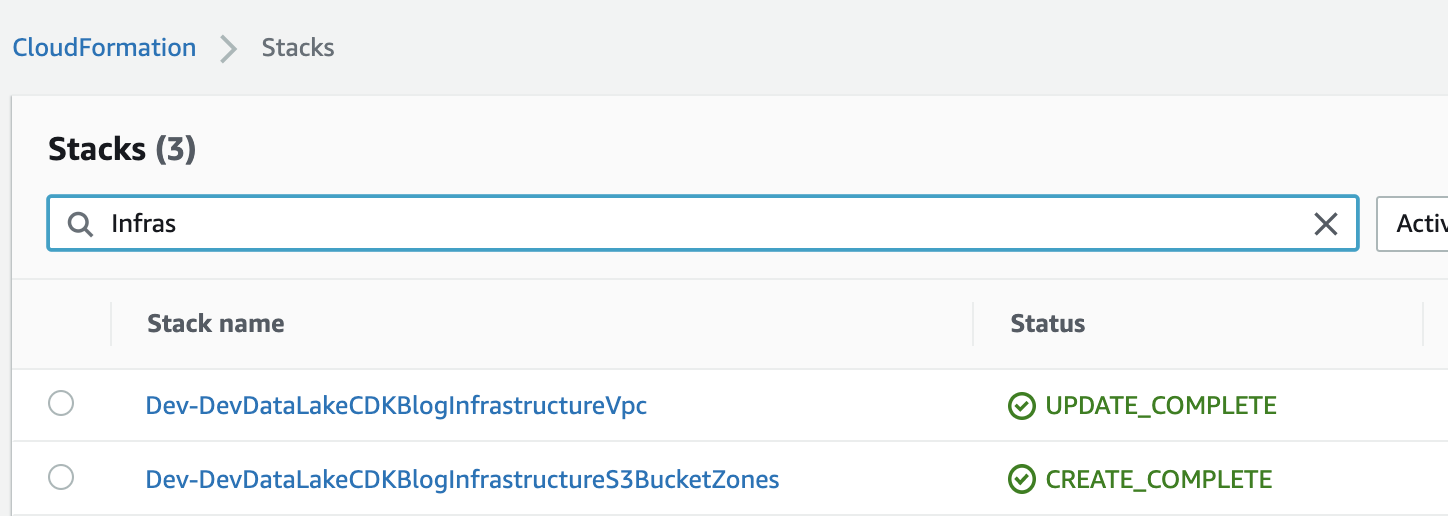
InsuranceLakestring literal is the value ofLOGICAL_ID_PREFIXconfigured in configuration.py. - The first three stacks represent the AWS CDK Pipeline stacks, which will be created in the deployment account. For each target environment, there will be three stacks.
- The
Run the command
cdk deploy --all.This command will only deploy the AWS Codepipelines for each environment, which will in turn, deploy the rest of the data lake stacks in the respective environment accounts. If each pipeline is connected to a populated repository, this deployment will start immediately.
Check the following expected outputs:
In the deployment account’s CloudFormation console, you will see the following CloudFormation stacks created:
In the deployment account’s CodePipeline console, you will see the pipelines triggered.
Wait for the infrastructure resource deployment through CodePipeline to complete, as these are dependencies for the ETL resources:
In the deployment account’s CodePipeline console, you should see the following (development environment shown):

CodePipeline will create the following stacks for each environment (visible from the CloudFormation console):
Go to the ETL project root directory where
cdk.jsonandapp.pyexist.Run the command
cdk ls.Check the following CloudFormation stack names listed on your terminal:
 Deploy-InsuranceLakeEtlMirrorRepository
 Dev-InsuranceLakeEtlPipeline
 Test-InsuranceLakeEtlPipeline
 Prod-InsuranceLakeEtlPipeline
 Dev-InsuranceLakeEtlPipeline/Dev/InsuranceLakeEtlDynamoDb
 Dev-InsuranceLakeEtlPipeline/Dev/InsuranceLakeEtlGlueBuckets
 Dev-InsuranceLakeEtlPipeline/Dev/InsuranceLakeEtlAthenaWorkgroup
 Dev-InsuranceLakeEtlPipeline/Dev/InsuranceLakeEtlDataLakeConsumer
 Dev-InsuranceLakeEtlPipeline/Dev/InsuranceLakeEtlGlueJobs
 Dev-InsuranceLakeEtlPipeline/Dev/InsuranceLakeEtlStepFunctions
 Test-InsuranceLakeEtlPipeline/Test/InsuranceLakeEtlDynamoDb
 Test-InsuranceLakeEtlPipeline/Test/InsuranceLakeEtlGlueBuckets
 Test-InsuranceLakeEtlPipeline/Test/InsuranceLakeEtlAthenaWorkgroup
 Test-InsuranceLakeEtlPipeline/Test/InsuranceLakeEtlDataLakeConsumer
 Test-InsuranceLakeEtlPipeline/Test/InsuranceLakeEtlGlueJobs
 Test-InsuranceLakeEtlPipeline/Test/InsuranceLakeEtlStepFunctions
 Prod-InsuranceLakeEtlPipeline/Prod/InsuranceLakeEtlDynamoDb
 Prod-InsuranceLakeEtlPipeline/Prod/InsuranceLakeEtlGlueBuckets
 Prod-InsuranceLakeEtlPipeline/Prod/InsuranceLakeEtlAthenaWorkgroup
 Prod-InsuranceLakeEtlPipeline/Prod/InsuranceLakeEtlDataLakeConsumer
 Prod-InsuranceLakeEtlPipeline/Prod/InsuranceLakeEtlGlueJobs
 Prod-InsuranceLakeEtlPipeline/Prod/InsuranceLakeEtlStepFunctions
Run the command
cdk deploy --all.Check the following expected outputs:
In the deployment account’s CloudFormation console, you will see the following CloudFormation stacks created:
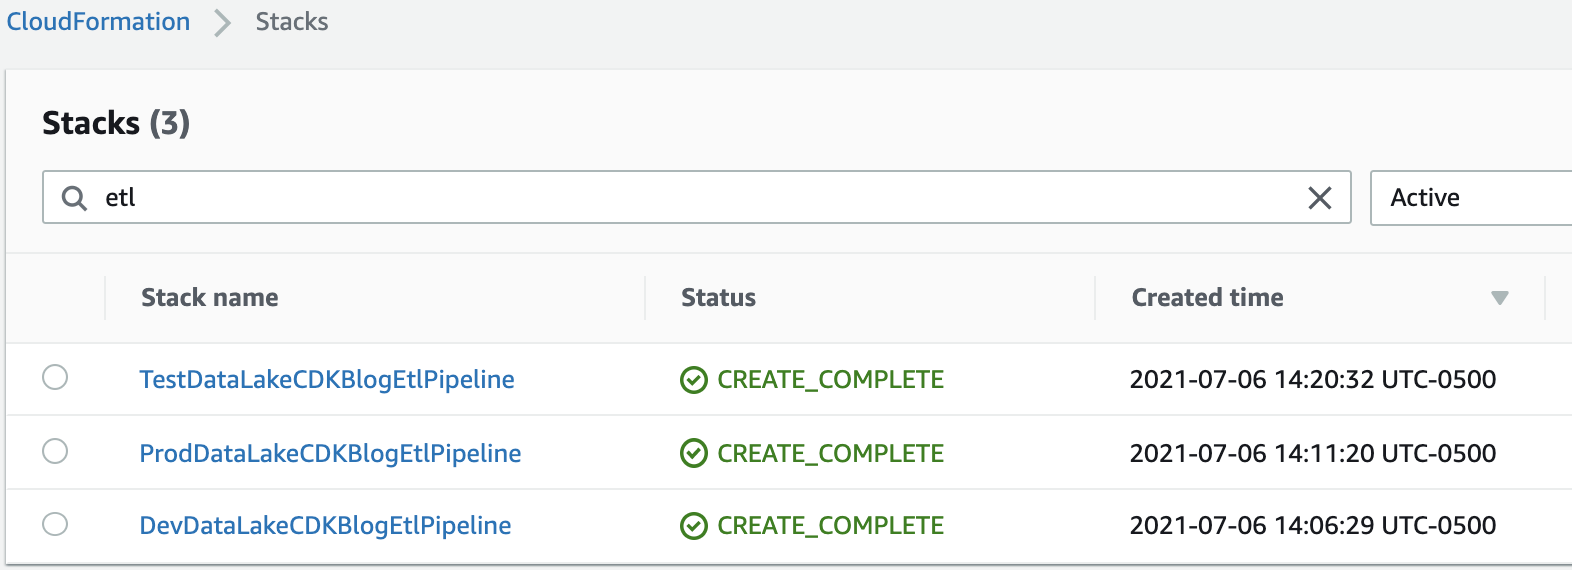
In the deployment account’s CodePipeline console, the following pipelines should be created and triggered:
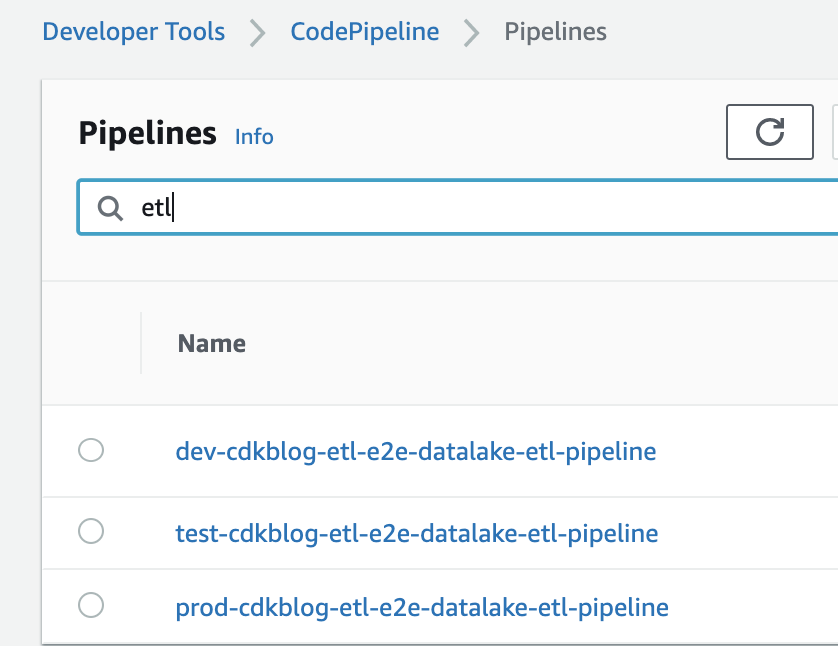
CodePipeline will create the following stacks for each environment (visible from the Cloudformation console):
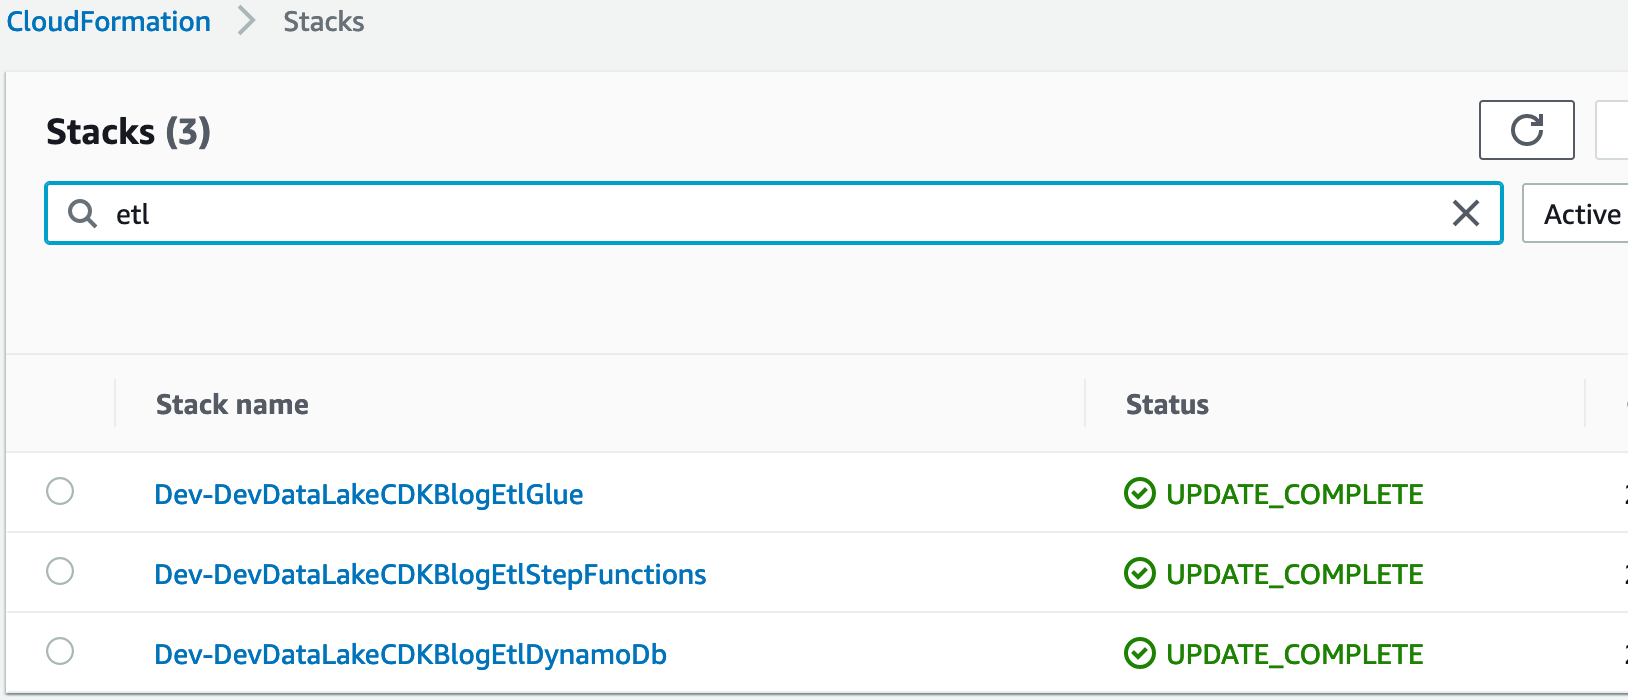
You can now begin using InsuranceLake in three environments and iteratively deploy updates.
To try out the ETL and start loading synthetic insurance data in the dev environment, refer to the Try out the ETL Process section of the Quickstart guide.