Guidance for Multi-Provider Generative AI Gateway on AWS
Summary: This implementation guide provides an overview of Guidance for Multi-Provider Generative AI Gateway on AWS, its reference architecture and components, considerations for planning the deployment, and configuration steps for deploying this guidance to Amazon Web Services (AWS). This guide is intended for Solution architects, Business decision makers, DevOps engineers, Data scientists, and Cloud computing professionals who want to implement Guidance for Multi-Provider Generative AI Gateway on AWS in their environment.
Overview
This implementation guide provides an automated AWS Cloud Development Kit (AWS CDK) and HashiCorp Terraform-based deployment of LiteLLM Proxy Server (LLM Gateway) onto Amazon Elastic Container Service (Amazon ECS) or Amazon Elastic Kubernetes Service (Amazon EKS) container orchestration platforms on AWS. It aims to be pre-configured with defaults that will allow most users to quickly get started with LiteLLM Proxy Server.
It also provides additional features on top of LiteLLM, such as an Amazon Bedrock Interface (instead of the default OpenAI interface), support for Amazon Bedrock Managed Prompts, Chat History, and support for Okta Oauth 2.0 JWT Token Auth.
Features and benefits
This comprehensive gateway serves as a complete enterprise solution for managing and standardizing interactions with various large language models (LLMs), including Amazon Bedrock models. It provides a single API for seamless integration with multiple LLM providers, handling standardized input/output across different models and automatically translating for provider-specific endpoints, including completion, embedding, and image generation, while maintaining consistent response formatting.
The system enables centralized management of LLM usage at user, team, and API key levels, with robust usage tracking and monitoring capabilities. Administrators can configure budgets, set rate limits, restrict model access, and establish custom routing rules and policies. The gateway implements intelligent retry and fallback logic across providers, featuring load balancing between deployments, automatic failover mechanisms, and prompt caching for cost optimization.
Security and compliance features include integration with Amazon Bedrock Guardrails, which extends to all LLM providers, along with secure API key management and comprehensive access controls. The Guidance comes with a web-based administrative interface where managers can oversee user and team settings, while users can generate API keys and test different LLMs through an interactive chat interface.
Cost optimization is achieved through prompt caching mechanisms, usage-based cost allocation, strict budget enforcement, and resource utilization monitoring. The gateway seamlessly integrates with Amazon Bedrock and other AWS services, offering additional optimizations and enhanced compatibility with the AWS ecosystem.
All functionality is accessible through both API endpoints and an intuitive UI, making it a robust solution for organizations seeking to implement and manage LLMs at scale while maintaining control over usage, costs, and security.
Use cases
Multi-provider LLM integration: Seamlessly switch between different LLM providers such as Amazon Bedrock, OpenAI, Azure OpenAI, Cohere, and more, using a single API interface.
Cost management: Track and monitor LLM usage across different models, set related budgets, and implement rate limiting to control spending.
Simplified development: Focus on application logic rather than managing complex API calls to various LLM providers by using a consistent input/output format.
Load balancing: Distribute requests across multiple LLM instances for better performance and redundancy.
Access control and authentication: Manage API keys and restrict access to specific models based on user permissions.
Logging and observability: Monitor LLM calls with detailed logging for troubleshooting and analysis.
Architecture overview
This section provides a reference implementation architecture diagrams for the components deployed with this Guidance.
Architecture Diagram
Below are reference architecture diagrams for LiteLLM and API/middleware containerized application deployed on Amazon ECS or Amazon EKS container orchestrators respectively in addition to their integrations with other AWS services and components interactions.
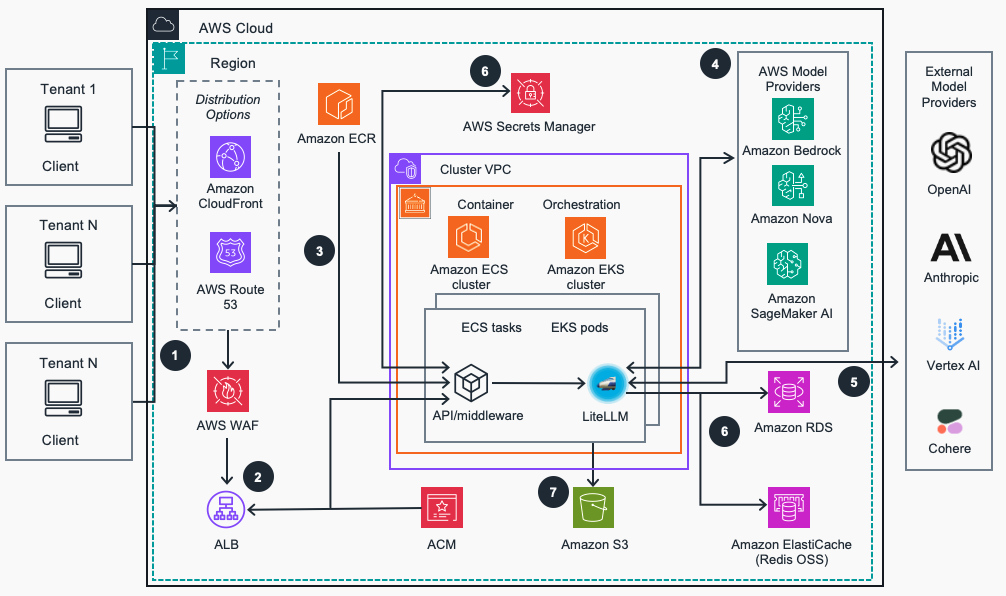
Figure 1: Generative AI gateway reference architecture on Amazon ECS or Amazon EKS for container orchestration
Architecture steps
- Tenants/Client applications access the LiteLLM gateway proxy API through Amazon Route 53 URL endpoint which is protected against common web exploits using AWS Web Application Firewall (WAF).
- AWS WAF forwards requests to an Application Load Balancer (ALB) to automatically distribute incoming application traffic to Amazon Elastic Container Service (ECS) tasks or to Amazon Elastic Kubernetes Service (EKS) pods (depending on selected container orchestration platform) running LiteLLM Generative AI gateway containers. An AWS TLS/SSL secures traffic to the load balancer using a certificate issued by AWS Certificate Manager (ACM).
- Container images for API/middleware and LiteLLM applications are built during guidance deployment and pushed into the the Amazon Elastic Container registry (ECR). They are used for deployment to Amazon ECS Fargate or Amazon EKS clusters that run these applications as containers in ECS tasks or EKS pods, respectively. LiteLLM provides a unified application interface for configuration and interacting with LLM providers. The API/middleware also integrates natively with Amazon Bedrock to enable features not supported by LiteLLM OSS project.
- Models hosted on Amazon Bedrock and Amazon Nova provide model access, guardrails, prompt caching, and routing to enhance the AI gateway and additional controls for clients through a unified API. Model access is also available for models deployed on Amazon SageMaker AI. Access to required Amazon Bedrock models must be properly configured.
- External model providers providers (OpenAI, Anthropic, Vertex AI etc.) are configured using LiteLLM Admin UI to enable additional LLM model access via unified application interface. Pre-existing configurations of third-party providers are integrated into the Gateway using LiteLLM APIs.
- LiteLLM integrates with Amazon ElastiCache (Redis OSS), Amazon Relational Database Service (RDS), and AWS Secrets Manager services. Amazon ElastiCache enables multi-tenant distribution of application settings and prompt caching. Amazon RDS enables persistence of virtual API keys and other configuration settings provided by LiteLLM. AWS Secrets Manager stores external model provider credentials and other sensitive settings securely.
- LiteLLM and the API/middleware store application logs in the dedicated Amazon S3 storage bucket for troubleshooting and access analysis.
Serving Architecture

Figure 2: LiteLLM Proxy Serving Architecture
AWS Services in this Guidance
| AWS Service | Role | Description |
|---|---|---|
| Amazon Bedrock | Core service | Manages Single API access to multiple Foundational Models |
| Amazon ECS | Core service | Manages application platform and on-demand infrastructure for LiteLLM container orchestration. |
| Amazon EKS | Core service | Manages Kubernetes control plane and compute nodes for LiteLLM container orchestration. |
| Amazon Elastic Compute Cloud (Amazon EC2) | Core service | Provides compute instances for Amazon EKS compute nodes and runs containerized applications. |
| Amazon Virtual Private Cloud (Amazon VPC) | Core Service | Creates an isolated network environment with public and private subnets across multiple Availability Zones. |
| AWS WAF | Core Service | Protect guidance applications from common exploits |
| Amazon Elastic Container Registry (Amazon ECR) | Supporting service | Stores and manages Docker container images for Amazon EKS deployments. |
| Amazon CloudFront | Supporting service | Global content delivery network that provides edge caching, enhanced security with AWS Shield Standard, and improved global performance for the Generative AI Gateway. |
| Application Load Balancer (ALB) | Supporting service | Distributes incoming traffic across multiple targets in the Amazon EKS cluster. |
| Amazon Simple Storage Service (Amazon S3) | Supporting service | Provides persistent object storage for applications logs and other related data. |
| Amazon Relational Database Service (Amazon RDS) | Supporting service | Enables persistence of virtual API keys and other configuration settings provided by LiteLLM. |
| Amazon ElastiCache Service (Redis OSS) | Supporting service | Enables multi-tenant distribution of application settings and prompt caching. |
| Amazon Route 53 | Supporting Service | Routes users to the Guidance application through DNS records. |
| AWS Identity and Access Management (IAM) | Supporting service | Manages access to AWS services and resources securely, including Amazon ECS or Amazon EKS cluster access. |
| AWS Certificate Manager (ACM) | Security service | Manages SSL/TLS certificates for secure communication within the cluster. |
| Amazon CloudWatch | Monitoring service | Collects and tracks metrics, logs, and events from Amazon EKS and other AWS resources provisioned in the Guidance. |
| AWS Secrets Manager | Management service | Manager stores external model provider credentials and other sensitive settings securely. |
| AWS Key Management Service (AWS KMS) | Security service | Manages encryption keys for securing data in Amazon EKS and other AWS services. |
For any Guidance deployment, either Amazon ECS or Amazon EKS can be used, but not both.
Plan your deployment
Distribution Options
Starting with version 1.1.0, this Guidance supports multiple deployment configurations to meet various security and accessibility requirements. You can customize how your LiteLLM gateway is accessed based on your specific needs.
Deployment Scenarios
Scenario 1: Default - Public with CloudFront (Recommended)
USE_CLOUDFRONT="true"
USE_ROUTE53="false"
PUBLIC_LOAD_BALANCER="true"
Why choose this scenario:
- Global performance with low-latency access via CloudFront’s edge locations
- Enhanced security with AWS Shield Standard DDoS protection
- Simplified HTTPS management with CloudFront’s default certificate
- Best option for public-facing AI services with global user base
Security:
- CloudFront IP filtering restricts ALB access to only CloudFront traffic
- WAF can be applied at the CloudFront level (requires global WAF)
- Simpler certificate management using CloudFront’s default certificate
Access URL: https://d1234abcdef.cloudfront.net
Scenario 2: Custom Domain with CloudFront
USE_CLOUDFRONT="true"
USE_ROUTE53="true"
PUBLIC_LOAD_BALANCER="true"
HOSTED_ZONE_NAME="example.com"
RECORD_NAME="genai"
CERTIFICATE_ARN="arn:aws:acm:region:account:certificate/certificate-id"
Why choose this scenario:
- Brand consistency with your custom domain
- Professional appearance and SEO benefits
- Same global performance and security as Scenario 1
Additional requirements:
- Route53 hosted zone for your domain
- ACM certificate for your domain (must be in us-east-1 for CloudFront)
Access URL: https://genai.example.com
Scenario 3: Direct ALB Access (No CloudFront)
USE_CLOUDFRONT="false"
USE_ROUTE53="true"
PUBLIC_LOAD_BALANCER="true"
HOSTED_ZONE_NAME="example.com"
RECORD_NAME="genai"
CERTIFICATE_ARN="arn:aws:acm:region:account:certificate/certificate-id"
Why choose this scenario:
- Lower latency for single-region deployments
- Simplified architecture without CloudFront
- Regional WAF can be directly applied to the ALB
- Cost savings by eliminating CloudFront distribution
Security considerations:
- No CloudFront layer means direct internet exposure of ALB
- WAF protection becomes particularly important
- ALB security group allows traffic from all IPs (0.0.0.0/0)
Access URL: https://genai.example.com (points directly to ALB)
Scenario 4: Private VPC Only
USE_CLOUDFRONT="false"
USE_ROUTE53="true"
PUBLIC_LOAD_BALANCER="false"
HOSTED_ZONE_NAME="example.internal"  # Often a private .internal domain
RECORD_NAME="genai"
CERTIFICATE_ARN="arn:aws:acm:region:account:certificate/certificate-id"
Why choose this scenario:
- Maximum security for internal enterprise applications
- Complete isolation from public internet
- Suitable for processing sensitive or proprietary data
Access methods:
- VPN connection to the VPC
- AWS Direct Connect
- VPC peering with corporate network
- Transit Gateway
Security considerations:
- No public internet access possible
- ALB security group only allows traffic from private subnet CIDRs
- Requires network connectivity to the VPC for access
Access URL: https://genai.example.internal (resolves only within VPC or connected networks)
Configuration Parameters
| Parameter | Default | Description |
|---|---|---|
USE_CLOUDFRONT | true | Enables CloudFront distribution for global delivery |
USE_ROUTE53 | false | Enables Route53 for custom domain support |
PUBLIC_LOAD_BALANCER | true | Deploys ALB in public subnets |
CLOUDFRONT_PRICE_CLASS | PriceClass_100 | CloudFront price class (100/200/All) |
HOSTED_ZONE_NAME | "" | Route53 hosted zone name for custom domain |
RECORD_NAME | "" | Record to create in Route53 (subdomain) |
CERTIFICATE_ARN | "" | ARN of ACM certificate for custom domain |
CloudFront Security
When using CloudFront, a custom security mechanism is implemented:
- CloudFront adds a secret header (
X-CloudFront-Secret) to all requests sent to the ALB - The ALB has listener rules that verify this header before allowing access
- Health check paths are specifically exempted to allow CloudFront origin health checks
- The secret is stable across deployments (won’t change unless explicitly changed)
This provides a robust defense against direct ALB access even if someone discovers your ALB’s domain name.
Prerequisites
Cost
Cost Considerations
When implementing this solution on AWS, it’s important to understand the various factors that contribute to the overall cost. This section outlines the primary cost components and key factors that influence pricing.
Cost Components
The total cost of running this solution can be broadly categorized into two main components:
LLM Provider Costs: These are the charges incurred for using services from LLM providers such as Amazon Bedrock, Amazon SageMaker, Anthropic, and others. Each provider has its own pricing model, typically based on factors like the number of tokens processed, model complexity, and usage volume.
AWS Infrastructure Costs: These are the costs associated with running the Generative AI Gateway proxy server on AWS infrastructure. This includes various AWS services and resources used to host and operate the solution.
Key Factors Influencing AWS Infrastructure Costs
While the default configuration provides a starting point, the actual cost of running the LiteLLM-based proxy server on AWS can vary significantly based on your specific implementation and usage patterns. Some of the major factors that can impact scaling and cost include:
Compute instances: The type and number of EC2 instances used to host the LiteLLM container as a proxy. Instance type selection affects both performance and cost.
Amazon EBS storage: The type and size of EBS volumes attached to the EC2 instances can influence both performance and cost.
Autoscaling configuration: The autoscaling policies configured for Amazon EKS and Amazon ECS clusters will affect how the solution scales in response to demand, impacting both performance and cost.
Traffic patterns: The shape and distribution of LLM requests, including factors such as:
- Request/response payload sizes
- Tokens per minute (TPM)
- Requests per minute (RPM)
- Concurrency levels
- Model latency (from downstream LLM providers)
- Network latency between AWS and LLM providers
Caching configuration: Effective caching can reduce the number of requests to LLM providers, potentially lowering costs but requiring additional resources.
Database storage: The amount of storage required for managing virtual keys, organizations, teams, users, budgets, and per-request usage tracking.
High availability and resiliency: Configurations for load balancing, routing, and retries can impact both reliability and cost.
Logging level: The configured logging level affects storage and potentially network egress costs.
Networking costs: This includes data transfer charges and the cost of running NAT gateways for outgoing calls to LLM providers.
It’s important to note that this is not an exhaustive list of cost factors, but rather highlights some of the major contributors to the overall cost of the solution.
Customer Responsibility
While this implementation guide provides default configurations, customers are responsible for:
- Configuring the solution to their optimal settings based on their specific use case and requirements.
- Monitoring and managing the costs incurred from running the proxy server on AWS infrastructure.
- Managing and optimizing the costs associated with their chosen LLM providers.
Customers should regularly review their AWS service usage patterns, adjust configurations as needed, and leverage AWS cost management tools to optimize their spending.
We recommend creating a budget through AWS Cost Explorer to help manage costs. Prices are subject to change and also depend on model provider usage patterns/volume of data. For full details, refer to the pricing webpage for each AWS service used in this guidance.
Sample cost table
The following tables provide a sample cost breakdown for deploying this guidance on Amazon ECS and Amazon EKS with the default parameters in the us-east-1 (N. Virginia) Region for one month. These estimates are based on the AWS Pricing Calculator outputs for the full deployments as per guidance and are subject to changes in underlying services configuration.
Note: If you enable CloudFront distribution (default in Scenarios 1 and 2), additional costs will apply:
| AWS service | Dimensions | Cost, month [USD] |
|---|---|---|
| Amazon CloudFront | 1 Distribution, 1 TB data transfer, 10 million HTTP/HTTPS requests, Price Class 100 | ~$85.00 |
For ECS container orchestration platform:
| AWS service | Dimensions | Cost, month [USD] |
|---|---|---|
| Amazon ECS | OS: Linux, CPU Architecture: ARM, 24 hours, 2 tasks per day, 4 GB Memory, 20 GB ephemeral storage | 115.33 |
| Amazon VPC | 1 VPC, 4 subnets, 1 NAT Gateway, 1 public IPv4, 100 GB outbound data per month | 50.00 |
| Amazon ECR | 5 GB image storage/month | 0.50 |
| ALB | 1 ALB, 1 TB/month | 24.62 |
| Amazon S3 | 100 GB/month | 7.37 |
| Amazon RDS | 2 db.t3.micro nodes, 100% utilization, multi-AZ, 2 vCPU,1 GiB Memory | 98.26 |
| Amazon ElastiCache Service (Redis OSS) | 2 cache.t3.micro nodes, 2 vCPU, 0.5 GiB Memory, Up to 5 GB Network performance, 100% utilization | 24.82 |
| Amazon Route 53 | 1 hosted zone, 1 million standard queries/month | 26.60 |
| Amazon CloudWatch | 25 metrics to preserve | 12.60 |
| AWS Secrets Manager | 5 secrets, 30 days, 1 million API calls per month | 7.00 |
| AWS KMS | 1 key, 1 million symmetric requests | 4.00 |
| AWS WAF | 1 web ACL, 2 rules | 7.00 |
| ACM | 1 Certificate | free |
| TOTAL | $378.10/month |
For detailed cost estimates for Amazon ECS, we recommended creating an AWS Pricing Calculator such as this:
For EKS container orchestration platform:
| AWS service | Dimensions | Cost, month [USD] |
|---|---|---|
| Amazon EKS | 1 control plane | 73.00 |
| Amazon EC2 | EKS Compute Nodes, 2 nodes t4g.medium | 49.06 |
| Amazon VPC | 1 VPC, 4 subnets, 1 NAT Gateway, 1 public IPv4, 100 GB outbound data per month | 50.00 |
| Amazon ECR | 5 GB image storage/month | 0.50 |
| ALB | 1 ALB, 1 TB/month | 24.62 |
| Amazon S3 | 100 GB/month | 7.37 |
| Amazon RDS | 2 db.t3.micro nodes, 100% utilization, multi-AZ, 2 vCPU,1 GiB Memory | 98.26 |
| Amazon ElastiCache Service (Redis OSS) | 2 cache.t3.micro nodes, 2 vCPU, 0.5 GiB Memory, Up to 5 GB Network performance, 100% utilization | 24.82 |
| Amazon Route 53 | 1 hosted zone, 1 million standard queries/month | 26.60 |
| Amazon CloudWatch | 25 metrics to preserve | 12.60 |
| AWS Secrets Manager | 5 secrets, 30 days, 1 million API calls per month | 7.00 |
| AWS KMS | 1 key, 1 million symmetric requests | 4.00 |
| AWS WAF | 1 web ACL, 2 rules | 7.00 |
| ACM | 1 Certificate | free |
| TOTAL | $384.83/month |
For detailed cost estimates for EKS platform, it is recommended to create an AWS Price calculator such as the following:
Security
When you build systems on AWS infrastructure, security responsibilities are shared between you and AWS. This shared responsibility model reduces your operational burden because AWS operates, manages, and controls the components including the host operating system, the virtualization layer, and the physical security of the facilities in which the services operate. For more information about AWS security, visit AWS Cloud Security.
This Guidance implements several security best practices and AWS services to enhance the security posture of your Amazon ECS or Amazon EKS clusters. Here are the key security components and considerations:
Identity and Access Management (IAM)
- IAM roles: The architecture deploys dedicated IAM roles (
litellm-stack-developers,litellm-stack-operators) to manage access to Amazon ECS or Amazon EKS cluster resources. This follows the principle of least privilege, ensuring users and services have only the permissions necessary to perform their tasks. - Amazon EKS-managed node groups: These groups use created IAM roles (
litellm-stack-eks-nodegroup-role) with specific permissions required for nodes to join the cluster and for pods to access AWS services.
Network Security
- Amazon VPC: Amazon ECS or Amazon EKS clusters are deployed within a VPC (newly created or custom specified in guidance deployment configuration) with public and private subnets across multiple Availability Zones, providing network isolation.
- Security groups: Security groups are typically used to control inbound and outbound traffic to EC2 instances and other resources within the VPC.
- NAT gateways: Deployed in public subnets to allow outbound internet access for resources in private subnets while preventing inbound access from the internet.
- CloudFront Security (when enabled): CloudFront provides enhanced security through:
- AWS Shield Standard DDoS protection at no additional cost
- Edge location traffic filtering
- TLS termination at edge locations
- Custom header authentication between CloudFront and ALB
- Reduced direct exposure of your origin infrastructure
Data Protection
- Amazon EBS encryption: EBS volumes used by EC2 instances for EKS compute nodes are typically encrypted to protect data at rest.
- AWS KMS: Used for managing encryption keys for various services, including EBS volume encryption.
- AWS Secrets Manager: Used for stores external model providers credentials and other sensitive settings securely.
Kubernetes-Specific Security
- Kubernetes RBAC: Role-based access control (RBAC) is implemented within the Amazon EKS cluster to manage fine-grained access to Kubernetes resources.
- ACM: Integrated to manage SSL/TLS certificates for secure communication within the clusters.
- AWS Identity and Access Manager: Used for role/policy-based access to AWS services and resources, including Amazon ECS or Amazon EKS cluster resource access.
Monitoring and Logging
- Amazon CloudWatch: Used for monitoring and logging of AWS resources and applications running on the Amazon EKS cluster.
Container Security
- Amazon ECR: Stores container images in a secure, encrypted repository. It includes vulnerability scanning to identify security issues in your container images.
Secrets Management
- AWS Secrets Manager: Secrets Manager stores external model provider credentials and other sensitive settings securely.
Additional Security Considerations
- Regularly update and patch Amazon ECS or Amazon EKS clusters, compute nodes, and container images.
- Implement network policies to control pod-to-pod communication within the cluster.
- Use pod security policies or pod security standards to enforce security best practices for pods.
- Implement proper logging and auditing mechanisms for both AWS and Kubernetes resources.
- Regularly review and rotate IAM and Kubernetes RBAC permissions.
Supported AWS Regions
As of March 2025, Guidance for Multi-Provider Generative AI Gateway on AWS is supported in the following AWS Regions:
| Region Name | Region Code |
|---|---|
| US East (Ohio) | us-east-1 |
| US East (N. Virginia) | us-east-2 |
| US West (Northern California) | us-west-1 |
| US West (Oregon) | us-west-2 |
| Europe (Paris) | eu-west-3 |
| Canada (Central) | ca-central-1 |
| South America (São Paulo) | sa-east-1 |
| Europe (Frankfurt) | eu-central-1 |
| Europe (Ireland) | eu-west-1 |
| Europe (London) | eu-west-2 |
| Europe (Paris) | eu-west-3 |
| Europe (Stockholm) | eu-north-1 |
| Europe (Milan) | eu-south-1 |
| Europe (Spain) | eu-south-2 |
| Europe (Zurich) | eu-central-2 |
Quotas
Service quotas, also referred to as limits, are the maximum number of service resources or operations for your AWS account.
Quotas for AWS services in this Guidance
Make sure you have sufficient quota for each of the services implemented in this guidance. For more information, see AWS service quotas.
To view the service quotas for all AWS services in the documentation without switching pages, view the information in the Service endpoints and quotas page in the PDF instead.
Deploy the Guidance
Prerequisite CLI tools
- Install Docker CLI
- Install AWS CLI
- Install terraform CLI
- Install yq utility (install with
brewif on Mac usingbrew install yq, or download binaries if on other Linux (see details here) If you have
DEPLOYMENT_PLATFORMparameter set toEKSin the.envfile for Amazon EKS as container orchestration platform:Install kubectl CLI utility
Environment tested and confirmed:
- Docker: version 27.3.1
- AWS CLI: version 2.19.5
- yq: version 4.40.5
- Terraform: v1.5.7
- kubectl Client Version: v1.32.1
- kubectl Kustomize Version: v5.5.0
Deployment process overview
Before you launch the Guidance, review the cost, architecture, security, and other considerations discussed in this document. Follow the step-by-step instructions in this section to configure and deploy the guidance into your account.
Time to deploy: Approximately 35-40 minutes
Create a Domain and Certificate (For Scenarios 2, 3, and 4 Only)
Note: This step is only necessary if you’re using a custom domain with Route53 (Scenarios 2, 3, or 4). If you’re using the default CloudFront option with its auto-generated domain (Scenario 1), you can skip this entire section.
- Verify that a HostedZone has been created in
Route53→Hosted zonesservice area:
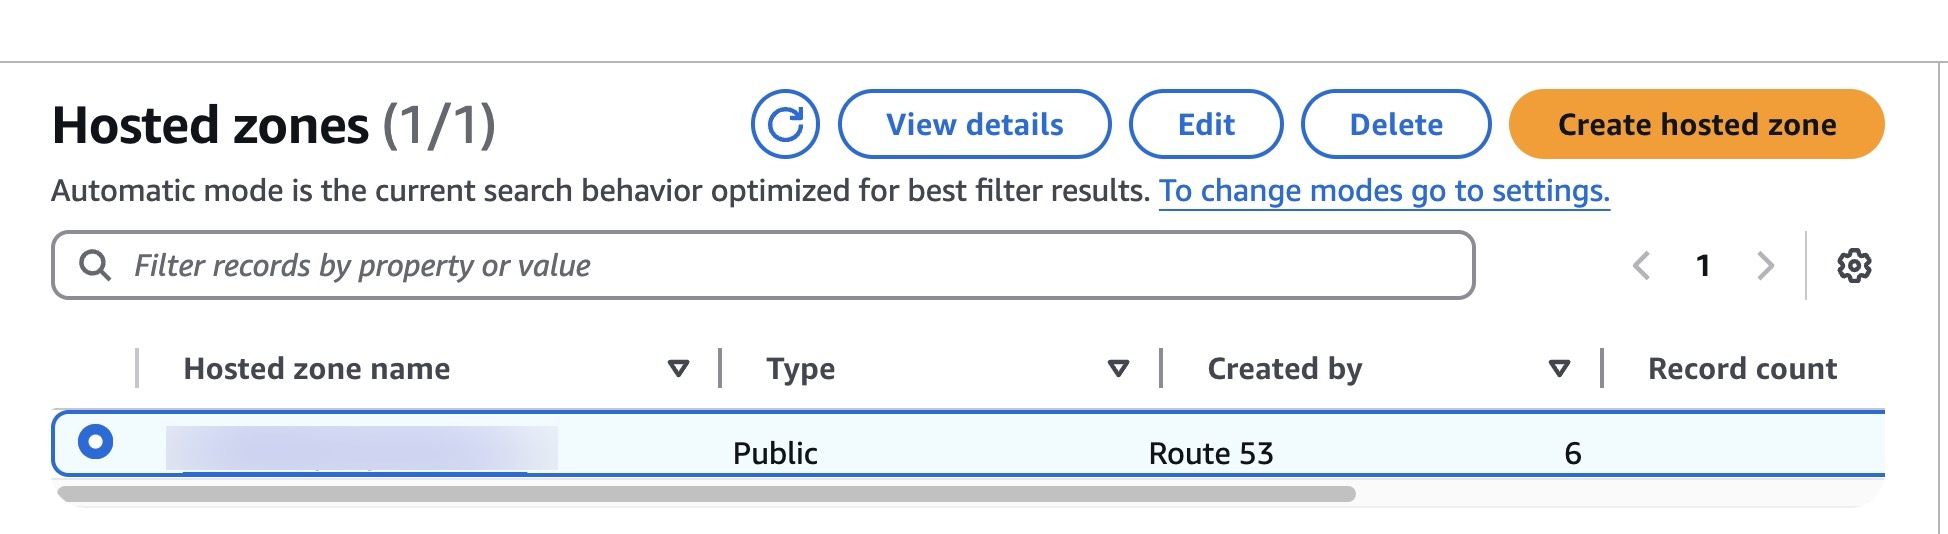
Figure 3: AWS Route 53 Hosted Zone entry
If you need to create a new certificate, complete the following steps to create an verify a certificate using the domain you just created:
- Go to
Certificate Manager (ACM) -> Request a certificate - Select “Request a public certificate”
- In
Fully qualified domain name, put in the domain you registered in Route53 above (for example,<username>.people.<company>.com) - [Optional] Click
Add another name to this Certificateand add a sub domain (for example,dashboard.<username>.people.<company>.com) - Select
Request
- Go to
Otherwise, you may import an existing certificate by using Certificate Manager (ACM) -> Import a certificate option:
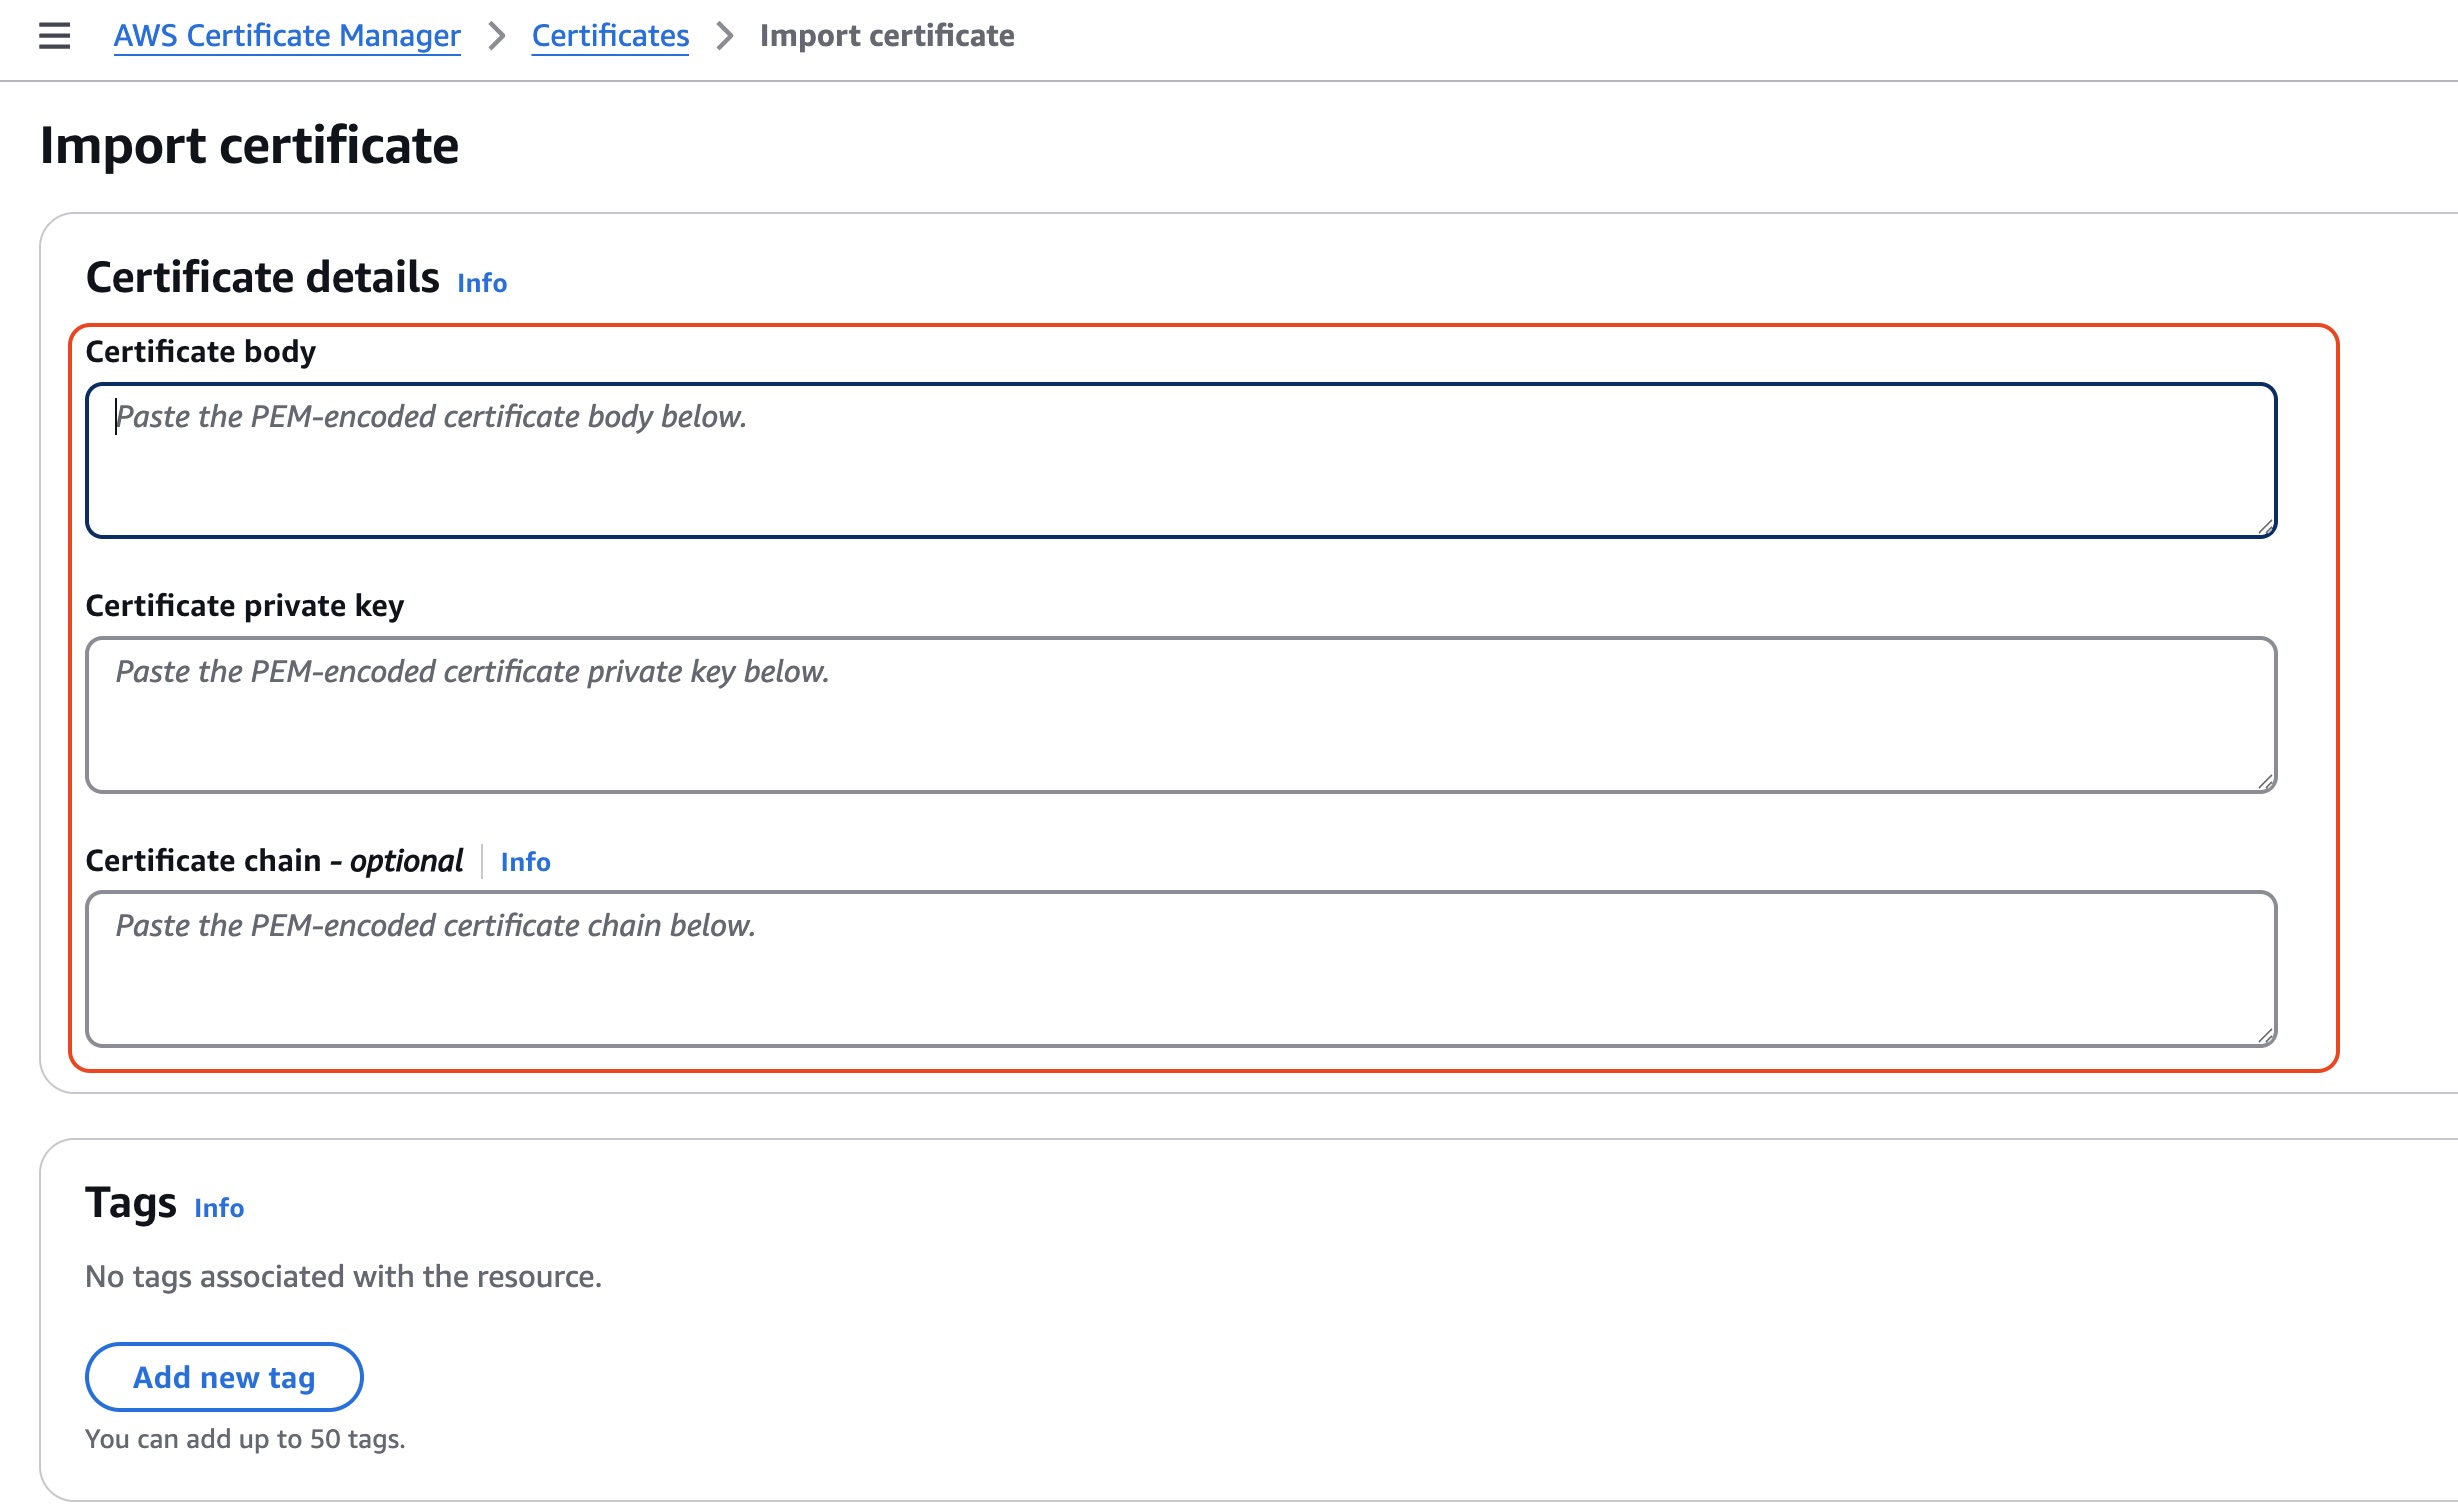
Figure 4: AWS Route 53 Import Certificate
- Go to your created/imported certificate in
AWS Certificate Manager -> Certificates, and selectCreate records in Route 53:
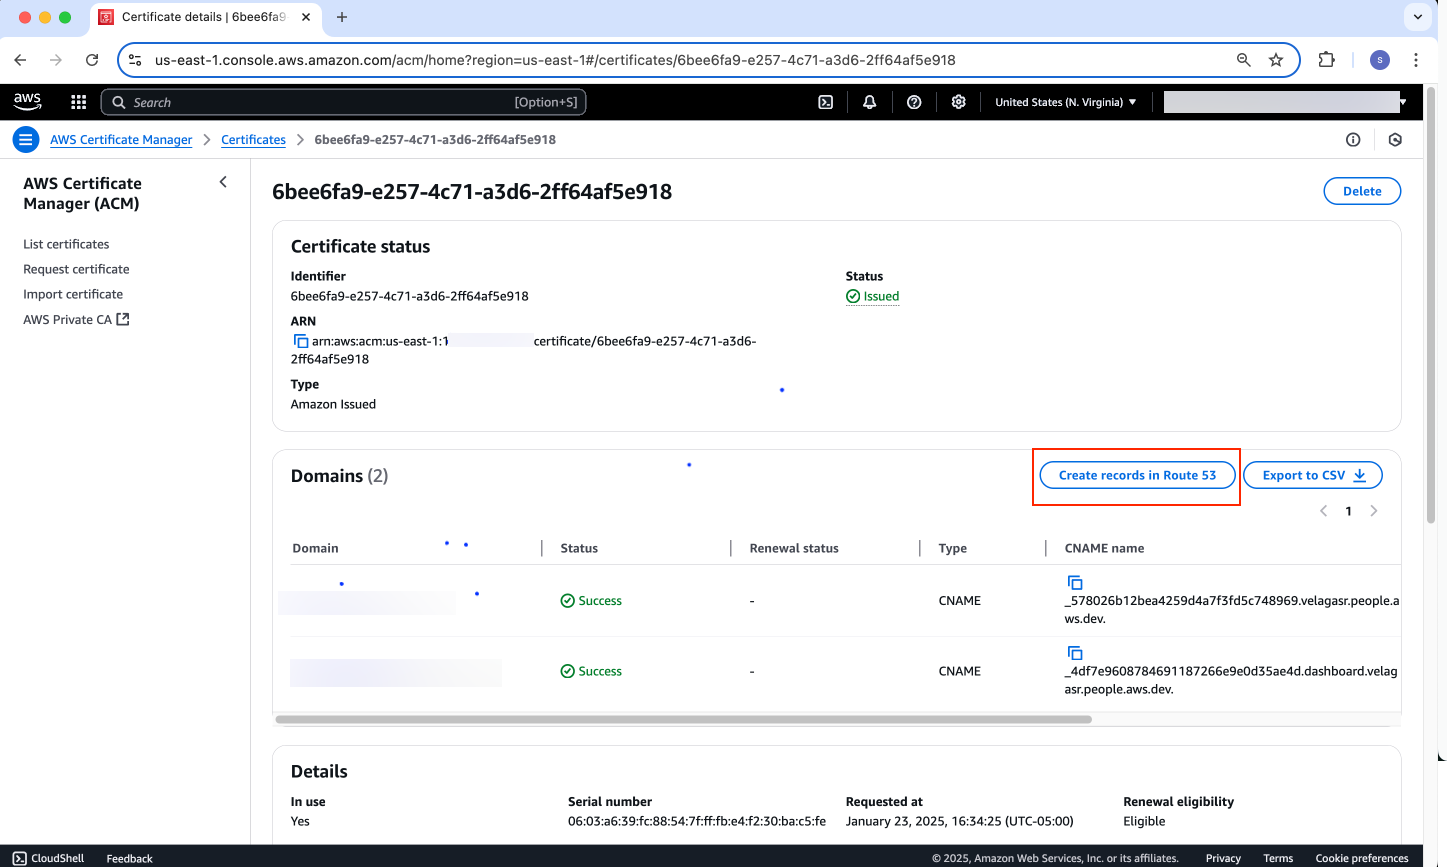
Figure 5: Sample AWS Certificate for Route 53 entry
Once created, the DNS records should appear associated with the certificate:
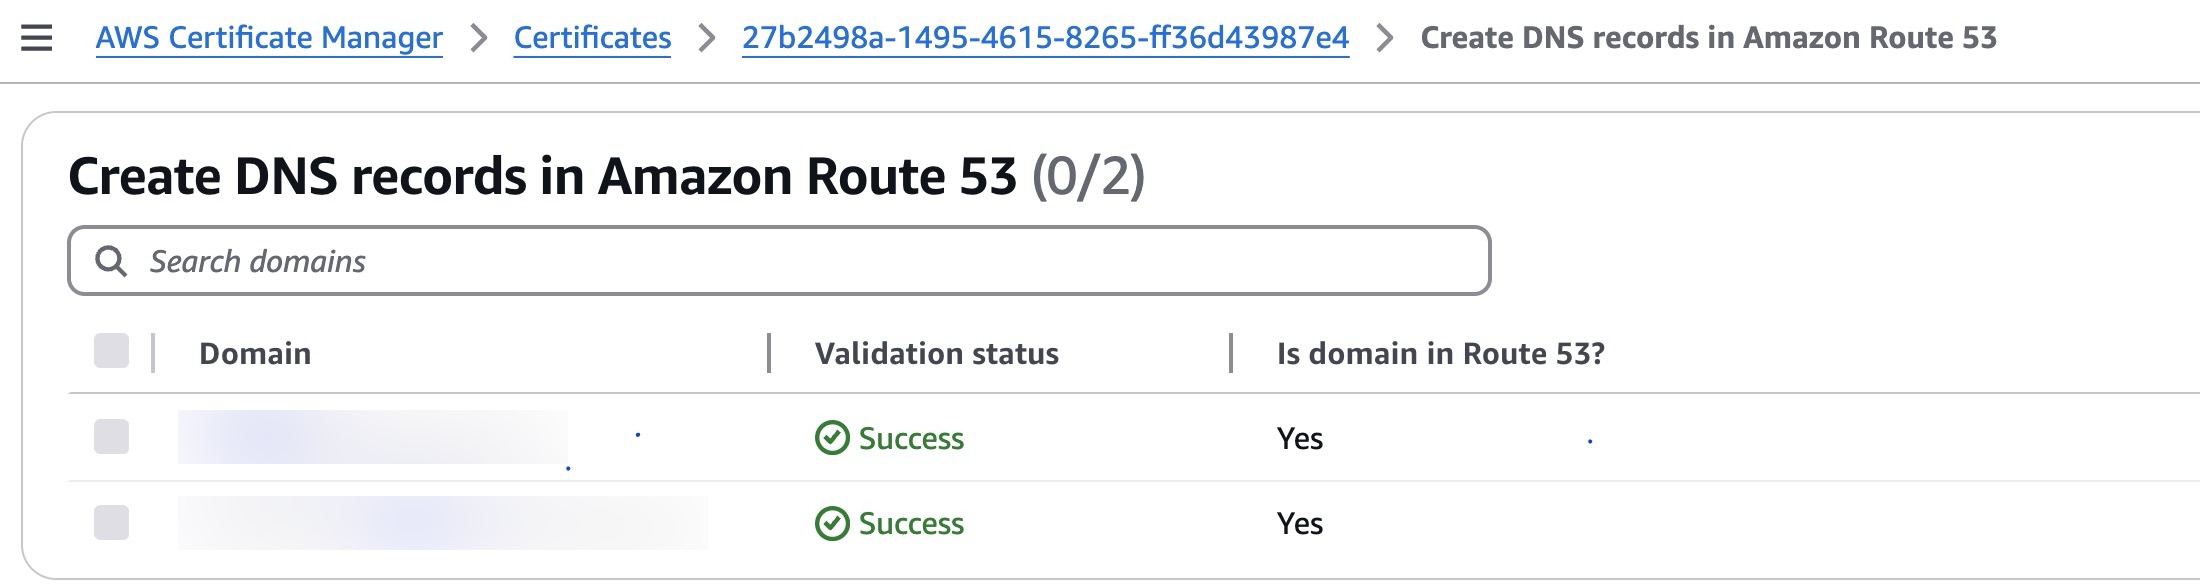
Figure 6: DNS records in Route 53
Deployment steps
- Make sure Docker daemon is running.
- Clone the code repository from GitHub:
git clone https://github.com/aws-solutions-library-samples/guidance-for-multi-provider-generative-ai-gateway-on-aws.git - In the terminal prompt, change into the root directory of the clone repository:
cd guidance-for-multi-provider-generative-ai-gateway-on-aws - Run
cp .env.template .envto copy template of LiteLLM deployment options configuration file to its actual value. In
.envconfig file, set theTERRAFORM_S3_BUCKET_NAMEvalue to a globally unique bucket name. This will store your .tfstate files for your Terraform deployment.In
.envconfig file, configure your preferred distribution option:- For the default CloudFront deployment (Scenario 1), set:
USE_CLOUDFRONT="true" USE_ROUTE53="false" PUBLIC_LOAD_BALANCER="true" - For custom domain with CloudFront (Scenario 2), set:
USE_CLOUDFRONT="true" USE_ROUTE53="true" PUBLIC_LOAD_BALANCER="true" HOSTED_ZONE_NAME="your-domain.com" RECORD_NAME="your-subdomain" CERTIFICATE_ARN="arn:aws:acm:us-east-1:XXXXXXXXXXXX:certificate/your-certificate-id" - For direct ALB access (Scenario 3), set:
USE_CLOUDFRONT="false" USE_ROUTE53="true" PUBLIC_LOAD_BALANCER="true" HOSTED_ZONE_NAME="your-domain.com" RECORD_NAME="your-subdomain" CERTIFICATE_ARN="arn:aws:acm:region:XXXXXXXXXXXX:certificate/your-certificate-id" - For private VPC deployment (Scenario 4), set:
USE_CLOUDFRONT="false"
USE_ROUTE53="true"
PUBLIC_LOAD_BALANCER="false"
HOSTED_ZONE_NAME="your-domain.internal"
RECORD_NAME="your-subdomain"
CERTIFICATE_ARN="arn:aws:acm:region:XXXXXXXXXXXX:certificate/your-certificate-id"
- For the default CloudFront deployment (Scenario 1), set:
- If you’re using a custom domain (Scenarios 2, 3, or 4), ensure you have:
- Created and validated a certificate in ACM (see “Create a Domain and Certificate” section above)
- Set up the appropriate Route53 hosted zone for your domain
- For CloudFront deployments (Scenario 2), your certificate must be in the us-east-1 region
- In
.envconfig file, fill out values of any API keys you need for any third-party providers. If you only want to use Amazon Bedrock, you can just leave these settings in that file as is:
Below is the .env file sample:
# LITELLM_VERSION eg: v1.56.5
# Get it from https://github.com/BerriAI/litellm/releases
LITELLM_VERSION="v1.61.0"
TERRAFORM_S3_BUCKET_NAME="<unique bucket name>" #Must be globally unique
BUILD_FROM_SOURCE="false"
HOSTED_ZONE_NAME="<userid>.<people>.<company>.com"
RECORD_NAME="dashboard.<userid>.<people>.<company>.com"
CERTIFICATE_ARN="arn:aws:acm:us-east-1:XXXXXXXXXXXX:certificate/9c89bb61-7272-4342-aae4-2018d6a79fe9"
OKTA_ISSUER=""
OKTA_AUDIENCE="api://default"
OPENAI_API_KEY="placeholder"
AZURE_OPENAI_API_KEY="placeholder"
AZURE_API_KEY="placeholder"
ANTHROPIC_API_KEY="placeholder"
GROQ_API_KEY="placeholder"
COHERE_API_KEY="placeholder"
CO_API_KEY="placeholder"
HF_TOKEN="placeholder"
HUGGINGFACE_API_KEY="placeholder"
DATABRICKS_API_KEY="placeholder"
GEMINI_API_KEY="placeholder"
CODESTRAL_API_KEY="placeholder"
MISTRAL_API_KEY="placeholder"
AZURE_AI_API_KEY="placeholder"
NVIDIA_NIM_API_KEY="placeholder"
XAI_API_KEY="placeholder"
PERPLEXITYAI_API_KEY="placeholder"
GITHUB_API_KEY="placeholder"
DEEPSEEK_API_KEY="placeholder"
AI21_API_KEY="placeholder"
LANGSMITH_API_KEY=""
LANGSMITH_PROJECT=""
LANGSMITH_DEFAULT_RUN_NAME=""
DEPLOYMENT_PLATFORM="ECS"
EXISTING_VPC_ID=""
EXISTING_EKS_CLUSTER_NAME=""
DISABLE_OUTBOUND_NETWORK_ACCESS="false"
CREATE_VPC_ENDPOINTS_IN_EXISTING_VPC="false"
INSTALL_ADD_ONS_IN_EXISTING_EKS_CLUSTER="false"
DESIRED_CAPACITY="2" #Number of ECS or EKS instances to run by default (for horizontal scaling)
MIN_CAPACITY="2"
MAX_CAPACITY="4"
ECS_CPU_TARGET_UTILIZATION_PERCENTAGE="50"
ECS_MEMORY_TARGET_UTILIZATION_PERCENTAGE="40"
ECS_VCPUS="2"
EKS_ARM_INSTANCE_TYPE="t4g.medium"
EKS_X86_INSTANCE_TYPE="t3.medium"
EKS_ARM_AMI_TYPE="AL2_ARM_64"
EKS_X86_AMI_TYPE="AL2_x86_64"
PUBLIC_LOAD_BALANCER="true"
RDS_INSTANCE_CLASS="db.t3.micro"
RDS_ALLOCATED_STORAGE_GB="20"
REDIS_NODE_TYPE="cache.t3.micro"
REDIS_NUM_CACHE_CLUSTERS="2" #Number of cache clusters (primary and replicas) the replication group will have
EC2_KEY_PAIR_NAME=""
DISABLE_SWAGGER_PAGE="false"
DISABLE_ADMIN_UI="false"
LANGFUSE_PUBLIC_KEY=""
LANGFUSE_SECRET_KEY=""
LANGFUSE_HOST="" # Optional, defaults to https://cloud.langfuse.com
FAKE_LLM_LOAD_TESTING_ENDPOINT_CERTIFICATE_ARN=""
FAKE_LLM_LOAD_TESTING_ENDPOINT_HOSTED_ZONE_NAME=""
FAKE_LLM_LOAD_TESTING_ENDPOINT_RECORD_NAME="
- By default, this Guidance is deployed with Redis OSS caching enabled, and with most popular model providers enabled. At first, the CDK deployment will automatically use the
config/default-config.yamland copy it toconfig.yaml. Make sure you enable model access on Amazon Bedrock. - If you want to remove support for certain models, or add more models, you can create and edit your own
config/config.yamlfile. - Make sure you have valid AWS credentials configured in your CLI environment before running the next step
- In the popup, copy the bash/zsh option and paste into the terminal window you plan to run the deploy command
- There are different deployment customizations available for target Amazon ECS or Amazon EKS. Please review the options below when deciding your target platform and specify appropriate values in the
.envfile:
Deployment Configurations
ECS platform - default option
By default, the deployment application platform is set to Amazon ECS with Fargate using the DEPLOYMENT_PLATFORM="ECS" parameter setting in the .env file:
DEPLOYMENT_PLATFORM="ECS"
EKS platform - basic options
If you prefer to deploy the Guidance on Amazon EKS with compute node groups, use the following:
DEPLOYMENT_PLATFORM="EKS"
For a brand new EKS cluster to be provisioned to host LiteLLM application - leave EXISTING_EKS_CLUSTER_NAME value empty:
EXISTING_EKS_CLUSTER_NAME=""
- After all required settings in the
.envfile are done and saved, initiate Guidance deployment by running the./deploy.shdeployment script.
For both Amazon ECS and Amazon EKS deployment, the container images are built by the deployment automation. Additionally, they are identical and pushed to the Amazon ECR container repositories named litellm and middleware respectively with images version tags based on the setting in the .env file that is also displayed in the output:
LITELLM_VERSION="v1.61.0"
To confirm, container images for LiteLLM and middleware integrations containers will be built and pushed to ECR registries as shown below:

Figure 7: Built container images for LiteLLM and middleware containers in the ECR registry
- After the deployment is complete, you can visit the LiteLLM UI by going to the url, which is based on the
RECORD_NAMEyou configured earlier.
RECORD_NAME="dashboard.<userid>.<people>.<company>.com"
- The master API key is stored in Secrets Manager in the LiteLLMMasterSalt-XXXXXXXX secret in the LITELLM_MASTER_KEY key. This API key can be used to call the LiteLLM API and is also the default password for the LiteLLM UI.
user id: admin, pwd: XXXXXXXXXXXX
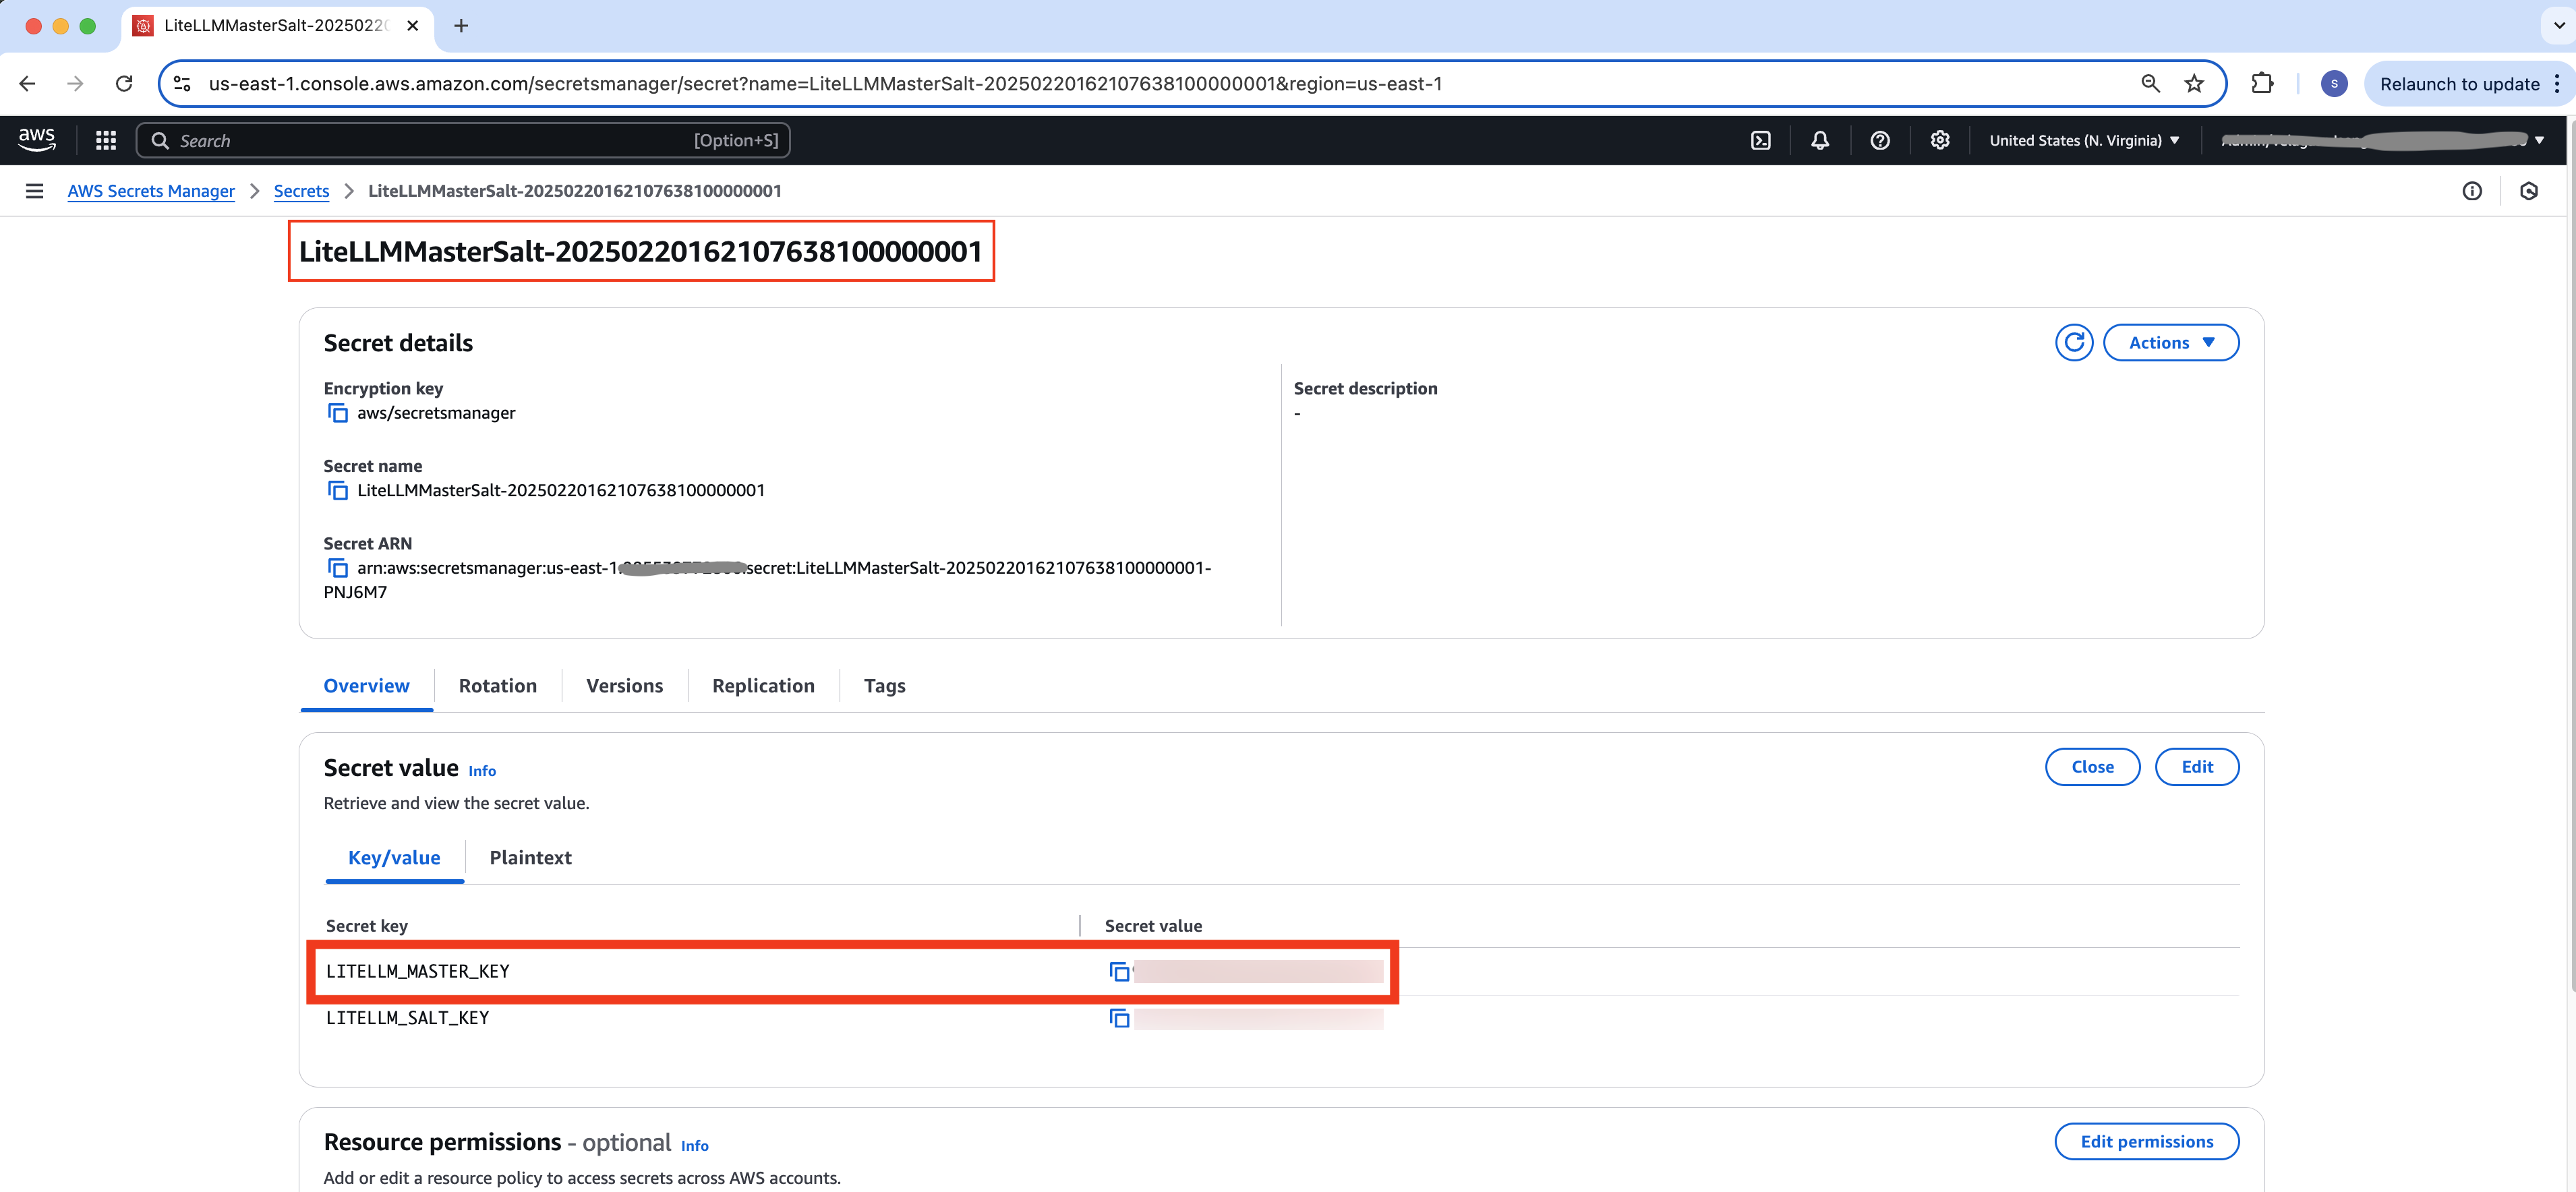
Figure 9: LiteLLM Admin login password
Optional Deployment Platform Configurations
Additional ECS platform deployment options
a. By default, the deployment application platform is set to Amazon ECS using the DEPLOYMENT_PLATFORM=”ECS” parameter setting in the .env file:
DEPLOYMENT_PLATFORM="ECS"
b. If you need to deploy the ECS components into an existing VPC in your account, set EXISTING_VPC_ID to your existing VPC ID in the .env file . The VPC is expected to have both private and public subnets. The public subnets should have Auto-assign public IPv4 address set to yes. The VPC should also have at least one NAT Gateway. This Guidance has been tested with the following VPC specification:
- 2 Availability Zones
- 1 NAT gateway
- 1 internet gateway
- 2 public subnets (auto-assigned public ips enabled, route table pointing to internet gateway)
- 2 private subnets (Route table pointed to NAT gateway)
EXISTING_VPC_ID="vpc-XXXXXXXXXXX"
c. If you’d like to run LiteLLM in subnets without outbound internet access, set DISABLE_OUTBOUND_NETWORK_ACCESS="true". Due to lack of internet access, this configuration will only work with Amazon Bedrock or Amazon SageMaker models. Because of this, you must remove all non-Amazon Bedrock/non-SageMaker models from your config/config.yaml file. If you do not do this, LiteLLM will fail to start as it will keep attempting to call third-party models over the internet.
DISABLE_OUTBOUND_NETWORK_ACCESS="true"
d. To manage ECS compute resource target utilization by tasks running containers, use the following settings:
ECS_CPU_TARGET_UTILIZATION_PERCENTAGE="50"
ECS_MEMORY_TARGET_UTILIZATION_PERCENTAGE="40"
ECS_VCPUS="2"
e. ECS compute nodes capacity settings can be set using parameters below:
DESIRED_CAPACITY="2"
MIN_CAPACITY="2"
MAX_CAPACITY="4"
Additional Amazon EKS deployment options
f. If you prefer to deploy the Guidance on Amazon EKS, use the following related setting in the .env file:
...
 DEPLOYMENT_PLATFORM="EKS"
For a brand new EKS cluster provisioned to host LiteLLM application, leave EXISTING_EKS_CLUSTER_NAME value empty:
...
EXISTING_EKS_CLUSTER_NAME=""
g. If you prefer to deploy a new Amazon EKS cluster into an existing VPC, specify EXISTING_VPC_ID value as shown below:
...
EXISTING_EKS_CLUSTER_NAME=""
EXISTING_VPC_ID="vpc-XXXXXXXXXXXXXX"
In this case, a new Amazon EKS cluster with 2 nodes based on t4g.medium AWS AMI (AMD_x86 or ARM64 architecture depending on the value of the CPU_ARCHITECTURE parameter or environment where the core images are built) will be created for deployment of LiteLLM containers.
h. If you want to use your existing Amazon EKS cluster deployed in an existing VPC, specify respective values for
EXISTING_VPC_ID and EXISTING_EKS_CLUSTER_NAME variables respectively to be VPC ID and Amazon EKS cluster name for the existing cluster:
EXISTING_VPC_ID="vpc-XXXXXXXXXXXXXX"
EXISTING_EKS_CLUSTER_NAME="my-eks-cluster"
If you’re deploying into an existing Amazon EKS cluster, it is assumed that the role or user deploying this has admin level access to the cluster. In that case, in your existing Amazon EKS cluster, a new node group with 2 nodes based on t4g.medium AWS AMI (AMD_x86 or ARM64 architecture depending on the value of the CPU_ARCHITECTURE parameter or environment where the core images are built) will be created for deployment of LiteLLM containers. For production grade EKS Clusters with extended auto-scaling, security, observability and EKS Auto mode support please refer to this AWS prescriptive guidance:
i. If you set INSTALL_ADD_ONS_IN_EXISTING_EKS_CLUSTER=”false”, you must have these EKS add-ons pre-installed:
- Amazon EKS Pod Identity Agent
- Amazon VPC CNI
- kube-proxy
- CoreDNS
Otherwise, set INSTALL_ADD_ONS_IN_EXISTING_EKS_CLUSTER=”true” to have them installed.
j. To control AMI, CPU architecture, and resource settings for EKS compute nodes (to be deployed in both greenfield or existing clusters), there are the following self-explanatory settings:
...
EKS_ARM_INSTANCE_TYPE="t4g.medium"
EKS_X86_INSTANCE_TYPE="t3.medium"
EKS_ARM_AMI_TYPE="AL2_ARM_64"
EKS_X86_AMI_TYPE="AL2_X86_64"

EKS Compute nodes group capacity settings can be set using parameters below:

DESIRED_CAPACITY="2"
MIN_CAPACITY="2"
MAX_CAPACITY="4"
k. The following setting can explicitly set the target CPU architecture of compute nodes (and container images, respectively) for both Amazon ECS and Amazon EKS orchestrators which can be set to “x86” or “arm”:
CPU_ARCHITECTURE="" #If empty, defaults to the architecture of your deployment machine "x86" or "arm"
k. If for some reason you need to use private load balancer (for example, company network security requirements), use the following related configuration parameters in the .env file:
...
HOSTED_ZONE_NAME="<userid>.<people>.<company>.com"
RECORD_NAME="dashboard.<userid>.<people>.<company>.com"
...
PUBLIC_LOAD_BALANCER="false"
This configuration would result in creation of a private ALB connected to LiteLLM containers/ports through corresponding target groups with the certificate associated the same way it gets associated with a public ALB.
EKS K8s Object Validation
To validate that all expected K8s objects are created in the Amazon EKS cluster, you may run the following command from the same environment where deploy.sh was run using kubectl CLI:
kubectl get deploy,po,svc,ingress
---------------------------------------
NAME  READY  UP-TO-DATE  AVAILABLE  AGE
deployment.apps/litellm-deployment  1/1  1 1  40m

NAME READY  STATUS RESTARTS  AGE
pod/litellm-deployment-79487599c5-vh9xx  2/2  Running  0 4m38s

NAME TYPE CLUSTER-IP  EXTERNAL-IP  PORT(S)  AGE
service/kubernetes ClusterIP  172.20.0.1  <none> 443/TCP  53m
service/litellm-service  ClusterIP  172.20.1.2  <none> 4000/TCP,3000/TCP  40m

NAME CLASS HOSTS  ADDRESS PORTS  AGE
ingress.networking.k8s.io/litellm-ingress  <none>  dashboard.<userid>.<people>.<company>.com  k8s-default-litellmi-a21acabe02-1905940975.us-east-1.elb.amazonaws.com  80 5m31s
Configuration Parameters for RDS and ElasticCache
The following parameters control the size of Amazon RDS database instances, related allocated storage, and Redis Cache node type and number of cache clusters:
...
RDS_INSTANCE_CLASS="db.t3.micro"
RDS_ALLOCATED_STORAGE_GB="20"
REDIS_NODE_TYPE="cache.t3.micro"
REDIS_NUM_CACHE_CLUSTERS="2" #Number of cache clusters (primary and replicas) the replication group will have
Settings that disable LiteLLM API Swagger page and/or Admin UI
To avoid potential security warnings for publicly exposed Swagger and/or Admin UI pages (see details below), there are the following settings. When set to “true”, LiteLLM Swagger and/or Admin UI pages will not be created/rendered:
...
DISABLE_SWAGGER_PAGE="false"
DISABLE_ADMIN_UI="false"
Using Public/Private Load Balancer configurations
When LiteLLM application platform is deployed into an existing VPC and there’s a requirement to use private load balancer for limiting public access, there is a specific configuration that can be used to achieve that.
Below is default and that use case specific configurations that can be used:
- If
PUBLIC_LOAD_BALANCER="true", deployment assumes that your public hosted zone already exists, and imports it - If
PUBLIC_LOAD_BALANCER="false", and you pass in aEXISTING_VPC_ID(meaning VPC exists and will be used for ECS/EKS deployment), deployment assumes that your private hosted zone already exists, and imports it. If that is not the case, use the parameterCREATE_PRIVATE_HOSTED_ZONE_IN_EXISTING_VPC="true"- deployment will create the hosted zone and associate with your existing VPC - If
PUBLIC_LOAD_BALANCER="false", and you don’t pass in aEXISTING_VPC_ID, deployment will create the hosted zone for you and associate it to your new VPC - To access private Load balancer from a bastion EC2 host, you can specify an existing value for
EC2_KEY_PAIR_NAMEparameter
To make it more convenient to get access to this private Load balancer, there is a script to deploy a Windows EC2 instance in the same VPC, described below:
Setting up EC2 in your VPC and remote desktop access to it
To get access to LiteLLM in the case you set PUBLIC_LOAD_BALANCER="false", please follow the steps below to provision and use dedicated “jump host” Amazon EC2:
Prerequisites:
- AWS CDK
Deploying the EC2
cdto thelitellm-private-load-balancer-ec2folder- cp
.ec2.env.template.ec2.env - In
.ec2.env, setKEY_PAIR_NAMEto a key pair that you have the private.pemfile for. If you don’t have a key pair, create one cdback to the root directory- Run
./create-ec2-to-access-private-load-balancer.sh
Remote Desktop Setup
- Download Microsoft Remote Desktop for Mac.
- Open Microsoft Remote Desktop, and select the “+” button in the top menu, then select “Add PC”.
In the “PC name” field under the General tab, enter
localhost:13389.- Select “Add” to add your remote desktop configuration.
- To get the EC2 instance password, follow these steps:
- Go to the AWS Console, and locate the EC2 instance named “WindowsBrowserInstance”.
- Select the instance and select “Connect”.
- Go to the “RDP client” tab.
- Select “Get password” at the bottom.
- Upload your private .pem file from your keypair (the one specified in
.ec2.envin theKEY_PAIR_NAMEvalue). - Copy the decrypted password. You’ll need this to connect.
- Open a terminal and run the following AWS SSM command to create a port forwarding session. Replace YOUR_INSTANCE_ID with the instance ID from your stack outputs:
aws ssm start-session --target YOUR_INSTANCE_ID --document-name AWS-StartPortForwardingSession --parameters "portNumber=3389,localPortNumber=13389"
- Return to Microsoft Remote Desktop and double-click your newly added PC. When prompted, enter
Username: Administrator,Password: [the password you retrieved in step 5]
EC2_KEY_PAIR_NAME setting can be used for SSH access to a bastion host.
Integration with LangFuse
If you have an existing deployment of popular OSS Langfuse metric visualization platform, there are configuration parameters for sending LiteLLM metrics to that environment, as shown below:
...
LANGFUSE_PUBLIC_KEY=""
LANGFUSE_SECRET_KEY=""
LANGFUSE_HOST="" # Optional, defaults to https://cloud.langfuse.com
Load Testing
Sometimes, there is a need to deploy a “fake” LLM server for OpenAI and Amazon Bedrock requests for the purpose of baselining load/latency testing. Parameters for those settings start with FAKE_LLM.. and are similar to “real” endpoint settings described above
...
HOSTED_ZONE_NAME="<userid>.<people>.<company>.com"
RECORD_NAME="dashboard.<userid>.<people>.<company>.com"
CERTIFICATE_ARN="arn:aws:acm:us-east-1:XXXXXXXXXXXX:certificate/XXXXXXXXXXXXXX"
....
#for fake LLM Server endpoint
FAKE_LLM_LOAD_TESTING_ENDPOINT_CERTIFICATE_ARN=""
FAKE_LLM_LOAD_TESTING_ENDPOINT_HOSTED_ZONE_NAME=""
FAKE_LLM_LOAD_TESTING_ENDPOINT_RECORD_NAME="
There is a create-fake-llm-load-testing-server.sh script in the project root directory that uses these settings to deploy a mockup LiteLLM server instance that would return responses.
Please note that you need to create a new certificate for the FAKE_LLM_LOAD_TESTING_ENDPOINT_CERTIFICATE_ARN with a subdomain that you use as FAKE_LLM_LOAD_TESTING_ENDPOINT_RECORD_NAME (e.g. fakellmserver.<userid>.<people>.<company>.com) and that you can use the same hosted zone for FAKE_LLM_LOAD_TESTING_ENDPOINT_HOSTED_ZONE_NAME that you used for HOSTED_ZONE_NAME
Also, you will need to add the following to your config.yaml in your models list:
...
- model_name: fake-openai-endpoint
    litellm_params:
      model: aiohttp_openai/any
      api_base: https://<value-you-put-for-FAKE_LLM_LOAD_TESTING_ENDPOINT_RECORD_NAME>/chat/completions
      api_key: "test"
This will deploy a simple HTTP backend that exposes 3 APIs for use through HTTP POST:
/model/{model_id}/converseReturns a single JSON response according to the Amazon Bedrock response schema. The model_id is ignored.
/chat/completions/v1/chat/completionsThe two completion endpoints return either:
- A normal (non-streaming) completion with a random 1–3 second delay
- A streaming response with multiple chunks and random 0.2–0.8 second delays
To clean up the mock LLM backend, run the delete-fake-llm-load-testing-server.sh script.
Config.yaml (all values pre-populated in Config.yaml, what they do, and what the default values are)
{.note} To update this file without having to redeploy the whole stack, you can use the update-litellm-config.sh script.
model_list: Within this field, many different models are already configured for you. If you would like to add more models or remove models, edit this field. Some model providers (such as Databricks and Azure OpenAI) will need you to add additional configuration to function, so they are commented out by default.model_name: This is the model’s public name. You can set it to whatever you like. When someone is calling your model using the OpenAI client, they will use this value for the model ID. By default, themodel_nameis set to the model ID from each provider.
If a model ID is used by two different providers, we instead used <provider>/<model_id> as the model_name. For example, the github provider shares a model ID with the groq provider. So, to avoid the conflict, we use github/llama-3.1-8b-instant instead of just llama-3.1-8b-instant.
litellm_params: This is the full list of additional parameters sent to the model. For most models, this will only bemodelwhich is the model ID used by the provider. Some providers such asazureneed additional parameters, which are documented inconfig/default-config.yaml.
You can also use this to set default parameters for the model such as temperature and top_p.
You can also use this to override the default Region for a model. For example, if you deploy the litellm to us-east-1, but want to use an Amazon Bedrock model in us-west-2, you would set aws_region_name to us-west-2. The parameter to adjust the default Region will vary by LLM provider.
You can also use this to set a weight for an LLM to load balance between two different models with the same model_name.
litellm_settings: These are additional settings for the litellm proxy.litellm_settings.cache: Whether to enable or disable prompt caching. Caches prompt results to save time and money for repeated prompts. Set toTrueby default.litellm_settings.cache_params.type: The type of cache to use. Set toRedisby default. Redis is currently the only cache type that will work out of the box with this deploymentlitellm_settings.max_budget: (float) sets max budget in dollars across the entire proxy across all API keys. Note that the budget does not apply to the master key. That is the only exception. Set to an extremely large value by default (1000000000.0).litellm_settings.budget_duration: (str) frequency of budget reset for entire proxy. You can set the duration as seconds (“30s”), minutes (“30m”), hours (“30h”), days (“30d”), months (“1mo”). Set to1mo(1 month) by default.litellm_settings.max_internal_user_budget: (float) sets default budget in dollars for each internal user. (This doesn’t apply to admins, teams, or the master key). Set to an extremely large value by default (1000000000.0).litellm_settings.internal_user_budget_duration: (str) frequency of budget reset for each internal user. You can set duration as seconds (“30s”), minutes (“30m”), hours (“30h”), days (“30d”), months (“1mo”). Set to1mo(1 month) by default.litellm_settings.success_callback: Defines where success logs are sent to. Defaults to Amazon S3. Amazon S3 is the only destination that works out of the box with this deployment.litellm_settings.failure_callback: Defines where failure logs are sent to. Defaults to Amazon S3. Amazon S3 is the only destination that works out of the box with this deployment.litellm_settings.service_callback: Defines where service logs (such as Amazon RDS and Redis) are sent to. Defaults to Amazon S3. Amazon S3 is the only destination that works out of the box with this deployment.litellm_settings.s3_callback_params.s3_bucket_name: Defines the bucket where the logs will be sent to. This is automatically populated with the name of an S3 bucket that is created during deployment.litellm_settings.s3_callback_params.s3_region_name: Defines the bucket Region where the logs will be sent to. This is automatically populated with the current Region used during deployment.
Amazon SageMaker AI
To use LLMs deployed with Amazon SageMaker AI, you’ll need to do the following:
- Update the model_list in your
config.yamlfile to include the LLM you deployed with Amazon SageMaker AI:
- model_name: jumpstart-or-custom-model
  litellm_params:
    model: sagemaker_chat/hf-llm-mistral-small-24b-instruct-2501-2025-05-06-16-42-06-084
- After you’ve deployed the Generative AI Gateway solution, usage is similar to other model providers; you’ll just need to replace the
base_urlvalue with the LiteLLM endpoint URL and theapi_keyvalue with one generated from the LiteLLM admin portal, then just choose your model:
import openai # openai v1.0.0+

client = openai.OpenAI(api_key="<API KEY>",base_url="https://<Your-Proxy-Endpoint>") # set proxy to base_url

response = client.chat.completions.create(
    model="jumpstart-or-custom-model",
    messages=[
        {"role": "system", "content": "You are a helpful and honest assistant."},
        {
            "role": "user",
            "content": "What is the town of Bari, Italy, known for? Provide a short answer.",
        },
    ],
    temperature=0.2,
    max_tokens=4024,
)
For more information, refer to the LiteLLM docs for Amazon SageMaker AI.
Adanced Routing
1. A/B testing and load balancing
To do A/B testing with two different models, do the following:
- Define two different models with the same
model_name. - Point them each to one of the two different models you want to A/B test.
- Set the
weightfor each of them to determine the percentage of traffic you want going to each model.
Example: Say you’re using OpenAI, but you want to migrate to Anthropic Claude on Amazon Bedrock. You want to send 10% of your traffic there to see if you’re getting comparable speed and quality before you fully commit. You can do so like this in your config.yaml:
- model_name: gpt-4o
    litellm_params:
      model: openai/gpt-4o
      weight: 9
- model_name: gpt-4o
    litellm_params:
      model: bedrock/anthropic.claude-3-5-sonnet-20240620-v1:0
      weight: 1
You can list several models under the same model name, and LiteLLM will automatically distribute traffic between them. If one begins failing, it will fall back to the others.
Example:
model_list:
  - model_name: claude-3-5-sonnet-20240620-v1:0
    litellm_params:
      model: bedrock/anthropic.claude-3-5-sonnet-20240620-v1:0
  - model_name: claude-3-5-sonnet-20240620-v1:0
    litellm_params:
      model: bedrock/anthropic.claude-3-haiku-20240307-v1:0
  - model_name: claude-3-5-sonnet-20240620-v1:0
    litellm_params:
      model: anthropic/claude-3-5-sonnet-20240620
To see more possible routing options, check the full documentation
2. Routing Strategies
By default, this Guidance is configured with usage-based-routing. This will always route to the model with lowest token per minute (TPM)) usage for that minute for a given model_name.
This routing will also respect tpm and rpm (requests per minute) limits and will stop sending traffic to a model if it exceeds that limit.
Example of setting multiple models to be load balanced between with different tpm and rpm limits.
model_list:
  - model_name: claude-3-5-sonnet-20240620-v1:0
    tpm: 100000
    rpm: 1000
    litellm_params:
      model: bedrock/anthropic.claude-3-5-sonnet-20240620-v1:0
  - model_name: claude-3-5-sonnet-20240620-v1:0
    tpm: 200000
    rpm: 2000
    litellm_params:
      model: bedrock/anthropic.claude-3-haiku-20240307-v1:0
  - model_name: claude-3-5-sonnet-20240620-v1:0
    tpm: 300000
    rpm: 3000
    litellm_params:
      model: anthropic/claude-3-5-sonnet-20240620
The routing strategy is configured as the following:
router_settings:
  routing_strategy: usage-based-routing-v2
  enable_pre_call_check: true
3. Routing traffic to different AWS accounts
In order to split the traffic between two different accounts for the same model or different model, you can define the model_name as below, but with different values for the parameters aws_access_key_id, aws_secret_access_key, and aws_region_name in config.yaml file.
Example:
- model_name: anthropic.claude-3-5-sonnet-20241022-v2:0
  litellm_params:
  model: bedrock/anthropic.claude-3-5-sonnet-20241022-v2:0
  aws_access_key_id: os.environ/AWS_ACCESS_KEY_ID_ACCOUNT_1
  aws_secret_access_key: os.environ/AWS_SECRET_ACCESS_KEY_ACCOUNT_1
  aws_region_name: os.environ/AWS_REGION_NAME_ACCOUNT_1

- model_name: anthropic.claude-3-5-sonnet-20241022-v2:0
  litellm_params:
  model: bedrock/anthropic.claude-3-5-sonnet-20241022-v2:0
  aws_access_key_id: os.environ/AWS_ACCESS_KEY_ID_ACCOUNT_2
  aws_secret_access_key: os.environ/AWS_SECRET_ACCESS_KEY_ACCOUNT_2
  aws_region_name: os.environ/AWS_REGION_NAME_ACCOUNT_2
You can explore alternative routing strategies here.
4. Fallbacks
You can also configure fallbacks for an entire model_name. If all models in a given model_name are failing, you can configure a final fallback.
Let’s say you frequently work with Claude 3.5 sonnet, but occasionally your users perform a query that overwhelms its context window size. You can configure a fallback for that scenario. All requests will go to Claude 3.5 Sonnet, but if they are too large, they will go to Gemini which has a larger context window.
router_settings:
    context_window_fallbacks: [{"anthropic.claude-3-5-sonnet-20240620-v1:0": ["gemini-1.5-pro"]}]
If a model_name fails for any other reason, you can configure a generic fallback.
router_settings:
    fallbacks: [{"gpt-4o": ["anthropic.claude-3-5-sonnet-20240620-v1:0"]}]
Finally, you can set a fallback for all model_name as a global fallback in case of unexpected failures:
router_settings:
  default_fallbacks: ["anthropic.claude-3-haiku-20240307-v1:0"]
You can find more details here and here.
Guardrails
To set Guardrails for your LLM API calls, follow these steps:
- Create a Guardrail in Amazon Bedrock.
- Get the Guardrail ID and guardrail version.
- Define the Guardrail, as shown in the example below in your
config.yaml.
guardrails:
   - guardrail_name: "bedrock-pre-guard"
     litellm_params:
       guardrail: bedrock
       mode: "during_call" # supported values: "pre_call", "post_call", "during_call"
       guardrailIdentifier: ff6ujrregl1q # your guardrail ID on bedrock
       guardrailVersion: "1"         # your guardrail version on bedrock
       default_on: true # enforces the guardrail serverside for all models. Caller does not need to pass in the name of the guardrail for it to be enforced.
If you set default_on to true, the guardrail will be enforced at all times. If you set it to false, enforcement is optional.
In the case that default_on is false, in order to make use of the Guardrail, you must specify its name in the client call.
Example:
export GATEWAY_URL=<Your-Proxy-Endpoint>
export GATEWAY_API_KEY=<Your-Master-Key-Or-Admin-Key>

curl -X POST "$GATEWAY_URL/v1/chat/completions" \
-H "Content-Type: application/json" \
-H "Authorization: Bearer $GATEWAY_API_KEY" \
-d '{
    "model": "anthropic.claude-3-5-sonnet-20240620-v1:0",
    "messages": [
        {
            "role": "user",
            "content": "prohibited topic"
        }
    ],
    "guardrails": ["bedrock-pre-guard"]
}'
You can find more details on Guardrails here.
Usage Instructions
- Using LiteLLM proxy with your code is practically identical to using OpenAI. You just need to replace the
<BASE_URL>of the LiteLLM endpoint URL (see below) and the API key value with one generated from LiteLLM admin portal, as shown in the sample below:
import openai # openai v1.0.0+
client = openai.OpenAI(api_key="<API KEY>",base_url="https://<Your-Proxy-Endpoint>") # set proxy to base_url
response = client.chat.completions.create(model="anthropic.claude-3-5-sonnet-20240620-v1:0", messages = [
    {
        "role": "user",
        "content": "this is a test request, write a short poem about ocean"
    }
])

print(response)
which should return a response such as the following:
liteLLM response ChatCompletion(id='chatcmpl-c496dbe7-610e-4bbf-8a50-b70f85725c13', choices=[Choice(finish_reason='stop', index=0, logprobs=None, message=ChatCompletionMessage(content="Here's a short poem about the ocean:\n\nVast and blue, the ocean's might,\nWaves that dance in day and night.\nSecrets deep beneath the foam,\nWhere countless creatures make their home.\nSalty breeze and sandy shore,\nThe sea's allure forevermore.", refusal=None, role='assistant', audio=None, function_call=None, tool_calls=None))], created=1739470642, model='us.anthropic.claude-3-5-sonnet-20240620-v1:0', object='chat.completion', service_tier=None, system_fingerprint=None, usage=CompletionUsage(completion_tokens=69, prompt_tokens=19, total_tokens=88, completion_tokens_details=None, prompt_tokens_details=None), session_id='b0ca2d23-cabe-4f5e-97c7-0b2729d4386d')
- Testing LiteLLM deployment with
curlcommand:
curl -X POST "https://<Your-Proxy-Endpoint>/user/new" \ -H "Content-Type: application/json" \ -H "Authorization: Bearer <Your-Master-Key-Or-Admin-Key>" \ -d '{ "user_email": "new_user@example.com", "user_role": "internal_user" }'
LiteLLM Admin UI access and usage:
- Log in to the base URL of your LiteLLM deployment (for example, **https://dashboard.
. . .com/**) You can see API documentation on that page:
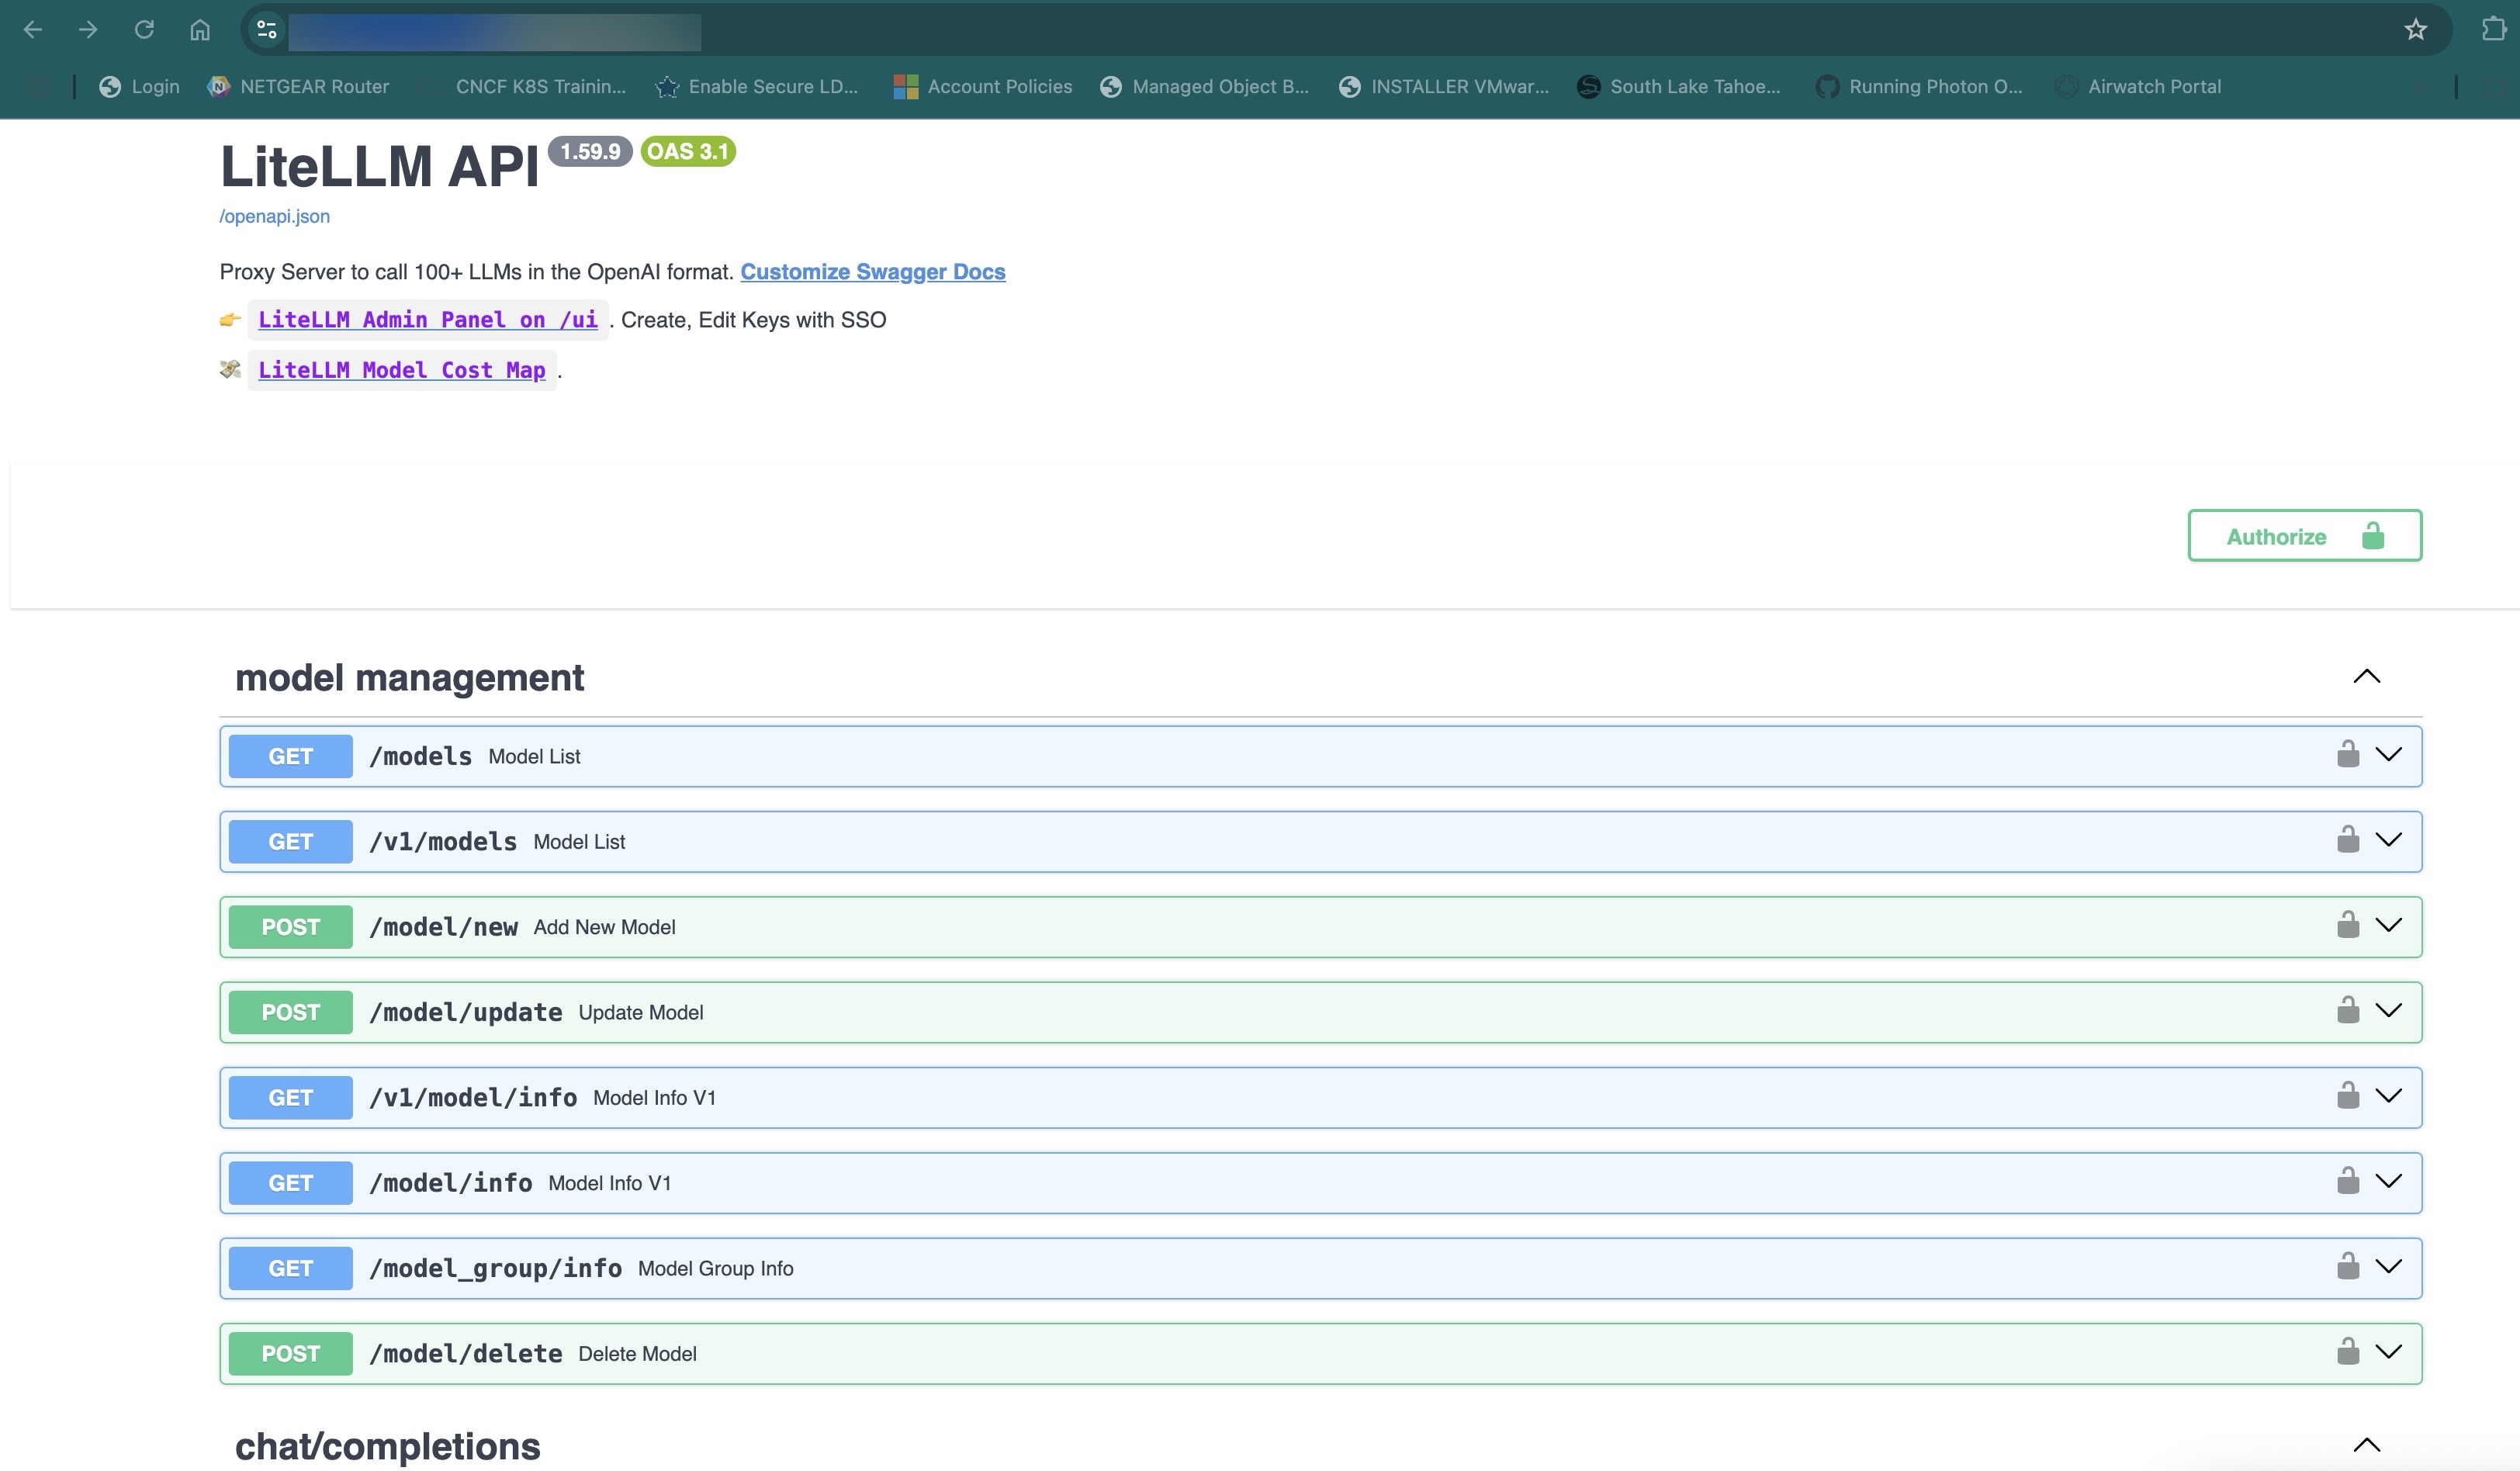
Figure 10: LiteLLM Base API URL
- Login to LiteLLM Admin interface using
/uipath added to the above dashboard URL such as:https://dashboard.<userid>.<people>.<company>.com/ui
login with Username: admin, pwd:
NOTE: Value of admin user’s password in case of both Amazon ECS and Amazon EKS deployments is retrieved from the following generated secret from Secrets Manager with name starting with: LiteLLMSecret value of LITELLM_MASTER_KEY key
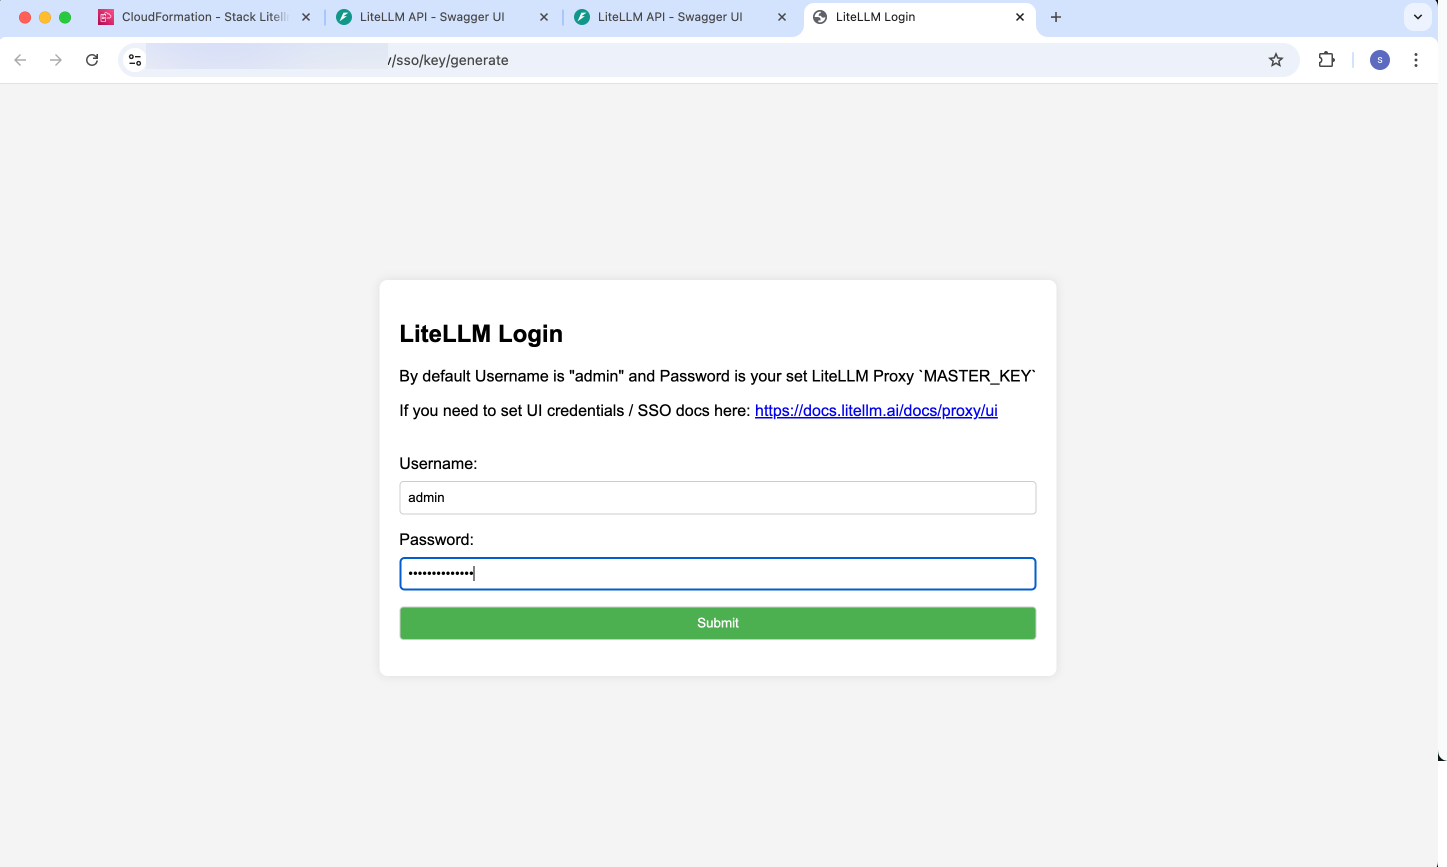
Figure 11: LiteLLM admin portal authentication
- Navigate to
Test Keytab, choose API Key Source as Current UI Session, and select desired model. You can chat with the model, as shown below:
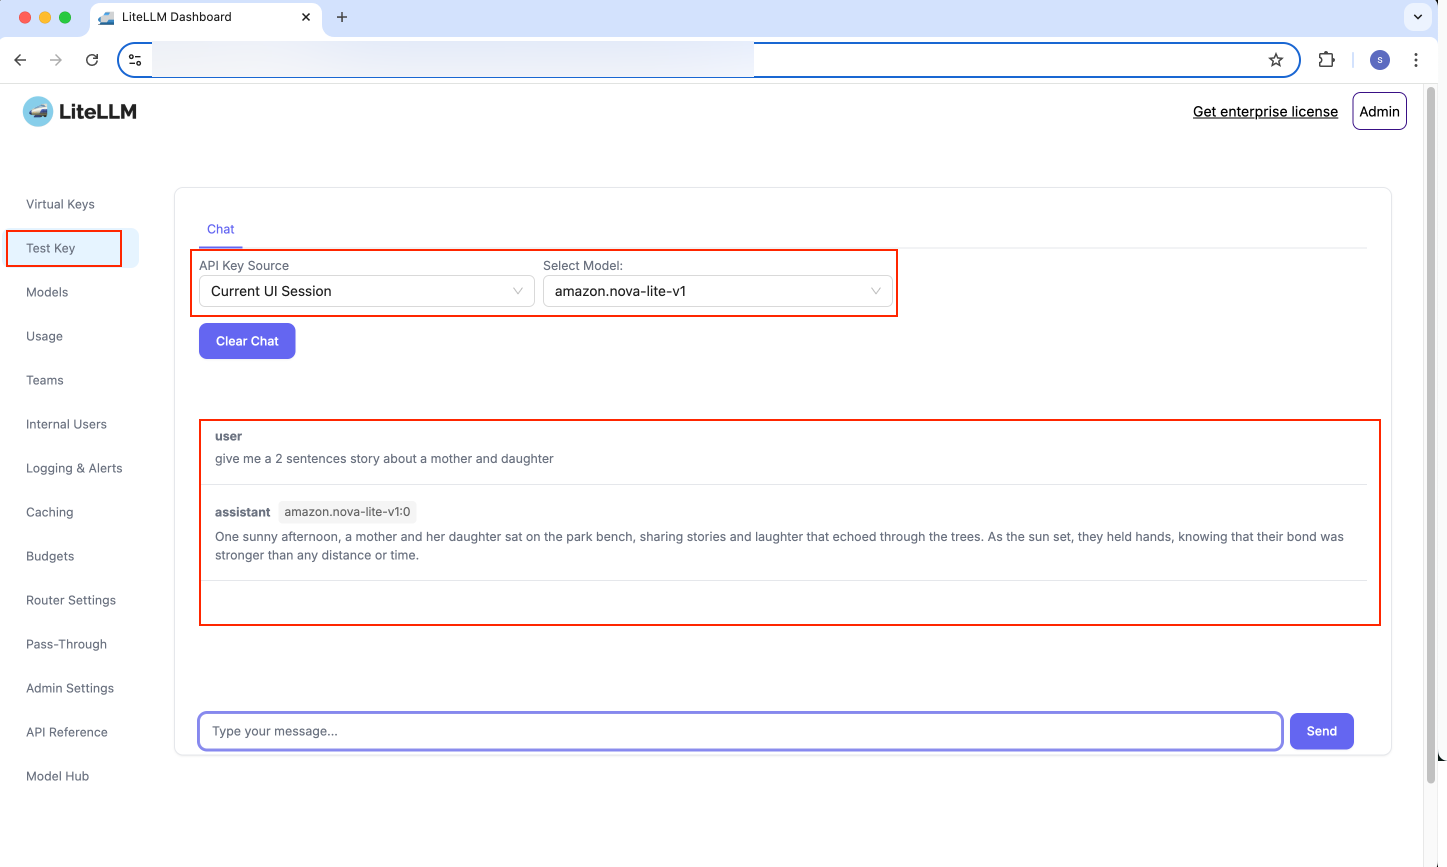
Figure 12: LiteLLM Test Key UI
- Go to
Virtual Keysand useCreate New Keymenu item, as shown below for yours and another user:
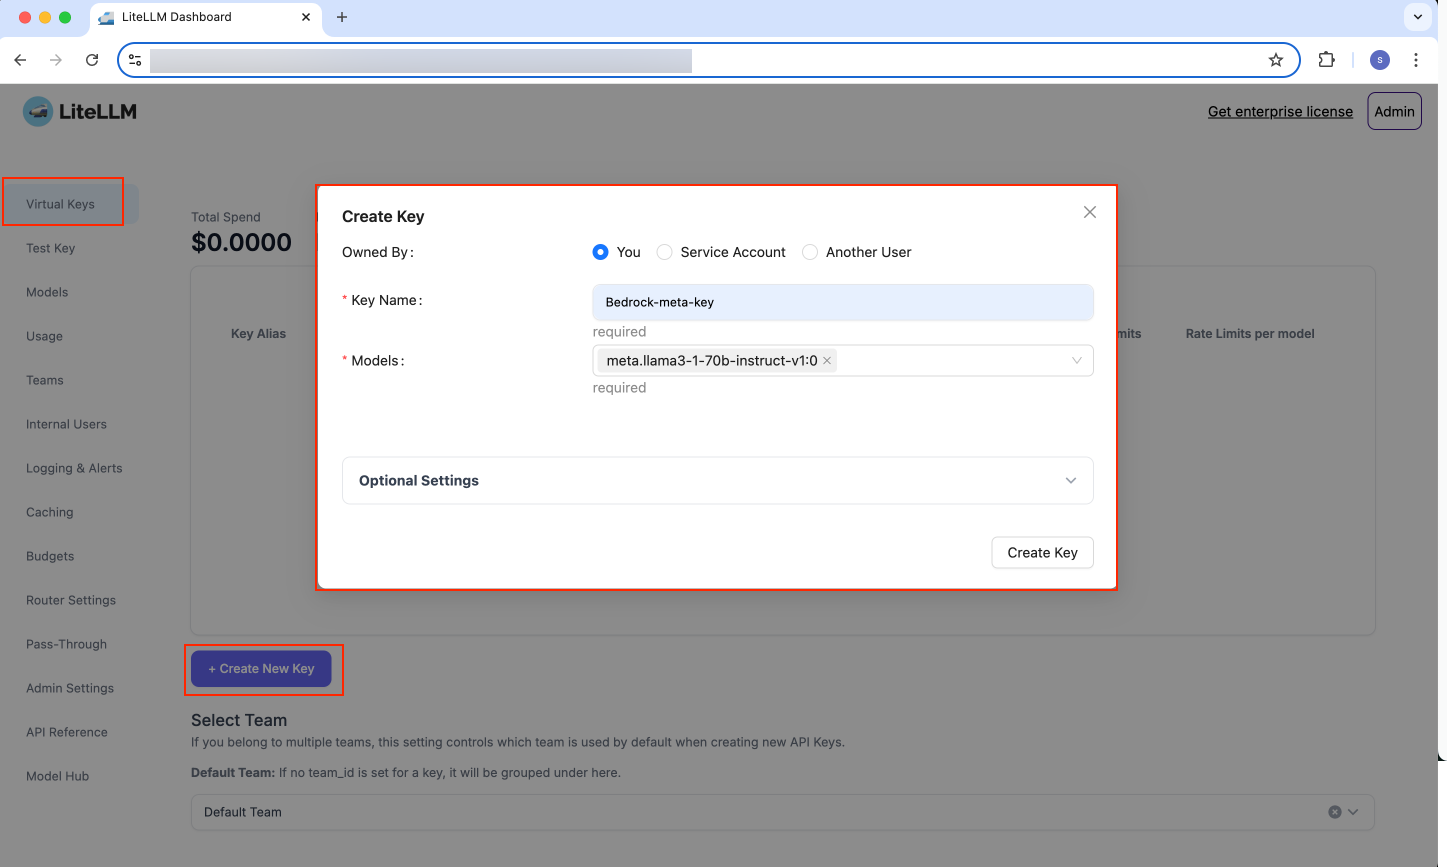
Figure 13: LiteLLM Create Virtual Key - Same User
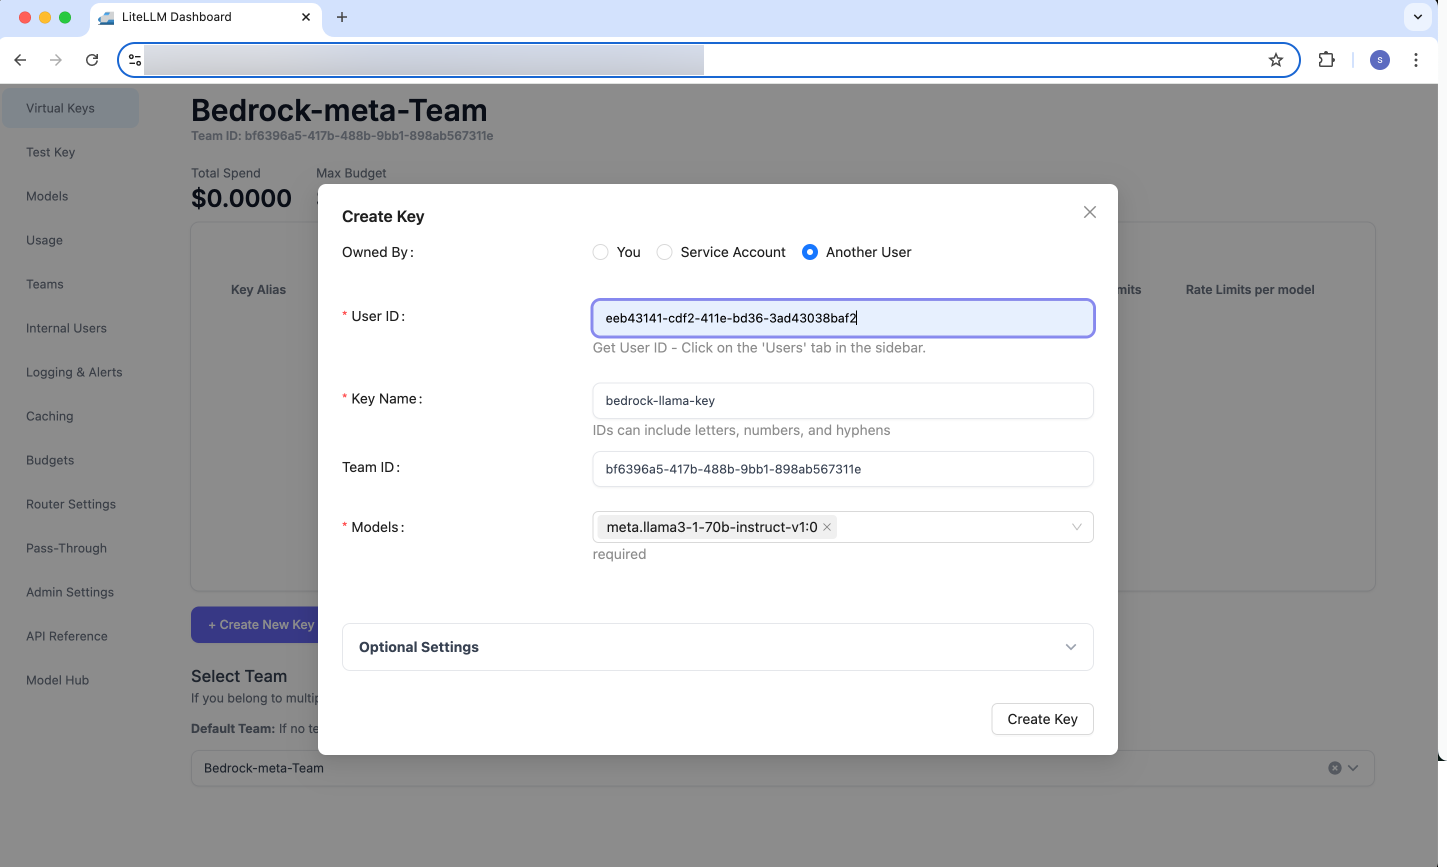
Figure 14: LiteLLM Create Virtual Key - Different User
- Navigate to
Teams→Create New Teamto create a new Team, as shown below:
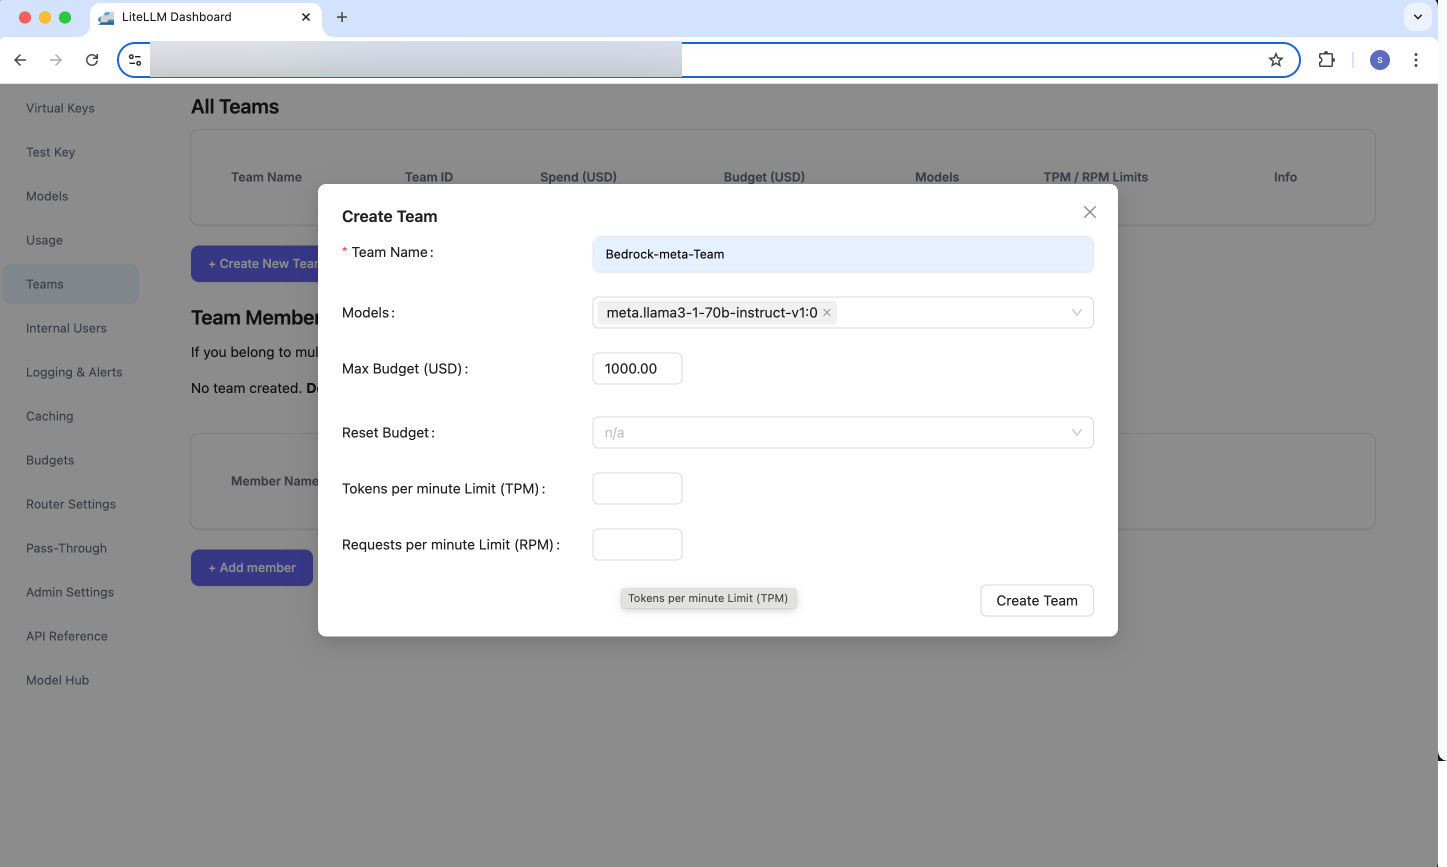
Figure 15: LiteLLM - Create new Team
- Add members to this team using
Teams→Add member:
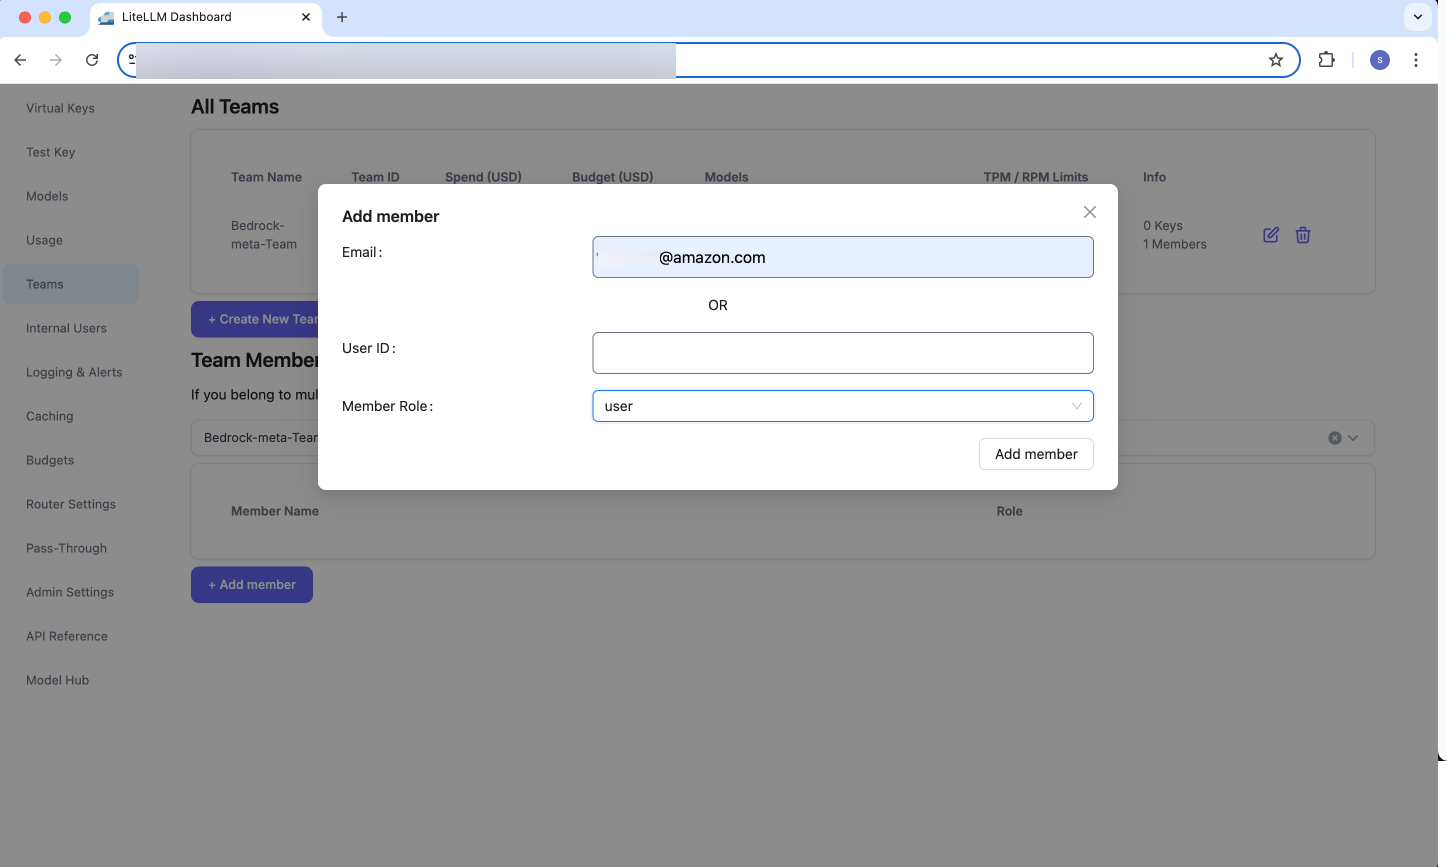
Figure 16: LiteLLM - Create new Team
- Verify that new Team is created and members added to that team:
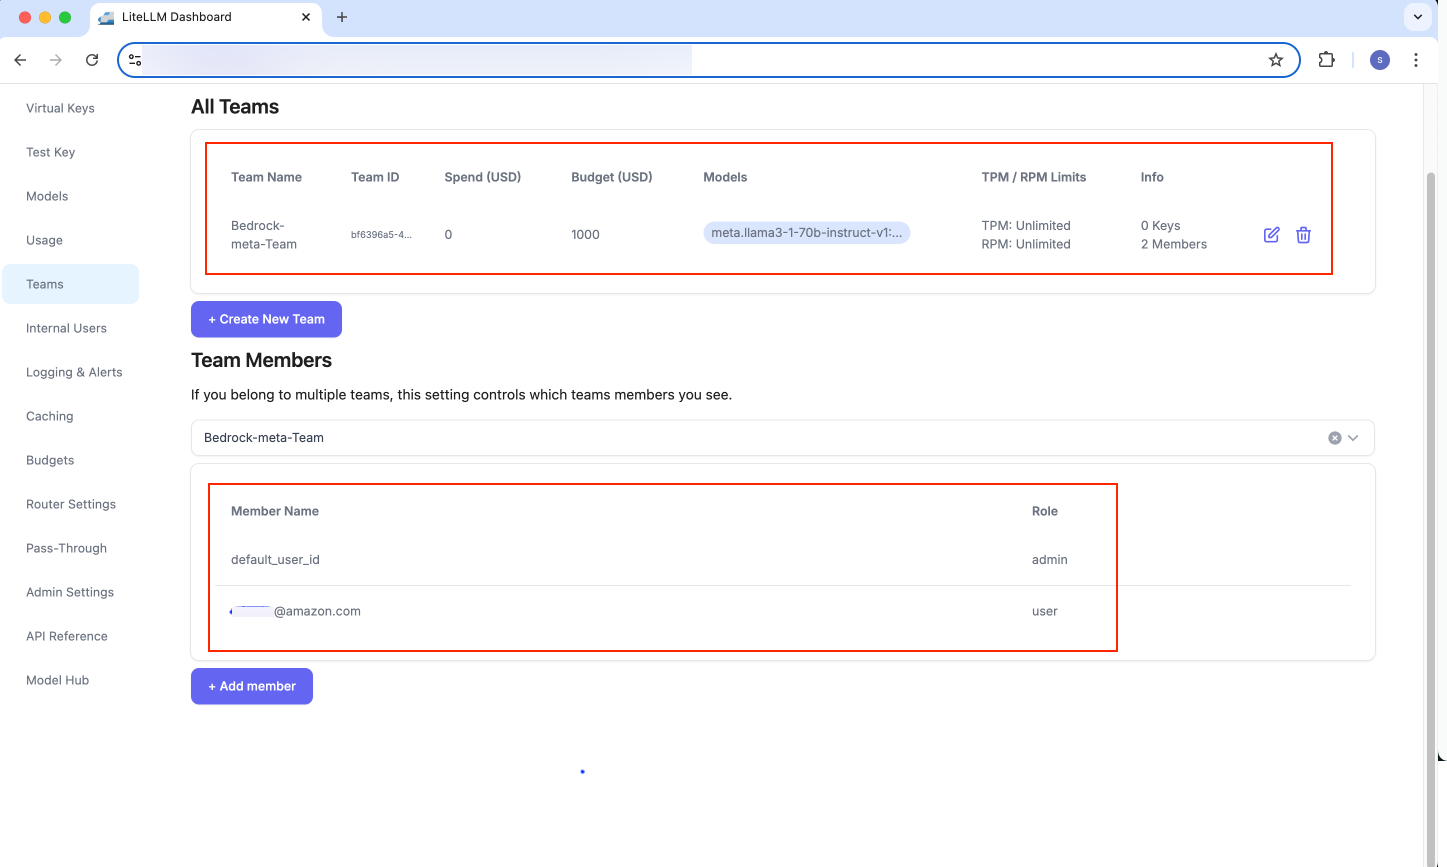
Figure 17: LiteLLM - Team members added
- You can then create a virtual key for testing API calls to the models that team has access to, as was shown above for individual user:
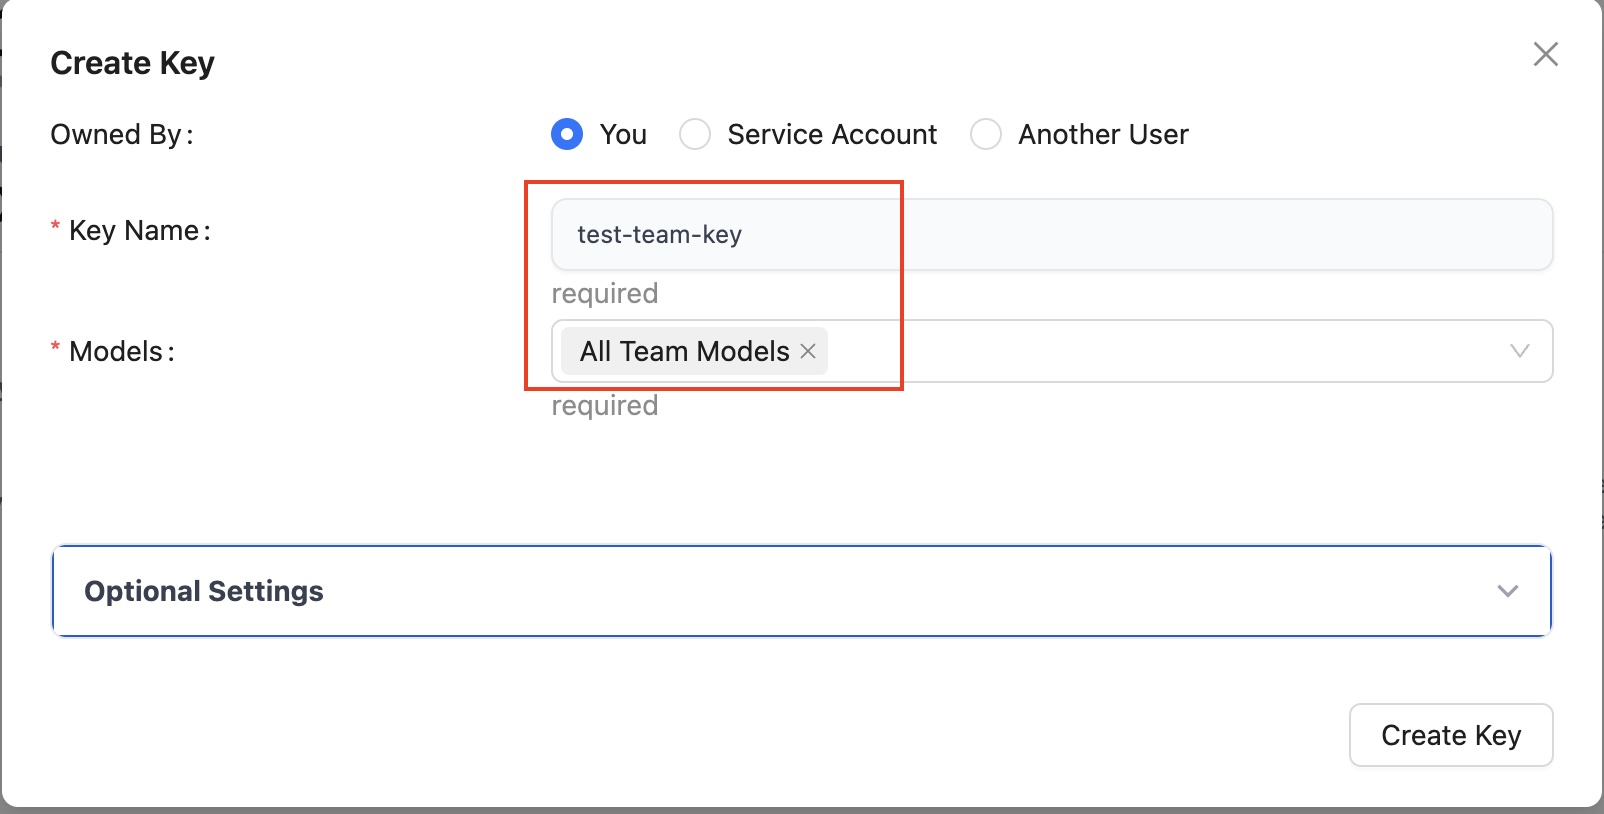
Figure 18: LiteLLM Create Virtual Key - Team models
Amazon Bedrock interface
This deployment has a middleware layer that allows you to use the Amazon Bedrock interface using boto3 library instead of the OpenAI interface. This requires overriding the endpoint_url and injecting your API key into the authorization header in the request. Below is an example script showing how to do this:
Set the required environment variables:
export API_ENDPOINT="your-bedrock-endpoint" #Should be https://<Your-Proxy-Endpoint>/bedrock
export API_KEY="your-api-key" #Should be your litellm api key you normally use
export AWS_REGION="your-region" #Should be your deployment region
Install dependencies:
pip install boto3
Run the below script:
Here is a basic example of initializing and using the boto3 client for use with the gateway:
import boto3
import os
from botocore.client import Config
from botocore import UNSIGNED
from typing import Generator, Dict, Any, Optional

def create_bedrock_client():
    """
    Creates a Bedrock client with custom endpoint and authorization header.
    Uses environment variables for configuration.

    Required environment variables:
    - API_ENDPOINT: Custom Bedrock endpoint URL
    - API_KEY: Authorization bearer token
    - AWS_REGION: AWS region

    Returns:
        boto3.client: Configured Bedrock client
    """

    # Get configuration from environment variables
    endpoint = os.getenv("API_ENDPOINT")
    api_key = os.getenv("API_KEY")
    region = os.getenv("AWS_REGION")

    if not all([endpoint, api_key, region]):
        raise ValueError(
            "Missing required environment variables: API_ENDPOINT, API_KEY, AWS_REGION"
        )

    # Initialize session and configure client
    session = boto3.Session()
    client_config = Config(
        signature_version=UNSIGNED,  # Disable SigV4 signing
        retries={"max_attempts": 10, "mode": "standard"},
    )

    # Create the Bedrock client
    client = session.client(
        "bedrock-runtime",
        endpoint_url=endpoint,
        config=client_config,
        region_name=region,
    )

    # Define authorization header handler
    def add_authorization_header(request, **kwargs):
        request.headers["Authorization"] = f"Bearer {api_key}"

    # Register the event handler
    client.meta.events.register("request-created.*", add_authorization_header)

    return client

bedrock_client = create_bedrock_client()
messages = [{"role": "user", "content": [{"text": "Create a list of 3 pop songs."}]}]
model_id = "anthropic.claude-3-5-sonnet-20240620-v1:0"
response = bedrock_client.converse(modelId=model_id, messages=messages)
print(response)
Amazon Bedrock Managed Prompts
The middleware layer also has support for Amazon Bedrock Managed Prompts. It works the same as documented here
You can use a managed prompt such as the following:
model_id = "arn:aws:bedrock:us-west-2:XXXXXXXXXXXXXX:prompt/6LE1KDKISG" #Put the arn of your prompt as the model_id
response = client.converse(
    modelId=model_id,
    promptVariables={ #specify any variables you need for your prompt
        "topic": {"text": "fruit"},
    })
The OpenAI Interface also has support for Amazon Bedrock Manage Prompts.
You can use a managed prompt, such as the following:
model = "arn:aws:bedrock:us-west-2:XXXXXXXXXXXXXX:prompt/6LE1KDKISG:2" #Put the arn of your prompt as the model_id

response = client.chat.completions.create(
    model=model,
    messages=[], #Messages is required to be passed in, but it will not be used. Your managed prompt will be used instead
    stream=False,
    extra_body={"promptVariables": {"topic": {"text": "fruit"}}},
)
return response.choices[0].message.content
Chat History
Middleware layer of this Guidance’s architecture also supports chat history, using a session_id.
A session_id is tied to a specific API key. Only that API key can access that chat history associated with the session. It may eventually make an exception for admins or eventually allow a single user across multiple API keys to own a session_id.
To use this with the OpenAI Interface when not using streaming, do the following:
response = client.chat.completions.create(
            model=model,
            messages=[{"role": "user", "content": prompt}],
            stream=False,
            extra_body={"enable_history": True}
        )

session_id = response.model_extra.get("session_id")

response_2 = client.chat.completions.create(
            model=model,
            messages=[{"role": "user", "content": prompt2}],
            stream=False,
            extra_body={"session_id": session_id}
        )
The session_id is returned as part of the response.model_extra dictionary. Pass that session_id in the extra_body parameter to continue the same conversation.
To use this with the OpenAI Interface with streaming, do the following:
stream = client.chat.completions.create(
            model=model,
            messages=[{"role": "user", "content": prompt}],
            stream=True,
            extra_body={"enable_history": True}
        )

session_id = None
first_chunk = True

for chunk in stream:
    # Get session_id from first chunk
    if first_chunk:
        session_id = getattr(chunk, "session_id", None)
        first_chunk = False

    #Do normal processing on all chunks

stream2 = client.chat.completions.create(
            model=model,
            messages=[{"role": "user", "content": prompt}],
            stream=True,
            extra_body={"session_id": session_id}
        )
The session_id is returned as part of the first chunk of the response stream. Pass that session_id in the extra_body parameter to continue the same conversation.
To use this with the Amazon Bedrock interface, do the following:
response = client.converse(
                modelId=model_id,
                messages=[{"role": "user", "content": [{"text": message}]}],
                additionalModelRequestFields={"enable_history": True}
            )

session_id = response["ResponseMetadata"]["HTTPHeaders"].get("x-session-id")

response2 = client.converse(
                modelId=model_id,
                messages=[{"role": "user", "content": [{"text": message2}]}],
                additionalModelRequestFields={"session_id": session_id},
            )
The session_id is returned as a header in response["ResponseMetadata"]["HTTPHeaders"]. Pass that session_id in the additionalModelRequestFields parameter to continue the same conversation.
The approach with Amazon Bedrock interface with streaming is identical, but included here for convenience:
response = client.converse_stream(
                modelId=model_id,
                messages=[{"role": "user", "content": [{"text": message}]}],
                additionalModelRequestFields={"enable_history": True},
            )
session_id = response["ResponseMetadata"]["HTTPHeaders"].get("x-session-id")

response2 = client.converse_stream(
                modelId=model_id,
                messages=[{"role": "user", "content": [{"text": message2}]}],
                additionalModelRequestFields={"session_id": session_id},
            )
The session_id is returned as a header in response["ResponseMetadata"]["HTTPHeaders"]. And you pass that session_id in the additionalModelRequestFields parameter to continue the same conversation
You can get the chat history for a given session id by calling POST /chat-history for history in OpenAI format, or POST /bedrock/chat-history for history in AWS Bedrock Converse API format, such as the following:
# Common headers, including authorization
headers = {"Authorization": f"Bearer {api_key}", "Content-Type": "application/json"}

# Request body containing session_id
payload = {"session_id": session_id}

# Endpoint to get chat history in OpenAI format
openai_url = f"{base_url}/chat-history"
response_openai = requests.post(openai_url, json=payload, headers=headers)

if response_openai.status_code == 200:
    print("OpenAI Format History:")
    print(response_openai.json())
else:
    print("Failed to retrieve OpenAI format history")
    print("Status code:", response_openai.status_code)
    print("Response:", response_openai.text)

# Endpoint to get chat history in Bedrock format
bedrock_url = f"{base_url}/bedrock/chat-history"
response_bedrock = requests.post(bedrock_url, json=payload, headers=headers)

if response_bedrock.status_code == 200:
    print("\nBedrock Format History:")
    print(response_bedrock.json())
else:
    print("Failed to retrieve Bedrock format history")
    print("Status code:", response_bedrock.status_code)
    print("Response:", response_bedrock.text)
You can get all session ids for an API key by calling POST /session-ids such as the following:
endpoint = f"{base_url}/session-ids"
headers = {"Authorization": f"Bearer {api_key}", "Content-Type": "application/json"}

response = requests.post(endpoint, headers=headers, json={})
if response.status_code == 200:
    print("Success!")
    print("Session IDs:", response.json().get("session_ids", []))
else:
    print(f"Error: {response.status_code}")
    print(response.text)
Best Practices for Amazon Bedrock Integration
When integrating Amazon Bedrock with Guidance for Multi-Provider Generative AI Gateway on AWS, following these best practices can help optimize performance, cost, and operational efficiency:
- Cross-Region Inference Optimization: Implement cross-Region inference profiles to:
- Manage unexpected traffic bursts effectively
- Distribute workloads across multiple AWS Regions
- Mitigate service quota limitations
- Handle peak usage scenarios seamlessly
- Achieve higher throughput and better resilience
Configure the cross-Region inference profile ID in the LiteLLM’s config.yaml file. For example, use us.anthropic.claude-3-5-sonnet-20240620-v1:0 instead of the foundation model ID.
Before implementing cross-Region inference profiles, it’s crucial to review and configure your AWS Identity and Access Management (IAM) policies and Service Control Policies (SCPs) appropriately. Your IAM policies must explicitly grant access to the Amazon Bedrock service across all Regions that are included in your cross-Region profile configuration. This includes permissions for model invocation in each specified Region, as well as the necessary IAM actions required for cross-Region operations. Without proper IAM and SCP configurations, your API calls will fail, even if the inference profile is correctly set up in your LiteLLM configuration. Work with your AWS security team to ensure that any organizational SCPs or permission boundaries don’t inadvertently restrict Amazon Bedrock access in any of the target regions.
Application Inference Profiles: Create and manage application inference profiles to track costs and Amazon Bedrock model usage effectively on AWS.
Quota Management and Scaling: Actively manage service quotas for Amazon Bedrock
- Regularly review current quota utilization for Amazon Bedrock APIs.
- Monitor default quotas through AWS Service Quotas console.
- Plan for quota increases based on usage patterns.
Request quota adjustments proactively:
- Use Service Quotas for adjustable limits.
- Submit limit increase forms for non-adjustable quotas.
- Work with your AWS account manager for on-demand model invocation quota increases.
Uninstall the Guidance
To avoid charges for AWS resources usage, you can uninstall Guidance for Multi-Provider Generative AI Gateway on AWS by running the ./undeploy.sh script located in the source code root folder (same as where ./deploy.sh script is located). Its order of uninstallation of AWS services mirrors the order of installation implemented in that script and should result in complete “cleanup” of all deployed services. You can also delete AWS resources using the AWS Management Console by deleting corresponding AWS CloudFormation stacks (names starting with LiteLLM.. and trackingStack) manually along with dependencies, but the automated uninstallation is recommended.
Related resources
- Open Source LiteLLM Project
- Open Source LiteLLM GitHub repository
- Amazon Bedrock Platform
- Amazon ECS Platform
- Amazon EKS Platform
- Amazon Elastic Container Registry
- Open AI specification
Contributors
- Daniel Zilberman, WWSO Sr Solutions Architect, AWS Tech Solutions Team
- Sreedevi Velagala, WWSO Solutions Architect, AWS Tech Solutions Team
- Michael Rodriguez, SDE, AWS Telco Engineering
- Dhawal Patel, Technical Lead, AWS Principal Generative AI Architect
- Todd Fortier, STT Sr. Solutions Architectect, AWS Solutions Library
Notices
Customers are responsible for making their own independent assessment of the information in this document. This document: (a) is for informational purposes only, (b) represents AWS current product offerings and practices, which are subject to change without notice, and (c) does not create any commitments or assurances from AWS and its affiliates, suppliers or licensors. AWS products or services are provided “as is” without warranties, representations, or conditions of any kind, whether express or implied. AWS responsibilities and liabilities to its customers are controlled by AWS agreements, and this document is not part of, nor does it modify, any agreement between AWS and its customers.