Guidance for Disaster Recovery Using Amazon Aurora
Overview
Business continuity is the ability of the organization and all the supporting applications to run critical business functions at all times, including during emergency events. To achieve business continuity, you must implement various types of resilience mechanisms. Resilience is the ability of an application to recover from an outage, either automatically or with human intervention. This solution offers a solution for effectively planning and testing disaster recovery procedures on Amazon Aurora, encompassing industry best practices. It also presents a comprehensive business continuity plan (BCP) for structuring disaster recovery strategies specifically tailored to your Amazon Aurora clusters.
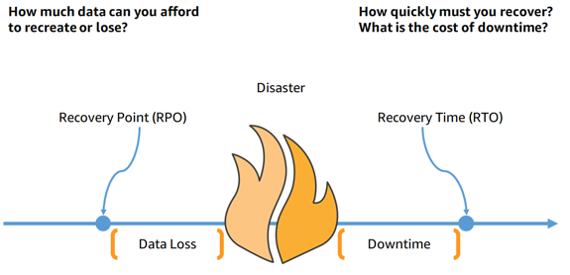
A key part of resilience is disaster recovery (DR) - the ability to respond to unforeseen events that severely impact business operations. Effective DR relies on defined business objectives of Recovery Point Objective (RPO) to avoid data loss, and Recovery Time Objective (RTO) to reduce downtime. Workloads must be architected with resilience to meet RPO and RTO targets in a disaster scenario, enabling business continuity. This approach maintains operations through an established Business Continuity Plan (BCP).
Figure 1 Data loss is measured from the time of data loss to the time of the disaster, whereas downtime is measured from the time of the disaster to the point of data recovery.
This guide provides a comprehensive overview of architecture diagrams, planning considerations, and configuration steps for deploying disaster recovery on AWS. The guide targets Database Admins, DevOps Engineers, Solutions Architects, business leaders, and cloud professionals aiming to implement Disaster Recovery Using Amazon Aurora.
Disaster recovery strategies
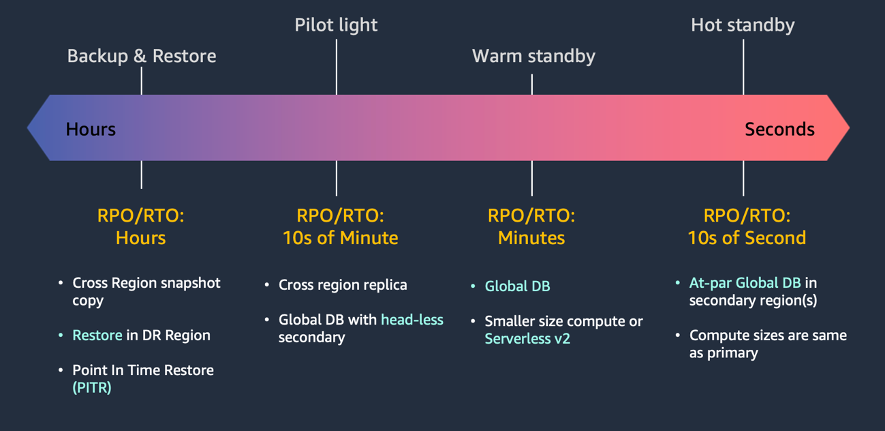
Disasters can be broadly categorized into four main types: human errors, malicious attacks, natural disasters, and technical failures. Typically, human intervention is needed to transition applications to their secondary copies to ensure their continued functionality during a disaster. For a disaster event based on disruption or loss of one physical data center, and to support a well-architected, highly available workload, you may only require a backup and restore approach to disaster recovery. If your definition of a disaster goes beyond the disruption or loss of a physical data center to that of a Region, or if you are subject to regulatory requirements that require it, then you should consider pilot light, warm standby, or hot standby (Multi-Site Active/Active).
Figure 2 Four disaster recovery strategies to consider
Backup and restore is a suitable approach for mitigating against data loss or corruption. This approach can also be used to mitigate against a Regional disaster by replicating data to other AWS Regions, or to mitigate a lack of redundancy for workloads deployed to a single Availability Zone. With Amazon Aurora, you can consider a couple different options: service-provided automated backups, manual volume snapshots, and self-managed logical backups (data dumps). Cold backups are the lowest-cost option, but come with the longest RTO and RPO. Aurora backups are continuous and incremental; using point-in-time recovery (PITR) functionality, you can restore to any point within the backup retention period. This is typically within 5 minutes of the current time for an active database (DB) cluster. This can help your application with accidental human errors or deletes. To protect against a Regional issue, after a snapshot is taken, you can copy the snapshot to another AWS Region by using the Amazon Relational Database Service (Amazon RDS) console, the AWS Command Line Interface (CLI), or the AWS Software Development Kit (AWS SDK). Additionally, AWS Backup can automate this copy process by configuring schedules and copies of manual snapshots.
With the pilot light approach, you replicate your data from one Region to another and provision a copy of your core workload infrastructure. This is best suited for natural disasters and technical failures. However, RPO/RTO will be in 10s of minutes. With Amazon Aurora MySQL and PostgreSQL-Compatible Edition clusters, you can create a headless cluster in a secondary Region with Aurora Global database. This type of configuration can lower expenses for an Aurora Global database. This requires making a trade-off between availability, Recovery Time Objective (RTO), and cost. Another option with the pilot light approach is with Amazon Aurora MySQL-Compatible Edition clusters. With these clusters, you can use cross-Region Aurora Replicas to create a replica of your primary DB cluster in another AWS Region by using the database engine’s native replication mechanism. In the case of DR, the RPO depends on the replication lag between the cross-Region clusters.
The warm standby approach involves ensuring that there is a scaled-down, but fully functional, copy of your production environment in another Region. This approach extends the pilot light concept and decreases the time to recovery because your workload is always ‘on’ in another Region. In this approach with Amazon Aurora, you have two options 1/ Aurora Global databases with provisioned minimal compute resources; and 2/ You can also create a secondary Region using Amazon Aurora Serverless v2 instances. After a failover, Aurora Serverless scales up quickly to support the application workload. When not in use, the replicas scale down to save costs. Overall, Aurora Serverless offers a balance of RTO and cost tradeoffs when compared to headless compute configurations.
You can run your workload simultaneously in multiple Regions as part of a hot standby strategy. Multi-site active/active serves traffic from all regions to which it is deployed, whereas hot standby active/passive serves traffic only from a single region, and the other Region(s) are only used for read-only and disaster recovery. Amazon Aurora Global Database can be operated as a hot standby active/passive strategy. It is designed for globally distributed applications, allowing a single Amazon Aurora database to span multiple AWS Regions. It replicates your data with no impact on database performance, enables fast local reads with low latency in each Region, and provides disaster recovery from Region-wide outages.
This implementation guide outlines the business continuity of Amazon Aurora, focusing on disaster recovery strategies for Region-level outages, including backup and restore and hot standby strategies. It delves into Amazon Aurora disaster recovery approaches such as 1/ Amazon Aurora Global Databases and 2/ Amazon Aurora backups using AWS Backup, offering a comprehensive evaluation of their respective pros and cons.
The ultimate goal is to simplify choosing the best database disaster recovery solution that aligns with your workload, RPO, and RTO needs.
This guidance provides the following features:
Comprehensive disaster recovery with Amazon Aurora Global Database, which spans multiple AWS Regions, enabling low-latency global reads and providing fast recovery in case of a disaster.
AWS Backup to centralize Aurora backups, which can be orchestrated to be copied over across AWS Regions or across AWS accounts for disaster recovery. AWS Backup offers a cost-effective, fully managed, and policy-based service that enables you to copy snapshots to a different Region or AWS account without having to worry about writing custom scripts and maintaining them.
Features and benefits
The Guidance for Disaster Recovery Using Amazon Aurora on AWS provides the following features:
Pre-built AWS CloudFormation templates: This solution includes pre-configured AWS CloudFormation templates to automatically provision the necessary resources for implementing a comprehensive disaster recovery plan for your organization’s databases using Amazon Aurora Global Database and AWS Backup.
Two solution options: This solution includes implementation guides and CloudFormation templates for two DR options based on your RTO and RPO requirements. For an RPO of 1 hour or more, the AWS Backup template provides a cost-effective approach. When RPO must be under a minute, the Aurora Global Database template is recommended. These options enable deploying the optimal DR strategy to satisfy your organization’s recovery objectives, whether prioritizing low-cost or near-zero data loss. The templates and this guide simplify implementing the preferred Amazon Aurora disaster recovery architecture based on your specific needs.
Notifications: With Aurora Global Database, track the replication lag across regions using the Amazon CloudWatch and Amazon SNS topics created by the guidance.
Automatically deploy one or more solutions using AWS Backup: While deploying this Guidance, you have the option to customize the solution as per your use case. The solution can be customized to create same-account cross-Region, cross-account same-Region, and cross-account cross-Region backups of your desired Amazon Aurora DB clusters using AWS Backup.
Multi-account support: With the AWS backup solution, you can easily store backups of the desired Amazon Aurora DB clusters in central backup account(s). This helps you manage, maintain, and protect your backups in a different target account from your primary AWS account.
Extend the solution: We designed the solution to be extensible and customizable. There are several other benefits of using Aurora Global Databases and integration with AWS Backup as covered in the following use case approach section. For example, if you are using your secondary cluster in the Aurora Global Database for localized reads to your application, you can create up to 15 read replicas to handle read traffic.
The use case approach
This solution is intended to provide a disaster recovery setup for your Amazon Aurora DB clusters. However, there are other use cases that also apply to these features. This section discusses the common use cases.
Aurora Global Database
Global reads with local latency: If you have offices around the world, you can use an Aurora global database to keep your main sources of information updated in the primary AWS Region. Offices in your other Regions can access the information in their own Region with local latency.
Scalable secondary Aurora DB clusters: You can scale your secondary clusters by adding more read-only instances (Aurora Replicas) to a secondary AWS Region. The secondary cluster is read-only, so it can support up to 16 read-only Aurora Replica instances rather than the usual limit of 15 for a single Aurora cluster.
Recovery from Region-wide and technical failures: The secondary clusters allow you to make an Aurora global database available in a new primary AWS Region more quickly (lower RTO) and with less data loss (lower RPO) than traditional replication solutions.
AWS Backup
Test database upgrades, parameter changes, and other maintenance actions: You can restore from the backups stored in AWS Backup, which always creates a new Aurora cluster without any impact to your primary Aurora database. Use the restored cluster to test minor or major version upgrades that can have significant changes. You can also use this restored cluster to test other maintenance actions, such as changes in database parameter groups or changes in the instance class. Once the tests are complete, you can delete the restored cluster to save costs.
Database refreshes across accounts: The database refresh process consists of recreating a target database using a consistent data copy of a source database, usually done for test and development purposes. Use the CloudFormation templates provided in this solution to create cross-account backups in same-Region or cross-Region from your primary database, which can be restored to perform database refreshes of your primary database.
Recover from Region-wide outages and ransomware attacks: You can copy database snapshots between accounts and retain the backups for longer periods to meet regulatory compliance requirements or as a means to further protect your organization from ransomware attacks. Whether your primary AWS account is compromised or there is a failure in the primary Region of your Aurora database, you can use this solution to create cross-account and cross-Region backups to recover from such failures quickly.
Architecture overview
Amazon Aurora Global Databases
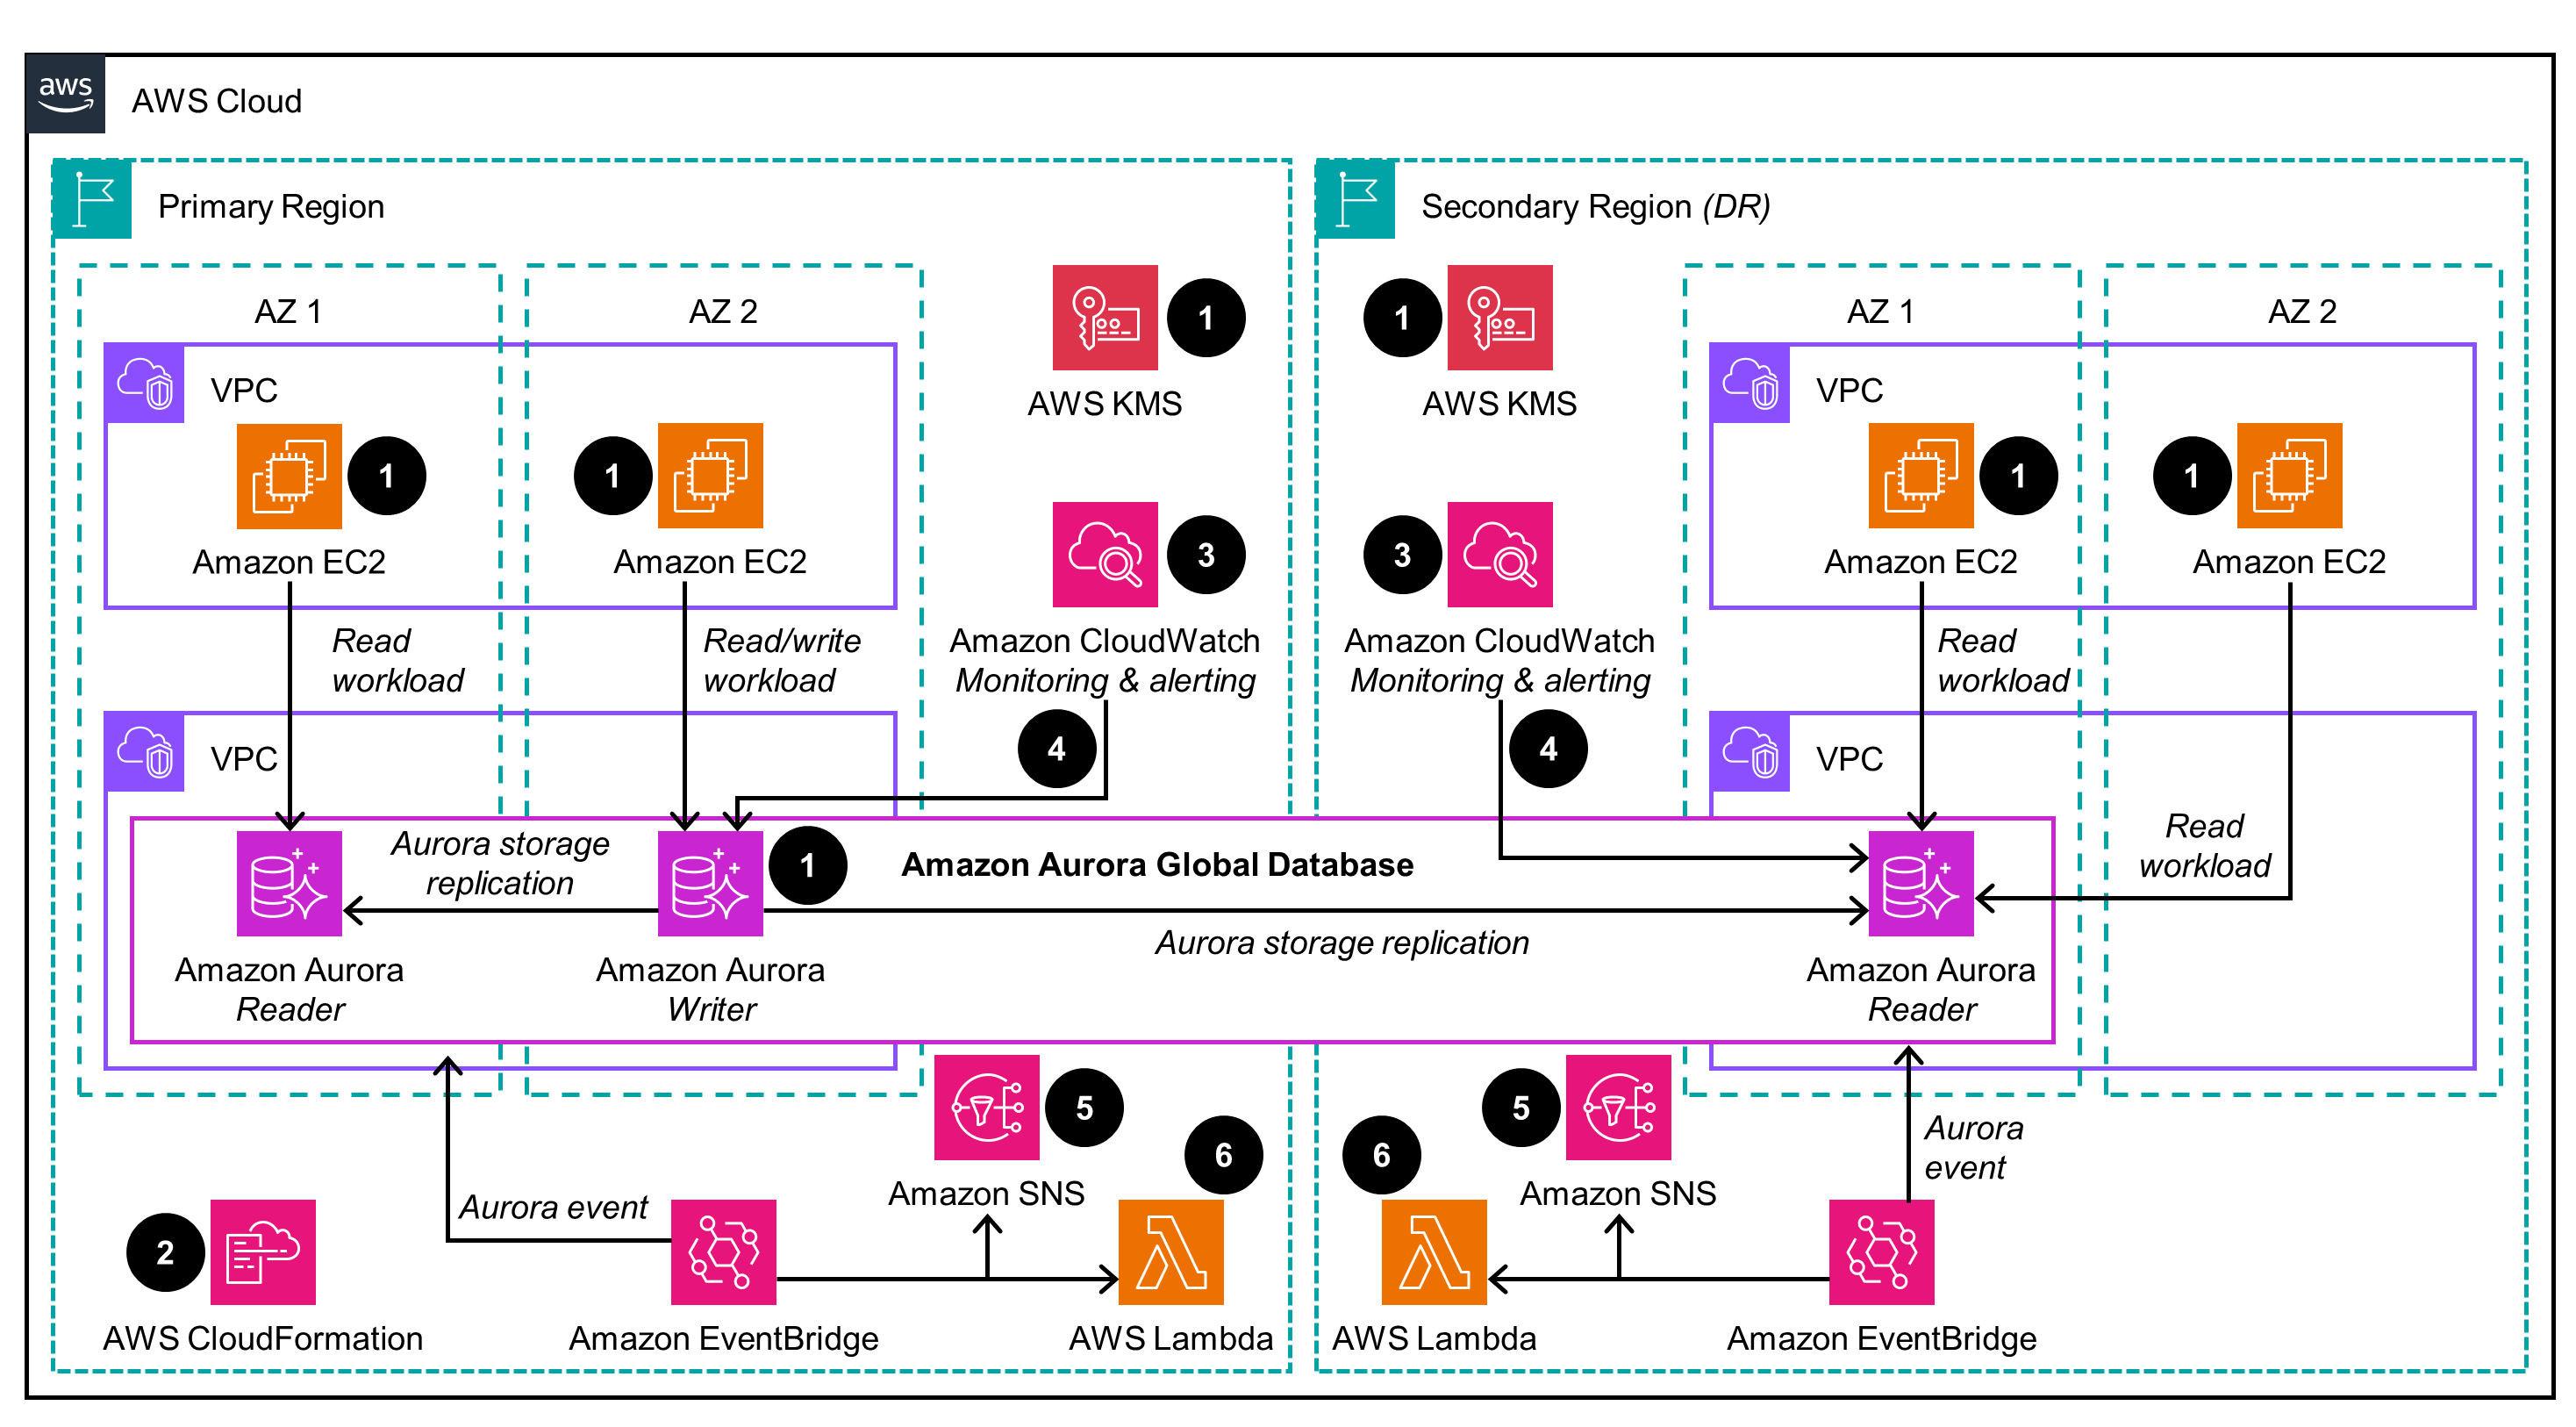
The disaster recovery option with Amazon Aurora Global Database provides the following components and workflows, which are shown as numbered steps in the following diagram.
Prerequisites: This Guidance requires an existing Amazon Aurora Regional cluster. The application can run on Amazon Elastic Compute Cloud (Amazon EC2), Amazon Elastic Kubernetes Service (Amazon EKS), Amazon Elastic Container Service (Amazon ECS), or another service of your choice. This Guidance assumes you have used Amazon EC2 instances in virtual private clouds (VPCs) across multiple Availability Zones (AZs). You can encrypt an Aurora cluster using the default Amazon Key Management Service Amazon KMS or using a customer-managed key (CMK).
The CloudWatch dashboard is configured in the primary and secondary Regions to monitor key metrics related to Aurora, along with replication status.
A CloudWatch alarm is created in both Regions to generate alarms for AuroraGlobalDBReplicationLag metrics and notifications through the Amazon SNS topic.
An EventBridge rule is configured for planned switchovers and unplanned failovers. When an event occurs, it sends notifications using Amazon SNS and calls the Lambda functions in both Regions.
The Lambda function provides a framework to add any additional functionalities during the planned switchover or unplanned outage event. Some of the functionality can be, but is not limited to:
You can configure the application to use an Amazon Route 53 in a newly promoted Region during a failover event so that no application configuration is required during the event.
You can configure the application to restart an Amazon EC2 instance or the application deployment pods in the Amazon EKS cluster after the database failover event.
AWS Backup
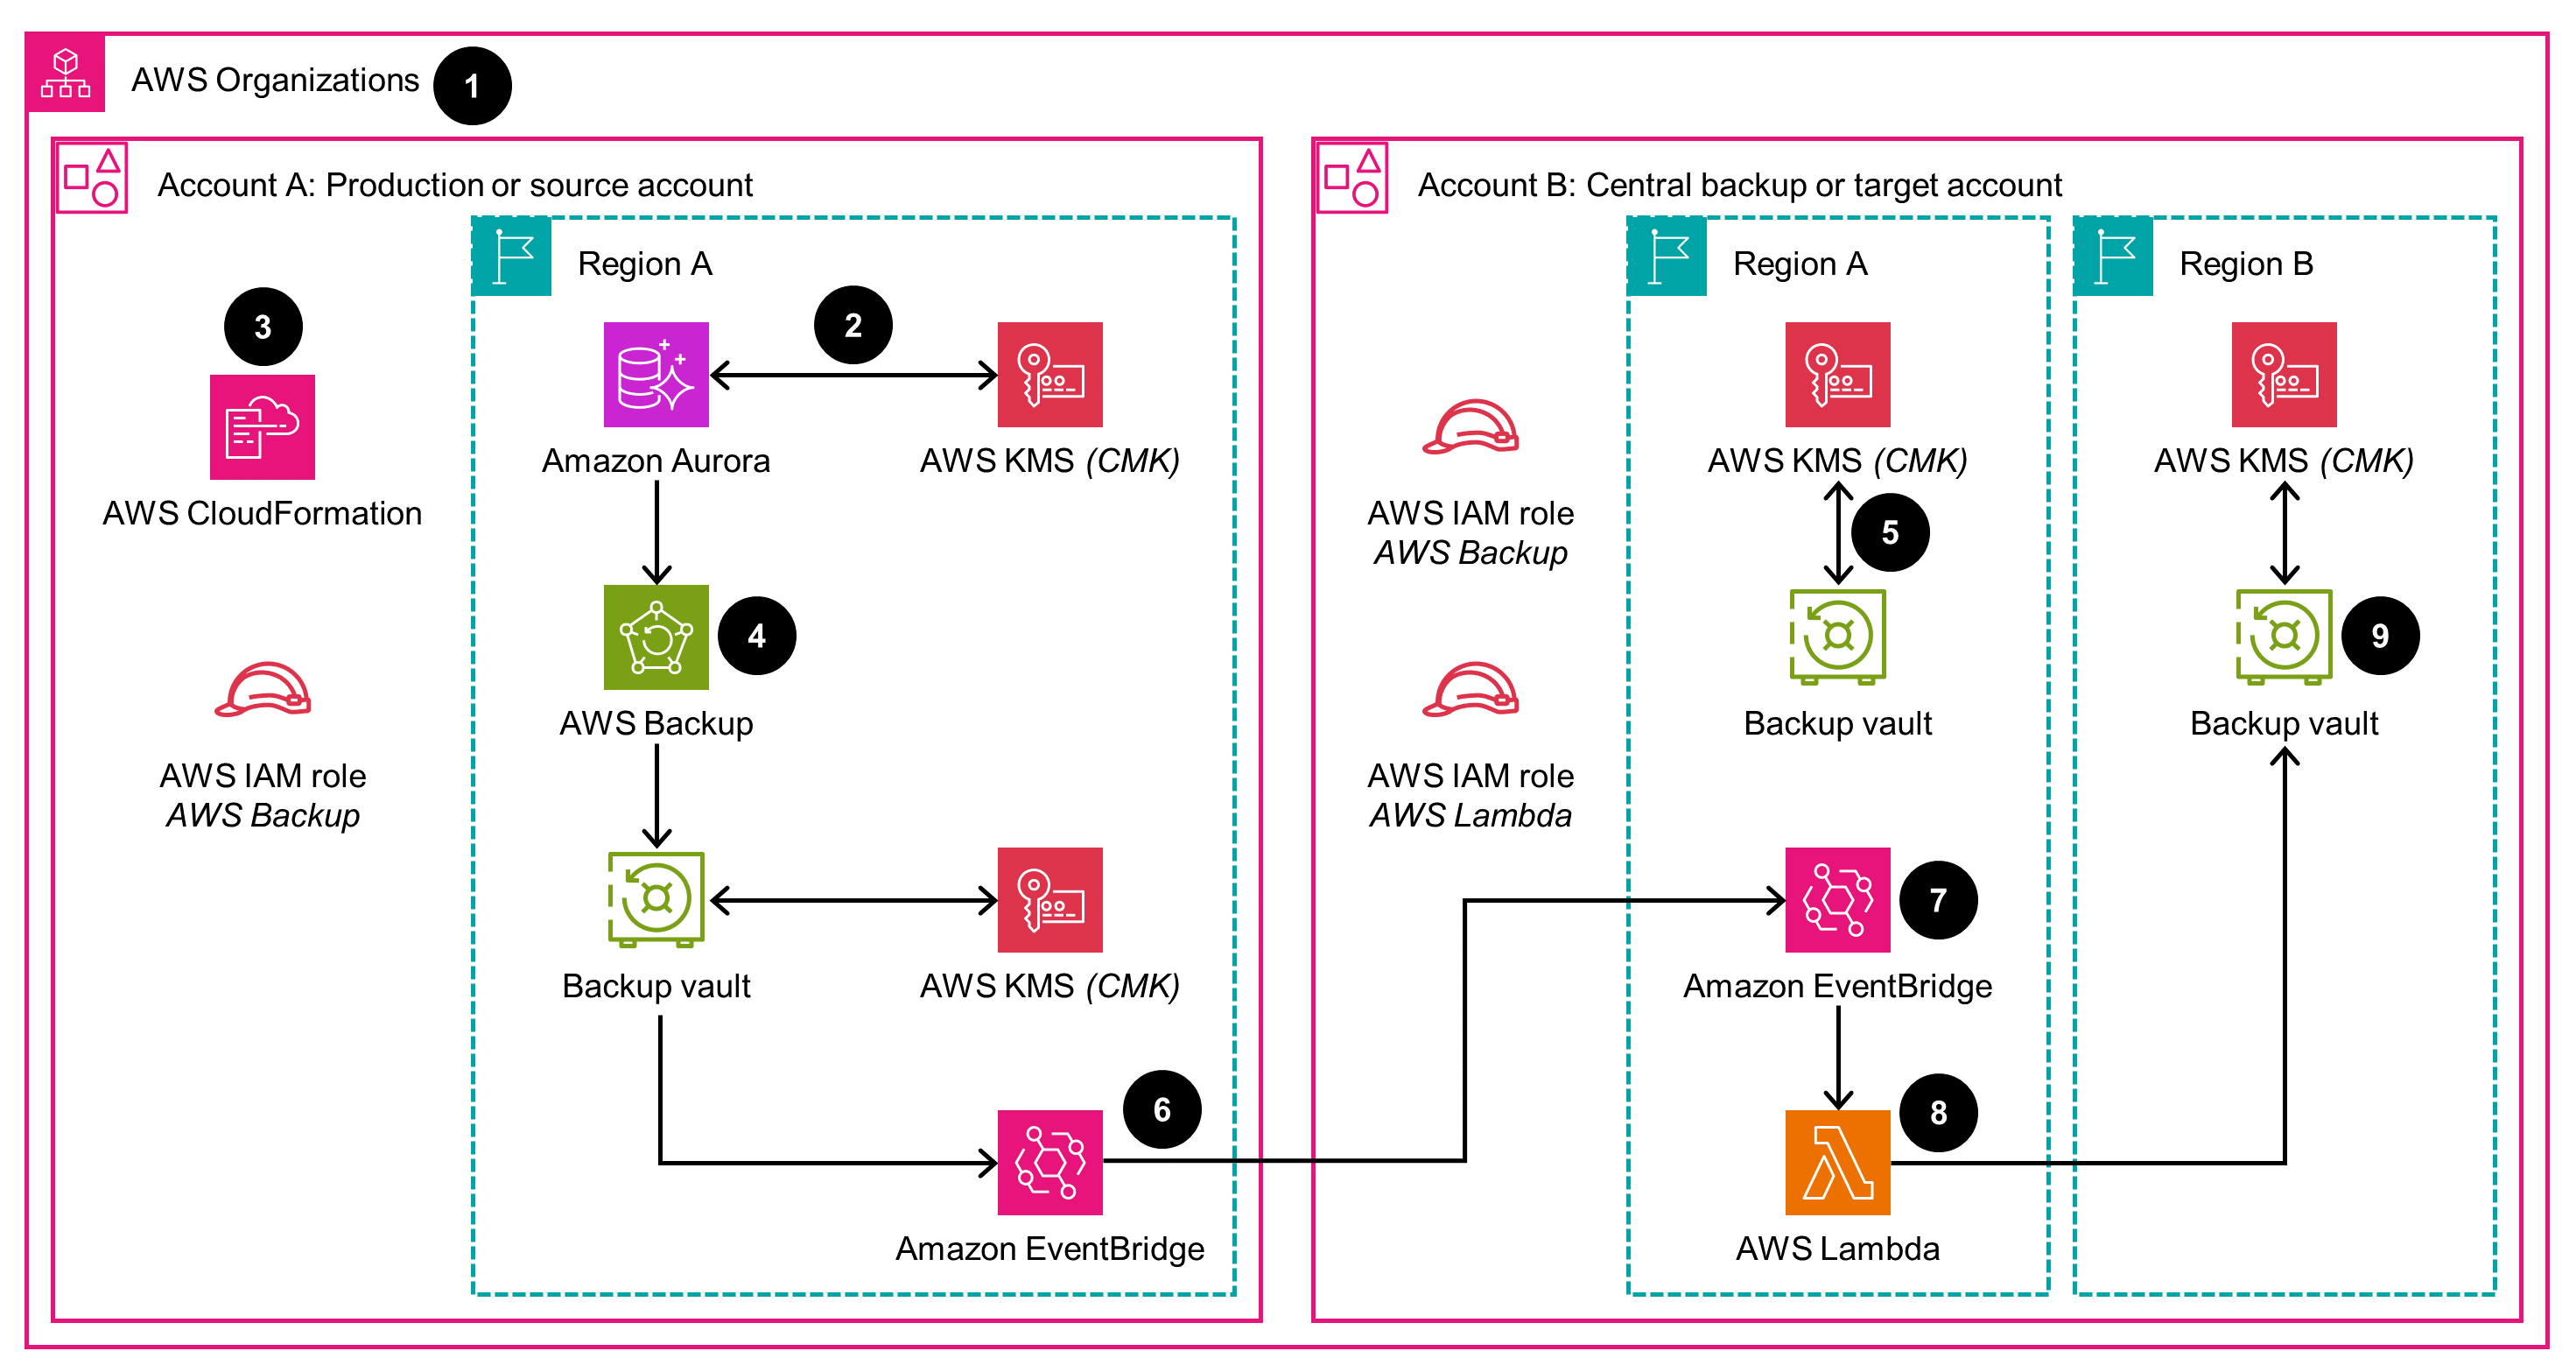
The Guidance’s disaster recovery option with AWS Backup provides the following components and workflows, which are shown as numbered steps in the following diagram.
A pre-existing organizational structure set up within AWS Organizations is necessary to establish cross-account AWS backup between two accounts: Account A, which serves as the Production/Source account, and Account B, designated as the Central Backup/Target account. It’s also important to note that you have the flexibility to include multiple target accounts.
An existing Amazon Aurora in the source account is encrypted using a CMK that is shared across the source and target accounts. The cluster should also be tagged appropriately so that the solution can identify the desired resources for backup.
CloudFormation is used to deploy the solution resources in your source and target AWS accounts and Regions. The required CloudFormation stacks are provided as part of this solution.
The Aurora cluster in Region A of the production account is backed by AWS Backup according to the schedule you provided while deploying the solution. The backups are stored in an AWS Backup vault encrypted with an AWS KMS CMK.
AWS Backup copies the backups to the cross-account (that is, the target account) and stores it in the backup vault in Account B Region A. The backup vault is encrypted using a CMK created by CloudFormation.
Once the cross-account backup copy is complete, an EventBridge rule in the source account forwards a “backup copy complete” notification to the target account event bus (Account B Region A).
An EventBridge rule in the target account in Region A identifies the notification as an incoming event.
Once the event is received in the target account, the EventBridge rule invokes a Lambda function to finally copy the backup to the desired destination (Account B, Region B) and store it in the AWS Backup vault in Region B.
The backup of your Aurora cluster is now available in the target account in Region B and is stored in the AWS Backup vault of Region B. The backup vault is encrypted with an AWS KMS CMK. This backup can be used to restore the Aurora database.
Services
Amazon Aurora: Amazon Aurora is compatible with both MySQL and PostgreSQL. In order to have a disaster recovery solution for the Amazon Aurora databases, we will be relying on one of the out-of-box solutions, Amazon Aurora Global Database, and also a custom solution using AWS Backup.
AWS Backup: AWS Backup will be used as the centralized backup service in this solution for three use cases: 1/ cross-region backup to protect against the primary region failure; 2/ cross-account backup; and 3/ cross-region, cross-account backup. AWS Backup natively provides support for use cases 1 and 2. For use case 3, we will be using the CloudFormation template provided as part of this solution.
Amazon CloudWatch: Amazon CloudWatch is a monitoring and management service that provides data and actionable insights for AWS, hybrid, and on-premises applications and infrastructure resources. We are using Amazon CloudWatch for monitoring and alerting in both the Regions. If you are using the solution to create an Aurora Global Database, the provided CloudFormation template will also create CloudWatch dashboards for you in the primary and secondary Region which will assist in monitoring the cross-Region replication lag between the two Regions. There will also be a sample CloudWatch alarm created for proactive monitoring of the replication lag.
Amazon EventBridge: Amazon EventBridge is a serverless event bus service that makes it easy to connect your applications with data from a variety of sources. You can set up routing rules to determine where to send your data to build application architectures that react in real time to all of your data sources. Amazon EventBridge enables you to build event-driven architectures that are loosely coupled and distributed.
In the Aurora Global database approach, we will use Amazon EventBridge to capture the events generated by the Aurora Global database during the planned switchover or unplanned outage, and send them to the Amazon Simple Notification Service to alert. This Guidance can be extended to call any Lambda function to invoke any process pipeline. With AWS Backup, an EventBridge rule identifies when AWS Backup has invoked a copy of the database backup from one account to another.
Amazon SNS: Amazon Simple Notification Service (Amazon SNS) is a managed service that provides message delivery from publishers to subscribers (also known as producers and consumers). Publishers communicate asynchronously with subscribers by sending messages to a topic, which is a logical access point and communication channel. Clients can subscribe to the Amazon SNS topic and receive published messages using a supported endpoint type, such as Amazon Kinesis Data Firehose, Amazon Simple Queue Service (Amazon SQS), AWS Lambda, HTTP, email, mobile push notifications, and mobile text messages (SMS). In the Aurora Global database approach, we use Amazon SNS to send an email notification whenever the replication lag falls below a certain threshold and for any event notifications, such as a planned switchover or an unplanned outage.
AWS Lambda: AWS Lambda is a serverless computing service that allows you to run code without provisioning or managing servers. With AWS Lambda, you can run code in response to various events, such as changes to data in an Amazon S3 bucket, updates to an Amazon DynamoDB table, or HTTP requests through Amazon API Gateway. In the Aurora Global database warm standby approach, we have created a skeleton AWS Lambda function that will be called whenever there is a planned switchover or unplanned outage operation through Amazon EventBridge. You can add any additional logic in the Lambda function, either to restart the application or update the cluster endpoint. With the AWS Backup solution, Lambda functions are used in the central backup account to copy the backup from the primary region to the secondary region of your choice.
AWS CloudFormation: We will be using AWS CloudFormation to speed up provisioning of the resources with infrastructure as code. The solution consists of two CloudFormation templates to deploy Aurora Global Database in the preferred secondary Region of your choice and set up cross-account and cross-Region backups using AWS Backup and AWS Organizations.
Amazon Route 53: In case of a planned switchover or unplanned outage in the Aurora Global Database approach, you may either manually modify the new Aurora writer instance endpoint in the application code, use Amazon Route 53 to automate this change, or make changes to your existing Route 53 settings.
Cost
You are responsible for the cost of the AWS services used while running this solution.
Amazon Aurora Global Databases
For a cost estimate example, assume there is an existing Amazon Aurora cluster in the US East (Ohio) Region with two instances: one writer instance and one reader instance. This cluster uses 80 GB of storage and processes 45 million write I/O operations and 5 million read I/O operations monthly. By implementing the Aurora Global Database solution, we will add a secondary US West (Oregon) Region with one instance that serves 5 million read I/O operations per month. In addition to that, the solution would also utilize AWS Lambda, Amazon EventBridge, Amazon SNS, and Amazon CloudWatch Dashboard.
The example below provides a cost estimation for running the Amazon Global Database setup with us-east-2 (Ohio) as the primary Region and us-west-2 (Oregon) as the secondary read-only Region based on the previously described scenario.
Current Aurora Cost Estimate:
Primary Region - US East (N. Ohio)
Usage
Calculation
Cost
Database instance
2 * db.r6g.large (at $0.26 per hour) * 30 days * 24 hours
$374.40
Storage
80 GB * $0.10 per GB-month (30 days)
$8
Replicated write I/Os
None
-
Read and write I/Os
50 million I/Os * $0.20 per 1 million I/Os
$10
Data transfers
45 million write I/Os * 2.75 KB per I/O * $0.02 per GB
$2.48
Primary Region cost with Aurora Standard
$394.88
As of August 2023, the cost for running Aurora Global Database solution with US West (Oregon) as the secondary read-only Region is approximately $214.20 per month, including a total of 4 planned switchovers or unplanned outages.
Secondary Region – US West (Oregon)
Usage
Calculation
Cost
Database instance
1 * db.r6g.large (at $0.26 per hour) * 30 days * 24 hours
$187.20
Storage
80 GB * $0.10 per GB-month (30 days)
$8
Replicated write I/Os
45 million replicated write I/Os * $0.20 per 1 million I/Os
$9
Read and write I/Os
50 million I/Os * $0.20 per 1 million I/Os
$10
Data transfers
None
-
Secondary Region cost with Aurora Standard
$214.2
AWS Lambda
500,000 requests per month
$0
Amazon EventBridge
4 events per month
$0
Amazon SNS
4 monthly API requests (Assuming 1 failover event per week between the regions)
$0
Amazon CloudWatch
1 Dashboard with x metrics
$0
Total
$214.20/month
AWS Backup
With AWS Backup, you pay only for the backup storage you use, backup data transferred between AWS Regions, backup data you restore, and backup evaluations. There is no minimum fee, and there are no setup charges.
You are not charged for the backup storage of up to 100% of the size of your database cluster. There is also no charge for database snapshots created within the backup retention period. For all other backups and snapshots (including those from deleted clusters), usage is metered per GB-month. The table below shows a sample monthly cost estimation breakdown for deploying this Guidance for a cross-Region, cross-account scenario. This Guidance utilizes AWS Lambda, and Amazon EventBridge as part of its implementation.
As of August 2023, the estimated monthly cost for running an AWS Backup solution for a cluster that uses 80 GB of storage with a snapshot every 12 hours (for example, approximately 60 snapshots per month) is approximately $684.40 per month.
Account A: Source Region - US East-1 (N. Virginia)
Usage
Calculation
Cost
Aurora snapshot
80 GB * $0.021 per GB-month (30 days)
$100.80
Data transfers
80 * 30 Days * 2 Snapshots per Day * 0.04 per GB
$192.00
Account B: Staging Region – US East-1 (N. Virginia)
Aurora snapshot
80 GB * $0.021 per GB-month (30 days)
$100.80
Data transfers
80 * 30 Days * 2 Snapshots per Day * 0.04 per GB
$192.00
Account B: Destination Region – US East-2 (Oregon)
Aurora snapshot
80 GB * $0.021 per GB-month (30 days)
$100.80
AWS Lambda
2 events per day i.e., 60 events per month
$0
Amazon EventBridge
2 events per day i.e., 60 events per month
$0
Total
$684.4/month
We recommend creating a budget through AWS Cost Explorer to help manage costs. Prices are subject to change. For full details, refer to the pricing webpage for each AWS service used in this Guidance.
Security
When you build systems on AWS infrastructure, security responsibilities are shared between you and AWS. This shared responsibility model reduces your operational burden because AWS operates, manages, and controls the components, including the host operating system, the virtualization layer, and the physical security of the facilities in which the services operate. For more information about AWS security, visit AWS Cloud Security.
IAM roles
AWS Identity and Access Management (IAM) roles allow you to assign granular access policies and permissions to services and users on the AWS Cloud. This solution creates IAM roles, AWSCloudFormationStackSetExecutionRole and AWSCloudFormationStackSetAdministrationRole to access and create additional Regional resources.
AWS Key Management Service keys
The AmazonAurora DR Solution allows you to provide your own Custom Managed Keys (CMK) and AWS Key Management Service (AWS KMS) keys to encrypt captured data by the inference endpoint and monitor baselines, violations reports, and instances’ volumes used by different pipelines. We recommend referring to security best practices for AWS Key Management Service to enhance the protection of your encryption keys.
Design considerations
Amazon Aurora Global Databases
Amazon Aurora Global Database is a feature that allows you to run your globally distributed applications using a single Aurora database that spans multiple AWS Regions. This can provide a number of benefits, including:
Cross-Region disaster recovery: If your primary Region experiences an outage, you can promote one of the secondary Regions to take on read/write responsibilities.
Reduced latency for global users: Your application can serve users in different Regions with lower latency by routing read requests to the nearest secondary Region.
Increased scalability: You can scale up or down the read capacity of your database by adding or removing secondary clusters. The secondary cluster is read-only, so it can support up to 16 read-only Aurora Replica instances rather than the usual limit of 15 for a single Aurora cluster.
Aurora Global Database requires careful planning and consideration to ensure data consistency, availability, and performance across different Regions.
Below are some important design considerations for an Aurora Global Database.
Aurora Global Database Headless Cluster
An Aurora Global Database headless cluster is a secondary cluster in an Aurora Global Database that does not have any DB instances. This type of configuration can lower expenses for an Aurora global database. In an Aurora DB cluster, compute and storage are decoupled. Without the DB instance, the secondary cluster only stores the data for the Aurora Global Database.
There are a few benefits to using a headless cluster in an Aurora Global Database:
Reduced costs: You do not have to pay for the compute resources that are used by the DB instances in the secondary cluster.
Simplified management: You do not have to manage the DB instances in the secondary cluster.
Improved scalability: You can scale the read capacity of your Aurora Global Database by adding more secondary clusters, even if they are headless clusters.
However, there are also a few limitations to using a headless cluster in an Aurora Global Database:
No read-only access: You cannot make the data in the secondary cluster available to your applications without a head node (compute resource).
Reduced availability/Increased RTO: If the primary cluster is unavailable, you cannot failover to the secondary cluster until you provision an instance. This can increase the RTO of your application.
Overall, headless clusters can be a good way to reduce costs and simplify the management of your Aurora Global Database. However, you need to be aware of the limitations before you use them. Depending on your recovery point objective (RPO) needs, you have the option with the proposed solution to decide whether an Aurora Global Database with a headless configuration is required or not.
Amazon RDS Proxy or other features in the critical connectivity path
Database proxies help with connection pooling and reduce the time during the planned switchover. When using Amazon Aurora, there are various database proxy options, like RDS Proxy, PgBouncer, PgPool, and ProxySQL, that can be implemented in your architecture. Careful evaluation is recommended when integrating any proxy into your Aurora environment to ensure it aligns with your application requirements, use cases, and database workload patterns.
A global database planned switchover or unplanned outage operation involves a role switch between the primary and one of the secondary DB clusters. When the selected secondary cluster becomes the new primary, one of its reader instances is promoted to a writer. This DB instance is now the new writer instance for the global cluster. When using RDS Proxy, make sure to redirect your application’s write operations to the appropriate read/write endpoint of the proxy that’s associated with the new primary cluster.
The Lambda function created as part of this deployment can be enhanced to update the configuration of the Proxy server to update the database endpoint during the global database planned switchover or unplanned outage operations.
Network dependencies such as subnet groups, security groups
When configuring security groups for Amazon Aurora Global Database, you need to consider several important factors to ensure the security and proper functioning of your database setup. Security groups act as virtual firewalls that control the traffic allowed to and from your database instances.
Configure the instances in the private subnet group without public access.
Follow the least-privilege principle in providing access to the Aurora Databases through security groups.
Data integrations that rely on the continuity of logical replication
Amazon Aurora PostgreSQL and MySQL support logical replication for extracting the changed data consumed by the downstream application. There are different ways to consume the delta change from the database, and one option is the AWS Database Migration Service (AWS DMS). Logical replication relies on either binary log replication in Aurora MySQL or logical replication slots in Aurora PostgreSQL. During the managed planned switchover, the replication slot or the binary log position is being transferred to the new primary Region, and any downstream consumer applications (such as AWS DMS, Debezium, and Maxwell) can start consuming the change data capture (CDC) data from that point onwards without any loss of data. In the event of an unplanned outage, the secondary Region is detached and promoted, and there could be a loss of data. The replication slot or the binary log position is not transferred to the newly promoted database and requires recreation of the AWS DMS tasks in the newly promoted Region.
Database credentials stored in Secrets Manager
AWS Secrets Manager is a service that helps you securely store, manage, and rotate secrets. Secrets Manager can be used to store database credentials, API keys, and other sensitive information. An application can retrieve credentials from the Secrets Manager to connect to the database. We recommend replicating your secrets to the secondary Regions, so that during planned switchovers or unplanned outage operations, the application can still retrieve those secrets, regardless of which Region is active as primary.
Amazon Aurora Database supports IAM and/or Kerberos for database authentication. Since IAM roles and policies are global, the IAM authentication works during the Aurora Global Database planned switchovers or unplanned outage operations. If the primary Region is configured for Kerberos authentication using AWS Directory Service for Microsoft Active Directory, make sure it is also configured in the secondary Region for application connectivity after the planned switchovers or unplanned outage operations.
Aurora Auto Scaling policies for read replicas
Amazon Aurora Auto Scaling dynamically adjusts the number of Aurora replicas provisioned for an Aurora DB cluster. Aurora Auto Scaling enables your Aurora DB cluster to handle sudden increases in connectivity or workload. When the connectivity or workload decreases, Aurora Auto Scaling removes unnecessary Aurora Replicas so that you don’t pay for unused provisioned DB instances. In the Aurora Global database configuration, make sure the same auto-scaling policy is configured in the secondary Region.
AWS Backup plans
When designing an Amazon Aurora Global Database architecture with AWS Backup plans, you should consider several factors to ensure effective data protection, recovery, and compliance. AWS Backup is a fully managed service that centralizes and automates backup management for various AWS resources, including Aurora databases. AWS Backup plans and policies are Regional and required to be configured in the secondary Region to continue taking backups of the Aurora Database after planned switchovers or unplanned outage operations.
Cluster and database parameter groups
In Amazon Aurora, cluster and database parameter groups are key for customizing database configurations. They allow fine-tuning of the settings to optimize performance, reliability, and behavior. For Aurora Global Database, you can create and associate different parameter groups for the primary cluster and Aurora replicas to cater to their specific needs. We recommend that you keep settings consistent among all the clusters in a global database. Doing this helps to avoid unexpected behavior changes if you promote a secondary cluster to be the primary cluster. Any parameter change in the primary Region needs to be synced to the secondary Region either manually or through any continuous integration/continuous delivery (CI/CD) pipeline to avoid deviations in the configuration.
AWS Backup
In the cloud, a strategy we see customers employ to accomplish the goal of protecting their data is to create a centralized account to which multiple departments or lines of business within the organization can back up their data. Backing up to a different account can offer protection if your production account is compromised by a ransomware attack, for example. Furthermore, organizations often copy their data to another geographic Region as a method of complementing their disaster recovery (DR) strategy, thereby offering additional protection in case of a complete Regional failure.
A backup and restore-based DR solution is economical when the requirements for recovery point objective (RPO) and recovery time objective (RTO) are in the order of hours.
Cold backups are the lowest-cost option but come with the longest RTO and RPO. You need to take a backup and restore it to a new instance before the database is back online. The amount of data being backed up affects how quickly a restore can happen.
You can consider a couple different options: Service-provided automated backups, manual volume snapshots, and self-managed logical backups (data dumps). In this solution, we use AWS Backup to manage these backups. A backup and restore-based DR solution is economical when the requirements for recovery point objective (RPO) and recovery time objective (RTO) are in the order of hours.
When customers use cold backups for their disaster recovery, we have commonly seen them choose one of these solutions depending on their business use case and compliance needs:
Same-account, cross-Region: This option provides protection from an AWS Regional issue (in case of a rare scenario, an AWS Region or the service in the Region is not accessible). However, this does not protect you if there is an issue with your AWS account or the account is compromised.
Cross-account, same-Region: With cross-account, you get protection in case there is an issue with your AWS account. However, as the cold backup is stored in the same Region as your primary Aurora cluster, this will not protect your account if, in a rare scenario, there is an AWS Region outage.
Cross-account, cross-Region: In the cloud, a strategy we see customers employ to accomplish the goal of protecting their data is to create a centralized account to which multiple departments or lines of business within the organization can back up their data. Backing up to a different account can offer protection if your production account is compromised by a ransomware attack, for example. Furthermore, organizations often copy their data to another geographic region as a method of complementing their disaster recovery (DR) strategy, thereby offering additional protection in case of a complete regional failure.
The AWS Backup service, as part of this Guidance, covers all the above-mentioned use cases, and we recommend implementing a cross-account, cross-region strategy as a DR solution for Amazon Aurora.
A few things to note are:
Backups managed by AWS Backup are considered manual DB snapshots and don’t count toward the DB snapshot quota for Amazon RDS.
Cross-account backups aren’t possible for Amazon Aurora databases encrypted using the default KMS key because the default service key can’t be shared with other accounts. If an Amazon Aurora cluster is encrypted with a KMS key, the KMS key should be shared with all accounts to which the snapshot is to be copied.
Below are some important design considerations while using AWS Backup to restore an Aurora database from a previous backup.
Network dependencies such as subnet groups, security groups
The backups taken by AWS Backup can be used to restore a new Aurora database cluster in the event of a disaster. You may also decide to restore from these backups if you are creating a test or staging environment and want to use the most recent copy of your production data. Once the restoration of the Aurora cluster is complete, the next step is to connect to it in order to proceed with your use case. For this, we have to ensure we are selecting the correct network resources while restoring the Aurora cluster. When restoring an Amazon Aurora cluster page, you will have to select the correct Virtual Private Cloud (VPC), security groups, and database subnet group. Security groups act as virtual firewalls that control the traffic allowed to and from your database instances.
Configure the instances in a private subnet group without public access.
Follow the principle of least privilege when providing access to the Aurora Databases through security groups.
While performing regular disaster recovery drills, it will be useful to test the restore procedure and create a runbook for your team to complete the process. In the event of a disaster, the recovery time objective (RTO) is the target period of time within which the database should have recovered for user connections. The time it takes for your Aurora cluster to be restored and your applications to successfully connect with it will also be a factor in the RTO value. Therefore, it is essential to have all the required networking resources ready in your central backup account or target account and target Region to ensure there are no disruptions after you have switched the endpoint in the application to point to the new Aurora restored cluster.
Instance configuration
While restoring from a backup stored in AWS Backup, the first Aurora cluster is restored by AWS Backup; it does not create or attach an Amazon RDS instance to your cluster. A writer instance can be attached to your cluster using the CLI, which is also described with detailed steps in the Deploy the Guidance section of this implementation guide. If you are attaching a writer instance to your cluster as part of actively recovering from a disaster, ensure you select the correct instance class configuration that closely matches the configuration of your original Aurora cluster. The DB instance class determines the computation and memory capacity of an Amazon Aurora DB instance. Choosing a smaller instance class if you are using Aurora Provisioned, or choosing a lower minimum and maximum ACU value if you are using Aurora Serverless v2, may put resource pressure on your database workloads. Therefore, before you switch production workloads to your restored Aurora cluster, ensure you are using the correct instance class. You can then also add additional replica instances (up to 15 replicas) to your Aurora cluster from the AWS console itself. Similarly, if you are planning to restore from a backup to refresh your test or staging environments, you can choose a similar or lower instance configuration compared to your original Aurora cluster in order to save costs.
Cluster and database parameter groups
In Amazon Aurora Database, cluster and database parameter groups are key for customizing database configurations. They allow fine-tuning settings to optimize performance, reliability, and behavior. You can create and associate different parameter groups for primary and Aurora replicas to cater to their specific needs. If you are restoring from AWS Backup to create a staging or test environment, you may decide to have different parameter settings compared to your original Aurora cluster that is servicing production traffic. If you are using the backups stored in AWS Backup to restore an Aurora cluster in the event of a disaster with the original cluster, we recommend you keep parameter settings consistent to avoid unexpected behavior changes or performance degradation. As part of your DR drills, you can have a copy of your instance or cluster parameter group ready in the central backup account and keep it updated on a timely basis as you continue to make changes to the parameter groups attached to your original Aurora cluster.
AWS CloudFormation templates
You can download the CloudFormation templates for this Guidance before deploying it.
This Guidance uses AWS CloudFormation to automate deployment. It includes the following two templates: the Amazon Aurora Global database deployment option and the AWS Backup deployment option.
CloudFormation template for Solution 1: Amazon Aurora Global Database
Use this template to launch the Amazon Aurora Global Database from your primary Region. As part of this solution, we will create a secondary Region as part of the Aurora Global Database replication topology and other required services. However, you can customize the template to meet your specific needs.
CloudFormation template for Solution 2: AWS Backup
Use these templates to launch the Amazon Backup solution for your Amazon Aurora cluster. To demonstrate, we will be implementing cross-account, cross-region backup. However, you can customize the parameters to meet your specific use cases, such as cross-account, same-region, and same-account, cross-region.
An existing Aurora MySQL or Aurora PostgreSQL cluster for which you would like to configure Amazon Aurora Global Databases.
Amazon Aurora cluster can be configured with a default AWS KMS key or a Customer Managed Key (CMK) for encryption, or without storage-level encryption. This solution supports all of the above combinations. However, we highly recommend encryption at rest using either the default AWS KMS key or a CMK.
Ensure that the AWSCloudFormationStackSetAdministrationRole role and theAWSCloudFormationStackSetExecutionRole role are created in the primary Aurora Global Database Region. For more information, refer to Grant self-managed permissions.
Install and configure the latest version of the AWS CLI (2.2.37 or newer) and Python 3.10 on the machine you are going to use to interact with it. This can be your personal laptop, an Amazon EC2 instance, Cloud9, or a similar machine. Set up the AWS credentials for the user who is authenticated to set up the stacks in the primary Region.
Provision the resources
Before you launch the solution, review the cost, architecture, network security, and other considerations discussed earlier in this guide.
This implementation guide will deploy resources using CloudFormation across two Regions - the primary Region (us-east-2) and the secondary Region (us-west-2). The primary Region already contains an Amazon Aurora cluster that requires a disaster recovery implementation in the secondary Region.
Here is the quick overview of the Aurora cluster that will be used to implement the Global Database DR solution and Regions.
2. Create the CloudFormation stacks in Primary Region A
In this section, you create two CloudFormation stacks in the Production account where the primary Aurora database cluster resides. You can find more information on these roles in the AWS CloudFormation documentation.
If this is the first CloudFormation stack you’re creating and you’re redirected to the AWS CloudFormation welcome screen, choose Create Stack to go directly to the window for specifying the CloudFormation template.
On the Create stack menu, choose With new resources.
For Template source, select Upload a template file.
Choose the file and upload AWSCloudFormationStackSetAdministrationRole.yml from the files you downloaded from GitHub while cloning the repository.
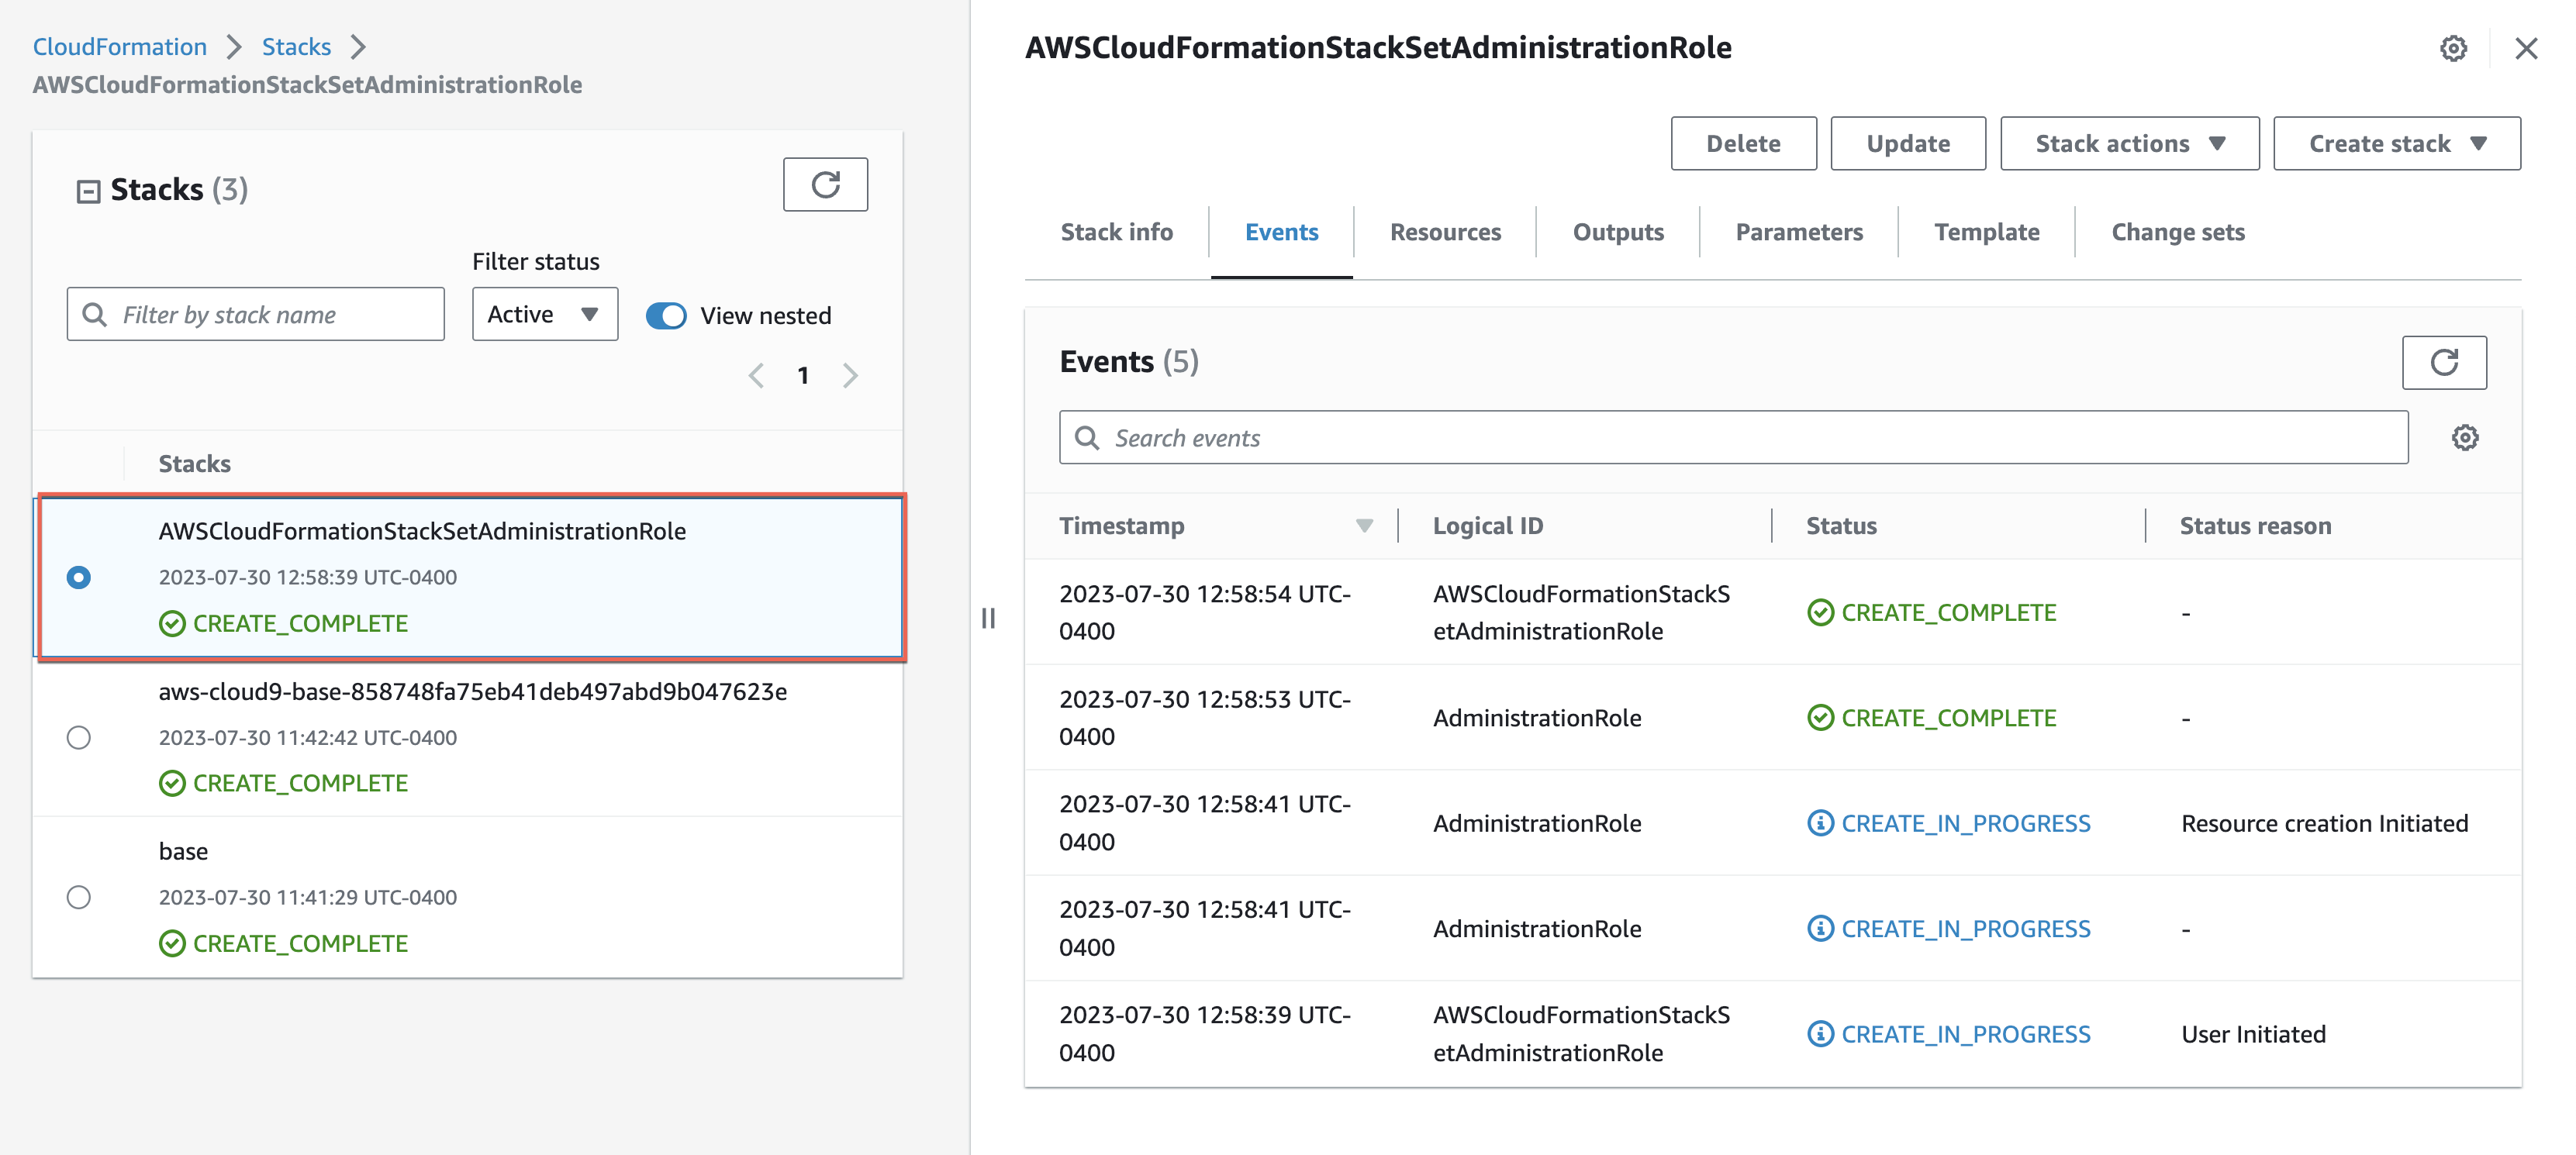
Choose Next and provide the stack name as AWSCloudFormationStackSetAdministrationRole
Choose Next.
Choose Next again.
Select the check box to acknowledge resource creation.
Choose Create stack.
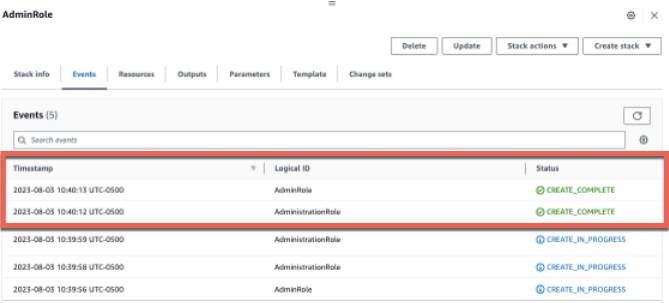
When the CloudFormation stack status changes to CREATE_COMPLETE, navigate to the Resources tab and validate that the role has been created successfully:
Deploy in the production account
We also have to deploy AWSCloudFormationStackSetExecutionRole CloudFormation template in the same Production account you are operating in and the same region (Region A).
From the CloudFormation console, choose Create Stack and choose With new resources.
For Template source, select Upload a template file.
Choose the file and upload AWSCloudFormationStackSetExecutionRole.yml from the files you downloaded from GitHub while cloning the repository.
Choose Next.
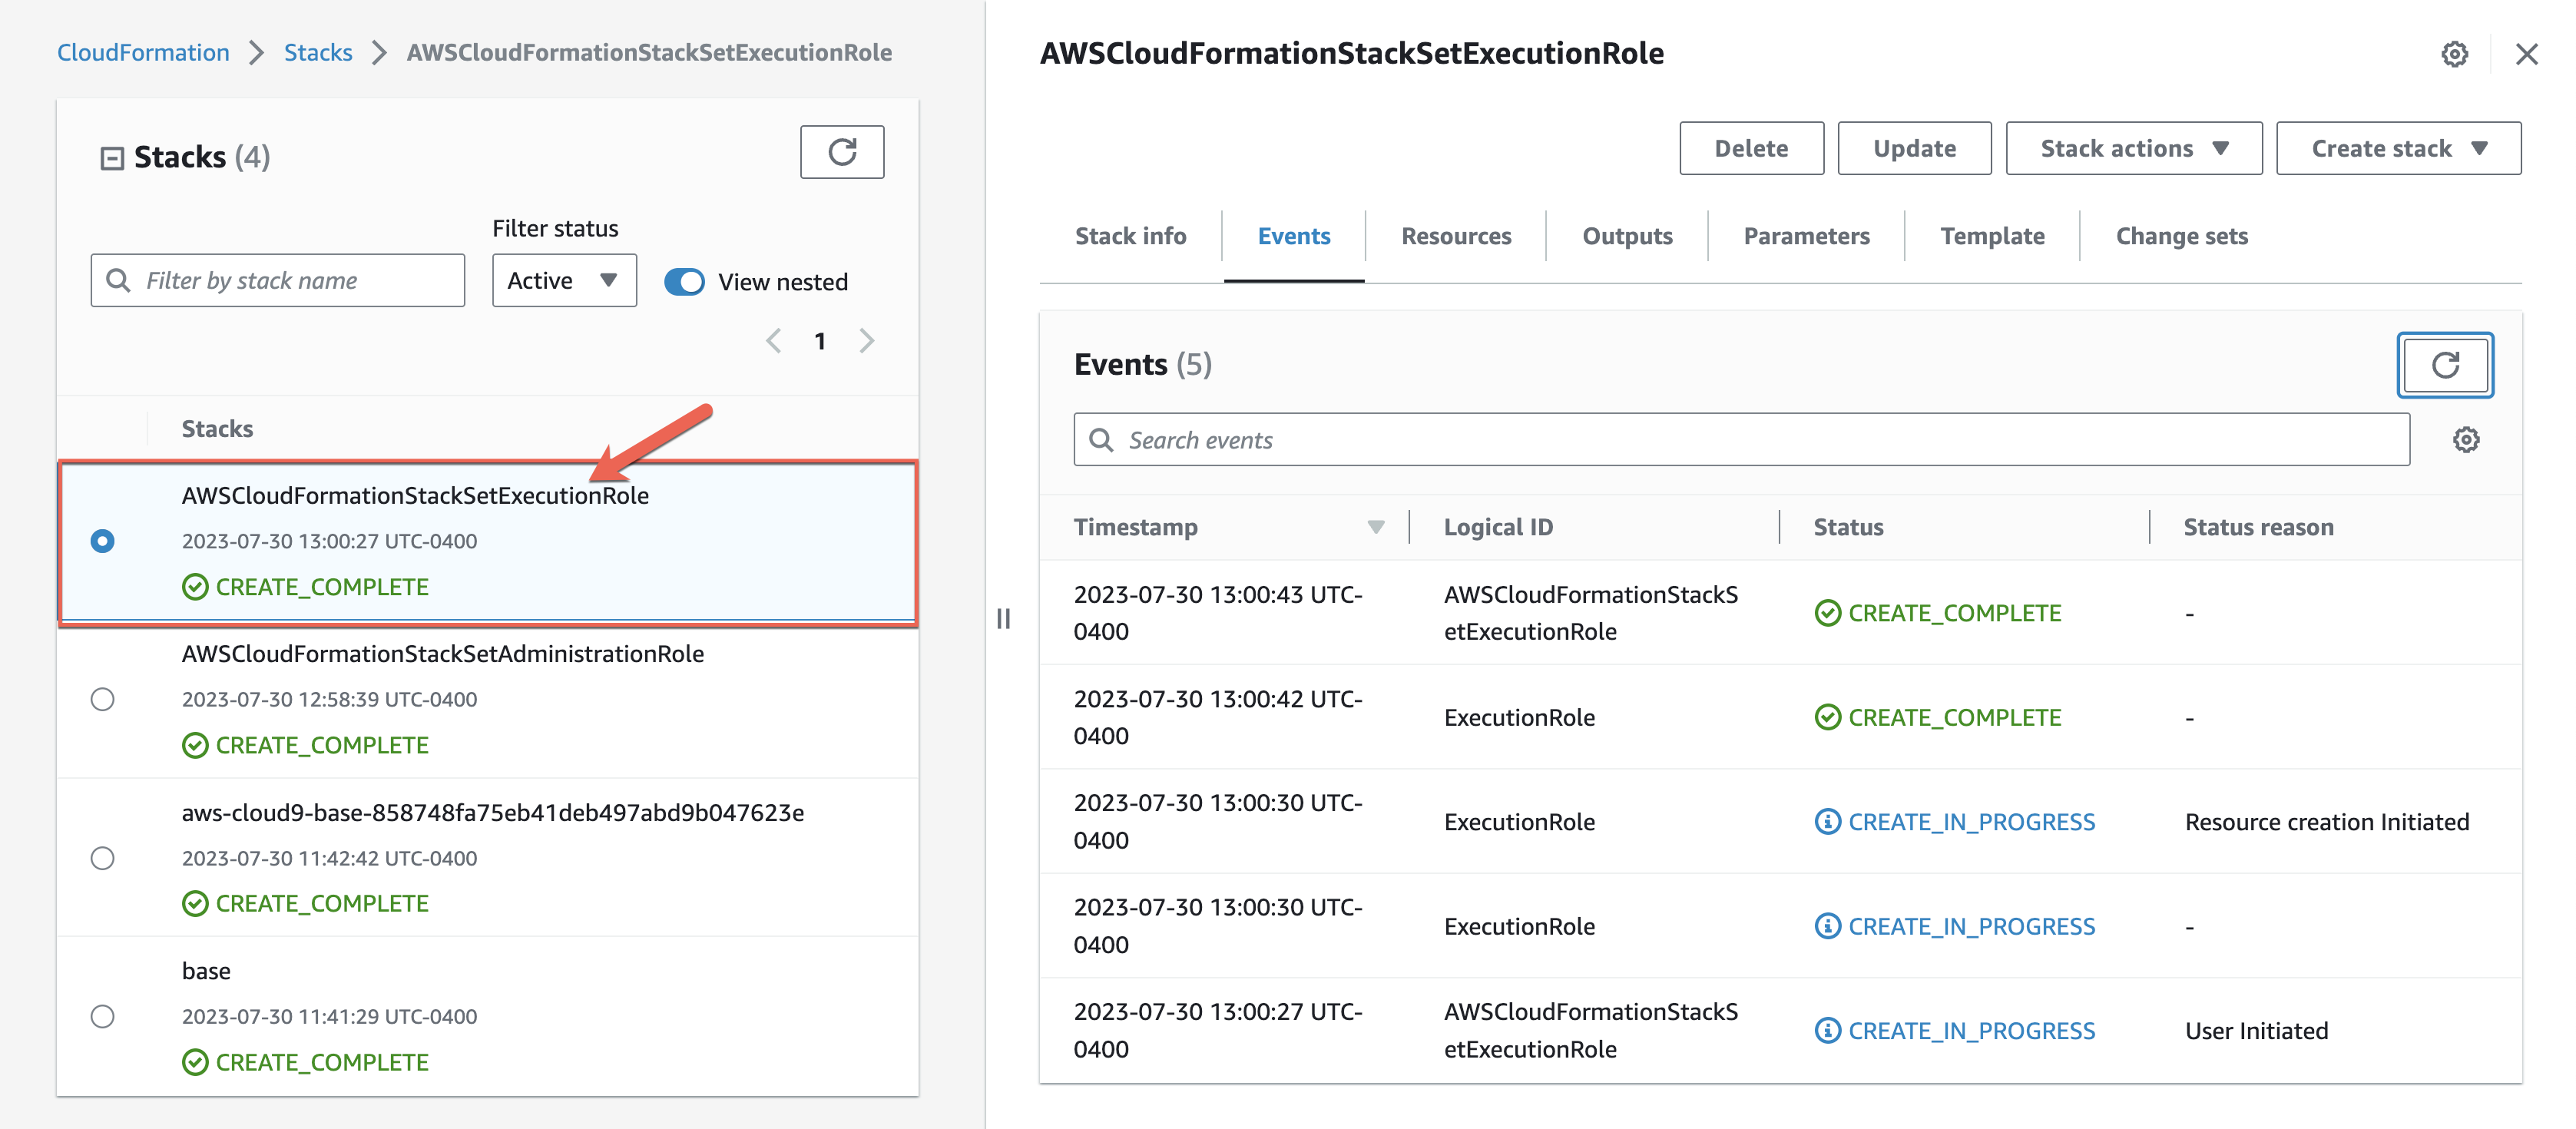
Provide the Stack Name as AWSCloudFormationStackSetExecutionRole.
Under AdministratorAccountId, provide the AWS Account Id of your source or Production OU account (the account you are working in).
Select Next
Choose Next again.
Select the check box to acknowledge resource creation.
Choose Create stack.
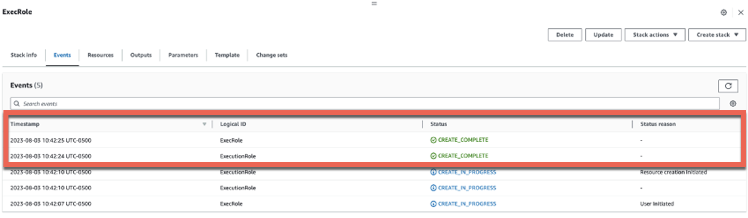
When the CloudFormation stack status changes to CREATE_COMPLETE, navigate to the Resources tab and validate that the role with other resources has been created successfully:
3. Run the CloudFormation stack in Primary Region A
In this section, we will create the Aurora Global Database and other required services to support this Guidance.
From the CloudFormation console, select Create Stack and choose With new resources.
For Template source, select Upload a template file.
Choose file and upload AuroraGloablDatabasaeSolution.yml from the files you downloaded from GitHub while cloning the repository.
Choose Next.
Here is the list of parameters along with the description:
Parameter Name
Parameter Description
Sample Value
StackName
Name of the Stack
AuroraGlobalDatabaseSolution
NotificationEmailAddress
Email address to notify for any alarm
mynotificationemail@domain.com
HeadlessCluster
No reader replica in the Secondary Region
No
GlobalDatabaseIdentifier
Name of the global database Identifier
apg-global-dr-sol
PrimaryClusterIdentifier
Name of the Primary cluster identifier
apg-dr-sol-us-east-2
DashboardNamePrefix
CloudWatch Dashboard Prefix
agd
SecondaryRegionName
Secondary Region name
us-west-2
SecondaryDBSubnetID
Secondary Region Database Subnet Group ID
apg-dr-sol-subnet
SecondarySecurityGroupID
Secondary Region Security Group ID
sg-06bd2742xxxxx
SecondaryEncryptionKeyAlias
Secondary Region Encryption Key Alias Name
apg-dr-sol-key
SecondaryClusterIdentifier
Secondary Region Cluster Identifier
apg-dr-sol-us-west-2
SecondaryInstanceIdentifier
Secondary Region Instance Identifier
apg-dr-sol-us-west-2-1
SecondaryClusterParameterGroup
Secondary Region Cluster Parameter Group
default
SecondaryDBParameterGroup
Secondary Region Database Parameter Group
default
Select Next
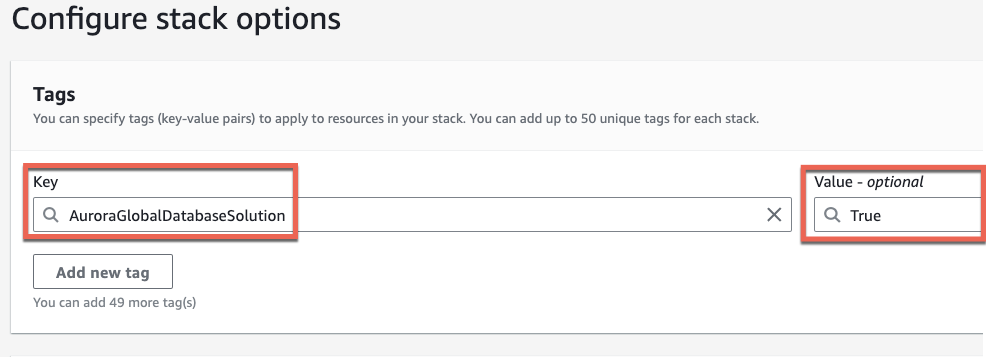
Optionally, you can add a tag to all the resources created as part of this CloudFormation stack:
Key: AuroraGlobalDatabaseSolution Value: True
Choose Next again.
Select the check box to acknowledge resource creation.
Choose Create stack.
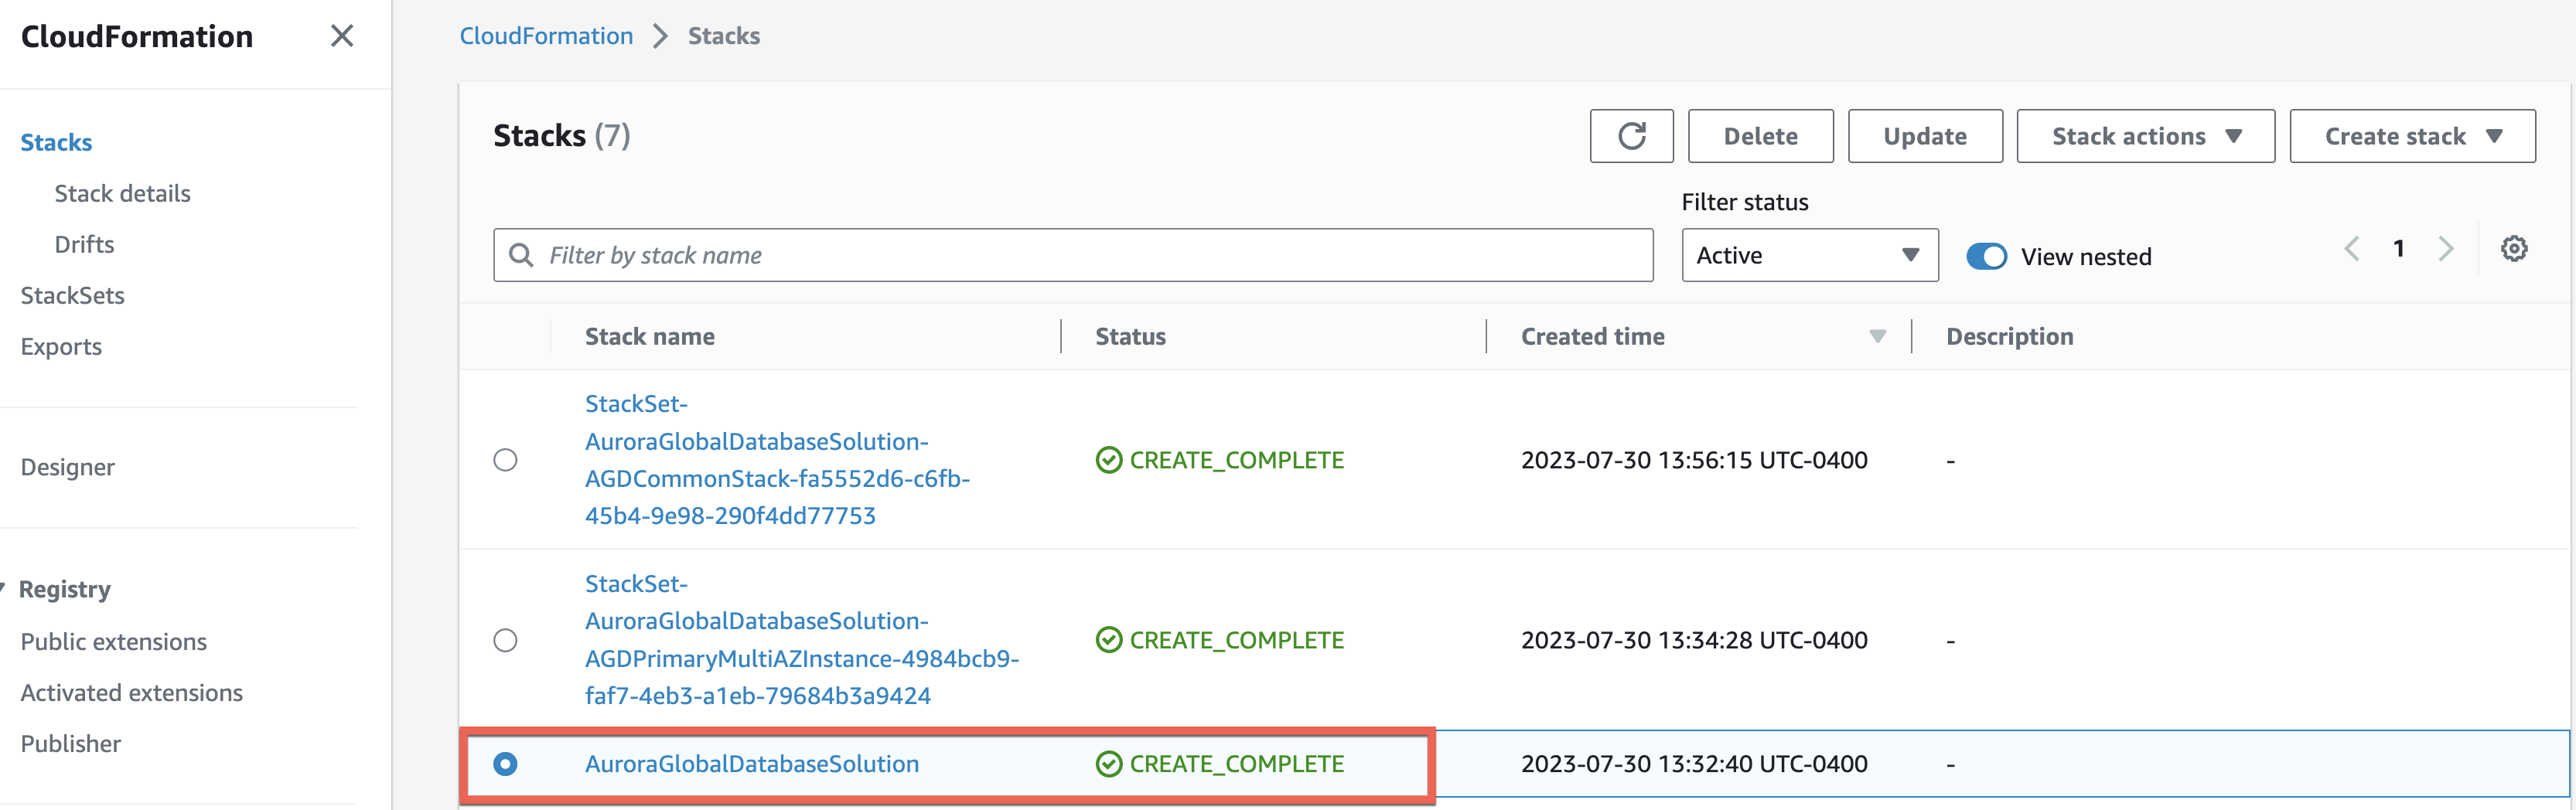
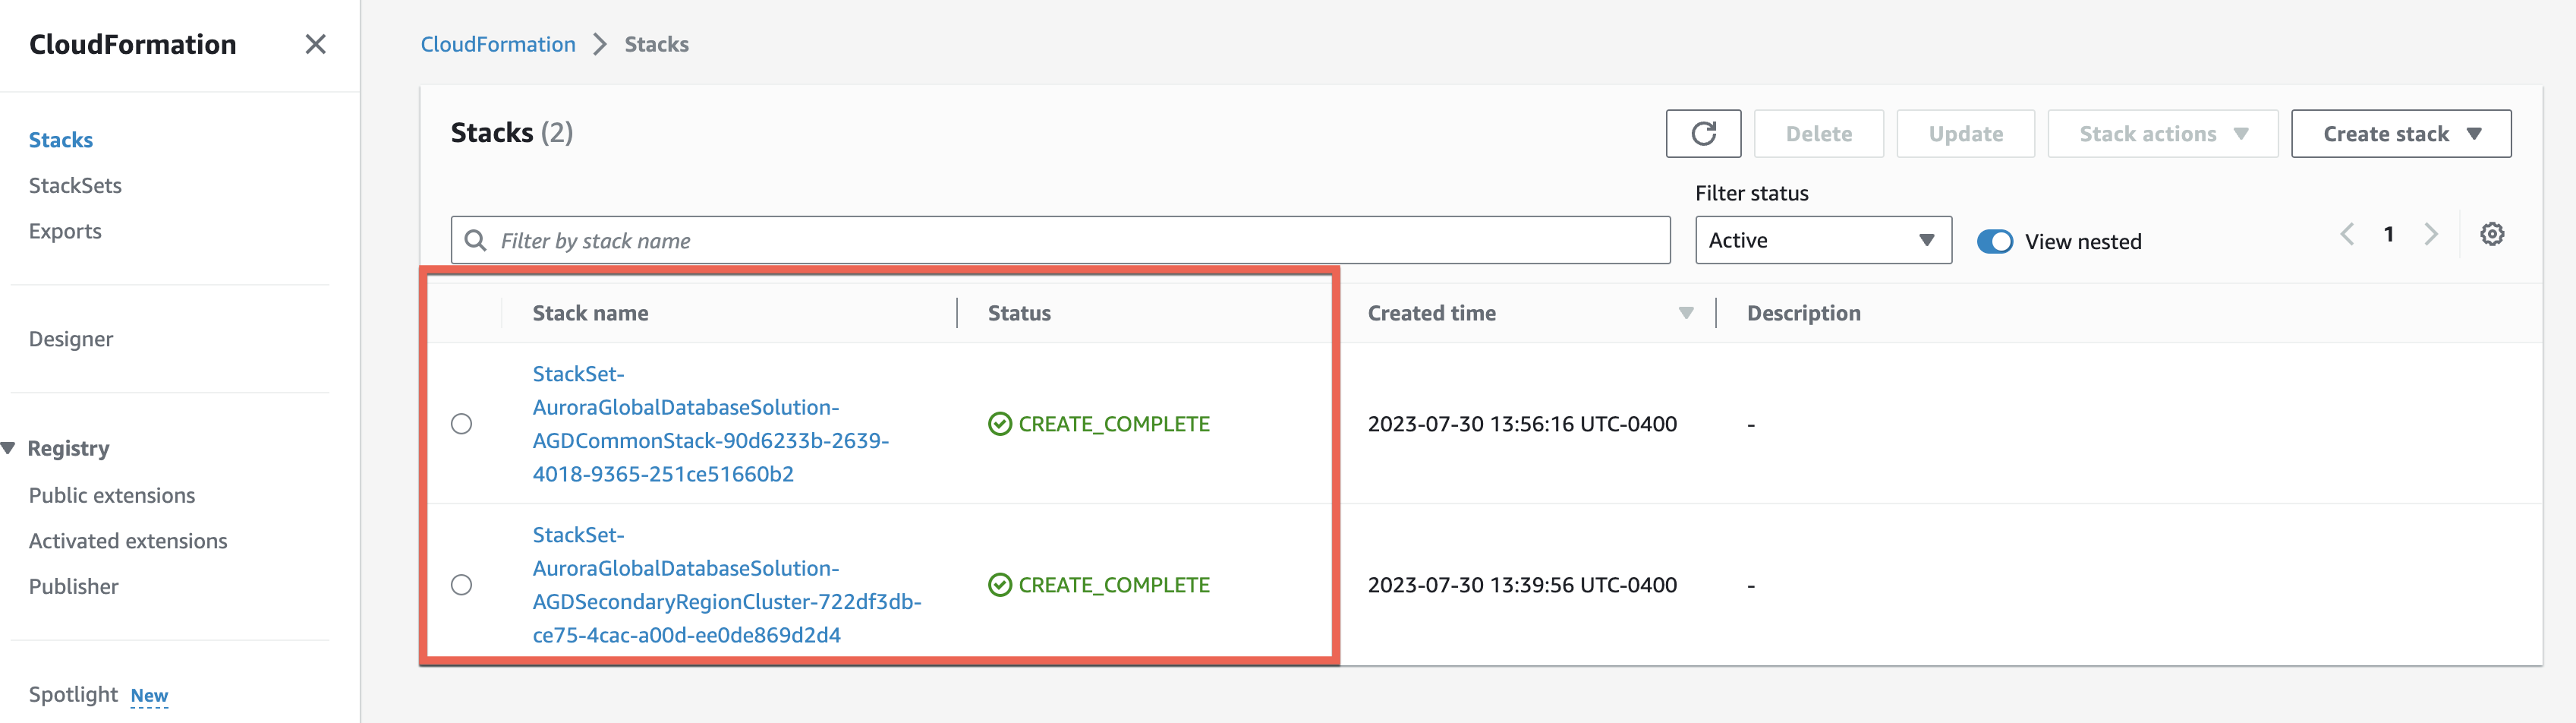
When the CloudFormation stack status changes to CREATE_COMPLETE, navigate to the Resources tab and validate that the role with other resources has been created successfully. The sample CloudFormation stack output from Primary region A (us-east-2):The sample CloudFormation stack output from DR Region B (us-west-2):
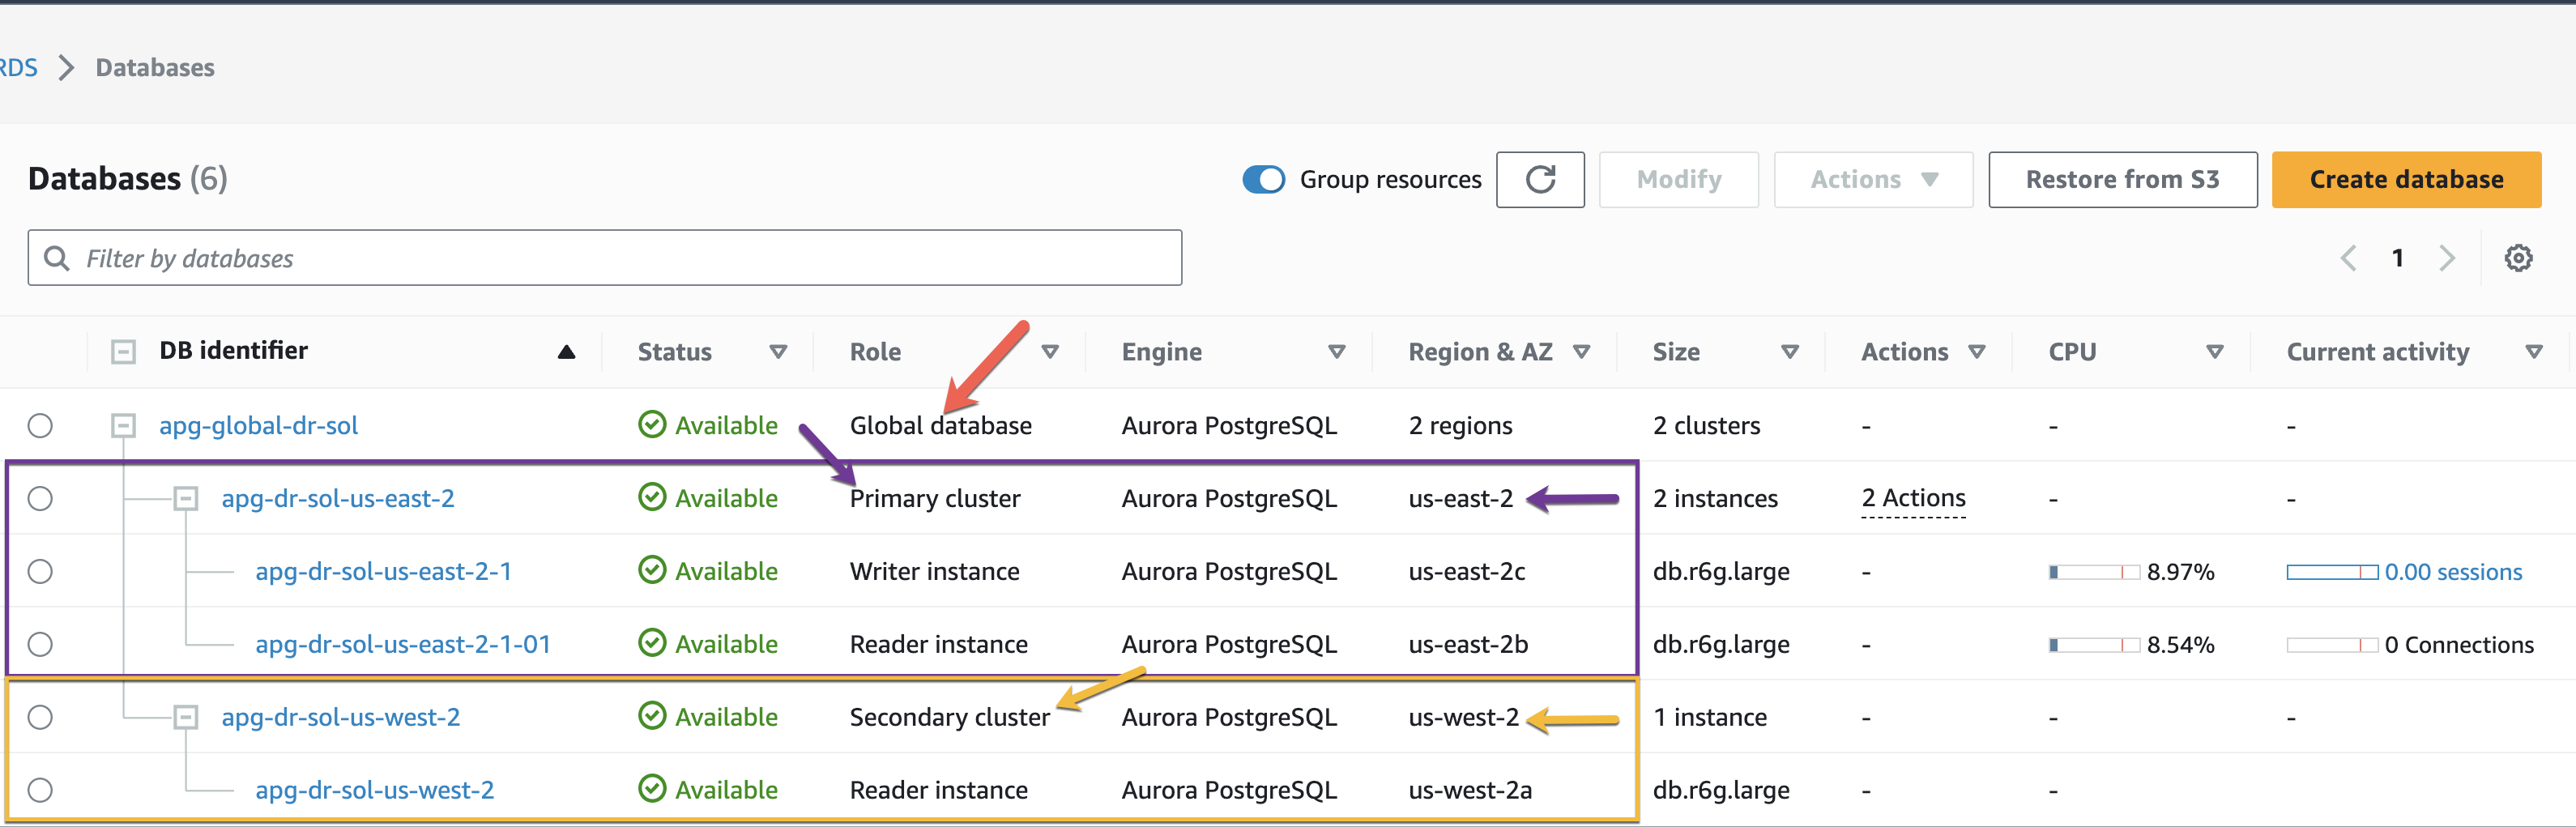
Now, review the Amazon Aurora cluster topology after successfully deploying the CloudFormation template:
Once the CloudFormation stack is deployed successfully, it wIll have provisioned the following resources:
If the Amazon Aurora Cluster in the primary Region is not already configured for multi-AZ, this capability will be enabled as part of the CloudFormation stack deployment. This will create an Aurora reader instance in a different availability zone (AZ) from the writer instance, matching the writer configuration in terms of instance type and parameter group.
Creates a global database with the name provided during the stack deployment.
Adds a secondary Region to the global database.
Adds a reader instance in the secondary Region based on the configuration information provided during the stack deployment.
Creates a CloudWatch dashboard with the predefined monitoring metrics.
Configures a CloudWatch alarm for Aurora Global Database replication lag.
Provides Lambda functions to handle Aurora Global Database planned switchovers or unplanned outages.
Configures Amazon SNS notification to alert for CloudWatch alarm and global database planned switchover/unplanned outage.
Monitoring
As part of this deployment, we have created the CloudWatch Dashboard on primary and secondary Regions to monitor the Aurora Global Database. In addition to that, the deployment also created a sample Global Replication Lag metric alarm. This alarm will send an email notification to the configured email if the replication lag is more than 600 seconds (10 minutes). This can be configurable depending on your RPO requirements.
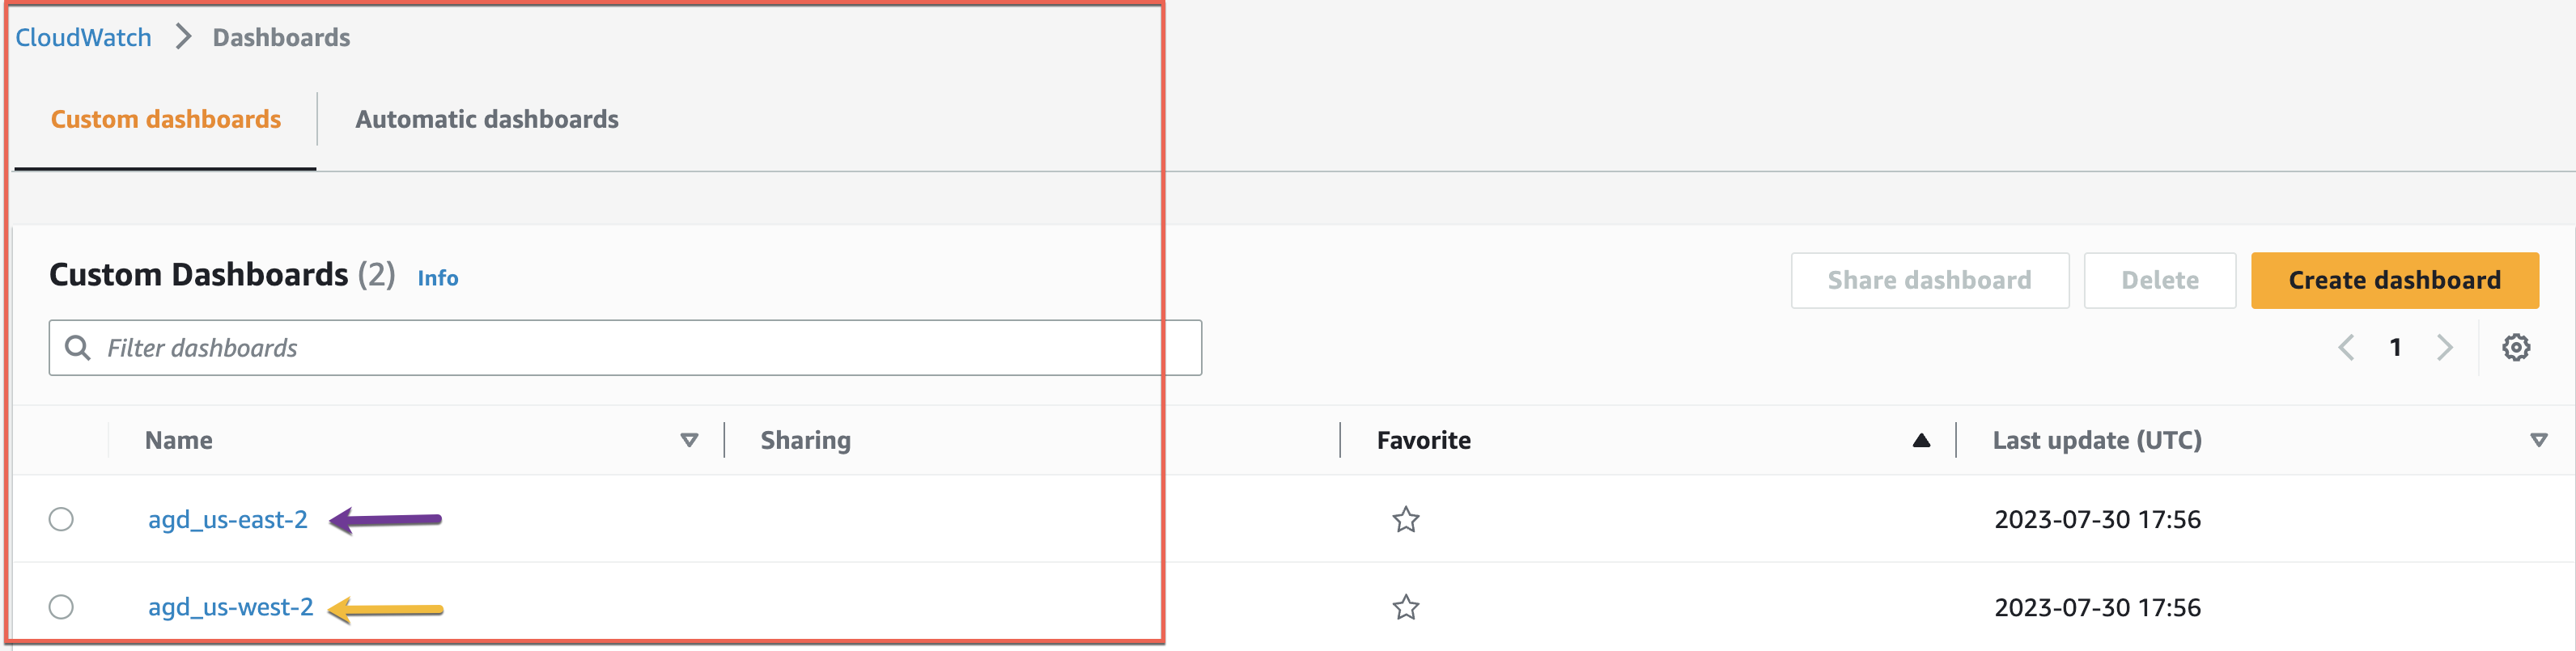
To monitor the Aurora Global Database, navigate to the Amazon CloudWatch console and select Dashboards.
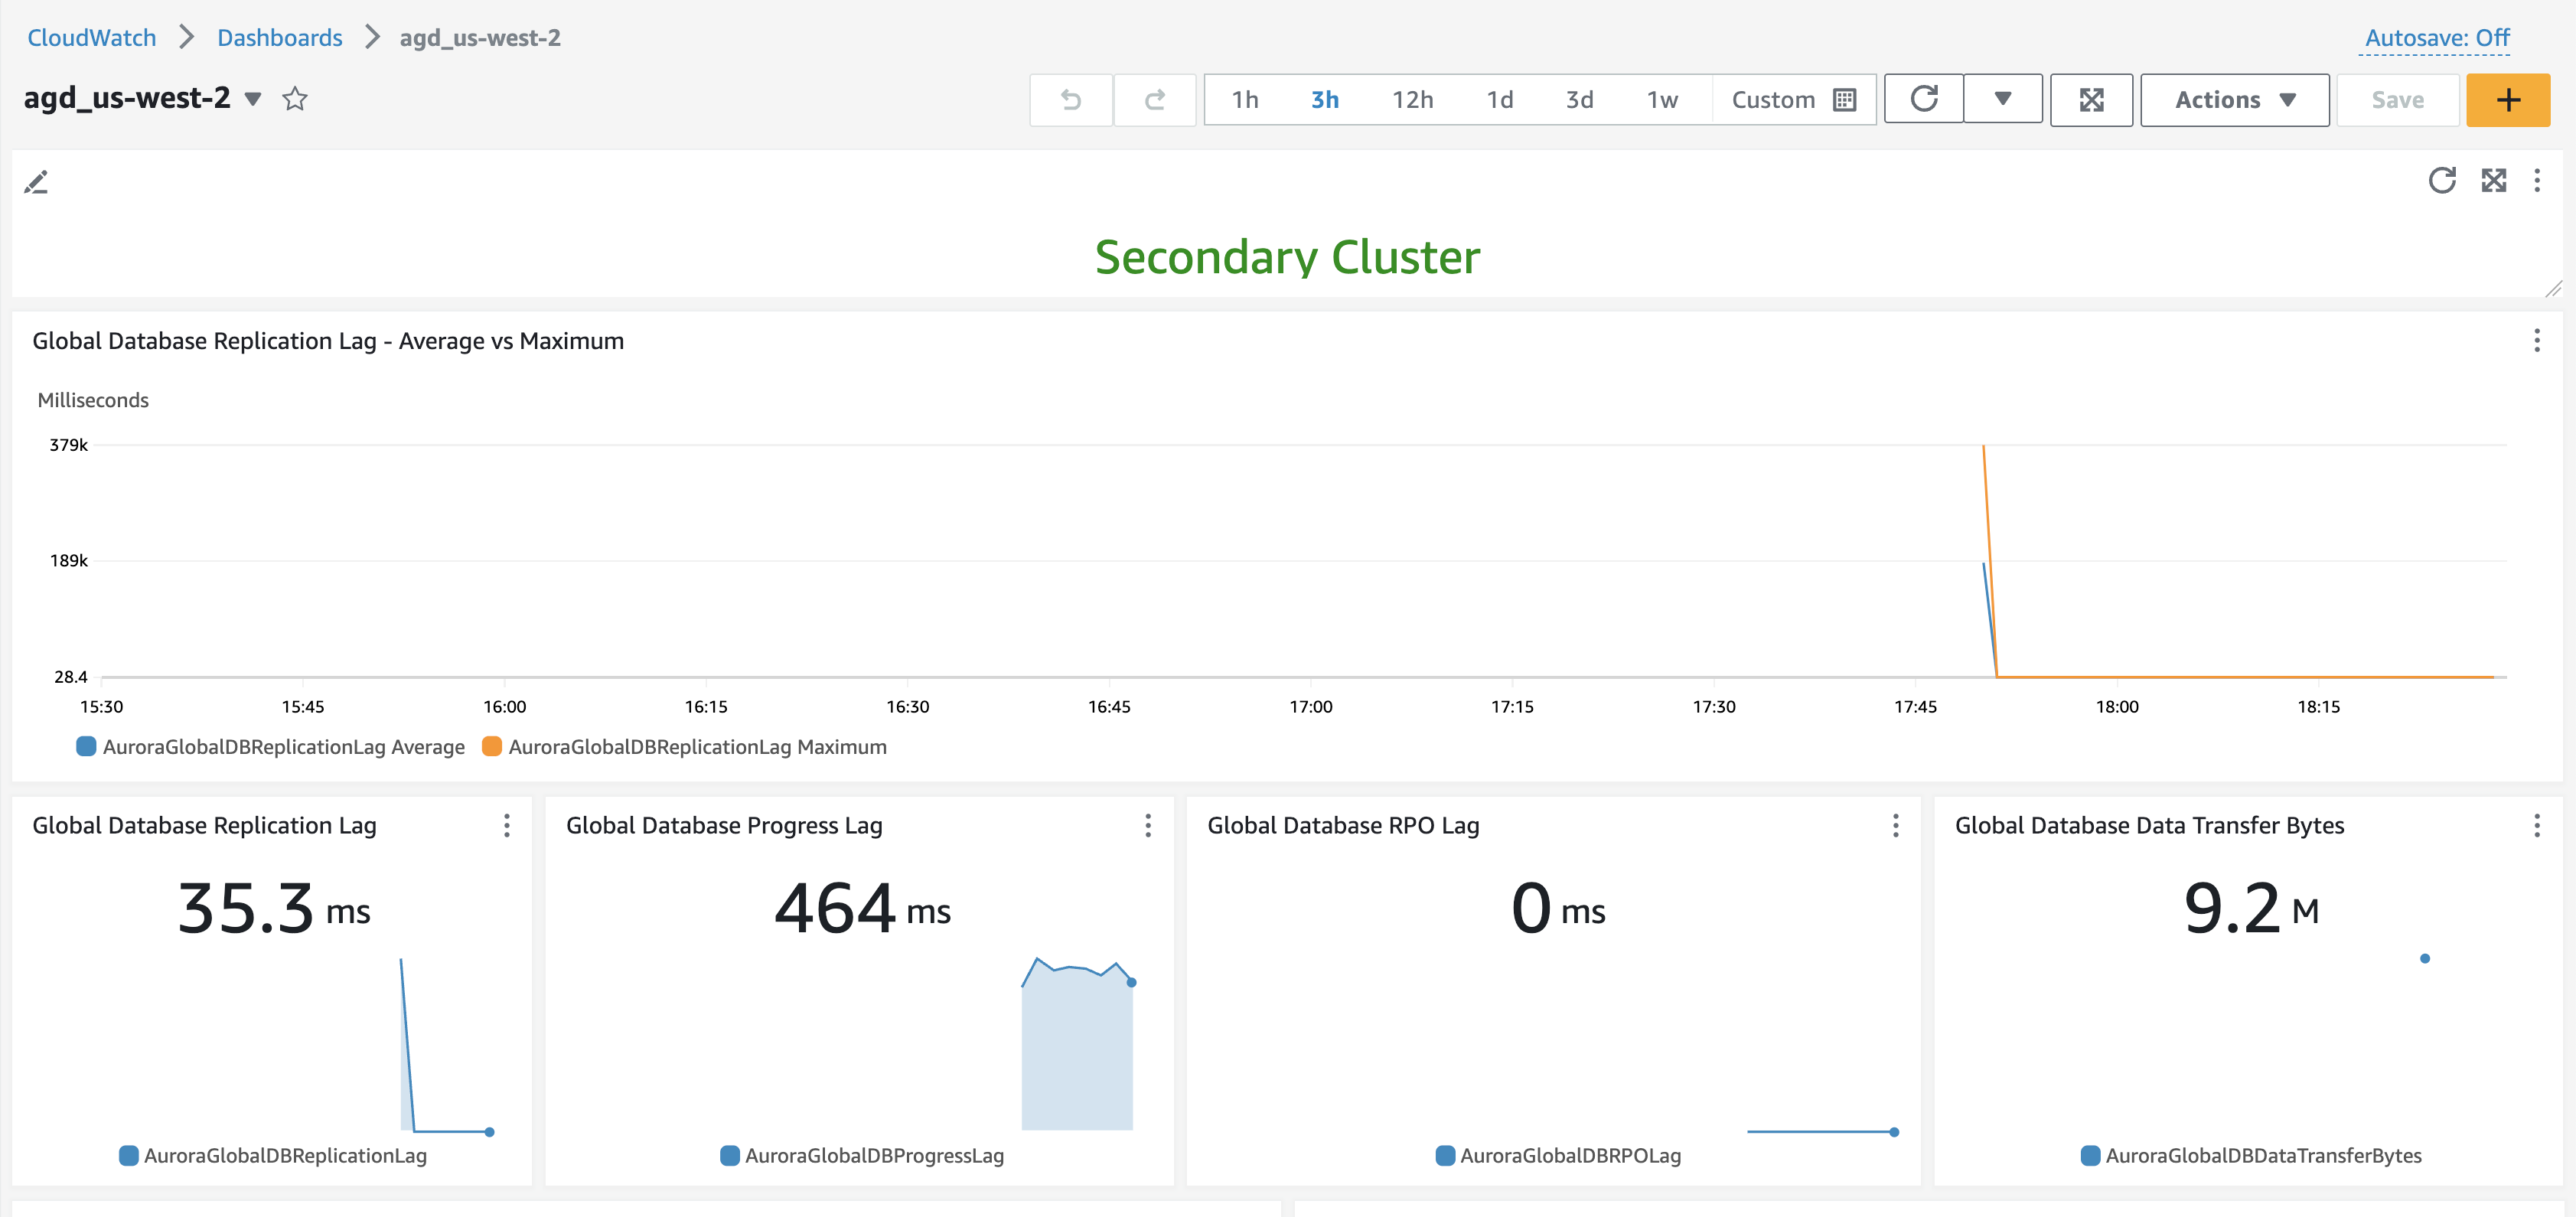
Select the Dashboard from the DR Region (example: agd_us-west-2). The CloudWatch dashboard calls a custom Lambda function to identify if the cluster is primary or secondary and requires permissions to execute. Select Execute them all.
Upon successful execution, you will see a dashboard:
Validate Aurora Global Database
The Aurora Global Database can be validated by performing a planned switchover/unplanned outage of the cluster manually from the console. Executing either a planned switchover or an unplanned outage will send an event to Amazon EventBridge, which generates an email through Amazon SNS and executes the skeleton Lambda function. This allows validation of the disaster recovery configuration for the Aurora Global Database.
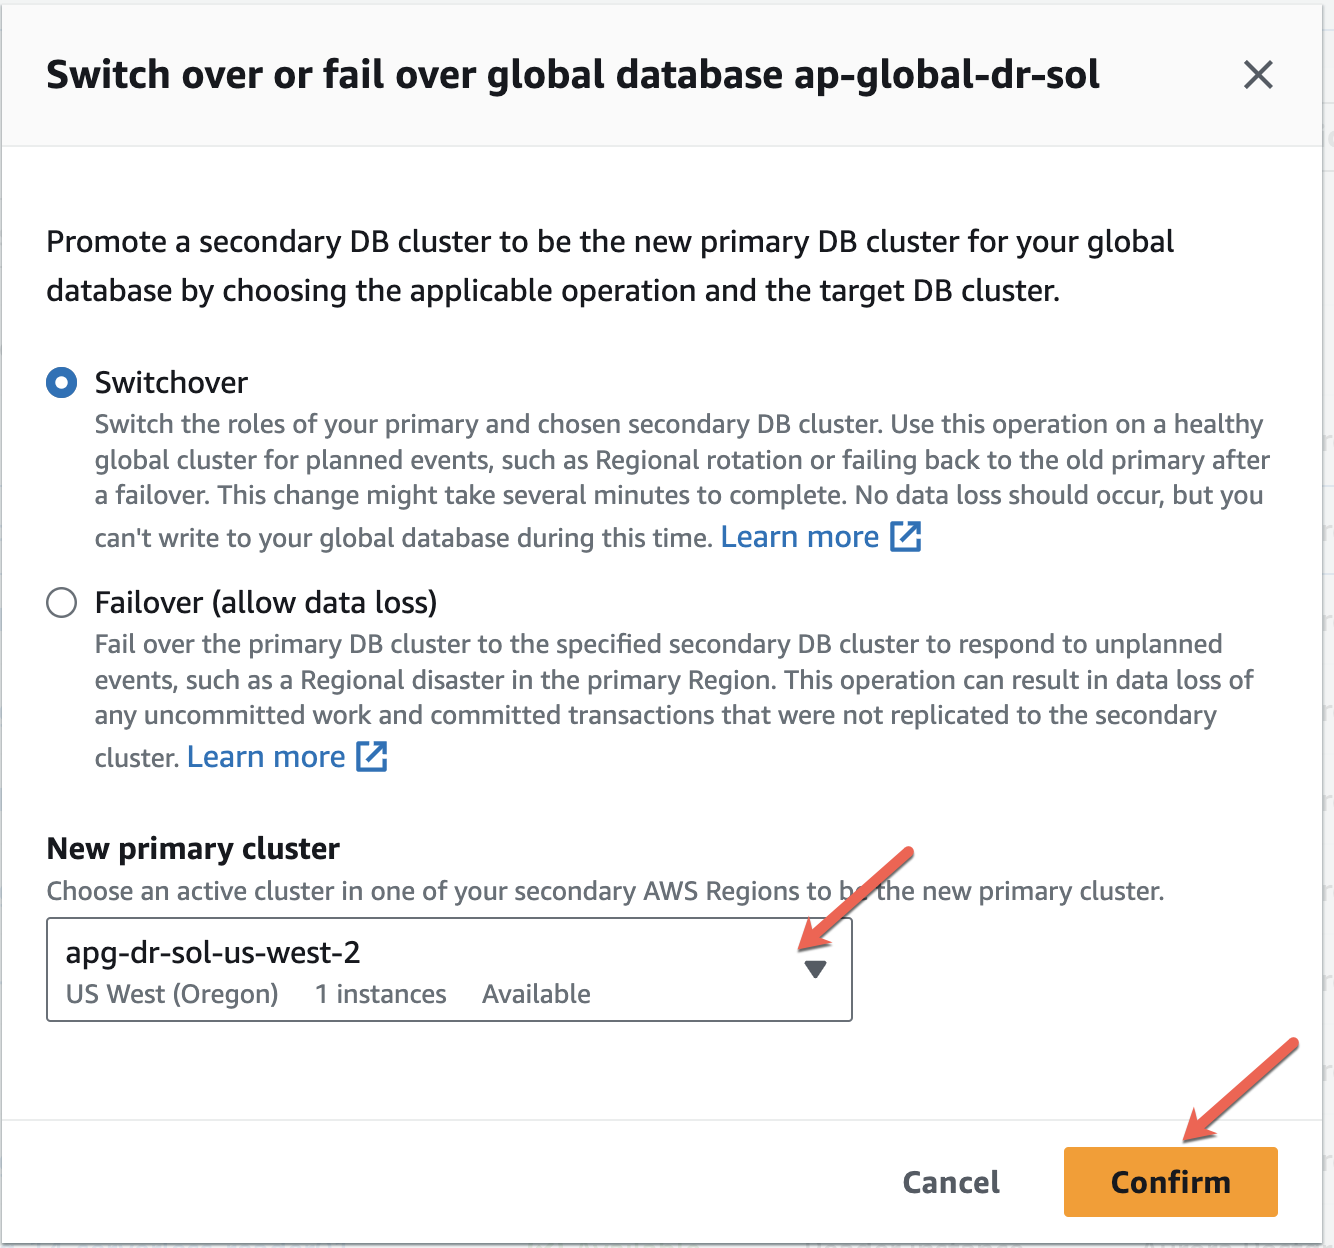
Initiate the planned switchovers from the console as described below:
To start the switchover process on your Aurora global database
Choose Databases and find the Aurora global database you want to fail over.
Choose Switchover or failover global database in the Actions menu. The switchover process doesn’t begin until after you choose the failover target in the next step. At this point, the switchover is pending.
For New primary cluster, choose an active cluster in one of your secondary AWS Regions to be the new primary cluster:
Enter confirm, and then choose Confirm.
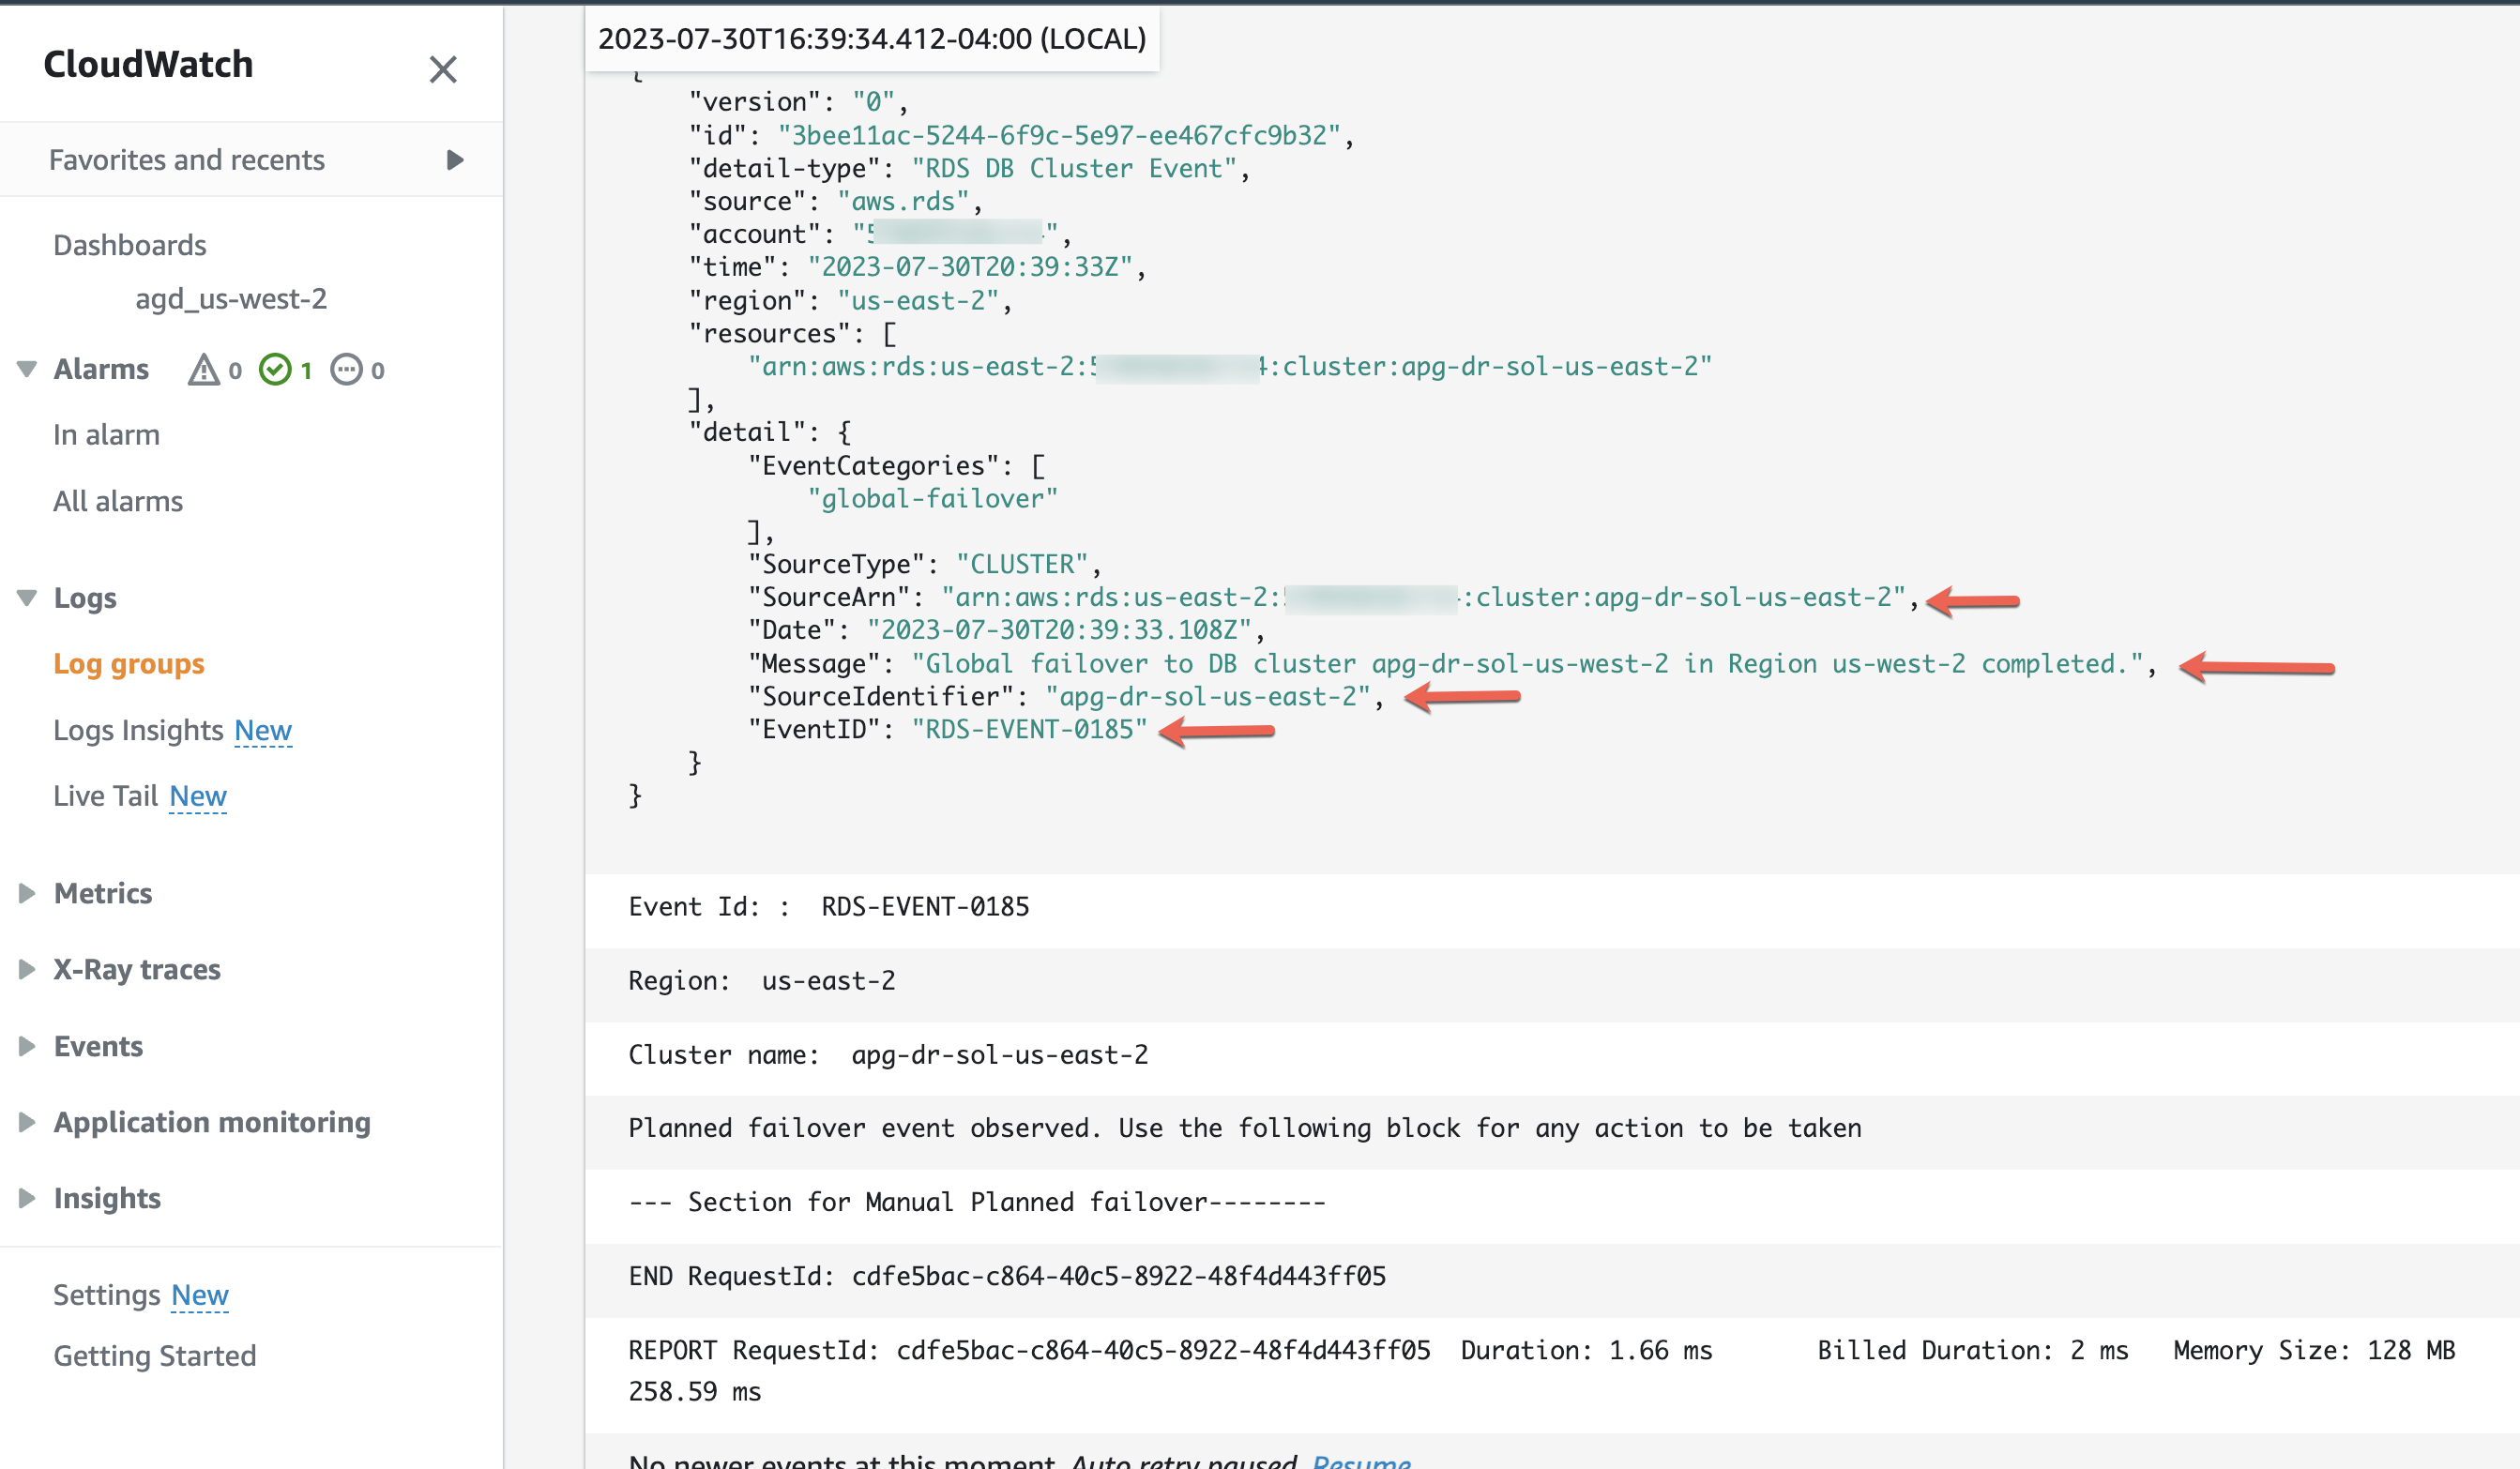
Upon successful completion of the switchover process, a sample email was generated as part of the planned switchover or unplanned outage process:
Also, you can observe the sample output from the Lambda function that was executed during the manual planned switchover from both the Regions:
For this Guidance, we have used an AWS Organization with two accounts: Account A which will be referred to as the Production Account or OU Account, and Account B which is the Central Backup Account or member account. Depending on your use case, you can choose to have 0 member accounts or multiple member accounts.
Existing Aurora MySQL or Aurora PostgreSQL cluster for which you would like to set cross account-cross Region backups. With this solution, depending on your use case, you can also accomplish single-account, cross-region, cross-account, same-region, and cross-account, cross-region as well.
The Amazon Aurora database should be encrypted with a non-default KMS, key and the KMS key should be shared with all the target account(s) to which the snapshot is to be copied. This is because cross-account backups aren’t possible for Amazon Aurora encryption using the default KMS key for Amazon RDS because the default service key can’t be shared with other accounts. For more information on sharing the KMS key cross-account, refer to Allowing access to an AWS KMS key.
Opting in for backing up the appropriate services, Amazon Aurora in this case, in each Region where you want to use AWS Backup to manage backups.
Appropriate IAM permissions to deploy a CloudFormation Stack on the Production OU account and in the central backup member accounts as well.
Install and configure the latest version of the AWS CLI (2.2.37 or newer) and Python 3.10 on the machine you are going to use to interact with the solution. This can be your personal laptop, an Amazon EC2 instance, Cloud9, or a similar machine. Set up the AWS credentials for the user who is authenticated to set up the stacks in the production (OU) account.
Provision the resources
1. Clone the repository and set AWS credentials
#untar the repo into a working directory and ‘cd’ to the working directory.
Set AWS_SECRET_ACCESS_KEY, AWS_ACCESS_KEY_ID for the IAM user that has the required privileges to deploy the AWS CloudFormation template in the AWS account that has OU configured for source and target accounts.
Before you start, also make a note of the following information:
Organizations ID: When you sign in to the organization’s management account in the AWS Organizations console from the production OU account, you can view details of the root. Copy the Root OU ID as shown in the detailed steps.
Production OU or source account number.
Central backup or target accounts number(s) (will only apply if you are deploying a cross-account backup setup).
2. Create the CloudFormation stacks in the source or production OU account (Region A)
In this section, you create two CloudFormation stacks in the production account where the primary Aurora Database cluster resides. The stack creates the following roles; you can find more information on these roles in the AWS CloudFormation documentation.
If this is the first CloudFormation stack you’re creating and you’re redirected to the AWS CloudFormation welcome screen, choose Create Stack to go directly to the window for specifying the CloudFormation template.
On the Create stack menu, choose With new resources:
For Template source, select Upload a template file.
Select Choose file and upload AWSCloudFormationStackSetAdministrationRole.yml from the files you downloaded from GitHub while cloning the repository.
Choose Next and provide the Stack name as AWSCloudFormationStackSetAdministrationRole
Choose Next.
Choose Next again.
Select the check box to acknowledge resource creation.
Choose Create stack.
The stack takes under 2 minutes to successfully complete. When the CloudFormation stack status changes to CREATE_COMPLETE, navigate to the Resources tab and validate that the role has been created successfully:
Deploy CloudFormation template in the same production account
We also have to deploy the AWSCloudFormationStackSetExecutionRole CloudFormation template in the same production account you are operating in and the same Region (Region A).
From the CloudFormation console, select Create Stack and choose With new resources.
For Template source, select Upload a template file.
Choose Choose file and upload AWSCloudFormationStackSetExecutionRole.yml from the files you downloaded from GitHub while cloning the repository.
Choose Next.
Provide Stack Name as AWSCloudFormationStackSetExecutionRole.
Under AdministratorAccountId provide the AWS Account Id of your source orProduction OU account itself (the account you are working in).
Select Next
Choose Next again.
Select the check box to acknowledge resource creation.
Choose Create stack.
The stack takes under 2 minutes to successfully complete. When the CloudFormation stack status changes to CREATE_COMPLETE, navigate to the Resources tab and validate that the role with other resources has been created successfully:
3. Run the CloudFormation stack in the Target or Central Backup account (Region B)
In this section, you deploy a CloudFormation stack in the Target or Central Backup member account(s) in Region B to create the AWSCloudFormationStackSetExecutionRole. Depending on your use case, you may choose a different destination to run this stack:
Cross-account - cross-Region: Follow the below steps in your target central backup account. If you have multiple target or central backup accounts, you will have to follow the steps for all of them. Run the stack in the Region of your choice; in this case, it’s a different Region (Region B) from the Region where your primary Aurora cluster resides (Region A).
Cross-account - same-Region: Follow the below steps in your target central backup account. If you have multiple target or central backup accounts, you will have to follow the steps for all of them. Run the stack in the Region of your choice; in this case, select the same AWS Region where your primary Aurora cluster resides (Region A).
Same-account - cross-Region: You are working in the same account only, so follow the below steps in your destination Region, which you would like to make your disaster recovery Region (Region B) different from the Region where your source primary cluster resides (Region A).
For the purpose of this Guidance, we will be implementing cross account - cross Region backups. Therefore, we will choose a different Region in the central backup account (Region B) compared to the Region where the primary Aurora cluster resides (Region A).
From the CloudFormation console, select Create Stack and choose With new resources.
For Template source, select Upload a template file.
Select Choose file and upload AWSCloudFormationStackSetExecutionRole.yml from the files you downloaded from GitHub while cloning the repository.
Choose Next.
Provide the Stack Name as AWSCloudFormationStackSetExecutionRole.
Under AdministratorAccountId, provide the AWS account Id of your Production or source account (not the account ID of your central backup or target account).
Select Next
Choose Next again.
Select the check box to acknowledge resource creation.
Choose Create stack.
The stack takes under 2 minutes to successfully complete. When the CloudFormation stack status changes to CREATE_COMPLETE, navigate to the Resources tab and validate that all the resources have been created successfully.
4. Add resources to the backup plan
In this step, we add resources to our backup plan by tagging your existing Aurora cluster. Specifically, we add a tag specifying the values you specified for the backup resource condition key and backup resource condition value when running the CloudFormation stack in the production account.
Confirm you’re in the same Region where you deployed the CloudFormation stacks (Region A).
Search for RDS or, on the Services menu, choose RDS under Databases.
Choose the Aurora database cluster you want to back up and choose the Tags tab.
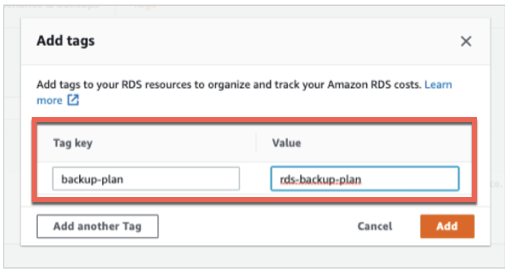
Choose Add tag.
For Tag key, enter backup-plan.
For Value, enter rds-backup-plan.
Choose Add:
5. Run the shell script
We will now work on deploying the backup schedule in AWS Backup according to which backups will be performed for your selected Aurora cluster in the source account Region A. The backup schedule will be provided using a cron job schedule expression. Refer to the cron expression for more details on what the values should be added as per your use case.
This step will be performed using the bash script deploy_stacksets.sh, which is part of the git repository and accepts a set of parameters. These parameters are explained in the table below. You will input these parameters based on your use case.
With the table, there is also a complete example of how the input values should look like for this script.
Parameter
Default
Description
pBackupVaultName
None
Backup Vault name on source and target
pSourceBackupAccountID
None
Backup source account id
pTargetBackupAccountID
None
Backup target account id
pSourceAWSRegion
None
Backup source region
pDestinationAWSRegion
None
Backup target region
pAWSOrganizationID
None
AWS Organization ID
pBackupPlanName
None
Backup Plan name in backup vault
pScheduleExpression
None
Schedule/cron expression for backup job
pConditionKey
None
Tag name for Amazon Aurora source database
pConditionKeyValue
None
Tag value for Amazon Aurora source database
pDeleteAfterDays
None
Number of days to retain backup
You will insert these parameter values as per your use case in the example script below. Once ready, you can run the script from your laptop terminal or an EC2 instance that has the latest CLI version installed. You can use the example script to plug in the values for your AWS resources and keep other parameters as is. Parameters that need to be altered as per your AWS resources are:
pSourceBackupAccountID
pTargetBackupAccountID
pSourceAWSRegion
pDestinationAWSRegion
pAWSOrganizationID
Notes
If you copy the script as is, the quotes may not be aligned correctly. In your notepad tool, please make sure they are aligned correctly before running it in your terminal.
Ensure you have set and configured the AWS credentials for your Production OU or source account as mentioned in Step 1.
If you get an error like *./delpoy_stacksets.sh* : No such file or directory, make sure you are running the script in the correct directory by using the cd command as mentioned in Step 1.
For pAWSOrganizationID, use the root organization ID, usually in the format of “r-****”. This is located in the AWS Organizations console of the source or Production OU account.
For example: Source account 330****00030, source region us-east-1 Target account 117***005459, destination region us-east-2
With the above script, a database snapshot will be created every 4 hours, as provided in the cron job schedule expression. This value will change depending on your company’s Recovery Point Objective, or RPO. An RPO is the amount of data you’re willing to lose during a disaster. The other parameter values for the above script will vary as per the following scenarios:
Scenario 1: With this Guidance, we are focusing on covering cross-account - cross-Region backup strategies with one source account and one central backup/target account. Therefore, the above script uses different values for the source and target backup account IDs (pSourceBackupAccountID and pTargetBackupAccountID). For implementing cross-Region, the source and destination AWS Regions are also different (pSourceAWSRegion and pDestinationAWSRegion). These Regions will be replaced by the Regions of your choice where you deployed the CloudFormation templates in Steps 1 and 2.
Scenario 2: If you are planning the cross-account - cross-Region strategy but have more than one central backup account where you would like the backups to be saved, you can provide comma-separated account ID values for the parameter pTargetBackupAccountID.
Scenario 3: If you are planning to have cross-account - same-Region backup, you can keep the pSourceAWSRegion and pDestinationAWSRegion as the same Account ID.
Scenario 4: Similarly, if you are planning to implement same-account - cross-Region, you will keep the pSourceBackupAccountID and pTargetBackupAccountID at the same value.
Once the script is successfully initiated with valid parameter values, it will take approximately 15 minutes for it to complete running. As the script is running, it will also be displaying the various CloudFormation StackSets it is creating in the source and target accounts. After the script finishes, the following resources will be deployed:
Create an AWS Key Management Service (AWS KMS) customer-managed key named ‘cmk-btest’ in the Production and Central Backup accounts. The keys are used by the AWS Backup vault in each account.
Create an AWS Backup vault in each account and assign the previously created KMS key to each vault. If you didn’t change the pBackupVaultName parameter in the bash script, this will be named btest.
Create a backup plan in the Production account that creates a snapshot of the database on a predefined schedule and copies the resulting snapshot to the Central Backup account. If you didn’t change the pBackupPlanName parameter in the bash script this will be named backup-plan.
Create a Lambda function in the Central Backup account to copy the snapshot to a different Region, named AWSBackup-RDS-Aurora-Cross-Region-Backup-Copy.
Create an EventBridge rule in the Production account to forward the event notifications of AWS Backup copy completion to the Central Backup account.
Create EventBridge rules in the Central Backup account to run the Lambda function that copies the incoming backup into another Region.
To troubleshoot any errors from the script, please navigate to the Stack Instance in the AWS CloudFormation console of the source Production OU account. The stack instances show the reason for any failures.
After making the required changes to resolve the errors, you will have to run the cleanup script AWSBackup_cleanup_stacksets.sh as provided in the Uninstall the solution section of this Guidance. After you have verified the stack sets and stack instances have been successfully removed, you can proceed to run the deploy script AWSBackup_deploy_stacksets.sh again.
6. Validate the backups
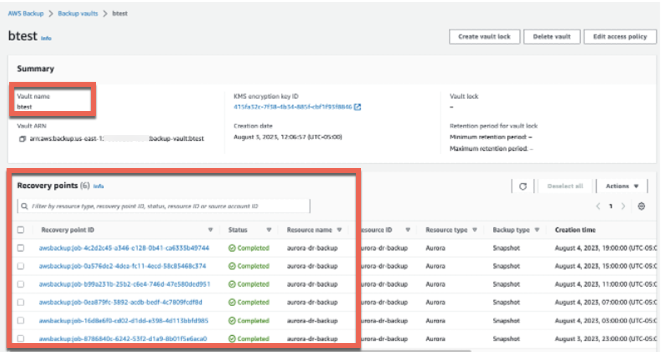
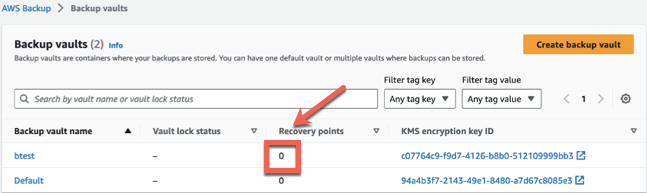
The following steps help validate that the backups have been created and copied successfully.
Choose the vault created by the CloudFormation stack, which will be named btest.
The following screenshot shows backups of the resources that you added to the backup plan by specifying appropriate tags:
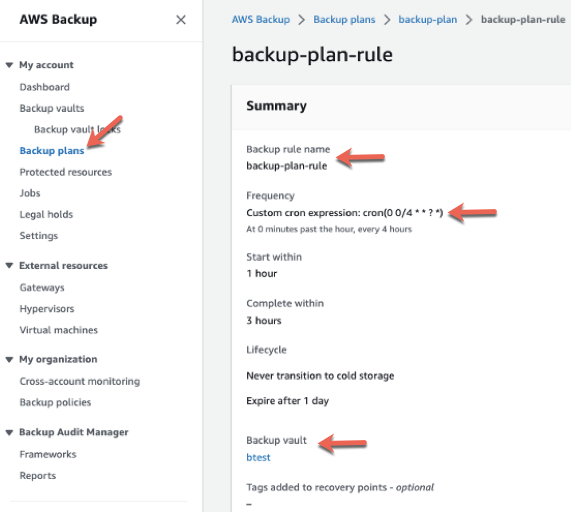
If you used the default values for specifying the cron expression when deploying the CloudFormation stack, a snapshot is taken every 4 hours. In addition, the backup rule created by the stack sets the backup job to start within an hour and complete within 4 hours.
Note that you can verify the setting by choosing Backup plans in the navigation pane. Choose the backup plan created by the template and choose the backup rule. The backup job may take some time to complete, and a snapshot appears in the backup vault when it’s done:
Repeat steps 1–3 in the central backup or target account in both Regions to validate cross-account and cross-Region backup copies are successfully completed.
7. Restore the database in the central backup account
After validating that backups are being created in the target or central backup account, you can then review the steps to restore from that backup. In scenarios such as restoring a test database in your backup account or if there is an issue in the primary account or Region, you can make use of the backups in the central backup account to restore and service your application user connections.
If you are implementing same-account - cross-Region backup strategy and have made corresponding changes while running the script in Step 5, then the below steps will be performed in the destination Region of the same account as your primary Aurora cluster.
To restore the database in the Central Backup account, complete the following steps:
Choose the Region where the snapshots to be restored are available.
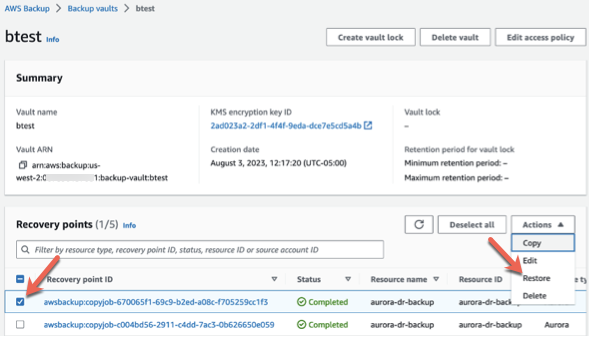
On the AWS Backup console, choose Backup vaults in the navigation pane.
Choose the vault that was created with the CloudFormation template.
Select your desired snapshot from the available snapshots.
On the Actions menu, choose Restore:
For the DB instance identifier, enter the desired name for your restored DB instance.
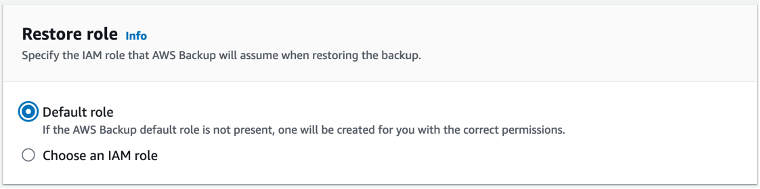
For the Restore role, the default setting that is selected is to use the Default role. You can keep this selected if you have not created another IAM role for AWS Backup. Otherwise, you can create a separate role for this operation with the AWSBackupServiceRolePolicyForRestores managed policy and use that. For more information about managed policies, see Managed policies for AWS Backup.
Once you have made all the settings, choose Restore backup.
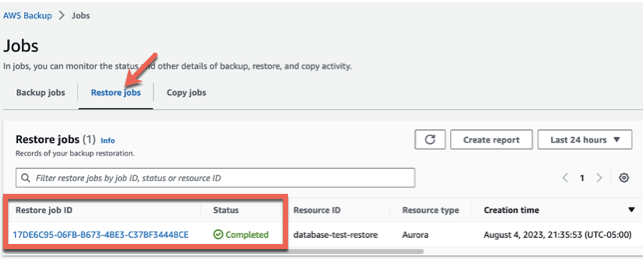
You can monitor the progress of the job by choosing the Restore jobs tab. Wait until the status of the job changes to Completed:
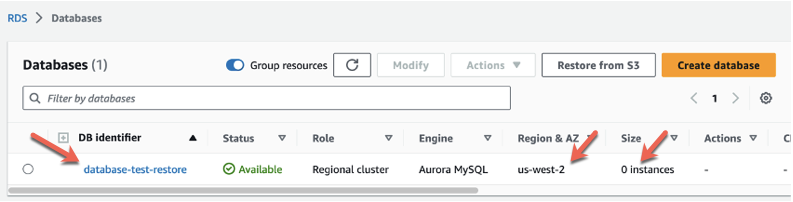
At this point, a new Aurora database cluster has been created in the Region you chose. You can verify this by navigating to the Databases page on the Amazon RDS console:
Once the restored cluster is available in status, it will have 0 instances. To connect to this database, an instance needs to be attached. To attach an instance to your cluster, you will need an AWS CLI. For detailed steps, refer to Restoring an Amazon Aurora cluster. As you are working in the central backup or target account, you may be required to configure the AWS CLI with a new access key, a secret access key, and the destination Region. Refer to Environment variables to configure the AWS CLI.
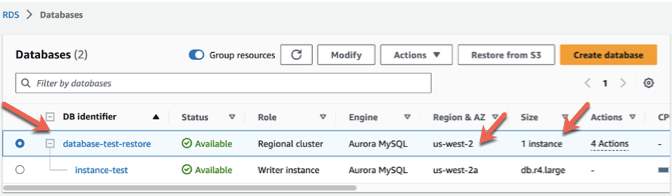
Once configured, you can run the below command to add an instance to your restored Aurora cluster:
Once the writer instance is available, if required, you can add reader instances to your Aurora cluster (up to 15) replicas by going to Actions and choosing Add reader. For more information, refer to Adding Aurora Replicas to a DB cluster.
Uninstall the Guidance
Solution 1: Amazon Aurora Global Databases
To uninstall this solution, you must delete the AWS CloudFormation stack that was created as a result of the Aurora DR Solution. Because some AWS CloudFormation stacks use IAM roles created by previous stacks, you must delete AWS CloudFormation stacks in the reverse order they were created (delete the most recent stack first, wait for the stack deletion to be completed, and then delete the next stack).
Select the following solutions stack one at a time in the same order as shown below to Delete it. Make sure the Primary Region is the same as when the deployment started. In this example, it is Primary Region (us-east-2).
AuroraGlobalDatabaseSolution
AWSCloudFormationStackSetAdministrationRole
AWSCloudFormationStackSetExecutionRole
Using the AWS Command Line Interface
Determine whether the AWS Command Line Interface (AWS CLI) is available in your environment. For installation instructions, refer to What Is the AWS Command Line Interface. After confirming that the AWS CLI is available, run the following command:
Deleting the CloudFormation stack deletes all the resources provisioned as part of the deployment. It is recommended that you use tags to ensure that all resources associated with Aurora DR Solution are deleted.
For example, all resources created by the CloudFormation stack should have the same tag. Then you can use Resources Groups & Tag Editor to confirm that all resources with the specified tag are deleted.
Solution 2: AWS Backup
To uninstall the solution, you must delete all the AWS Backup recovery points and the AWS CloudFormation stacks and stack sets that were created as a result of the AWS Backup solution. In order to do so, you can run the steps below on your AWS CLI terminal with the user role that has the correct administrator privileges.
To run the below scripts, make sure you are in the correct directory where you cloned the git repository.
Delete restore points from the backup vault that was created as part of this solution by using the below script.
Note: The same script needs to be run in the target account target region, target account source region, and source account source region. If you used the default backup vault name btest, then you can run this script without any changes:
pBackupVaultName="btest"; export pBackupVaultName

for rarn in `aws backup list-recovery-points-by-backup-vault --backup-vault-name "${pBackupVaultName}" --query 'RecoveryPoints[].RecoveryPointArn' --output text`
do
   aws backup delete-recovery-point --backup-vault-name "${pBackupVaultName}" --recovery-point-arn ${rarn}
done
Upon running the script source and target account, it deletes all recovery points from all the backup vaults in all accounts and Regions as shown in the below screenshot.
Run the below script in the Production OU/source account in the primary Region. This script deletes all three StackSets that were created in the source Production OU account and source Region:
Lastly, we will delete the CloudFormation stacks AWSCloudFormationStackSetExecutionRole and AWSCloudFormationStackSetAdministrationRole that we had created in the source and target accounts. You can do so by either using the below AWS CLI commands or directly from the AWS console as well.
Delete AWSCloudFormationStackSetAdministrationRole from the source account in the source region.
Visit our GitHub repository to download the source files for this solution.
Contributors
The following individuals and organizations contributed to this document:
Raj Jayakrishnan, Senior Database Solutions Architect, Amazon Web Services
Shagun Arora, Database Specialist Solutions Architect, Amazon Web Services
Vijay Karumajji, Principal DB Specialist Solutions Architect, Amazon Web Services
Notices
Customers are responsible for making their own independent assessment of the information in this document. This document: (a) is for informational purposes only, (b) represents AWS current product offerings and practices, which are subject to change without notice, and (c) does not create any commitments or assurances from AWS and its affiliates, suppliers, or licensors. AWS products or services are provided “as is” without warranties, representations, or conditions of any kind, whether express or implied. AWS responsibilities and liabilities to its customers are controlled by AWS agreements, and this document is not part of, nor does it modify, any agreement between AWS and its customers.