Guidance for Asynchronous Image Generation with Stable Diffusion on AWS
Summary: This implementation guide provides an overview of Guidance for Asynchronous Image Generation with Stable Diffusion on AWS, its reference architecture and components, considerations for planning the deployment, and configuration steps for deploying the guidance name to Amazon Web Services (AWS). This guide is intended for solutions architects, business decision makers, DevOps engineers, data scientists, and cloud professionals who want to implement 'Guidance for Asynchronous Image Generation with Stable Diffusion on AWS' in their environment.
Overview
This guidance covers implementing a fast-scaling and low-cost Stable Diffusion inference technology with serverless and container technology on AWS.
Stable Diffusion is a popular open-source project for generating images using generative artificial intelligence (AI). Building a scalable and cost-efficient inference solution is a common challenge for AWS customers. This guide shows how to use serverless and container services to build an end-to-end, low-cost, and fast-scaling asyncronous image generation architecture. The GitHub repository contains the sample code and cloud development kit (CDK) deployment scripts, helping AWS customers to deploy This guidance in a few steps.
Features and benefits
The Guidance for Asynchronous Image Generation with Stable Diffusion on AWS provides the following features:
- Event-driven architecture
- Autoscaling of pods based on queue length using KEDA
- Automatic Amazon EKS compute Node EC2 scaling using Karpenter
- New inference EKS compute nodes provisioned within 2 minutes
- Up to 70% cost savings using GPU Spot instances for compute nodes
- Support for multiple community Stable Diffusion runtimes
Use cases
Stable Diffusion represents a notable improvement in text-to-image model generation. It’s broadly available and needs significantly less processing power than many other text-to-image models. Some of its capabilities include text-to-image, image-to-image, graphic artwork, and image editing.
As a powerful text-to-image generation model, Stable Diffusion has a wide range of applications, including:
- Artistic creation: Stable Diffusion can automatically generate high-quality artworks such as paintings, illustrations, and concept art based on text descriptions, providing inspiration and assistance to artists.
- Game design: Stable Diffusion can be used to quickly create game assets such as characters, scenes, and props, accelerating prototyping and game content iteration.
- Image editing: Stable Diffusion has capabilities for image denoising, super-resolution reconstruction, style transfer, and other tasks.
- E-commerce operations: Stable Diffusion can generate visual assets like product description images, reducing operational costs and improving image production efficiency for e-commerce platforms.
This guide provides an architecture diagram and step-by-step instructions for running Stable Diffusion inference tasks at scale on Amazon EKS. When configured, This guidance can perform the following tasks:
- Text-to-Image: Generate images based on the provided prompts and configurations.
- Image-to-Image: Generate images based on provided prompts, reference images, and configurations.
- Single Image Super-Resolution: Upscale the resolution of an image while preserving details as much as possible.
- Pipelines: Orchestrate the above tasks and custom tasks.
Architecture overview
This guidance consists of three main components:
- Serverless task scheduling and dispatching
- Stable Diffusion runtime on Amazon EKS and Amazon EC2 accelerated compute instances
- Management and maintenance components
Serverless task scheduling and dispatching
This component includes an API endpoint based on Amazon API Gateway and a task dispatching part based on Amazon SNS and Amazon SQS.
- Users submit requests with parameters like the model and text prompt to an API endpoint integrated with AWS services through API Gateway.
- Requests are validated by AWS Lambda and published to an Amazon SNS topic.
- Amazon SNS publishes the requests to the corresponding SQS queue based on the runtime name specified in the request.
Stable Diffusion runtime
This component includes the Stable Diffusion runtime on Amazon EKS, supporting elastic scaling based on requests.
For each runtime version, the following features apply:
- During deployment, each runtime has an independent Amazon SQS queue to receive requests.
- The Queue Agent receives tasks from the Amazon SQS queue and sends them to the Stable Diffusion runtime for image generation.
- The generated images are stored in an Amazon S3 bucket by the Queue Agent, and a completion notification is published to an Amazon SNS topic.
- When the Amazon SQS queue accumulates too many messages, KEDA scales up the runtime replicas based on the queue length, and Karpenter launches new GPU instances to host the new replicas.
- When the Amazon SQS queue no longer accumulates messages, KEDA scales down the replicas, and Karpenter terminates unnecessary GPU instances to save costs.
Architecture diagram
This section shows an architecture diagram for the components deployed with This guidance.
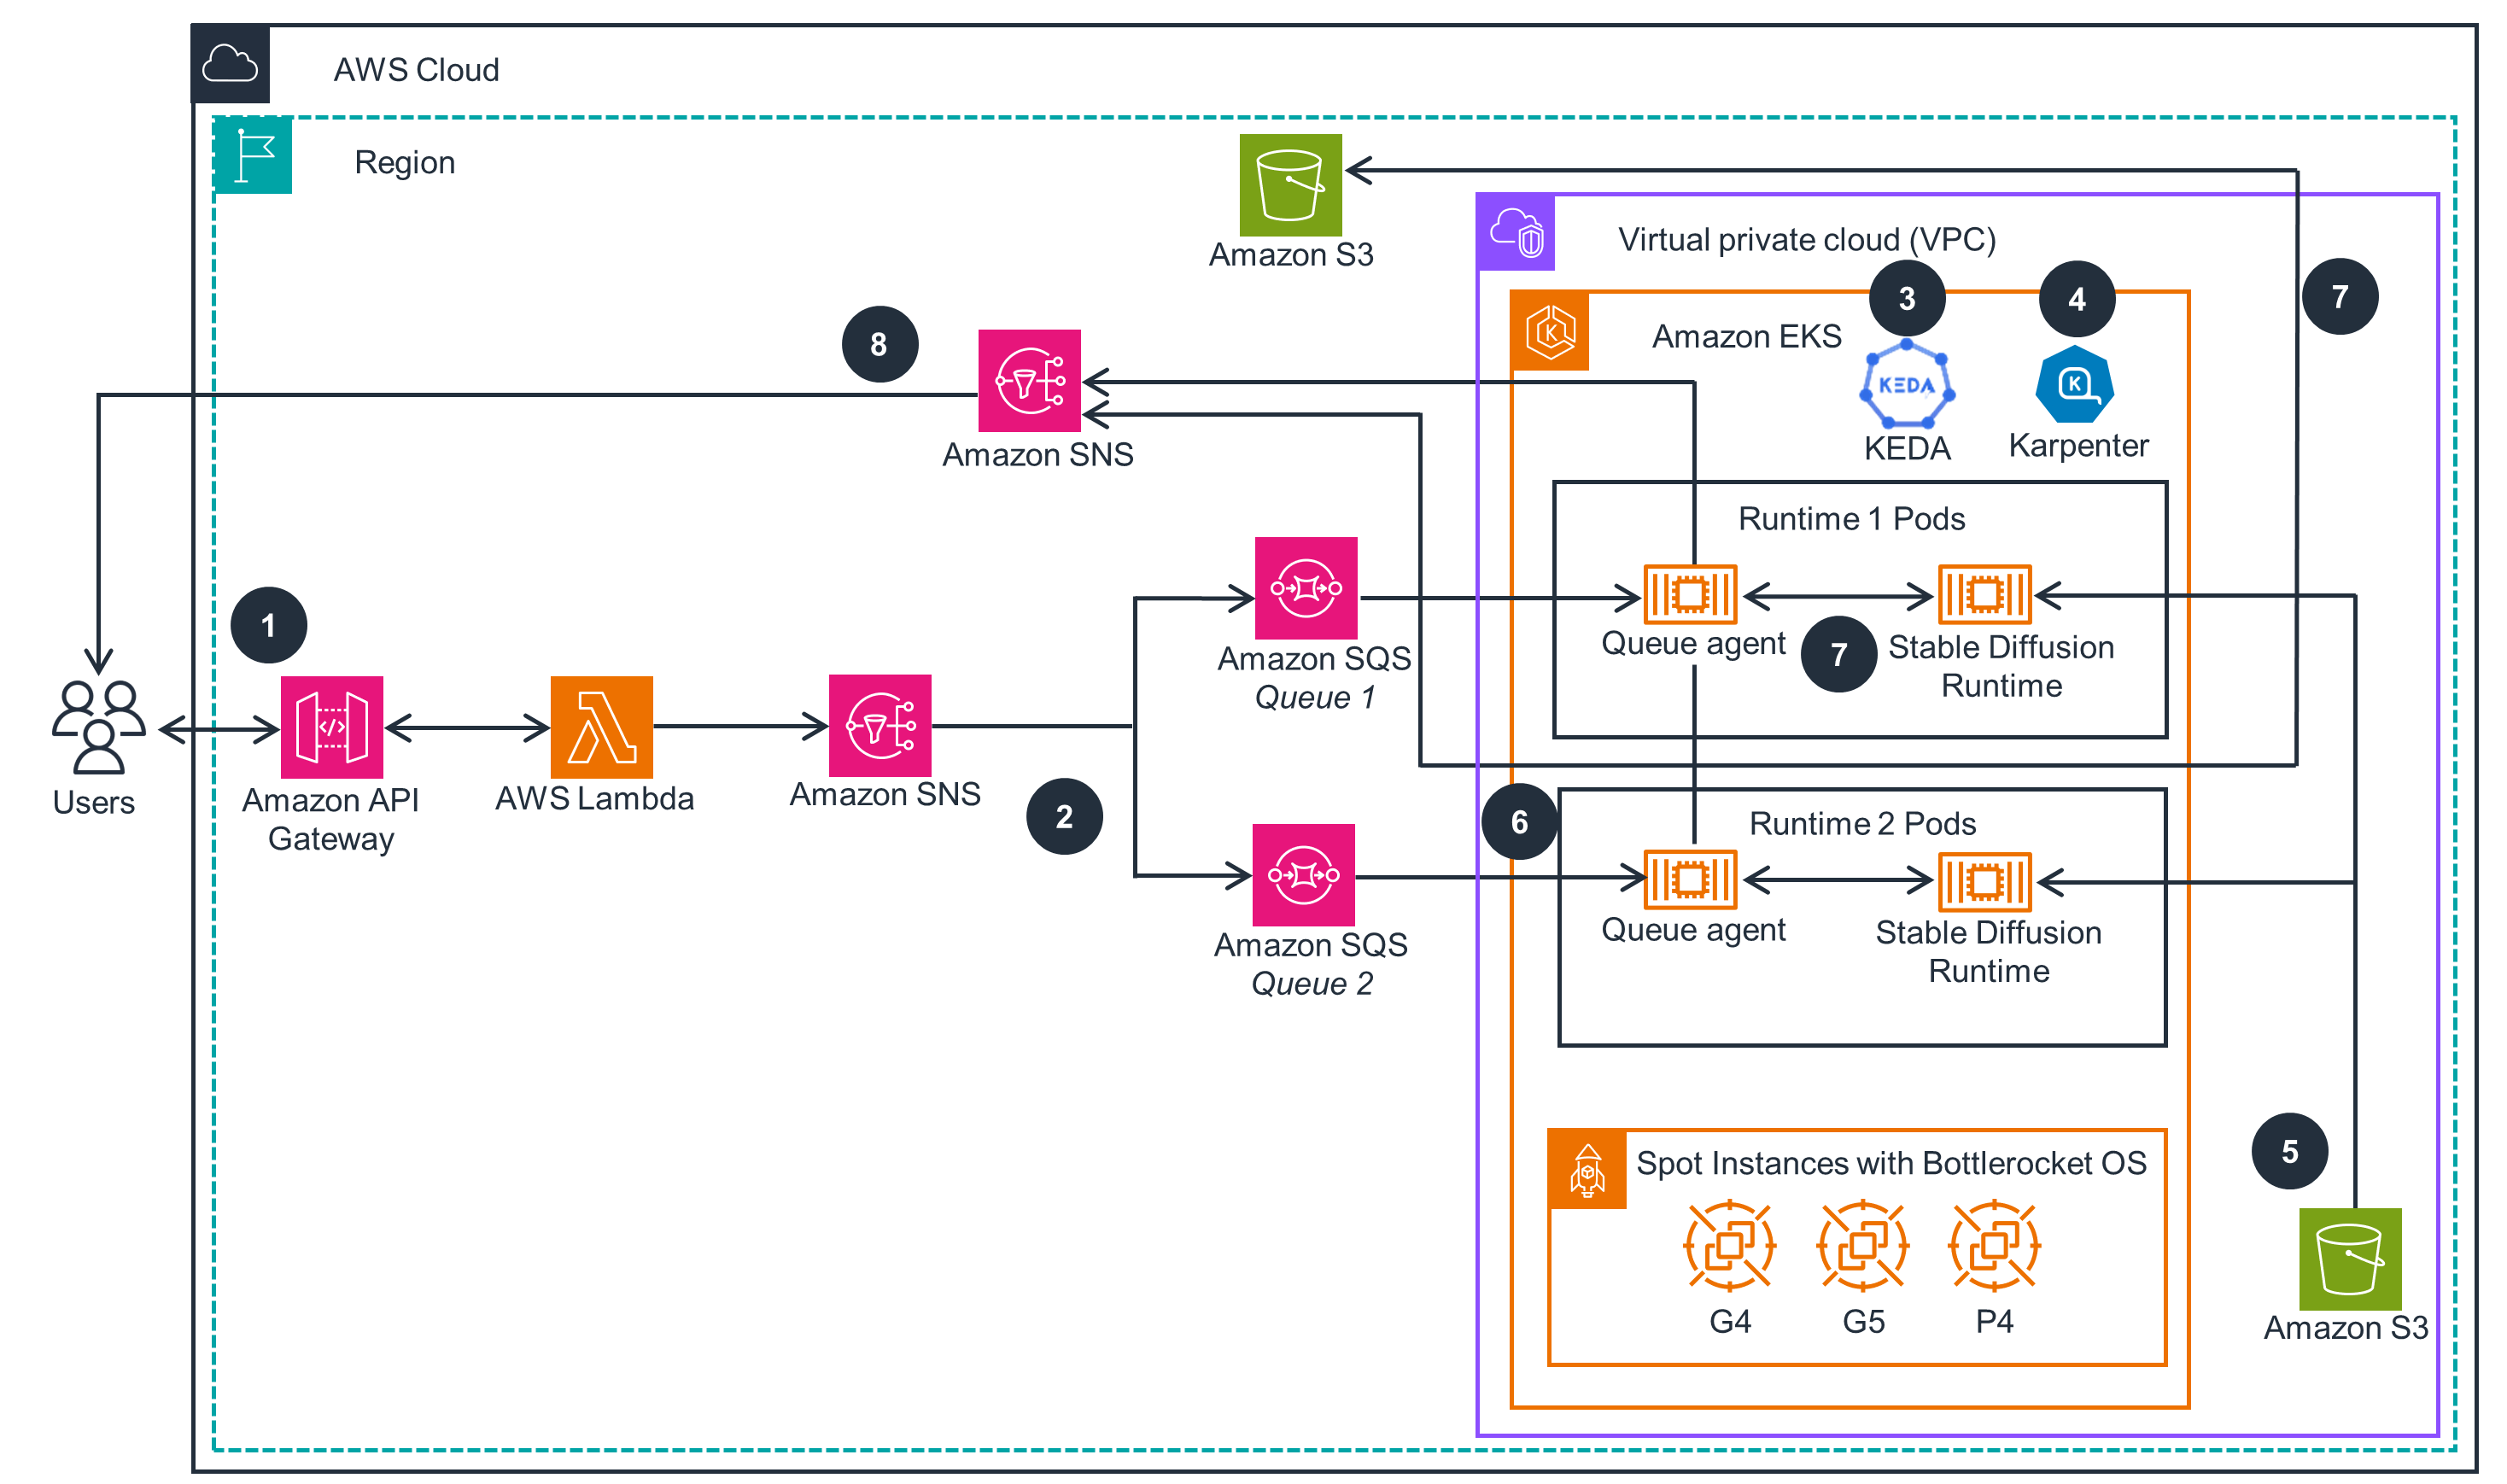
Figure 1: Asynchronous Image Generation with Stable Diffusion on AWS reference architecture
Architecture steps
- A user or an application sends a prompt to Amazon API Gateway that acts as an endpoint for the overall Guidance, including authentication. AWS Lambda function validates the requests, publishes them to the designated Amazon Simple Notification Service (Amazon SNS) topic, and immediately returns a response.
- Amazon SNS publishes the message to Amazon Simple Queue Service (Amazon SQS) queues. Each message contains a Stable Diffusion (SD) runtime name attribute and will be delivered to the queues with matching SD runtime.
- In the Amazon Elastic Kubernetes Service(Amazon EKS) cluster, the previously deployed open source Kubernetes Event Driven Auto-Scaler (KEDA) scales up new pods to process the incoming messages from SQS model processing queues.
- In the Amazon EKS cluster, the previously deployed open source Kubernetes auto-scaler, Karpenter, launches new compute nodes based on GPU Amazon Elastic Compute Cloud (Amazon EC2) instances (such as g4, g5, and p4) to schedule pending pods. The instances use pre-cached SD Runtime images and are based on Bottlerocket OS for fast boot. The instance can be launched with on-demand or spot pricing model.
- Stable Diffusion Runtimes load ML model files from Amazon Simple Storage Service (Amazon S3) via Mountpoint for Amazon S3 CSI Driver on runtime initialization or on demand.
- Queue agents (a software component created for This guidance) receive messages from SQS model processing queues and convert them to inputs for SD Runtime API calls.
- Queue agents call SD Runtime APIs, receive and decode responses, and save the generated images to designated Amazon S3 buckets.
- Queue agents send notifications to the designated SNS topic from the pods, the user receives notifications from SNS and can access images in S3 buckets.
AWS services in This guidance
| AWS Service | Description |
|---|---|
| Amazon Simple Storage Service (Amazon S3) | Core Service Used for storing models and generated images. |
| Amazon Virtual Private Cloud (Amazon VPC) | Core Service - network security layer |
| Amazon Elastic Conatiner Registry (Amazon ECR) | Used for storing container images required by the runtimes. |
| Amazon API Gateway | Core Service- Provides the API endpoint for external access. |
| AWS Lambda | Core Service - Used for request validation and routing. |
| Amazon Simple Queue Service (Amazon SQS) | Core Service - Used for storing pending tasks. |
| Amazon Simple Notification Service (Amazon SNS) | Core Service - Used for routing tasks to different SQS queues and providing completion notifications and callbacks. |
| Amazon Elastic Kubernetes Service (Amazon EKS) | Core Service - Used for managing and running the Stable Diffusion runtimes. |
| Amazon Elastic Compute Cloud (Amazon EC2) | Core Service - Used for running the Stable Diffusion runtimes. |
| Amazon CloudWatch | Auxiliary service - Used for monitoring system health, providing metrics, logs, and traces. |
| AWS Cloud Development Kit (AWS CDK) | Used for deploying and updating This guidance. |
Cost
You are responsible for the cost of the AWS services used while running This guidance. As of April 2024, the cost of running this Guidance with the default settings in the us-west-2 (Oregon) for one month and generating one million images would cost approximately $436.72 (excluding free tiers).
We recommend creating a budget through AWS Cost Explorer to help manage costs. Prices are subject to change. For full details, refer to the pricing webpage for each AWS service used in This guidance.
The main services and their pricing for usage related to the number of images are listed below (per one million images):
| AWS Service | Billing Dimension | Quantity per 1M Images | Unit Price [USD] | Total [USD] |
|---|---|---|---|---|
| Amazon EC2 | g5.2 xlarge instance, Spot instance per hour | 416.67 | $ 0.4968 | $ 207 |
| Amazon API Gateway | Per 1M REST API requests | 1 | $ 3.50 | $ 3.50 |
| AWS Lambda | Per GB-second | 12,500 | $ 0.0000166667 | $ 0.21 |
| AWS Lambda | Per 1M requests | 1 | $ 0.20 | $ 0.20 |
| Amazon SNS | Per 1M requests | 2 | $ 0.50 | $ 0.50 |
| Amazon SNS | Data transfer per GB | 7.62** | $ 0.09 | $ 0.68 |
| Amazon SQS | Per 1M requests | 2 | $ 0.40 | $ 0.80 |
| Amazon S3 | Per 1K PUT requests | 2,000 | $ 0.005 | $ 10.00 |
| Amazon S3 | Per GB per month | 143.05*** | $ 0.023 | $ 3.29 |
| Total, 1M images | $226.18 |
The fixed costs unrelated to the number of images, with the main services and their pricing listed below (per month):
| AWS Service | Billing Dimension | Quantity per Month | Unit Price [USD] | Total [USD] |
|---|---|---|---|---|
| Amazon EKS | Cluster | 1 | $ 72.00 | $ 72.00 |
| Amazon EC2 | m5.large instance, On-Demand instance per hour | 1440 | $ 0.0960 | $ 138.24 |
| Total, month | $210.24 |
* Calculated based on an average request duration of 1.5 seconds and the average Spot instance pricing across all Availability Zones in the US West (Oregon) Region from January 29, 2024, to April 28, 2024.
** Calculated based on an average request size of 16 KB.
*** Calculated based on an average image size of 150 KB, stored for 1 month.
Please note that these are estimated costs for reference only. The actual costs may vary depending on the model you use, task parameters, current Spot instance pricing, and other factors.
Security
When you build systems on AWS infrastructure, security responsibilities are shared between you and AWS. This shared responsibility model reduces your operational burden because AWS operates, manages, and controls the components, including host operating systems, the virtualization layer, and the physical security of the facilities in which the services operate. For more information about AWS security, visit AWS Cloud Security.
IAM Roles
AWS Identity and Access Management (IAM) roles allow AWS customers to assign granular access policies and permissions to AWS services and users in the cloud.
This guidance creates separate IAM roles and grants permissions for the following components:
- Amazon EKS cluster, including
- Creating and operating the cluster
- Compute node groups
- Nodes created by Karpenter
- Pods running in the cluster, including
- Karpenter
- KEDA
- Fluent Bit
- Stable Diffusion runtimes
- AWS Lambda functions
- Amazon API Gateway
This guidance uses IAM roles for internal user access control, following the principle of least privilege, ensuring that each component can only access authorized components and maintaining application workload isolation.
Access Control
This guidance uses an API Key mechanism for external user access control, requiring users to include a valid API Key in their requests. For more information about API Keys, please refer to the API Specification.
Networking
This guidance operates within an isolated VPC by default, separate from your other workloads. If you need to connect this VPC to your existing VPC or a transit gateway, you are responsible for the gateways, firewalls, and access control.
Service Quotas
Service quotas, also referred to as limits, are the maximum number of service resources or operations for your AWS account.
Quotas for AWS services in This guidance
To view the service quotas for all AWS services in the documentation without switching pages, view the information in the Service endpoints and quotas page in the PDF instead.
Each AWS account has quotas on the number of resources that can be created in each AWS Region. You can view service quotas in the AWS console using the Service Quotas tool. If a service quota can be increased, you can open a case through this tool to request an increase.
The main service quotas related to This guidance are:
| AWS Service | Quota Entry | Estimated Usage | Adjustable |
|---|---|---|---|
| Amazon EC2 | Running On-Demand G and VT instances | Based on max concurrent GPU instances | [X] |
| Amazon EC2 | All G and VT Spot Instance Requests | Based on max concurrent GPU instances | [X] |
| Amazon SNS | Messages Published per Second | Based on max concurrent requests | [X] |
Additionally, consider the following service quotas during deployment:
| AWS Service | Quota Entry | Estimated Usage | Adjustable |
|---|---|---|---|
| Amazon VPC | VPCs per Region | 1 | [X] |
| Amazon VPC | NAT gateways per Availability Zone | 1 | [X] |
| Amazon EC2 | EC2-VPC Elastic IPs | 1 | [X] |
| Amazon S3 | General purpose buckets | 1 per queue | [X] |
Deploy the Guidance
Check the following considerations before deployment:
Deployable Regions
The services or Amazon EC2 instance types used in this guidance may not be available in all AWS Regions. Please deploy this sample code in an AWS Region that provides the required services.
Verified Deployable Regions
| Region Name | Verified |
|---|---|
| US East (N. Virginia) | [X] |
| US West (Oregon) | [X] |
When deploying the guidance into an AWS Region not in the table above, you may need to manually specify the instance type used by Karpenter as g4dn or other GPU instance types when deploying in Regions that do not support g5 instances.
Deploying into AWS China Regions
For information and the procedures for deploying in Amazon Web Services in the China Region, see Deploying in AWS China Regions
IAM permissions
Deploying this guidance requires administrator or equivalent permissions. Due to the number of components, we do not provide a minimal permissions list.
Choose Stable Diffusion Runtime
You need a runtime component to deploy a Stable Diffusion model and provide API access to it.
Currently, the following community Stable Diffusion runtimes are available:
You can also choose other runtimes or build your own. You need to package your runtime as a container image that can run on Amazon EKS.
You need to fully understand and comply with the license terms of the Stable Diffusion runtime you use.
Example Runtime
You can use the community-provided example Dockerfile to build runtime container images for Stable Diffusion Web UI and ComfyUI runtimes. Please note that these images are for technical evaluation and testing purposes only and should not be deployed to production environments
Model Storage
By default, this guidance will load models to the
/opt/ml/code/modelsdirectory. Ensure your runtime is configured to read models from this directory. You need to disable memory-mapped (mmap) files to achieve the highest performance.
- For SD Web UI, set
disable_mmap_load_safetensors: trueinconfig.json- For ComfyUI, manually modify the source code as described in this community issue.
Notes on Stable Diffusion (SD) Web UI Runtime
For the SD Web UI runtime, there are static runtimes (pre-load models) and dynamic runtimes (load models on-demand), depending on the model being run.
- Static runtimes use models specified in
modelFilenameparameter. The model is loaded into GPU memory at startup.- Dynamic runtimes the following parameter need to be set to
dynamicModel: true. No model needs to be specified - the runtime will load the model from Amazon S3 and perform inference based on the model used in the request.
Other important limitations
- In the current version, this guidance will automatically create a new VPC when deployed. The VPC includes:
- CIDR
10.0.0.0/16 - 3 public subnets in different availability zones, with size
/19 - 3 private subnets in different availability zones, with size
/19 - 3 NAT gateways (placed in public subnets)
- 1 Internet gateway
- Corresponding route tables and security groups
Currently, those parameters of a new VPC cannot be customized.
- CIDR
- In the current version, this guidance can only be deployed on a new EKS cluster with a fixed version of
1.28. We will update the cluster version as new Amazon EKS versions are released.
Deployment process overview
Before you launch this guidance, review the cost, architecture, security, and other considerations discussed in this guide. Follow the step-by-step instructions in this section to configure and deploy the guidance into your account.
We provide a one-click deployment script for a quick start. The total deployment time is around 30 minutes.
Get source code
Run the following command to get the source code and deployment scripts:
git clone --recursive https://github.com/aws-solutions-library-samples/guidance-for-asynchronous-inference-with-stable-diffusion-on-aws
cd guidance-for-asynchronous-inference-with-stable-diffusion-on-aws
Quick start
We provide a one-click deployment script for a quick start. The total deployment time is approximately 30 minutes.
Operation System
This script only supports Linux with Bash as shell, and validated with Amazon Linux and Ubuntu. Windows, WSL (Windows Subsystem of Linux) and MacOS are not supported. You are recommended to use an EC2 instance or Cloud9 workspace to run the script.
One-click deployment
Run the following command to deploy with the simplest settings:
cd deploy
./deploy.sh
This script will:
- Install the necessary runtimes and tools.
- Create an S3 bucket, download the Stable Diffusion 1.5 foundation model from HuggingFace, and place it in the bucket.
- Create an EBS snapshot containing the SD Web UI image using our provided sample image.
- Create a Stable Diffusion guidance with the SD Web UI runtime.
Minimal Deployment
The configuration file generated by this script is the simplest configuration, containing only one runtime and without an ability to customize (such as scaling thresholds, custom models, and custom images). If you need to customize the configuration, run the following command:
./deploy.sh -d
This parameter will cause the deployment script to only complete the pre-deployment preparation but not actually deploy. After modifying the configuration, you can run the following command to deploy:
cdk deploy --no-rollback --require-approval never
Deployment parameters
The deployment script provides some parameters for you to customize the deployed Guidance:
-h, --help: Display help information-n, --stack-name: Customize the name of the deployed Guidance, affecting the naming of generated resources. Default issdoneks.-R, --region: The AWS Region to deploy the guidance to. Defaults to the current AWS profile Region.-d, --dry-run: Only generate configuration files; do not perform deployment.-b, --bucket: Specify an existing S3 bucket name for storing models. This S3 bucket must already exist and be in the same Region as the guidance.-s, --snapshot: Specify an existing EBS snapshot ID. You can build the EBS snapshot yourself by following the documentation below.-r, --runtime-name: Specify the name of the deployed runtime, affecting the name used for API calls. Default issdruntime.-t, --runtime-type: Specify the type of the deployed runtime, only acceptingsdwebuiandcomfyui. Default issdwebui.
Manual deployment
You can also deploy this guidance on AWS “manually” without using the deployment script by following these steps:
- Create an Amazon S3 model storage bucket and store the required models in the bucket
- (Optional) Build the container image
- (Optional) Store the container image in an EBS cache to accelerate startup
- Deploy and launch the guidance stack
Model storage
The models required by this guidance should be stored in an S3 bucket beforehand.
Create the S3 bucket
Follow these steps to create the S3 bucket:
AWS Management Console {: .label .label-blue }:
- Open the Amazon S3 console.
- In the left navigation pane, choose Buckets.
- Choose Create Bucket.
- In Bucket name, enter a name for your bucket. The name must follow bucket naming rules.
- In AWS Region, choose the same Region where you plan to deploy the guidance.
To ensure model loading speed, make sure the bucket is in the same AWS Region as your Guidance deployment. If you plan to deploy multiple replicas of the guidance in multiple Regions, create a separate bucket in each Region.
- Choose Create Bucket
AWS Command Line Interface (AWS CLI):
Run the following command to create the bucket, replace <bucket name> with your desired bucket name and us-east-1 with the AWS Region where you plan to deploy the guidance:
aws s3api create-bucket --bucket <bucket name> --region us-east-1
Store Models
Store all ML models you need to use in an S3 bucket following this directory structure:
└── /
    ├── CLIP
    ├── Codeformer
    ├── ControlNet
    ├── ESRGAN
    ├── GFPGAN
    ├── LDSR
    ├── Lora
    ├── RealESRGAN
    ├── ScuNET
    ├── Stable-diffusion
    ├── SwinIR
    ├── VAE
    ├── VAE-approx
    ├── embeddings
    └── hypernetworks
Place the models into their corresponding directories. The Stable-diffusion directory must exist and contain the Stable Diffusion model. Other directories can be omitted if there are no models.
Currently, .safetensors and .ckpt model formats are supported. If you downloaded models from Civitai without an extension, add the .ckpt extension.
Follow these steps to upload the models to the S3 bucket:
AWS Management Console {: .label .label-blue }:
- Open the Amazon S3 console.
- In the left navigation pane, choose Buckets.
- Select the bucket you created in the previous step and navigate to the desired folder.
- If the corresponding folder does not exist:
- Choose Create Folder
- In Folder Name, enter the folder name.
- Choose Create folder
- Repeat the above steps until the folder structure matches the structure above.
- Choose Upload
- Choose Add files and select the model files you want to upload.
- Choose Upload. Do not close the browser during the upload process.
AWS CLI {: .label .label-green }:
Run the following command to upload the model files to the bucket. Replace <model name> with your model file name, <folder>, with the model type, and <bucket name> with your desired bucket name:
aws s3 cp <model name> s3://<bucket name>/<folder>/
When uploading with the AWS CLI, there is no need to create the directory structure in advance.
You can use third-party tools like s5cmd to improve upload speed.
Image Building
You can build the image from the source code and store it in your image repository.
Runtime Selection
You need to provide the Stable Diffusion runtime image yourself. You can find the supported Stable Diffusion runtimes in the Deployment Planning section.
Pre-built Images
For evaluation and testing purposes, you can use our pre-built container images:
SD Web UI: public.ecr.aws/bingjiao/sd-on-eks/sdwebui:latest
ComfyUI: public.ecr.aws/bingjiao/sd-on-eks/comfyui:latest
Queue Agent: public.ecr.aws/bingjiao/sd-on-eks/queue-agent:latest
Please note that these images are only for technical evaluation and testing purposes, and you are responsible for any license issue associated with using them.
Build the Image
Run the following command to build the queue-agent image:
docker build -t queue-agent:latest src/backend/queue_agent/
Sample Runtimes
You can use the community-provided sample Dockerfile to build the container images for Stable Diffusion Web UI and ComfyUI runtimes. These images are only for technical evaluation and testing purposes and should not be deployed to production environments.
Push the Image to Amazon ECR
Image Repository Selection
We recommend using Amazon ECR as the image repository, but you can also choose other image repositories that support the OCI standard, such as Harbor.
First-time Push
Amazon ECR requires creating the image repository before pushing.
AWS CLI
Run the following command to create:
aws ecr create-repository --repository-name sd-on-eks/queue-agentAWS Management Console {: .label .label-blue }:
- Open the Amazon ECR console.
- Choose Get started.
- For Visibility settings, choose Private.
- For Repository name, enter
sd-on-eks/queue-agent.- Choose Create repository.
Run the following commands to log in to the image repository and push the image. Replace us-east-1 with your AWS Region and 123456789012 with your AWS account ID:
aws ecr get-login-password --region us-east-1 | docker login --username AWS --password-stdin 123456789012.dkr.ecr.us-east-1.amazonaws.com

docker tag queue-agent:latest 123456789012.dkr.ecr.us-east-1.amazonaws.com/sd-on-eks/queue-agent:latest
docker push 123456789012.dkr.ecr.us-east-1.amazonaws.com/sd-on-eks/queue-agent:latest
Build and Push Helm Chart
Some components in this guidance are deployed using a Helm Chart. In general, you do not need to deeply customize the contents of the Helm Chart and can directly use our pre-built Helm Chart. You can also configure the runtime settings using the config.yaml file. The Helm Chart can be stored on any HTTP server accessible over the Internet or in an image repository compatible with the OCI standard,including Amazon ECR.
China Region Support
Due to a known issue with the CDK framework, you cannot store the Helm Chart in an ECR image repository in the China Regions. We are actively working to resolve this issue.
Using ECR Image Repository
First-time Push
Amazon ECR requires creating an image repository before pushing.
AWS CLI {: .label .label-green }:
Run the following command to create:
aws ecr create-repository --repository-name sd-on-eks/charts/sd-on-eksAWS Management Console {: .label .label-blue }:
- Open the Amazon ECR console.
- Choose Get started.
- For Visibility settings, choose Private.
- For Repository name, enter
sd-on-eks/charts/sd-on-eks.- Choose Create repository.
Run the following commands to log in to the image repository and push the Helm Chart. Replace us-east-1 with your AWS Region and 123456789012 with your AWS account ID:
helm package src/charts/sd_on_eks
helm push sd-on-eks-<version>.tgz oci://123456789012.dkr.ecr.us-east-1.amazonaws.com/sd-on-eks/charts/
After uploading, modify config.yaml and add the following content under each runtime that needs to use the Helm Chart:
modelsRuntime:
- name: sdruntime
  namespace: default
  type: sdwebui
  chartRepository: "oci://123456789012.dkr.ecr.us-east-1.amazonaws.com/sd-on-eks/charts/sd-on-eks"
  chartVersion: "1.1.0" # Modify if you customized the Helm Chart version
Using HTTP Server
Access Control
Make sure the HTTP server is open to the Internet and does not have any access control (such as IP allow-listing).
Run the following command to package the Helm Chart:
helm package src/charts/sd_on_eks
After packaging, an output file named sd-on-eks-<version>.tgz will be generated. Place this file in an empty folder and run the following command:
helm repo index
You can place the generated compressed package and index.yaml on the HTTP server. Assuming the HTTP server domain is example.com (IP addresses are also acceptable), you need to modify config.yaml and add the following content under each runtime that needs to use the Helm Chart:
modelsRuntime:
- name: sdruntime
  namespace: default
  type: sdwebui
  chartRepository: "http://example.com/"
  chartVersion: "1.0.0"  # Modify if you customized the Helm Chart version
Image Cache Building
By pre-caching the container image as an EBS snapshot, you can optimize the startup speed of compute instances. When launching new instances, the instance’s data volume will have the container image cache pre-loaded, eliminating the need to pull from the image repository.
The EBS snapshot should be created before deploying the guidance. We provide a script for building the EBS snapshot.
Using Custom Image
If you built and pushed the image to Amazon ECR, run the following command. Replace us-east-1 with the Region where the guidance is deployed and 123456789012 with your 12-digit AWS account number:
cd utils/bottlerocket-images-cache
./snapshot.sh 123456789012.dkr.ecr.us-east-1.amazonaws.com/sd-on-eks/sdwebui:latest,123456789012.dkr.ecr.us-east-1.amazonaws.com/sd-on-eks/queue-agent:latest
Using Pre-built Image
If you are using the pre-built images provided by the guidance, run the following command:
cd utils/bottlerocket-images-cache
./snapshot.sh public.ecr.aws/bingjiao/sd-on-eks/sdwebui:latest,public.ecr.aws/bingjiao/sd-on-eks/comfyui:latest,public.ecr.aws/bingjiao/sd-on-eks/queue-agent:latest
After the script completes, it will output the EBS snapshot ID (in the format snap-0123456789). You can apply this snapshot during deployment.
For more details about this script, refer to the GitHub repository.
Manual Deployment
Follow these steps to deploy This guidance manually:
Install Required Components
Install the following runtimes before deployment:
- Node.js version 18 or later.
- AWS CLI.
- AWS CDK Toolkit.
- git.
Edit Configuration File
The configuration for This guidance is stored in the config.yaml file. We provide a configuration file template and you can customize it according to your actual specificiation.
Set the model storage bucket (required)
Replace
<bucket name>inmodelBucketArnwith the name of the S3 bucket where you placed the models.modelBucketArn: arn:aws:s3:::<bucket name>China Regions
If you are using an AWS China Region, make sure the partition in the ARN is
aws-cn.modelBucketArn: arn:aws-cn:s3:::<bucket name>Set the Stable Diffusion runtime (required)
You need to specify the runtime parameters. The runtime is defined in
modelsRuntimewith the following configuration:modelsRuntime: - name: "sdruntime" # Required parameter, the name of the runtime, cannot be the same as other runtimes namespace: "default" # Required parameter, the Kubernetes namespace where the runtime is located, not recommended to place in the same namespace as other runtimes type: "sdwebui" # Required parameter, the type of this runtime, currently only supports "sdwebui" and "comfyui" modelFilename: "v1-5-pruned-emaonly.safetensors" # (SD Web UI) Name of the model used by this runtime, cannot be the same as other runtimes dynamicModel: false # (SD Web UI) Whether this runtime allows dynamic model loadingYou can configure multiple runtimes in the
modelsRuntimesection.Set custom image (optional)
If you built the image and/or Helm Chart yourself, you need to specify the image in the corresponding runtime with the following configuration:
 modelsRuntime:
 - name: "sdruntime"
   namespace: "default"
   type: "sdwebui"
   modelFilename: "v1-5-pruned-emaonly.safetensors"
   dynamicModel: false
   chartRepository: "" # Optional parameter, if you built the Helm Chart, enter the address where the Chart is located. Include the protocol prefix (oci:// or https://)
   chartVersion: "" # Optional parameter, if you built the Helm Chart, enter the version of the Chart
   extraValues: # Add the following content
     runtime:
       inferenceApi:
         image:
           repository: <account_id>.dkr.ecr.<region>.amazonaws.com/sd-on-eks/sdwebui # Address of the Stable Diffusion runtime image
           tag: latest # Image tag
       queueAgent:
         image:
           repository: <account_id>.dkr.ecr.<region>.amazonaws.com/sd-on-eks/queue-agent # Address of the Queue Agent image
           tag: latest # Image tag
Set EBS snapshot-based image cache (optional)
If you built an EBS snapshot-based image cache, you need to specify the snapshot ID in the corresponding runtime with the following configuration:
 modelsRuntime:
 - name: "sdruntime"
   namespace: "default"
   type: "sdwebui"
   modelFilename: "v1-5-pruned-emaonly.safetensors"
   extraValues:
     karpenter: # Add the following content
       nodeTemplate:
         amiFamily: Bottlerocket
         dataVolume:
           snapshotID: snap-0123456789 # Replace with the EBS snapshot ID
Other detailed settings (optional)
If you need to configure the runtime in detail, refer to the Configuration Options example.
Start Deployment
After completing the configuration, run the following command to deploy:
npm install
cdk deploy
Deployment generally takes 15-20 minutes. Since the deployment is performed on the AWS side through AWS CloudFormation, you do not need to redeploy if the CDK CLI is accidentally closed.
Next Steps
After the deployment is complete, you will see the following output:
Outputs:
sdoneksStack.GetAPIKeyCommand = aws apigateway get-api-keys --query 'items[?id==`abcdefghij`].value' --include-values --output text
sdoneksStack.FrontApiEndpoint = https://abcdefghij.execute-api.us-east-1.amazonaws.com/prod/
sdoneksStack.ConfigCommand = aws eks update-kubeconfig --name sdoneksStack --region us-east-1 --role-arn arn:aws:iam::123456789012:role/sdoneksStack-sdoneksStackAccessRole
...
Deploying in AWS China Regions
This guidance supports deployment in AWS China Regions.
| Region Name | Verified |
|---|---|
| China (Ningxia) | [x] |
However, due to the special network environment in China, there are the following limitations:
- You need to build the container image yourself or copy the pre-built image to ECR in the China Region.
- Some components’ Helm Charts are hosted on GitHub, and there may be issues retrieving the Helm Charts when deploying in China Regions; retries are recommended when this issue occurs.
- You cannot automatically download models from Hugging Face or GitHub and need to manually download the models and upload them to the S3 bucket.
- According to Chinese laws and regulations, you must obtain an Internet Content Provider (ICP) license to service API requests via Amazon API Gateway. As a result, this solution is not directly accessible through API Gateway in China. You can associate a domain name that has been associated with a valid ICP license to the API Gateway via custom domain names You can also send messages directly to SNS to invoke the solution.
Steps for Deploying in China Regions
The steps for deploying in AWS China Regions differ from the regular deployment flow. Follow these steps for deployment:
- Build or transfer the container image to ECR.
- Download the models and store them in the S3 bucket.
- Create an EBS disk snapshot.
- Generate and modify the configuration file.
- Proceed with deployment.
Build or Transfer Image to ECR
Since the default container images are stored in ECR Public, you may experience slow speeds or intermittent disconnections when pulling images or creating image caches. We recommend that you build the images yourself or transfer the existing images to your ECR image repository.
If you need to build the images yourself, please refer to the Image Building documentation.
If you need to transfer the pre-built images to ECR in the China Region, you can run the following commands on an instance with Docker installed and ECR permissions:
docker pull public.ecr.aws/bingjiao/sd-on-eks/sdwebui:latest
docker pull public.ecr.aws/bingjiao/sd-on-eks/comfyui:latest
docker pull public.ecr.aws/bingjiao/sd-on-eks/queue-agent:latest

aws ecr create-repository --repository-name sd-on-eks/sdwebui
aws ecr create-repository --repository-name sd-on-eks/comfyui
aws ecr create-repository --repository-name sd-on-eks/queue-agent

docker tag public.ecr.aws/bingjiao/sd-on-eks/sdwebui:latest 123456789012.dkr.ecr.cn-northwest-1.amazonaws.com.cn/sd-on-eks/sdwebui:latest
docker tag public.ecr.aws/bingjiao/sd-on-eks/comfyui:latest 123456789012.dkr.ecr.cn-northwest-1.amazonaws.com.cn/sd-on-eks/comfyui:latest
docker tag public.ecr.aws/bingjiao/sd-on-eks/queue-agent:latest 123456789012.dkr.ecr.cn-northwest-1.amazonaws.com.cn/sd-on-eks/queue-agent:latest

aws ecr get-login-password --region cn-northwest-1 | docker login --username AWS --password-stdin 123456789012.dkr.ecr.cn-northwest-1.amazonaws.com.cn

docker push 123456789012.dkr.ecr.cn-northwest-1.amazonaws.com.cn/sd-on-eks/sdwebui:latest
docker push 123456789012.dkr.ecr.cn-northwest-1.amazonaws.com.cn/sd-on-eks/comfyui:latest
docker push 123456789012.dkr.ecr.cn-northwest-1.amazonaws.com.cn/sd-on-eks/queue-agent:latest
We recommend that you follow the Image Building documentation to place the Helm Chart in ECR or an HTTP server.
Download Models and Store in S3 Bucket
Since Hugging Face cannot be accessed smoothly from mainland China, download the models from other mirror sites and upload them to the S3 bucket following the Model Storage documentation.
Create EBS Disk Snapshot
Follow the Image Cache Building documentation to create an EBS disk snapshot to accelerate image loading.
Generate and Modify Configuration File
Run the following command to install the tools and generate the initial configuration file:
cd deploy
./deploy.sh -b <bucket name> -s <snapshot ID> -d
This command will generate a config.yaml template in the parent directory, but this template needs to be edited for deployment in the China Region. Please edit the file according to the comments:
stackName: sdoneks
modelBucketArn: arn:aws-cn:s3:::${MODEL_BUCKET}  # Change aws to aws-cn in this ARN
APIGW:
  stageName: dev
  throttle:
    rateLimit: 30
    burstLimit: 50
modelsRuntime:
- name: sdruntime
  namespace: "default"
  modelFilename: "v1-5-pruned-emaonly.safetensors"
  dynamicModel: false
  # chartRepository: "http://example.com/" # If you self-hosted the Helm Chart, uncomment this line and change the value to the address of the Helm Chart (oci:// or http://), otherwise delete this line
  type: sdwebui
  extraValues:
    runtime:
      inferenceApi:
        image:
          repository: 123456789012.dkr.ecr.cn-northwest-1.amazonaws.com.cn/sd-on-eks/sdwebui # Change this to the address of your ECR image repository
          tag: latest
      queueAgent:
        image:
          repository: 123456789012.dkr.ecr.cn-northwest-1.amazonaws.com.cn/sd-on-eks/queue-agent # Change this to the address of your ECR image repository
          tag: latest
    karpenter:
      nodeTemplate:
        amiFamily: Bottlerocket
        dataVolume:
          snapshotID: snap-1234567890 # The EBS snapshot ID will be automatically filled in here
      provisioner:
        instanceType:
        - "g5.xlarge"
        - "g5.2xlarge"
        capacityType:
          onDemand: true
          spot: true
After completing the modifications, run the following command to re-deploy:
cdk deploy
Deployment Verification
You can use the test script to verify if the guidance is deployed successfully. Run the following command to perform the test:
cd test
STACK_NAME=sdoneksStack RUNTIME_TYPE=sdwebui ./run.sh
If you modified the guidance stack name or runtime type, replace sdoneksStack and sdwebui parameter values with the values actually used.
This script will automatically find the API Gateway endpoint, retrieve the API Key, and send test requests.
- For the SD Web UI runtime, it will send text-to-image, image-to-image, and single image super-resolution requests.
- For the ComfyUI runtime, it will send a Pipeline request.
Within seconds to minutes (depending on whether image caching is enabled and the minimum number of instance replicas), you can find the generated images at the output_location.
Usage Guide
API Calling Rules
After deploying the guidance, you can send requests to the Stable Diffusion runtimes through the API endpoint provided by Amazon API Gateway.
When sending requests, follow these rules:
Request Endpoint and Format
The API endpoint of the guidance can be obtained from the CloudFormation outputs:
AWS Management Console
- Go to the AWS CloudFormation console
- Choose Stacks
- In the list, select sdoneksStack (or your custom name)
- Choose Output
- Record the value of the FrontApiEndpoint item (in the format
https://abcdefghij.execute-api.ap-southeast-1.amazonaws.com/prod/)
AWS CLI
Run the following command to get the API endpoint:
aws cloudformation describe-stacks --stack-name sdoneksStack --output text --query 'Stacks[0].Outputs[?OutputKey==`FrontApiEndpoint`].OutputValue'
You need to append the API version to the endpoint. Currently, we support the v1alpha1 and v1alpha2 versions. For example, when using the v1alpha2 version API, the request should be sent to:
https://abcdefghij.execute-api.ap-southeast-1.amazonaws.com/prod/v1alpha2
This endpoint only accepts JSON-formatted POST requests and requires the Content-Type: application/json request header.
Request Types
Different runtime types accept specific request types:
- For the SD Web UI runtime, only text-to-image, image-to-image, and single image super-resolution requests are accepted.
- For the ComfyUI runtime, only Pipeline requests are accepted.
Please refer to the detailed documentation for each request type for the specific Request Schema.
API Key
For security reasons, all requests must include an API Key. Follow these steps to obtain the API Key:
AWS Management Console
- Go to the Amazon API Gateway console
- Choose API Keys
- In the list, select the API Key with a name similar to
SdOnEK-defau-abcdefghij(or your custom name) - Record the value of the API key item
AWS CLI
Run the following command to get the API Key:
echo $(aws cloudformation describe-stacks --stack-name sdoneksStack --output text --query 'Stacks[0].Outputs[?OutputKey==`GetAPIKeyCommand`].OutputValue')
When sending requests, you need to include the x-api-key request header with the value set to the API Key obtained above.
Anonymous Requests
Requests without an API Key will directly return a
401error.
Throttling Rules
To protect the backend API, API Gateway will throttle excessive requests using the same API Key.
The default settings are:
- 30 requests per second
- Burst limit of 50 requests
For more details on throttling, refer to Throttle API requests for better throughput.
If you need to modify these settings, modify the APIGW section in config.yaml. You can also modify the corresponding Usage Plan in API Gateway.
Sending messages directly to Amazon SNS topic
If your network environment does not have access to the API Gateway endpoints, or if you want to invoke the solution via Amazon SNS, you can send messages directly to the SNS topic. However, since the message will not be validated by Lambda function, you need to strictly follow the formatting in the message format, or the Queue Agent will discard the message silently.
Find SNS topic
You can find the SNS topic ARN in the CloudFormation outputs:
AWS Management Console
- Go to the AWS CloudFormation console
- Choose Stacks
- In the list, select sdoneksStack (or your custom name)
- Choose Output
- Record the value of the sdNotificationLambdaARN item (in the format
arn:aws:sns:us-east-1:123456789012:sdoneksStack-sdNotificationLambdaCfn-abcdefgh)
AWS CLI
Run the following command to get the SNS topic ARN:
aws cloudformation describe-stacks --stack-name sdoneksStack --output text --query 'Stacks[0].Outputs[?OutputKey==`sdNotificationLambdaARN`].OutputValue'
Message schema
The message needs to contain the runtime: <runtime name> attribute, otherwise the message will not be routed to the SQS queue of the corresponding runtime, and will be discarded by SNS.
The schema of the message body sent to SNS is similar to the v1alpha2 API schema, but does not contain the outermost task field. An example is shown below:
{
  "metadata": {
    "id": "test-t2i", // Required, task ID
    "runtime": "sdruntime", // Required, the name of the runtime used for the task
    "tasktype": "text-to-image", // Required, task type. Ensure task type fits runtime type.
    "prefix": "output", // Required, the prefix (directory name) for the output file in the S3 bucket
    "context": "" // Optional, can contain any information, will be included in the callback
  },
  "content": { // Content will be pass to runtime
  ...
  }
}
Send Message
You can send messages to SNS topic by AWS management console or AWS SDK. Please refer to the Amazon SNS documentation for details.
Text-to-Image (SD Web UI)
This request type is only applicable to the SD Web UI runtime.
The basic usage of Stable Diffusion is that an image is generated based on the input prompt.
The content in the request will be passed directly to the SD Web UI, but if there are links (HTTP or S3 URLs), the link content will be converted to base64-encoded content and filled in the corresponding fields.
Request schema
v1alpha2
{
  "task": {
    "metadata": {
      "id": "test-t2i", // Required, task ID
      "runtime": "sdruntime", // Required, the name of the runtime used for the task
      "tasktype": "text-to-image", // Required, task type
      "prefix": "output", // Required, the prefix (directory name) for the output file in the S3 bucket
      "context": "" // Optional, can contain any information, will be included in the callback
    },
    "content": { // Same specification as the SD Web UI text-to-image API
      "alwayson_scripts": {},
      "prompt": "A dog",
      "steps": 16,
      "width": 512,
      "height": 512
    }
  }
}
v1alpha1
{
    "alwayson_scripts": {
        "task": "text-to-image", // Required, task type
        "sd_model_checkpoint": "v1-5-pruned-emaonly.safetensors", // Required, base model name
        "id_task": "test-t2i", // Required, task ID, used when uploading result images and returning responses
        "save_dir": "outputs" // Required, the prefix (directory name) for the output file in the S3 bucket
    },
    // Same specification as the SD Web UI text-to-image API
    "prompt": "A dog",
    "steps": 16,
    "width": 512,
    "height": 512
}
Response schema
v1alpha2
{
  "id_task": "test-t2i",
  "runtime": "sdruntime",
  "output_location": "s3://outputbucket/output/test-t2i"
}
v1alpha1
{
  "id_task": "test-t2i",
  "sd_model_checkpoint": "v1-5-pruned-emaonly.safetensors",
  "output_location": "s3://outputbucket/output/test-t2i"
}
Model Switching
If the corresponding runtime is set to dynamicModel: true, you need to add the following content in the alwayson_scripts section of the request:
        "content": {
          "alwayson_scripts": {
            "sd_model_checkpoint": "v1-5-pruned-emaonly.safetensors" //Place the model name here
          },
        }
Upon receiving the request, the SD Web UI will unload the current model and load the corresponding model from memory or the S3 bucket. If the specified model does not exist, the request will directly return an error.
Image Retrieval
After the image is generated, it will be stored in the S3 bucket path specified by output_location. If batch_size or other parameters that generate multiple images are set, each image will be automatically numbered and stored.
The default storage format is lossless PNG, but if special formats (such as GIF) are involved, the system will automatically recognize and add the appropriate extension.
Image-to-Image (SD Web UI)
This request type is only applicable to the SD Web UI runtime.
The basic usage of Stable Diffusion is that an image is generated based on the input prompt and reference image.
The content in the request will be passed directly to SD Web UI, but if there are links (HTTP or S3 URLs), the link content will be converted to base64-encoded content and filled in the corresponding fields.
Request Schema
v1alpha2
{
  "task": {
    "metadata": {
      "id": "test-i2i", // Required, task ID
      "runtime": "sdruntime", // Required, the name of the runtime used for the task
      "tasktype": "image-to-image", // Required, task type
      "prefix": "output", // Required, the prefix (directory name) for the output file in the S3 bucket
      "context": "" // Optional, can contain any information, will be included in the callback
    },
    "content": { // Same specification as the SD Web UI image-to-image API
      "alwayson_scripts": {},
      "prompt": "cat wizard, gandalf, lord of the rings, detailed, fantasy, cute, adorable, Pixar, Disney, 8k",
      "steps": 16,
      "width": 512,
      "height": 512,
      "init_images": ["https://huggingface.co/datasets/huggingface/documentation-images/resolve/main/diffusers/cat.png"] // Place the image link here, the image will be downloaded and base64-encoded before being placed in the request
    }
  }
}
v1alpha1
{
    "alwayson_scripts": {
        "task": "image-to-image", // Required, task type
        "image_link": "https://huggingface.co/datasets/huggingface/documentation-images/resolve/main/diffusers/cat.png", // Required, URL of the input image
        "id_task": "test-i2i", // Required, task ID, used when uploading result images and returning responses
        "sd_model_checkpoint": "v1-5-pruned-emaonly.safetensors", // Required, base model name, associated with queue dispatching or model switching
    },
    // The following are official parameters, use the default values or pass them in directly
    "prompt": "cat wizard, gandalf, lord of the rings, detailed, fantasy, cute, adorable, Pixar, Disney, 8k",
    "steps": 16,
    "width": 512,
    "height": 512
}
Response schema
v1alpha2
{
  "id_task": "test-i2i",
  "runtime": "sdruntime",
  "output_location": "s3://outputbucket/output/test-t2i"
}
v1alpha1
{
  "id_task": "test-i2i",
  "sd_model_checkpoint": "v1-5-pruned-emaonly.safetensors",
  "output_location": "s3://outputbucket/output/test-t2i"
}
Model Switching
If the corresponding runtime is set to dynamicModel: true, you need to add the following content in the alwayson_scripts of the request:
        "content": {
          "alwayson_scripts": {
            "sd_model_checkpoint": "v1-5-pruned-emaonly.safetensors" //Place the model name here
          },
        }
Upon receiving the request, the SD Web UI will unload the current model and load the corresponding model from memory or an S3 bucket. If the specified model does not exist, the request will return an error.
Image Retrieval
After the image is generated, it will be stored in the S3 bucket path specified by output_location. If batch_size or other parameters that generate multiple images are set, each image will be automatically numbered and stored.
The default storage format is lossless PNG, but if special formats (such as GIF) are involved, the system will automatically recognize and add the appropriate extension.
Single Image Upscaling (SD Web UI)
This request type is only applicable to the SD Web UI runtime.
This request type only provides the
v1alpha2API.
For a single image, use the super-resolution model to upscale the image.
Request Schema
v1alpha2
{
  "task": {
    "metadata": {
      "id": "test-extra",
      "runtime": "sdruntime",
      "tasktype": "extra-single-image",
      "prefix": "output",
      "context": ""
    },
    "content": {
      "resize_mode":0,
      "show_extras_results":false,
      "gfpgan_visibility":0,
      "codeformer_visibility":0,
      "codeformer_weight":0,
      "upscaling_resize":4,
      "upscaling_resize_w":512,
      "upscaling_resize_h":512,
      "upscaling_crop":false,
      "upscaler_1":"R-ESRGAN 4x+",
      "upscaler_2":"None",
      "extras_upscaler_2_visibility":0,
      "upscale_first":false,
      "image":"https://huggingface.co/datasets/huggingface/documentation-images/resolve/main/diffusers/cat.png"
    }
  }
}
Response schema
v1alpha2
{
  "id_task": "test-extra",
  "runtime": "sdruntime",
  "output_location": "s3://outputbucket/output/test-t2i"
}
Available Super-Resolution Models
The available super-resolution models are the same as the default models in SD Web UI:
- Lanczos
- Nearest
- 4x-UltraSharp
- ESRGAN_4X
- LDSR
- R-ESRGAN 4x+
- R-ESRGAN 4x+ Anime6B
- ScuNET GAN
- ScuNET PSNR
- SwinIR 4x
If you need more super-resolution models, you can place them in the LDSR, SwinIR, ESRGAN, RealESRGAN, ScuNET, etc. directories in the S3 bucket according to the model type.
After completing the above steps, you need to restart the Pod for the new models to take effect.
Image Retrieval
After the image is generated, it will be stored in the S3 bucket path specified by output_location. The default storage format is lossless PNG, but if special formats (such as GIF) are involved, the system will automatically recognize and add the appropriate extension.
Pipeline (ComfyUI)
This request type is only applicable to the ComfyUI runtime.
This request type only provides the
v1alpha2API.
ComfyUI provides workflow orchestration capabilities, allowing you to design workflows using various nodes in the interface and export them to a json file.
Exporting the Workflow
After designing the workflow in the interface, follow these steps to export it:
- Select the gear icon in the top-right corner of the menu panel.
- Select
Enable Dev mode Options. - Select
Save(API Format)to save the workflow as a file.
Request Schema
v1alpha2
{
  "task": {
    "metadata": {
      "id": "test-pipeline", // Required, task ID
      "runtime": "sdruntime", // Required, the name of the runtime used for the task
      "tasktype": "pipeline", // Required, task type
      "prefix": "output", // Required, the prefix (directory name) for the output file in the S3 bucket
      "context": "" // Optional, can contain any information, will be included in the callback
    },
    "content": {
      ... // Place the exported workflow content here
    }
  }
}
Response schema
v1alpha2
{
  "id_task": "test-pipeline",
  "runtime": "sdruntime",
  "output_location": "s3://outputbucket/output/test-pipeline"
}
Image Retrieval
After the image is generated, it will be stored in the S3 bucket path specified by output_location. If batch_size or other parameters that generate multiple images are set, each image will be automatically numbered and stored.
The default storage format is lossless PNG, but if special formats (such as GIF) are involved, the system will automatically recognize and add the appropriate extension.
Callbacks and Notifications
The Stable Diffusion on Amazon EKS solution uses an asynchronous inference mode. When an image is generated or an error occurs, the user will be notified through Amazon SNS. User applications can subscribe to the SNS topic to receive notifications about image generation completion.
Adding Subscriptions
Refer to the Amazon SNS documentation to learn about the message destination types supported by SNS.
You can find the generated SNS topic ARN in the CloudFormation outputs:
AWS Management Console
- Go to the AWS CloudFormation console
- Choose Stacks
- In the list, select sdoneksStack (or your custom name)
- Choose Output
- Record the value of the sdNotificationOutputArn item (in the format
arn:aws:sns:us-east-1:123456789012:sdoneksStack-sdNotificationOutputCfn-abcdefgh)
AWS CLI
Run the following command to get the SNS topic ARN:
aws cloudformation describe-stacks --stack-name sdoneksStack --output text --query 'Stacks[0].Outputs[?OutputKey==`sdNotificationOutputArn`].OutputValue'
To receive messages, you need to add your message receiver (such as an Amazon SQS queue, HTTP endpoint, etc.) as a subscription to this SNS topic.
AWS Management Console {: .label .label-blue }:
- In the left navigation pane, choose Subscriptions.
- On the Subscriptions page, choose Create subscription.
- On the Create subscription page under Details, do the following:
- For Topic ARN, select the ARN you recorded in the previous step.
- For Protocol, select the type of your receiver.
- For Endpoint, enter the address of your receiver, such as an email address or the ARN of an Amazon SQS queue.
- Choose Create subscription
AWS CLI {: .label .label-green }:
Use Amazon SNS with the AWS CLI to add a subscription to this topic.
Callback Message Format
The guidance code will send task completion notifications to SNS in the following format, regardless of the API version used in the request:
{
    "id": "task_id", // Task ID
    "result": true, // true for successful completion, false for unsuccessful completion
    "runtime": "sdruntime", // Sender name of runtime
    "image_url": [ // S3 URLs of the generated images, in the format of task ID + 4 random characters + image sequence number, all image links will be included if there are multiple images
        "s3://outputbucket/output/test-t2i/test-t2i-abcd-1.png"
    ],
    "output_url": "s3://outputbucket/output/test-t2i/test-t2i-abcd.out", // S3 URL of the task output, containing the full return from the runtime
    "context": { // Context content included in the request
        "abc": 123
    }
}
Uninstall the Guidance
The deployed Guidance code can be deleted using the CloudFormation console.
Permanent Deletion
All deleted resources will be permanently removed and cannot be recovered by any means.
Deletion Scope
- The following resources will be permanently deleted:
- Amazon EKS cluster and all worker nodes
- SNS topics and all subscriptions
- SQS queues
- VPC and subnet, etc.
- IAM roles used by the guidance
- The following resources will not be deleted:
- S3 bucket for storing output images
- S3 bucket for storing models
Pre-Deletion Preparation
Before deleting the guidance resources, ensure the following conditions are met:
- All SQS queues have been emptied.
- No additional policies are attached to IAM roles.
- No additional resources (such as EC2 instances, ENIs, Cloud9 environments, etc.) exist within the VPC.
Deleting the Solution
You can delete the guidance code using either the CDK CLI or the AWS Management Console.
Use AWS Management Console:
- Navigate to the AWS CloudFormation console.
- Select Stacks.
- In the list, select sdoneksStack (or another name you customized).
- Select Delete, and in the pop-up dialog, choose Delete.
Use AWS CDK CLI:
In the guidance’s source code directory, run the following command to unistall the deployed code:
npx cdk destroy
Deleting the guidance resources should approximately 20-30 minutes.
Related resources
Contributors
- Bingjiao Yu, Soltions Architect Container Specialist
- Daniel Zilberman, Sr. Solutions Architect Tech Solutions team
- Harold Sun, Sr. GCR Serverless Special Solution Architect
Acknowledgement for code contributors:
- Anbei Zhao, Sr. Solutions Architect
- Congyao Lu, Solutions Architect
- Felix Wang, Sr. Solutions Architect
- Walkley He, Manager of Container Specialist Soltions Architects
- Xi Wan, Solutions Architect
Acknowledgement for project sponsors:
- Xiaoming Fu, Solutions Architect Manager
- Zhanling Chen, AppMod Specialist Manager
Notices
Customers are responsible for making their own independent assessment ofthe information in this document. This document: (a) is for informational purposes only, (b) represents AWS current product offerings and practices, which are subject to change without notice, and (c) does not create any commitments or assurances from AWS and its affiliates, suppliers or licensors. AWS products or services are provided “as is” without warranties, representations, or conditions of any kind, whether express or implied. AWS responsibilities and liabilities to its customers are controlled by AWS agreements, and this document is not part of, nor does it modify, any agreement between AWS and its customers.