Guidance for Uploading Audiences created in AWS Clean Rooms to Meta Business Marketing Suite
Summary: This Guidance demonstrates how AWS Clean Rooms can help marketers and data engineers activate audience segments on the Meta Business Marketing Suite.
Overview
Today, marketers have plenty of options when it comes to audience targeting and intelligence solutions in the form of Software as a Service (SaaS). Increasingly, first party data in an enterprise are being siloed because of on-premise, public cloud, and SaaS implementation models for business applications.
With these enterprise data siloes and the need for multiple data providers get the right marketing intelligence, marketers are faced with the difficulty in bringing data together in a privacy compliant way.
AWS Clean Rooms service is a data collaboration tool that helps marketers bring data together from various data providers and publishers and match it against their first party data in a fast, privacy compliant fashion. AWS Clean Rooms allows this to be done with minimum data movement.
One of the common outcomes for an advertiser from the data collaboration is a list of customers who need to be targeted on leading publishing platforms like Meta, Amazon Ads, Snap, and TikTok. This document serves as a solution guidance for marketers and data engineers to activate their audiences on Meta Business Marketing platform.
Meta has multiple properties under their brand for advertisers to use. This solution focuses and on Facebook Marketing API. The strategies mentioned here could be used for other meta properties like Instagram Ads API.
Considerations for this guidance
Intended audience is existing AWS customers with an active account and have already engaged in a data collaboration using AWS Clean Rooms service.
AWS Clean Rooms service is used by a marketing analyst or data engineer to create an audience list using the SQL query and export capability which comes out of the box in the AWS Clean Rooms service
User personas who are implementing this solution guidance are data engineers in marketing or a central data team.
Each run of the data pipeline uploads a new list of audience data. Updates to existing audience list and de-duplication is expected to be handled by the Publisher (Meta) API
The solution accelerates deployment of the services needed to create an activation data pipeline. Example data transformations will also be provisioned.
Expectation is that customers can customize the services and transformation logic provisioned in their account by the solution to meet their specific needs.
Solution Architecture for AWS Clean Rooms Activation flow
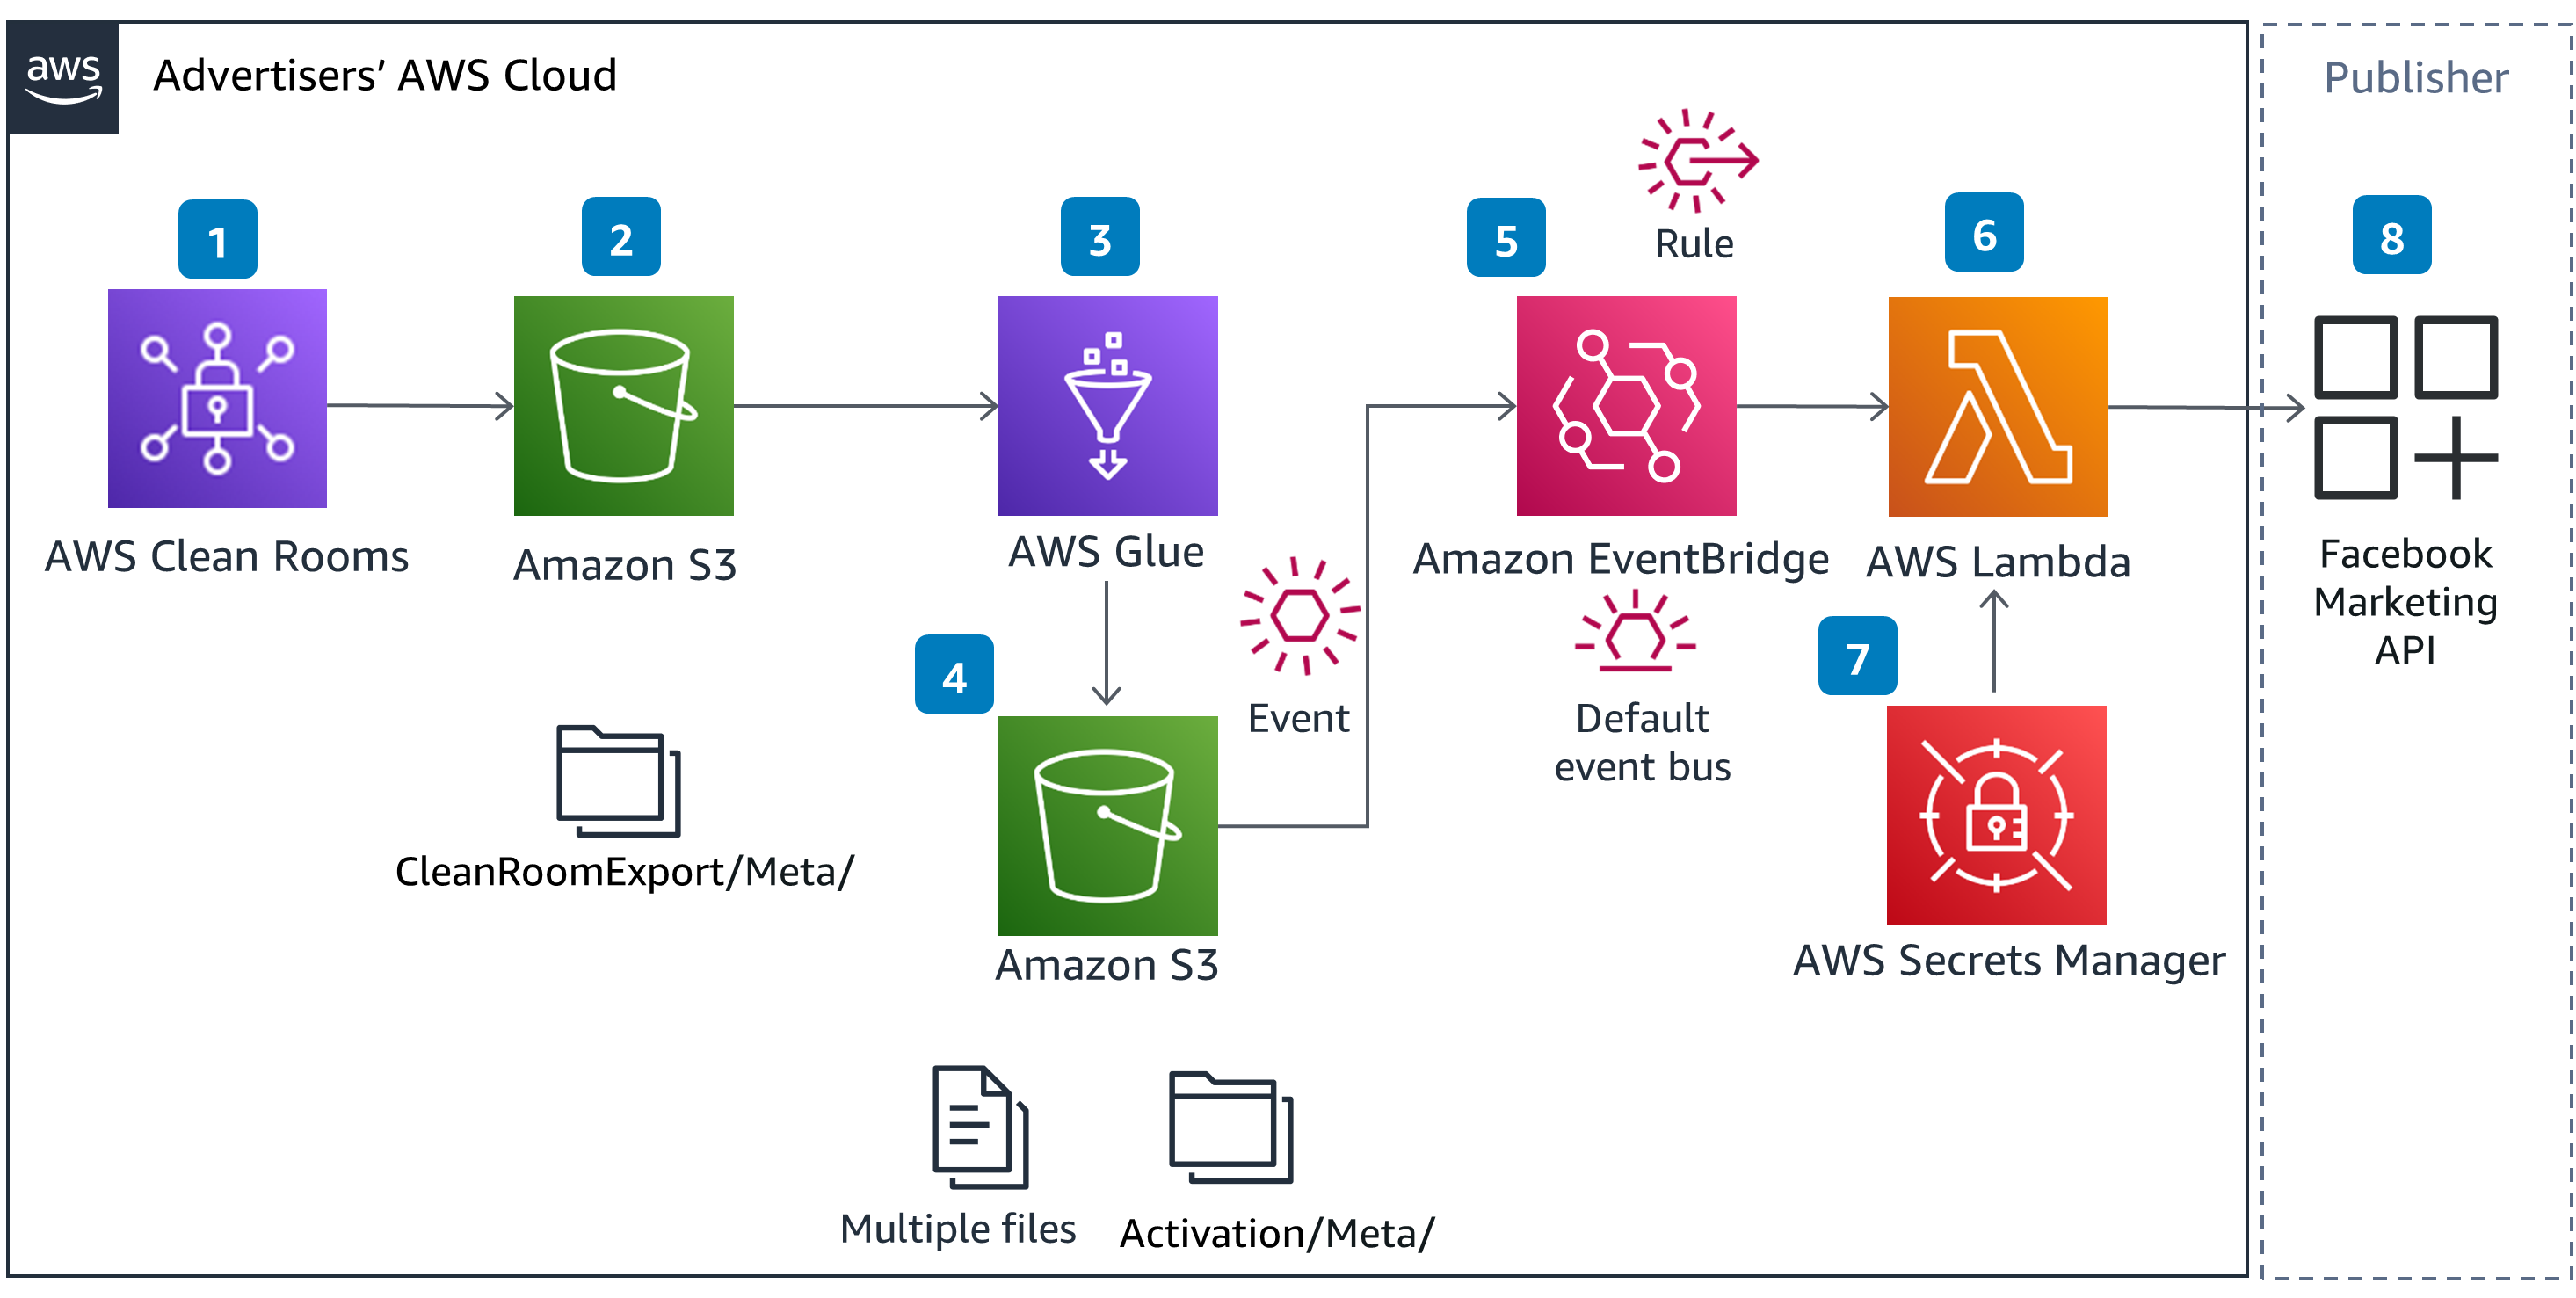
Figure 1 - Diagram for AWS Clean Rooms activation flow
Detailed steps for Meta activation after data collaboration
The proposed solution for activation on Facebook Marketing API uses Amazon S3, AWS Glue, Amazon EventBridge, AWS Secrets Manager, and AWS Lambda services. These services are put together in the solution for collecting the output of AWS Clean Rooms collaboration, normalizing, and delivering data to the Meta ads platform based on their API contracts.
For demonstration purposes, this solution is using the Conversion API within the Meta ads platform. Please refer to Meta documentation for data normalization requirements. There are several ways to setup the Conversions API. The Direct integration using code approach is used here.
The solution also uses Facebook’s Business Software Development Kit (SDK) in Python for building the integration. Use of SDK abstracts the hashing/pseudo-anonymizing Personally Identifiable Information (PII).
Prerequisites
For setting up this solution, you will need access to the following beforehand:
A registered Facebook App with Basic settings configured
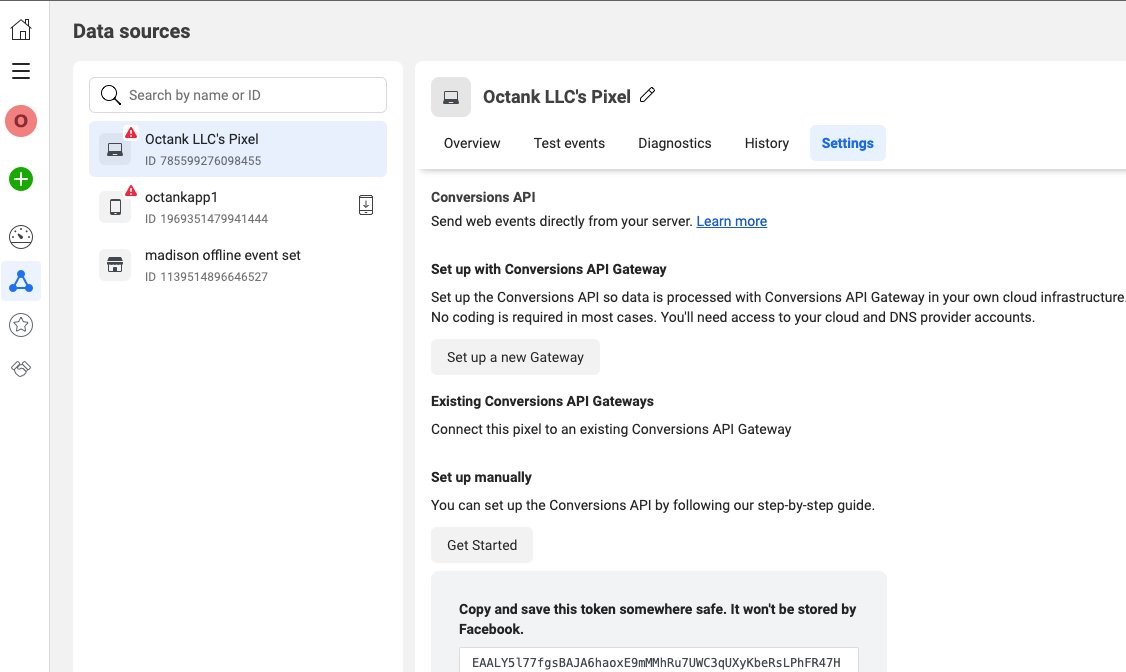
Figure 2 - Image of the settings tab where you’ll find the token
- AWS Secrets Manager secret (you can create the secret in following steps)
Solution Setup instructions
High Level Steps
The solution setup consists of these high-level steps:
AWS Identity and Access Management (IAM) setup using AWS IAM service
AWS Key Management Store (AWS KMS) setup for encryption keys using AWS KMS service
App secret and configuration setup using AWS Secrets Manager/AWS System Manager Parameter store service
Data Storage setup in Amazon S3 service
Data Transformation job setup using AWS Glue service
Event handling setup using Amazon EventBridge and AWS Simple Queue Service (SQS) service
Facebook data publish setup using AWS Lambda service
These steps are in more detail below:
Detailed instructions
IAM Setup
Step 1: Create a new IAM role that would be used for the build of this solution. This role is assumed by the AWS services that need access to other AWS services.
Navigate to Access Management → Roles → Create role
Keep Trusted entity type as AWS Service
Select Lambda as the Use case and select next. We are starting with Lambda but could add more as needed
In the Add permissions page, search and use the below permissions:
AWSLambdaBasicExecutionRoleAWSGlueServiceRoleCreate an inline policy with the policy statement below to give the role read access to Amazon S3, KMS, System Manager services and resources under them. Substitute bucket name, region, account, key id, and parameter values with real ones:
{
    "Version": "2012-10-17",
    "Statement": [
        {
            "Sid": "CleanRoomActivationS3Access",
            "Effect": "Allow",
            "Action": [
                "s3:PutObject",
                "s3:GetObject",
                "s3:ListBucket",
                "s3:DeleteObject",
                "s3:GetBucketLocation",
                "s3:ListMultipartUploadParts"
            ],
            "Resource": [
                "arn:aws:s3:::<bucket name>/*",
                "arn:aws:s3:::<bucket name>"
            ]
        },
        {
            "Sid": "CleanRoomActivationKMSAccess",
            "Effect": "Allow",
            "Action": [
                "kms:Describe*",
                "kms:Get*",
                "kms:List*",
                "kms:Decrypt",
                "kms:Encrypt",
                "kms:GenerateDataKey"
            ],
            "Resource": "arn:aws:kms:<region>:<account>:key/<key id>"
        },
        {
            "Sid": "CleanRoomActivationSSMAccess",
            "Effect": "Allow",
            "Action": [
                "ssm:GetParameter*"
            ],
            "Resource": "arn:aws:ssm:<region>:<account id>:parameter/<parameter path>*"
        }
    ]
}
Enter name, description and tags and create role.
Open the newly created role and navigate to the Trust relationships tab.
Edit the trust policy to include the below trust relationships to let multiple services assume this role:
{
    "Version": "2012-10-17",
    "Statement": [
        {
            "Effect": "Allow",
            "Principal": {
                "Service": "lambda.amazonaws.com"
            },
            "Action": "sts:AssumeRole"
        },
        {
            "Effect": "Allow",
            "Principal": {
                "Service": "glue.amazonaws.com"
            },
            "Action": "sts:AssumeRole"
        }
    ]
}
- Keep the ARN of the role handy for future use
AWS Key Management Service (AWS KMS) Setup
Step 2: Create a new AWS KMS Key
Navigate to the AWS KMS console and select on Create Key
Keep Symmetric as Key Type and Encrypt and decrypt as key usage and select next
Enter name, description and tags, and click next
Keep all other settings as default and create the key. Keep the Key id and ARN handy for future use
Secrets and configuration storage
Step 3: Store access token from Meta Pixel setup in either AWS Secrets manager or AWS System Manager Parameter Store
If using AWS Secrets manager for storing secrets, follow below steps:
On the Secrets Manager console, choose Store a new secret.
For Secret type, select Other
Enter your key as credentials and the value as the base64-encoded string.
Leave the rest of the options at their default.
Choose Next.
Give a name to the secret following a URI format to make it easier to find it amongst multiple secrets in the
/dev/cleanroom-activations/meta/conversions/access_token.Follow through the rest of the steps to store the secret.
If using AWS System Manager Parameter Store for storing secrets and other configurations, follow the steps below:
On the System Manager console, navigate to Application Management → Parameter Store and select Create parameter
Enter parameter name in a URI format. For example,
/dev/cleanroom-activations/meta/conversionsEnter a description, keep Tier as Standard and choose SecureString as Type
Select an AWS KMS key to encrypt the secret. Use Customer Managed Key as a best practice. Create a new one for the project if needed as it can be used for encryption of data throughout the data pipeline
Keep datatype as text and into the value input enter the json string below. Fill in the
access_tokenandpixel_idvalues:
{
    "access_token": "",
    "pixel_id": ""
}
- Enter tags and click on create parameter
Data storage setup
Step 4: Create two Amazon S3 buckets, one for storing output of AWS Clean Rooms collaboration export query and another for storing output of the AWS Glue data transformation job
Navigate to Amazon S3 console
Choose Create bucket
Provide a globally unique bucket name
Choose the appropriate region
Block public access
Enable Bucket Versioning
Enable SSE-S3 based bucket encryption
Provide appropriate tag(s)
Create bucket and repeat the process for the second one
Data transformation setup
Step 5: Create an AWS Glue job that reads from export bucket and generates activation output files. Create multiple files:
Navigate to AWS Glue studio console → Data Integration and ETL → AWS Glue Studio → Jobs
On the create job page keep Visual with source and target option and keep source and target as Amazon S3 and select create
On the AWS Glue studio canvas go to Job Details
Add a name, select the new IAM role created earlier
Select Server-side encryption in Advanced options and keep all other configurations default
Click save on the top right corner of console
Go back to the canvas and click on the Source s3 node.
a. Select the s3 bucket and folder where data collaboration output will be stored
b. It’s assumed at this point that the output of the AWS Clean Rooms export may have multiple files having the same structure and the AWS Glue job is expected to read all of them when run
c. In this example, it’s assumed that output file is a CSV with “,” as delimiter
d. Choose escape, Quote and column header options accordingly
tips
- Use data preview option to ensure data is being read correctly
- AWS Glue requires input file to be encoded in utf8. If input file is not utf8 encoded, refer this page for potential solutions for converting
Remove the ApplyMapping node
Add a new SQL query to transform node and select source s3 bucket as parent. We will come back to this transform node to finish the setup
Select target s3 node and change the node parent to the SQL transform node
Go to Data target properties tab and select the Amazon S3 target location. Keep all other configurations as default and save the job using the button on the top right corner of the console
Once all the steps are validated, AWS Glue gives you an option to preview data. At this point doing that validation, it is a good idea to visualize data output in each step:
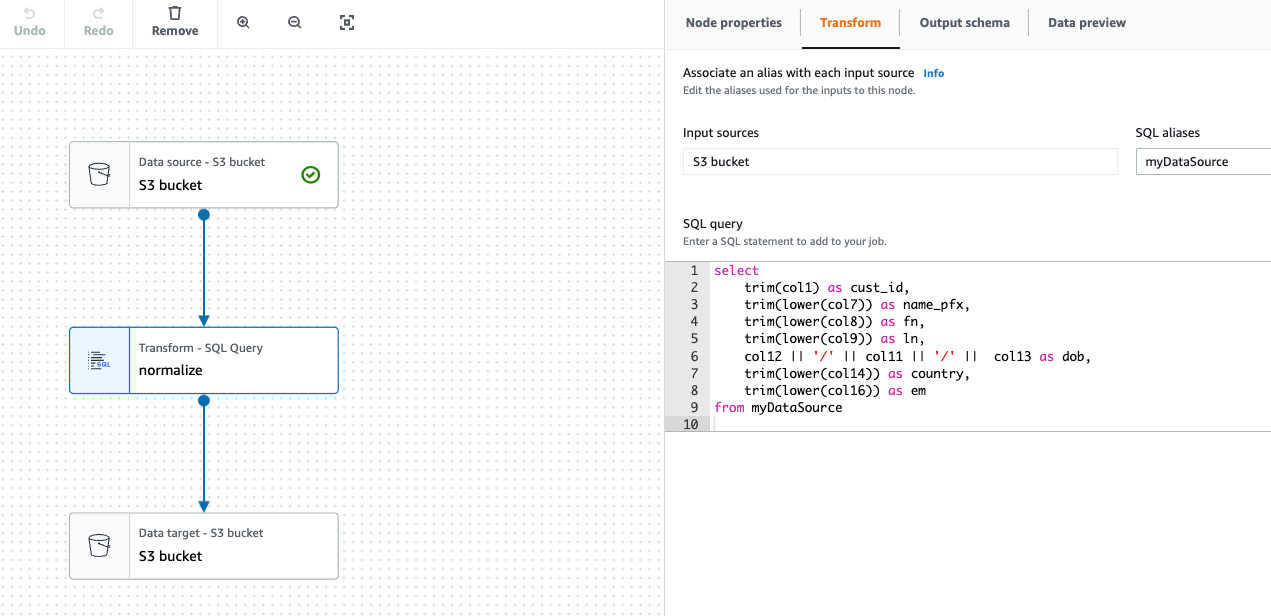
Figure 3 - Visualization of data output in each step
Event handling setup
Create a new dummy lambda function. This step is just to have a reference point available to update the EventBridge rule. Once the integration is done and tested on a high level, you will be coming back and updating this function to include more logic
Create an Amazon Simple Queue Service (Amazon SQS) queue that would act as a dead letter queue for s3 upload events
a. Navigate to Amazon SQS console and select Create queue
b. Keep Type as Standard and give a name for the queue. Suffix DLQ to notate that this queue acts as a dead letter queue
c. Keep the configuration settings as is
d. In the Access policy card, keep the Basic selection on.
e. Give permission to the IAM role created earlier to send and receive messages from this queue by entering the ARN of the role in the input field
f. Keep all other configurations as default. Encryption at rest is optional because this queue will not be storing sensitive data. It will be storing only the metadata about objects created in the s3 bucket
g. Add tags as needed and create the queue. Keep the ARN of the queue handy for future reference
- Create an Amazon EventBridge rule on the default event bus
Create a new rule:
a. From the Amazon EventBridge Console navigate to Events → Rules.
b. Enter Name, Description and keep default selected in Event bus option
c. Keep Rule with an event pattern selected and click next
d. Select AWS Events as Event Source
e. Skip Sample event card and scroll down to Event Pattern
f. Select Custom patterns that allows you to enter the pattern as a json
g. Edit json below to update the bucket.name and object.key.prefix key value pairs and paste in the json editor
{
  "source": ["aws.s3"],
  "detail-type": ["Object Created"],
  "detail": {
    "bucket": {
      "name": ["cleanroom-activations"]
    },
    "object": {
      "key": [{
        "prefix": "meta/"
      }]
    }
  }
}
h. Ensure that json is valid and select next
i. Select AWS service as target and select the newly created lambda function
j. Keep all the other settings as defaults except for retry attempts and dead-letter queue option
k. For retry attempts change the value to 3
l. Select the newly created Amazon SQS queue from the drop down and select next
m. Add tags as required and select next
n. Review the configurations and select create button to complete rule creation.
- Create an event bus archive to persist events specific to the file upload and for replay capability
Facebook data publish setup
Update the Lambda function and include logic to read the files and send it to Meta API
Clone sample code from repo and change it to meet your needs. Paste the code in to the Lambda code editor.
Add two dependency layers to the Lambda function following referenced documentations AWS Data Wrangler and Facebook Business
Use Python 3.9 where ever Python 3.8 is referenced in the above instruction
Use facebook_business as the module name in pip install
Give FacebookBusiness-Python39 as the layer name
a. While using AWS Data Wrangler package use “chunksize” option reading s3 files
b. Use Meta Python Business SDK to build the payload and send data to the platform
c. Upload a sample file to the s3 bucket created and test the lambda function using a sample event payload. Replace bucket and object name with real bucket and object name so that the function can access the file to read data:
{
    "version": "0",
    "id": "2d4eba74-fd51-3966-4bfa-b013c9da8ff1",
    "detail-type": "Object Created",
    "source": "aws.s3",
    "account": "123456789012",
    "time": "2021-11-13T00:00:59Z",
    "region": "us-east-1",
    "resources": [
        "arn:aws:s3:::<bucket name>"
    ],
    "detail": {
        "version": "0",
        "bucket": {
            "name": "<bucket name>"
        },
        "object": {
            "key": "<object name>",
            "size": 99797,
            "etag": "7a72374e1238761aca7778318b363232",
            "version-id": "a7diKodKIlW3mHIvhGvVphz5N_ZcL3RG",
            "sequencer": "00618F003B7286F496"
        },
        "request-id": "4Z2S00BKW2P1AQK8",
        "requester": "348414629041",
        "source-ip-address": "72.21.198.68",
        "reason": "PutObject"
    }
}
Successful execution should show results similar to below:
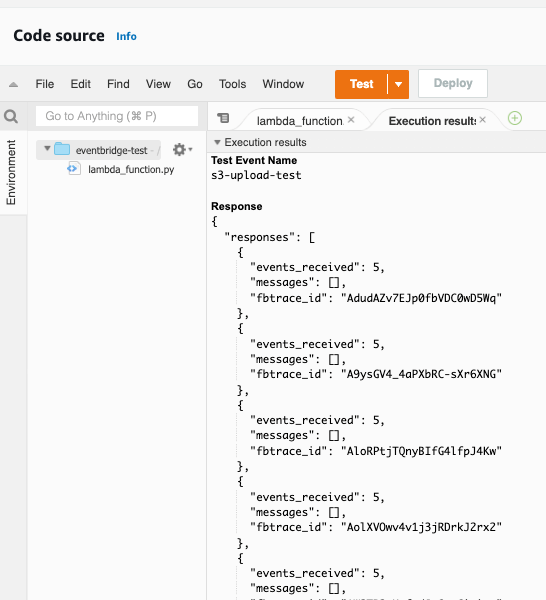
Figure 4 - Successful execution should show results similar to image above
d. Test the end-to-end flow starting from file upload.
e. Validate data in Meta platform using the Events Manager portal
Figure 5 - Image of Events Manager portal
Scheduling and other operational procedures
Here are some considerations for ongoing maintenance and support of the solution
AWS Glue comes with a scheduler functionality that can be used to schedule jobs at a regular cadence. Use this for recurring jobs.
Use Amazon CloudWatch service for viewing execution logs and visualizations for troubleshooting.
Since the source of data for this integration is generated in a batch mode, re-running of failed batches could end up sending duplicate data into the activation channels and it’s assumed that the activation channel API’s are able to handle it.
To avoid duplications, e-running the data collaboration query by restricting the records exported is recommended.
Amazon EventBridge event replay feature could be used to re-run batches without the need for recreating the files,
Implement Amazon S3 bucket lifecycle policies to keep data secure
Performance Considerations
Proposed solution implements below for performance optimization techniques
Data output from AWS Clean Rooms Clean Rooms data collaboration and AWS Glue transform job stage should be stored in multiple files.
Read data in chunks of predefined size from each file in the AWS Lambda function
These measures provide the following benefits:
Publisher API request can be batched up with multiple rows, reducing the risk of hitting Publisher API rate limits.
Memory utilization of Lambda can be minimized
Customer List Custom Audiences API
For activation purposes, customers should be using the Customer List Custom Audiences API. Setting up your Meta account to receive custom customer lists should be done in consultation with your Meta Business Marketing point of contact(s).
Once the Meta app and Ad account setup is done, follow the steps below to repoint your pipeline to hit the Custom Audiences API
Create a new the AWS Lambda function that connects to the Custom Audiences API.
Update EventBridge rule to call the new Lambda function
Data Transformation – Alternatives
The AWS glue job that does the transformation/normalization of data can be substituted with an AWS Glue DataBrew job. DataBrew service is a no code solution to build your data transformation logic. The data transformation code is stored as a re-usable recipe. A published recipe is then used in a DataBrew job to generate output.
Conclusion
The reference architecture provided here addresses the need for activation of audiences on multiple publisher platforms. The detailed guidance provides the steps needed to activate on Meta which can be used as a template for adding new publishing channels. The main difference in the activation flow for other platforms like Snapchat and TikTok would be on the Lambda code that connects to the publisher API as well as their unique data transformation needs.
Notices
Meta and Facebook are trademarks of Meta Platforms, Inc. or its affiliates.