Guidance for Preparing and Validating Records for AWS Entity Resolution
Summary: AWS Entity Resolution provides the ability to apply standard normalization rules on input data. The accuracy of identity resolution is dependent on the quality of the input data sets. In addition to this, for better customer experiences and marketing outcomes, the personally identifiable information (PII) data entities like Physical Address, Email, Phone Numbers have to be validated for deliverability. Normalization standardizes the input data, such as removing extra spaces and special characters, and standardizing to lower case format.
AWS Entity Resolution provides the ability to apply standard normalization rules on input data. The accuracy of AWS Entity Resolution is dependent on the quality of the input data sets. In addition to this, for better customer experiences and marketing outcomes, the personally identifiable information (PII) data entities like Physical Address, Email, Phone Numbers have to be validated for deliverability. Normalization standardizes the input data, such as removing extra spaces and special characters, and standardizing to lower case format. For example: if an input field has an input type of PHONE_NUMBER, and the values in the input are formatted as (123) 456-7890, AWS Entity Resolution will normalize the values to 1234567890.
This Guidance with sample code is used to deploy the data normalization and validation services to the Amazon Web Services (AWS) Cloud using AWS Cloud Development Kit (AWS CDK). It builds a pipeline to normalize and validate the data collected from the various system of engagements or records using the AWS GlueDataBrew recipe templates. The validated data is then parsed, standardized, and validated using a third-party validation service Smarty. The runtime code and the cloud infrastructure are delivered as code using AWS Python Cloud Deployment Kit.
Overview
The workflow delivered in this Guidance provides an example of how the parse, standardize, and validation steps are done with the physical address entity.
The data preparation and validation workflow have four steps:
Cleanse or Normalize
Parse
Standardize
Validate
For the cleanse step, there are two options:
Use the Data Normalization Guidance as the cleanse step. Use the output of the cleanse step as the source of the workflow delivered in this guidance.
a. This Guidance expects the data to be available in an Amazon Simple Storage Service (Amazon S3) bucket, that serves as an input to an AWS Glue DataBrew job.
Use the AWS Glue DataBrew recipe delivered in this Guidance as a template to build your own data cleanse process.
Reference Architecture
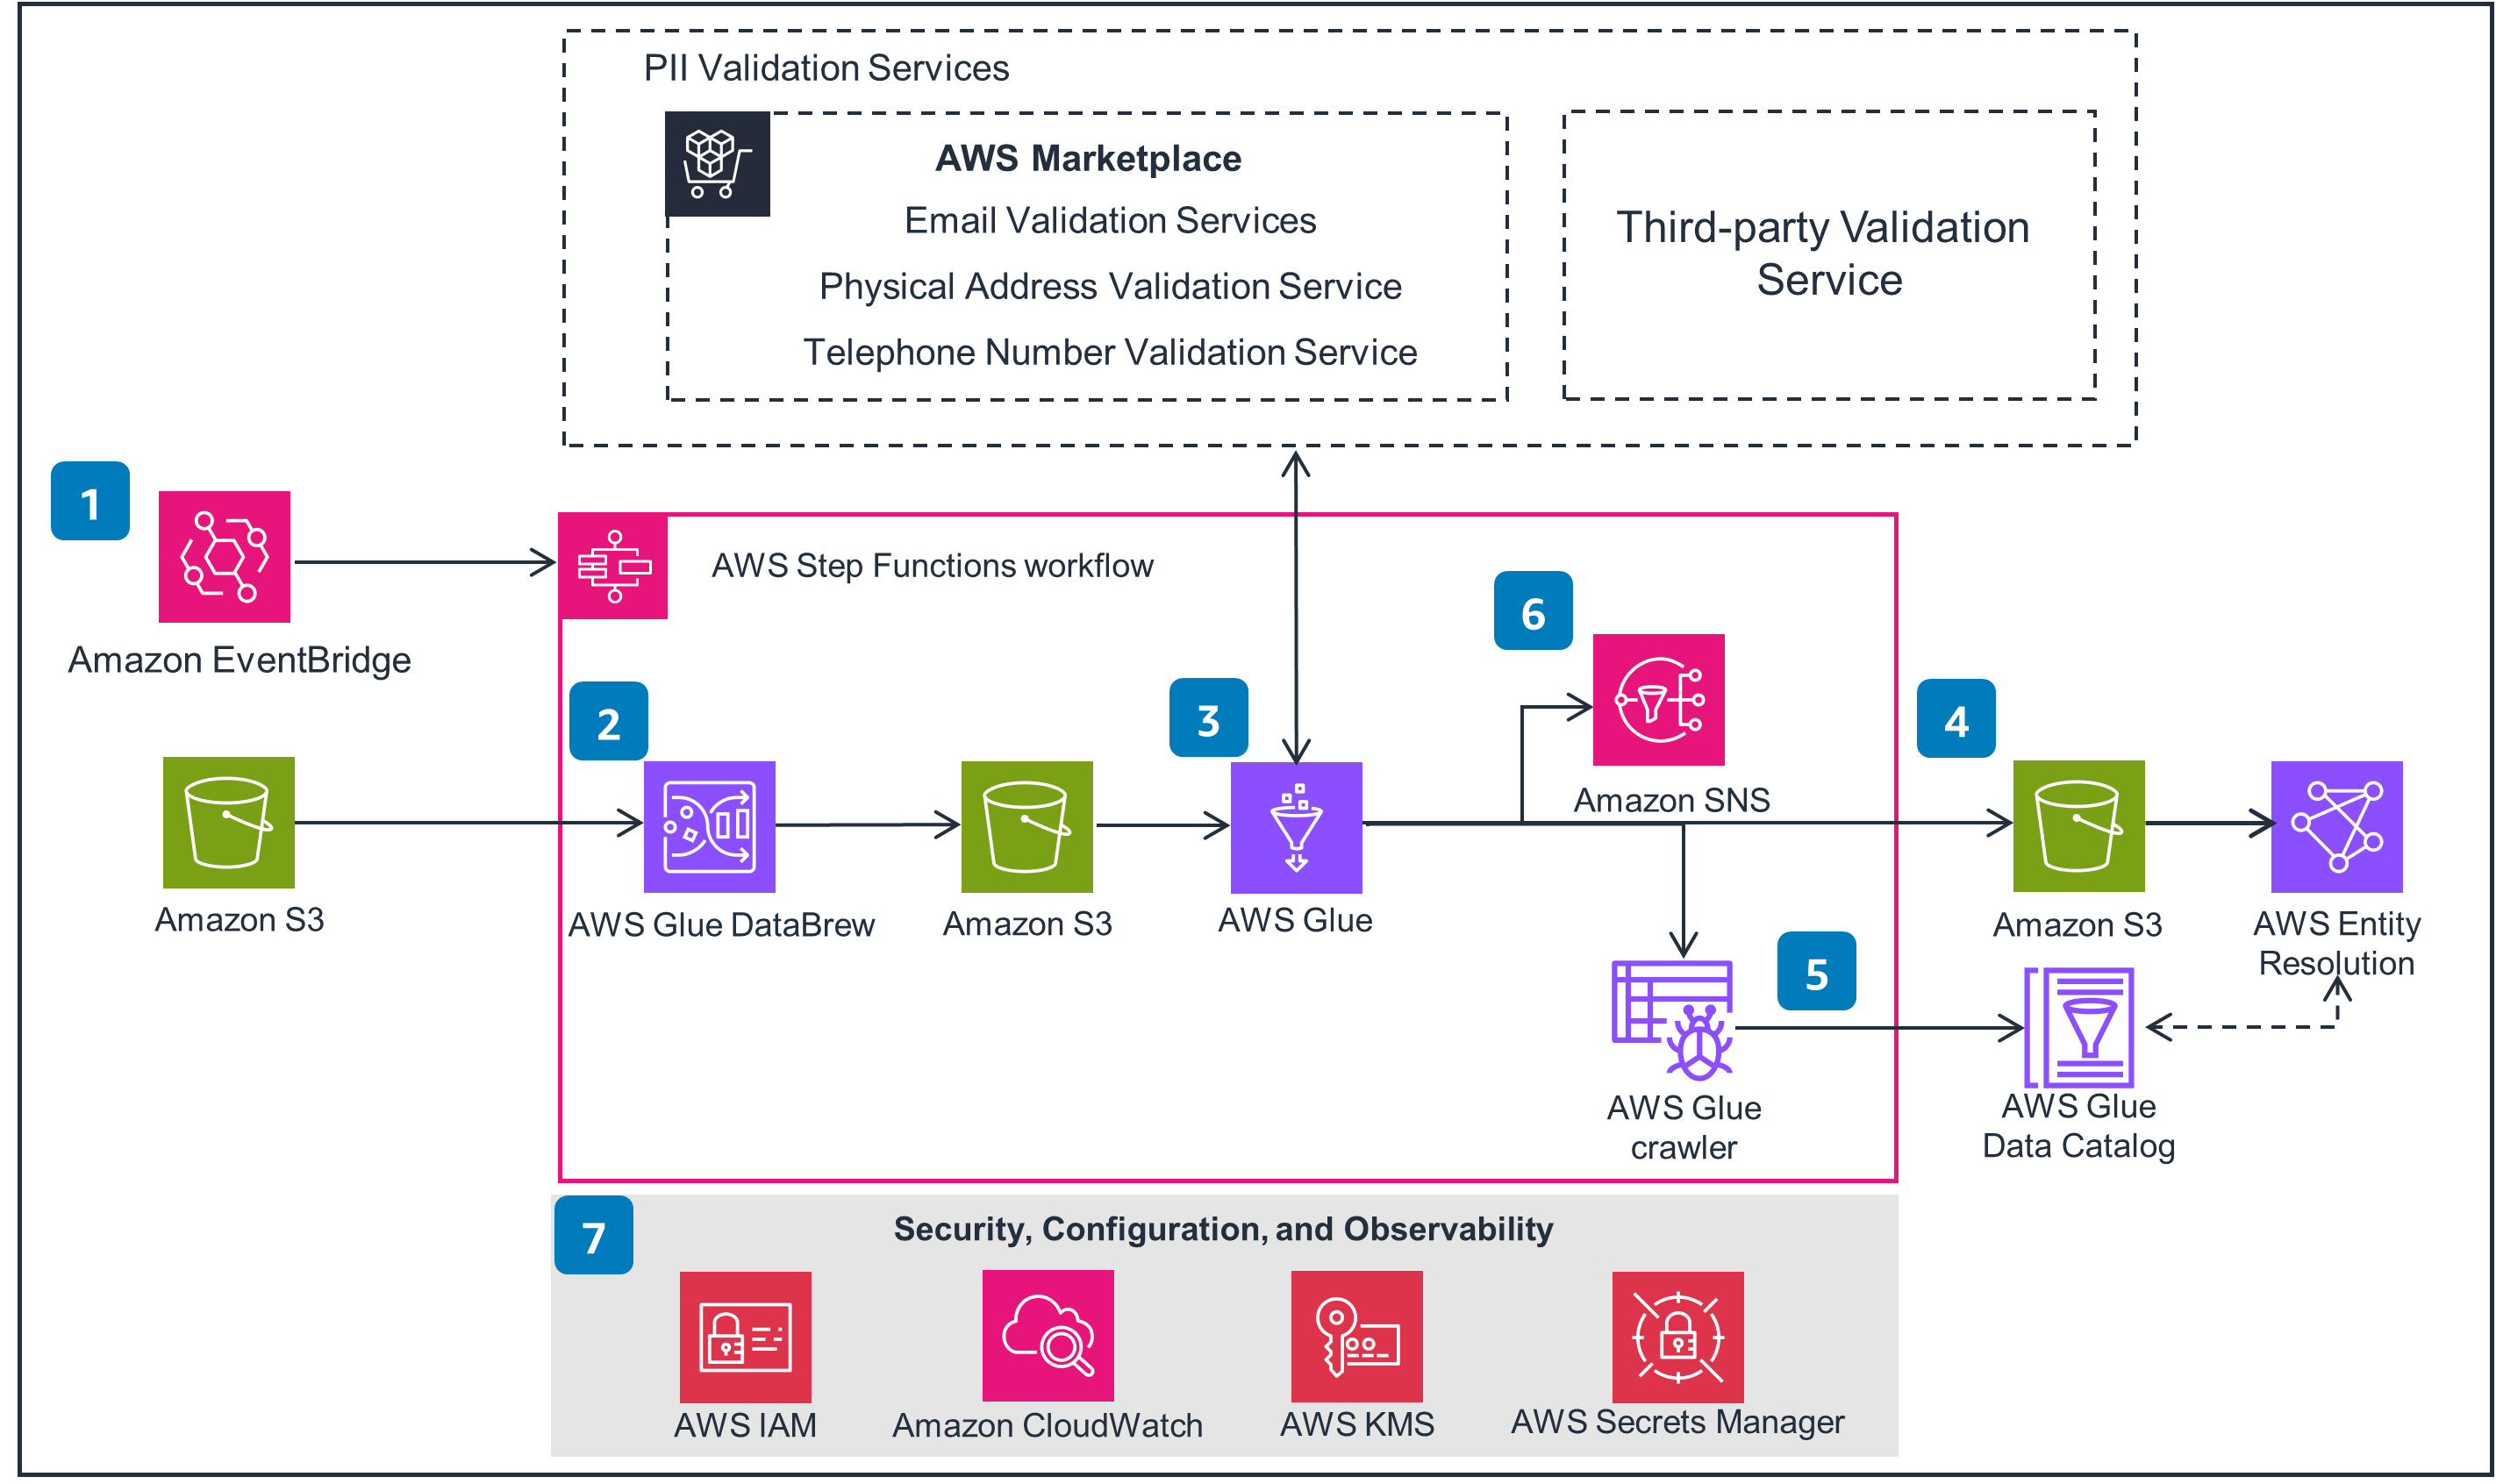
Figure 1 - Reference architecture displaying how AWS services integrate with this Guidance.
Create a rule in Amazon EventBridge to schedule the data processing in AWS Step Functions. The Step Functions state machine includes data cleaning and validation steps.
Use AWS Glue DataBrew recipe to transform the data from the source Amazon Simple Storage Service (Amazon S3) location. Use this step to normalize data, which will give better outcomes with data validation API.
Use AWS Glue to read the output of the DataBrew job, enabling the invocation of the respective personally identifiable information (PII) entity validation services in small batches.
AWS Glue writes the validated data to the target curated Amazon S3 bucket for AWS Entity Resolution to consume.
An AWS Glue crawler job is initiated to “refresh” the table definition or metadata of the curated Amazon S3 storage location, and stores it in the AWS Glue Data Catalog.
An event is published to Amazon Simple Notification Service (Amazon SNS) to inform the user that the new curated data files are now available for consumption.
Security, Configuration, and Observability
This Guidance uses the following AWS services to promote security and access control:
AWS Identity and Access Management (IAM): Least-privilege access to specific resources and operations.
AWS Key Management Service (AWS KMS): Provides encryption for data at rest and data in transit, using Pretty Good Privacy (PGP) encryption of data files.
AWS Secrets Manager: Provides hashing keys for PII data
Amazon CloudWatch: Monitors logs and metrics across all services used in this Guidance.
Architecture Details
This Guidance contains the following components:
AWS Glue DataBrew recipe - the recipe is a set of data transformation steps. You can apply these steps to the dataset stored in Amazon S3. The Guidance expects you to export the recipe as a JSON into the Amazon S3 bucket.
AWS Glue extract, transform, and load (ETL) job - this is a Scala based Apache Spark program that reads the input data from an Amazon S3 bucket, applies the appropriate normalization rules, invokes the third-party validation service Smarty for address validation, and writes the output to a curated Amazon S3 bucket.
Orchestration components (AWS Lambda, and AWS Step Functions) - the orchestration framework built using Step Functions orchestrates the invocation of the AWS Glue job, invokes the crawler, and prepares the data for consumption for AWS Entity Resolution.
AWS Glue DataBrew Recipe
The recipe is a set of data transformation steps. You can apply these steps to the dataset stored in Amazon S3. When you first create a project using the DataBrew console, you define a recipe to be associated with that project. If you don’t have an existing recipe, the console creates one for you. You can download a copy of the recipe steps, by choosing Download as JSON or Download as YAML as shown in the following screenshot.
The AWS CDK script provided as part of the code uploads the AWS Glue DataBrew recipe file to an Amazon S3 bucket and adds it as a dependency path to the AWS Glue DataBrew job.
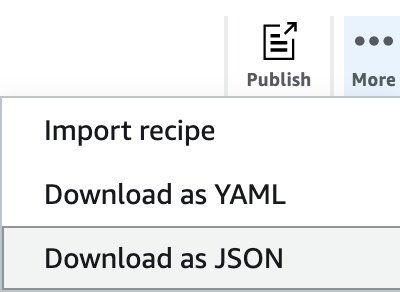
Figure 2 - Screenshot from DataBrew console
As an example, the below JSON template shows various rules that are defined in the AWS Glue DataBrew recipe.
[
  {
    "Action": {
      "Operation": "REMOVE_COMBINED",
      "Parameters": {
        "collapseConsecutiveWhitespace": "false",
        "removeAllPunctuation": "false",
        "removeAllQuotes": "false",
        "removeAllWhitespace": "false",
        "removeCustomCharacters": "false",
        "removeCustomValue": "false",
        "removeLeadingAndTrailingPunctuation": "false",
        "removeLeadingAndTrailingQuotes": "false",
        "removeLeadingAndTrailingWhitespace": "false",
        "removeLetters": "false",
        "removeNumbers": "false",
        "removeSpecialCharacters": "true",
        "sourceColumn": "address1"
      }
    }
  },
  {
    "Action": {
      "Operation": "DELETE_DUPLICATE_ROWS",
      "Parameters": {
        "duplicateRowsCount": "0"
      }
    }
  },
  {
    "Action": {
      "Operation": "REMOVE_MISSING",
      "Parameters": {
        "sourceColumn": "address1"
      }
    }
  },
  {
    "Action": {
      "Operation": "REMOVE_MISSING",
      "Parameters": {
        "sourceColumn": "zip_code"
      }
    }
  },
  {
    "Action": {
      "Operation": "REMOVE_COMBINED",
      "Parameters": {
        "collapseConsecutiveWhitespace": "false",
        "removeAllPunctuation": "false",
        "removeAllQuotes": "true",
        "removeAllWhitespace": "true",
        "removeCustomCharacters": "false",
        "removeCustomValue": "false",
        "removeLeadingAndTrailingPunctuation": "false",
        "removeLeadingAndTrailingQuotes": "false",
        "removeLeadingAndTrailingWhitespace": "false",
        "removeLetters": "false",
        "removeNumbers": "false",
        "removeSpecialCharacters": "true",
        "sourceColumn": "state_code"
      }
    }
  }
]
As part of customization, you can add operations to this rule set and provide the corresponding implementation to support it. As an example, add support for normalization of custom identifiers, or telephone numbers, or email address.
AWS Glue ETL Job
This is a Scala based Spark program that reads the input data from an Amazon S3 bucket, applies the appropriate normalization rules, invokes the third party validation service Smarty for address validation writes the output to a target curated Amazon S3 bucket.
Orchestration Components
As new data arrives in the input Amazon S3 bucket, an event notification is generated which will invoke AWS Step Functions. As part of Step Functions, it will process the AWS Glue DataBrew job. Once the job successfully completes AWS Glue to read the output of the AWS Glue DataBrew job, it enables the invocation of the respective PII entity validation services in small batches. It would crawl the new output files and update the AWS Glue table with the new partition data (if any).
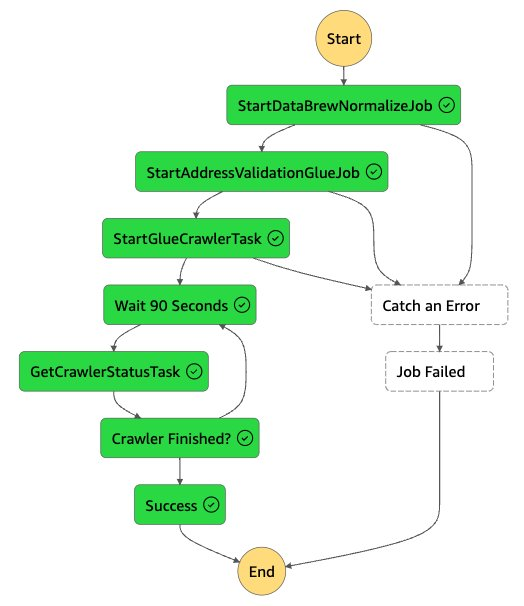
Figure 3 Image of DataBrew workflow
AWS CDK Code Overview and Deployment
The sample code contains an AWS CDK script that deploys the AWS Glue DataBrew job, publishes the AWS Glue DataBrew recipe, and the AWS Glue ETL script.
In order to deploy this Guidance, you need to build the code in your local environment, or you can use AWS Cloud 9, an integrated development environment (IDE). The environment needs to have the following prerequisite software:
JDK 1.8 or higher
Apache Maven 3.8.2 or higher
Node.js (npm) 10.13.0 or higher
AWS Cloud Development Kit 2.83.1 or higher
Download the code
The code is hosted in GitHub
Open a terminal
Run git clone command to download a copy of the code in your local machine
git clone <git@github.com:aws-solutions-library-samples/guidance-for-preparing-and-validating-records-for-entity-resolution-on-aws.git>
Deploy the stack using AWS CDK
The project code requires that the AWS account is bootstrapped in order to allow the deployment of the CDK stack. Bootstrap CDK on the CLI profile you created earlier.
cdk bootstrap --profile <profile name>- Update the cdk.context.json
- Update the cli profile name you are using. This is required for the boto3 code that is used for publishing the recipe as a workaround as CDK doesn’t support this step. These one of the two required parameter changes for the stack to deploy successfully
- Create a Symmetric KMS key and input the alias of the same for the against parameter “kms_key_alias”. This is the second required change
- The source bucket for AWS Glue DataBrew job should typically exist in a real-world setting. Use the flag attribute “data_bucket_exist_flag” accordingly
- The stack suffixes account and region to the bucket names make the S3 URI unique
- AWS Glue DataBrew sample job assumes that input is a csv. The stack comes with a sample file to test the workflow
- If you have a custom DataBrew recipe built using the UI, export the recipe as a json to the runtime directory and provide the name of the file here
- Update the AWS EventBridge schedule hour of the day to run the workflow on a regular basis
- Update other variables as required. See comments below on its application. Keeping the defaults provided will deploy the pipeline that works with sample data.
Run below shell scripts to build the dependency packages needed for the runtime code to work. The CDK deploys these dependencies as well
cd address_validation/datapipeline/runtime/_lambda/ ./create_lambda_package_producer.sh # for running the workflow with processing in lambda instead of glue ./create_lambda_package_smarty.sh ./create_lambda_package_awsloc.sh # for trying out address parsing capability of AWS Location Service API- Review the infrastructure components being deployed
cdk synth Entity-Resolution-Address-Validation-Sandbox --profile=<profile name> - Deploy the workflow sample code and related AWS services used in the Entity resolution workflow.
cdk deploy Entity-Resolution-Address-Validation-Sandbox --profile=<profile name>
This will create the following resources in your AWS Account:
An input Amazon S3 bucket containing the sample data file
An output Amazon S3 bucket to which the results will be written
An AWS Glue DataBrew recipe job that will process the normalization rules on the input data and write result to the output bucket.
An AWS Glue ETL job that will be enabling the invocation of the respective PII entity validation services in small batches
Appropriate AWS Identity and Access Management (IAM) roles and permissions for the AWS Glue ETL job to read and write from the respective Amazon S3 buckets
The CDK script publishes the input and output Amazon S3 bucket locations:
inputdatapath - the Amazon S3 bucket that holds the input sample data
gluenormalizedoutputpath - the Amazon S3 bucket that holds the output data written by the AWS Glue ETL job
Run the Solution
Once the stack has been successfully created, you can run the solution:
Navigate to AWS Step Functions in AWS console and locate the Address Validation workflow and process it.
Review the data inputs and outputs in each step.
Change the data set, AWS Glue DataBrew recipe, as needed to meet your needs.
Access the output
Once a run has been successfully completed, navigate to the output Amazon S3 bucket (refer to the CDK output for more information). The bucket will have a CSV file that is generated as a result of the AWS Glue ETL job run. This file contains the normalized version of the input data.
Cleanup
To delete the resources created by the CDK stack, run the following command: cdk destroy
Additionally, if you would like to delete the input and output Amazon S3 buckets, you may do so manually by navigating to the Amazon S3 console.
Conclusion
AWS First-Party Data Normalization is an open-source library that enables customers to accelerate their data cleansing and normalization efforts. They can customize the library as per their needs and data patterns.
Contributors
The following individuals contributed to this solution: Shamnad Shaffi and Ranjith Krishnamoorthy