Guidance for Customizing Normalization Library for AWS Entity Resolution
Summary: This implementation guide provides an overview of Guidance for Customizing Normalization Library for AWS Entity Resolution, its reference architecture and components, considerations for planning the deployment, and configuration steps for deploying the Guidance name to Amazon Web Services (AWS). This guide is intended for solution architects, business decision makers, DevOps engineers, data scientists, and cloud professionals who want to implement Guidance for Customizing Normalization Library for AWS Entity Resolution in their environment.
Overview
AWS Entity Resolution provides the ability to apply standard normalization rules on data input. Normalization standardizes the input data, such as removing extra spaces or special characters and standardizing to lowercase format. For example, if an input field has an input type of PHONE_NUMBER, and the values in the input are formatted as (123) 456-7890, AWS Entity Resolution will normalize the values to 1234567890.
In certain cases, you may need to customize or extend these rules for specific entity types. This Guidance demonstrates how to customize the normalization library for your data and further use it with AWS Entity Resolution. The Guidance provides a cloud development kit (CDK) code that demonstrates how to read the data input from an Amazon Simple STorage Service (Amazon S3) bucket, apply the normalization rules, and prepare the resultant dataset for use in AWS Entity Resolution.
This Guidance is for users wanting to customize and extend the normalization library for AWS Entity Resolution.
For users that do not need to customize or extend the normalization library, they may select the Normalize data option for the specific data input while creating a Matching Workflow.
As you customize the library for your specific rules and/or entity types, be sure the Normalize data option is unchecked while creating a Matching Workflow for the specific data input within AWS Entity Resolution.
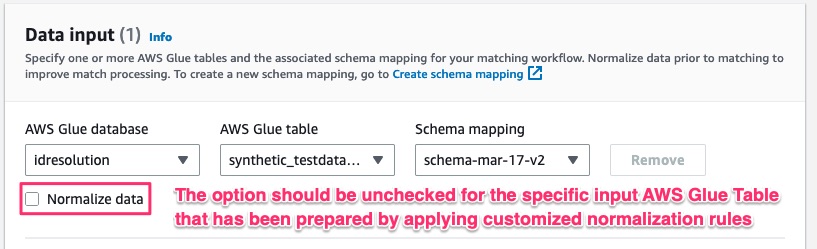
Figure 1: Normalization Option
Solution Overview
This Guidance demonstrates the steps in customizing and leveraging the normalization library for applying normalization rules on your data. Once the normalized data is generated, it can be crawled as an AWS Glue table for consumption by AWS Entity Resolution.
This Guidance requires data to be available in an Amazon S3 bucket, which serves as an input to an AWS Glue extract, transform, load (ETL) job. This AWS Glue ETL job executes the normalization rules as a spark-based distributed process. The output is written to another Amazon S3 bucket, encrypted using server-side encryption with Amazon S3-managed (SSE-S3) keys.
Architecture Overview

Figure 2: AWS Architecture
Architecture Details
The Guidance contains the following components:
NormalizationLibrary - This is a java-based library that contains the normalization rules and its implementation. This library can be customized to support additional entity types and rules.
AWS Glue ETL Job - This is a scala-based Spark program that reads the input data from an Amazon S3 bucket, applies the appropriate normalization rules, and writes the output to an Amazon S3 bucket.
Orchestration components (AWS Lambda and AWS Step Functions) - The orchestration framework built using the Step Function orchestrates the invocation of the AWS Glue job, invokes the crawler, and prepares the data for consumption by AWS Entity Resolution.
Normalization Library
This is a java-based library that contains the normalization rules defined in a JSON file, normalizeRules.json.
The normalize rules contains a list of operations, as shown below. Each operation defines a rule that can be applied on one or more entity types. As an example, the below operationList shows various rules that are pre-defined in the library.
{
   "operationList":[
      {
         "name":"TRIM",
         "description":"Trims leading and trailing whitespace"
      },
      {
         "name":"CONVERT_ACCENT",
         "description":"Covert accented letter to regular letter"
      },
      {
         "name":"LOWERCASE",
         "description":"Lowercases all alpha characters"
      },
      {
         "name":"REPLACE_WITH_MAP",
         "description":"Replace with the map provided in arg0"
      },
      {
         "name":"REPLACE_WORD_WITH_MAP",
         "description":"Replace with the map provided in arg0"
      },
      {
         "name":"ENSURE_PREFIX_WITH_MAP",
         "description":"Ensure field is prefixed with map"
      },
      {
         "name":"REMOVE_ALL_NON_ALPHA",
         "description":"Removes all non-alpha characters \\[a-zA-Z\\]"
      },
      {
         "name":"REMOVE_ALL_NON_NUMERIC",
         "description":"Removes all non-numeric characters \\[0-9\\]"
      },
      {
         "name":"REMOVE_ALL_NON_ALPHANUMERIC",
         "description":"Removes all non-alpha-numeric characters \\[a-zA-Z0-9\\]"
      },
      {
         "name":"REMOVE_ALL_NON_EMAIL_CHARS",
         "description":"Removes all non-alpha-numeric characters \\[a-zA-Z0-9\\] and \\[.@-\\]"
      },
      {
         "name":"REMOVE_ALL_LEADING_ZEROES",
         "description":"Removes all leading zeroes"
      },
      {
         "name":"REMOVE_ALL_CHARS_AFTER_DASH",
         "description":"Removes all characters after a dash, and the dash"
      }
   ]
}
As part of customization, you may add operations to this rule set and provide the corresponding implementation to support it. For example, you may add support for normalization of custom identifiers, IP addresses, and other items.
Another entry in the normalizeRules.json is mapping of the operations/rules to corresponding entity types, as shown in the following example. For example, the mapping below indicates that for entity type firstName, the rules to be applied should include removing all whitespaces, converting the text to lower case, removing accented characters, and removing all non-alpha characters. You can change these rules as needed to better fit your requirements.
"firstName": {
  "rules": [
    ["TRIM"],
    ["LOWERCASE"],
    ["CONVERT_ACCENT"],
    ["REMOVE_ALL_NON_ALPHA"]
  ]
},
"lastName": {
  "rules": [
    ["TRIM"],
    ["LOWERCASE"],
    ["CONVERT_ACCENT"],
    ["REMOVE_ALL_NON_ALPHA"]
  ]
}
Another operation type supported by the library is a lookup map. This allows the normalization rules to bring consistency in the data for entity types such as address or country. For example, if there are two records, and one record shows the address as 5th avenue while the other record shows 5th ave, the normalization rule map for address mapping converts avenue to ave so that the two records will show the same address for resolution.
This capability in the library helps in performing alias matching on entities.
"defaultAddressMap": {
  "avenue": "ave",
  "bouled": "blvd",
  "circle": "cir",
  "circles": "cirs",
  "court": "ct",
  "centre": "ctr",
  "center": "ctr",
  "drive": "dr",
  "freeway": "fwy",
  "frwy": "fwy",
  "highway": "hwy",
  "lane": "ln",
  "parks": "park",
  "parkways": "pkwy",
  "pky": "pkwy",
  "pkway": "pkwy",
  "pkwys": "pkwy",
  "parkway": "pkwy",
  "parkwy": "pkwy",
  "place": "pl",
  "plaza": "plz",
  "plza": "plz",
  "road": "rd",
  "square": "sq",
  "squ": "sq",
  "sqr": "sq",
  "street": "st",
  "str": "st",
  "str.": "strasse"
},
"addressMap": {
  "us": {
    "alley": "aly",
    "allee": "aly",
    "ally": "aly",
    "annex": "anx",
    "annx": "anx",
    "anex": "anx",
    "arcade": "arc",
    "av": "ave",
    "avenu": "ave",
    "avenue": "ave",
    "aven": "ave",
    "avnue": "ave",
    "avn": "ave",
    "beach": "bch",
    .......
    .......
    .......
   }
}
In order to customize the library to support additional rules or entity types, another important file is Operations.java. This contains the implementation details for the rules specified in the JSON file. You would add the implementaiton details for custom rules in this file to support it.
AWS Glue ETL Job
To apply normalization rules at scale, a scala-based AWS Glue ETL job wraps the normalization library within a spark application. The ETL job reads the source data from an Amazon S3 path, applies the normalization rules on the different entites, and writes the output back to an Amazon S3 bucket.
The CDK script provided as part of the code uploads the normalization jar to an Amazon S3 bucket and adds it as a dependency path to the AWS Glue ETL job. Additionally, the ETL job parameter takes an Amazon S3 path as input and output.
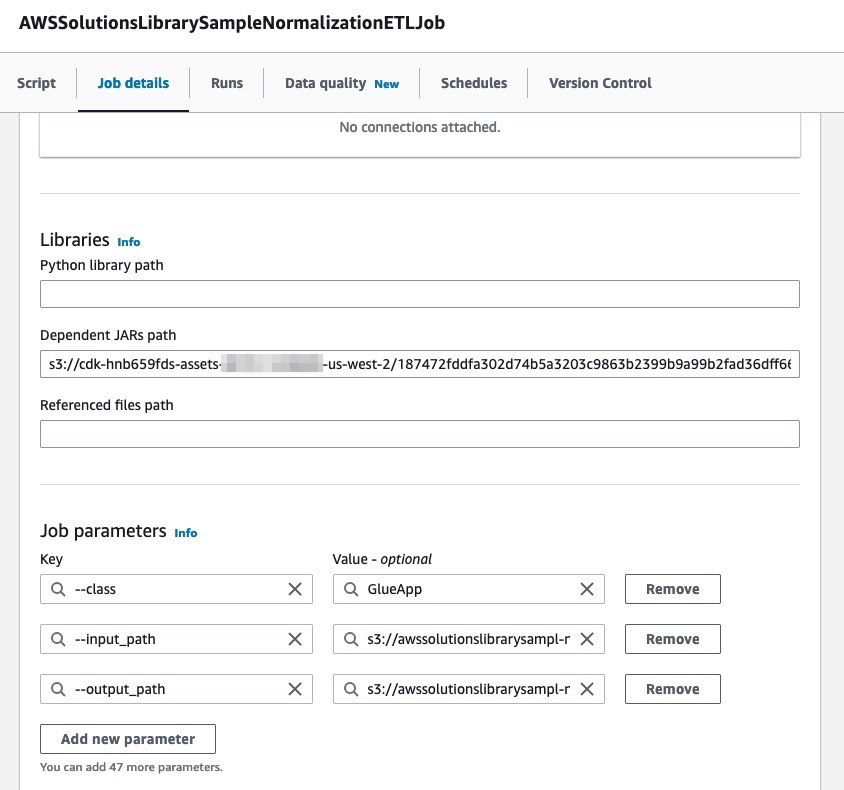
Figure 3: AWS Glue ETL Job Details
The following code snippet demonstrates the map transformation function that transforms the input record into a CustomerRecord java bean. This is sent to the normalizer that returns the normalized data record, which is then written to the output Amazon S3 bucket.
val transformedDF = staticData.map(row=>{
      logger.info("row: "+row.getClass)
      var record = CustomerRecord.builder().address((row.getAs[String]("address1")+" "+row.getAs[String]("address2")))
        .city(row.getAs("city"))
        .country(row.getAs("country_code"))
        .firstName(row.getAs("first_name"))
        .lastName(row.getAs("last_name"))
        .email(row.getAs("email_address"))
        .phone(row.getAs("phone_nbr"))
        .postal(row.getAs("zip_code"))
        .state(row.getAs("state_code"))
        .build();

      record = normalizer.normalizeRecord(record)
      logger.info("address: "+row.getAs("address1")+"\tnormalized: "+record.getAddress())
      Row.fromSeq(row.toSeq:+record.getAddress():+record.getCity():+record.getState():+record.getPostal():+record.getCountry():+record.getFirstName():+record.getLastName():+record.getEmail():+record.getPhone())
    }, encoder)

   transformedDF.write.option("header","true").format("csv").save(args("output_path"))
Orchestration Components
As new data arrives in the input Amazon S3 bucket, an event notification is generated which will trigger a Step Function. As part of this Step Function, it will execute the AWS Glue ETL job. Once the job successfully completes, it will crawl the new output files and update the AWS Glue table with the new partition data, if there is any.

Figure 4: AWS Step Functions Details
Additionally, as the normalized data is written to the output Amazon S3 bucket, Amazon EventBridge sends a notification to AWS Entity Resolution service that performs entity resolution on the incremental, newly-arrived, normalized data.
AWS CDK Code Overview and Deployment
The sample code contains an AWS CDK script that deploys an AWS Glue ETL script to execute the rules defined in the normalization library as shown in the following figure.
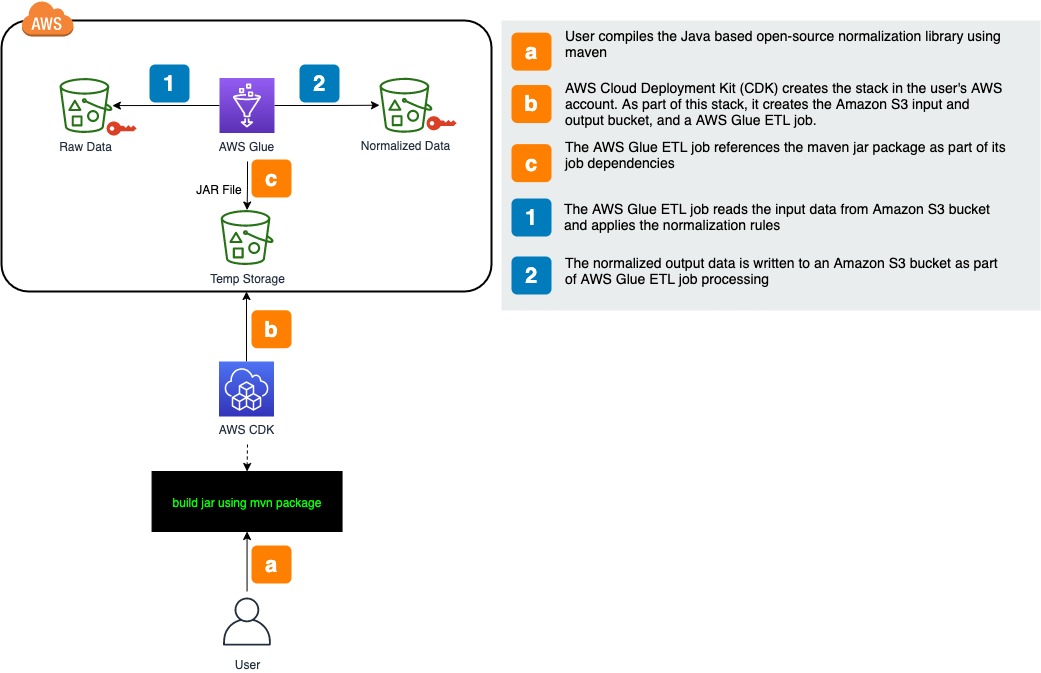
Figure 5: CDK Code Overview
To deploy this solution, you need to build the code in your local environment (or you can use AWS Cloud 9 IDE). The environment needs to have the following prerequisite software:
JDK 1.8 or higher
Apache Maven 3.8.2 or higher
Node.js (npm) 10.13.0 or higher
AWS Cloud Development Kit (CDK) 2.83.1 or higher
Download the code
The code is hosted in github at this location: (https://github.com/aws-solutions-library-samples/guidance-for-cleansing-data-using-open-source-normalization-rules-on-aws)
Open a terminal.
Run git clone command to download a copy of the code in your local machine.
git clone https://github.com/aws-solutions-library-samples/guidance-for-cleansing-data-using-open-source-normalization-rules-on-aws.git
Build the Java code
Navigate to the root folder of the code.
cd guidance-for-cleansing-data-using-open-source-normalization-rules-on-awsRun the below command to compile the code and create a jar-with-dependency in the target or folder.
mvn clean package
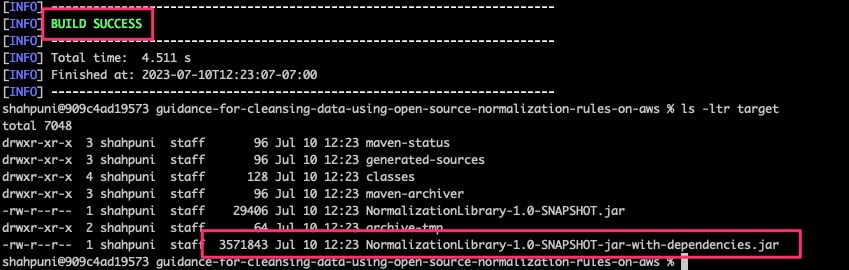
Figure 6: Apache Maven build output
Deploy the stack using AWS CDK
Navigate to the root folder of the code.
- Run the following commands:
npm install npm install cdk-nag - This will download and install the necessary modules within the node_modules/ directory.

Figure 7: npm install build output
Bootstrap your AWS account with CDK if you have never used CDK before.
You may bootstrap by running the following command:
cdk bootstrapRefer to Bootstrapping in the AWS CDK Developer Guide for more details on how to bootstrap CDK.
Once the environment is bootstrap’d, deploy the stack:
cdk deploy --require-approval never
This will create the following resources in your AWS account:
An input Amazon S3 bucket containing the sample data file
An output Amazon S3 bucket to which the results will be written
An AWS Glue ETL job that will execute the normalization rules on the input data and write result to the output bucket
Appropriate AWS Identity and Access Management (IAM) roles and permissions for the AWS Glue ETL job to read and write from the respective Amazon S3 buckets.
The CDK script publishes the input and output Amazon S3 bucket locations.
inputdatapath: The Amazon S3 bucket that holds the input sample data
gluenormalizedoutputpath: The Amazon S3 bucket that holds the output data written by the AWS Glue ETL job

Figure 8: CloudFormation Stack output
Run the Guidance
Once the stack has been successfully created, you can run the Guidance by performing the following:
Navigate to the AWS Glue Console in your web browser.
Select the AWS Glue ETL job, AWSSolutionsLibrarySampleNormalizationETLJob, from the listing table.
Navigate to the Runs tab and trigger a new Run.
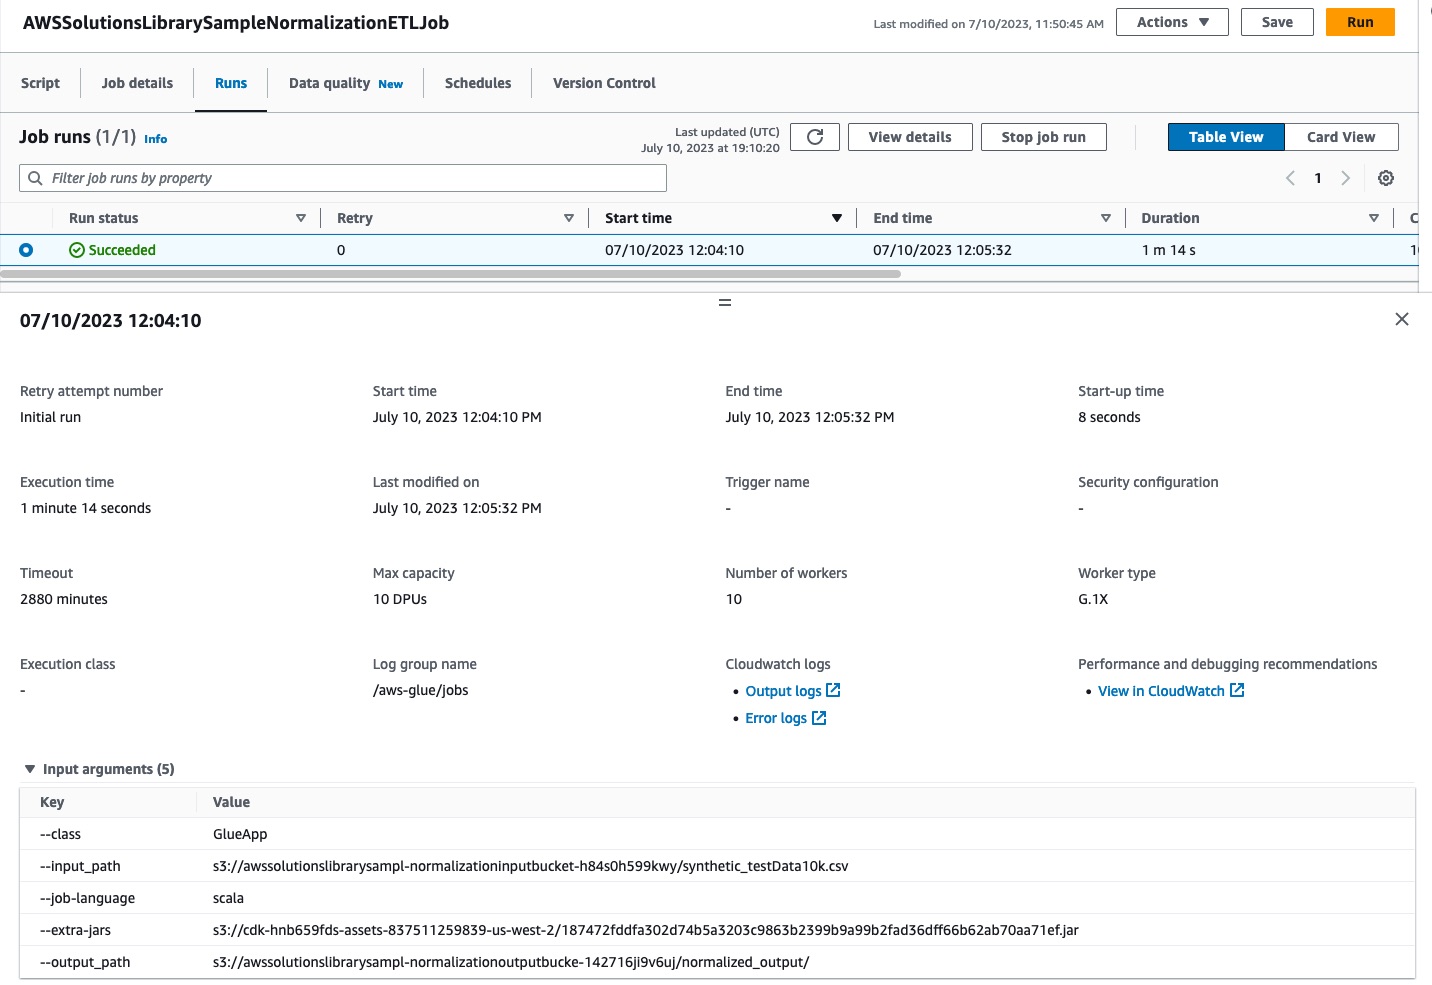
Figure 9: AWS Glue ETL job run
Access the output
Once a run has been successfully completed, navigate to the output Amazon S3 bucket (refer to the CDK output for more information).
The bucket will have a CSV file that is generated as a result of the AWS Glue ETL job run. This file contains the normalized version of the input data.
Cleanup
To delete the resources created by the CDK stack, run the following command:
cdk destroy
Additionally, if you would like to delete the input and output Amazon S3 buckets, you may do so manually by navigating to the Amazon S3 console.
Conclusion
The AWS First Party Data Normalization Library is an open source library that enables customers to accelerate their data cleansing and normalization efforts. They can customize the library per their needs and data patterns.
Contributors
- Punit Shah
Notices
Customers are responsible for making their own independent assessment of the information in this document. This document: (a) is for informational purposes only, (b) represents AWS current product offerings and practices, which are subject to change without notice, and (c) does not create any commitments or assurances from AWS and its affiliates, suppliers or licensors. AWS products or services are provided “as is” without warranties, representations, or conditions of any kind, whether express or implied. AWS responsibilities and liabilities to its customers are controlled by AWS agreements, and this document is not part of, nor does it modify, any agreement between AWS and its customers.