Guidance for Connecting Data from Adobe Experience Platform to AWS Clean Rooms
Summary: In this Guidance, you will ingest customer profile data from the Adobe Experience Platform (AEP) and ingest it into your Amazon Simple Storage Service (Amazon S3) bucket. The Guidance will demonstrate how to read this data, normalize it, and process it to make it compatible within AWS Clean Rooms.
Scenario
ACME is an AWS customer who uses the Adobe Experience Platform (AEP) to manage their customer profiles across all systems. The Chief Marketing Officer (CMO) of ACME wants to select a subset of the ACME customers contained in their AEP account and enrich this subset of users with additional data from a third-party. The CMO tasks the data engineering team to make this possible.
The ACME data engineering team evaluates this request and defines the following steps to do:
Access and retrieval from AEP; data ingestion and security in AWS:
Create an Amazon Simple Storage Service (Amazon S3) repository that can receive the export object from AEP
Ensure the data is protected/secure and encrypted to adhere to the ACME security practices
Get access to the AEP account to select the specific fields needed (this provides schema stability downstream), and define and execute the query
Configure a periodic task that will execute this query and export the result set to the ACME AWS account
Transformation of data to target data structure/repository:
- On receipt of this data into Amazon S3, they will need to initiate a process that will transform the data from the AEP format into the format required by the AWS Clean Rooms service identified for enabling the sharing and enrichment of the data set
Automation:
- The data engineering team anticipates that they will do many similar tasks so they will automate this process for future re-use
This Guidance aims to assist ACME to import their customer profile information in an ongoing manner (daily) from Adobe Experience Platform into their AWS account and thereafter, process it, normalize it, and prepare it for consumption within an AWS Clean Rooms environment using AWS native services.
Implementation Details
In this Guidance, customer profile data from the Adobe Experience Platform (AEP) is ingested into your Amazon Simple Storage Service (Amazon S3) bucket. The Guidance will demonstrate how to read this data, normalize it, and process it to make it compatible within AWS Clean Rooms.
Reference Architecture
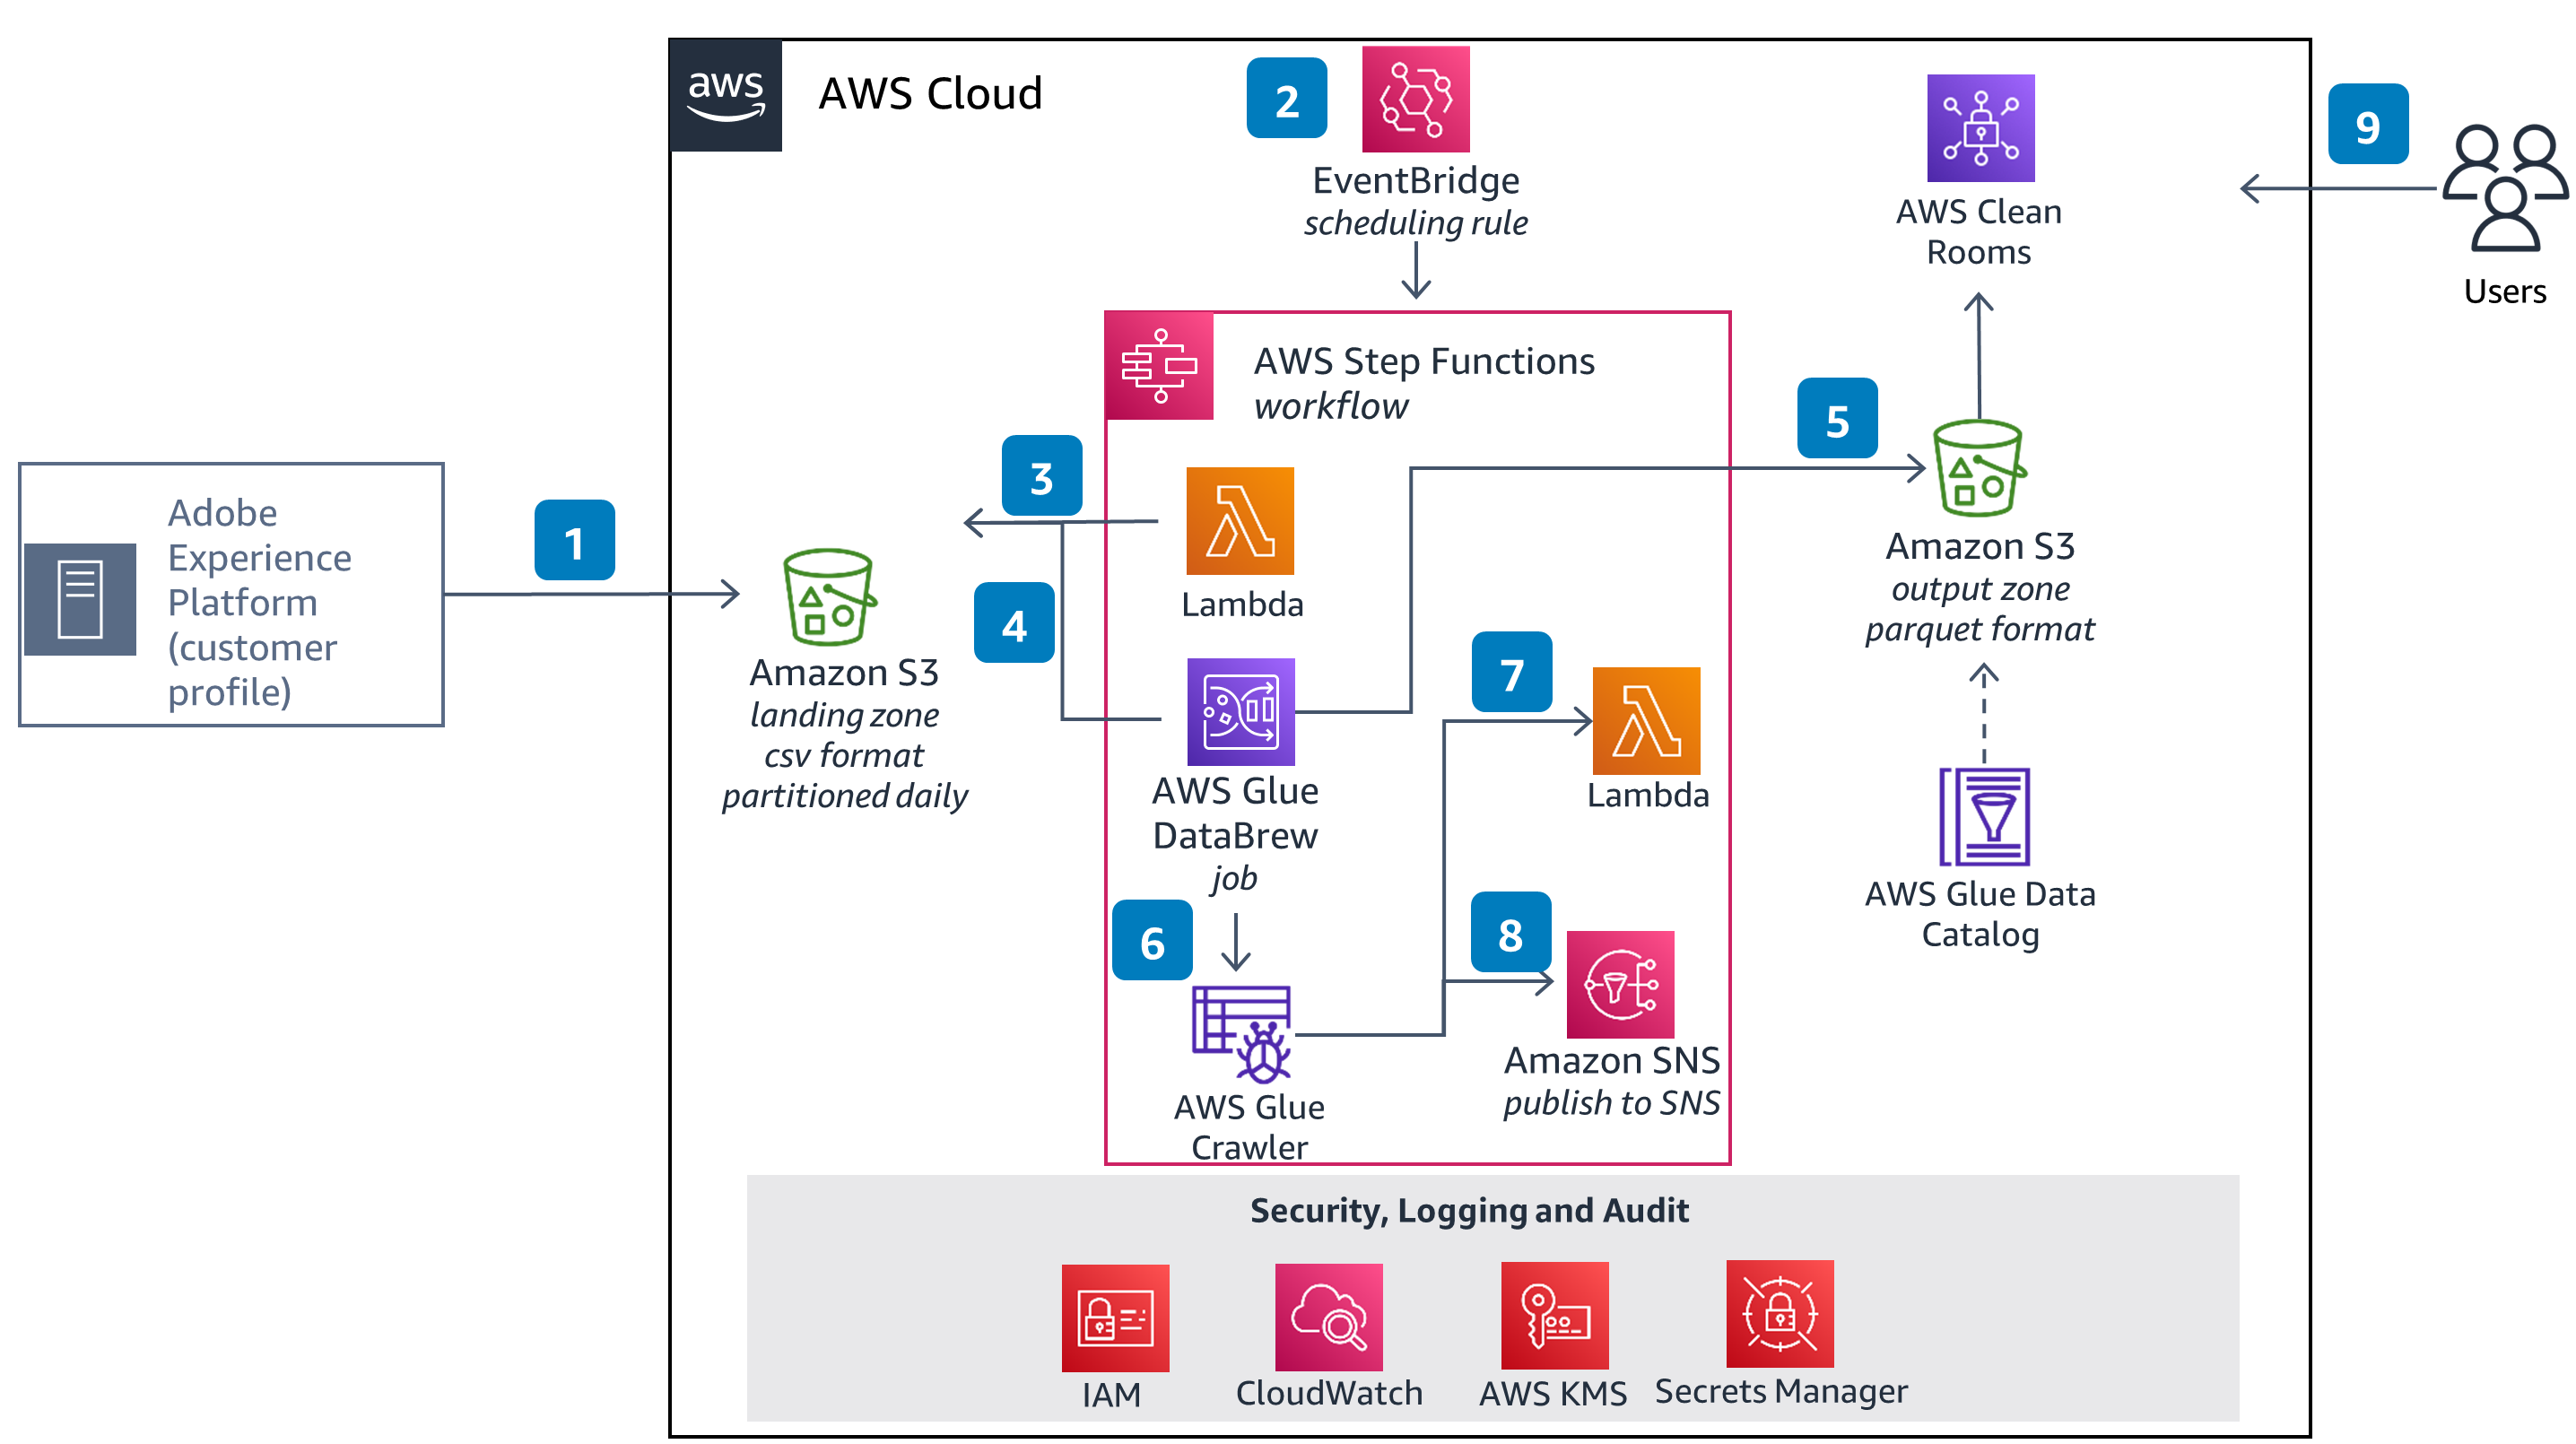
Figure 1: Reference Architecture for importing AEP data into AWS
Data Ingestion
In order to ingest data from AEP, you will need to setup a daily export schedule from within AEP to Amazon S3.
The dataset used in this Guidance is Adobe Experience Platform Customer Profile.
Adobe Experience Platform (AEP) and Amazon S3 integration
In this section, you will establish a live outbound connection to your Amazon S3 storage to periodically (daily) export customer profile data from AEP for a given selected segment.
1. Create an Amazon S3 bucket for receiving data from AEP
You will create an Amazon S3 bucket that will serve as the landing zone for the incoming data files from AEP.
Sign in into AWS console and navigate to Amazon S3 bucket page (https://console.aws.amazon.com/s3/buckets)
Choose Create bucket
Provide a globally unique bucket name
Choose the appropriate region
Block public access
Enable Bucket Versioning
Enable SSE-S3 based bucket encryption
Provide appropriate tag(s)
Create bucket
Once the bucket is created, create three folders within the bucket.
Navigate within the bucket and click Create folder
Provide the folder name as landing and select SSE-S3 as the server-side encryption option
Repeat the above two steps to create two folders named raw and archive.
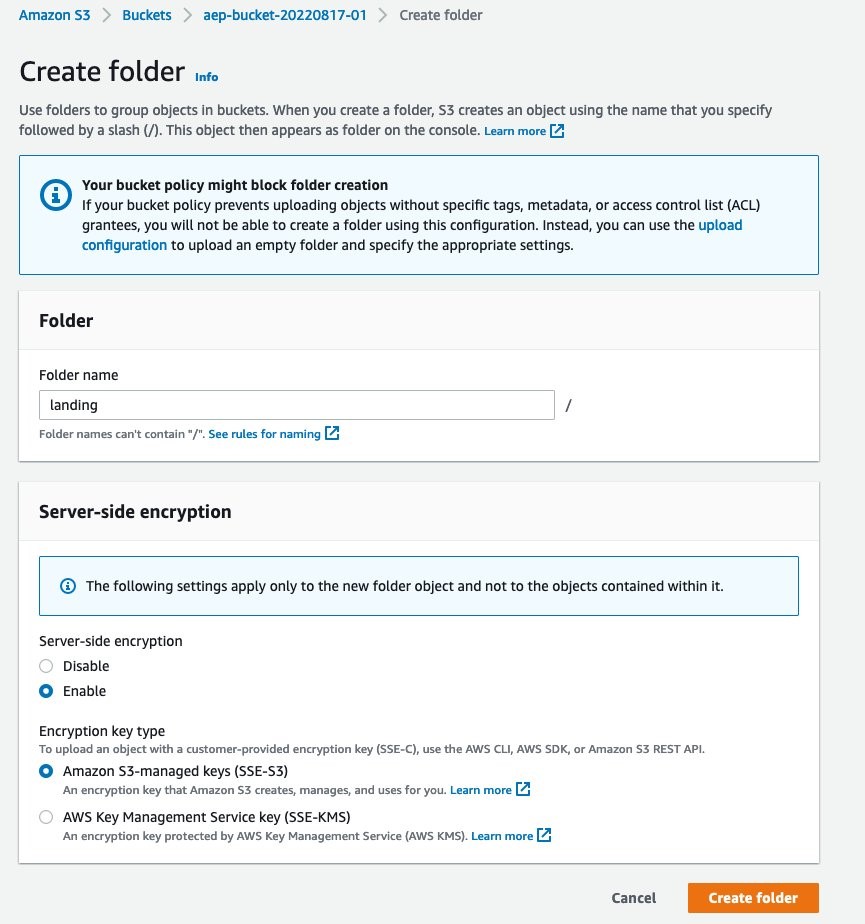
Figure 2: Displays UI when creating the landing folder

Figure 3: UI after all 3 folders are created
2. AWS Access Keys and permissions
You will have to provide AEP with Access Keys (access key ID and secret key ID) to connect to your Amazon S3 storage.
It is recommended for you to create a separate AWS Identity and Access Management (IAM) user within your AWS account that has limited access to allow AEP to connect to Amazon S3 [see the next section for permissions required]. While AWS does not recommend sharing of access keys with any third party, AEP currently supports connectivity via access keys and therefore a separate dedicated service user will limit the exposure of your account.
Steps to create an IAM user and generate access keys
Sign in into AWS console as a user with appropriate permissions to create IAM user and access keys
Navigate to the AWS IAM console
In the navigation pane, select Users → Add user
Type the name of the user
Select Programmatic access to generate the access keys for this user that can be entered into AEP console
Within Permissions section, select Attach existing policies and click on Create Policy
Within the new tab, create the policy as shown below
Navigate to the create user screen and refresh the policy list and select the policy created
Proceed to create the user
Important: Download and save the CSV file with the access key details
Reference Link: https://docs.aws.amazon.com/IAM/latest/UserGuide/id_users_create.html#id_users_create_console
Setup IAM Permissions for the user in AWS for AEP to connect
For AEP to establish a connection and write data into Amazon S3, it needs the following permissions:
s3:GetObject
s3:GetBucketLocation
s3:DeleteObject
s3:ListBucket
s3:PutObject
s3:ListMultipartUploadParts
Below is the policy JSON to associate with the IAM user (please note to enter the correct S3 bucket ARN)
{
    "Version": "2012-10-17",
    "Statement": [
        {
            "Sid": "VisualEditor0",
            "Effect": "Allow",
            "Action": [
                "s3:PutObject",
                "s3:GetObject",
                "s3:ListBucket",
                "s3:DeleteObject",
                "s3:GetBucketLocation",
                "s3:ListMultipartUploadParts"
            ],
            "Resource": [
                "arn:aws:s3:::<bucket-name>/*",
                "arn:aws:s3:::<bucket-name>"
            ]
        }
    ]
}
3. Setup AWS Key Management Service (AWS KMS) based key for encryption-decryption
You will create an AWS KMS key to generate a public-private key pair. This allows AEP to use the public key to encrypt the files while exporting them to Amazon S3. Later during the data processing, the private key will be used to decrypt the file for further processing.
Sign into the AWS console and navigate to the AWS KMS page.
Select Create a key
Select Asymmetric as key type; Encrypt and Decrypt as key usage; RSA_2048 as key spec
Provide the key alias name
Select the appropriate key administrators
Select the appropriate IAM roles and users (including the IAM user created above) to allow key usage. Note: also make sure to select the IAM role that will be responsible for decryption of the files later during the data processing stage
Create the key
Once the key has been created, navigate to the key and select the Public Key tab and download the key. You will need this key for later while setting up the Amazon S3 connection within AEP.
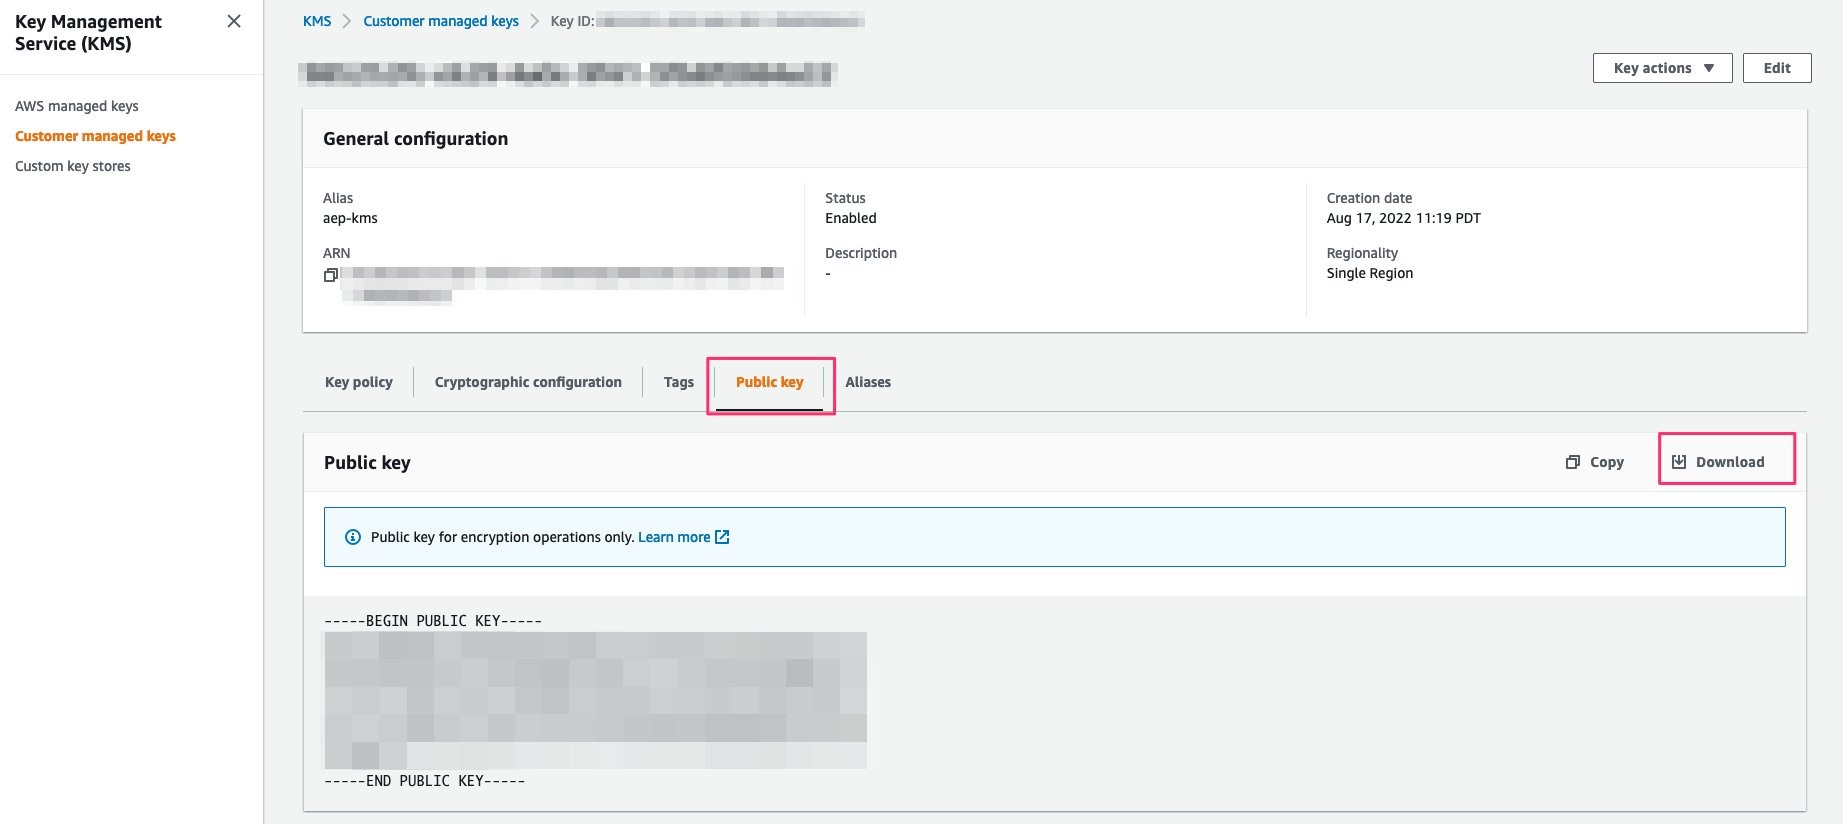
Figure 4: Highlights Public Key tab
4. Connect to Amazon S3 as a destination within AEP
You will need Manage Destinations access control permission as part of your AEP user permissions.
Navigate to Connections → Destinations → Catalog and search for Amazon S3
Select Set up if you do not have an active S3 connection already created. Alternatively, if you see Activate as an option, you can click on it and choose Configure new destination in the next screen that opens up.
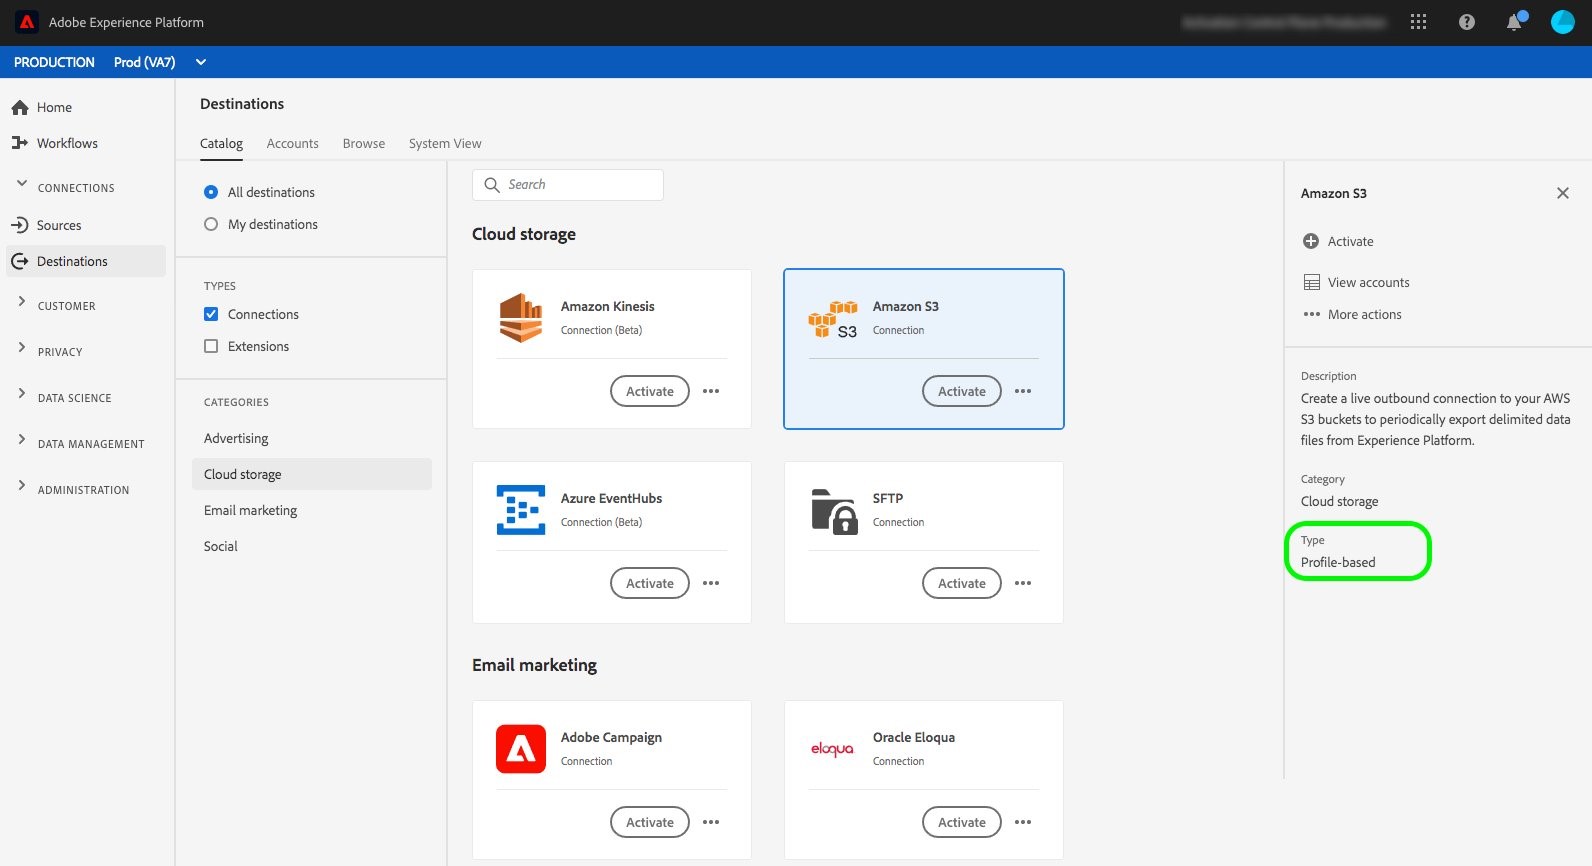
Figure 5: Highlights Amazon S3 with the Activate option
Enter the access keys of the IAM user previously created
Enter the public key downloaded from AWS KMS in the previous section
Fill in additional details:
name
description
bucket [the name of the bucket previously created]
folder path: landing/
Check the options for all the alerts
Save the destination configuration
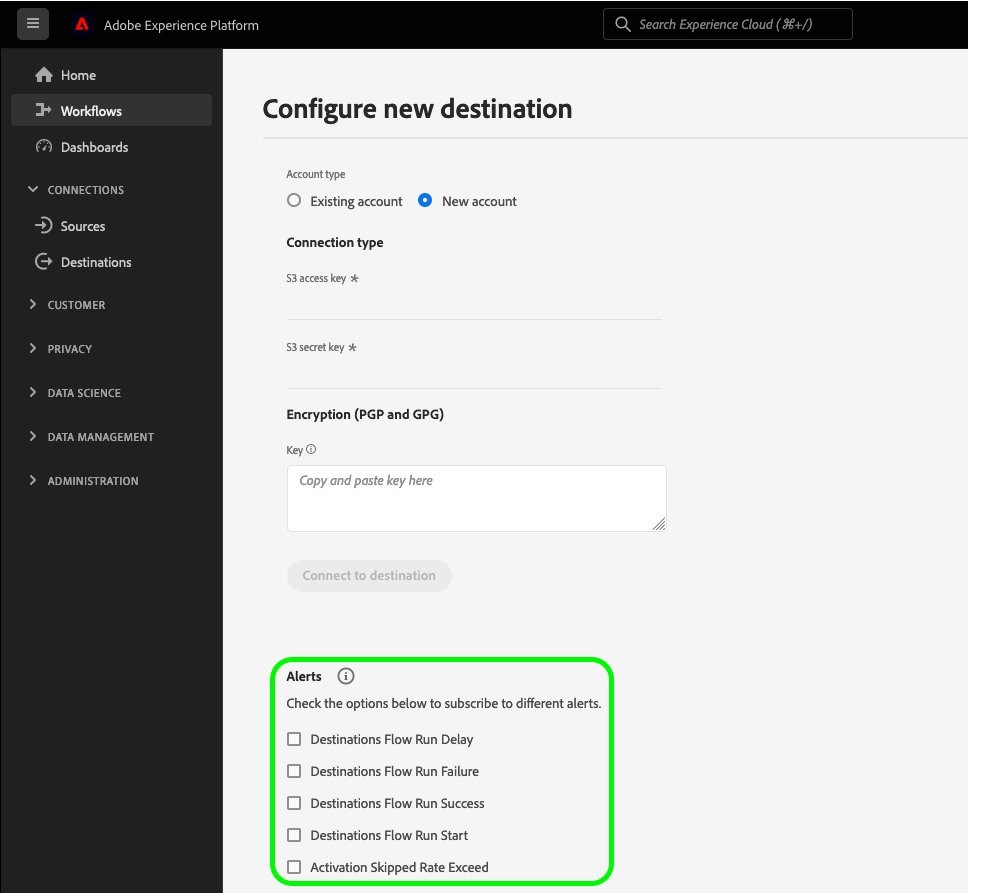
Figure 6: Highlights the options for different alerts
Reference Link: https://experienceleague.adobe.com/docs/experience-platform/destinations/catalog/cloud-storage/amazon-s3.html?lang=en
5. Create a batch export job within AEP to upload data files to Amazon S3
You will setup an activation of audience data (batch profile export) to Amazon S3 in this section.
Navigate to Connections → Destinations → Catalog and search for Amazon S3
Select Activate Segments
Choose the correct Amazon S3 connection and proceed
Select the desired segment of choice and proceed to scheduling. For this Guidance, select one segment from the list.
Create a schedule with the following options:
export full files
schedule frequency: daily
select the time as 12pm GMT
save the schedule
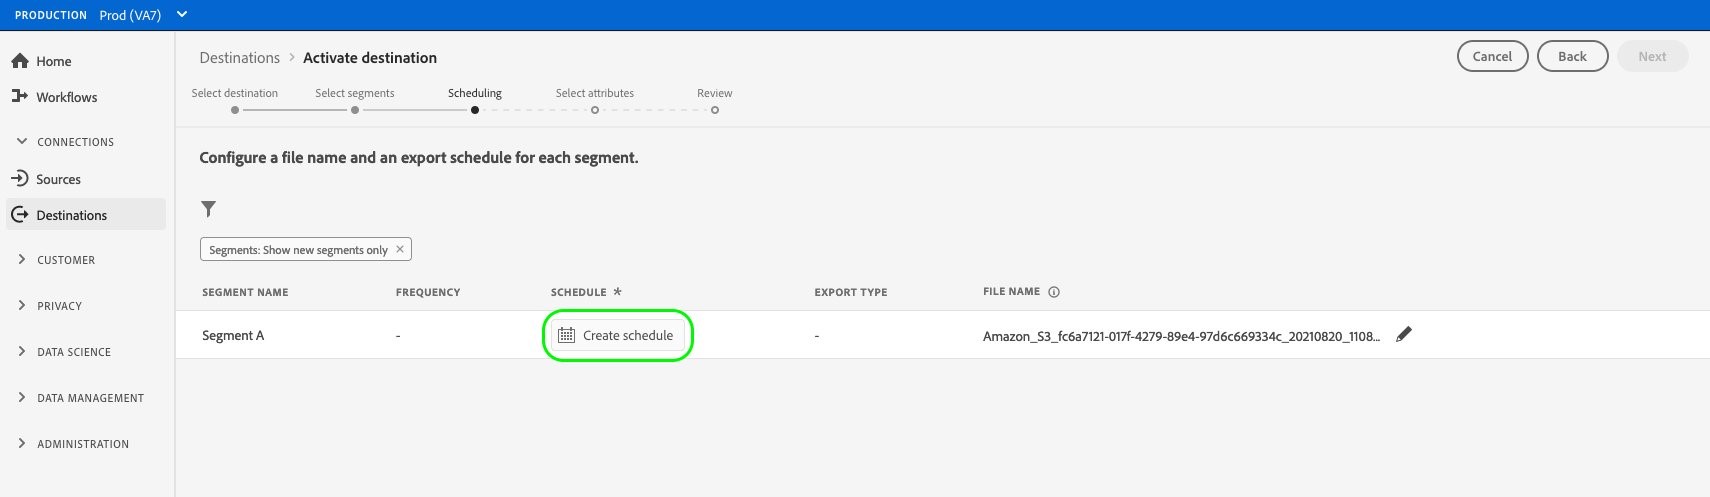
Figure 7: Displays UI for creating a schedule
- Select the profile attributes
Select add new fields and choose the below listed schema fields from the profile class:
| Label | Adobe XDM Field Name |
|---|---|
| customerID | personID |
| first_name | person.name.firstName |
| last_name | person.name.lastName |
| address_1 | homeAddress.street1 |
| address_2 | homeAddress.street2 |
| city | homeAddress.city |
| state | homeAddress.stateProvince |
| zip | homeAddress.postalCode |
| country | homeAddress.country |
| personalEmail.address | |
| phone | mobilePhone.number |
| loyalty_member_status | loyalty.status |
| segmentation_status | segmentMembership.status |
- Review and finish the activation flow
Once the export is setup, AEP will publish one or more CSV files in Amazon S3 for the selected segment. The number of file(s) uploaded in Amazon S3 will depend on the amount of data that qualifies for that segment; for every five million profile records, one file is generated for the segment.
Data Processing
Once the data arrives from AEP in your Amazon S3 bucket, a daily prompt will decrypt the file(s), normalize it, perform the Personal Identifiable Information (PII) handling of the data and prepare it to be made available for AWS Clean Rooms.
1. AWS Lambda function to decrypt the data file(s)
An AWS Lambda function is used to decrypt the file(s) using the AWS KMS APIs and write the decrypted file(s) to a separate prefix/folder within the same Amazon S3 bucket.
AWS Lambda IAM role will need appropriate permissions to read/write from Amazon S3 and AWS KMS
{
    "Version": "2012-10-17",
    "Statement": [
        {
            "Sid": "VisualEditor0",
            "Effect": "Allow",
            "Action": [
                "s3:GetObject",
                "s3:ListBucket"
            ],
            "Resource": [
                "arn:aws:s3:::[bucket name]",
                "arn:aws:s3:::[bucket name]/*"
            ]
        }
    ]
}
{
    "Version": "2012-10-17",
    "Statement": [
        {
            "Sid": "VisualEditor0",
            "Effect": "Allow",
            "Action": "kms:Decrypt",
            "Resource": "arn:aws:kms:us-east-1:[accountid]:key/[KMS key id]"
        }
    ]
}
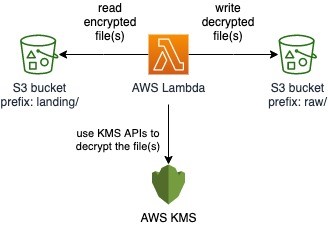
Figure 8: AWS Lambda function is used to decrypt files
Sample code:
def decrypt_data_key(data_key_encrypted):
    """Decrypt an encrypted data key

    :param data_key_encrypted: Encrypted ciphertext data key.
    :return Plaintext base64-encoded binary data key as binary string
    :return None if error
    """

    # Decrypt the data key
    kms_client = boto3.client('kms')
    try:
        response =
kms_client.decrypt(CiphertextBlob=data_key_encrypted)
    except ClientError as e:
        logging.error(e)
        return None

    # Return plaintext base64-encoded binary data key
    return base64.b64encode((response['Plaintext']))

 def decrypt_file(filename):
    """Decrypt a file encrypted by encrypt_file()

    The encrypted file is read from <filename>.encrypted
    The decrypted file is written to <filename>.decrypted

    :param filename: File to decrypt
    :return: True if file was decrypted. Otherwise, False.
    """

    # Read the encrypted file into memory
    try:
        with open(filename + '.encrypted', 'rb') as file:
            file_contents = file.read()
    except IOError as e:
        logging.error(e)
        return False

    # The first NUM_BYTES_FOR_LEN bytes contain the integer length of the
    # encrypted data key.
    # Add NUM_BYTES_FOR_LEN to get index of end of encrypted data key/start
    # of encrypted data.
    data_key_encrypted_len =
int.from_bytes(file_contents[:NUM_BYTES_FOR_LEN],
                                            byteorder='big' \)
                             + NUM_BYTES_FOR_LEN
    data_key_encrypted =
file_contents[NUM_BYTES_FOR_LEN:data_key_encrypted_len]

    # Decrypt the data key before using it
    data_key_plaintext = decrypt_data_key(data_key_encrypted)
    if data_key_plaintext is None:
        return False

    # Decrypt the rest of the file
    f = Fernet(data_key_plaintext)
    file_contents_decrypted =
f.decrypt(file_contents[data_key_encrypted_len:])

    # Write the decrypted file contents
    try:
        with open(filename + '.decrypted', 'wb') as file_decrypted:
            file_decrypted.write(file_contents_decrypted)
    except IOError as e:
        logging.error(e)
        return False

    # The same security issue described at the end of encrypt_file()
exists
    # here, too, i.e., the wish to wipe the data_key_plaintext value
from
    # memory.
    return True
2. Data Exploration using AWS Glue DataBrew
In this Guidance, you will use AWS Glue DataBrew to explore the incoming data and create the recipe to normalize and process the data.
While other AWS services can be used to perform these tasks, AWS Glue DataBrew is chosen to demonstrate the ease of manipulating the data visually using the AWS Glue DataBrew service.
Sign in into the AWS console as a user with the appropriate permissions to create IAM user and access keys
Navigate to AWS Glue DataBrew
Select Create project
Provide the name of the project
Select Create new recipe and provide a name
Choose New dataset and select Amazon S3 as your source
Provide the path as follows: s3://[bucket name]/raw/<.*>.csv
This will ensure that all file(s) in the landing/ folder will be picked up for processing
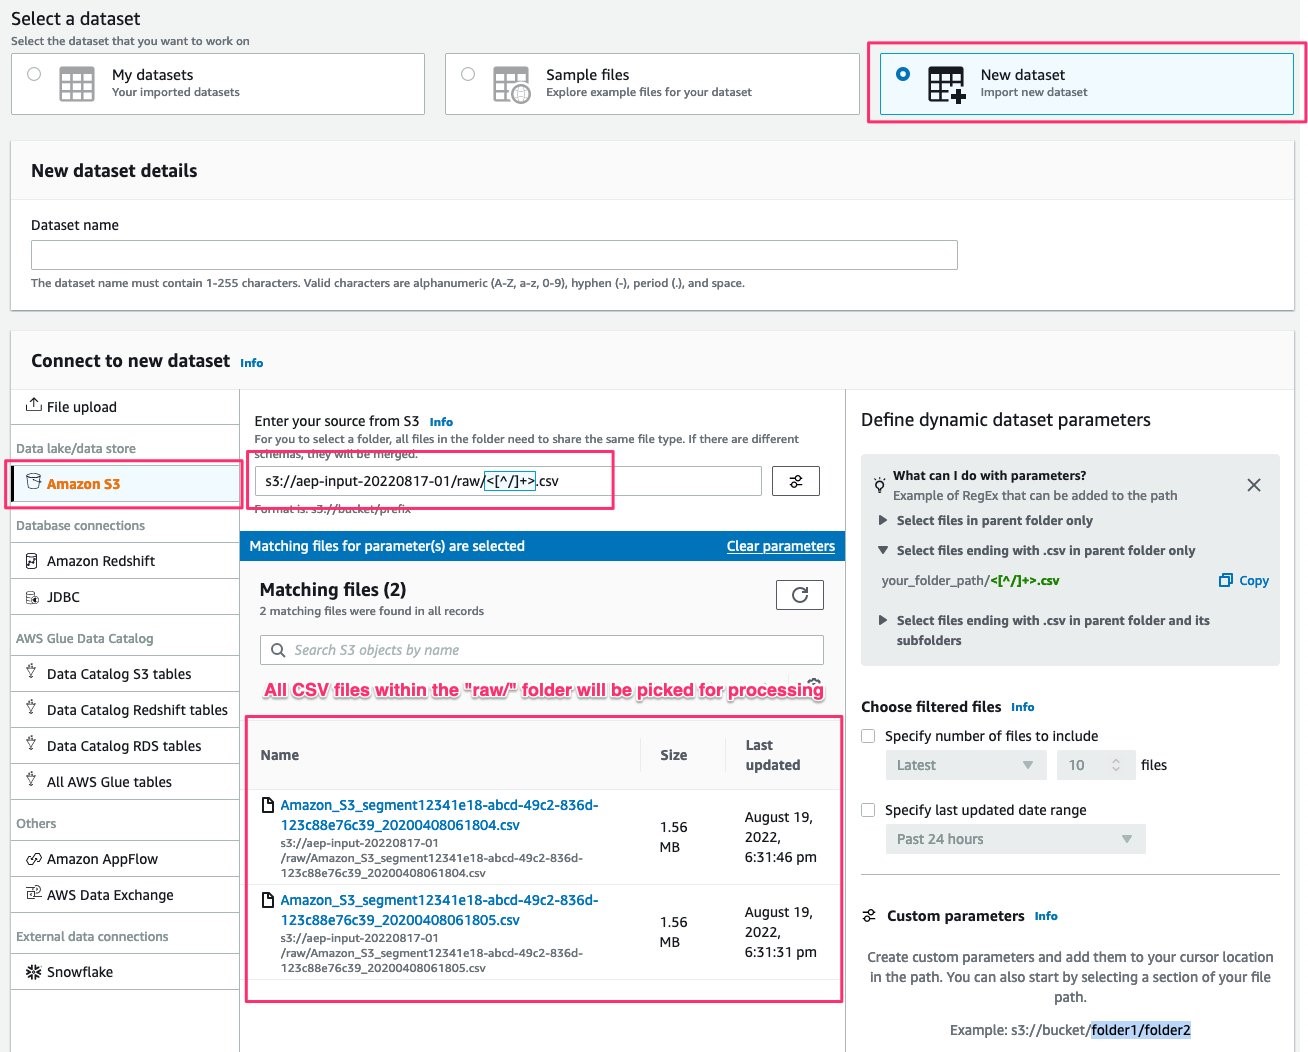
Figure 9: AWS Glue DataBrew UI with New dataset highlighted
Select CSV as the file type and treat first row as header options
Provide the appropriate tags; this will help for cost calculation/monitoring
Choose the appropriate IAM role (or create one if it does not exist)
Your IAM user needs permission to access the AWS Glue DataBrew from AWS Console
IAM permissions for AWS Glue DataBrew to access the data resources on your behalf
Create project
Once the project has been created, a visual editor displaying a sample of 500 records will open up.
At this stage, you can add steps for data cleansing, normalization, and PII handling.
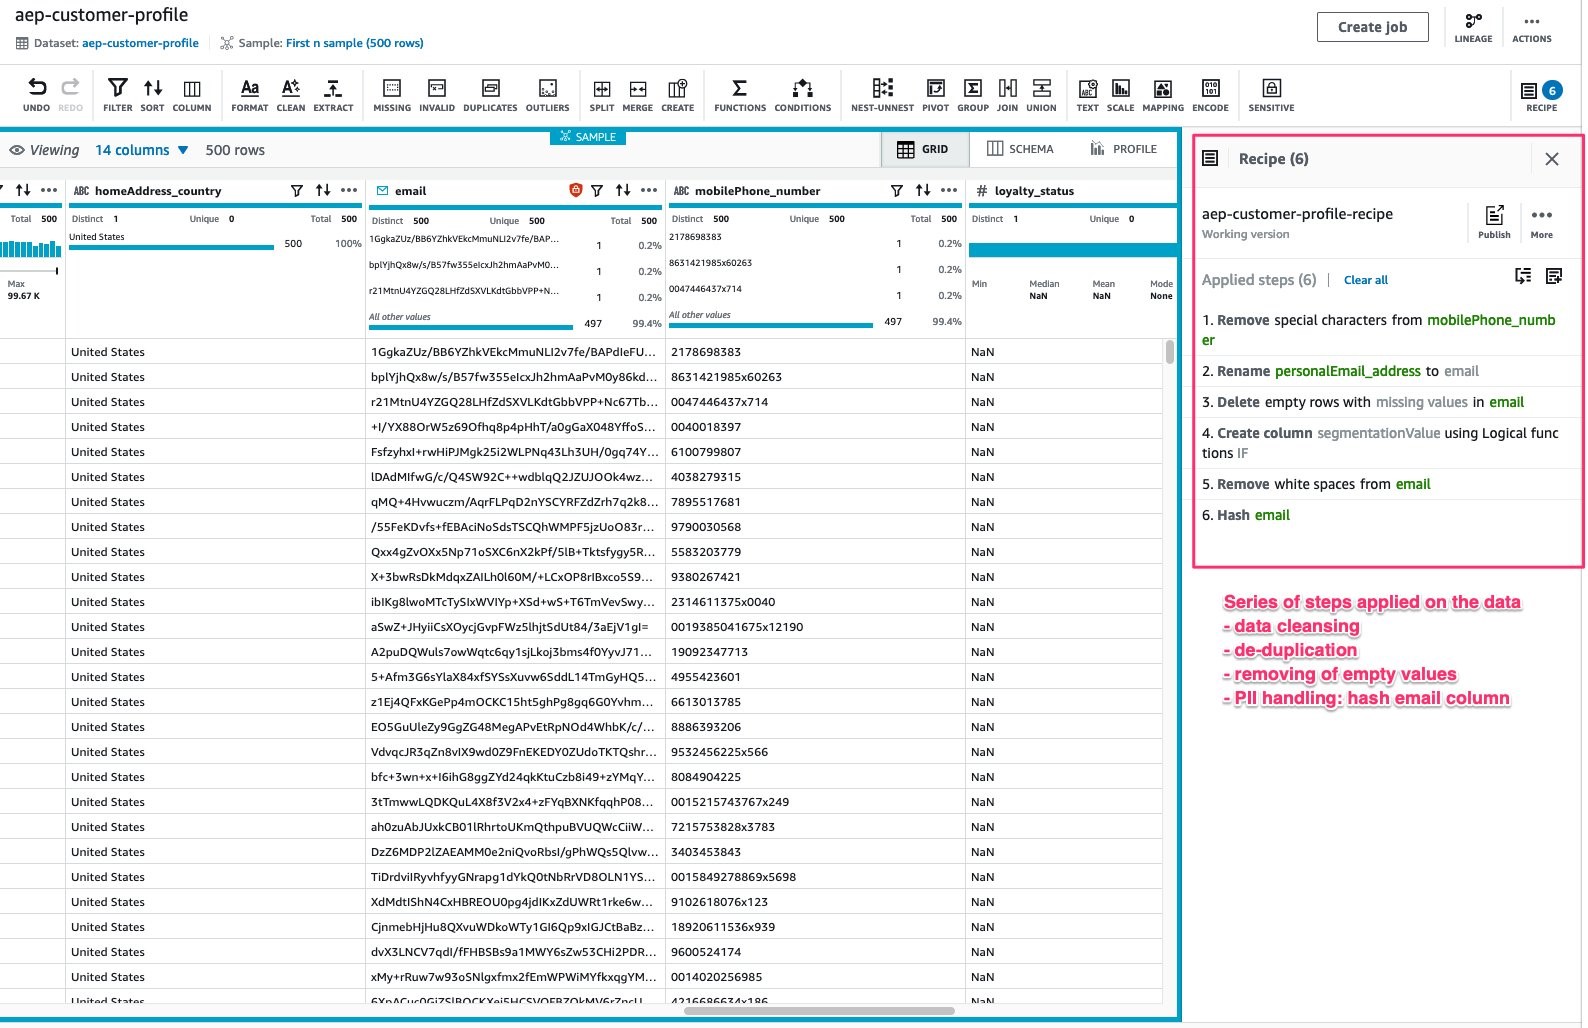
Figure 10: Visual editor displaying a sample of records
The following steps will be performed as part of data processing:
1. Normalization - the incoming data will be parsed and the column names will be appropriately renamed. While this is an optional step, mapping the schema makes this dataset further accessible within AWS Clean Rooms for additional workflows such as identity resolution and de-duplication.
Certain columns are cleansed (for example, phone number formatting is performed), data quality checks are performed to drop records that do not match the criteria, for example, drop records with empty email values.
2. PII Data Handling - the PII information in the incoming data is hashed using a secret key from AWS Secrets Manager.
Reference Link: https://docs.aws.amazon.com/databrew/latest/dg/recipe-actions.CRYPTOGRAPHIC_HASH.html
Once all the steps have been completed, publish the recipe. This will create a version of the recipe.
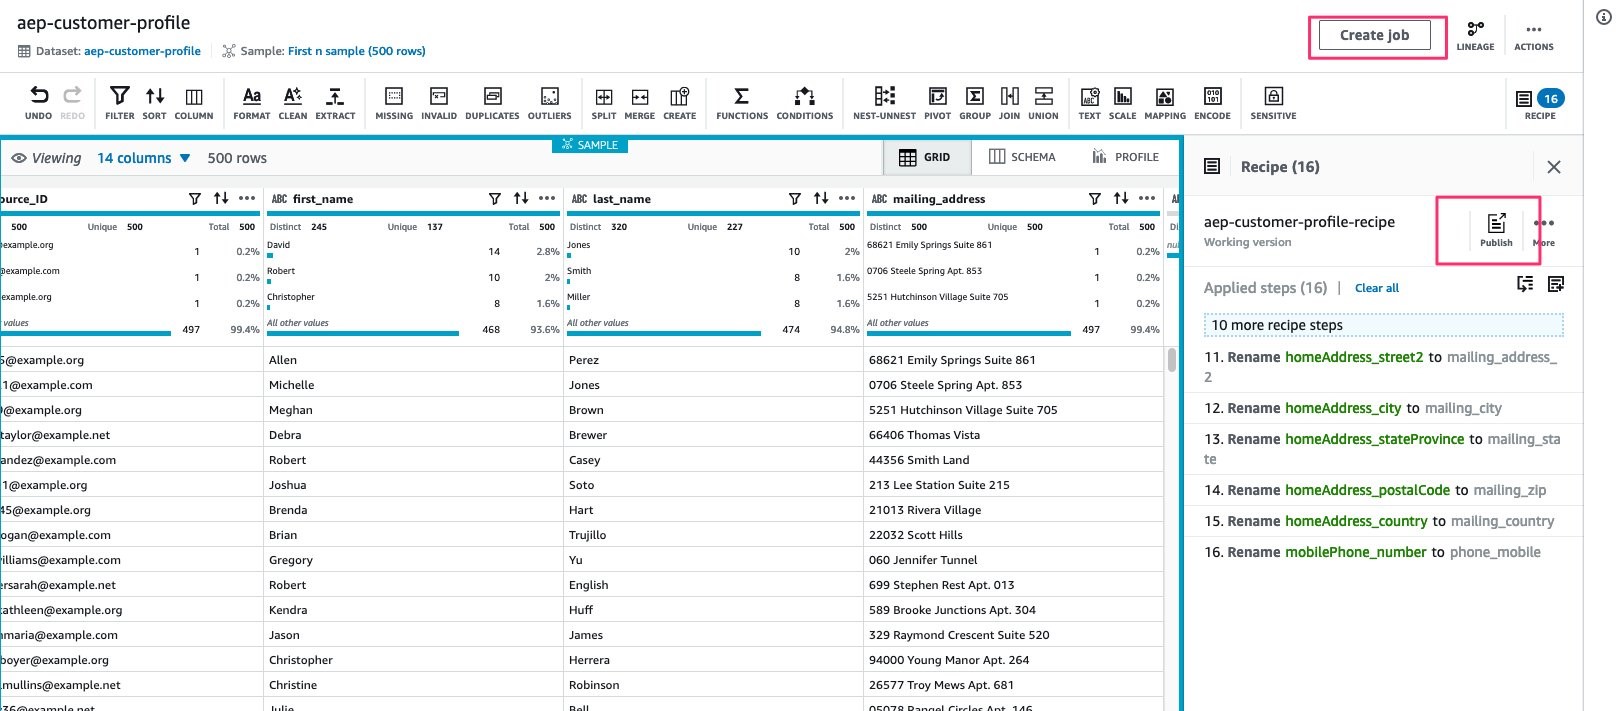
Figure 11: Data processing step with Publish and Create job highlighted
Select Create Job to run the above recipe on the entire dataset and generate an output.
Provide the job name
Under the Job output settings create Output 1 as follows:
Amazon S3 | Parquet file format | Snappy compression [if you do not have an Amazon S3 output location, you can create one by following the steps outlined in the section Create an Amazon S3 bucket]
Provide the Amazon S3 output location
Click on the settings for Output 1
- Replace output files for each job run (this option is chosen since this is a full refresh)
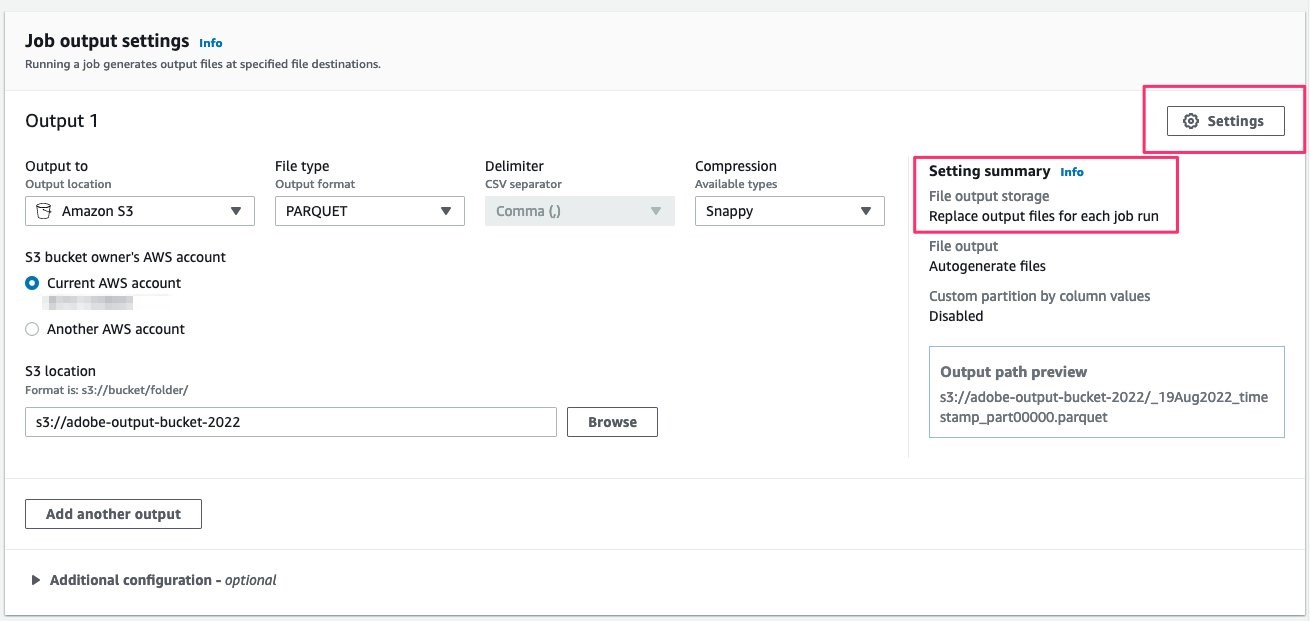
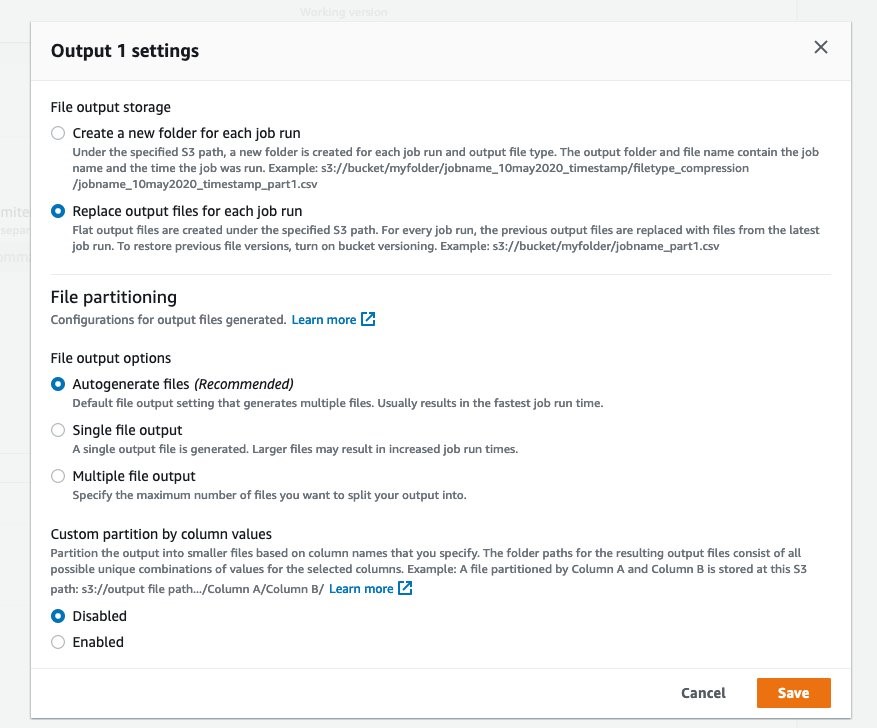
Figures 12 and 13: Job output settings
Provide the appropriate tags
Chose the IAM role that was previously created/chosen while creating the AWS Glue DataBrew project
this role needs permissions to access the source Amazon S3 data and write to Amazon S3 at the output location
- Create and run job
Navigate to the JOBS section in the left menu and wait until the job you just created runs successfully.
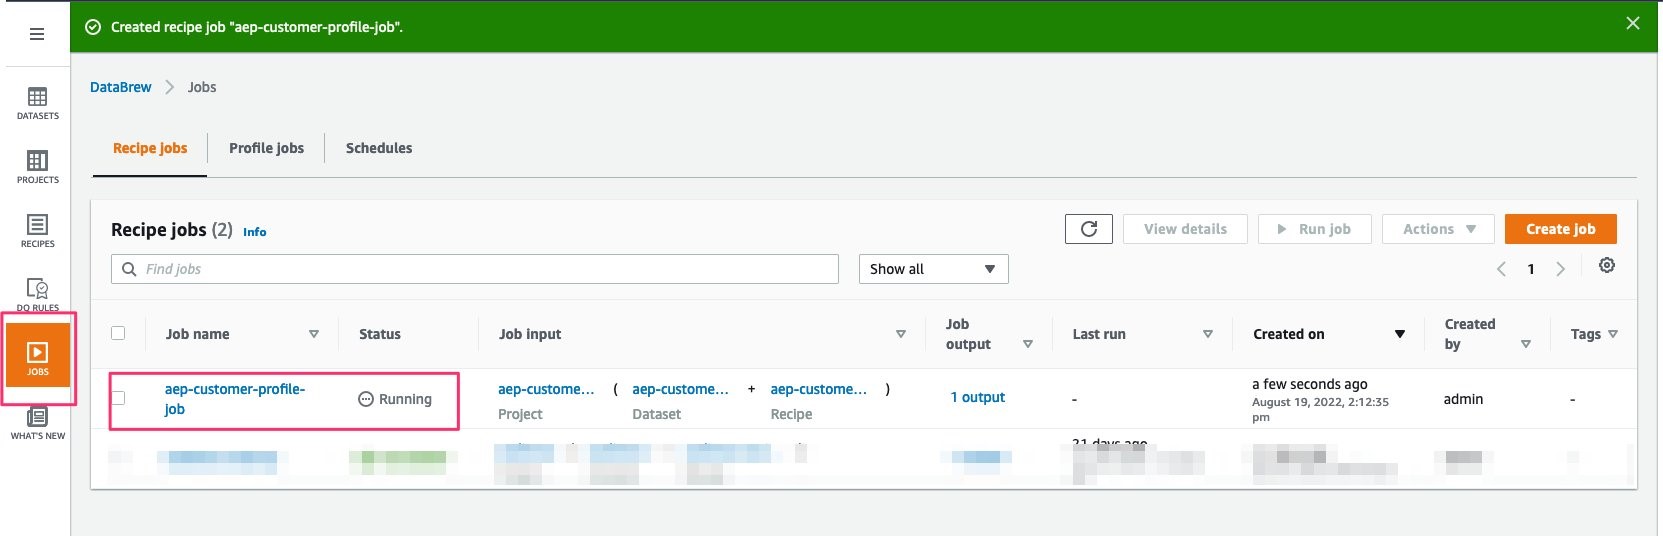
*Figure 14: JOBS section in AWS Glue DataBrew UI
Once the job is successfully completed, navigate to the output Amazon S3 location to verify.
As you observe in the below screenshot, two output files have been generated, one for each input source file.
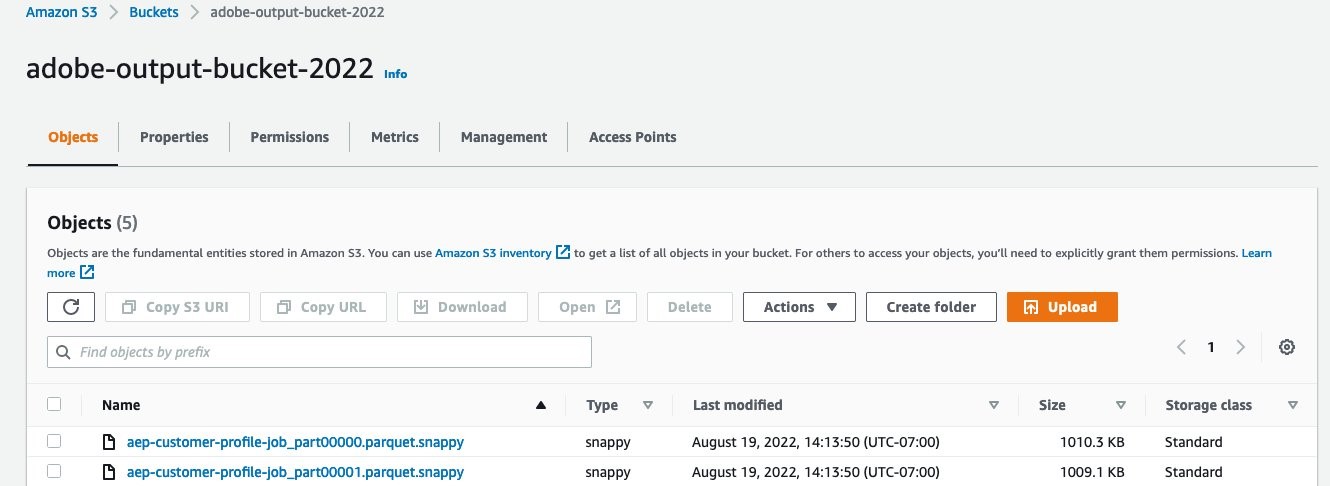
Figure 15: Two output files are generated
3. AWS Lambda function for cleanup
An AWS Lambda function is used to perform cleanup activities, namely moving the file(s) from landing/ and raw/ prefix to an archive/ prefix folder within the same Amazon S3 bucket.
Note: AWS Lambda IAM role will need appropriate permissions to read/write from Amazon S3
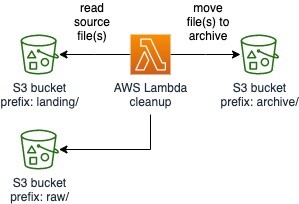
Figure 16: Diagram of Lambda function
Data Catalog
In order to use the AEP data in AWS Clean Rooms environment, the data needs to be registered with AWS Glue Data Catalog as a table.
1. Create AWS Glue Data Catalog database
You will create a database within AWS Glue Data Catalog
Sign in into AWS console and navigate to the AWS Glue Data Catalog page
Select Databases under the Data catalog section in the left menu
Select Add database and provide a name
2. Create AWS Glue Crawler
You can use a crawler to populate the AWS Glue Data Catalog with tables by crawling the Amazon S3 bucket output location. Upon completion, the crawler creates the table in your data catalog. This table can be later referenced within AWS Clean Rooms environment.
Sign in into AWS console and navigate to AWS Glue Data Catalog page
Select Crawlers under the Data catalog section in the left menu
Select Add crawler option
Provide the name for the crawler and appropriate tags
Under security configuration, choose the security configuration as recommended by your admin. If there is no existing security configuration, you can create one by selecting the Security configurations from the left panel menu. The security configuration allows you to specify encryption options for the Amazon S3 bucket that the AWS Glue service will write to along with logging encryption options to Amazon CloudWatch.
Chose Data stores and Crawl all folders as the crawler source type options; since this Guidance is for a full refresh, crawl all folders will yield the desired result as older data will be overwritten with new data.
Add a data store
- Enter S3 and provide output bucket location:
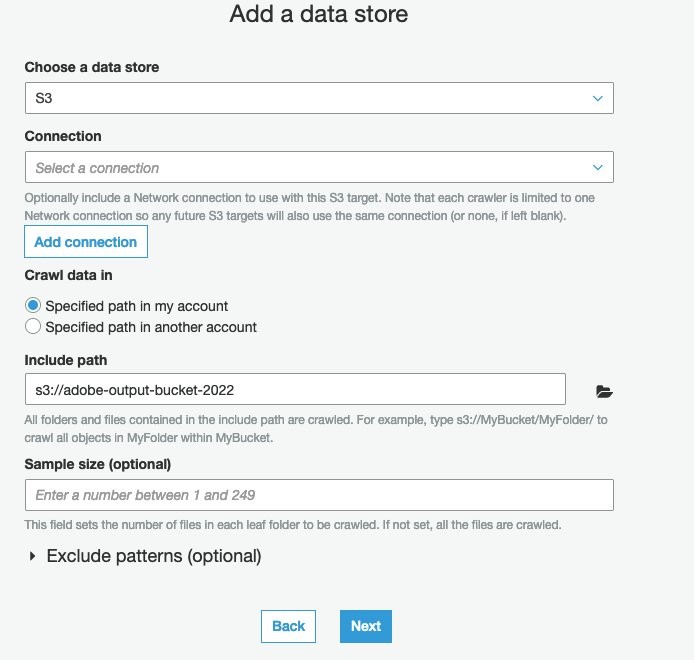
*Figure 17: Adding a data store
- Choose an IAM Role or let AWS Glue create a role for you:
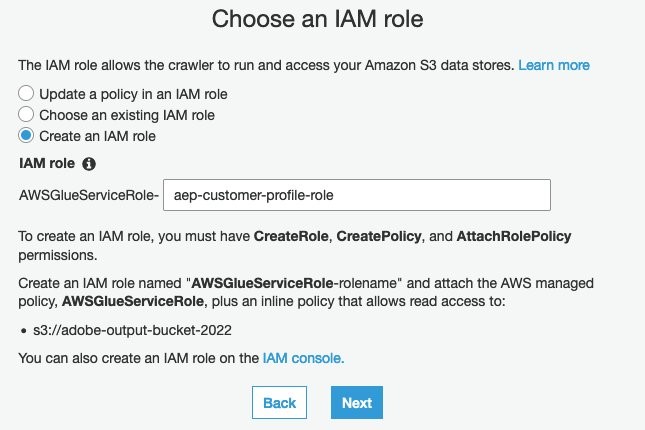
Figure 18: Choose an IM role or let Aws Glue create an IAM role for you
- Choose Frequency as Run on demand. We will be automating the entire workflow using AWS Step Functions in the later section.
- Choose the database previously created as the crawler’s output
- Create a crawler and run it
Once the crawler runs successfully, verify the AWS Glue Data Catalog table is created.
Navigate to the Tables section from the left panel menu.
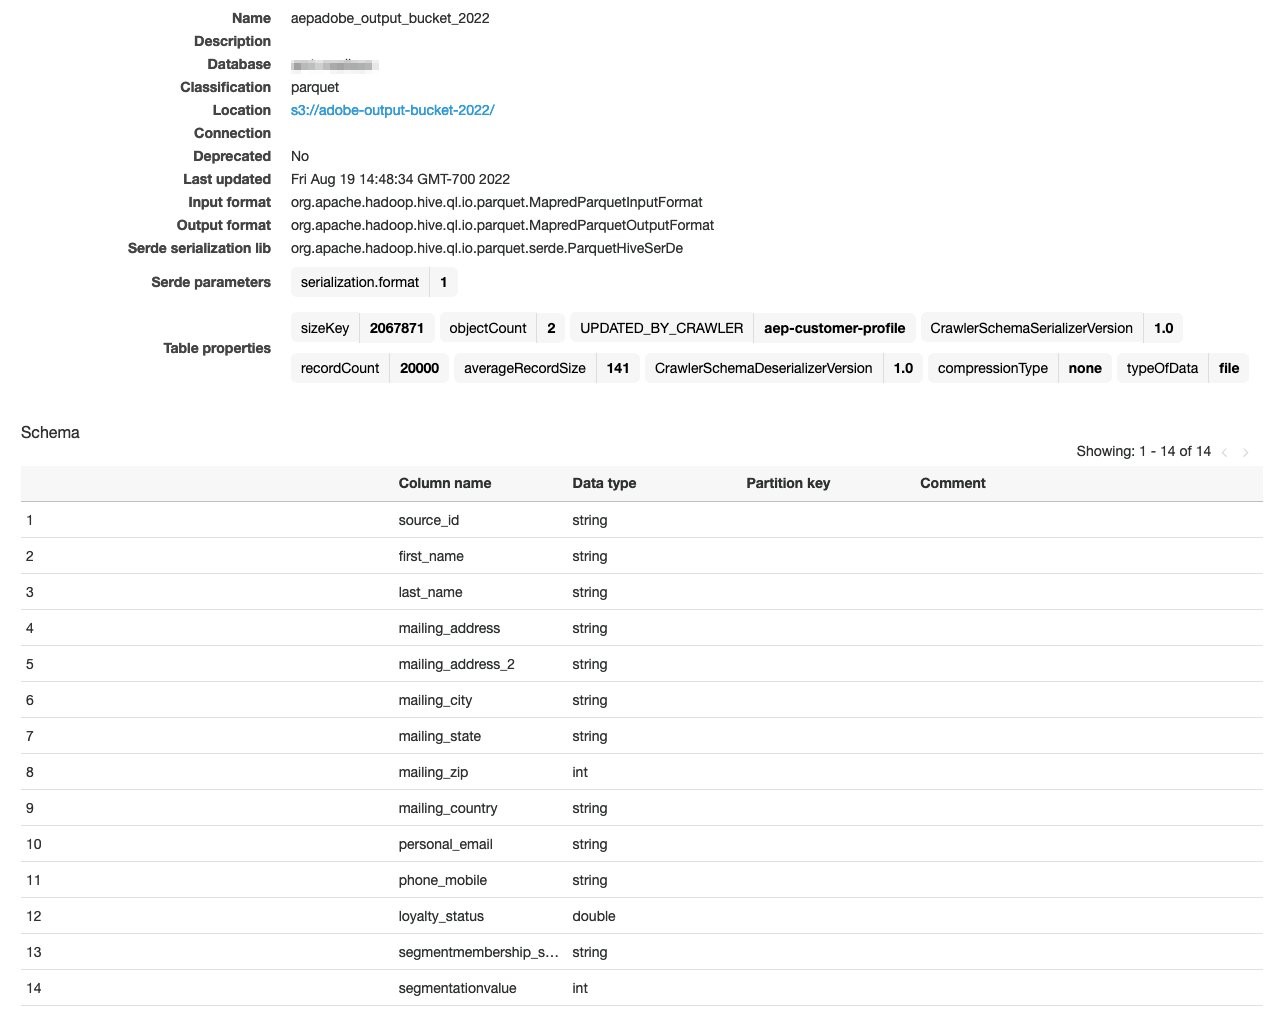
Figure 19: AWS Glue Data Catalog
3. Verification
You can further verify that the table has been successfully created in AWS Glue Data Catalog by running a query in Amazon Athena.
Navigate to Amazon Athena Query Editor in your AWS Console
Select AwsDataCatalog as the Data source
Select the AWS Glue Data Catalog database
Under the Query text area, you can run a SELECT query to verify the data displays
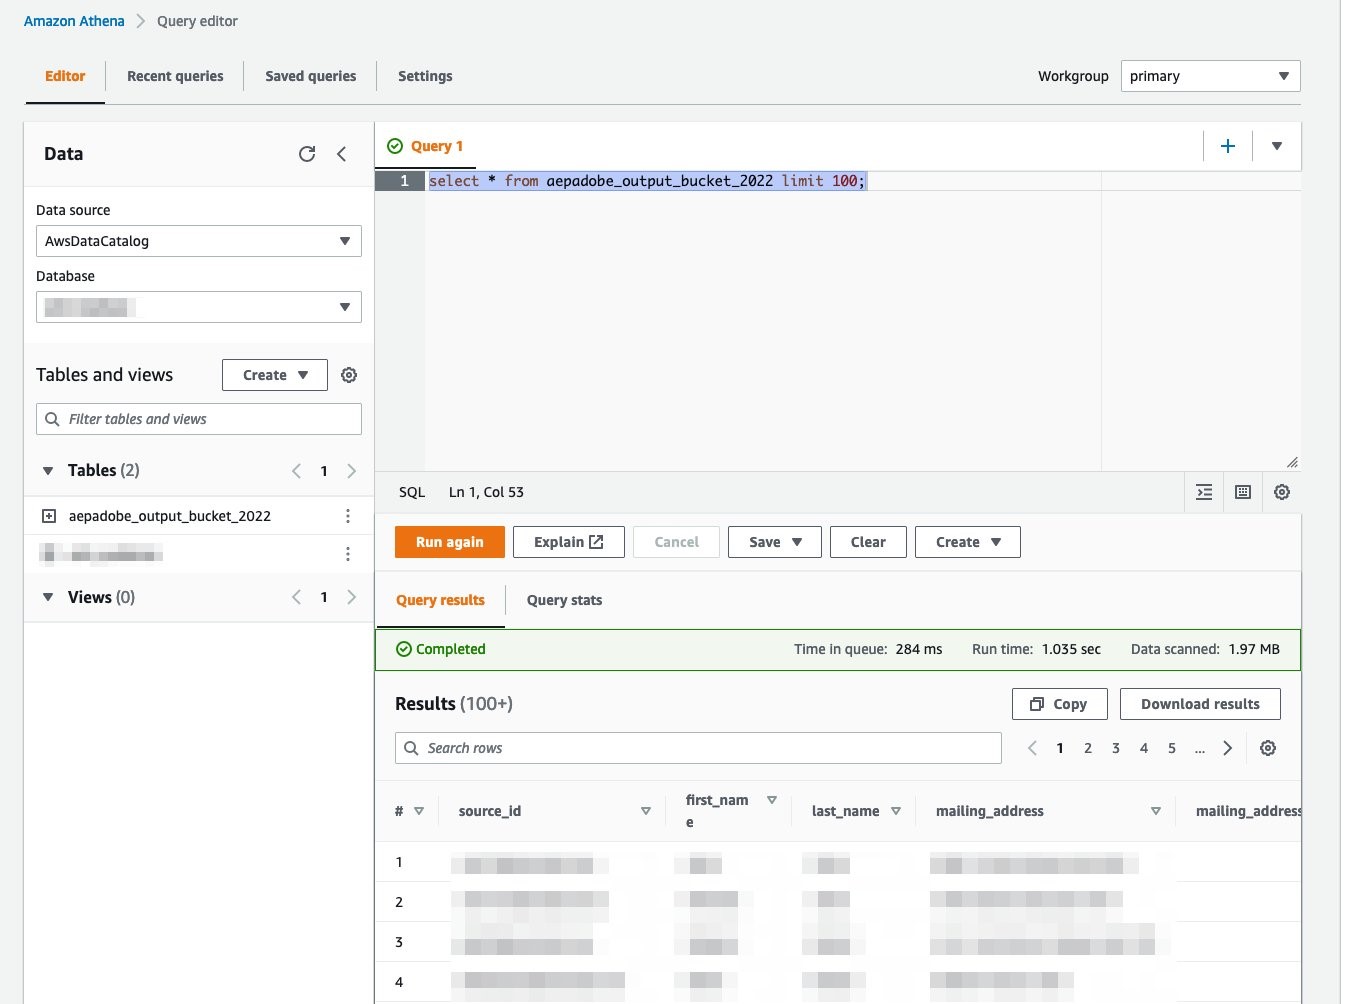
Figure 20: Amazon Athena query
Automation using AWS Step Functions and Amazon EventBridge
To make the entire solution automated and deployable as a unit, you will use AWS Step Functions to integrate the data processing workflow. On a daily scheduled run, the AWS Step Function will orchestrate various stages to decrypt and process the data and then initiate an AWS Glue Crawler job. Once the AWS Glue crawler job is completed, it will send a notification to the Amazon Simple Notification Service (Amazon SNS) topic letting you know that the data is available for consumption in AWS Clean Rooms.
1. Create AWS Step Function
Navigate to Step Functions in your AWS Console
Select Create state machine
Design your workflow visually and create a standard type state machine
In the visual editor, draw your state machine definition as shown below with the correct configuration.
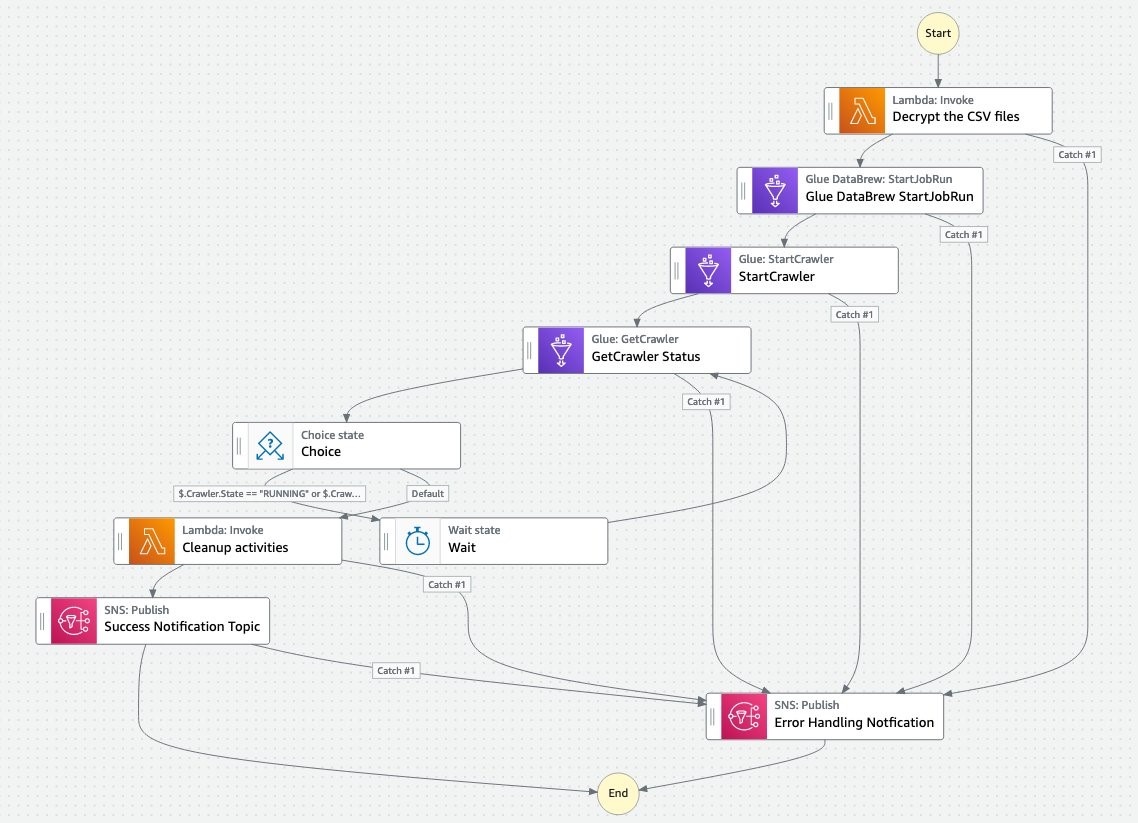
Figure 21: Visual editor configuration
Provide appropriate tag names
Let the step function create a new IAM role or choose an existing appropriate IAM role. Permissions needed for Step Function to execute as desired.
Ability to publish to Amazon SNS topics - error topic and success topic:
{
    "Version": "2012-10-17",
    "Statement": [
        {
            "Sid": "VisualEditor0",
            "Effect": "Allow",
            "Action": "sns:Publish",
            "Resource": [
                "arn:aws:sns:us-east-1:[accountid]:aep-error-handling",
                "arn:aws:sns:us-east-1:[accountid]:aep-notification-topic"
            ]
        }
    ]
}
Ability to invoke Lambda functions:
{
    "Version": "2012-10-17",
    "Statement": [
        {
            "Sid": "VisualEditor0",
            "Effect": "Allow",
            "Action": "lambda:InvokeFunction",
            "Resource": [
                "arn:aws:lambda:us-east-1:[accountid]:function:AEP-DecryptFiles:*",
                "arn:aws:lambda:us-east-1:[accountid]:function:aep-cleanup-activities:*"
            ]
        },
        {
            "Sid": "VisualEditor1",
            "Effect": "Allow",
            "Action": "lambda:InvokeFunction",
            "Resource": [
                "arn:aws:lambda:us-east-1:[accountid]:function:AEP-DecryptFiles",
                "arn:aws:lambda:us-east-1:[accountid]:function:aep-cleanup-activities"
            ]
        }
    ]
}
Ability to start a Glue DataBrew job:
{
    "Version": "2012-10-17",
    "Statement": [
        {
            "Effect": "Allow",
            "Action": [
                "databrew:startJobRun",
                "databrew:listJobRuns",
                "databrew:stopJobRun"
            ],
            "Resource": [
                "arn:aws:databrew:us-east-1:[accountid]:job/aep-customer-profile-job"
            ]
        }
    ]
}
Ability to start an AWS Glue Crawler and its associated APIs for status check:
{
    "Version": "2012-10-17",
    "Statement": [
        {
            "Sid": "VisualEditor0",
            "Effect": "Allow",
            "Action": [
                "glue:GetCrawler",
                "glue:StartCrawler"
            ]
            "Resource": "arn:aws:glue:us-east-1:[accountid]:crawler/aep-customer-profile"
        }
    ]
}
- Save the step function definition
Error Handling within the AWS Step Function
Each step within the Step Function will have a “catch-ALL” mechanism to trap all errors and report them. For this Guidance, you are not setting up any retry logic.
Example of a catch-ALL for a given step:
"Glue DataBrew StartJobRun": {
      "Type": "Task",
      "Resource": "arn:aws:states:::databrew:startJobRun.sync",
      "Parameters": {
        "Name": "aep-customer-profile-job"
      },
      "Catch": [
        {
          "ErrorEquals": [
            "States.ALL"
          ],
          "Next": "Error Handling Notfication"
        }
      ],
      "Next": "StartCrawler"
}
In the above snippet, any error state will result in a notification being sent to the error handling Amazon SNS topic that will further inform all the subscribers.
Details about the State Machine
1. AWS Lambda - Decrypt CSV files
Provide the ARN of the lambda function created previously that is responsible for decrypting the incoming files and placing them in the raw/ prefix location
Error Handling: For this Guidance, you will catch ALL errors and send a notification to an Amazon SNS topic for notification. Additionally, these errors will also be captured and logged within AWS CloudWatch Log Groups
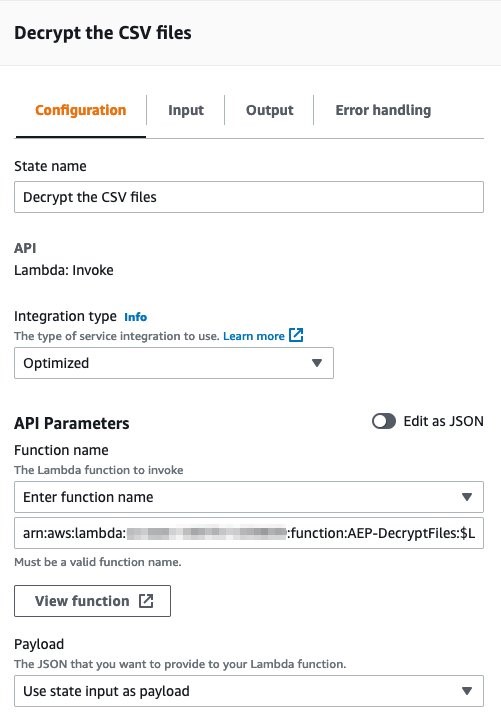
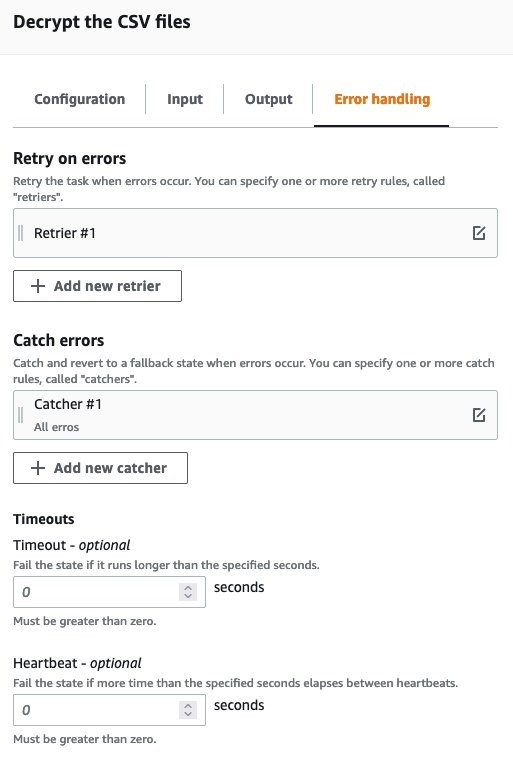
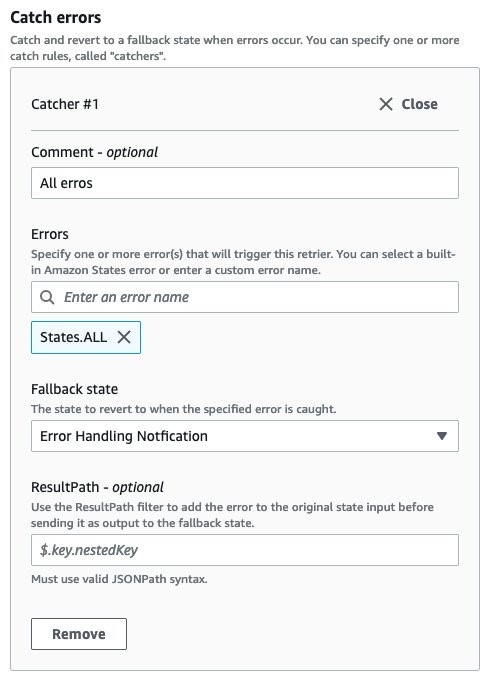
Figures 22-24: Decrypting CSV files
2. AWS Glue DataBrew StartJobRun
a. Provide the name of the DataBrew Job; you can find this from the AWS Console → DataBrew → Jobs
b. Select the Wait for task to complete checkbox; this will ensure that the step machine waits to move to the next step until the DataBrew job is completed successfully
Error Handling: For this Guidance, you will catch ALL errors and send a notification to an Amazon SNS topic for notification. Additionally, these errors will be captured and logged within AWS CloudWatch Log Groups.
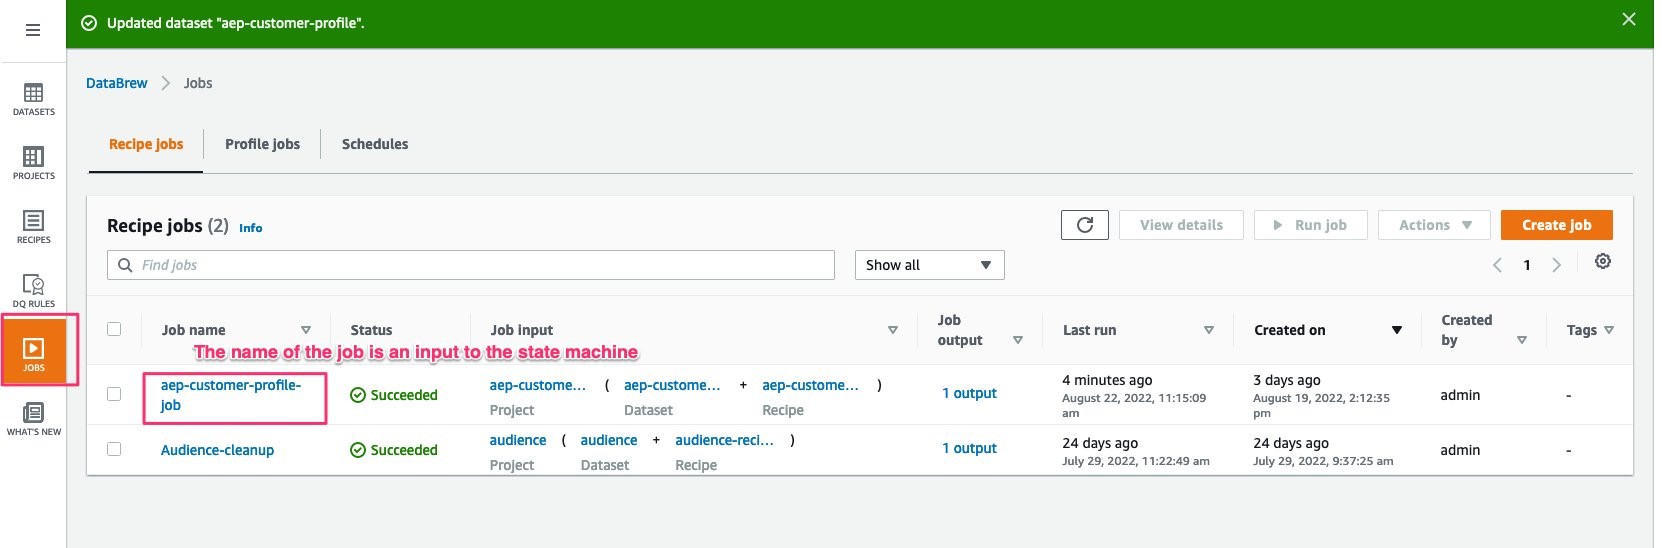

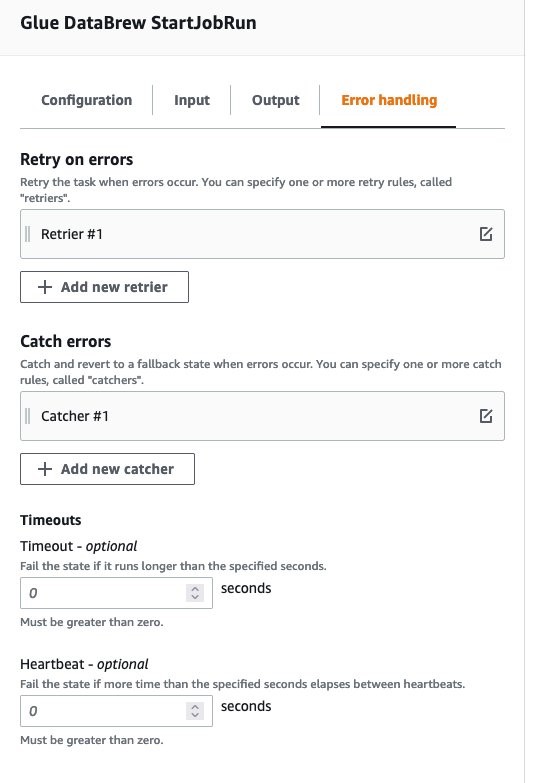
Figures 25-27: AWS Glue DataBrew StartJobRun
3. WS Glue StartCrawler
- Provide the name of the glue crawler previously created; you can find this from AWS Console → Glue → Crawlers
Error Handling: For this Guidance, you will catch ALL errors and send a notification to an Amazon SNS topic for notification. Additionally, these errors will also be captured and logged within AWS CloudWatch Log Groups
we will NOT check the wait for callback option; this is to avoid writing custom callback function. Instead, we will rely on the native APIs of AWS Glue Crawler to poll for status within the Step Function

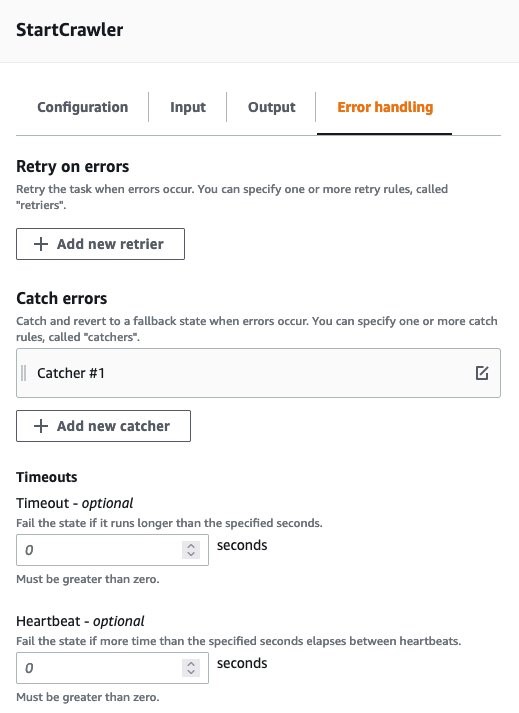
Figures 28-29: AWS Glue StartCrawler
4. AWS Glue GetCrawler
It fetches the meta information about the particular AWS Glue crawler including its current state. If the current state is RUNNING OR STOPPING, it will wait for a configured amount of time and fetch the information once again. This will continue until the AWS Glue crawler status is READY.
Error Handling: For this Guidance, you will catch ALL errors and send a notification to an Amazon SNS topic for notification. Additionally, these errors will also be captured and logged within AWS CloudWatch Log Groups
Example of GetCrawler output json
{
  "Crawler": {
    "Classifiers": [],
    "CrawlElapsedTime": 12421,
    "CrawlerSecurityConfiguration": "s3",
    "CreationTime": "2022-08-19T21:47:41Z",
    "DatabaseName": "amt-db",
    "LakeFormationConfiguration": {
      "AccountId": "",
      "UseLakeFormationCredentials": false
    },
    "LastCrawl": {
      "LogGroup":
"/aws-glue/crawlers-role/service-role/AWSGlueServiceRole-aep-customer-profile-role-s3",
      "LogStream": "aep-customer-profile",
      "MessagePrefix": "2ab03631-e730-42cb-9d4b-b4a5a7f8b385",
      "StartTime": "2022-08-23T02:59:58Z",
      "Status": "SUCCEEDED"
    },
    "LastUpdated": "2022-08-19T21:47:41Z",
    "LineageConfiguration": {
      "CrawlerLineageSettings": "DISABLE"
    },
    "Name": "aep-customer-profile",
    "RecrawlPolicy": {
      "RecrawlBehavior": "CRAWL_EVERYTHING"
    },
    "Role":
"service-role/AWSGlueServiceRole-aep-customer-profile-role",
    "SchemaChangePolicy": {
      "DeleteBehavior": "DEPRECATE_IN_DATABASE",
      "UpdateBehavior": "UPDATE_IN_DATABASE"
    },
    "State": "RUNNING",
    "TablePrefix": "aep",
    "Targets": {
      "CatalogTargets": [],
      "DeltaTargets": [],
      "DynamoDBTargets": [],
      "JdbcTargets": [],
      "MongoDBTargets": [],
      "S3Targets": [
        {
          "Exclusions": [],
          "Path": "s3://adobe-output-bucket-2022"
        }
      ]
    },
    "Version": 1
  }
}
5. Choice State
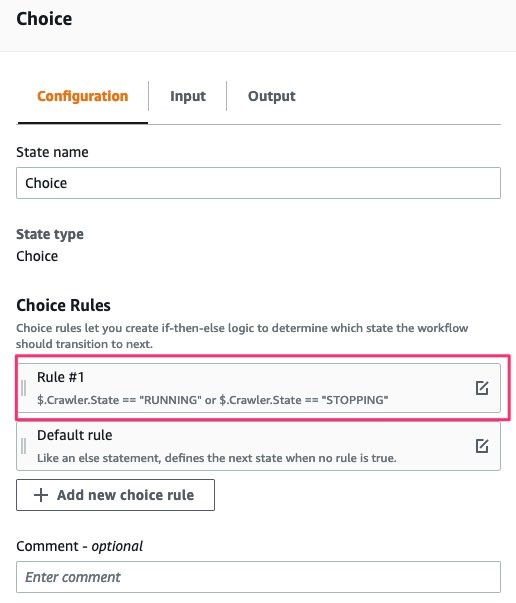
Figure 30: Choice state
6. Wait state
If the GetCrawler status is RUNNING or STOPPING, the step functions waits for a configured time of 30 seconds, and checks the status once again. If the status of the crawler is in any other state, it moves to the next state function, otherwise it continues to wait and checks for the status again.
7. AWS Lambda - Cleanup activities
Provide the ARN of the Lambda function created previously that is responsible for performing cleanup activities.
Error Handling: For this Guidance, you will catch ALL errors and send a notification to an Amazon SNS topic for notification. Additionally, these errors will also be captured and logged within AWS CloudWatch Log Groups
8. Publish to Amazon SNS upon successful execution
Select the appropriate topic in the configuration panel of the step function
2. Schedule the AWS Step Function using Amazon EventBridge rule
You will create a rule in the Amazon EventBridge to invoke the AWS Step Function to start on a daily schedule.
Sign in into AWS console and navigate to the Amazon EventBridge page
Select Create rule
Provide the rule name and select schedule as the rule type
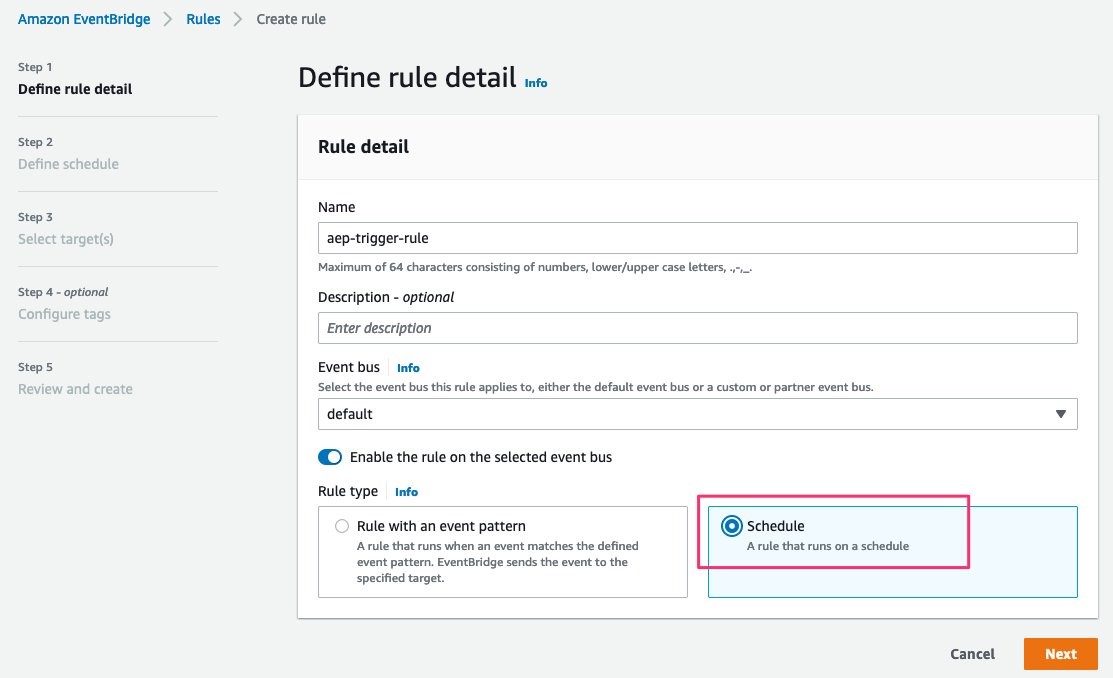
Figure 31: Amazon EventBridge schedule highlighted
select schedule pattern as “A fine-grained pattern”
Provide the cron expression as 0 0 * * ? *
This will run the job at midnight everyday (UTC time zone)
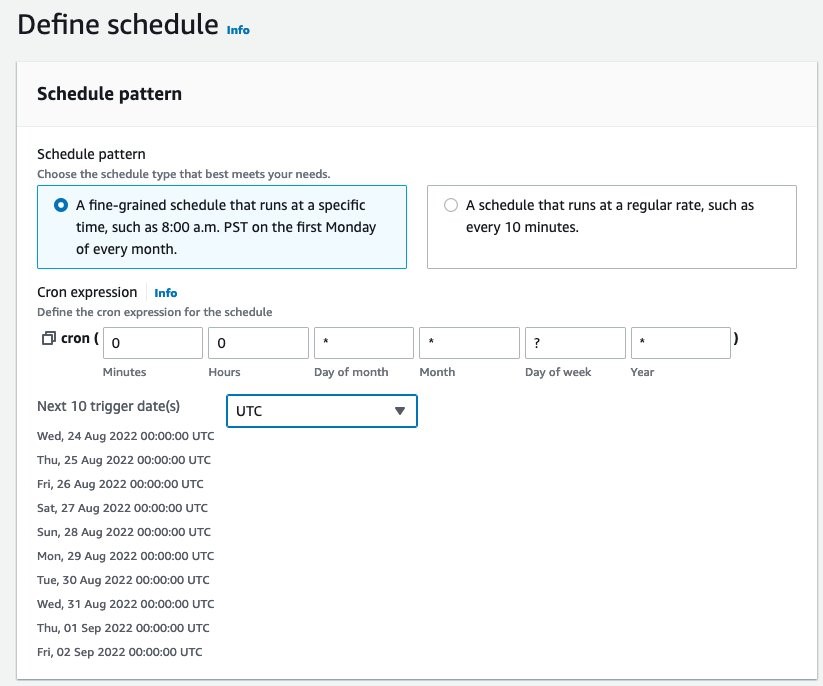
Figure 32: Defining AWS Step Function
- Select AWS Service and Step Functions state machine as the target and select the step function:
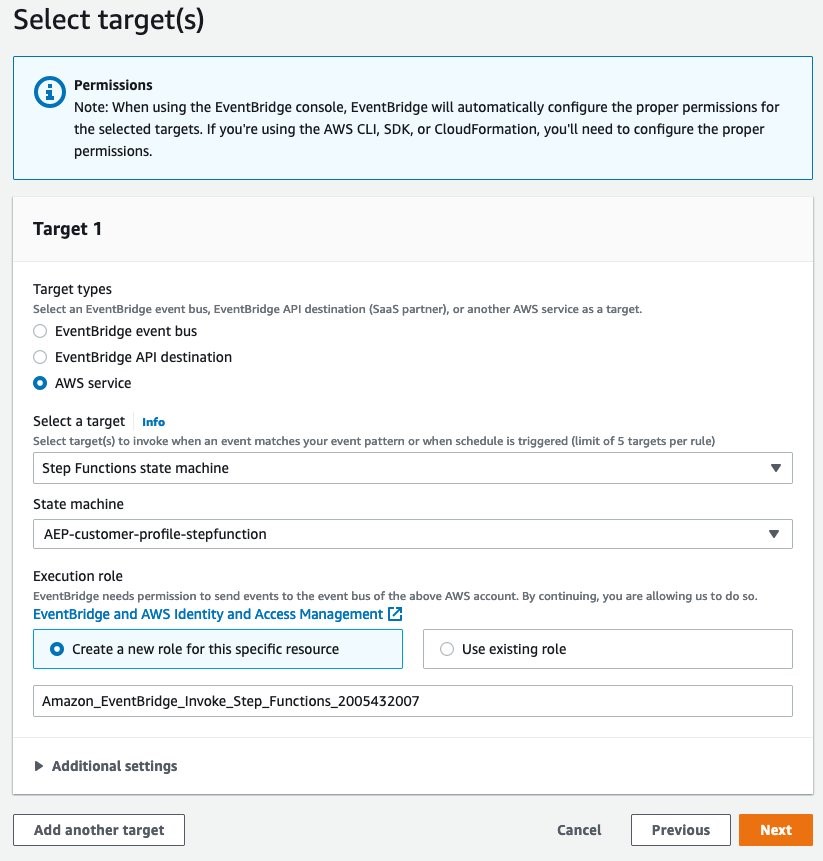
Figure 33: Selecting AWS Service and Step Functions state machine
Provide the appropriate tags
Create the rule
The rule will invoke the AWS Step Function daily to perform the data preparation task on the incoming data from AEP.
Closing Out
In this Guidance, the focus was for ACME data engineers to be able to setup an ongoing data export from the Adobe Experience Platform and prepare it to be made available for business team members to use it in AWS Clean Rooms.
The Guidance is based on a consistent input schema that does not change, with a full refresh of data (periodic overwrite) every time a new export is pushed.
Future versions of this Guidance will address handling schema changes and incremental arrival of data.
Notices
Adobe, the Adobe logo, Acrobat, the Adobe PDF logo, Adobe Premiere, Creative Cloud, InDesign, and Photoshop are either registered trademarks or trademarks of Adobe in the United States.